Original link: https://codewithmukesh.com/blog/specification-pattern-in-aspnet-core/
In this article, we will discuss in ASP Net core application and how it enhances the existing generic warehousing pattern. We will build ASP. Net with generic warehousing pattern and Entity Framework Core from scratch Net core webapi, and finally realize the specification mode. You can The complete source code for this implementation can be found here [1]. Let's start.
Understanding the specification model: why?
Let's use a simple example to understand the necessity of using the specification pattern. The following is the code snippet of the Developer class, which has the required properties such as Name, Email, Experience, etc.
public class Developer
{
    public int Id { get; set; }
    public string Name { get; set; }
    public string Email { get; set; }
    public int YearsOfExperience {get;set;}
    public decimal EstimatedIncome {get;set;}
    public int Followers { get; set; }
}
Now, we may have a service layer that returns data sets from DB through abstractions such as Entity Framework Core. This is what it looks like.
public class DeveloperService : IDeveloperService
{
    private readonly ApplicationDbContext _context;
    public DeveloperService(ApplicationDbContext context)
    {
        _context = context;
    }
    public async Task<IEnumerable<Developer>> GetDeveloperCount()
    {
        // return a count of all developers in the database
    }
}
Although you will get the number of all developers, the more practical and logical requirement is to use some kind of filter to get the number of developers. Do you agree? For example, the number of developers with an estimated revenue of $100000 or more, or the number of developers with 5 years or more experience. The possibilities are infinite.
However, this will eventually give you a large number of service layer functions, such as getdeveloper count with salesgreaterthan (decimal minsalary), getdeveloper count with experience more than (int minexp), and so on. The more you need, the more functionality you end up with. What if you need a number of developers with salary higher than x and experience higher than y years? This is another challenge that may lead to additional methods.
You might argue that you can apply these filters directly to Entity Framework Core entities, such as
await _context.Developers.Where(a=>a.Salary > 10000 && a.Experience > 6).ToListAsync()
However, no, this is far from the clean application code base you need. This approach will eventually quickly destroy the scalability of the application, which, believe me, is simply unmaintainable. Tip: your application always needs a service layer between the application and the database, and is fully responsible for handling the business logic.
This is where your application needs to use the specification pattern. Note that the generic warehousing pattern has some limitations that are addressed by using the specification pattern. We will build a project and then use the protocol.
What will we build
To demonstrate ASP Net core, we will build a simple Web API Application with two endpoints:
-
Return specific developer details
-
Return to developer list
The combination of logic and generics will make our work unit more practical. Here we will specifically identify and implement the use cases of the specification pattern. This is almost where you use ASP Net core 5.0 everything you need to build a complete application. Let's start.
PS, you can find the complete source code of this implementation here.
Set item
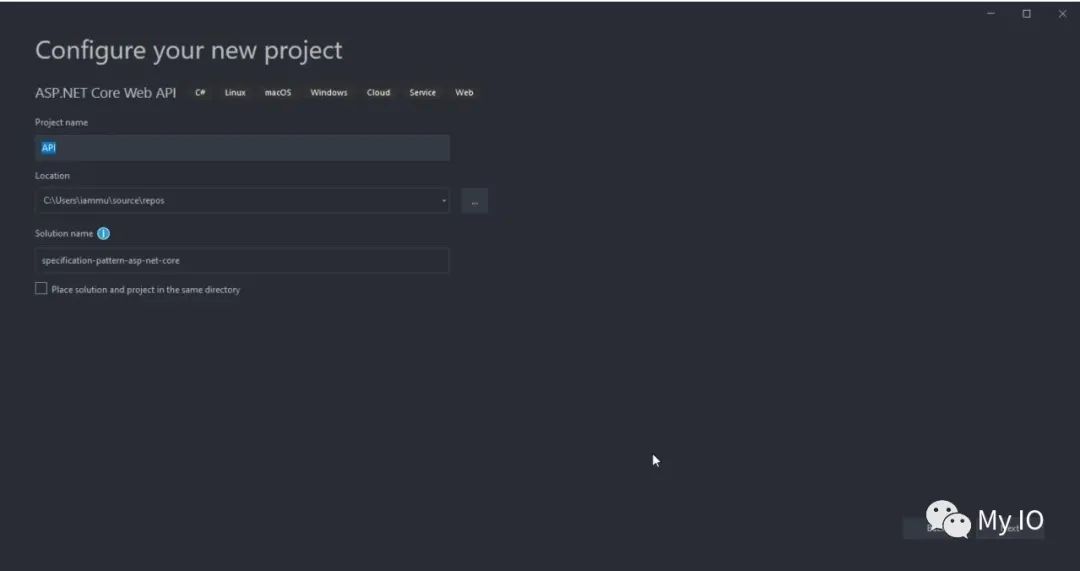
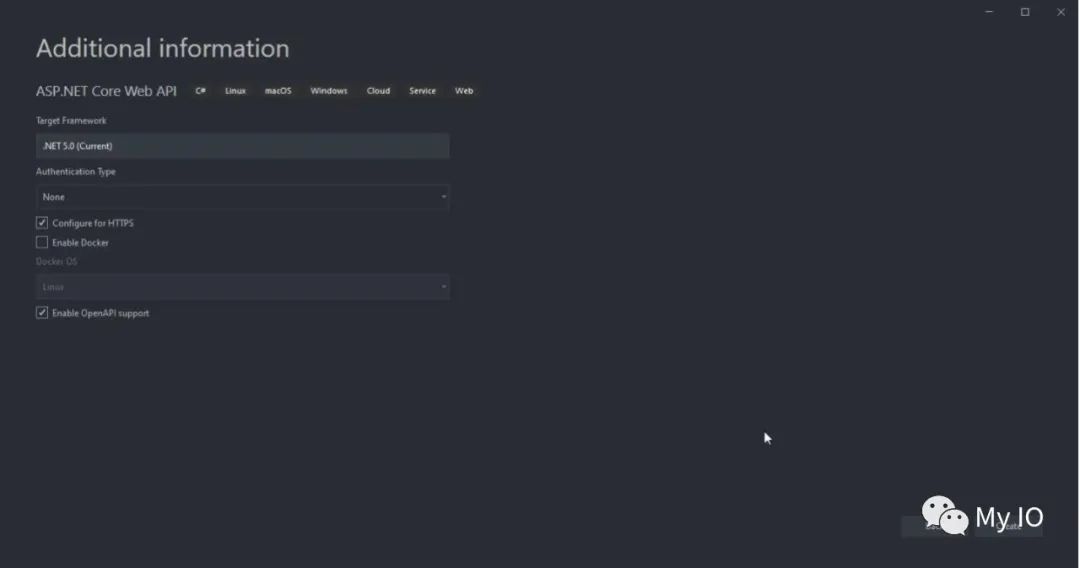
First, let's open Visual Studio 2019 + and create a new solution and a web API project. Note that we will also follow the hexagonal architecture in this implementation to keep the solution well organized.
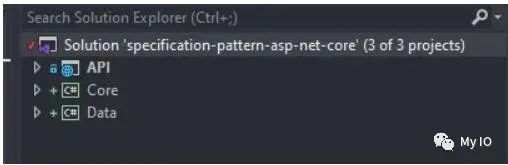
After adding the API project, let's add 2 class library projects to this solution. We call it Data and Core.
-
Data is where all implementations related to the database and context are located.
-
The Core is where we will add interfaces and domain entities.
This is what the solution looks like at this stage.
Add the desired model
As mentioned earlier, in the Core project, create a new folder called Entities and add two classes, Developer and Address.
public class Address
{
    public int Id { get; set; }
    public string City { get; set; }
    public string Street { get; set; }
}
public class Developer
{
    public int Id { get; set; }
    public string Name { get; set; }
    public string Email { get; set; }
    public int YearsOfExperience { get; set; }
    public decimal EstimatedIncome { get; set; }
    public Address Address { get; set; }
}
Add DBContext, Migrations, and required packages
Now, let's install the required NuGet package into the corresponding project.
Open the package manager console and set the Data project as the default project from the drop-down list. Run the following command to install the required packages.
Install-Package Microsoft.EntityFrameworkCore
Install-Package Microsoft.EntityFrameworkCore.SqlServer
Install-Package Microsoft.EntityFrameworkCore.Tools
Next, set the API project as the default project and run the following command.
Install-Package Microsoft.EntityFrameworkCore.Design
Before setting up the application context class, let's add the connection string. To do this, open Appsettings. From the API project JSON and add the following.
Note that we are currently using SQLServer Local DB for this demonstration.
"ConnectionStrings": {
  "DefaultConnection": "Data Source=(localdb)\\mssqllocaldb;Initial Catalog=specification-pattern-demo;Integrated Security=True;MultipleActiveResultSets=True"
},
When we're done, let's create the necessary context classes to help us access the database. To do this, under the data item, add a new class and name it ApplicationDbContext.
public class ApplicationDbContext : DbContext
{
    public ApplicationDbContext(DbContextOptions options) : base(options)
    {
    }
    public DbSet<Developer> Developers { get; set; }
    public DbSet<Address> Addresses { get; set; }
}
Here, you can see that we mentioned the Developer and Address classes to be included in the Application Db Context.
Next, we need to add this context to our ASP Net core application and configure connection details. Open startup. In the API project CS, add the following content under the ConfigureServices method.
services.AddDbContext<ApplicationDbContext>(options => options.UseSqlServer(Configuration.GetConnectionString("DefaultConnection")));
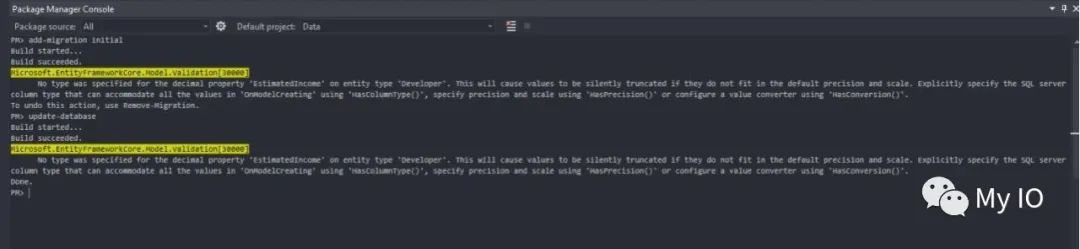
Finally, we are ready to add the migration and update the database. Open the package manager console again and set the Data project as the default project. Run the following command:
add-migration initial
update-database
This is a screenshot showing the same content. Note that you may receive warnings about the precision of the decimal attribute above. We can ignore it for the time being.
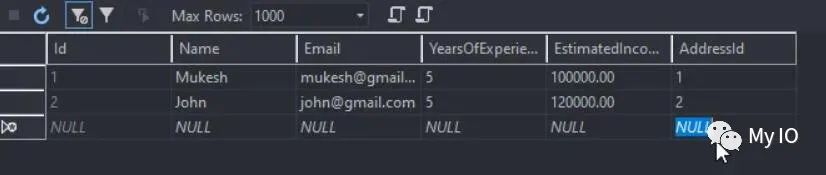
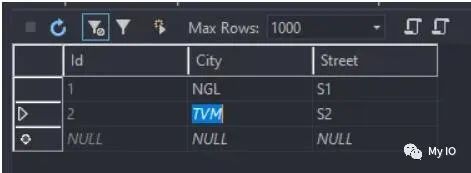
After that, our database should now have the required tables and corresponding fields ready. For demonstration purposes, I use the SQL Server object Explorer tool of the Visual Studio 2019 IDE to add some sample data directly to the database.
Implementing generic warehousing patterns
Since our requirement is to return the developer's result set, we create a generic Warehousing Schema so that it can query data from the database using ApplicationDbContext. The importance of using the generic warehousing pattern is that this code can also be reused for multiple other entities.
For example, we'll add a new entity named Product later. You don't have to add a new class to access Product data from the database, but you can use the existing generic repository implementation in most use cases. Note that we will discuss and address some of the limitations of the generic repository pattern later in this article.
Under the Core project, add a new folder and name it Interfaces. Here, add a new interface IGenericRepository.
public interface IGenericRepository<T> where T: class
{
    Task<T> GetByIdAsync(int id);
    Task<List<T>> GetAllAsync();
}
Create a generic warehouse implementation
Now, let's implement the interface created above. Since we follow the hexagonal / onion architecture, we will have to add implementations outside the core of the application. This means that all data related implementations will be added to the data project.
Here, add a new class, GenericRepository.
public class GenericRepository<T> : IGenericRepository<T> where T : class
{
    protected readonly ApplicationDbContext _context;
    public GenericRepository(ApplicationDbContext context)
    {
        _context = context;
    }
    public async Task<List<T>> GetAllAsync()
    {
        return await _context.Set<T>().ToListAsync();
    }
    public async Task<T> GetByIdAsync(int id)
    {
        return await _context.Set<T>().FindAsync();
    }
}
You can see that we are injecting an instance of ApplicationDbContext into the constructor of this warehouse implementation. This instance is further used to read data from the database.
Finally, in the startup of API engineering CS to register the IGenericRepository interface into the service container of the application.
services.AddScoped(typeof(IGenericRepository<>), (typeof(GenericRepository<>)));
The problem of generic warehousing patterns: anti patterns?
Some developers believe that generic warehousing is an anti pattern. If not used properly, yes, any pattern will mess up your code. The main complaint about generic warehousing is that a single method may expose the entire database access code to users. This may also mean that multiple methods need to be combined for each requirement (as described at the beginning of this article). For example, look at the following interface declaration:
List<T> FindAsync(Expression<Func<T, bool>> query);
This method can be used as part of the generic warehousing pattern to solve the problems we encounter. However, because this method is too general, it is impossible for the generic repository to know the expression we pass to it. Another idea might be to remove this method from the IGenericRepository interface and use it in a new interface, for example, IDeveloperRepository derived from IGenericRepository. This may work, but considering the addition of entities and changes in requirements in the future, this change is not a wise choice.
Imagine that there are 20-30 new entities and a large number of new warehouses must be created? It's not a good idea, is it? Consider that there are many methods in IDevloperRepository and its implementation, such as getdevelopers with salesgreaterthan (decimal salary) and getdevelopers with experience lessthan (int years). It's not concise, is it?
What if there is a more concise way to solve this requirement? This is where the protocol model comes in handy.
In ASP Net core using specification mode to enhance warehousing mode
The protocol model may seem complicated at first glance. I feel it, too. However, once you add some base classes and evaluators, all you have to do is create specification classes, which are usually 2 to 10 lines according to your requirements. Let's start using ASP Net core.
Under the Core project, add a new folder and name it Specifications. This is where all protocol related interfaces go.
Create a new interface and name it ispecification cs
public interface ISpecification<T>
{
    Expression<Func<T, bool>> Criteria { get; }
    List<Expression<Func<T, object>>> Includes { get; }
    Expression<Func<T, object>> OrderBy { get; }
    Expression<Func<T, object>> OrderByDescending { get; }
}
This is only a minimal implementation. Let me explain the method definition for each declaration.
-
Criteria - you can add entity based expressions here.
-
Includes – if you want to include foreign key table data, you can use this method to add it.
-
OrderBy and OrderByDescending are self-evident.
Next, in the same folder, add a new class basespecification. This will be the implementation of the ISpecification interface.
public class BaseSpecifcation<T> : ISpecification<T>
{
    public BaseSpecifcation()
    {
    }
    public BaseSpecifcation(Expression<Func<T, bool>> criteria)
    {
        Criteria = criteria;
    }
    public Expression<Func<T, bool>> Criteria { get; }
    public List<Expression<Func<T, object>>> Includes { get; } = new List<Expression<Func<T, object>>>();
    public Expression<Func<T, object>> OrderBy { get; private set; }
    public Expression<Func<T, object>> OrderByDescending { get; private set; }
    protected void AddInclude(Expression<Func<T, object>> includeExpression)
    {
        Includes.Add(includeExpression);
    }
    protected void AddOrderBy(Expression<Func<T, object>> orderByExpression)
    {
        OrderBy = orderByExpression;
    }
    protected void AddOrderByDescending(Expression<Func<T, object>> orderByDescExpression)
    {
        OrderByDescending = orderByDescExpression;
    }
}
Here, we will add three basic methods and a constructor.
-
Add an expression to the Includes property
-
Add an expression to the OrderBy property
-
Add an expression to the OrderByDescending property
-
You can notice that we also have a constructor that accepts conditions. Criteria can be (x = > X. salary > 100), etc. You see, don't you?
Upgrade generic warehousing
First, let's add a method to the IGenericRepository interface.
IEnumerable<T> FindWithSpecificationPattern(ISpecification<T> specification = null);
Next, let's implement the new method in the GenericRepository class.
public IEnumerable<T> FindWithSpecificationPattern(ISpecification<T> specification = null)
{
    return SpecificationEvaluator<T>.GetQuery(_context.Set<T>().AsQueryable(), specification);
}
Now, the idea behind setting all this up is to create a separate specification class that can return a specific result set. Each of these new specification classes will inherit from the BaseSpecification class. See? Now let's create these specification classes so that it makes sense 😉
Therefore, let's draw two requirements / regulations:
1. Return the specifications of the developer list in descending salary order.
2. Another protocol returns a list of developers with N or more experience and their addresses.
In the same Specification folder of the Core project, add our first Specification class developer byincomespecification
public class DeveloperByIncomeSpecification : BaseSpecifcation<Developer>
{
    public DeveloperByIncomeSpecification()
    {
        AddOrderByDescending(x => x.EstimatedIncome);
    }
}
Here, you can see that we derive from the BaseSpecification class and use the AddOrderByDescending method in the constructor. Ideally, this Convention would return a list of developers in descending order of revenue.
Next, let's add another class, specification developer
public class DeveloperWithAddressSpecification : BaseSpecifcation<Developer>
{
    public DeveloperWithAddressSpecification(int years) : base(x=>x.EstimatedIncome > years)
    {
        AddInclude(x => x.Address);
    }
}
Therefore, here we pass the query expression to the base class of Specification Class, which is the constructor of BaseSpecification, and then add it to the Criteria attribute we created earlier. It's actually very simple.
Now, with our specification class ready, let's add api endpoints.
Under the API project, add a new API Controller under the Controllers folder and name it developers controller.
public class DevelopersController : ControllerBase
{
    public readonly IGenericRepository<Developer> _repository;
    public DevelopersController(IGenericRepository<Developer> repository)
    {
        _repository = repository;
    }
    [HttpGet]
    public async Task<IActionResult> GetAll()
    {
        var developers = await _repository.GetAllAsync();
        return Ok(developers);
    }
    [HttpGet("{id}")]
    public async Task<IActionResult> GetById(int id)
    {
        var developer = await _repository.GetByIdAsync(id);
        return Ok(developer);
    }
    [HttpGet("specify")]
    public async Task<IActionResult> Specify()
    {
        var specification = new DeveloperWithAddressSpecification(3);
        //var specification = new DeveloperByIncomeSpecification();
        var developers = _repository.FindWithSpecificationPattern(specification);
        return Ok(developers);
    }
}
Line 3 – 7: inject IGenericRepository into the constructor of the Controller. Line 8 – 19: use the warehouse instance to return the standard endpoint of all developers and developers with a specific Id.
Line 20 – 27: This is the most interesting part of the controller. Lines 23 and 24 here are the two specification classes we created earlier. This is just to prove that any such specification instance can be created in the controller or anywhere using the genericreposition. We will use developer with address specification (3) for demonstration.
Now let's run the application and check the results of the specified endpoint.
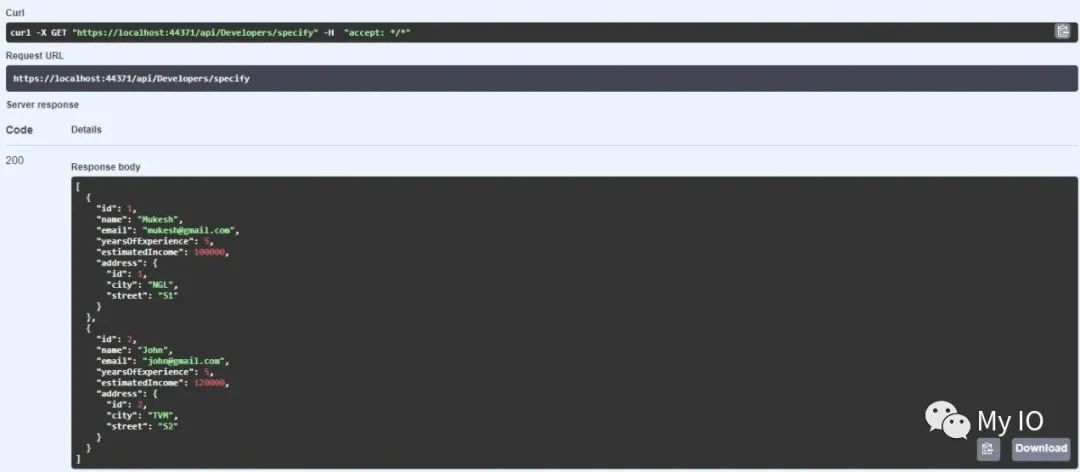
You can see that the address data is also returned. Now, back to the controller, comment out line 24 and let's use developer by incomespecification for the time being. Run the application again.

Now you can notice that no Address data is returned. Why? It's very simple because we use different protocols and don't mention adding an Address entity. Instead, the Convention returns a collection of developers in descending order of revenue. Simple, but neat, right? This may be ASP Net core application.
It's strange, but this is actually when you can understand what the specification pattern is 😛 According to Wikipedia - in computer programming, the specification pattern is a specific software design pattern in which business rules can be combined by linking them together using Boolean logic. This pattern is often used in the context of domain driven design.
It makes more sense now, doesn't it? Business rules (which we require to return developers with a certain level of experience or higher) are grouped together through link criteria (which occurs in the developer withaddressspecification class), which is Boolean logic. It's simple, but it's too powerful 😉
Looking ahead, the possibilities of this model are endless and very helpful to expand applications. This mode may also support data shaping and paging. Very powerful model, the learning curve is very small, isn't it? This is the summary of this article.
summary
In this paper, we introduce ASP Net core application and how it enhances the generic warehousing pattern by gaining the upper hand. We also built a complete Web API application that follows the onion architecture for clean code management. You can also find the complete source code on my Github.