Take the fifth lecture.
(4) Property selector
The attribute selector can decide whether to apply the specified style to an element based on whether it has an attribute or whether it has a specific value. Here is a code example to illustrate the use of attribute selectors:
<!DOCTYPE html>
<html>
<head>
<meta http-equiv = "content-type" content = "text/html";charset = "utf-8" />
    <title>Attribute selector example</title>
    <meta charset = "utf-8" />
    <style type = "text/css">
           li{list-style:none}
           a[href $= "docx"]
           {
               background:url(word.jpg) no-repeat left center;
               padding-left:25px;
               line-height:36px;
               font-family:Blackbody;
               font-size:26px;
           }
           a[href $= "pptx"]
           {
               background:url(ppt.jpg) no-repeat left center;
               padding-left:25px;
               line-height:36px;
               font-family:Regular script;
               font-size:26px;
           }
           [id = "exp1"] {background-color:Gray}
           [id *= "exp"] {color:Red}
           [id ^= "sub"] {font-size:24px}
           [id $= "-2"] {font-style:italic;line-height:40px;color:Black}
    </style>
</head>
<body>
    <h1>attribute selectors</h1>
    <nav id = "exp1">sample text exp1
        <ul>
            <li><a href="Word.docx">Word File</a></li>
            <li><a href="PPT.pptx">PPT Presentation</a></li>
        </ul>
    </nav>
    <div id = "exp2">sample text exp2</div>
    <div id = "subexp2-1">sample text sub_exp2-1</div>
    <div id = "subexp2-2">sample text sub_exp2-2</div>
</body>
</html>
The results are shown in Figure 1.
 Figure 1 Attribute selector example
Cut out a few pieces of code to explain:
Figure 1 Attribute selector example
Cut out a few pieces of code to explain:
a[href $= "docx"]
{
    background:url(word.jpg) no-repeat left center;
    padding-left:25px;
    line-height:36px;
    font-family:Blackbody;
    font-size:26px;
}
The above code indicates that the < a > tag has href attribute, and the href attribute value should be set in this style (icon, font, font size, etc.) at the end of docx. Similarly, you can set the < a > tag style ending with pptx. Next, look at the following code:
[id = "exp1"] {background-color:Gray}
[id *= "exp"] {color:Red}
[id ^= "sub"] {font-size:24px}
[id $= "-2"] {font-style:italic;line-height:40px;color:Black}
In the first line, the tag with id attribute value equal to exp1 is set using this style, and the background color is grey.
In the second line, the tag containing exp in the id attribute value is set in this style and displayed in red.
In the third line, the tag in the id attribute value that starts with sub uses this style setting, and the font size is 24.
The fourth line is marked with the id attribute value ending in - 2, set in italics, 40px in height and black.
As can be seen from the display effect in Figure 1, if there are multiple style conflicts (e.g., including exp and ending with -2), the browser will adopt the principle of "near use" and adopt the style definition nearest to the original color location.
(5) Pseudo-class selector
"Pseudo-class selector" is also called "virtual-class selector". It is a method of adding "pseudo-class" to control the setting of specific markup style on the basis of various selectors introduced earlier. Examples are as follows:
<style type = "text/css">
       a{text-decoration:none}   /*Remove the underline*/
       a:link{color:Red}     /*The text of the hyperlink is set to red*/
       a:visited{color:Green}    /*Set the accessed hyperlink text to green*/
       a:hover{color:Blue}   /*The text turns blue when the mouse pointer is on the hyperlink*/
       a:active{color:Yellow}    /*The text turns yellow when you click on a hyperlink*/
</style>
4 box model
Box model is an important concept used by CSS to specify how web page elements should be presented. All CSS styling rules are related to box models. In web design, each element can be understood as a rectangular box composed of content, padding, border and margin. The relationship between them is shown in Figure 2.
 Figure 2 Schematic diagram of CSS box model
The width of the box model is equal to the content width + the left and right width of the inner margin + the left and right width of the border + the left and right width of the outer margin.
The height of box model = high content + high and low inner margin + high and low margin + high and high outer margin.
The outer rectangles enclosing content, padding, border and margin regions are called content-box, padding-box, border-box and margin-box, respectively.
Next, let's look at a piece of code to understand the concept of box model:
Figure 2 Schematic diagram of CSS box model
The width of the box model is equal to the content width + the left and right width of the inner margin + the left and right width of the border + the left and right width of the outer margin.
The height of box model = high content + high and low inner margin + high and low margin + high and high outer margin.
The outer rectangles enclosing content, padding, border and margin regions are called content-box, padding-box, border-box and margin-box, respectively.
Next, let's look at a piece of code to understand the concept of box model:
<!DOCTYPE html>
<html>
<head>
<meta http-equiv="Content-Type" content="text/html; charset=utf-8"/>
    <title>Shadow effect of box area</title>
	<meta charset="utf-8" />
    <style type="text/css">
        .box{     /*Define box class styles*/
            width:100px;   /*content Breadth*/
            height:40px;    /*content High*/
            padding:10px;    /*Inside margin width 10px*/
            text-align:center;  /*The element level in the region is in the middle*/
            vertical-align:middle;  /*The element level in the region is in the middle*/
            border:blue solid 26px;   /*Border style*/
            margin-bottom:20px;
            position:absolute; top:10px;  /*10 px from the top*/
        }
        #Box 1 {/* defines the element style used for id box 1*/
            border-radius:40px/30px;   /*Set border rounded corner effect, horizontal radius 40px, vertical radius 30px*/
            box-shadow:10px 10px 10px gray;  /*Set the shadow effect of the area, the horizontal distance of the shadow from the area is 10px, the vertical distance is 10px, the blur radius is 10px, and the color gray is 10px.*/
        }
        #Box2 {/* defines the element style used for id box2*/
            border-radius:20px 30px 60px 80px;   /*Set the corner effect of the border, the radius of the corner, up and down (clockwise)*/
            box-shadow:10px 10px 0 gray;  /*Set the shadow effect of the area, the horizontal distance of the shadow from the area is 10px, the vertical distance is 10px, the blur radius is 0px, and the color gray is gray.*/
            left:200px;            /*Set the left margin of the area to 200 PX*/
        }
        #Box 3 {/* defines the element style for id box 3*/
            border-image:url(pic1.png) 26 26 26 26;        /*When image is segmented, the upper, right, lower and left margins are 26px*/
            left:400px;            /*Set the left margin of the area to 400 PX*/
        }
    </style>
</head>
<body>
    <div id="box1" class="box"><p>Area 1</p></div>
    <div id="box2" class="box"><p>Area 2</p></div>
    <div id="box3" class="box"><p>Area 3</p></div>
</body>
</html>
The operation effect is shown in Figure 3.
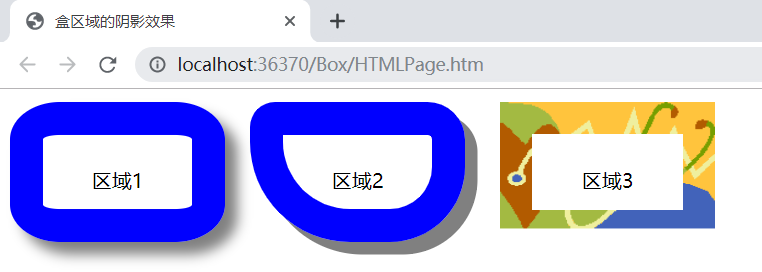 Figure 3. Running effect of CSS box model routine
Annotations have been written in the above code, which can be further understood by modifying the code and observing the changes in the operation effect. In addition, for the png picture needed in box 3, you can draw one by yourself through the drawing tool.
Figure 3. Running effect of CSS box model routine
Annotations have been written in the above code, which can be further understood by modifying the code and observing the changes in the operation effect. In addition, for the png picture needed in box 3, you can draw one by yourself through the drawing tool.