Preface
AucFrame Future Articles:
"AucFrame Unified Management Gradle" Source Port
Gradle for managing lib
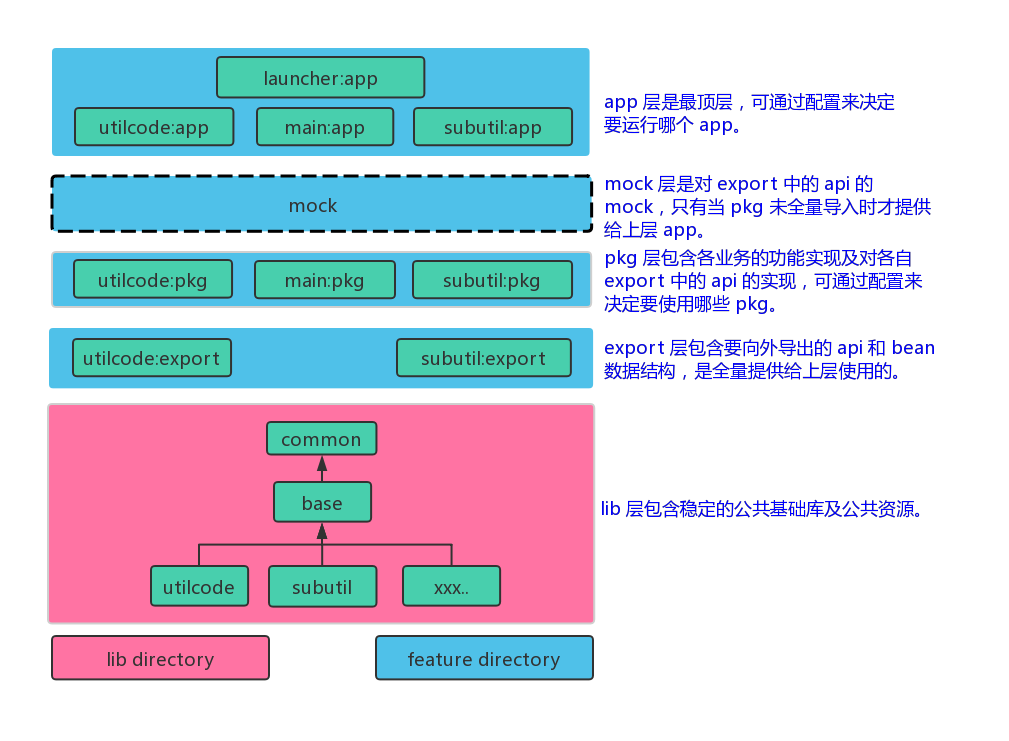
First, let's look at the architecture of the AucFrame again.
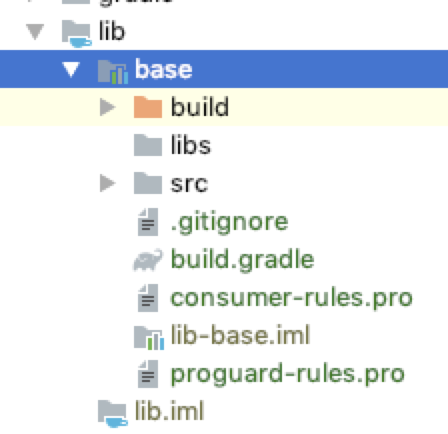
We start from the bottom up, create lib folders in the root directory, create a new Android Library type base module in the project, and then delete base.iml, because not deleting the base.iml file will affect the subsequent movement, deleting the Android test and test test directory is OK, then I They moved the base folder into lib. Finally, we changed the': base'in the set. gradle file to: lib:base. Finally, we clicked on the synchronization of Gradle. Finally, lib.iml will be generated under lib, and lib-base.iml will be generated under base to indicate success. The results are as follows:
In the same way, we create: lib:common, and then configure their dependencies.
We can see that base and common's build.gralde are exactly the same, so can we pull them out? The answer is yes.
We create the buildLib.gradle file in the project root directory, which represents all lib-type modules and can be used. We can put it in public content, as follows:
apply {
    plugin "com.android.library"
    plugin "kotlin-android"
    plugin "kotlin-android-extensions"
}

android {
    compileSdkVersion Config.compileSdkVersion

    defaultConfig {
        minSdkVersion Config.minSdkVersion
        versionCode Config.versionCode
        versionName Config.versionName
    }

    buildTypes {
        release {
            minifyEnabled false
            proguardFiles getDefaultProguardFile('proguard-android-optimize.txt'), 'proguard-rules.pro'
        }
    }

    lintOptions {
        abortOnError false
    }
}
As you can see, we used the attributes in Config.groovy to make it easier for all lib versions to be consistent. When it comes to versions being consistent, we also need to unify the dependencies of third-party libraries. Simply, we created the configuration of dependency libraries in Config.groovy. Now it looks like this:
class Config {

    static applicationId = 'com.blankj.aucframe'            // TODO: MODIFY
    static appName = 'AucFrame'                             // TODO: MODIFY

    static compileSdkVersion = 27                           // TODO: MODIFY
    static minSdkVersion = 21                               // TODO: MODIFY
    static targetSdkVersion = 27                            // TODO: MODIFY
    static versionCode = 1_000_000                          // TODO: MODIFY
    static versionName = '1.0.0'// E.g. 1.9.72 => 1,009,072 // TODO: MODIFY

    static kotlin_version = '1.3.10'
    static support_version = '27.1.1'
    static leakcanary_version = '1.6.3'

    static depConfig = [
            plugin       : [
                    gradle: "com.android.tools.build:gradle:3.3.0",
                    kotlin: "org.jetbrains.kotlin:kotlin-gradle-plugin:$kotlin_version",
            ],
            support      : [
                    appcompat_v7: "com.android.support:appcompat-v7:$support_version",
                    design      : "com.android.support:design:$support_version",
                    multidex    : "com.android.support:multidex:1.0.2",
                    constraint  : "com.android.support.constraint:constraint-layout:1.1.3",
            ],
            kotlin       : "org.jetbrains.kotlin:kotlin-stdlib-jdk7:$kotlin_version",
            utilcode     : "com.blankj:utilcode:1.25.0",
            free_proguard: "com.blankj:free-proguard:1.0.1",
            swipe_panel  : "com.blankj:swipe-panel:1.1",

            leakcanary   : [
                    android         : "com.squareup.leakcanary:leakcanary-android:$leakcanary_version",
                    android_no_op   : "com.squareup.leakcanary:leakcanary-android-no-op:$leakcanary_version",
                    support_fragment: "com.squareup.leakcanary:leakcanary-support-fragment:$leakcanary_version",
            ],
    ]
}
Next, let base and common apply them. We write the following complete content to base's build.gradle:
apply {
    from "${project.rootDir.path}/buildLib.gradle"
}

dependencies {
    implementation fileTree(include: ['*.jar'], dir: 'libs')
    api Config.depConfig.utilcode
    api Config.depConfig.free_proguard
    api Config.depConfig.swipe_panel

    api Config.depConfig.support.appcompat_v7
    api Config.depConfig.support.design
    api Config.depConfig.support.multidex
    api Config.depConfig.support.constraint
    api Config.depConfig.kotlin
    compileOnly Config.depConfig.leakcanary.android_no_op.dep
}
Since our common module relies on base, the configuration of common is as follows:
apply {
    from "${project.rootDir.path}/buildLib.gradle"
}

dependencies {
    api project(":lib:base")
}
Written content is relatively simple, I do not explain one by one, let's manage feature s.
Now let's put two basic classes in the base module, BaseApplication and BaseActivity, two common classes in the common, Common Application and Common BackActivity, and some common resources. See the source code for details, and let's manage the frature.
Gradle for managing feature s
Gradle for export Management
Looking at the architecture diagram again, we can see that there are app, pkg (, export) modules in each feature in feature. We operate step by step from bottom to top. Now we create feature directory in the root directory, feature 0 and feature 1 directory in feature directory, similar to creating fea, we create FEA directory in FEA directory. Create export module in feature 0 and feature 1. Note that the export package names in two features should be distinguished. Here are com. blankj. feature 0. export, com. blankj. feature 1. export. After the establishment, the set. grade file is as follows:
include ':app', ':lib:base', ':lib:common',
        ':feature:feature0:export', ':feature:feature1:export',
Since export relies on common, the build.gradle of the two exports is as follows:
apply {
    from "${project.rootDir.path}/buildLib.gradle"
}

dependencies {
    api project(":lib:common")
}
Now let's synchronize gradle and find that two export s have been added.
Gradle for managing pkg
We create two PKG in the same way. The package names are com.blankj.feature0.pkg and com.blankj.feature1.pkg. The set. gradle file is as follows:
include ':app', ':lib:base', ':lib:common',
        ':feature:feature0:export', ':feature:feature1:export',
        ':feature:feature0:pkg', ':feature:feature1:pkg'
pkg is dependent only on its own export, so: feature: feature 0: pkg build.gradle is as follows:
apply {
    from "${project.rootDir.path}/buildLib.gradle"
}

dependencies {
    api project(":feature:feature0:export")
}
feature:feature1:pkg build.gradle is the same.
gradle synchronization, you can see that two PKG have been added, now we add a feature 0:pkg in: feature: feature: feature 0: pkg, and add a feature 1:pkg in: feature: feature: feature 1: pkg, see the source code specifically.
Gradle for managing app
The top layer of pkg is the mock layer, because this layer is optional, we will skip it for the time being, and then we will work on it when we use it, so now there are only app s left. First, we use similar ways to buildLib.gradle to create a common buildApp.gradle file in the root directory, which is as follows. As shown.
apply {
    plugin "com.android.application"
    plugin "kotlin-android"
    plugin "kotlin-android-extensions"
}

android {
    defaultConfig {
        minSdkVersion Config.minSdkVersion
        versionCode Config.versionCode
        versionName Config.versionName
        applicationId Config.applicationId + suffix
        targetSdkVersion Config.targetSdkVersion
        multiDexEnabled true
        resValue "string", "app_name", Config.appName + suffix
    }

    buildTypes {
        debug {
            minifyEnabled false
            proguardFiles getDefaultProguardFile('proguard-android.txt'), 'proguard-rules.pro'
        }
        release {
            minifyEnabled true
            proguardFiles getDefaultProguardFile('proguard-android.txt'), 'proguard-rules.pro'
        }
    }

    packagingOptions {
        exclude 'META-INF/*'
    }

    dexOptions {
        preDexLibraries true
        javaMaxHeapSize "8g"
        maxProcessCount 8
        dexInProcess = true
    }
}

dependencies {
    // LeakCanary
    debugImplementation Config.depConfig.leakcanary.android
    debugImplementation Config.depConfig.leakcanary.support_fragment
    releaseImplementation Config.depConfig.leakcanary.android_no_op
}

def getSuffix() {
    if (project.path == ":feature:launcher:app") return ""
    return project.path.replace(":", "_").substring(":feature".length(), project.path.length() - ":app".length())
}
So we can use these common attributes in build.gradle in every app. Careful friends should see that besides launcher, every application Id is suffixed with feature module name. The specific method is getSuffix(), which makes it easy for us to install multiple applications on mobile phones at the same time. .
First, we delete the app directory in the root directory and create two apps in the same way in feature0 and feature1. The package names are com.blankj.feature0.app, com.blankj.feature1.app. After the establishment, the set. gradle file is as follows:
include ':lib:base', ':lib:common',
        ':feature:feature0:export', ':feature:feature1:export',
        ':feature:feature0:pkg', ':feature:feature1:pkg',
        ':feature:feature0:app', ':feature:feature1:app'
App only depends on their pkg, so: feature: feature 0: app's build.gradle is as follows:
apply {
    from "${project.rootDir.path}/buildApp.gradle"
}

dependencies {
    api project(":feature:feature0:pkg")
}
feature:feature1:app's build.gradle is the same.
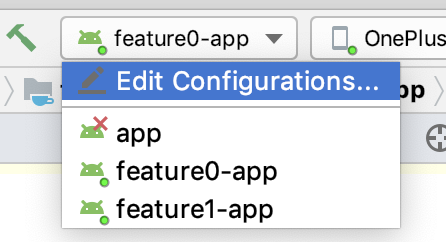
Synchronizing the project, you can see that two apps have also been compiled into the project, feature0-app and feature1-app already exist in the list of runnable apps, as shown in the following figure:
Now let's add a Feature A App in feature: feature 0: app, and a Feature A App in feature: feature 1: app. See the source code for details, and then set up their respective Android Manifest. xml. Here's an example of feature: feature 0: app:
<?xml version="1.0" encoding="utf-8"?>
<manifest xmlns:android="http://schemas.android.com/apk/res/android"
    package="com.blankj.feature0.app">

    <application
        android:name="com.blankj.feature0.app.Feature0App"
        android:allowBackup="false"
        android:icon="@mipmap/ic_launcher"
        android:label="@string/app_name"
        android:theme="@style/AppTheme">
        <activity android:name="com.blankj.feature0.pkg.Feature0Activity">
            <intent-filter>
                <action android:name="android.intent.action.VIEW" />
                <action android:name="android.intent.action.MAIN" />

                <category android:name="android.intent.category.LAUNCHER" />
            </intent-filter>
        </activity>
    </application>

</manifest>
You can see that we added Feature0 Active as the startup page so that we can debug it quickly. Similarly, feature:feature1:app's Android Manifest. XML is the same, and then we can run them separately. Because their application Id is different, they can be installed at the same time.
Next, we create the top-level feature:launcher:app module in the same way as before. Now we make it depend on: feature: feature: feature 0: PKG and feature: feature: feature: feature 1: PKG module. Later we will make it support dynamic configuration. Its build.gradle is as follows:
apply {
    from "${project.rootDir.path}/buildApp.gradle"
}

dependencies {
    api project(":feature:feature0:pkg")
    api project(":feature:feature1:pkg")
}
Add it to set. gradle, synchronize gradle, you will find that there is more launcher-app in the runnable app, we create a Launcher App, here we assume that the entry of app is in feature 0, so configure: feature: launcher: Android Manifest. XML in app as follows:
<?xml version="1.0" encoding="utf-8"?>
<manifest xmlns:android="http://schemas.android.com/apk/res/android"
    package="com.blankj.feature0.app">

    <application
        android:name="com.blankj.feature0.app.Feature0App"
        android:allowBackup="false"
        android:icon="@mipmap/ic_launcher"
        android:label="@string/app_name"
        android:theme="@style/AppTheme">
        <activity android:name="com.blankj.feature0.pkg.Feature0Activity">
            <intent-filter>
                <action android:name="android.intent.action.VIEW" />
                <action android:name="android.intent.action.MAIN" />

                <category android:name="android.intent.category.LAUNCHER" />
            </intent-filter>
        </activity>
    </application>

</manifest>
We installed all three applications on mobile phones. The application names are AucFrame, AucFrame_feature0 and AucFrame_featrue1. So far, our unified management of Gradle is over.
Play a small advertisement
Welcome to my knowledge planet. You are too beautiful "Learning AucFrame Framework, currently the first phase of 66 50 places have been fully filled, interested can join the Wechat Sweep Code Group, the second phase of the opening of the unified pull you.