preface
The background of Activity/Window/View is the background of View, followed by the background of Activity, and the background of Window is used less. What is the relationship and difference between the three?
Through this article, you will learn:
1. Principle and application of View background
2. Principle and application of Window background
3. Principle and application of Activity background
4. Common background settings
1. Principle and application of View background
Let's look at a simple illustration:
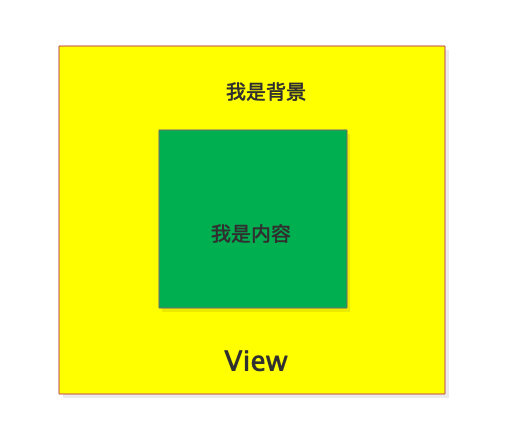
Generally speaking, the View display area is divided into two parts:
1. Background
2. Content
This chapter focuses on the background drawing. Please move on to the content drawing: Draw process of Android custom View (Part 1)
Have you considered two questions in your daily application:
1. Why can the content area cover the background area
2. Why can View.scrollTo(xx) only move content
Let's start with the first question
Let's see how to draw the background of View:
The well-known View.draw(xx) method is as follows:
#View.java
public void draw(Canvas canvas) {
        ...
        //Drawing background ----------- (1)
        drawBackground(canvas);

        ...
        if (!verticalEdges && !horizontalEdges) {
            //--------------(2)

            //Draw your own content
            onDraw(canvas);

            //Draw sub layout
            dispatchDraw(canvas);
            ...
            //Foreground, highlight, etc
            return;
        }
        ...
    }
It can be seen from points (1) and (2) above that the background is drawn first and then the content is drawn, so the content area will cover part of the background area.
Look at the second question
Mainly the drawBackground(canvas) method:
#View.java
    private void drawBackground(Canvas canvas) {
        //Background Drawable
        final Drawable background = mBackground;
        if (background == null) {
            //No background, no need to draw
            return;
        }

        //Set the background Drawable and set its size
        setBackgroundBounds();

        //Support hardware acceleration
        if (canvas.isHardwareAccelerated() && mAttachInfo != null
                && mAttachInfo.mThreadedRenderer != null) {
            //Draw the background and return drawable ------------------- (1)
            mBackgroundRenderNode = getDrawableRenderNode(background, mBackgroundRenderNode);

            final RenderNode renderNode = mBackgroundRenderNode;
            if (renderNode != null && renderNode.hasDisplayList()) {
                //Drawing complete
                setBackgroundRenderNodeProperties(renderNode);
                //Associated with Canvas, that is, hang the drawn background on Canvas
                ((RecordingCanvas) canvas).drawRenderNode(renderNode);
                return;
            }
        }

        //Software drawing
        final int scrollX = mScrollX;
        final int scrollY = mScrollY;
        if ((scrollX | scrollY) == 0) {
            //No offset, draw directly
            background.draw(canvas);
        } else {
            //Now translate the canvas back ------------- (2)
            canvas.translate(scrollX, scrollY);
            //draw
            background.draw(canvas);
            //Translate back
            canvas.translate(-scrollX, -scrollY);
        }
    }
Two key points are marked above:
(1)
Where the background is actually drawn:
#View.java
    private RenderNode getDrawableRenderNode(Drawable drawable, RenderNode renderNode) {
        if (renderNode == null) {
            //Create renderNode
            renderNode = RenderNode.create(drawable.getClass().getName(),
                    new ViewAnimationHostBridge(this));
            renderNode.setUsageHint(RenderNode.USAGE_BACKGROUND);
        }

        //Get the size, which has been set before
        final Rect bounds = drawable.getBounds();
        final int width = bounds.width();
        final int height = bounds.height();
        //Gets the Canvas that draws the background
        final RecordingCanvas canvas = renderNode.beginRecording(width, height);

        //translation
        canvas.translate(-bounds.left, -bounds.top);

        try {
            //Draw background
            drawable.draw(canvas);
        } finally {
            //After drawing, record the displayList to renderNode
            renderNode.endRecording();
        }

        ...
        return renderNode;
    }
It can be seen that a new Canvas is generated, the background is drawn with the Canvas, and the drawing is recorded in the renderNode of the background.
(2)
As you may have found, why pan the Canvas here?
For software rendering, the Canvas passed from RootView is the same, that is, the entire ViewTree shares a Canvas. For View drawing, the method call sequence is as follows:
draw(x)->dispatchDraw(x)->child.draw(x1,x2,x3)->child.draw(x)
In the child.draw(x1,x2,x3) method, judge whether to move the content (mscollx = 0 | mscolly! = 0). If necessary, move the Canvas as follows:
canvas.translate(-mScrollX, -mScrollY)
Note that this is the reverse.
At this time, the canvas has been moved. When calling child.draw(xx), it is the draw(xx) method analyzed above:
1. Draw the background first
2. Draw content
When drawing the background, translate the Canvas back, then draw the background, and finally translate back. When drawing the content again, the Canvas does not change, but still translates (- mscollx, - mscolly), so the content will translate when drawing, but the background will not change when drawing, which answers the second question.
The above only answers the second question for software rendering, so why don't you need to pan the Canvas when hardware accelerates rendering? Here is a brief conclusion:
When hardware accelerates rendering, each View has its own Canvas and RenderNode, and the corresponding background also has its own Canvas and RenderNode. Therefore, even if the Canvas of the View is translated, the Canvas of the background will not be affected. Therefore, the Canvas of the background does not need to be translated for mscollx and mscolly.
View drawing details, please move to: Draw process of Android custom View (Part 1)
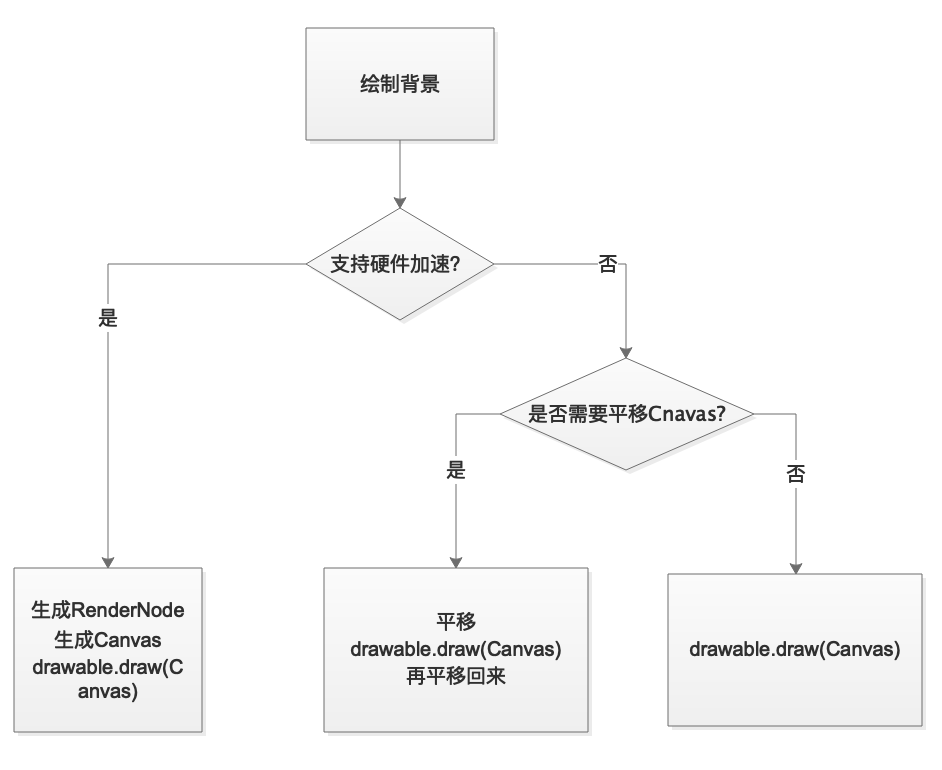
The background drawing process is shown in the figure:
The above is for View background analysis. Generally speaking, we only need to specify Drawable for setting the background.
Whether through dynamic settings:
#View.java
public void setBackground(Drawable background){...}
public void setBackgroundColor(@ColorInt int color){...}
public void setBackgroundResource(@DrawableRes int resid){...}
...
Or through xml static configuration:
android:background="@color/colorGreen"
android:background="@drawable/test"
...
In the end, the generated Drawable object is assigned to the member variable mBackground of View. Finally, the Drawable is used to draw the background [drawBackground()].
2. Principle and application of Window background
To set the Window background, you need to obtain the Window object. We often use Window objects in two places: Activity and Dialog.
Window is an abstract class and its implementation class is PhoneWindow. Therefore, the window point in Activity and Dialog is actually a PhoneWindow object.
The Window reference is obtained as follows:
Activity.getWindow()
Dialog.getWindow()
Let's see how Window sets the background:
    #Window.java
    public abstract void setBackgroundDrawable(Drawable drawable);

    #PhoneWindow.java
    @Override
    public final void setBackgroundDrawable(Drawable drawable) {
        //mBackgroundDrawable records the background of the current Window
        if (drawable != mBackgroundDrawable) {
            //If the background changes, it needs to be reset
            mBackgroundDrawable = drawable;
            if (mDecor != null) {
                //mDecor is known as DecorView
                //The DecorView method is called here
                mDecor.setWindowBackground(drawable);
                ...
            }
        }
    }
PhoneWindow overrides the setBackgroundDrawable(xx) method in Window. setWindowBackground(xx) of DecorView is called in this method.
#DecorView.java
    public void setWindowBackground(Drawable drawable) {
        if (mOriginalBackgroundDrawable != drawable) {
            mOriginalBackgroundDrawable = drawable;
            //The member variable mBackground assigned to View is to set the background for View
            updateBackgroundDrawable();

            //It is mainly used to judge that if the Window is not translucent (windowtransparent = true), but the drawable has transparency, the transparency is forced to be set to 255
            if (drawable != null) {
                mResizingBackgroundDrawable = enforceNonTranslucentBackground(drawable,
                        mWindow.isTranslucent() || mWindow.isShowingWallpaper());
            } else {
                mResizingBackgroundDrawable = getResizingBackgroundDrawable(
                        mWindow.mBackgroundDrawable, mWindow.mBackgroundFallbackDrawable,
                        mWindow.isTranslucent() || mWindow.isShowingWallpaper());
            }
            if (mResizingBackgroundDrawable != null) {
                mResizingBackgroundDrawable.getPadding(mBackgroundPadding);
            } else {
                mBackgroundPadding.setEmpty();
            }
            drawableChanged();
        }
    }
It can be seen that setting the background for Window is finally fed back to DecorView.
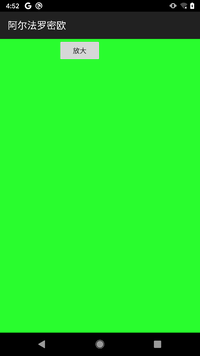
Take Activity as an example, set the background of Activity Window to green:
        ColorDrawable colorDrawable = new ColorDrawable();
        colorDrawable.setColor(Color.GREEN);
        getWindow().setBackgroundDrawable(colorDrawable);
The effects are as follows:
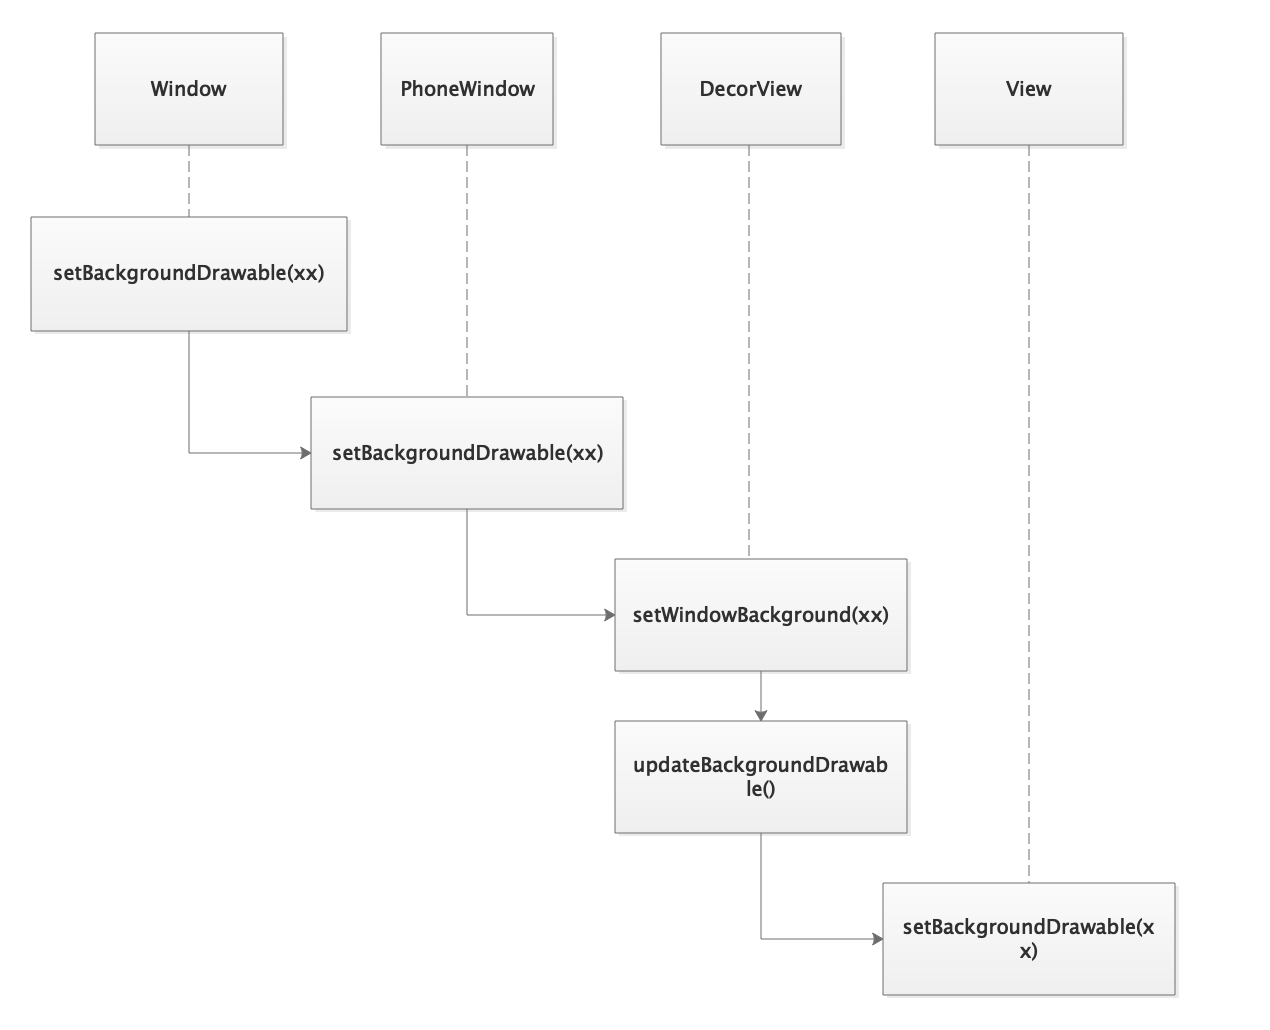
Method call process:
3. Principle and application of Activity background
Generally speaking, we will set the background in Activity Theme:
    <style name="activitytheme" parent="Theme.AppCompat.Light.DarkActionBar">
        <item name="android:windowBackground">#0033ff</item>
    </style>
In Activity onCreate(xx), setContentView(xx) is invoked and then generateLayout(xx) method of PhoneWindow is called:
#PhoneWindow.java
    protected ViewGroup generateLayout(DecorView decor) {
        ...
        if (getContainer() == null) {
            if (mBackgroundDrawable == null) {
                ...
                //Get the background set in theme
                if (a.hasValue(R.styleable.Window_windowBackground)) {
                    mBackgroundDrawable = a.getDrawable(R.styleable.Window_windowBackground);
                }
            }
            ...
        }
        ...

        if (getContainer() == null) {
            //Set DecorView background
            mDecor.setWindowBackground(mBackgroundDrawable);
            ...
        }
        ...
    }
The background set in Theme is taken out here and set to the DecorView background.
Strictly speaking, Activity does not have the so-called background. Its "background" refers to the background of Window. It is only for convenience and is not specifically distinguished.
Activity has a default background. Different topics have different values. The default background color of my topic is:
@color/material_grey_50
#fffafafa
What should I do when I want to set the Activity to be transparent? If I set the background to be transparent, you will find that the effect is not achieved, but black. At this time, I need to use it with another property:
    <style name="activitytheme" parent="Theme.AppCompat.Light.DarkActionBar">
        <item name="android:windowIsTranslucent">true</item>
        <item name="android:windowBackground">#00000000</item>
    </style>
4. Common background settings
It can be seen from the above that when setting the background of both Activity and Window, the background of DecorView is finally set.
We know that to display a View on the screen, you actually need to add the View to the Window. Call the following method:
WindowManager.addView(View view, ViewGroup.LayoutParams params)
This view is used as the RootView of Window.
Let's take a look at some common rootviews:
- Activity/Dialog uses DecorView as the RootView
- PopupWindow uses popupdecorview (when no background is set) / popupbackgroundview (when there is a background)
- Select any View as the RootView for the normal suspended window
Setting the background is actually setting the background of RootView
The above example illustrates the Activity background settings. Next, it describes the common pop-up background settings and precautions.
Dialog background settings
Let's start with a simple Demo
    private void showDialog(Context context) {
        Dialog dialog = new Dialog(context);
        FrameLayout frameLayout = new FrameLayout(context);
        TextView textView1 = new TextView(context);
        textView1.setText("hello");
        frameLayout.addView(textView1, new FrameLayout.LayoutParams(WRAP_CONTENT, WRAP_CONTENT));
//                frameLayout.setBackgroundColor(Color.RED);---------->(1)
        dialog.setContentView(frameLayout);
        dialog.getWindow().setLayout(800, 800);
        ColorDrawable colorDrawable = new ColorDrawable();
        colorDrawable.setColor(Color.TRANSPARENT);
//                dialog.getWindow().setBackgroundDrawable(colorDrawable);--------->(2)
        dialog.show();
    }
Add TextView to FrameLayout and add FrameLayout as Dialog ContentView. The effect is as follows:
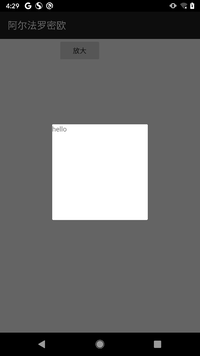
It can be seen that Dialog sets a background by default, which is a rectangle with rounded corners.
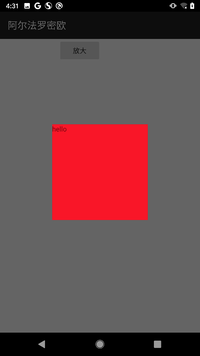
Now open the comment (1): set the FrameLayout background
The effects are as follows:
If you find that the fillet is gone, first find out which background the fillet background is?
Comment out (1), open (2) and set
colorDrawable.setColor(Color.RED);
The effects are as follows:
For no reason, there are more black areas in the outer layer.
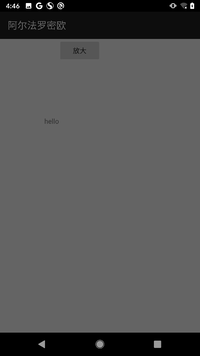
Change the background color to transparent:
colorDrawable.setColor(Color.TRANSPARENT);
When we look at the effect again, we find that the whole Dialog has no background.
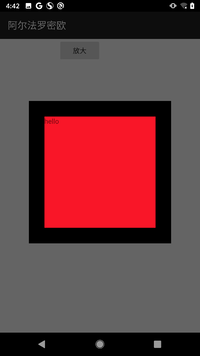
On this basis, open the comment (1), and the effect is as follows:
The above operations may be more convoluted. In fact, they want to express two:
1. The default background of Dialog is the background of DecorView (the default background of DecorView will set Padding in four directions. When the default background is removed, it will be found that the ContentView area becomes larger)
2. Generally speaking, do not change the Dialog background to ColorDrawable type. There will be a black background. Either change the background to transparent and set the background of contentView, or change the background to point to Shape.
There are two ways to set Dialog background:
//dynamic
    dialog.getWindow().setBackgroundDrawable(colorDrawable);

//static state
//Set style
    <style name="myDialog">
        <item name="android:windowBackground">@android:color/transparent</item>
    </style>
PopupWindow background settings
PopupWindow does not use Window, nor does it use DecorView as the RootView.
    private void showPopupWindow(Context context, View anchor) {
        TextView textView1 = new TextView(context);
        textView1.setText("heloo jj");
        PopupWindow popupWindow = new PopupWindow(textView1, 300, 300, true);
        ColorDrawable colorDrawable = new ColorDrawable();
//                colorDrawable.setColor(Color.GREEN);-------------->(1)
        popupWindow.setBackgroundDrawable(colorDrawable);
        popupWindow.showAsDropDown(anchor);
    }
Run the Demo above:

As you can see, PopupWindow has no background.
Open the comment (1) as follows:
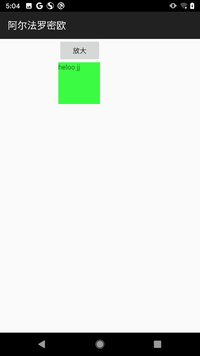
The background has been added.
What you want to say:
If the background is not set in PopupWindow, the background will be transparent.
When setting the PopupWindow background, a PopupBackgroundView will be generated as the root view of PopupWindow, and setting the PopupWindow background is to set the background of PopupBackgroundView
There are two ways to set PopupWindow background:
//dynamic
    popupWindow.setBackgroundDrawable(colorDrawable);

//static state
//Set style
    <style name="myPopupWindow">
        <item name="android:popupBackground">@color/green</item>
    </style>
Normal floating window background settings
If yes, add pop-up window directly through windowmanager.addview (view view, ViewGroup. Layoutparams, params).
You need to set the background of RootView, that is, the background of the view of the above method, otherwise the background will be black.
The suspended window has been analyzed many times. For more details, please move to:
Window/WindowManager must know
This article is based on Android 10.0