catalogue
I. three phases of Gradle construction project
1. Initialization phase of gradle construction project
(2) Related life cycle methods
2. Configuration phase of gradle construction project
3. Execution phase of gradle construction project
(2) Related life cycle methods
(2) Other ways to create a Task
(4) Execution sequence of tasks
III. buildSrc in Android Gradle
Fourth, guess the custom Task in build Execution problems in gradle
preface
stay Android Gradle plug-in development first battle We have tried how to customize a Gradle plug-in, but we still need to sort out some of the concepts involved. In addition, I think I can do a lot of things with Gradle plug-in, and I want to learn about it.
I. three phases of Gradle construction project
Gradle is a build tool, which is to turn the code into a common build tool for APK applications, such as ant and maven. In a new project we use Android Studio, we usually create a setting in the home directory Gradle file, a build Gradle file, there is a build.exe under each module Gradle file. So what are the functions of these documents?
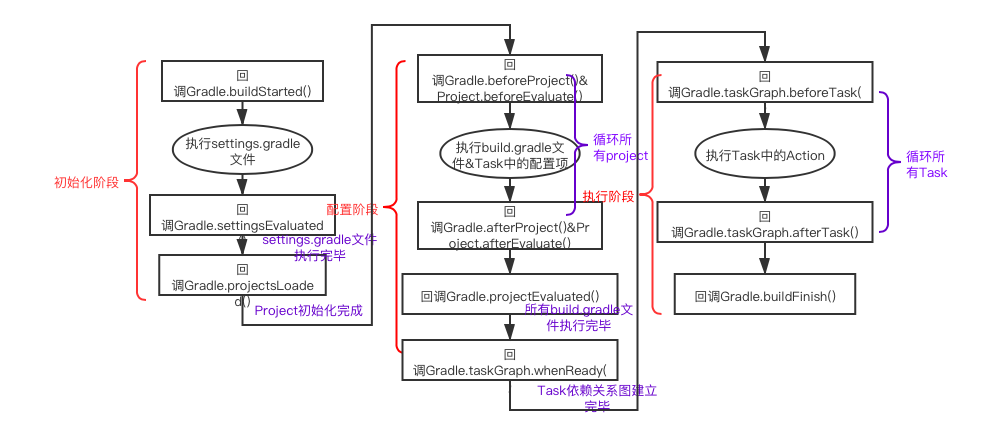
A Gradle needs to go through three stages when building a project:
- (1) Initialization phase: create Project object
- (2) Configuration phase: create tasks under Project
- (3) Execution phase: execute Task
Of course, Gradle provides some methods to monitor the process of Gradle's construction project and provide these Hook points for developers to modify the behavior in the construction process. However, the monitoring method must be called before the life cycle method call, otherwise the corresponding method will not be called at all. The callbacks of different methods corresponding to the above three stages are as follows:
Therefore, the listening events of the Gradle construction process need to be placed in settings In the Gradle file, the code is as follows:
//Monitoring the life cycle of Gradle needs to be placed in settings In Gradle, otherwise some methods cannot listen
this.gradle.addBuildListener(new BuildListener() {
    @Override
    void buildStarted(Gradle gradle) {
        println(prefix + "buildStarted ")
    }

    @Override
    void settingsEvaluated(Settings settings) {
        println(prefix + "settingsEvaluated ")
    }

    @Override
    void projectsLoaded(Gradle gradle) {
        println(prefix + "projectsLoaded Already completed Gradle Initialization phase of build")
        //Will call the corresponding this gradle. projectsLoaded{}
    }

    @Override
    void projectsEvaluated(Gradle gradle) {
        println(prefix + " projectsEvaluated Already completed Gradle Configuration phase of build")
    }

    @Override
    void buildFinished(BuildResult buildResult) {
        println(prefix + "buildFinished  Already completed Gralde Execution phase of the build")
    }
})
In addition, if you only want to listen to a life cycle method, you can directly call the method corresponding to the life cycle separately, as follows:
this.gradle.projectsLoaded {

}
For the monitoring of other processes, you can use {this gradle. Add the corresponding listener by addbuildlistener(), or call the corresponding listening function directly. Other monitoring methods include:
- org.gradle.api.execution.TaskExecutionGraphListener
- org.gradle.api.ProjectEvaluationListener
- org.gradle.api.execution.TaskExecutionListener
- org.gradle.api.execution.TaskActionListener
- .......
1. Initialization phase of gradle construction project
(1) Function
This stage is mainly to create a Project hierarchy and create a Project instance for each Module. How many Project instances are there in this Project? The relevant script is settings gradle. settings.gradle decides which projects will participate in the build. Check settings The contents under gradle are as follows:
rootProject.name = "AndroidPlugin"
include ':app'
include ':firstplugin'
Usually, the compiled and packaged module needs to be added to the file during Project development. Settings Gradle script corresponds to a settings object. In the initialization phase, an instance object of settings will be built, and corresponding Project instances will be created for each module under the instance.
(2) Related life cycle methods
At the end of the initialization phase, it will call back to projectsLoaded(gradle). At this time, after completing the initialization phase, you can get all the Project information, as follows:
this.gradle.allprojects {
    Project project ->
        println(prefix + " allprojects Project name =  "+project.name)
}
Sync the settings The gradle file can be seen from the output content that the Project instance information can be obtained only after the projectsLoaded(gradle) callback is completed. Before the previous life cycle method, the Project information can not be obtained.
<<<<<<settings.gradle<<<<<<<<<<< settingsEvaluated
<<<<<<<settings.gradle<<<<<<<<<<< projectsLoaded Already completed Gradle Initialization phase of build
<<<<<<<settings.gradle<<<<<<<<<<<  allprojects Project name =  AndroidPlugin
<<<<<<<settings.gradle<<<<<<<<<<<  allprojects Project name =  app
<<<<<<<settings.gradle<<<<<<<<<<<  allprojects Project name =  firstplugin
In addition, the settings returned in settingsEvaluated(Settings settings) are the settings Gradle file. In this method, you can get setting Gradle file to instance object settings.
2. Configuration phase of gradle construction project
(1) Function
This stage mainly completes the configuration of each Project and the task dependency diagram of each task, so that tasks can be executed according to this dependency in the execution stage.
In the initialization phase, each module has been initialized as a Project object, so in this phase, each build. Module is executed Various statements, closures and configuration segment statements of Task in gradle script.
- 1) Project root directory
There will be a build in the root directory of the project Gradle file, the code is as follows:
buildscript {
    //1. Download warehouse of the dependent plug-in library
    repositories {
        google()
        mavenCentral()
        maven{
            //maven local warehouse
            url uri('plugins')
        }
    }
    //2. Identify each gradle plug-in
    dependencies {
        classpath "com.android.tools.build:gradle:4.2.1"

        // NOTE: Do not place your application dependencies here; they belong
        // in the individual module build.gradle files
        classpath "com.wj.plugin:FirstPlugin:1.0.0"
    }
}

allprojects {
    //3. Public configuration of all modules under the Project
    repositories {
        google()
        mavenCentral()
        jcenter() // Warning: this repository is going to shut down soon
    }
}
    //4. Ad hoc tasks
task clean(type: Delete) {
    delete rootProject.buildDir
}
The main functions are:
1) Some projects rely on the download repository address of the required Gradle plug-in
2) Unique identification of the Gradle plug-in
3) Set some public configurations for all modules under the Project
4) Some specific tasks
Legacy problem: these specific tasks are executed by Android Gradle by default. What operation is executed? Because when executing the clean Task of the root directory, it is found that it is not actually executed.
- 2) Root directory of each Module
There will also be a build under each Module Gradle file, the general contents are as follows:
android {
    compileSdkVersion 30
    buildToolsVersion "30.0.3"

    defaultConfig {
       ......
    }
    ......
}


firstPluginConfig{
    sdkVersion '1.0.0'
}

dependencies {
 ......
}
The content is mainly about the configuration information of some projects under the current module:
1) For example, android {} is some closures to specify the compiled version of the project and other information;
2) firstPluginConfig is the configuration information in the custom Gradle plug-in;
3) The dependencies {} closure defines some dependencies of the Module, usually local dependencies, library dependencies and remote dependencies.
The project interface is build Gradle is the main API to interact with gradle, which can access all gradle functions. Because a build Gradle is a project instance, so in build Gradle can directly call relevant methods in project, such as
println(this.name)
This statement outputs the name of the Project instance in the same way as in a class that implements the plugin < Project > interface.
System.out.println("================"+project.name)2) Related life cycle methods
In this stage, the build.exe under each module will be executed circularly The gradle file will be called back to the projectsEvaluated(gradle) method after the entire configuration phase. In the whole process, you can listen to each build through the following methods The hook points of gradle before and after execution are as follows:
//Loop through each build Gradle to build task dependency graph
this.gradle.beforeProject {
    Project project ->
        println(prefix + "beforeProject Project name = " + project.name)
}

this.gradle.afterProject {
    Project project ->
        println(prefix + "afterProject Project name  = " + project.name)
}
Sync the settings The gradle file, which can be seen from the output content, will call back to the projectsEvaluated(gradle) method to complete the configuration phase of the whole Project after completing the configuration of all Project instances.
> Configure project :
<<<<<<<settings.gradle<<<<<<<<<<< beforeProject Project name = AndroidPlugin
<<<<<<<settings.gradle<<<<<<<<<<< afterProject Project name  = AndroidPlugin

> Configure project :app
<<<<<<<settings.gradle<<<<<<<<<<< beforeProject Project name = app
<<<<<<<settings.gradle<<<<<<<<<<< afterProject Project name  = app

> Configure project :firstplugin
<<<<<<<settings.gradle<<<<<<<<<<< beforeProject Project name = firstplugin
<<<<<<<settings.gradle<<<<<<<<<<< afterProject Project name  = firstplugin
<<<<<<<settings.gradle<<<<<<<<<<<  projectsEvaluated Already completed Gradle Configuration phase of build
At this time, you can output all the task s in the whole project. The code is as follows:
//Output all tasks in the task diagram
this.gradle.taskGraph.whenReady {
    List<Task> taskList = this.gradle.taskGraph.allTasks
    for (Task task : taskList) {
        println(prefix + " in graph of task  = " + task.name+" in project = "+task.getProject())
    }
}
This task will be output only when Android Studio executes build, if it is only sync settings Gradle file, you can't see the output of this content.
Remaining problems:
1. Make a bold guess when in build When defining tasks in gradle, there should be a dependency of running tasks. When customizing tasks, you need to add this execution order. This may be the reason why the Task customized in the project is not executed
2. But look at the problem in reverse: why does Android Studio automatically add build. In the project root directory clean under gradle can be executed, but tasks copied in the same way cannot be executed? And it is not in the taskGraph
Because there are many output contents, they are not listed here.
Of course, it can also be in each build Gradle listens to the configuration process of each Project separately, that is, in the build of each module Add the following code under gradle:
//Before configuration
this.beforeEvaluate {
    println("in build.gradle beforeEvaluate")

}
//After configuration
this.afterEvaluate {
    println("in build.gradle afterEvaluate ")

}
3. Execution phase of gradle construction project
(1) Function
This stage is mainly to execute the task task and complete the generation of the final goal. A Project can have multiple tasks, which can be interdependent. Task is the smallest unit of execution in Gradle. All tasks will be encapsulated in the Gradle plug-in. Of course, they can also be in build Task is directly defined in Gradle. For example, when creating an Android Project, it will be in build. In the root directory of the Project There is a clean task in Gradle, as follows
task clean(type: Delete) {
    delete rootProject.buildDir
}
Some contents of specific tasks are summarized in detail later. There are also some places where I haven't found the answer yet.
Remaining problems:
1. Why does AndroidStudio automatically add to build. In the root directory The clean in the gradle file can be in the taskGraph, but the custom task added in the same way cannot be executed
2. Is it necessary to specify the execution order of tasks when adding custom tasks?
(2) Related life cycle methods
This stage is the last stage in the whole process of Gradle construction project. It completes the final construction process and finally calls back to the buildFinished(BuildResult buildResult) method. Because each Task is executed in this stage, Gradle also provides corresponding listening methods and Hook points. The code is as follows:
this.gradle.taskGraph.beforeTask {
    Task task ->
        println(prefix + "beforeTask Task name = " + task.name)
}

this.gradle.taskGraph.afterTask {
    Task task ->
        println(prefix + "afterTask Task name = " + task.name)
}
When executing each Task, it will call back to these two methods. Simply list one. When Android Studio build project, the output content is as follows:
> Task :app:preDebugBuild UP-TO-DATE
<<<<<<<settings.gradle<<<<<<<<<<< beforeTask Task name = preDebugBuild
<<<<<<<settings.gradle<<<<<<<<<<< afterTask Task name = preDebugBuild
Of course, you can also listen to the execution process of a Task by adding an Action in each Task. The code is as follows:
task clean(type: Delete) {
    delete rootProject.buildDir
    doLast {
        println(prefix + " clean task do last")
    }
    doFirst {
        println(prefix + " clean task do first")
    }
}
Until all tasks are executed, finally call back to the buildFinished(BuildResult buildResult) method. Complete the entire Gradle build project process.
For relevant contents, you can directly view the relevant codes on github. The contents monitored in this life cycle are all in settings. In the root directory In gradle, the address of github: https://github.com/wenjing-bonnie/AndroidPlugin.git
II. Project in Gradle
I mentioned a setting Gradle is a Settings object, which determines which modules are added to the Project construction process through the Settings object; Each Module contains a build Gradle, a build Gradle is a Project, and the Project object is created through the Settings object.
1. Task s in project
A Project is essentially a collection of tasks. The TaskContainer in Project is a collection of tasks. Each Project is composed of a series of tasks in the construction process. Each Task is mainly to complete some specific tasks, such as compiling, packaging, publishing and so on.
(1) Define tasks
Can be directly in build Add task to gradle file as follows:
//Custom Task
task firstTask {
    println(prefix + "firstTask ")
}

task("secondTask") {
    println(prefix + "secondTask by (string) ")
}

task(thirdTask) {
    println(prefix + "thirdTask by () ")
}
firstTask, secondTask and thirdTask are the names of the Task.
The effect is the same as that in Project. Create a Task in the following way. The code is as follows:
    project.task("secondTaskInProject"){
            println("===== secondTaskInProject ==== ")
        }
The {secondTaskInProject is the name of the Task created.
(2) Other ways to create a Task
Of course, there are other ways to create custom tasks.
- (1) Inherit existing Task types, such as
task copyTask(type: Copy) {
    from 'copyTask.txt'
    into 'src/main'
    doLast {
        println(prefix + " Task of copy do last")
    }
    rename {
            //rename
        String fileName ->
            fileName = "copyTaskOk.txt"
    }
}
Copy is an existing Task that can complete the copy function. Of course, some operations such as filter, exclude and rename can also be added in this process.
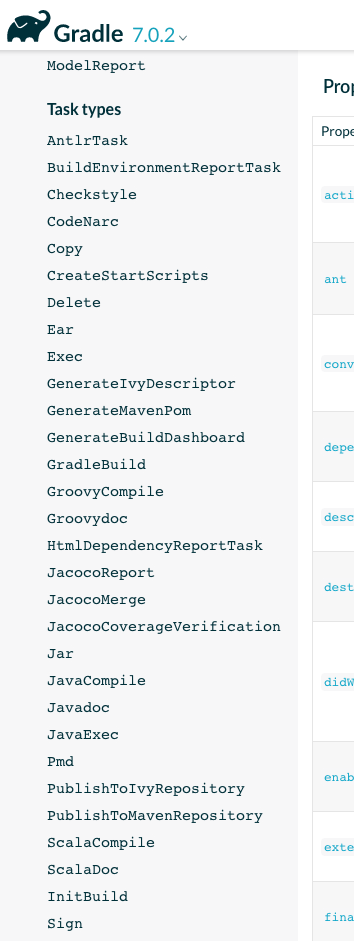
Other existing Task types include:
- 1) Sync: similar to Copy, except that when executing the Task, the source file will be copied to the target directory, and all non copied files in the target directory will be deleted, unless sync. Is specified Preserve {} to add matching rules to ensure that files that meet the matching rules are not deleted. The code is roughly as follows:
task syncTask(type: Sync) {
    from 'copyTask.txt'
    into 'src/main/synctest'
    preserve {
        //Keep the file from being overwritten
        exclude 'src/main/synctest/syncexist.txt'
    }
    doLast {
        println(prefix + "syncTask do last")
    }
}
If you want the contents under src/main/synctest not to be overwritten, use exclude to filter out the contents that cannot be overwritten and keep the contents that cannot be overwritten.
- 2) Zip: creates a zip archive file. The default file is zip
- 3) Delete: delete
- .......
For each Task type, please refer to the official API document: https://docs.gradle.org/current/dsl/org.gradle.api.Task.html . It can be linked from the left, as shown in the figure:
- (2) Directly inherit DefaultTask
public class FirstPluginConfigTask extends DefaultTask {
}
Then add it to Project in the following way.
- 1) Obtain the TaskContainer in the current Project through in Project
     //Get TaskContainer in current project
TaskContainer taskContainer = project.getTasks()- 2) Add Task to Project
    //create(): Creates a Task with the given name and adds it to this container.
        taskContainer.create("secondTaskInProject", {
            println("===== secondTaskInProject ==== ")
        })
Then through taskcontainer Create() adds the Task to the Project
FirstPluginConfigTask task = taskContainer.create("firstPluginConfig", FirstPluginConfigTask.class)Among them, FirstPluginConfigTask is a Task that inherits the DefaultTask, and "firstPluginConfig" is the name of the Task, which can be found in build Used directly in gradle.
(3)Action
In fact, the essence of a Task is a group of action objects in sequence. Action can be understood as a piece of code. You can add doFirst {} and doLast {} to the Task to start and end the action. Like in 3. Execution phase of gradle construction project Add doFirst {} and doLast {} for the Task of clean, and complete some event processing before and after the execution of clean.
task clean(type: Delete) {
    delete rootProject.buildDir
    doLast {
        println(prefix + "Android Studio auto add clean task do last")
    }
    doFirst {
        println(prefix + "Android Studio auto add clean task do first")
    }
}
You can usually add an Action by closing Closures.
(4) Execution sequence of tasks
stay The official document of Gradle introduces the API of Task There is a passage that attracts me, as follows
A task may have dependencies on other tasks or might be scheduled to always run after another task. Gradle ensures that all task dependencies and ordering rules are honored when executing tasks, so that the task is executed after all of its dependencies and any "must run after" tasks have been executed.
A Task may depend on other tasks or may be required to run after other tasks. Gradle ensures that the dependencies and sequence rules of these tasks are followed when executing these tasks, so that these tasks will be executed after the dependent tasks are executed or after the tasks "must be run".
So is this the answer to my previous questions? When each Task is executed, it is necessary to set the execution order.
Task provides the following methods to set dependencies or execution order:
- 1)BTask.dependsOn ATask: finish ATask first and execute bTask later;
- 2)BTask.mushRunAfter ATask: execute ATask first and bTask later
- 3)BTask.mushRunAfter ATask CTask.mushRunAfter ATask: execute in the order of atask, bTask and ctask
- 4)BTask. Shouldranafter ATask: finish ATask first and execute bTask later
2. Dependencies in project
There will also be some dependent libraries in a Project to make the Project run successfully. In order to successfully add a dependency library to the Project, the following four elements are generally required to work together.
(1)ConfigurationContainer
It is used to manage the grouping of dependent libraries. This Configuration item is used to group dependent libraries. Different dependent libraries can be run in different compilation environments, and each group of dependent libraries is a Configuration.
In build Gradle allows you to add a custom Configuration:
configurations {

}
The effect is the same as in Project. Obtain the ConfigurationContainer of the current Project through the following code:
ConfigurationContainer configurationContainer = project.getConfigurations()
There are some standard configurations in the Android Gradle plug-in, such as implementation, testImplementation, Android testImplementation, provider, and the previous compile, testCompile, Android testCompile, and so on.
This is reflected when we usually add dependencies to Android projects, usually as follows:
dependencies {

    implementation 'androidx.appcompat:appcompat:1.2.0'
    implementation 'com.google.android.material:material:1.2.1'
    implementation 'androidx.constraintlayout:constraintlayout:2.0.1'
    testImplementation 'junit:junit:4.+'
    androidTestImplementation 'androidx.test.ext:junit:1.1.2'
    androidTestImplementation 'androidx.test.espresso:espresso-core:3.3.0'
}
This means that different dependencies will be added to the project in different operating environments.
Remaining problems: how does the final embodiment correspond to Android studio to run this project???
(2)DependencyHandler
Define the class library on which to build the project.
In build The gradle file defines the class library that the project depends on through dependencies {}.
- 1) You can add remote dependencies. You need repositories {} to add corresponding warehouses
dependencies {
    //gradle sdk
    implementation gradleApi()
     //groovy sdk
    implementation localGroovy()
}
repositories {
    mavenCentral()
}- 2) You can add local dependency libraries, project, jar packages, native dependency libraries, etc
dependencies {
    compile fileTree(dir: 'libs', include: ['*.jar'])
    implementation project(':libs:WidgetLibrary')
    implementation files('libs/xxxxx.jar')
}
The effect is the same. In Project, you can manage these dependent libraries through DependencyHandler.
DependencyHandler dependencyHandler = project.getDependencies()
(3) RepositoryHandler
Define the warehouse of the added dependent library. It can be a local warehouse or a remote warehouse
In build In gradle, repositories {} are used to add repositories that depend on libraries. The methods are as follows:
repositories {
     //maven remote warehouse
    mavenCentral()
     //maven local warehouse
    maven{
        url uri('plugins')
     }
}
The effect is the same. In Project, you can manage dependent warehouses through repository handler
RepositoryHandler repositoryHandler = project.getRepositories()
(4)ArtifactHandler
Define a method of publishing Gradle plug-ins, such as jar or pom.
Before in Android Gradle plug-in development first battle Medium 4. Plug in release It uses maven to publish the plug-in, that is, publish the plug-in to maven warehouse.
And now it's through building In Gradle, configure the way that the Gradle plug-in is packaged into a jar package through artifacts {}. The code is as follows:
//====Method 1: package into Jar package begin
def marvenjar = 'mavenjar'
//The default name is [archivebasename] - [archiveappendix] - [archiveversion] - [archiveclassifier] [archiveExtension]
task makeJar(type: org.gradle.jvm.tasks.Jar) {
    //Delete previously created folders
    delete marvenjar
    archiveBaseName = "firstplugin"
    archiveAppendix = "appendix"
    //Why doesn't it work??
    archiveVersion = '1.0.0'
    archiveClassifier = 'classifiter'
    //Extension. The default is jar
    //archiveExtension = "extension"
    doLast {
        println "=== task jar is finished ==="
    }
}

artifacts {
    //Regard firstPluginJar as an artifact and hand it over to archives for management
    archives makeJar
}

uploadArchives {
    repositories {
        maven {
            //In build Generate Maven jar folder under the same level directory of gradle
            url "file:" + marvenjar
        }
    }
}
Finally, through the gradle plug-in of Android studio and uploadArchives, it will be in build Generate the corresponding [archivebasename] - [archiveappendix] - [archiveversion] - [archiveclassifier] in the mavenjar folder under the same level directory of gradle [archiveextension] jar package named as.
Legacy problem: archiveVersion doesn't know why it doesn't work. The generated name is unspecified
Relevant codes have been uploaded to https://github.com/wenjing-bonnie/AndroidPlugin.git . Specifically, it corresponds to androidplugin / firstplugin / build Gradle related code.
The effect is the same as that in Project. You can configure the publishing method of Gradle plug-in through ArtifactHandler.
ArtifactHandler artifactHandler = project.getArtifacts()
III. buildSrc in Android Gradle
stay Android Gradle plug-in development first battle In, we customize a Gradle plug-in of "com.wj.firstplugin" by creating a new Module, but each time we modify the content of the Gradle plug-in in this way, we need to publish it through the uploadArchives of the Gradle tool, Android Gradle provides a more convenient way to customize some Gradle plug-ins with special functions during the construction of the project:
When Android Gradle builds a project, it will first detect whether there is a buildSrc directory in the root directory, and gradle will automatically compile and detect the code in it and put the relevant build Gradle is added to the build script of the project.
Therefore, for this special setting, we can create the buildSrc directory in the root directory of the project, and can only create the folder in the root directory of the project, and then create the groovy folder, resources folder and build Gradle file (ignore other folders and files in it, which are generated during the construction process).
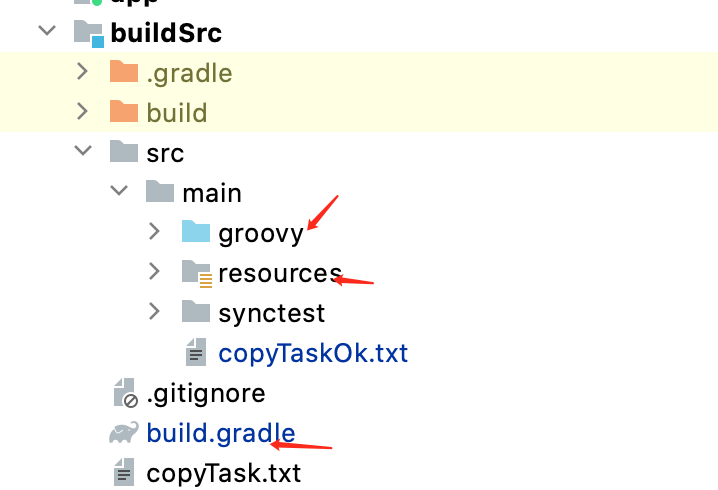
In addition, buildSrc has been defaulted to a fixed Module and does not need to be added to settings In the gradle file.
Under this groovy directory and Android Gradle plug-in development first battle Medium 3, Custom Gradle plugin By adding the relevant code of the corresponding custom Gradle plug-in, you don't need to publish. You can realize the function of the Gradle plug-in only through the build of Android Studio.
The specific code has been uploaded to https://github.com/wenjing-bonnie/AndroidPlugin.git The contents of the buildSrc directory.
Fourth, guess the custom Task in build Execution problems in gradle
Guess what's ahead 3. Execution phase of gradle construction project Why is it mentioned in build Reason why custom tasks in gradle are not executed: it is tentatively considered that the dependency of tasks needs to be set.
Because when you add custom copyTask and syncTask in buildSrc, you add
assemble.dependsOn copyTask
assemble.dependsOn syncTask
Then it is found that in the process of Android Studio build, copyTask and syncTask have been added to the task queue, and the corresponding task contents have been successfully executed.
> Configure project :buildSrc
> Task :buildSrc:copyTask
~~~~~~GlobalGradleProject~~~~~~~~ Task of copy do last

> Task :buildSrc:compileJava NO-SOURCE
> Task :buildSrc:compileGroovy UP-TO-DATE
> Task :buildSrc:processResources UP-TO-DATE
> Task :buildSrc:classes UP-TO-DATE
> Task :buildSrc:jar UP-TO-DATE
> Task :buildSrc:generateSourceRoots UP-TO-DATE

> Task :buildSrc:syncTask
~~~~~~GlobalGradleProject~~~~~~~~syncTask do last

> Task :buildSrc:assemble
> Task :buildSrc:compileTestJava NO-SOURCE
> Task :buildSrc:compileTestGroovy NO-SOURCE
> Task :buildSrc:processTestResources NO-SOURCE
> Task :buildSrc:testClasses UP-TO-DATE
> Task :buildSrc:test SKIPPED
> Task :buildSrc:check SKIPPED
> Task :buildSrc:build
Remaining problems:
1. Why can't "copyTask. Dependson assembly" work? Can't you execute the assembly first and then the copyTask?
2. And why are the two execution sequences not next to each other? Why is syncTask behind several tasks?
3. If you don't rely on existing tasks in this way, how can you execute custom tasks?
Via dependsOn(ATask,BTask,CTask,...) To make atask, bTask and ctask execute in order.
4. Why does AndroidStudio automatically build. In the root directory The clean Task generated by gradle can be executed automatically. On the contrary, adding other tasks in the root directory cannot be executed? And changing the name of clean can't be executed?
Of course, two tasks can be executed in order through the following methods, but you still need to rely on existing tasks. The code is as follows:
this.afterEvaluate {
    tasks.matching {
        Task task->
            task.name.equals("compileJava")
    }.each {
        Task task ->
            println(prefix + " afterEvaluate task name = " + task.name)
            task.dependsOn(copyTask, syncTask)
    }
}
During the Android Studio build process, it is found that the} copyTask and syncTask are also added to the task queue, and the corresponding tasks are also being executed, as follows:
> Configure project :buildSrc
~~~~~~GlobalGradleProject~~~~~~~~ afterEvaluate task name = compileJava

> Task :buildSrc:copyTask UP-TO-DATE
> Task :buildSrc:syncTask UP-TO-DATE
> Task :buildSrc:compileJava NO-SOURCE
> Task :buildSrc:compileGroovy UP-TO-DATE
> Task :buildSrc:processResources UP-TO-DATE
> Task :buildSrc:classes UP-TO-DATE
> Task :buildSrc:jar UP-TO-DATE
> Task :buildSrc:assemble UP-TO-DATE
> Task :buildSrc:compileTestJava NO-SOURCE
........
This is to add copyTask and syncTask to the task queue after the buildSrc Project is configured.
V. summary
- 1.Gradle construction project mainly has three processes: initialization stage, configuration stage and execution stage;
- 2.Gradle provides some life-cycle methods to monitor the whole construction process, which can be directly through gradle Directly call the corresponding life cycle method;
- The monitoring of 3.Gradle's life cycle method needs to be called before the corresponding monitoring method is invoked, otherwise the corresponding method will not be invoked. Therefore, if you want to monitor the whole life cycle method, you must be in settings Set listening in gradle file;
- 4. In the initialization stage, it mainly completes the hierarchy of the whole Project and generates corresponding Project instances for each Module. After completion, it will call back to this gradel. Projectsloaded(), you can use this gradle. Allprojects {} get the Project object generated for each Module under the Project;
- 5. In the configuration phase, it is mainly based on the build. Under each module Gradle completes the configuration under the module and the dependency diagram of the Task
- (1) Each build The gradle configuration process will call back to this gradle. Beforeproject {} and this gradle. afterProject{}
- (2) Of course, it can also be in build Listen to the process in the gradle file and call back to this Beforeevaluate {} and this afterEvaluate {}
- (3) Build. In all module s After gradle completes configuration, it will call back to this gradle. projectsEvaluated{}
- (4) After this stage is completed, you can use this gradle. taskGraph. Whenready {} gets all the tasks
- 6. In the execution phase, all tasks are executed, and this will be executed when each Task is executed gradle. taskGraph. Beforetask {} and this gradle. taskGraph. afterTask {}. Of course, you can also listen through doFirst {} and doLast {} in the Task
- 7. A setting Gradle file corresponds to a Settings object, and each build Gradle file corresponds to a Project object, and each Project is composed of a series of tasks, while a Task is composed of Action;
- 8. When building a project, Android studio will first detect whether the root directory of the project contains buildSrc directory by default, which is also the first build processed in the construction process Gradle. You can customize the Gradle plug-in with specific functions in this directory.
I feel that after combing for a few days, I seem to have a little understanding of the Gradle construction project, but I still need to continue to study. There are still a lot of contents to understand, such as how to execute the custom tasks in the remaining problems in the whole process, such as what the tasks displayed in the Gradle tool of Android Studio do.....
come on.