Introduction to the basic dble architecture
dble is a highly available and scalable distributed middleware based on mysql.The River Laker sent the nickname MyCat Plus. Open source address
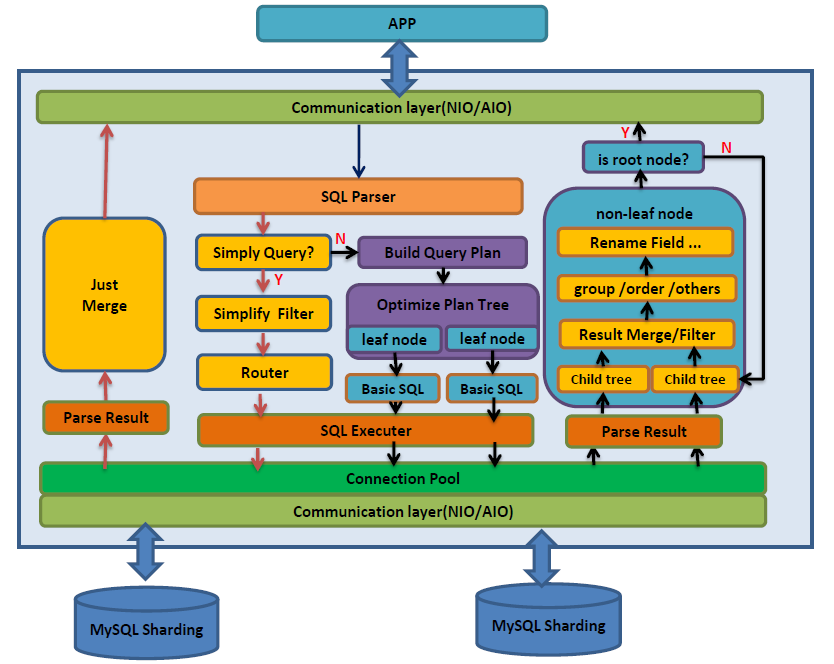
Let's start with the architecture diagram, where external applications are connected via NIO/AIO.First, let's talk about what NIO/AIO is.
- BIO, the traditional Blocking I/O, was the only option before JDK1.4.Synchronous blocking I/O mode with low concurrent processing power.
- NIO, also known as Non-Blocking I/O, is a new feature released after JDK1.4 to synchronize non-blocking mode.
- AIO, also known as Asynchronous I/O, was not supported until JDK version 1.7 and is an asynchronous, non-blocking I/O model.
You can see that after the application is launched, it first passes NIO operations to the SQL Parse layer for resolution.SQL parses production execution plans and routes them down to the underlying MySQL Sharing databases for execution, which is also accomplished through NIO/AIO.After each database at the bottom level is executed, it returns to the middle level for merging, filtering, grouping, sorting, and so on, and finally returns to the client.
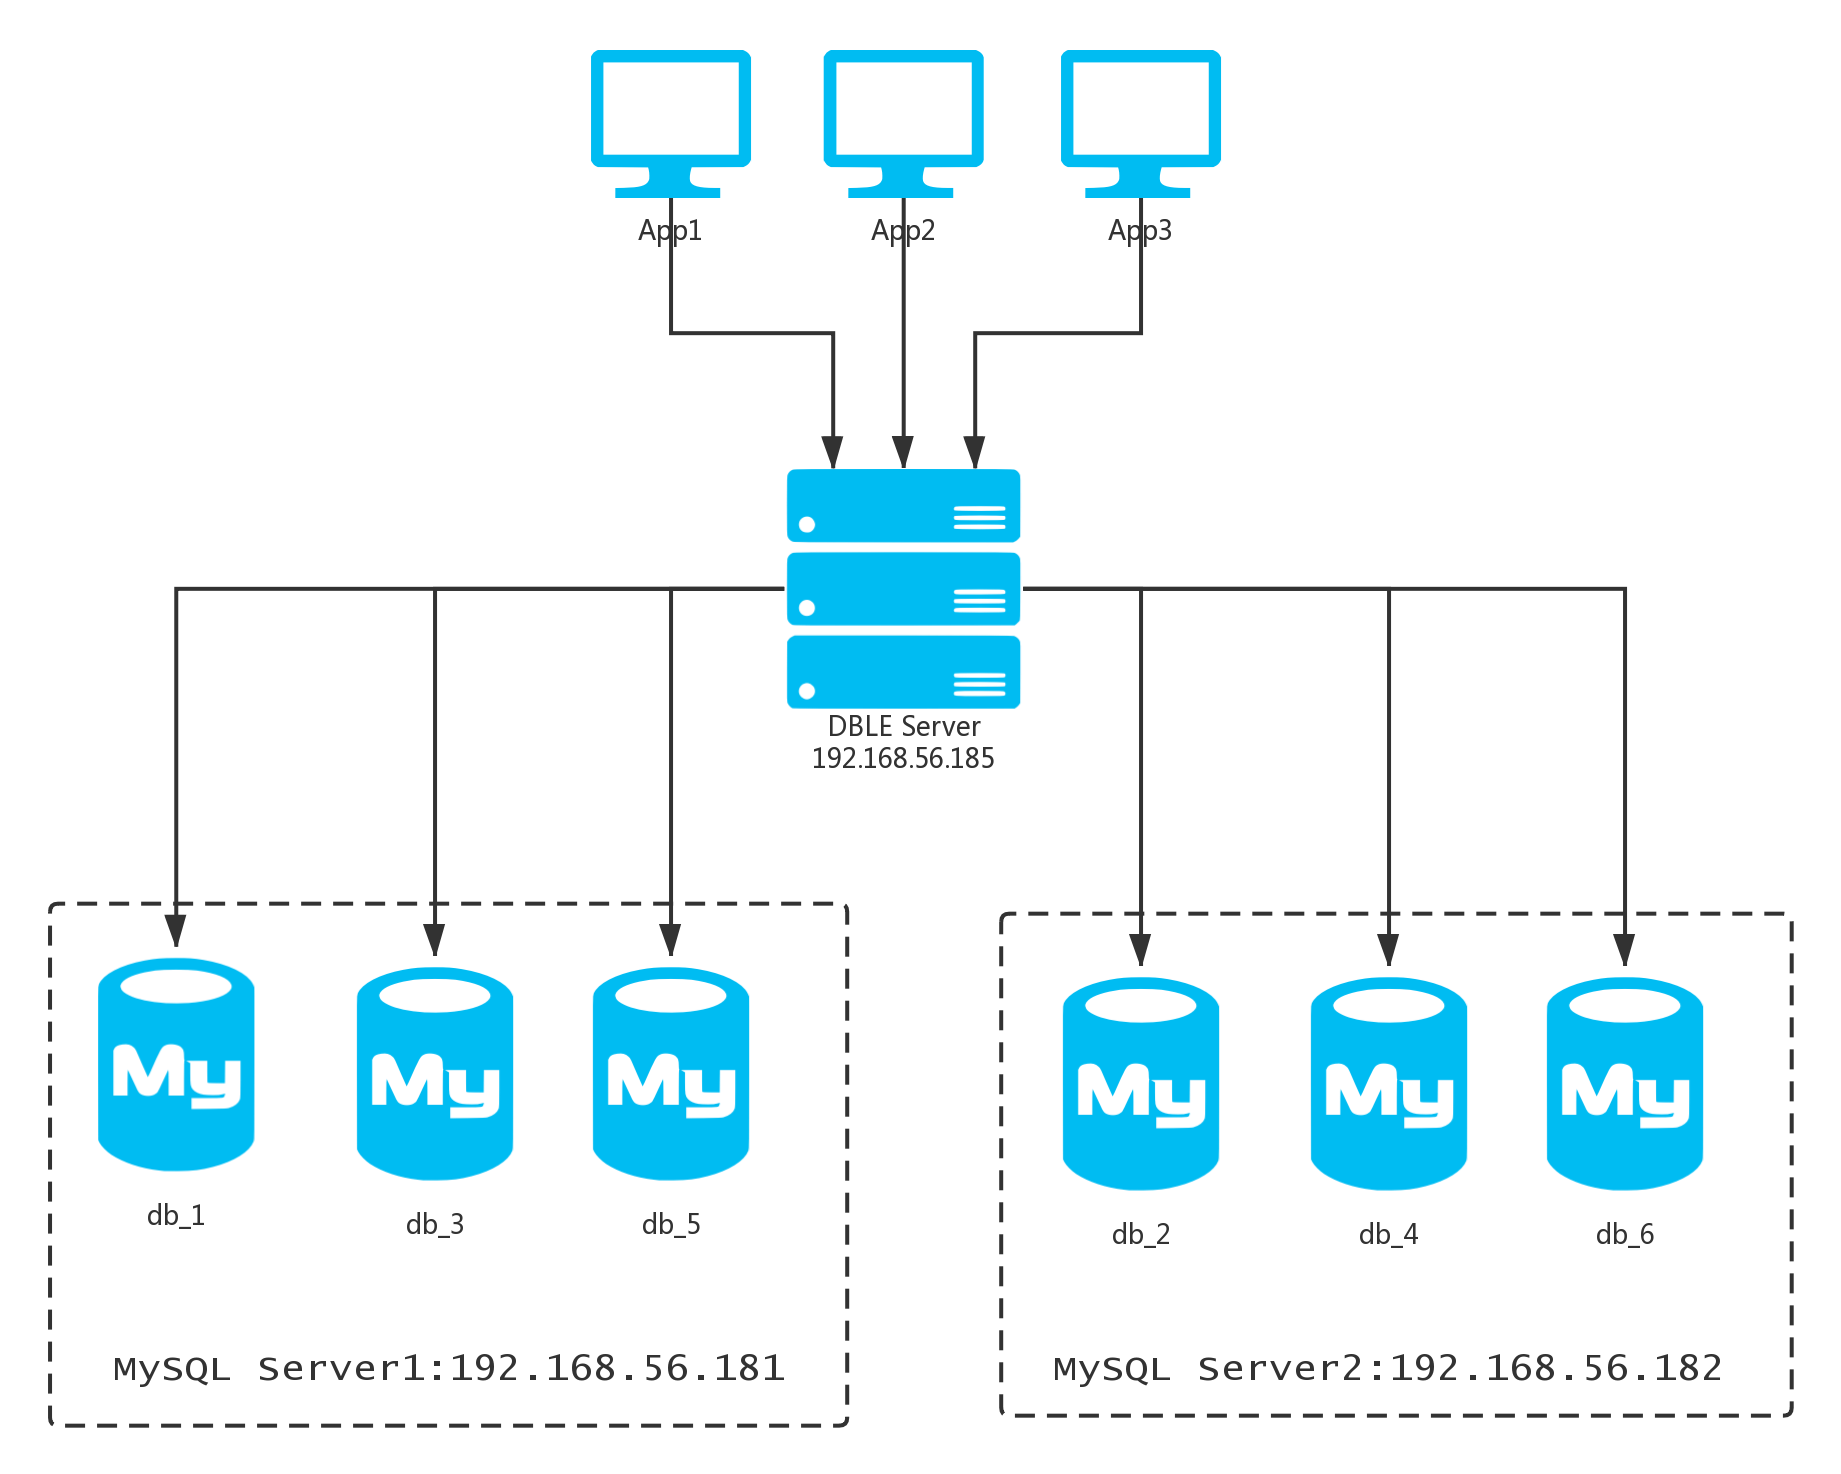
Once we know the basic architecture, we can build it quickly.Download first: DBLE Download Address , the latest version is 2.19.09.0, here you choose to download actiontech-dble-2.19.09.0.tar.gz.Our fast build environment and IP are as follows:
| The server | IP Address | describe |
|---|---|---|
| DBLE Server | 192.168.56.185 | DBLE instance, database middleware, responsible for receiving SQL for routing distribution |
| MySQL A Server | 192.168.56.181 | Physical Instance A, will create db1,db3,db5 three schema s |
| MySQL B Server | 192.168.56.182 | Physical Instance B, which will create db2, db4, db6schema s |
Quick installation of dble
1. You first need to configure the environment variables for JAVA1.8 on the dble Server server.
JDK1.8 is installed by default in CentOS 7 and needs to be installed if not.Configure the environment where our system is already installed.
export JAVA_HOME=/etc/alternatives/jre_1.8.0_openjdk
PATH=$PATH:$HOME/bin:$JAVA_HOME/bin

[root@mycat bin]# java -version
openjdk version "1.8.0_161"

OpenJDK Runtime Environment (build 1.8.0_161-b14)
OpenJDK 64-Bit Server VM (build 25.161-b14, mixed mode)
2. Create installation directory and unzip files on the dble Server server
Upload the installation media actiontech-dble-2.19.09.0.tar.gz to the dble server.
cd /tmp
tar -xvf actiontech-dble-2.19.09.0.tar.gz
mkdir -p /dble
cd /tmp/dele
mv * /dble
cd /dble/conf
Next you need to copy the three template files for modification.Here is a brief description of the functions of the following three files:
| File Name | Effect |
|---|---|
| rule.xml | Define fragmentation rules |
| schema.xml | Define specific slicing, define the relationship between tables and schema s, and dataNode, specify which type of slicing method each table will use, define the connection information for each dataNode, and so on. |
| server.xml | Definition of dble server related parameters, including dble performance, timed tasks, ports, user configuration |
cp -rp server_template.xml server.xml
cp -rp schema_template.xml schema.xml
cp -rp rule_template.xml rule.xml
3. Configure root users on two MySQL servers
In order to install quickly, two MySQL Server s are required to grant root the relevant operational privileges to log on remotely.
MariaDB [(none)]> GRANT ALL PRIVILEGES ON *.* TO 'root'@'%' IDENTIFIED BY '123456' WITH GRANT OPTION;
Query OK, 0 rows affected (0.000 sec)

MariaDB [(none)]> flush privileges;
Query OK, 0 rows affected (0.000 sec
4. Configure the schema.xml file on the dble server, mainly modifying the following
Here the dataHost is the node name.We have two sets of servers, we need to configure the IP address of the related writeHost, then Mysql's username and password (for simplicity and convenience, use root temporarily here).
<dataHost name="dataHost1" maxCon="1000" minCon="10" balance="0" switchType="-1" slaveThreshold="100">
    <heartbeat>show slave status</heartbeat>
    <!-- can have multi write hosts -->
    <writeHost host="hostM1" url="192.168.56.181:3306" user="root" password="123456">
    </writeHost>
</dataHost>
<dataHost name="dataHost2" maxCon="1000" minCon="10" balance="0" switchType="-1" slaveThreshold="100">
    <heartbeat>show slave status</heartbeat>
    <!-- can have multi write hosts -->
    <writeHost host="hostM2" url="192.168.56.182:3306" user="root" password="123456">
    </writeHost>
</dataHost>
5. Start dble
Here you can start the program by using the dble command. After starting, you can view wrapper.log and show that Server startup successfully started successfully.
[root@mycat logs]# dble start
Starting dble-server...

---->wrapper.log Journal
STATUS | wrapper  | 2019/12/17 23:25:25 | --> Wrapper Started as Daemon
STATUS | wrapper  | 2019/12/17 23:25:25 | Launching a JVM...
INFO   | jvm 1    | 2019/12/17 23:25:26 | Wrapper (Version 3.2.3) http://wrapper.tanukisoftware.org
INFO   | jvm 1    | 2019/12/17 23:25:26 |   Copyright 1999-2006 Tanuki Software, Inc.  All Rights Reserved.
INFO   | jvm 1    | 2019/12/17 23:25:26 |
INFO   | jvm 1    | 2019/12/17 23:25:28 | Server startup successfully. dble version is [5.6.29-dble-2.19.09.0-fd62e7a27a561169acabc11df32b2f0d13a0b922-20191121135714]. Please see logs in logs/dble.log
6. Log on for verification
Next, we can use the root user to log on to the middleware host in the 192.168.56.185 database for management.Log in remotely from the 181 host because Mysql client is not installed on 185.
[root@mysql5 ~]# mysql -uroot -p -P8066 -h192.168.56.185 -p123456
Welcome to the MariaDB monitor.  Commands end with ; or \g.
Your MySQL connection id is 2
Server version: 5.6.29-dble-2.19.09.0-fd62e7a27a561169acabc11df32b2f0d13a0b922-20191121135714 dble Server (ActionTech)

Copyright (c) 2000, 2018, Oracle, MariaDB Corporation Ab and others.

Type 'help;' or '\h' for help. Type '\c' to clear the current input statement.

MySQL [(none)]> show databases;
+----------+
| DATABASE |
+----------+
| testdb   |
| testdb2  |
+----------+
2 rows in set (0.002 sec)
MySQL [(none)]> use testdb;
Database changed
MySQL [testdb]> show tables;
Empty set (0.002 sec)
7. Create data slices
In the schema.xml file we previously configured, we had the following default configuration.The file is configured with six data slices corresponding to six schemas in different instances of different hosts.
<!-- <dataNode name="dn1$0-743" dataHost="dataHost1" database="db$0-743" /> -->
<dataNode name="dn1" dataHost="dataHost1" database="db_1"/>
<dataNode name="dn2" dataHost="dataHost2" database="db_2"/>
<dataNode name="dn3" dataHost="dataHost1" database="db_3"/>
<dataNode name="dn4" dataHost="dataHost2" database="db_4"/>
<dataNode name="dn5" dataHost="dataHost1" database="db_5"/>
<dataNode name="dn6" dataHost="dataHost2" database="db_6"/>
At this point we need to manage the account.Open the server.xml file.Find the user here.The first user defined is the administrative user.There is also the beginning port configuration, the default administrative port is 9066.
<user name="man1">
        <property name="password">654321</property>
        <property name="manager">true</property>
        <!-- manager user can't set schema-->
</user>

<!--<property name="serverPort">8066</property> -->
<!--<property name="managerPort">9066</property> -->
You can execute administrative commands by logging in on ports man1 and 9066, where we create fragments as planned by dataNode in schema.xml.This is a convenient place to create and support the writing of dn$1-n.
[root@mysql5 ~]# mysql -uman1 -p -P9066 -h192.168.56.185 -p654321
Welcome to the MariaDB monitor.  Commands end with ; or \g.
Your MySQL connection id is 3
Server version: 5.6.29-dble-2.19.09.0-fd62e7a27a561169acabc11df32b2f0d13a0b922-20191121135714 dble Server (ActionTech)

Copyright (c) 2000, 2018, Oracle, MariaDB Corporation Ab and others.

Type 'help;' or '\h' for help. Type '\c' to clear the current input statement.

MySQL [(none)]> create database @@dataNode='dn$1-6';
Query OK, 1 row affected (0.049 sec)
Next we can log in to MySQL A to verify.In instance A, we can see that schema db_1,db_3,db_5 were created.Configuration results are consistent with those in our schema.xml file.
[root@mysql5 ~]# mysql -uroot -S /tmp/mysql.sock1 -p
Enter password:
Welcome to the MariaDB monitor.  Commands end with ; or \g.
Your MariaDB connection id is 190
Server version: 10.3.17-MariaDB MariaDB Server

Copyright (c) 2000, 2018, Oracle, MariaDB Corporation Ab and others.

Type 'help;' or '\h' for help. Type '\c' to clear the current input statement.

MariaDB [(none)]> show databases;
+--------------------+
| Database           |
+--------------------+
| db_1               |
| db_3               |
| db_5               |
| information_schema |
| mysql              |
| performance_schema |
| test               |
+--------------------+
7 rows in set (0.001 sec)
8. Create test tables
Below dble's conf directory is a configuration file called template_table.sql, which is provided to us to test some test cases.Since MySQL service is not installed on 192.168.56.185, both management port 9066 and service port 8066 are actually Java listening, we need to scp this file to 192.168.56.181 first.Use MySQL program on 181 to connect 185 remotely.
[root@mycat conf]# ps -ef | grep mysql
root      3670  1287  0 00:28 pts/0    00:00:00 grep --color=auto mysql
[root@mycat conf]# netstat -anp | grep 8066
tcp6       0      0 :::8066                 :::*                    LISTEN      3432/java
[root@mycat conf]# netstat -anp | grep 9066
tcp6       0      0 :::9066                 :::*                    LISTEN      3432/java
[root@mycat conf]# scp template_table.sql root@192.168.56.181:/root

---Log on to 181 and execute the script on connection management port 8066.
[root@mysql5 ~]# mysql -uroot -p -P8066 -h192.168.56.185 -p123456
Welcome to the MariaDB monitor.  Commands end with ; or \g.
Your MySQL connection id is 4
Server version: 5.6.29-dble-2.19.09.0-fd62e7a27a561169acabc11df32b2f0d13a0b922-20191121135714 dble Server (ActionTech)

Copyright (c) 2000, 2018, Oracle, MariaDB Corporation Ab and others.

Type 'help;' or '\h' for help. Type '\c' to clear the current input statement.

MySQL [(none)]> source /root/template_table.sql

---Once created, you can log in to testdb When you query the tables created, you can see the types of tables, which have global tables and sliced tables.
MySQL [testdb]> use testdb;
Database changed
MySQL [testdb]> show all tables;
+----------------------+----------------+
| Tables_in_testdb     | Table_type     |
+----------------------+----------------+
| tb_child1            | SHARDING TABLE |
| tb_child2            | SHARDING TABLE |
| tb_child3            | SHARDING TABLE |
| tb_date              | SHARDING TABLE |
| tb_enum_sharding     | SHARDING TABLE |
| tb_global1           | GLOBAL TABLE   |
| tb_global2           | GLOBAL TABLE   |
| tb_grandson1         | SHARDING TABLE |
| tb_grandson2         | SHARDING TABLE |
| tb_hash_sharding     | SHARDING TABLE |
| tb_hash_sharding_er1 | SHARDING TABLE |
| tb_hash_sharding_er2 | SHARDING TABLE |
| tb_hash_sharding_er3 | SHARDING TABLE |
| tb_hash_string       | SHARDING TABLE |
| tb_jump_hash         | SHARDING TABLE |
| tb_mod               | SHARDING TABLE |
| tb_parent            | SHARDING TABLE |
| tb_pattern           | SHARDING TABLE |
| tb_range_sharding    | SHARDING TABLE |
| tb_single            | SHARDING TABLE |
| tb_uneven_hash       | SHARDING TABLE |
+----------------------+----------------+
21 rows in set (0.002 sec)

---Next you can use explain To view the execution of the slice table.I don't have a conditional query here tb_mod,You can see that broadcasts are used sql,Four slices are scanned.Why are there four slices? Here we need to see schema.xml Definition of table in.
<table name="tb_mod" dataNode="dn1,dn2,dn3,dn4" rule="rule_mod"/>[DBLE Download Address](https://github.com/actiontech/dble/releases),
MySQL [testdb]> explain select * from tb_mod;
+-----------+----------+----------------------+
| DATA_NODE | TYPE     | SQL/REF              |
+-----------+----------+----------------------+
| dn1       | BASE SQL | select * from tb_mod |
| dn2       | BASE SQL | select * from tb_mod |
| dn3       | BASE SQL | select * from tb_mod |
| dn4       | BASE SQL | select * from tb_mod |
+-----------+----------+----------------------+
4 rows in set (0.006 sec)
//If I query id=2, I will query through the fragment key, here is the modularization algorithm, and 2 is placed on the dn3 fragment.
MySQL [testdb]> explain select * from tb_mod where id=2;
+-----------+----------+---------------------------------+
| DATA_NODE | TYPE     | SQL/REF                         |
+-----------+----------+---------------------------------+
| dn3       | BASE SQL | select * from tb_mod where id=2 |
+-----------+----------+---------------------------------+
1 row in set (0.054 sec)
Concluding remarks:
dble is still a good installation, but its concept and configuration xml are a bit cumbersome.You need to be careful.
Reference Documents
1.dble Micro Class https://opensource.actionsky.com/20191125-dble/\
2. Quick Start Guide for Open Source Distributed Middleware DBLE https://www.jianshu.com/p/cd5911058c