Continued [basic knowledge] basic knowledge of RMAN - Part1
Use two articles to sort out the contents learned before and do the experiment again. There are both commonly used and not commonly used. There are many points that can be deeply dug. We'll do it later
1, Configure backup set - backup slice - compression - Encryption
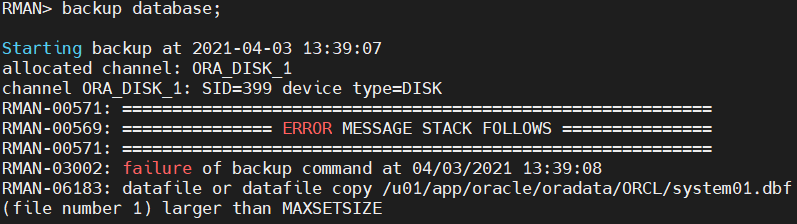
1. Configure the maximum backup set size
configure maxsetsize to 500m;
configure maxsetsize clear;
If the backup is greater than the set value, you will be prompted that the backup is unsuccessful. Generally speaking, the maximum size of the backup set will not be set
2. Configure the maximum size of the backup slice
configure channel device type disk maxpiecesize 500m;
3. duplex backup as like as two peas in the backup will produce two identical backup sets.
configure datafile backup copies for device type disk to 2;
configure datafile backup copies for device type disk clear;
4. Some tablespaces can be excluded when backing up the whole database
configure exclude for tablespace sysaux;

--The following backup will not be affected by the configuration. It is assumed that no backup has been configured sysaux Table space, but if you use this statement to back up, it will not be affected by the configuration
backup database noexclude;
5. Configure compression
RMAN supports pre compression and binary compression of backup sets
Pre compression block processing: better backup compression is achieved by merging the free space in each data block and setting the changed free space to binary 0
--Enable compression
configure device type disk backup type to compressed backupset;

--Set the compression level and select high During backup CPU High occupancy
configure compression algorithm 'BASIC|HIGH|MEDIUM|LOW'
2, Configure backup encryption
- Password encryption mode
- Transparent encryption mode (wallet)
- blend
The encryption algorithm can be through v$rman_encryption_algorithms view, default AES128.
RMAN encrypts CPU intensive operations, which may affect backup performance.
1. Password encryption mode
--Turn on settings,Set password to oracle
set encryption on identified by "oracle" only;

--Backup data file No. 4
backup datafile 4;

--If there is no decryption, an error will be reported when trying to recover
--Decrypt with password
set decryption identified by "oracle";

--Recover data file 4
restore datafile 4;
recover datafile 4;
alter database open;

--You can take the backup set to another machine for recovery, as long as the password is specified correctly.
2. Transparent encryption mode wallet
It can be automatically encrypted during backup and decrypted during restore
- Create wallet directory
mkdir -p /u01/app/oracle/admin/prod/wallet
- Secret key setting
alter system set encryption key identified by "oracle";
- Opening and closing wallet s
--Close Wallet:
alter system set wallet close identified by "oracle";

--Open your wallet:
alter system set wallet open identified by "oracle";
4. Others
--Turn on encryption
configure encryption for database on;
When this backup is restored locally, there is no need to enter a password, and wallet automatically decrypts and encrypts it.
Copy the backup set to another machine and cannot be recovered.
3. Mixed mode
It can be restored on the local machine or on a different machine (rarely used, no experiment)
--After the simple password mode, there will be only,Remove it here
set encryption on identified by "oracle";

set decryption identified by "oracle";

--Open your wallet
alter system set wallet open identified by "oracle";
3, Perform database recovery
Premise: 1 The database must be in archive mode; 2. Have RMAN backup
Recovery scenario 1
How to use RMAN to restore the database to normal operation after losing one or more data files.
Scenario:
- Delete the data files corresponding to the undo, system and users tablespaces
- Control files, redo files, parameter files and temporary files are not considered
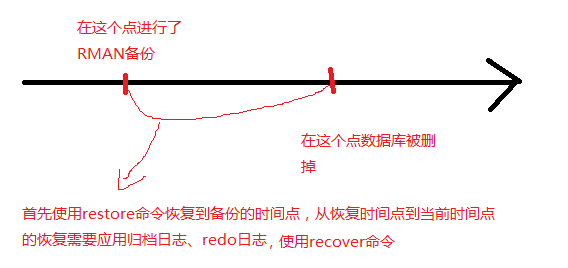
Recovery steps:
--close database,The files have been deleted immediate Definitely not
shutdown abort

--Start to mount Status, the backup information is stored in the control file
startup mount

--View instance status
select status from v$instance;

--land RMAN,implement restore Recover deleted physical files
restore database;
restore datafile '/xxxx/xx/dbf'
restore datafile 1;

--Overall recovery, application log
recover database;
recover datafile xxx;

--Open database
alter database open;

--If used run block
RMAN>run{
  restore database;
  recover database;
}
SQL>alter database open;

--If the original location of the data file is full,Recovery does not want to recover to this location
--Original location:/u01/app/oracle/oradata/prod
--New location:/u01/app/oracle/oradata/prod2
--use set newname Change the information in the control file
run{
  set newname for datafile 1 to '/u01/app/oracle/oradata/prod2/system01.dbf';
  set newname for datafile 2 to '/u01/app/oracle/oradata/prod2/sysaux01.dbf';
  set newname for datafile 3 to '/u01/app/oracle/oradata/prod2/undotos01.dbf';
  set newname for datafile 4 to '/u01/app/oracle/oradata/prod2/users01.dbf';
  restore database;
  switch datafile all;  --Change the information in the control file
  recover database;
}
alter database open;
Recovery scenario 2
If the data of a table is deleted by mistake, it is required to recover to a certain time point before deleting the data
--Close database and start to mount state
shutdown immediate
startup mount

--rman Next execution
run{
set until time "to_date('2021-01-19 12:55:21','yyyy-mm-dd hh24:mi:s')";
restore database;
recover database;
}
alter database open resetlogs;  --The database needs to be used for incomplete recovery resetlogs recovery
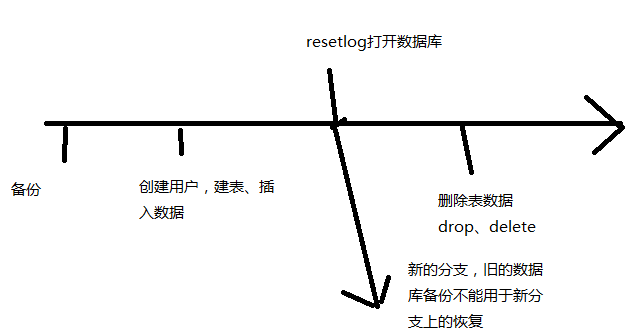
Note: after using resetlogs to open the database, the database will open a new branch. The previous backup cannot be used for recovery on the new branch and needs to be backed up again.
4, Recovering databases using DataRecoveryAdvisor
Recovery guide is an oracle database tool, which can automatically diagnose faults and provide appropriate recovery suggestions
RMAN> list failure; --Information is available only when triggered
RMAN> advise failure;
RMAN> repair failure preview; --View the contents of the recovery script
RMAN> repair failure;
5, Use block tracing to speed up backups
Block Change Tracking is the basis of incremental backup. It is mainly used in incremental backup of RMAN. It records the changes of the database since the last backup and identifies the changed blocks for incremental backup. The CTWR (change tracking writer) process can be seen after it is enabled. Read only the changed contents without scanning the whole database, so as to improve the backup performance of RMAN. Speed up backup and shorten backup time.
--query
select * from v$block_change_tracking;

--Create a file to record changes
alter database enable block change tracking using file '/u01/ctf';
alter database disable block change tracking;

--db_create_file_dest If this value is set, no more input is required using file 'XX'
6, Incremental backup
- Differential incremental backup
- Cumulative incremental backup
- Incremental update backup (oracle specific)
1. Differential incremental backup
The data block whose database has changed since the last differential backup at the same level or the last higher-level backup
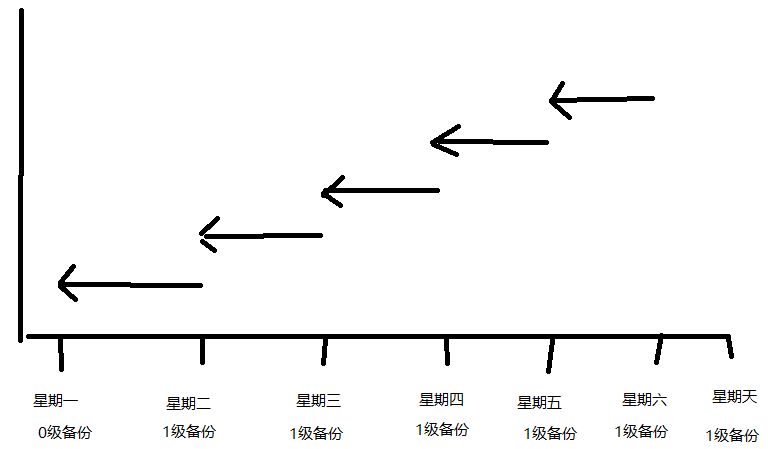
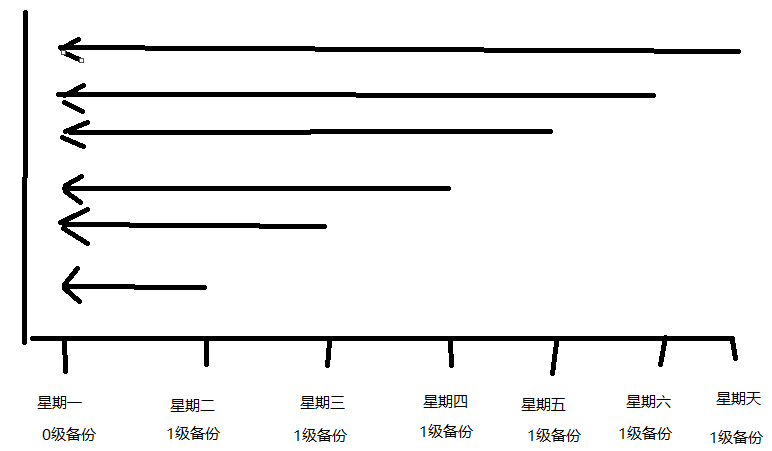
Note: Generally speaking, level 0 backup is a complete backup of data space (including database logical log), with a large amount of backup. On this basis, level 1 backup is incremental backup, with a small amount of backup, only backing up the data after level 0 backup.
Level 0 backup is full backup and level 1 backup is incremental backup
be careful:
backup database: -- full database backup, which cannot be part of incremental strategy
backup incremental level 0 database; -- The whole database backup can be used as the basis of incremental backup.
--0 Level backup
backup incremental level 0 database format '/u01/backup/l0_%U'

--1 Level incremental backup
backup incremental level 1 database format '/u01/backup/l1_%U'
2. Cumulative incremental backup
All changes in the database since the last level 0 backup.
--Cumulative incremental backup has too many keywords cumulative
backup incremental level 1 cumulative database format '/u01/backup/lc1_%U';
Note: do not mix differential incremental backup with cumulative incremental backup. Just use one. Usually differential incremental backup is used more
7, Data recovery based on incremental backup
--Saturday:0 Level backup(scn 716049)
backup incremental level 0 format '/u01/backup/full_%U' datatbase;

--Sunday-Friday:1 Level differential incremental backup
--Backup for the first time(scn 716120):
backup incremental level 1 format '/u01/backup/level1_%U' database;

--Backup the second time(scn 716148):
backup incremental level 1 format '/u01/backup/level1_%U' database;

--Query current database file scn
select file#,name,CHECKPOINT_CHANGE# from v$datafile_header;

--restore complete scn It's 716049, recover The first increment is 716120, and the second becomes 716148
--If the log file contains an incremental backup set scn,Then the log file will be applied directly
--Watch v$log In view first_change#,next_change#, representing the scn at the beginning and the scn at the end of the log. If the scn of the incremental backup is within this range, it will not be applied
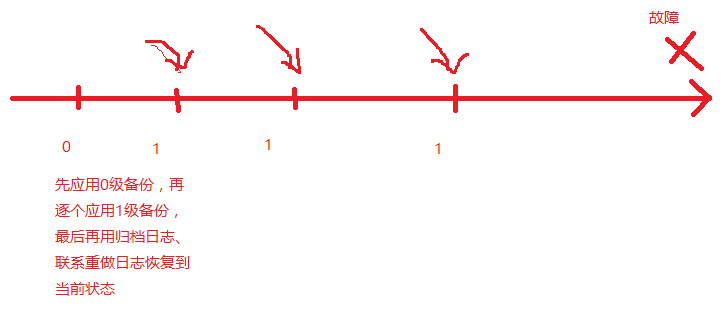
Summary:
- The first is to restore the database to restore the files from the level 0 backup
- recover application, incremental backup, archive log, redo log
- All are done automatically, under the command of rman
8, Restoring Catalog management backup information using Catalog
catalog recovery directory is an Oracle database, which is used to store the backup information of Oracle database, one or more.
A single database uses the control file to store the backup information, and the storage time of the control file is limited
control_ file_ record_ keep_ The default time is 7 days / the production environment is generally set to 30 days
rman target /
rman target / nocatalog
--Using these two methods to log in is to use the control file to store backup information
--rman You will be prompted after logging in, using target database control file instead of recovery catalog
The dbid of the catalog database must be different from the dbid of the backup database
--see dbid
select dbid from v$database;
Steps:
--1.Users used to create recovery directories
create user rco identified by rco quota unlimited on users;  --quota unlimited There is no limit on the space allocated by the user in the table space
grant connect,resource,recovery_catalog_owner to rco;

--2.Create recovery directory,In source library rman Connect recovery directory
rman target / catalog rco/rco@192.168.230.101:1521/prod
create catalog;

--3.Register the database in the recovery directory
--After execution, the backup information in the control file will be synchronized to catalog library
register database;

--Manual synchronization
--Scenario: the database has been registered in the recovery directory and is used again nocatalog Mode login for backup, in this case catalog There is no backup information in the library. You need to log in to catalog Library, manual execution resync catalog Synchronize;
resync catalog;
9, Make bad blocks
1. Create a user, create a table, insert data, and execute the following stored procedure to insert data
create table test (name varchar2(50));

begin
for i in 1..5000 loop
insert into test(name) values('pxk');
end loop;
commit;
end;
/
2. Confirm which blocks the data is stored in
Now you need to know which block of these data exists and destroy it. oracle provides a package to execute the following query:
--rowid_object Used to get a specific ROWID Corresponding data object number
select name,dbms_rowid.rowid_object(rowid) from test;

--Query the corresponding data of each row rowid
select rowid,name from test;
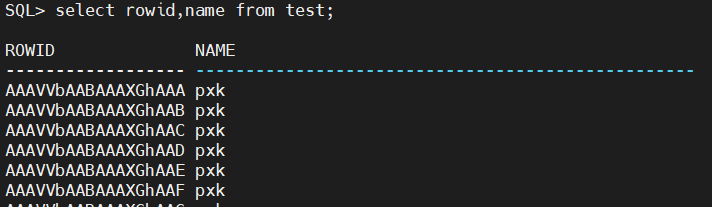
The composition of rowid is divided into four parts (hexadecimal):
AAASppAAEAAAACDAAA
AAASpp-AAE-AAAACD-AAA
- The first six characters are the object ID
- The middle three are file ID s
- The next six are block ID s
- The last three digits are the line number
--Query object ID,file ID,block ID,Line number
select distinct dbms_rowid.rowid_object(rowid) as objectid,dbms_rowid.rowid_relative_fno(rowid) as file_nu,dbms_rowid.rowid_block_number(rowid) as blockId,dbms_rowid.rowid_row_number(rowid)   from test;
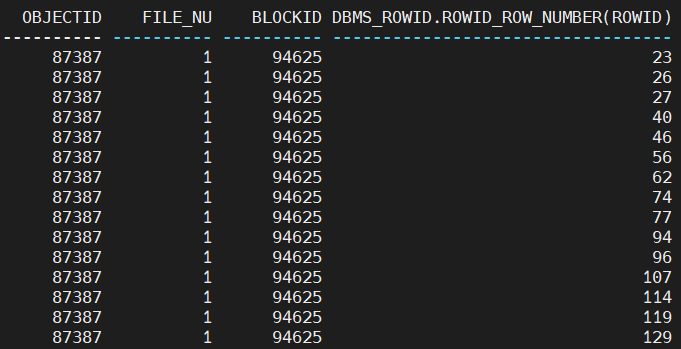
According to object_id to dba_objects table query:
--Confirm that the object is test surface
select object_name,object_type from dba_objects where object_id='87387';

Query file ID:
--The table is visible in the query system In the data file of the tablespace
select file# from v$dbfile where file#=1;

3. Create bad block
Extract block:
--use dd Command destruction, extract a block first
 dd if=/oradata/datafile/pxk/system01.dbf of=test.dbf bs=8192 count=1 skip=94625 conv=notrunc
Write corruption:
dd if=/dev/zero of=/oradata/datafile/pxk/system01.dbf bs=8192 count=1 seek=94625 conv=notrunc
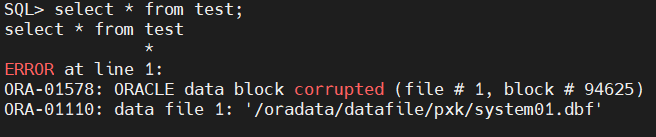
After completing this step, the block where the test table is located is destroyed with all zeros. At this time, execute the select statement, and the table will be prompted with an error. If not, refresh it with the following statement
--Refresh command to brush the data in memory into the file
 alter system flush buffer_Cache;
Error message:
4. Check the broken block
Mode 1:
validate datafile 1;
--Indicates that there are 1 or more bad blocks
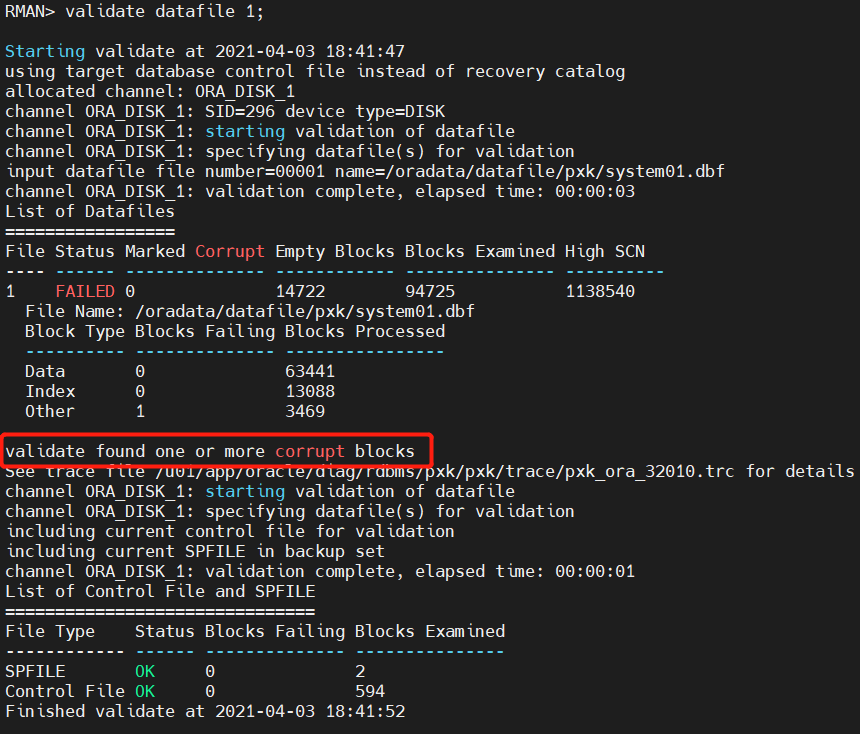
Check the trace file in the prompt message, which is displayed as block 94625, which is the one we destroyed

Mode 2:
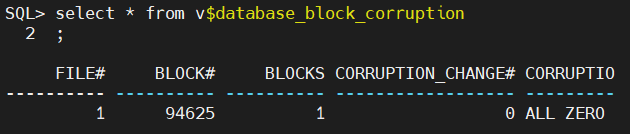
--use oracle Provided dbv tool dbv file=/oradata/datafile/pxk/system01.dbf ```# title 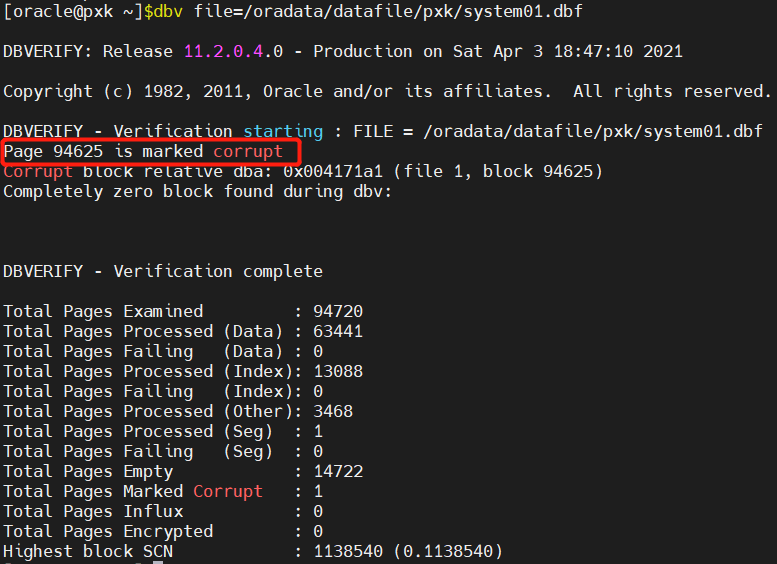 **Mode 3**: ```sql --Use view to view bad blocks select * from v$database_block_corruption
10, Block masking and block recovery
1. Block recovery:
Block recovery can be used to recover one or more corrupted file blocks.
advantage:
1. To reduce MTTR, only damaged blocks need to be recovered.
2. During the recovery, the data file is still online.
3. If there is no block recovery technology and a single block is broken, the whole data file needs to be offline, recovered and online. In this way, the recovery time is very long and affects the business operation.
prerequisite:
RMAN backup is required
Recovery statement:
--Recovery of a few bad blocks
 Recovery statement: recover datafile 1 block 94625;

--A large number of bad blocks are recommended DRA Data office Recovery Guidance
2. Block shielding
If there is no backup, the bad block can be shielded, and other blocks will not be affected.
--Query whether block masking is enabled
select skip_corrupt from dba_tables where table_name='TEST'

--Execute block mask
exec dbms_repair.skip_corrupt_blocks('SYS','TEST');

--It will be found after shielding select It is found that the table can be queried, but the data becomes less because the bad blocks are shielded
11, Using dbms_backup_restore package
Usage scenario:
- Only backup sets (including control files and data files)
- Data files and control files are deleted
If you use rman, you need to restore the control file first. You can start it to the mount state and restore the data file
Through this package, control files and data files can be recovered in the unmount state, which is more convenient than rman
1. Restore control files under unmount
--Execute the following stored procedure and find that the control file has been recovered
declare
deviceType varchar2(256);
done boolean;
begin
devicetype:=dbms_backup_restore.deviceAllocate(type=>'',ident=>'t1');  --t1 Can be replaced with any character
dbms_backup_restore.restoresetDataFile;
dbms_backup_restore.restoreControlFileto('/oradata/datafile/pxk/control01.ctl');
dbms_backup_restore.restoreBackupPiece('/u01/app/oracle/product/11.2.0/db_1/dbs/c-1967227408-20210403-00',done=>done);    --The location of the backup film should be indicated here
dbms_backup_restore.deviceDeallocate;
end;
/
2. Recover data files under unmount
declare
deviceType varchar2(256);
done boolean;
begin
devicetype:=dbms_backup_restore.deviceAllocate(type=>'',ident=>'t1');
dbms_backup_restore.restoresetDataFile;
dbms_backup_restore.restoreDataFileto(dfnumber=>1,toname=>'/oradata/datafile/pxk/system01.dbf');
dbms_backup_restore.restoreDataFileto(dfnumber=>2,toname=>'/oradata/datafile/pxk/sysaux01.dbf');
dbms_backup_restore.restoreDataFileto(dfnumber=>3,toname=>'/oradata/datafile/pxk/undotbs01.dbf');
dbms_backup_restore.restoreDataFileto(dfnumber=>4,toname=>'/oradata/datafile/pxk/users01.dbf');
dbms_backup_restore.restoreBackupPiece('/u01/app/oracle/product/11.2.0/db_1/dbs/12vrcvsl_1_1',done=>done);
dbms_backup_restore.deviceDeallocate;
end;
/

--After the above execution, we'll go to rman lower recover
--Again sqlplus lower alter database open RESETLOGS;
dbms_ backup_ Limitations of the restore package:
- When restoring, you must know whether the backup piece information contains data files, control files, etc.
- To restore the database, you need to indicate the file number, where to restore the new file name, and where the data file backup set is located.
RMAN recovers control files, and data files do not have these restrictions.
12, Table level recovery using RMAN
12c new feature, point in time recovery based on table
delete can flash back within the time range
DDL(drop,truncate) and other misoperations can be recovered at the rman table level
Recovery principle:
- Establish an auxiliary instance
- Restore the entire database on the secondary instance
- Export and import through datapump tool
recover table sys.test
until time "to_date('2018-05-20 15:53:29','yyyy-mm-dd hh24:mi:s')"
auxiliary destination '/u01/tsbak'     --This is the path of the auxiliary instance. Create it in advance
remap table sys.test:sys.test_new      --When restoring, you can navigate to other tables
datapump destination '/tmp'            --appoint dump Path to file
dumpfile 'exp.dat'                     --dump File name of the file
notableimport;                         --This represents export only dump File, but do not perform import
During the recover y process, an instance will be generated automatically, and the background process of this instance can be seen through ps -ef
After the recovery is completed, the instance will be automatically deleted, and only some residual files remain in the previously set directory
recover table sys.test
until time "to_date('2018-05-20 15:53:29','yyyy-mm-dd hh24:mi:s')"
auxiliary destination '/u01/tsbak'       --This is the path of the secondary instance
remap table sys.test:sys.test_new
13, Write Automatic full backup shell script
The following script is only for learning and is not suitable for production
1. Set the automatic backup of control files and set the backup location
--Modify parameters:
show all;
--open
CONFIGURE CONTROLFILE AUTOBACKUP ON;
--Set position
CONFIGURE CONTROLFILE AUTOBACKUP FORMAT FOR DEVICE TYPE DISK TO '/u01/backup/%d-ctrl-%F';
2. Set the backup script
--Script suffix can be used .RMN file: Oracle Recovery Manager Script
--Script storage path: /u01/exec/fulldb.rmn

--Keep it for 7 days and delete the previous backup
run{
  allocate channel ch1 device type disk;
  allocate channel ch2 device type disk;
  delete noprompt backupset completed before 'sysdate-7';   --Delete 7-day-old backups
  sql 'alter system archive log current';     --This statement means to archive the current log file for maximum backup of the database
  backup format '/u01/backup/%d_full_%U' database;        --%d Name of the current database
  backup archivelog all format '/u01/archbak/%d_arch_%U' delete all input;  --delete all input It means to delete all inputs, because after the archive backup is completed, the archive log is useless and can be deleted to make room
  release channel ch1;
  release channel ch2;
}
Execute the above script
--If there is no problem with implementation, write again shell script
rman target / cmdfile fulldb.rmn
3. Write shell script
--1.establish fulldb.sh
#!/bin/bash

echo "=====================">>/u01/backup/fulldb.log
echo "===================fulldb "`(date +"%Y-%m-%d")`"===========">>/u01/backup/fulldb.log
echo "================Full RMAN Backup Begin==============" >> /u01/backup/fulldb.log
export ORACLE_HOME=/u01/app/oracle/product/11.2.0/db_1
export ORACLE_SID=pxk
export NLS_LANG=american_america.zhs16gbk
export NLS_DATE_FORMAT='yyyy-mm-dd hh24:mi:s'
/u01/app/oracle/product/11.2.0/db_1/bin/rman target / cmdfile /home/oracle/backup.rmn log /u01/backup/fulldb.log append
echo $(date +"%Y-%m-%d %H:%M:%S") >> /u01/backup/fulldb.log
echo "================Full RMAN Backup End==============" >> /u01/backup/fulldb.log
4.crontab scheduled tasks
crontab -e
0 1 * * * /home/oracle/fulldb.sh > /dev/null 2&>1
crontab -l
Execute the script at 1 a.m. every day
Train 1 - minutes
2 trains - hour
Column 3 - date
Column 4 - month
Train 5 - week
Column 6 - command
1 – for standard output 2 – for standard error
2 & > 1 means that the output redirection of 2 is equal to 1. Both standard output and standard error are thrown in
Example: AAAA 2 > / dev / null will not output errors on the screen
14, Write automatic incremental backup shell script
1. Set level 0 backup
--/home/oracle/level0.rmn
--If the backup information is kept for 7 days,Then set sysdate-14
--Script content:
run{
  delete noprompt backupset completed before 'sysdate-14';    --Delete old backup
  sql 'alter system archive log current';                     --Archive current redo log
  backup incremental level 0 format '/u01/backup/%d_inc0_%U' database;
  backup archivelog all format '/u01/archbak/%d_arch_%U' delete all input';
}
2. Set level 1 backup
--/home/oracle/level1.rmn
--Script content:
run{
  delete noprompt backupset completed before 'sysdate-14';
  sql 'alter system archive log current';
  backup incremental level 1 format '/u01/backup/%d_inc1_%U' database;      --Differential incremental backup
  backup archivelog all format '/u01/archbak/%d_arch_%U' delete all input';
}
3.shell script
--/home/oracle/level0.sh
--Script content:
echo "--------------------Level 0 backup begin------------------------"  >> /u01/backup/level0-1.log
export ORACLE_HOME=/u01/app/oracle/product/11.2.0/db_1
export ORACLE_SID=pxk
export NLS_DATE_FORMAT='yyyy-mm-dd hh24:mi:s'
export NLS_LANG=american_america.zhs16gbk
/u01/app/oracle/product/11.2.0/db_1/bin/rman target / cmdfile /home/oracle/level0.rmn log /u01/backup/level0-1.log append
echo "--------------------level 0 end backup---------------------------" >> /u01/backup/level0-1.log

--/home/oracle/level1.sh
--Script content:
echo "--------------------Level 1 backup begin------------------------"  >> /u01/backup/level0-1.log
export ORACLE_HOME=/u01/app/oracle/product/11.2.0/db_1
export ORACLE_SID=pxk
export NLS_DATE_FORMAT='yyyy-mm-dd hh24:mi:s'
export NLS_LANG=american_america.zhs16gbk
/u01/app/oracle/product/11.2.0/db_1/bin/rman target / cmdfile /home/oracle/level1.rmn log /u01/backup/level0-1.log append
echo "--------------------level 1 end backup---------------------------" >> /u01/backup/level0-1.log
4.crontab settings
0 1 * * 0 /home/oracle/level0.sh > /dev/null 2&>1
--Perform level 0 backup at 1 a.m. on Sunday

0 1 * * 1-6 /home/oracle/level1.sh > /dev/null 2&>1
--Monday-6 Perform a level 1 backup at 1 a.m
15, Supplement
--Note that the backup sequence is data files, archive log files, and finally control files and parameter files
rman target / <<EOF
run{
  allocate channel ch1 device type disk;
  allocate channel ch2 device type disk;
  sql 'alter system archive log current';
  backup as compressed backupset database format '/u01/backup/rman/db_%d_%T_%U';
  sql 'alter system archive log current';
  backup current controlfile format '/u01/backup/rman/con_%s_%p';
  crosscheck archivelog all;
  release channel ch1;
  release channel ch2;
}
EOF