Basic query in Hive
@
0, data preparation
1) First, create two tables, one department table with three fields, Department id int, department name string and address number int.
dept:
10	ACCOUNTING	1700
20	RESEARCH	1800
30	SALES	1900
40	OPERATIONS	1700
2) Then create an employee information table with eight fields: employee number int, employee name string, employee position string, employee superior number int, induction time string, salary double, bonus double, Department ID int.
emp:
7369	SMITH	CLERK	7902	1980-12-17	800.00		20
7499	ALLEN	SALESMAN	7698	1981-2-20	1600.00	300.00	30
7521	WARD	SALESMAN	7698	1981-2-22	1250.00	500.00	30
7566	JONES	MANAGER	7839	1981-4-2	2975.00		20
7654	MARTIN	SALESMAN	7698	1981-9-28	1250.00	1400.00	30
7698	BLAKE	MANAGER	7839	1981-5-1	2850.00		30
7782	CLARK	MANAGER	7839	1981-6-9	2450.00		10
7788	SCOTT	ANALYST	7566	1987-4-19	3000.00		20
7839	KING	PRESIDENT		1981-11-17	5000.00		10
7844	TURNER	SALESMAN	7698	1981-9-8	1500.00	0.00	30
7876	ADAMS	CLERK	7788	1987-5-23	1100.00		20
7900	JAMES	CLERK	7698	1981-12-3	950.00		30
7902	FORD	ANALYST	7566	1981-12-3	3000.00		20
7934	MILLER	CLERK	7782	1982-1-23	1300.00		10
3) Create department table
Hive needs to operate in hadoop cluster. Please start hadoop cluster first and then run hive
create table if not exists dept(
deptno int,
dname string,
loc int
)
row format delimited fields terminated by '\t';
4) Create employee table
create table if not exists emp(
empno int,
ename string,
job string,
mgr int,
hiredate string,
sal double,
comm double,
deptno int)
row format delimited fields terminated by '\t';
5) Import the data prepared above
load data local inpath '/opt/module/hive/datas/dept.txt' into table dept;
load data local inpath '/opt/module/hive/datas/emp.txt' into table emp;
1. Basic query
1) Full table query and specific column query
Full table query (not recommended)
hive (default)> select * from emp;
Select a specific column query (recommended)
hive (default)> select empno, ename from emp;
2) Column alias
Rename a column to facilitate subsequent calculation and use. After the column name, you can add the AS keyword in the middle or not
hive (default)> select ename AS name, deptno dn from emp;
3) Arithmetic operator
| operator | describe |
|---|---|
| A+B | Add A and B |
| A-B | A minus B |
| A*B | Multiply A and B |
| A/B | A divided by B |
| A%B | A to B remainder |
| A&B | A and B are bitwise AND |
| A^B | A and B bitwise XOR |
| ~A | A reverse by bit |
| For example, query the data of all employees' salaries plus 1000 |
hive (default)> select empno,ename,sal +1 from emp;
4) Common functions
Find the total number of rows (count)
hive (default)> select count(*) cnt from emp;
Maximum wage (max)
hive (default)> select max(sal) max_sal from emp;
Minimum wage (min)
hive (default)> select min(sal) min_sal from emp;
sum of wages
hive (default)> select sum(sal) sum_sal from emp;
Average of wages (avg)
hive (default)> select avg(sal) avg_sal from emp;
5) limit and where statements
Because the data level of the query cannot be known, it is safe to use the limit statement to limit the number of rows returned
hive (default)> select * from emp limit 5;
hive (default)> select * from emp limit 2,3;
The where statement mainly filters the data that does not meet the requirements
Query all employees whose salary is greater than 1000
hive (default)> select * from emp where sal >1000;
Note: field aliases cannot be used in the where clause.
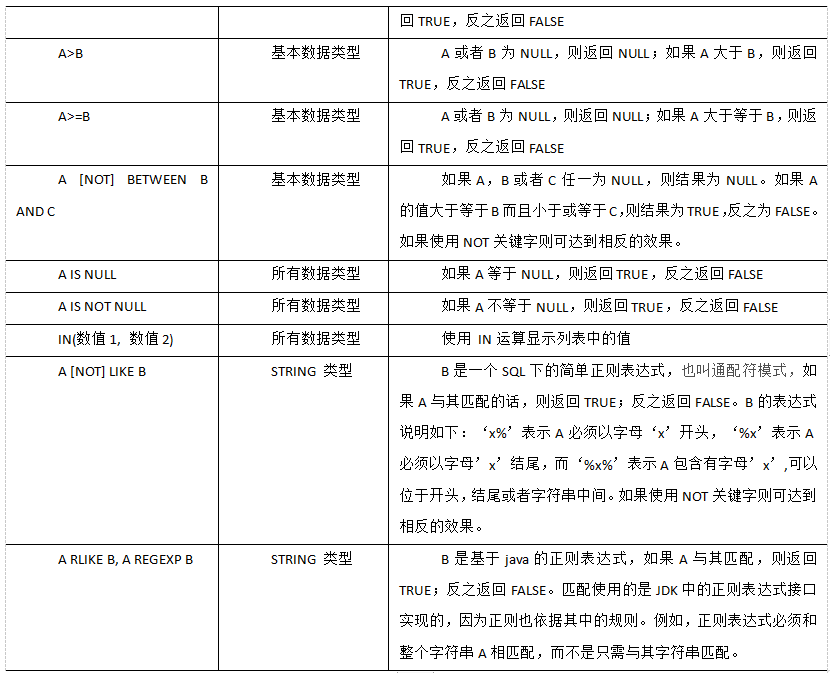
6) Comparison operator
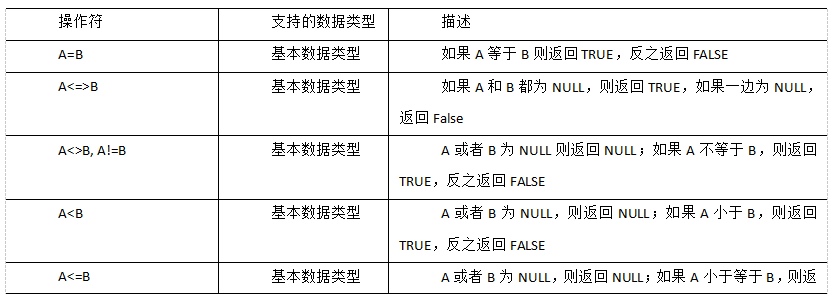
 Case practice
(1) Find out all employees whose salary is equal to 5000
hive (default)> select * from emp where sal =5000;
(2) Query employee information with salary between 500 and 1000
hive (default)> select * from emp where sal between 500 and 1000;
(3) Query all employee information with comm blank
hive (default)> select * from emp where comm is null;
(4) Query employee information with salary of 1500 or 5000
hive (default)> select * from emp where sal IN (1500, 5000);
7) like and RLike
(1) Use the LIKE operation to select similar values
(2) The selection criteria can contain characters or numbers:% represents zero or more characters (any character)_ Represents a character.
(3) RLIKE clause
RLIKE clause is an extension of this function in Hive, which can specify matching conditions through the more powerful language of Java regular expression.
Case practice
(1) Find employee information whose name starts with S
hive (default)> select * from emp where ename LIKE 'S%';
hive (default)> select * from emp where ename RLIKE '^S';
(2) Find employee information whose name ends with S
hive (default)> select * from emp where ename LIKE '%S';
hive (default)> select * from emp where ename RLIKE 'S$';
(3) Find employee information with S in name
hive (default)> select * from emp where ename  LIKE '%S%';
hive (default)> select * from emp where ename  RLIKE '[S]';
8) Logical operators (and, or, not)
Case practice
(1) The inquiry salary is more than 1000, and the Department is 30
hive (default)> select * from emp where sal>1000 and deptno=30;
(2) The inquiry salary is greater than 1000, or the Department is 30
hive (default)> select * from emp where sal>1000 or deptno=30;
(3) Query employee information except 20 departments and 30 departments
hive (default)> select * from emp where deptno not IN(30, 20);
2. Grouping
1) group by statement
The GROUP BY statement is usually used with an aggregate function to group one or more queued results, and then aggregate each group.
Case practice:
(1) Calculate the average salary of each department in emp table
hive (default)> select t.deptno, avg(t.sal) avg_sal from emp t group by t.deptno;
(2) Calculate emp the maximum salary for each position in each department
hive (default)> select t.deptno, t.job, max(t.sal) max_sal from emp t group by
 t.deptno, t.job;
2) having statement
First, understand the differences between having and where
1) Differences between having and where
(1) The group aggregation function cannot be written after where, but can be used after having.
(2) having is only used for group by group statistics statements.
Case practice
(1) The average salary of each department is greater than 2000
Find the average salary of each department
hive (default)> select deptno, avg(sal) from emp group by deptno;
The average salary of each department is greater than 2000
hive (default)> select deptno, avg(sal) avg_sal from emp group by deptno  having
 avg_sal > 2000;
3. Join statement
1) Equivalent join
Hive supports common SQL JOIN statements, but sql only supports equivalent connections, (hive 3.1.2) supports non equivalent connections.
Case practice
(1) Query employee number, employee name and department name according to the same department number in employee table and department table;
hive (default)> select e.empno, e.ename, d.dname from emp e join dept d on e.deptno = d.deptno;
2) Table alias
1) Benefits
(1) Use aliases to simplify queries.
(2) Using table name prefix can improve execution efficiency.
Case practice
Merge employee table and department table
hive (default)> select e.*,d.* from emp e join dept d on e.deptno = d.deptno;
3) Inner connection
Inner join: data matching the join conditions will be retained only if there are two tables to be joined.
hive (default)> select e.empno, e.ename, d.deptno from emp e join dept d on e.deptno = d.deptno;
4) Left outer connection
Left outer JOIN: all records in the table on the left of the JOIN operator that meet the WHERE clause will be returned.
hive (default)> select e.empno, e.ename, d.deptno from emp e left join dept d on e.deptno = d.deptno;
5) Right outer connection
(just remember one of the left outer connection and the right outer connection)
Right outer JOIN: all records in the right table of the JOIN operator that meet the WHERE clause will be returned.
hive (default)> select e.empno, e.ename, d.deptno from emp e right join dept d on e.deptno = d.deptno;
6) Full external connection
Full outer join: all records in all tables that meet the conditions of WHERE statement will be returned. If the specified field of any table does not have a qualified value, NULL value is used instead.
hive (default)> select e.empno, e.ename, d.deptno from emp e full join dept d on e.deptno
 = d.deptno;
7) Multi table connection
Note: to connect n tables, at least n-1 connection conditions are required. For example, connecting three tables requires at least two connection conditions.
Data preparation is under / opt / module / hive / data /: VIM location txt
Two fields, address number int and address name string.
1700	Beijing
1800	London
1900	Tokyo
1) Create location table
create table if not exists location(
loc int,
loc_name string
)
row format delimited fields terminated by '\t';
2) Import data
hive (default)> load data local inpath '/opt/module/hive/datas/location.txt' into table location;
3) Multi table join query
hive (default)>SELECT e.ename, d.dname, l.loc_name
FROM   emp e
JOIN   dept d
ON     d.deptno = e.deptno
JOIN   location l
ON     d.loc = l.loc;
In most cases, Hive will start a MapReduce task for each pair of JOIN connection objects. In this example, a MapReduce job will be started to connect table e and table d, and then a MapReduce job will be started to connect the output of the first MapReduce job to Table l; Connect.
Note: why not join tables d and l first? This is because Hive always executes from left to right.
8) Cartesian product
1) Cartesian assemblies arise under the following conditions
(1) Omit connection conditions
(2) Invalid connection condition
(3) All rows in all tables are connected to each other
Case practice
hive (default)> select empno, dname from emp, dept;
4. Sorting
1) Global sorting
Order By: Global sort. There is only one Reducer
1) Sorting using the ORDER BY clause
ASC (ascend): ascending (default)
DESC (descend): descending
2) The ORDER BY clause is at the end of the SELECT statement
Case practice
(1) Query employee information in ascending order of salary
hive (default)> select * from emp order by sal;
(2) Query employee information in descending order of salary
hive (default)> select * from emp order by sal desc;
(3) Sort by alias
Sort by twice the employee's salary
hive (default)> select ename, sal*2 twosal from emp order by twosal;
(4) Multiple column sorting
Sort by department and salary in ascending order
hive (default)> select ename, deptno, sal from emp order by deptno, sal ;
(5) Sort By within each Reduce
Sort by: for large-scale data sets, order by is very inefficient. In many cases, global sorting is not required. In this case, sort by can be used.
Sort by generates a sort file for each reducer. Each reducer is sorted internally, not for the global result set.
1) Set the number of reduce
hive (default)> set mapreduce.job.reduces=3;
2) View and set the number of reduce
hive (default)> set mapreduce.job.reduces;
3) View employee information in descending order according to department number
hive (default)> select * from emp sort by deptno desc;
4) Import the query results into the file (sorted by department number in descending order)
hive (default)> insert overwrite local directory '/opt/module/hive/datas/sortby-result'
 select * from emp sort by deptno desc;
2) Partition
Distribution by: in some cases, we need to control which reducer a particular row should go to, usually for subsequent aggregation operations. The distribute by clause can do this. Distribute by is similar to partition (custom partition) in MR. it is used in combination with sort by.
For the distribution by test, you must allocate multiple reduce for processing, otherwise you cannot see the effect of distribution by.
Case practice:
(1) First partition by department number, and then sort by employee number and salary.
hive (default)> set mapreduce.job.reduces=3;
hive (default)> insert overwrite local directory '/opt/module/hive/datas/distribute-result' select * from emp distribute by deptno sort by sal desc;
be careful:
- The partition rule of distribution by is to divide the hash code of the partition field by the number of reduce, and then divide the same remainder into a region.
- Hive requires that the DISTRIBUTE BY statement be written before the SORT BY statement.
- After the demonstration, MapReduce job. The value of reduces should be set back to - 1, otherwise an error may be reported when the following partition or bucket table load runs mr
(2) Partition sorting (Cluster By)
When the distribution by and sort by fields are the same, the cluster by mode can be used.
In addition to the function of distribute by, cluster by also has the function of sort by. However, sorting can only be in ascending order, and the sorting rule cannot be ASC or DESC.
The following two expressions are equivalent
hive (default)> select * from emp cluster by deptno;
hive (default)> select * from emp distribute by deptno sort by deptno;
Note: division by department number is not necessarily a fixed value. Departments 20 and 30 can be divided into one division.
Partition table and bucket table
The partition table actually corresponds to an independent folder on an HDFS file system. Under this folder are all the data files of the partition. The partition in Hive is a subdirectory, which divides a large data set into small data sets according to business needs. When querying, select the specified partition required by the query through the expression in the WHERE clause, which will greatly improve the query efficiency.
1. Basic operation of partition table
1) Introduce partition table (manage logs according to date and simulate through department information)
dept_20200401.log
dept_20200402.log
dept_20200403.log
2) Create partition table syntax
hive (default)> create table dept_partition(
deptno int, dname string, loc string
)
partitioned by (day string)
row format delimited fields terminated by '\t';
Note: the partition field cannot be the data that already exists in the table. The partition field can be regarded as a pseudo column of the table.
3) Load data into partitioned table
(1) Data preparation
dept_20200401.log
10	ACCOUNTING	1700
20	RESEARCH	1800
dept_20200402.log
30	SALES	1900
40	OPERATIONS	1700
dept_20200403.log
50	TEST	2000
60	DEV	1900
(2) Load data
hive (default)> load data local inpath '/opt/module/hive/datas/dept_20200401.log' into table dept_partition partition(day='20200401');
hive (default)> load data local inpath '/opt/module/hive/datas/dept_20200402.log' into table dept_partition partition(day='20200402');
hive (default)> load data local inpath '/opt/module/hive/datas/dept_20200403.log' into table dept_partition partition(day='20200403');
Note: the partition must be specified when the partition table loads data
4) Query data in partition table
Single partition query
hive (default)> select * from dept_partition where day='20200401';
Multi partition joint query
hive (default)> select * from dept_partition where day='20200401'
              union
              select * from dept_partition where day='20200402'
              union
              select * from dept_partition where day='20200403';
hive (default)> select * from dept_partition where day='20200401' or
                day='20200402' or day='20200403' ;
5) View how many partitions the partition table has
hive> show partitions dept_partition;
6) Add partition
Create a single partition
hive (default)> alter table dept_partition add partition(day='20200404') ;
Create multiple partitions at the same time (no commas between partitions)
hive (default)> alter table dept_partition add partition(day='20200405') partition(day='20200406');
7) Delete partition
Delete a single partition
hive (default)> alter table dept_partition drop partition (day='20200406');
Delete multiple partitions at the same time (there must be commas between partitions)
hive (default)> alter table dept_partition drop partition (day='20200404'), partition(day='20200405');
8) View partition table structure
hive> desc formatted dept_partition;

# Partition Information
# col_name              data_type               comment
month                   string
2. Secondary partition of partition table
There is also a large amount of log data in a day. How to split the data?
1) Create secondary partition table
hive (default)> create table dept_partition2(
               deptno int, dname string, loc string
               )
               partitioned by (day string, hour string)
               row format delimited fields terminated by '\t';
2) Normal load data
(1) Load data into secondary partition table
hive (default)> load data local inpath '/opt/module/hive/datas/dept_20200401.log' into table
dept_partition2 partition(day='20200401', hour='12');
(2) Query partition data
hive (default)> select * from dept_partition2 where day='20200401' and hour='12';
3) There are three ways to upload data directly to the partition directory and associate the partition table with the data
(1) Method 1: repair after uploading data
Upload data
hive (default)> dfs -mkdir -p
 /user/hive/warehouse/db_hive.db/dept_partition2/day=20200401/hour=13;
hive (default)> dfs -put /opt/module/hive/datas/dept_20200401.log  /user/hive/warehouse/db_hive.db/dept_partition2/day=20200401/hour=13;
Query data (the data just uploaded cannot be queried)
hive (default)> select * from dept_partition2 where day='20200401' and hour='13';
Execute repair command
hive> msck repair table dept_partition2;
Query data again
hive (default)> select * from dept_partition2 where day='20200401' and hour='13';
(2) Method 2: add partition after uploading data
Upload data
hive (default)> dfs -mkdir -p
 /user/hive/warehouse/db_hive.db/dept_partition2/day=20200401/hour=14;
hive (default)> dfs -put /opt/module/hive/datas/dept_20200401.log  /user/hive/warehouse/db_hive.db/dept_partition2/day=20200401/hour=14;
Execute add partition
hive (default)> alter table dept_partition2 add partition(day='20200401',hour='14');
Query data
hive (default)> select * from dept_partition2 where day='20200401' and hour='14';
(3) Method 3: after creating a folder, load data to the partition
Create directory
hive (default)> dfs -mkdir -p
 /user/hive/warehouse/db_hive.db/dept_partition2/day=20200401/hour=15;
Upload data
hive (default)> load data local inpath '/opt/module/hive/datas/dept_20200401.log' into table
 dept_partition2 partition(day='20200401',hour='15');
Query data
hive (default)> select * from dept_partition2 where day='20200401' and hour='15';
3. Dynamic zoning adjustment
When inserting data into a partition table in a relational database, the database will automatically Insert the data into the corresponding partition according to the value of the partition field. Hive also provides a similar mechanism, dynamic partition. However, using hive's dynamic partition requires corresponding configuration.
1) Enable dynamic partition parameter setting
(1) Enable the dynamic partition function (true by default, enabled)
hive.exec.dynamic.partition=true
(2) Set to non strict mode (the mode of dynamic partition, strict by default, means that at least one partition must be specified as a static partition, and the non strict mode means that all partition fields are allowed to use dynamic partitions.)
hive.exec.dynamic.partition.mode=nonstrict
(3) How many dynamic partitions can be created on all MR nodes. Default 1000
hive.exec.max.dynamic.partitions=1000
(4) How many dynamic partitions can be created on each node executing MR. This parameter needs to be set according to the actual data. For example, if the source data contains one year's data, that is, the day field has 365 values, then the parameter needs to be set to greater than 365. If the default value of 100 is used, an error will be reported.
hive.exec.max.dynamic.partitions.pernode=100
(5) How many HDFS files can be created in the whole MR Job. Default 100000
hive.exec.max.created.files=100000
(6) Whether to throw an exception when an empty partition is generated. Generally, no setting is required. Default false
hive.error.on.empty.partition=false
2) Case practice
Requirement: insert the data in the dept table into the target table Dept by Region (loc field)_ In the corresponding partition of partition.
(1) Create target partition table
hive (default)> create table dept_partition_dy(id int, name string) partitioned by (loc int) row format delimited fields terminated by '\t';
(2) Set dynamic partition
set hive.exec.dynamic.partition.mode = nonstrict;
hive (default)> insert into table dept_partition_dy partition(loc) select deptno, dname, loc from dept;
(3) View the partition of the target partition table
hive (default)> show partitions dept_partition_dy;
4. Barrel separation table
Partitioning provides a convenient way to isolate data and optimize queries. However, not all data sets can form reasonable partitions. For a table or partition, Hive can be further organized into buckets, that is, more fine-grained data range division.
Bucket splitting is another technique for breaking up a data set into parts that are easier to manage.
Partition refers to the storage path of data; Buckets are for data files.
1) First, create a bucket table by directly importing data files
(1) Data preparation
1001	ysy1
1002	ysy2
1003	ysy3
1004	ysy4
1005	ysy5
1006	ysy6
1007	ysy7
1008	ysy8
1009	ysy9
1010	ysy10
1011	ysy11
1012	ysy12
1013	ysy13
1014	ysy14
1015	ysy15
1016	ysy16
(2) Create bucket table
create table stu_buck(id int, name string)
clustered by(id)
into 4 buckets
row format delimited fields terminated by '\t';
(3) View table structure
hive (default)> desc formatted stu_buck;
Num Buckets:            4
(4) Import the data into the bucket table (the load data of the new version of hive can run Mr directly (there will be some problems). The old version of hive needs to transfer the data to a table and then import it into the bucket table through query.)
hive (default)> load data local inpath '/opt/module/hive/datas/student.txt' into table stu_buck;
(5) Query bucket data
hive(default)> select * from stu_buck;
Barrel separation rules:
According to the results, Hive's bucket division determines which bucket the record is stored in by hashing the value of the bucket division field and dividing it by the number of buckets.
That's all for today's sharing. See you next time.