Basic summary of web apis
Author: Participants
Basic summary of web apis
preface
1, Web API introduction
1. Concept of API
API is an interface. It is simply understood that it provides programmers with tools to complete certain functions
Generally speaking, if you want to charge your mobile phone, you need a charging interface,
2. Concept of Web API
Web API is a set of APIs (BOM and DOM) provided by the browser to operate browser functions and page elements.
At this stage, we mainly explain the common API s for browsers, and mainly do interactive effects for browsers. For example, we want to pop up a warning box in the browser and directly use alert('pop up ')
Because there are many Web APIs, we call this stage Web APIs.
3.API and Web API summary
- API is an interface provided for our programmers to help us realize certain functions. We can use it without worrying about how to implement it internally
- Web API is mainly aimed at the interface provided by the browser, and mainly aims at the interactive effect of the browser.
- Web API s generally have inputs and outputs (function parameters and return values), and many web APIs are methods (functions)
- Learning Web API can be combined with the previous idea of learning built-in object methods
2, DOM introduction
1. What is DOM
Document Object Model (DOM) is a standard programming interface recommended by W3C organization to deal with extensible markup language (html or xhtml).
W3C has defined a series of DOM interfaces that can change the content, structure and style of * * * web pages***
2.DOM tree
- Document: a page is a document, which is represented by document in DOM
- Node: all contents in the web page are nodes (labels, attributes, text, notes, etc.) in the document tree, which are represented by node
- Tag node: all tags in a web page are usually called element nodes, also referred to as "elements", which are represented by element
3, Get element
1. Get by ID
Syntax: document getElementById(id)
Function: get element object according to ID
Parameter: id value, case sensitive string
Return value: element object or null
Case code
 <div id="time">2019-9-9</div>
    <script>
        // Because we load the document page from top to bottom, we have to have a label first, so we write the script below the label
        var timer = document.getElementById('time');
        console.log(timer);
        console.log(typeof timer);
        // console.dir prints the element object we returned to better view the properties and methods inside
        console.dir(timer);
    </script>
2. Get element syntax according to tag name:
document.getElementsByTagName('tag name ') or element GetElementsByTagName ('tag name ')
Function: get the element object according to the tag name
Parameters: tag names
Return value: collection of element objects (pseudo array, array elements are element objects)
Case code
<ul>
        <li>Know or not know or not, should be waiting for you for a long time 11</li>
        <li>Know or not know or not, should be waiting for you for a long time 22</li>
        <li>Do you know, I should have been waiting for you for a long time 33</li>
        <li>Know or not know or not, should be waiting for you for a long time 44</li>
        <li>Know or not know or not, should be waiting for you for a long time 55</li>
    </ul>
    <ul id="nav">
        <li>Rare words</li>
        <li>Rare words</li>
        <li>Rare words</li>
        <li>Rare words</li>
        <li>Rare words</li>
    </ul>
    <script>
        // 1. The returned is the collection of obtained element objects stored in the form of pseudo array
        var lis = document.getElementsByTagName('li');
        console.log(lis);
        console.log(lis[0]);
        // 2. We want to print the element objects in turn. We can traverse
        for (var i = 0; i < lis.length; i++) {
            console.log(lis[i]);
        }
        // 3. element.getElementsByTagName() can get some tags in this element
        var nav = document.getElementById('nav'); // This gets the nav element
        var navLis = nav.getElementsByTagName('li');
        console.log(navLis);
    </script>
3.H5 new element acquisition method
Code case
<body>
<div class="box">Box 1</div>
<div class="box">Box 2</div>
<div id="nav">
<ul>
<li>home page</li>
<li>product</li>
</ul>
</div>
<script>
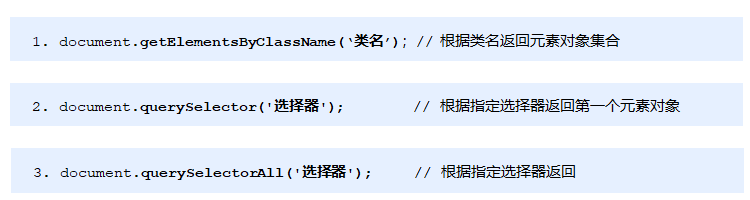
// 1. getElementsByClassName obtains some element collections according to the class name
var boxs = document.getElementsByClassName('box');
console.log(boxs);
// 2. querySelector returns the first element object of the specified selector. Remember that the selector in it needs to be signed box #nav
var firstBox = document.querySelector('.box');
console.log(firstBox);
var nav = document.querySelector('#nav');
console.log(nav);
var li = document.querySelector('li');
console.log(li);
// 3. querySelectorAll() returns the collection of all element objects of the specified selector
var allBox = document.querySelectorAll('.box');
console.log(allBox);
var lis = document.querySelectorAll('li');
console.log(lis);
</script>
</body>```
4. Get special elements
- document. Body returns the body element object
- document.document.Element returns an html element object
4, Event basis
1. Event overview
JavaScript enables us to create dynamic pages, and events are behaviors that can be detected by JavaScript.
Simple understanding: trigger response mechanism.
2. Three elements of event
- Event source (who): the element that triggers the event
- Event type (what event): for example, click event
- Event handler (what to do): code to be executed after the event is triggered (function form), event handler
Code case:
<body>
    <button id="btn">Tang Bohu</button>
    <script>
        // Click a button to pop up a dialog box
        // 1. An event is an event handler that consists of three parts: an event source, an event type, and an event handler
        //(1) Event source the object whose button the event is triggered
        var btn = document.getElementById('btn');
        //(2) How do event types trigger events, such as onclick, mouse over or keyboard down
        //(3) The event handler is completed by a function assignment
        btn.onclick = function() {
            alert('Point Qiuxiang');
        }
    </script>
</body>
3. Steps to execute the event
- Get event source (html element)
- Registration event
- Add event handler
Code case:
<body>
    <div>123</div>
    <script>
        // Perform event steps
        // Click the div console output, and I'm selected
        // 1. Get event source
        var div = document.querySelector('div');
        // 2. Binding event registration event
        // div.onclick
        // 3. Add event handler
        div.onclick = function() {
            console.log('I was chosen');
        }
    </script>
</body>
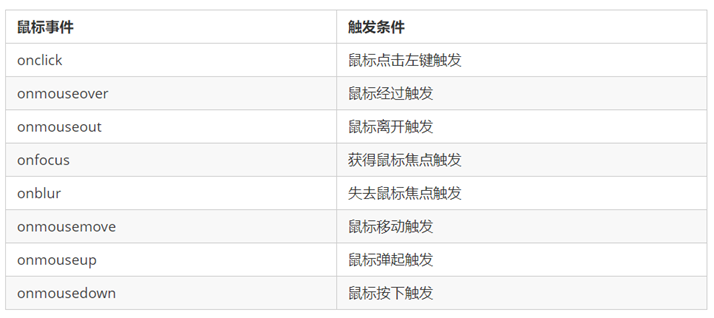
4. Common mouse events
5, Operation element
1. Change element content (get or set)
Code case
<body>
    <button>Displays the current system time</button>
    <div>At a certain time</div>
    <p>1123</p>
    <script>
        // When we click the button, the text in div will change
        // 1. Get element
        var btn = document.querySelector('button');
        var div = document.querySelector('div');
        // 2. Registration event
        btn.onclick = function() {
            // div.innerText = '2019-6-6';
            div.innerHTML = getDate();
        }
        function getDate() {
            var date = new Date();
            // Let's write a Wednesday, May 1, 2019
            var year = date.getFullYear();
            var month = date.getMonth() + 1;
            var dates = date.getDate();
            var arr = ['Sunday', 'Monday', 'Tuesday', 'Wednesday', 'Thursday', 'Friday', 'Saturday'];
            var day = date.getDay();
            return 'Today is:' + year + 'year' + month + 'month' + dates + 'day ' + arr[day];
        }
    </script>
</body>
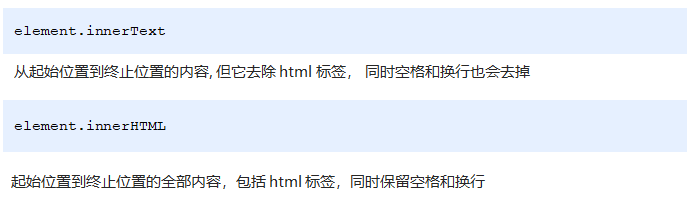
The difference between innerText and innerHTML
-
Differences in obtaining content:
innerText removes spaces and line breaks, while innerHTML retains spaces and line breaks
-
Differences in setting content:
innerText does not recognize html, but innerHTML does
2. Obtain the value of the attribute through the attribute operation of common elements
Element object Attribute name
Set the value of the property
Element object Attribute name = value
3. Attribute operation of form element
Gets the value of the property
Element object Attribute name
Set the value of the property
Element object Attribute name = value
There are some attributes in the form element, such as disabled, checked and selected. The values of these attributes of the element object are Boolean.
Code case
<body>
    <button>Button</button>
    <input type="text" value="Input content">
    <script>
        // 1. Get element
        var btn = document.querySelector('button');
        var input = document.querySelector('input');
        // 2. Register event handlers
        btn.onclick = function() {
            // The value text content in the form is modified through value
            input.value = 'It was clicked';
            // If you want a form to be disabled, you can no longer click disabled. We want this button to be disabled
            // btn.disabled = true;
            this.disabled = true;
            // this refers to the caller btn of the event function
        }
    </script>
</body>
6. Style attribute operation
Method 1: by operating the style attribute
The style attribute of the element object is also an object!
Element object style. Style attribute = value;
Code case
<body>
    <div></div>
    <script>
        // 1. Get element
        var div = document.querySelector('div');
        // 2. Register event handlers
        div.onclick = function() {
            // The attributes in div.style adopt hump naming method
            this.style.backgroundColor = 'purple';
            this.style.width = '250px';
        }
    </script>
</body>
Method 2: operate the className attribute
Element object className = value;
Because class is a keyword, all use className.
<body>
    <div class="first">text</div>
    <script>
        // 1. Use element Style gets and modifies the element style. It is used when there are few styles or simple functions
        var test = document.querySelector('div');
        test.onclick = function() {
            // this.style.backgroundColor = 'purple';
            // this.style.color = '#fff';
            // this.style.fontSize = '25px';
            // this.style.marginTop = '100px';

            // 2. We can change the style of an element by modifying its className, which is suitable for situations with many styles or complex functions
            // 3. If you want to keep the original class name, we can do this multiple class name selector
            // this.className = 'change';
            this.className = 'first change';
        }
    </script>
</body>
summary
