1, Foreword
The basic part of the Spring framework is too long. It is divided into several articles to consolidate the learning record.
1. What is Spring
The spring framework was created due to the complexity of software development. Spring uses basic JavaBean s to accomplish things that could only be done by EJB s before. However, the use of spring is not limited to server-side development. In terms of simplicity, testability and loose coupling, most Java applications can benefit from spring.
Objective: to solve the complexity of enterprise application development
Function: use basic JavaBean s instead of EJB s
Scope: any Java application
Spring is a lightweight inversion of control (IoC) and aspect oriented (AOP) container framework.
2. Spring advantages
1 convenient decoupling and simplified development
Through the container, Spring separates the creation of objects from the code and gives them to Spring for control, so as to avoid high coupling between modules caused by direct coding. Users do not have to code and deal with the single instance and multiple instance control of objects by themselves. They can mainly focus on the interface function without paying attention to the specific implementation class and implementation details
2 AOP section programming
AOP aspect programming is a concept of programming. Spring implements this concept well. Through aspect programming, we can increase functions without modifying the original code. It is usually used for transaction control, logging, performance detection, permission control and so on
3 declarative transactions
The control of transactions can be entrusted to Spring. We can declare the transaction processing method through annotations or configuration files without coding and processing ourselves
4. Integrate JUNIT to facilitate testing
spring integrates JUNIT unit test, which can easily and quickly test the functions of the project, which is convenient for us to debug the program
5. It is convenient to integrate various excellent frameworks
SSM> Spring+SpringMVC +MyBatis
SSH> Spring+Hibernate +Strust
Various other frameworks
6. Rich functional packaging
spring encapsulates JavaEE (JDBC, JavaMail,) in a series of ways to simplify our use of API s and improve the efficiency of program development
7 standardized source code learning samples
spring has ingenious source code design, clear structure and extensive use of design patterns. It is not only a model of java code specification, but also the source code often asked in the interview of senior programmers
3. Spring architecture
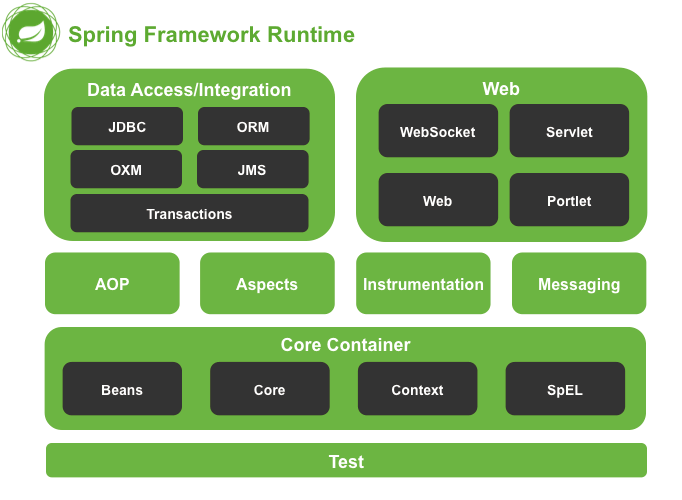
1.Data Access/Integration
- The data access / integration layer includes JDBC, ORM, OXM, JMS and Transactions modules, which are described below.
- JDBC module: it provides an abstract layer of JDBC, which greatly reduces the coding of database operations in the development process.
- ORM module: provides an integration layer for popular object relational mapping API s, including JPA, JDO, Hibernate and iBatis.
- OXM module: provides an abstract layer implementation that supports object / XML Mapping, such as JAXB, Castor, XMLBeans, JiBX and XStream.
- JMS module: refers to the Java message service, which contains information for production and consumption.
- Transactions transaction module: support programming and declarative transaction management, implement special interface classes, and provide all POJO s.
2.Web module
- The Web layer of Spring includes Web, Servlet, Struts and Portlet components. The details are as follows.
- Web module: it provides basic web development integration features, such as multi file upload function, IoC container initialization of Servlet listener and web application context.
- Servlet module: including Spring model view controller (MVC) to implement Web application.
- Struts module: it contains Spring applications in support classes and integrates the classic Struts Web layer.
- Portlet module: it provides the function of using MV C in portlet environment, which is similar to that of Web servlet module.
3.Core Container
- Spring's Core container is the foundation of other modules. It is composed of Beans module, Core module, Context module and Expression Language module. Details are as follows.
- Beans module: it provides BeanFactory, which is a classic implementation of the factory pattern. Spring calls the management object Bean.
- Core module: provides the basic components of Spring framework, including IoC and DI functions.
- Context module: Based on the core and Beans modules, it is the medium to access, define and configure any object. The ApplicationContext interface is the focus of the context module.
- Expression Language module: it is a powerful Expression Language for querying and manipulating object graphs at runtime.
- Other modules
- Other modules of Spring include AOP, Aspects, Instrumentation and Test modules, which are described below.
- AOP module: it provides aspect oriented programming implementation, which allows to define method interceptors and entry points, and separate the code according to functions to reduce coupling.
- Aspects module: provides integration with AspectJ. It is a powerful and mature aspect oriented programming (AOP) framework.
- Instrumentation module: it provides the support of class tools and the implementation of class loader, which can be used in a specific application server.
- Test module: supports Spring components and tests using JUnit or TestNG framework.
2, Spring IOC basic usage
1. IOC concept
In short, the right to create an object, or the location of control, is transferred from the JAVA code to the spring container. The spring container controls the creation of an object, that is, the inversion of control. When spring creates an object, it will read the information in the configuration file, and then use the reflection to create the object and store it in the container. When we need an object, we can obtain the object through the id, We don't need to go to new
Bottom line: create objects and give them to the container
Basic test code:
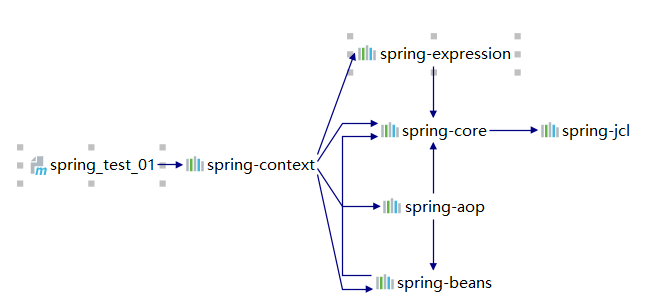
Create a Maven project, and then import the shelf package of spring beans. After importing the shelf package, the four dependencies will also be automatically imported into the project
Spring context, container
Spring beans create objects
Spring core jar
Spring expression expression jar
 <dependency>
    <groupId>org.springframework</groupId>
    <artifactId>spring-beans</artifactId>
    <version>5.3.5</version>
 </dependency>
The dependency transfer diagram is as follows
To facilitate testing, we import Junit test dependencies
        <dependency>
            <groupId>junit</groupId>
            <artifactId>junit</artifactId>
            <version>4.13.1</version>
            <scope>test</scope>
        </dependency>
Then create the implementation class
package com.xiaohui.dao;

public interface EmpDao {
    int addEmp();
}

package com.xiaohui.dao.impl;

import com.xiaohui.dao.EmpDao;

public class EmpDaoImpl implements EmpDao {
    @Override
    public int addEmp() {
        System.out.println("addEmp()");
        return 0;
    }
}
Create a new Spring xml file in the resources directory and copy < bean id = "empdao" class = "com. Xiaohui. Dao. Impl. Empdaoimpl" > < / bean >
public class Test01 {
    @Test
    public void testAddEmp(){
        //Get a container object and read spring XML file. After instantiating the configured object in the configuration file, it is automatically put into the container
        ApplicationContext applicationContext = new ClassPathXmlApplicationContext("spring.xml");
        //Get the object of the object by the ID of the container
        EmpDao empDao = applicationContext.getBean("empDao",EmpDao.class);
        //Call method test
        empDao.addEmp();
    }
}
2. Implementation principle of IOC container
- 1. Reading configuration file with XML parsing technology
<bean id="empDao" class="com.msb.dao.impl.EmpDaoImpl"></bean>
Read the above information into the ID of the program object. One is the full pathname of the object's class
- 2. Reflection technology instantiates objects and puts them into containers
Get the bytecode of the class
Class clazz =Class.forName("com.msb.dao.impl.EmpDaoImpl")
Instantiate objects by bytecode
Object obj = clazz.newInstance();
Put objects into a map collection
map.put("empDao",obj) - 3. Factory mode returns Bean object getBean method
     public Object getBean(String name){
            Object obj =map.get(name);
            return obj;
     }
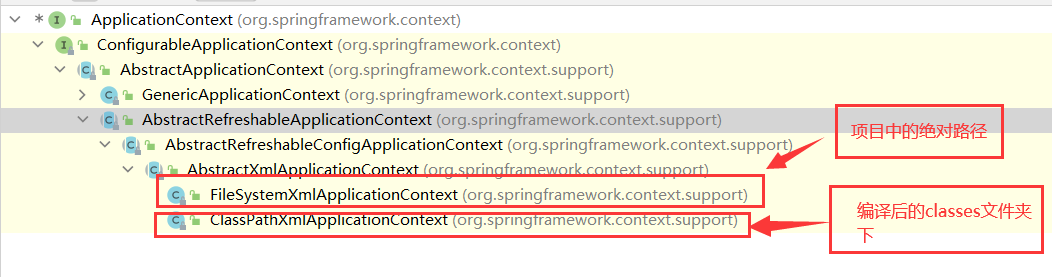
- IOC interface
- BeanFactory interface: the basic function interface of IOC container, which is used internally by spring. We generally do not use this interface directly when dealing with business
- ApplicationContext provides more powerful sub interfaces for developers
3, Implementing DI in XML
- Bean management in spring:
- Bean (Chinese translation of coffee beans) Also known as JAVABean In fact, it is one object in JAVA program, so bean management is actually spring's management of objects in JAVA program
- What is the content of management
- 1. Object creation IOC
- IOC is called inversion of control, which means that Spring creates objects for us, and then we use them directly instead of NEW
- IOC deals with how objects are created
- 2. Attribute assignment DI
- DI Dependency Injection, i.e. "dependency injection" refers to assigning values to object attributes when creating attributes
The realization of object function often depends on the value of attribute, so assigning value to object attribute can be regarded as dependency injection - Because object attributes are not only basic data types, but also other classes or reference types
Then dependency injection will put more relationships between objects together, which can create a huge dependency
DI deals with the attribute assignment and interdependence of objects
- DI Dependency Injection, i.e. "dependency injection" refers to assigning values to object attributes when creating attributes
- 1. Object creation IOC
1. IOC create object
Construct objects by parameterless construction method
<bean id="user1" class="com.xiaohui.bean.User"></bean>
Common properties of bean Tags
- id the id of the object
- Full pathname of class
- name is similar to id, but generally not used
- Scope controls the single instance and multiple instances of the object and the scope of use
- singleton scope (the default value of scope), there will only be one shared bean instance in the Spring IOC container
- For the beans deployed in the prototype scope, each acquisition will generate a new bean instance, which is equivalent to a new operation
- Request means that a new bean will be generated for each HTTP request, and the bean is only valid in the current HTTP request
- The session scope means that a new bean will be generated for each HTTP request, and the bean is only valid in the current HTTP session
- The global session scope is similar to the standard HTTP Session scope, but it only makes sense in portlet based web applications
- Lazy init lazy loads and instantiates the object when calling getBean
2. DI assigns values to object properties
a. Assign values to object attributes through the set method
 <!--property Is using set Method to implement dependency injection-->
    <bean id="user1" class="com.xiaohui.bean.User">
        <property name="userid" value="1"></property>
        <property name="username" value="Zhang San"></property>
        <property name="password" value="abcdefg"></property>
    </bean>
b. Assign values to object properties through parameterized construction
<!--
    constructor-arg Is to use the construction method to implement dependency injection
    constructor-arg The number of must correspond to the number of parameters of a construction method
    name Refers to the parameter name
    index Refers to the index of the parameter
    value Refers to the parameter value
    -->
    <bean id="user2" class="com.xiaohui.bean.User">
        <constructor-arg name="userid" value="20"></constructor-arg>
        <constructor-arg name="username" value="A Wu"></constructor-arg>
        <constructor-arg name="password" value="123456789"></constructor-arg>
    </bean>
    <bean id="user3" class="com.xiaohui.bean.User">
        <constructor-arg index="0"  value="30"></constructor-arg>
        <constructor-arg index="1"  value="ASA"></constructor-arg>
        <constructor-arg index="2"  value="987654321"></constructor-arg>
    </bean>
c. Assign values to object attributes through the p namespace and the C namespace
Add constraint
<?xml version="1.0" encoding="UTF-8"?>
<beans xmlns="http://www.springframework.org/schema/beans"
       xmlns:xsi="http://www.w3.org/2001/XMLSchema-instance"
       xmlns:p="http://www.springframework.org/schema/p"
       xmlns:c="http://www.springframework.org/schema/c"
       xsi:schemaLocation="http://www.springframework.org/schema/beans
       http://www.springframework.org/schema/beans/spring-beans.xsd">
Configuration object
<!--p Namespace,That's right property Simplified treatment of-->
    <bean id="user4" class="com.msb.bean.User" p:userid="4" p:username="Xiaodong" p:password="111111" ></bean>
    <!--c Namespace,That's right constructor-arg Simplification of-->
    <bean id="user5" class="com.msb.bean.User" c:userid="5" c:username="Xiaoxi" c:password="222222" ></bean>
d. Inject null values and special symbols
<bean id="user1" class="com.msb.bean.User">
<!--null value-->
<property name="userid">
<null></null>
</property>
<!--Special symbol translation character < < >> & & -->
<property name="username" value="&xiaoming<>"></property>
<!-- Special symbols <![CDATA[content]]> -->
<property name="password">
<value><![CDATA[&<123456>]]></value>
</property>
</bean>
e. About bean references
Create two entity classes
package com.msb.bean;
import java.util.Date;

public class Mouse {
    private String name;
    private Date birthdate;
    @Override
    public String toString() {
        return "Mouse{" +
                "name='" + name + '\'' +
                ", birthdate=" + birthdate +
                '}';
    }
    public Mouse() {
    }
    public Mouse(String name, Date birthdate) {
        this.name = name;
        this.birthdate = birthdate;
    }
    public String getName() {
        return name;
    }
    public void setName(String name) {
        this.name = name;
    }
    public Date getBirthdate() {
        return birthdate;
    }
    public void setBirthdate(Date birthdate) {
        this.birthdate = birthdate;
    }
}
package com.msb.bean;

public class Cat {
    private String name;
    private Mouse mouse1;
    @Override
    public String toString() {
        return "Cat{" +
                "name='" + name + '\'' +
                ", mouse1=" + mouse1 +
                '}';
    }
    public Cat() {
    }
    public Cat(String name, Mouse mouse1) {
        this.name = name;
        this.mouse1 = mouse1;
    }
    public String getName() {
        return name;
    }
    public void setName(String name) {
        this.name = name;
    }
    public Mouse getMouse1() {
        return mouse1;
    }
    public void setMouse1(Mouse mouse1) {
        this.mouse1 = mouse1;
    }
}
applicationContext3.xml
<?xml version="1.0" encoding="UTF-8"?>
<beans xmlns="http://www.springframework.org/schema/beans"
       xmlns:xsi="http://www.w3.org/2001/XMLSchema-instance"
       xsi:schemaLocation="http://www.springframework.org/schema/beans
        http://www.springframework.org/schema/beans/spring-beans.xsd">

    <!--Tell the container to prepare one Date object-->
    <bean id="date1" class="java.util.Date"></bean>

    <bean id="mouse" class="com.xiaohui.bean.Mouse">
        <property name="name" value="Jerry"></property>
        <!--bean Reference external bean-->
        <property name="birthdate" ref="date1"></property>
    </bean>

    <bean id="cat1" class="com.xiaohui.bean.Cat">
        <property name="name" value="Tom"></property>
        <!--bean Reference external bean-->
        <property name="mouse1" ref="mouse"></property>
    </bean>

    <bean id="cat2" class="com.xiaohui.bean.Cat">
        <property name="name" value="Tom2"></property>
        <!--Reference internal bean-->
        <property name="mouse1">
            <bean class="com.xiaohui.bean.Mouse">
                <property name="name" value="Jerry2"></property>
                <property name="birthdate">
                    <bean class="java.util.Date"></bean>
                </property>
            </bean>
        </property>
    </bean>

    <bean id="mouse2" class="com.xiaohui.bean.Mouse"></bean>
    <bean id="cat3" class="com.xiaohui.bean.Cat">
        <property name="name" value="Tom3"></property>
        <!--Cascade introduction bean-->
        <property name="mouse1" ref="mouse2"></property>
        <!--Calling this class with reflection get***()Method to obtain the object and then assign a value-->
        <property name="mouse1.name" value="Jerry3"></property>
        <property name="mouse1.birthdate">
            <bean class="java.util.Date"></bean>
        </property>
    </bean>

</beans>
Test code:
    @Test
    public void testCat(){
        ApplicationContext applicationContext = new ClassPathXmlApplicationContext("applicationContext3.xml");
        Cat cat = applicationContext.getBean("cat1", Cat.class);
        System.out.println(cat.toString());

        Cat cat2 = applicationContext.getBean("cat2", Cat.class);
        System.out.println(cat2.toString());

        Cat cat3 = applicationContext.getBean("cat3", Cat.class);
        System.out.println(cat3.toString());

    }
result:
Cat{name='Tom', mouse1=Mouse{name='Jerry', birthdate=Tue May 11 16:54:10 CST 2021}}
Cat{name='Tom2', mouse1=Mouse{name='Jerry2', birthdate=Tue May 11 16:54:10 CST 2021}}
Cat{name='Tom3', mouse1=Mouse{name='Jerry3', birthdate=Tue May 11 16:54:10 CST 2021}}
f. About set injection
<?xml version="1.0" encoding="UTF-8"?>
<beans xmlns="http://www.springframework.org/schema/beans"
       xmlns:xsi="http://www.w3.org/2001/XMLSchema-instance"
       xmlns:p="http://www.springframework.org/schema/p"
       xmlns:c="http://www.springframework.org/schema/c"
       xmlns:util="http://www.springframework.org/schema/util"
       xsi:schemaLocation="http://www.springframework.org/schema/beans
       http://www.springframework.org/schema/beans/spring-beans.xsd
       http://www.springframework.org/schema/util
       http://www.springframework.org/schema/util/spring-util.xsd">

    <!--Define public collections-->
    <util:list id="outerbookList">
        <!--Declare multiple Book object-->
        <bean id="b1" class="com.xiaohui.bean.Book" p:bname="JAVA" p:author="hibernate "></bean>
        <bean id="b2" class="com.xiaohui.bean.Book" p:bname="Go" p:author="hibernate "></bean>
        <bean id="b3" class="com.xiaohui.bean.Book" p:bname="JVM" p:author="hibernate "></bean>
    </util:list>

    <bean id="student1" class="com.xiaohui.bean.Student">
        <!--Array injection first-->
        <!--<property name="books" value="1,2,3"></property>-->
        <!--Array injection second-->
        <property name="books">
            <array>
                <value>java</value>
                <value>Mysql</value>
                <value>Spring</value>
            </array>
        </property>

        <!--set Set injection-->
        <property name="bookSet">
            <set>
                <value>java</value>
                <value>Mysql</value>
                <value>Spring</value>
            </set>
        </property>

        <!--list Set injection-->
        <property name="bookList">
            <list>
                <value>java</value>
                <value>Mysql</value>
                <value>Spring</value>
            </list>
        </property>

        <!--Map Set injection-->
        <property name="bookMap">
            <map>
                <entry key="java" value="aaa"></entry>
                <entry key="mysql" value="bbb"></entry>
                <entry key="spring" value="ccc"></entry>
            </map>
        </property>

        <!--List The first method of object injection-->
        <!--<property name="bookList2" ref="outerbookList"></property>-->
        <!--Second-->
        <property name="bookList2">
            <list>
                <bean class="com.xiaohui.bean.Book">
                    <property name="bname" value="java"></property>
                    <property name="author" value="aaa"></property>
                </bean>
                <bean class="com.xiaohui.bean.Book">
                    <property name="bname" value="mysql"></property>
                    <property name="author" value="bbb"></property>
                </bean>
                <bean class="com.xiaohui.bean.Book">
                    <property name="bname" value="spring"></property>
                    <property name="author" value="ccc"></property>
                </bean>
                <ref bean="book1"></ref>
            </list>
        </property>
    </bean>

    <bean name="book1" class="com.xiaohui.bean.Book">
        <property name="bname" value="Java"></property>
        <property name="author" value="ddd"></property>
    </bean>


</beans>
Test code:
    @Test
    public void testStudent(){
        ApplicationContext applicationContext = new ClassPathXmlApplicationContext("applicationContext4.xml");
        Student student = applicationContext.getBean("student1", Student.class);
        System.out.println(student.getBooks());
        System.out.println(student.getBookList());
        System.out.println(student.getBookSet());
        System.out.println(student.getBookMap());
        System.out.println(student.getBookList2());

    }
result:
[java, Mysql, Spring]
[java, Mysql, Spring]
[java, Mysql, Spring]
{java=aaa, mysql=bbb, spring=ccc}
[Book{bname='java', author='aaa'}, Book{bname='mysql', author='bbb'}, Book{bname='spring', author='ccc'}, Book{bname='Java', author='ddd'}]
g. Get bean in factory mode
Features: the class class defined in the bean tag is not the class of the returned object, but the factory that produces the object
Factory design mode: GOF
spring defines a factory interface for us, which can produce the interface of objects. We can obtain bean s through the factory
Define the factory object and implement the FactoryBean interface
package com.xiaohui.bean;

import org.springframework.beans.factory.FactoryBean;

public class BookFactroy implements FactoryBean<Book> {
    @Override
    public Book getObject() throws Exception {
        Book book = new Book();
        book.setBname("java");
        book.setAuthor("programmer");
        return book;
    }

    @Override
    public Class<?> getObjectType() {
        return null;
    }
}
configuration file
<bean id="bookFactroy" class="com.xiaohui.bean.BookFactroy"></bean>
Test code
package com.xiaohui.test;

import com.xiaohui.bean.*;
import org.junit.Test;
import org.springframework.context.ApplicationContext;
import org.springframework.context.support.ClassPathXmlApplicationContext;

import java.util.Arrays;

public class Test02 {

    @Test
    public void testUser(){
        ApplicationContext applicationContext =
                new ClassPathXmlApplicationContext("applicationContext5.xml");
        //The object returned by the factory is the Book object, so here we need to use the Book class to receive
        Book book = applicationContext.getBean("bookFactroy", Book.class);
        System.out.println(book);
    }

}
result:
Book{bname='java', author='programmer'}
4, Bean life cycle
SpringBean's lifecycle reference link: Detailed explanation of Spring Bean life cycle
- The bean goes through various stages from creation to destruction and the methods called in each stage
- 1 create bean instance through constructor (execute constructor)
- 2. Assign value to bean attribute (execute set method)
- 3. Initialize the bean (call the initialization method of the bean and configure the method to be called)
- 4. Bean acquisition (container object getBean method)
- 5. The container closes and destroys the bean (to call the destruction method, you need to configure the method to be called)
Test life cycle
Prepare bean
<?xml version="1.0" encoding="UTF-8"?>
<beans xmlns="http://www.springframework.org/schema/beans"
       xmlns:xsi="http://www.w3.org/2001/XMLSchema-instance"
       xsi:schemaLocation="http://www.springframework.org/schema/beans
       http://www.springframework.org/schema/beans/spring-beans.xsd">

     <bean id="user" class="com.xiaohui.bean.User" init-method="initUser" destroy-method="destoryUser">
          <property name="username" value="Zhang San"></property>
     </bean>

</beans>
Entity class
package com.xiaohui.bean;

 **/
public class User {
    private Integer userid;
    private String username;
    private String password;

    public User() {
        System.out.println("First step:User structure");
    }

    public void setUsername(String username) {
        System.out.println("Step 2: User set method");
        this.username = username;
    }

    public void initUser(){
        System.out.println("Step 3: User initialization");
    }

    public void destoryUser(){
        System.out.println("Step 5: User Destroy");
    }

    public Integer getUserid() {
        return userid;
    }

    public void setUserid(Integer userid) {
        this.userid = userid;
    }

    public String getUsername() {
        return username;
    }


    public String getPassword() {
        return password;
    }

    public void setPassword(String password) {
        this.password = password;
    }

    public User(Integer userid, String username, String password) {
        System.out.println("allArgConstructor");
        this.userid = userid;
        this.username = username;
        this.password = password;
    }

    @Override
    public String toString() {
        return "User{" +
                "userid=" + userid +
                ", username='" + username + '\'' +
                ", password='" + password + '\'' +
                '}';
    }
}

Test code:
	@Test
    public void testUser(){
        ClassPathXmlApplicationContext applicationContext =
                new ClassPathXmlApplicationContext("applicationContext6.xml");
        User user = applicationContext.getBean("user", User.class);
        System.out.println("Step 4: User Object gets from the container");
        System.out.println(user);
        //Close the container
        applicationContext.close();
    }
result:
First step:User structure
 Step 2: User set method
 Step 3: User initialization
 Step 4: User Object gets from the container
User{userid=null, username='Zhang San', password='null'}
Step 5: User Destroy
- About post processor
- 1 create bean instance through constructor (execute constructor)
- 2. Assign value to bean attribute (execute set method)
- 3 method of passing bean instance to bean post processor
- 4. Initialize the bean (call the initialization method of the bean and configure the method to be called)
- 5 method of passing bean instance to bean post processor
- 6. Bean acquisition (container object getBean method)
- 7. The container closes and destroys the bean (to call the destruction method, you need to configure the method to be called)
1. Create a post processor to implement beanpostprocessor and rewrite two methods
package com.xiaohui.beanProcesser;

import org.springframework.beans.BeansException;
import org.springframework.beans.factory.config.BeanPostProcessor;

public class MyBeanProcesser implements BeanPostProcessor {
    @Override
    public Object postProcessAfterInitialization(Object bean, String beanName) throws BeansException {
        //Object bean instantiated bean
        //id of string beanname bean
        System.out.println("bean:Before initializing the method");
        return bean;// return bean is required here
    }

    @Override
    public Object postProcessBeforeInitialization(Object bean, String beanName) throws BeansException {
        System.out.println("bean:After initializing the method");
        return bean;// return bean is required here
    }
}
2 configure the post processor and add the life cycle of the post processor to all bean s in the container
<bean id="myBeanProcesser" class="com.xiaohui.beanProcesser.MyBeanProcesser"></bean>
result:
First step:User structure
 Step 2: User set method
bean:After initializing the method
 Step 3: User initialization
bean:Before initializing the method
 Step 4: User Object gets from the container
User{userid=null, username='Zhang San', password='null'}
Step 5: User Destroy
- Functions of BeanPostProcessor interface:
- If we want to complete bean instantiation, configuration and other initialization methods in the Spring container, we need to add some logic processing before and after. We need to define one or more BeanPostProcessor interface implementation classes, and then register them in the Spring IoC container.
1. Both methods in the interface should return the incoming bean instead of null. If NULL is returned, we will not get the target through the getBean method.
2. ApplicationContext will automatically detect all beans that implement the BeanPostProcessor interface in the configuration file, register them as post processors, and then call it when the container creates beans. Therefore, deploying a post processor is no different from deploying other beans. When using BeanFactory implementation, the bean post processor must be explicitly registered through code, and the registration method is defined in the ConfigurableBeanFactory interface in the IoC container inheritance system
5, Automatic assembly
The property tag allows you to manually assign properties for injection
We can also complete the automatic injection of attributes through automatic transfer, that is, automatic assembly, which can simplify the configuration of DI
package com.xiaohui.bean;

public class Dept {
}

package com.xiaohui.bean;

public class Emp {
    private Dept dept;
    @Override
    public String toString() {
        return "Emp{" +
                "dept=" + dept +
                '}';
    }
    public Dept getDept() {
        return dept;
    }
    public void setDept(Dept dept) {
        this.dept = dept;
    }
    public Emp() {
    }
    public Emp(Dept dept) {
        this.dept = dept;
    }
}
configuration file
<?xml version="1.0" encoding="UTF-8"?>
<beans xmlns="http://www.springframework.org/schema/beans"
       xmlns:xsi="http://www.w3.org/2001/XMLSchema-instance"
       xmlns:p="http://www.springframework.org/schema/p"
       xmlns:c="http://www.springframework.org/schema/c"
       xsi:schemaLocation="http://www.springframework.org/schema/beans
       http://www.springframework.org/schema/beans/spring-beans.xsd">
    <bean id="dept" class="com.msb.bean.Dept"></bean>
    <!--
    autowire Property control automatically injects objects in the container onto the properties of the current object
    byName According to the goal id Value and attribute value injection,To ensure that the property value of the current object is consistent with that of the target object id Consistent value
    byType Inject according to type,Ensure that there is only one instance of the same type of target object in the container
    -->
    <bean id="emp" class="com.msb.bean.Emp" autowire="byName"></bean>
</beans>
Test code
@Test
    public void testUser(){
        ApplicationContext applicationContext =
                new ClassPathXmlApplicationContext("applicationContext7.xml");
        Emp emp = applicationContext.getBean("emp", Emp.class);
        System.out.println(emp);
    }
result:
Emp{dept=com.xiaohui.bean.Dept@13c9d689}
6, Use external property profile
1. Import Druid dependency and MySQL connector dependency
        <dependency>
            <groupId>com.alibaba</groupId>
            <artifactId>druid</artifactId>
            <version>1.1.23</version>
        </dependency>
        <!-- https://mvnrepository.com/artifact/mysql/mysql-connector-java -->
        <dependency>
            <groupId>mysql</groupId>
            <artifactId>mysql-connector-java</artifactId>
            <version>8.0.21</version>
        </dependency>
2. Prepare a JDBC in the resources directory Properties property configuration file
jdbc.driver=com.mysql.cj.jdbc.Driver
jdbc.url=jdbc:mysql://127.0.0.1/mybatis?useSSL=false&useUnicode=true&characterEncoding=UTF-8&serverTimezone=Asia/Shanghai
jdbc.username=root
jdbc.password=root
Add the context namespace in applicationContext and read the attribute configuration file. Configure the druid data source and inject the information in the attribute configuration file into the connection pool
<?xml version="1.0" encoding="UTF-8"?>
<beans xmlns="http://www.springframework.org/schema/beans"
       xmlns:xsi="http://www.w3.org/2001/XMLSchema-instance"
       xmlns:context="http://www.springframework.org/schema/context"
       xsi:schemaLocation="http://www.springframework.org/schema/beans
       http://www.springframework.org/schema/beans/spring-beans.xsd
       http://www.springframework.org/schema/context
       http://www.springframework.org/schema/context/spring-context.xsd">

     <context:property-placeholder location="jdbc.properties"></context:property-placeholder>

     <bean id="druidDataSource" class="com.alibaba.druid.pool.DruidDataSource">
          <property name="username" value="${jdbc.username}"></property>
          <property name="password" value="${jdbc.password}"></property>
          <property name="url" value="${jdbc.url}"></property>
          <property name="driverClassName" value="${jdbc.driver}"></property>
          <property name="initialSize" value="1"></property>
     </bean>

</beans>
3 Debug test code
    @Test
    public void testUser() throws SQLException {
        ApplicationContext applicationContext =
                new ClassPathXmlApplicationContext("applicationContext8.xml");
        DruidDataSource druidDataSource = applicationContext.getBean("druidDataSource", DruidDataSource.class);
        System.out.println(druidDataSource);
    }

7, Annotation management bean
1. Create object IOC in annotation mode
- @Component is placed on the class and used as a tag to tell spring that the current class needs to be instantiated by the container and put into the container
- This annotation has three sub annotations
- @The controller is used to instantiate the controller layer bean
- @Service is used to instantiate service layer bean s
- @Repository is used to instantiate persistence layer bean s
- When you are not sure which layer it is, use Component
- It's OK to mix these annotations with each other, but it's not recommended
- This annotation has three sub annotations
<?xml version="1.0" encoding="UTF-8"?>
<beans xmlns="http://www.springframework.org/schema/beans"
       xmlns:xsi="http://www.w3.org/2001/XMLSchema-instance"
       xmlns:context="http://www.springframework.org/schema/context"
       xsi:schemaLocation="http://www.springframework.org/schema/beans
       http://www.springframework.org/schema/beans/spring-beans.xsd
       http://www.springframework.org/schema/context
       http://www.springframework.org/schema/context/spring-context.xsd">
    <!--Add annotation scan,Scan the specified package,Instantiate all annotated classes in the package
        base-package Put the package to be scanned behind
        If there are multiple packages to scan,You can separate them with commas  com.xiaohui.bean,com.xiaohui.service
        Or you can write a layer of package path  com.xiaohui
        It can be specified by annotation bean of id@Component("user1")
        If not specified,be id The default is lowercase
        -->
    <context:component-scan base-package="com.xiaohui.bean"></context:component-scan>

</beans>
Entity class and test code
package com.xiaohui.bean;

import org.springframework.stereotype.Component;

@Component
public class User {
}

    @Test
    public void testGetBean(){
        ApplicationContext applicationContext = new ClassPathXmlApplicationContext("applicationContext.xml");
        User user = applicationContext.getBean("user", User.class);
        System.out.println(user);
    }
result:
com.xiaohui.bean.User@41fecb8b
Component scan configuration annotation identification
use-default-filters="false"
The default value is true, which means the default scanning filter is used
The Default scan filter will recognize and include four annotations @ Component @Controller @Service @Repository
Instead of using the default filter, use our own filter
    <!--Control scan only Controller annotation-->
    <context:component-scan base-package="com.xiaohui.bean" use-default-filters="false">
        <context:include-filter type="annotation" expression="org.springframework.stereotype.Controller"/>
    </context:component-scan>

    <!--Control not to scan Controller annotation-->
    <context:component-scan base-package="com.xiaohui.bean" use-default-filters="true">
        <context:exclude-filter type="annotation" expression="org.springframework.stereotype.Controller"/>
    </context:component-scan>
Test code:
//@Component
@Controller
//@Service
//@Repository
public class User {
}

    @Test
    public void testGetBean(){
        ApplicationContext applicationContext = new ClassPathXmlApplicationContext("applicationContext.xml");
        User user1 = applicationContext.getBean("user", User.class);
        System.out.println(user1);
    }

Scan only Controller When commenting, the result is com.xiaohui.bean.User@5ace1ed4
 Do not scan Controller Note, the result is org.springframework.beans.factory.NoSuchBeanDefinitionException: No bean named 'user' available
2. Annotation dependent injection DI
@Autowired automatically assembles according to the attribute data type
@Qualifier injects dependencies based on attribute names
@Resources can be injected by type or name
@Value injection normal data type (8+String)
Project structure diagram
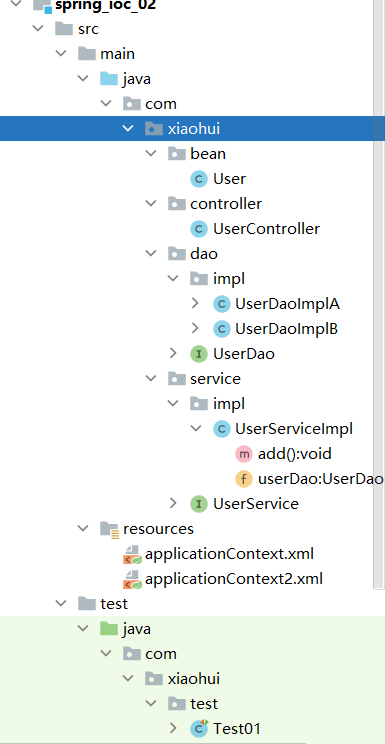
Interface and implementation class
public interface UserDao {
    void add();
}

@Repository
public class UserDaoImplA implements UserDao {
    @Override
    public void add() {
        System.out.println("UserDaoImplA  add...");
    }
}

@Repository
public class UserDaoImplB implements UserDao {
    @Override
    public void add() {
        System.out.println("UserDaoImplB  add...");
    }
}

public interface UserService {
    void add();
}
applicationContext2.xml
<?xml version="1.0" encoding="UTF-8"?>
<beans xmlns="http://www.springframework.org/schema/beans"
       xmlns:xsi="http://www.w3.org/2001/XMLSchema-instance"
       xmlns:context="http://www.springframework.org/schema/context"
       xsi:schemaLocation="http://www.springframework.org/schema/beans
       http://www.springframework.org/schema/beans/spring-beans.xsd
       http://www.springframework.org/schema/context
       http://www.springframework.org/schema/context/spring-context.xsd">

    <context:property-placeholder location="classpath:aaa.properties"></context:property-placeholder>
    <context:component-scan base-package="com.xiaohui"></context:component-scan>

</beans>
aaa.properties
sname=Xiao Ming
sage=20
sgender=male
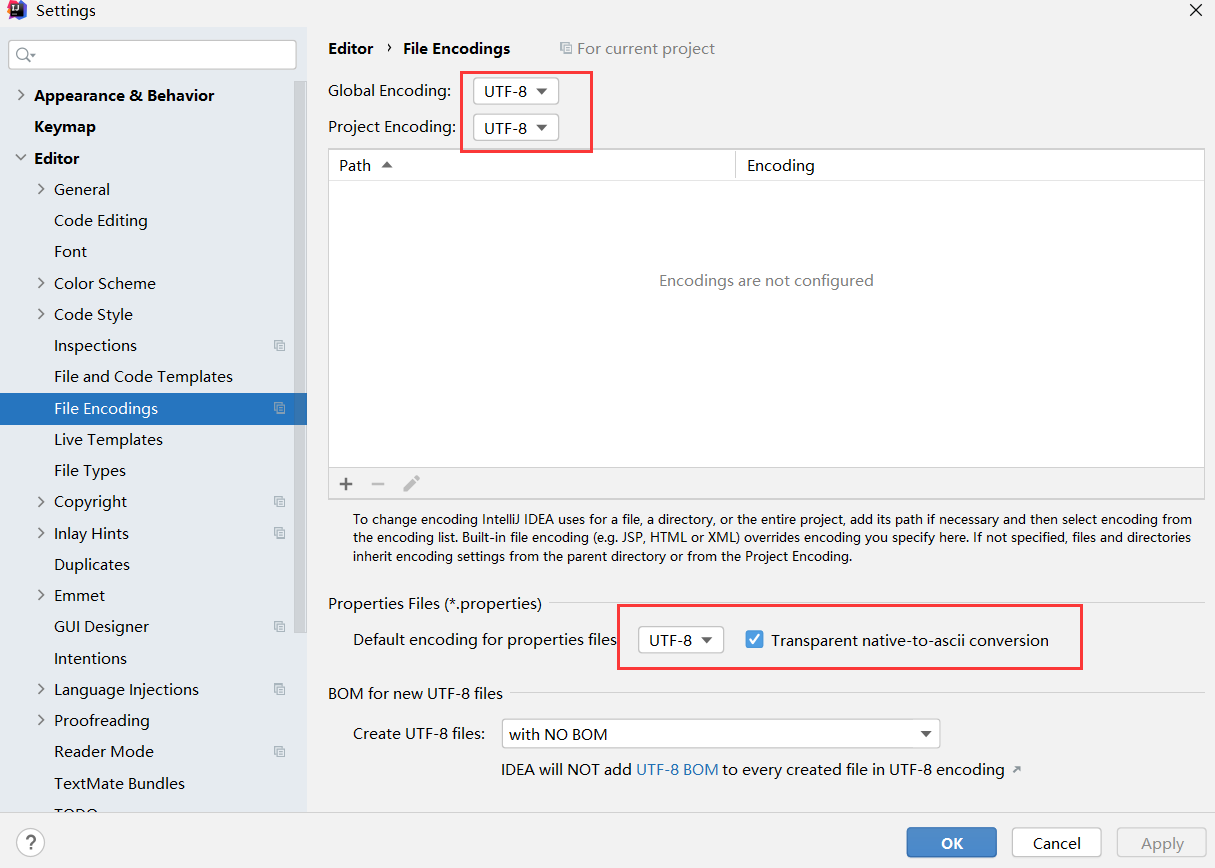
When using external files to read content, Chinese garbled code is used for setting and related configuration
- @Autowired (common)
- Find the corresponding object in the container according to the type, and assign a value to the current attribute after finding it
- There is no need to rely on the set method
- The attribute type can be an interface, which will automatically match the corresponding implementation class object
- @Autowired works with @ Qualifier to specify injected objects by name
- @If the Resource does not configure name, it is injected according to the type
- @Resource(name = "userDaoImplB") configures name, which is injected according to the name
- @Resource is the annotation of javax package in JDK
- @Autowired and @ Qualifier are annotations in spring
- @Value can be assigned to a common attribute
- @Value can use the expression ${} to get the variable value of the system
- Or Values in the properties property configuration file
package com.xiaohui.service.impl;

import com.xiaohui.dao.UserDao;
import com.xiaohui.dao.impl.UserDaoImplA;
import com.xiaohui.service.UserService;
import org.springframework.beans.factory.annotation.Autowired;
import org.springframework.beans.factory.annotation.Qualifier;
import org.springframework.stereotype.Service;

import javax.annotation.Resource;

@Service
public class UserServiceImpl implements UserService {
//    @Autowired
//    @Qualifier("userDaoImplB")
//    private UserDao userDao;

    @Resource(name="userDaoImplA")
    private UserDao userDao;

    //Ordinary attribute assignment (external files or direct assignment can be used)
    @Value("${sname}")
    private String sname;
    @Value("${sgender}")
    private String sgender;
    @Value("${sage}")
    private Integer sage;

    @Override
    public void add() {
        System.out.println("UserServiceImpl add...");
        System.out.println(sname);
        System.out.println(sgender);
        System.out.println(sage);
        userDao.add();
    }
}
The test results of @ Autowired and @ Qualifier are the same as those of @ Resource
UserServiceImpl add...
Xiao Ming
 male
20
UserDaoImplA  add...
3. Configure classes to implement IOC and DI (understand)
Add @ ComponentScan and @ PropertySource through a configuration class in the config directory to scan packages and external files
Create a configuration class to replace the XML configuration file
package com.xiaohui.config;

import org.springframework.context.annotation.ComponentScan;

@ComponentScan(basePackages = "com.xiaohui")
@PropertySource("classpath:aaa.properties")
public class SpringConfig {
}
Test code:
    @Test
    public void testGetBean2(){
        ApplicationContext applicationContext =
                new AnnotationConfigApplicationContext(SpringConfig.class);
        UserServiceImpl userServiceImpl = applicationContext.getBean("userServiceImpl", UserServiceImpl.class);
        userServiceImpl.add();
    }
result:
UserServiceImpl add...
Xiao Ming
 male
20
UserDaoImplB  add...
8, Agent mode
Proxy mode is to access the target object through the proxy object, which can enhance additional functions based on the target object, such as adding permissions, access control and audit.
1. Static proxy
In the static proxy, both the proxy class and the proxy class need to implement the same interface, which means that our static proxy class can only proxy one class, and we need to know which class we want to proxy in advance to write the proxy class. If we have other classes that want to use the proxy, we must write another proxy class. However, in actual development, we may have many classes that need to be represented, and we may not know which class we want to represent in advance. Therefore, if we continue to use static agents, it will increase a lot of workload, low efficiency and poor code reuse rate.
package com.xiaohui.test;

public class Test1 {
    public static void main(String[] args) {
        Person person =new Person("Zhang San");
        Court court=new Lawyer(person);
        court.doCourt();
    }
}
// Interface
interface Court{
    void doCourt();
}
// proxy class
class Lawyer implements Court{
    private Person person;
    public Lawyer(Person person) {
        this.person = person;
    }
    @Override
    public void doCourt() {
        System.out.println("Lawyer evidence:The video proves that Zhang San was traveling at that time,Not at the crime scene");
        System.out.println("Lawyer summary:Zhang San can't kill");
        person.doCourt();
    }
}
// Proxied class
class Person implements Court{
    private String name;
    public Person(String name) {
        this.name = name;
    }
    @Override
    public void doCourt() {
        System.out.println(name+"say:I didn't kill anyone");
    }
}
Using agent technology to obtain agent object instead of Zhang San to enhance the method of lawsuit
2. Dynamic agent
Dynamic proxy can proxy for some non-specific classes or some non-specific methods. We can dynamically change the rules of the proxy when the program is running. The proxy mode created by the proxy class when the program is running becomes dynamic proxy. In this case, the proxy class is not defined in the Java code, but dynamically generated according to our "instructions" in the Java code when the program runs
Proxy dynamic proxy JDK dynamic proxy oriented interface
cglib dynamic proxy third-party dynamic proxy facing parent class
a. Proxy dynamic proxy JDK dynamic proxy
Obtain a Proxy object through Proxy dynamic Proxy, and enhance a method in the Proxy object
- The premise of using proxy dynamic proxy
- Interface oriented
- 1. There must be interfaces and implementation classes
- 2. Methods defined in the enhancement interface
- 3. Only annotations on Methods in the interface can be read
package com.xiaohui.testProxy;

import java.lang.reflect.InvocationHandler;
import java.lang.reflect.Method;
import java.lang.reflect.Proxy;

public class Test02 {
    public static void main(String[] args) {
        Dinner dinner = new Person("Zhang San");

        //Obtain a Proxy object through Proxy dynamic Proxy, and enhance a method in the Proxy object
        // Classloader, the class loader of the proxy object
        ClassLoader classLoader = dinner.getClass().getClassLoader();
        // Class<?> [] interfaces, all interfaces implemented by the proxy object
        Class[] interaces= dinner.getClass().getInterfaces();
        // InvocationHandler h, the execution processor object, is specifically used to define enhanced rules
        InvocationHandler invocationHandler = new InvocationHandler(){
            @Override
            public Object invoke(Object proxy, Method method, Object[] args) throws Throwable {
//                Object proxy proxy object
//                Method method the method being represented
//                Object[] args is the runtime argument of the proxy method
                Object res = null;
                if(method.getName().equals("eat")){
                    System.out.println("Wash your hands before meals");
                    //Let the original eat method run
                    res = method.invoke(dinner,args);
                    System.out.println("Wash the dishes after dinner");
                }else{
                    //Let the original drink method run
                    res = method.invoke(dinner,args);
                }
                return res;
            }
        };

        Dinner dinnerProxy =(Dinner) Proxy.newProxyInstance(classLoader,interaces,invocationHandler);
        dinnerProxy.eat("steamed stuffed bun");
//        dinnerProxy.drink();
    }
}

interface Dinner{
    void eat(String foodName);
    void drink();
}

class Person implements Dinner{
    private String name;
    public Person(String name) {
        this.name = name;
    }

    @Override
    public void eat(String foodName) {
        System.out.println(name+"I am eating"+foodName);
    }

    @Override
    public void drink() {
        System.out.println(name+"I'm drinking tea");
    }
}

class Student implements Dinner {
    private String name;

    public Student(String name) {
        this.name = name;
    }

    @Override
    public void eat(String foodName) {
        System.out.println(name + "Eating in the canteen" + foodName);
    }

    @Override
    public void drink() {
        System.out.println(name + "I'm drinking coke");
    }
}
summary
- 1. Enhance the object function without modifying the original code or there is no way to modify the original code. Use the proxy object to replace the original object to complete the function successfully
So as to achieve the purpose of expanding functions - 2. JDK Proxy dynamic proxy interface oriented dynamic proxy must have the existence of interface and implementation class. The proxy object enhances the method rewritten by the implementation class in the method of implementing the interface
- The generated proxy object can only be converted into an interface, not a proxy class
- Proxy objects can only enhance the methods defined in the interface, and other interface independent methods in the implementation class cannot be enhanced
- The proxy object can only read the annotation on the method in the interface, and cannot read the annotation on the implementation class method
b. CGLIB dynamic proxy
1. It is oriented to the parent class and has no direct relationship with the interface
2. Not only one method in the interface, but also other methods that can be enhanced
3. You can read all annotations on Methods in the parent class
package com.xiaohui.testCglib;

import org.junit.Test;
import org.springframework.cglib.proxy.Enhancer;
import org.springframework.cglib.proxy.MethodInterceptor;
import org.springframework.cglib.proxy.MethodProxy;

import java.lang.reflect.Method;

/**
 * @ClassName Test01
 **/
public class Test01 {
    @Test
    public void testCglib() {
        //Get a Person object
        Person person = new Person();
        //1. Get an Enhancer object
        Enhancer enhancer = new Enhancer();
        //2. Set parent bytecode
        enhancer.setSuperclass(person.getClass());
        //3. Gets the MethodInterceptor object used to define enhancement rules
        MethodInterceptor methodInterceptor = new MethodInterceptor() {
            @Override
            public Object intercept(Object o, Method method, Object[] objects, MethodProxy methodProxy) throws Throwable {
                /*
                Object o, The generated proxy object personProxy
                Method method,  The original method to be executed in the parent class is person > > > eat()
                Object[] objects,  The array of arguments passed in when the method is called
                MethodProxy methodProxy Override the method personproxy > > > eat() of the parent class in the subclass
                */
                Object res = null;
                if (method.getName().equals("eat")) {
                    System.out.println("Please wash your hands before meals");
                    res = methodProxy.invokeSuper(o, objects);
                    System.out.println("Please wash the dishes after dinner");
                } else {
                    res = methodProxy.invokeSuper(o, objects);
                }
                return res;
            }
        };
        //4. Callback setting methodInterceptor
        enhancer.setCallback(methodInterceptor);
        //5. Get proxy object
        Person person1 = (Person) enhancer.create();
        //6. Use proxy objects to complete functions
        person1.eat("steamed stuffed bun");
    }
}

class Person {
    public Person() {
    }

    public void eat(String foodName) {
        System.out.println("Zhang San is eating" + foodName);
    }
}

class Son extends Person{
    public Son() {
        super();
    }

    @Override
    public void eat(String foodName) {
        System.out.println("Please wash your hands before meals");
        super.eat(foodName);
        System.out.println("Please wash the dishes after dinner");
    }
}