It's said that uni app is awesome. A set of code can be released to all kinds of wechat, QQ, Baidu, headline applet, H5, Android and IOS. Don't be awesome. There are super good-looking plug-ins, which are completely ready to use and super convenient?
So good, I'm going to learn it a little, and then reconstruct my conjunction applet.
Learning mainly depends on the official documents. I'm just going to introduce my learning process. Let's start!
1, Prepare
Video tutorial: https://www.bilibili.com/video/BV1BJ411W7pX?p=3&spm_ id_ from=pageDriver
Official website: https://uniapp.dcloud.io/
Development tool download: https://www.dcloud.io/hbuilderx.html Download App development here
2, Wechat applet running fault
at Pipe.onStreamRead (internal/stream_base_commons.js:20
terms of settlement: https://blog.csdn.net/weixin_41700702/article/details/111187129
In fact, just open the security service port of wechat!
3, Learning related common component functions
1,globalStyle
This is the global configuration. Modify the navigation bar. The configuration path is page.json and pages statistics
"globalStyle": {
        "navigationBarTextStyle": "black",
        "navigationBarTitleText": "uni-app",//Navigation bar text color
        "navigationBarBackgroundColor": "#eee ", / / background color of navigation bar
        "backgroundColor": "#F8F8F8 "/ / background color
        "enablePullDownRefresh": true
    },
The official documents have the meanings of relevant configurations
2,tabBar
This is the menu at the bottom of the configuration. There are also many configurations at the same level as globalStyle. Here is my configuration
"tabBar":{
        //"color":"#F0AD4E",
        //"selectedColor":"#007AFF",
        //"backgroundColor":"#4CD964",
        //"position":"top",
        //"borderStyle":"black",
        "list":[
            {
                "pagePath":"pages/index/index",
                "text":"diction ",
                "iconPath":"static/images/syclose.png",
                "selectedIconPath":"static/images/syopen.png"
            },
            {
                "pagePath":"pages/reply/reply",
                "text":"review",
                "iconPath":"static/images/fx2close.png",
                "selectedIconPath":"static/images/fx2open.png"
            },
            {
                "pagePath":"pages/record/record",
                "text":"record",
                "iconPath":"static/images/wdclose.png",
                "selectedIconPath":"static/images/wdopen.png"
            }
        ]
    },
3,condition
Sometimes we want to debug a page directly and don't want to click in from the home page, especially the wechat applet, so we can choose from the compilation mode with condition. At the same level as globalStyle, here is my configuration
"condition":{
        "current": 0,
        "list":[
            {
                "name":"Game page",
                "path":"pages/play/play",
                "query":"id=80"
            }
        ]

    }
The above is generally used in the development environment. Please refer to the official documents for details
4. Textcomponent
Component learning is relatively simple. It is similar to various HTML tags, such as button, div, span, etc. you can directly refer to the official documents
<view>I'm reviewing</view>
<view><text selectable="true">Singing and dancing</text></view>
<view><text space="ensp">sing,      dance</text></view>
<view><text space="emsp">sing,      dance</text></view>
<view><text space="nbsp">sing,      dance</text></view>
<view><text>&</text></view>
<view><text decode="false">&</text></view>
5. view component
<view class="box2" hover-class="box2-down">
<view class="box1" hover-class="box1-down"
    hover-start-time="1000"
    hover-stay-time="1000"
    hover-stop-propagation="true">be similar to HTML Medium div</view>
6. button component
<button>Button</button>
<button size="mini">Button</button>
<button type="primary">Button</button>
<button plain="true">Button</button>
<button disabled="true">Button</button>
<button loading="true">Button</button>
7. image component
<image src="../../static/images/shezhi.png"></image>
<image src="https://www.suibibk.com/fileupload/images/202011/1605364293267.jpg"></image>
<image mode="aspectFill" src="https://www.suibibk.com/fileupload/images/202011/1605364293267.jpg"></image>
<image mode="aspectFit" src="https://www.suibibk.com/fileupload/images/202011/1605364293267.jpg"></image>
<image mode="scaleToFill" src="https://www.suibibk.com/fileupload/images/202011/1605364293267.jpg"></image>
<image mode="heightFix" src="https://www.suibibk.com/fileupload/images/202011/1605364293267.jpg"></image>
<image mode="widthFix" src="https://www.suibibk.com/fileupload/images/202011/1605364293267.jpg"></image>
8. Style
<style>
    .box1{
        width:100px;
        height:100px;
        background:red;
    }
    .box1-down{
        background:green;

    }
    .box2{
        width:200px;
        height:200px;
        background:black;
    }
    .box2-down{
        background:red;

    }
</style>
You can also import styles
play.css
view{
    color: #F0AD4E;
    font-size: 30rpx;
}
Then import
<style>
    @import url("./play.css");
    .box{
        width: 750rpx;
        height: 100rpx;
        background: red;
        font-size: 20rpx;
    }
    .box2{
        width: 375rpx;
        height: 100rpx;
        background: green;
    }
</style>
9. Data binding
{{}}
v-bind:src
v-for
We are
export default {
        data() {
            return {
                msg:'hello',
                flag: true,
                path: 'https://www.suibibk.com/fileupload/images/202011/1605364293267.jpg',
                arr: [
                    {
                        name: 'Kobayashi 1',
                        age: 20,
                        id: 1
                    },
                    {
                        name: 'Kobayashi 2',
                        age: 30,
                        id: 2
                    },
                    {
                        name: 'Kobayashi 3',
                        age: 40,
                        id: 3
                    }
                ]
            }
        }
Define the information, image path, array, and then do so in the component
<view class="box3">{{msg}}</view>
        <view>{{1+'Hello!'}}</view>
        <view>{{234+678}}</view>
        <view>{{flag?'This is irony':"It's true"}}</view>
        <view><image v-bind:src="path"></image></view>
        <view><image :src="path"></image></view>
        <view v-for="(item,index) in arr" :key="item.id">
            name:{{item.name}};Age:{{item.age}}
        </view>
10. Events and pass through parameters
<button v-on:click="clickButton">click</button>
<button v-on:click="clickButton2">Click to get event object</button>
<button v-on:click="clickButton3(10)">Click to transfer parameters</button>
<button v-on:click="clickButton4(20,$event)">Click to pass parameters and get event objects</button>
Then we define methods at the same level as data()
methods:{
    clickButton (){
        console.log("Click on me")
    },
    clickButton2 (e){
        console.log("Click me:"+e)
    },
    clickButton3 (num){
        console.log("Click me:"+num)
    },
    clickButton4 (num,e){
        console.log("Click me:"+num+";"+e)
    }
}
11. Life cycle
It is the same level as methods. Please refer to the official document for specific meaning
onLoad: function(options) {
    console.log('Page loading:'+options.id)
},
onShow: function() {
    console.log('Page display')
},
onHide: function() {
    console.log('Page hiding')
},
onReady: function() {
    console.log('The page is rendered')
}
12. Pull down refresh
Start the pull-down refresh in pages.json
"pages": [
    ...
        {
            "path": "pages/record/record",
            "style": {
                "navigationBarTitleText": "record",
                "enablePullDownRefresh": true
            }
        },
        ...
    ]
enablePullDownRefresh is true to enable the pull-down refresh. The pull-down refresh method will be triggered after the pull-down refresh
onPullDownRefresh() {
            console.log("Pull down refresh...")

            setTimeout(()=>{
                this.arr = ['D','E','F']
                //Stop pull-down refresh
                uni.stopPullDownRefresh()
            },2000)

        }
You can also click the button to start the active trigger pull-down refresh
<button @click="refresh()">Manual pull-down refresh</button>
Click to trigger the pull-down refresh
refresh (){
    uni.startPullDownRefresh()
}
The onPullDownRefresh method is then automatically executed.
13. Listen for events when the page scrolls to the bottom
"pages": [
    ...
        {
            "path": "pages/record/record",
            "style": {
                "navigationBarTitleText": "record",
                "onReachBottomDistance": 200
            }
        },
        ...
    ]
onReachBottomDistance indicates how far away from the bottom will trigger the event of scrolling to the bottom. The default value is 50. The following method will be triggered
onReachBottom() {
    console.log("Scroll to the next page");
    this.arr=[...this.arr,...['1','2','3']]
}
4, Send GET/POST request
Very simple. Please refer to the official website for details
toPOST() {
                uni.request({
                    url: "https://www.suibibk.com/getReplys",
                    method: "POST",
                    data:{
                        id: "890369880069505024",
                        visible: "1"
                    },
                    success(data) {
                        console.log("Request return result:"+data)
                    }
                })
            }
5, Data cache
toStorage() {
    uni.setStorage({
        key: "id",
        data: {"name":"Xiaomei"},
        success: function() {
            console.log("Keep data successfully")
        }
    })
},
toStorageSync() {
    uni.setStorageSync("id2",{"name":"Xiaomei 2"})
},
getStorage() {
    uni.getStorage({
        key: "id",
        success:function(res) {
            console.log("Asynchronous data acquisition succeeded:"+res.data.name)
        }
    })
},
getStorageSync() {
    const user = uni.getStorageSync("id2")
    console.log(user.name);
},
removeStorage() {
    uni.removeStorage({
        key: "id",
        success:function() {
            console.log("Successfully removed data asynchronously")
        }
    })
},
removeStorageSync() {
    uni.removeStorageSync("id2")
    console.log("Data removed successfully")
}
See the name and meaning, including synchronous and asynchronous. Normal synchronization is more convenient
6, Upload and preview pictures
<view>
    <button @click="chooseImg()">Upload pictures</button>
    <!--Here is the preview-->
    <image v-for="img in imgArr" :src="img" @click="previewImg(img)"></image>
</view
Users can click upload to select multiple photos and preview them
export default {
    data() {
        return {
            title: 'Hello',
            imgArr: []
        }
    }
}
Here, an array is defined to store the uploaded path
chooseImg() {
    console.log("Upload pictures")
    uni.chooseImage({
        count: 5,
        success: (res) => {
            this.imgArr = res.tempFilePaths
            console.log("imgArr:"+this.imgArr)
        }
    })
}
It is set here that you can only upload 5, but you can't control it on H5. See the official documents for details
7, Conditional compilation, cross end compatibility
Because we use a set of codes at multiple ends, there are always some contents that are personalized on different platforms. Uni app provides #idef and other methods to perform conditional compilation in view, script and style, as shown below
<!-- #ifdef H5 -->
<view>Only in H5 Display on</view>
<!-- #endif -->
<!-- #ifdef MP-WEIXIN -->
<view>It will only be displayed on wechat applet</view>
<!-- #endif -->
onLoad() {
    //#ifdef H5
    console.log("Only in H5 Upper initialization")
    //#endif
    //#ifdef MP-WEIXIN
    console.log("It will only be initialized on wechat")
    //#endif
}
/* #ifdef H5 */
view {
color: #007AFF;
}
/* #endif */
/* #ifdef MP-WEIXIN */
view {
color: #FF0000;
}
/* #endif */8, Navigation jump
Navigation jump has explicit and programmatic forms. In fact, the declarative form is similar to the a tag of HTML. navigator is used in uni app. See the official documents for details
<navigator url="/pages/play/play?id=80">Jump to game page</navigator>
<navigator url="/pages/reply/reply" open-type="switchTab">Jump to review page</navigator>
<navigator url="/pages/play/play" open-type="redirect">Jump to game page</navigator>
Only switchTab mode can jump to tabBar type pages
Let's talk about programming
button @click="goPlay()">Jump to game page</button>
<button @click="goReply()">Jump to review page</button>
<button @click="goPlay2()">Jump to game page</button>
Trigger the following methods respectively
goPlay(){
    uni.navigateTo({
        url:'/pages/play/play'
    })
},
goReply(){
    uni.switchTab({
        url:'/pages/reply/reply'
    })
},
goPlay2(){
    uni.redirectTo({
        url:'/pages/play/play'
    })
}
9, Jump pass parameter
In fact, it's very simple. Just spell it in the back
<navigator url="/pages/play/play?id=80">Jump to game page</navigator>
Then you can get it in the life cycle method onLoad of the play page
onLoad: function(options) {
    console.log('Page loading:'+options.id)
}
10, The creation and use of components and the life cycle of components
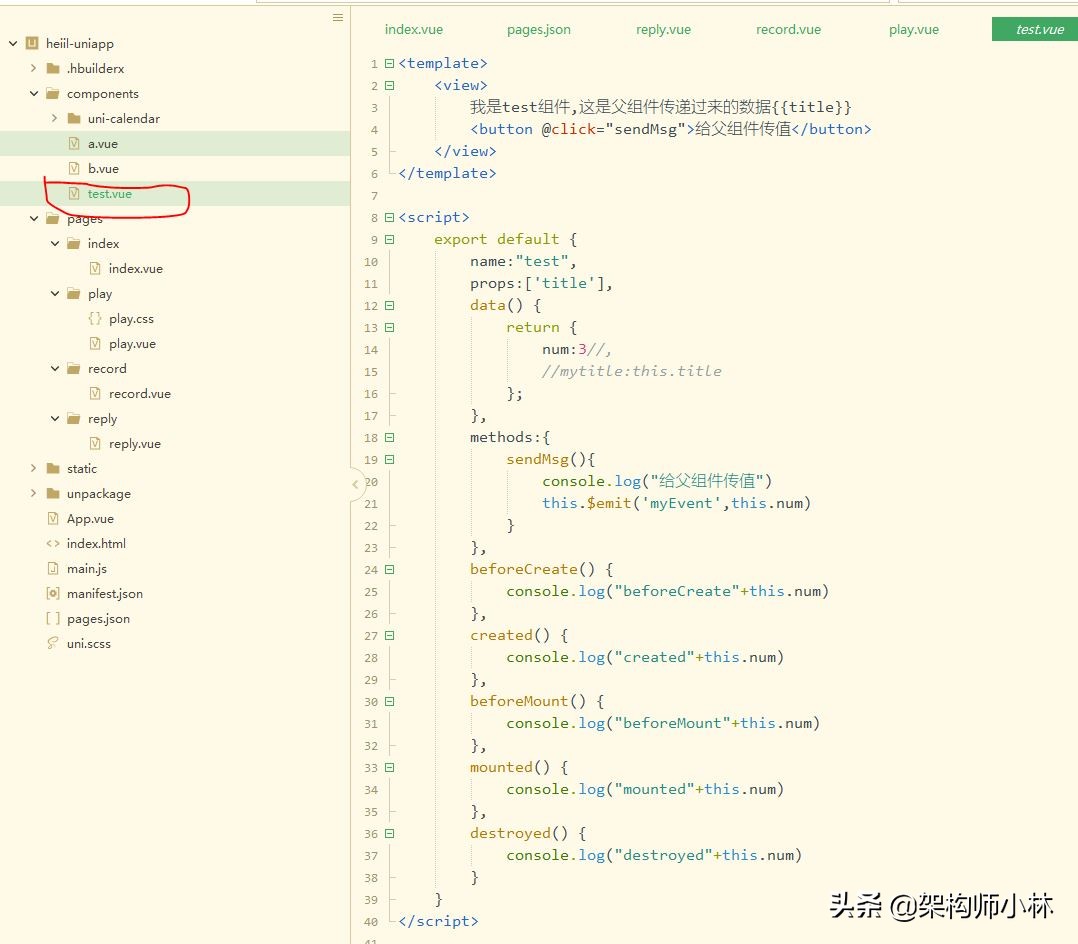
The creation of components is also very simple. We only need to build one component, such as test.vue on the way
Then import it in the script of the page you want to use
import test from '../../components/test.vue'
Register to component
components:{
    test
}
It can be used directly like the view and button components
<test></test>
11, Transfer data between components
We can customize components. How do parent components and child components transfer data? Normally, parent components can automatically transfer data to child components, but child components cannot. Why? Because if you can, what is the risk of referencing the parent component of the child component.
1. Father to son
For example, we introduced the sub component test.vue, so how to transfer data to the sub component test.vue?
Very simple, please refer to the official website for details!
As in the parent component
<test :title="title"></test>
Where title is the variable of the parent component
data() {
    return {
        title: 'Hello'
    }
}
How does the subcomponent test.vue get the title Value?
export default {
    name:"test",
    props:['title']
    ...
}
You just need to use props to get the sub components
Then, the sub components can be obtained directly {{title}}.
2. Son to father
If the child component wants to pass values to the parent component, nine can only define methods, such as in the child component test.vue
<button @click="sendMsg">Pass value to parent component</button>
Define sendMsg method
methods:{
    sendMsg(){
        console.log("Pass value to parent component")
        this.$emit('myEvent',this.num)
    }
}
Here, $emit is used to pass the value to the parent component. The parent component only needs to define the myEvent method to obtain the value, such as
<test @myEvent="getMsg"></test>
Then the getMsg method will be called automatically
getMsg(num){
    console.log("Get the passed value of the sub component:"+num)
}
3. Sibling component transmission
The transfer of values between sibling components is somewhat similar to the publish subscribe mode. For example, we can create two more components
components/a.vue
<template>
    <view>
        <button @click="addNum">a Component modification b Component data</button>
    </view>
</template>
components/b.vue
<template>
    <view>
        b Component data{{num}}
    </view>
</template>
Are referenced in the parent component
import test from '../../components/test.vue'
import testA from '../../components/a.vue'
import testB from '../../components/b.vue'
...
components:{
    test,
    "test-a": testA,
    "test-b": testB
}
<test-a></test-a> <test-b></test-b>
How to click the button in component a and transfer the value to brother component b?
Very simply, we register a listening event in b.vue
export default {
    name:"b",
    data() {
        return {
            num:0
        };
    },
    created() {
        //Register listening events
        uni.$on('updateNum',num=>{
            console.log("b The component is listening")
            this.num+=num
        })
    }
}
Here, we use $on, and then the updateNum event will be triggered as long as there is an event. Then we use the a component
export default {
        name:"a",
        data() {
            return {

            };
        },
        methods:{
            addNum(){
                console.log("modify b Value of the component")
                uni.$emit('updateNum',10)
            }
        }
    }
Just use uni.$emit('updateNum',10) to publish events!
Refer to the official documents for details!
12, Use of uni UI component library
For example, we need to use a date component, uni calendar, and then we just need to add it to the components directory, because the uni calendar component complies with the easycom specification. Since HBuilderX 2.5.5, we only need to import this component into the project and use it directly in the page template, without importing and registering components in the page.
We use it directly
<uni-calendar
    :insert="true"
    :lunar="true"
    :start-date="'2019-3-2'"
    :end-date="'2019-5-20'"
     @change="change"
 />
Perfect!
12, Summary
Mainly based on official documents. After all, the technology update is too fast!