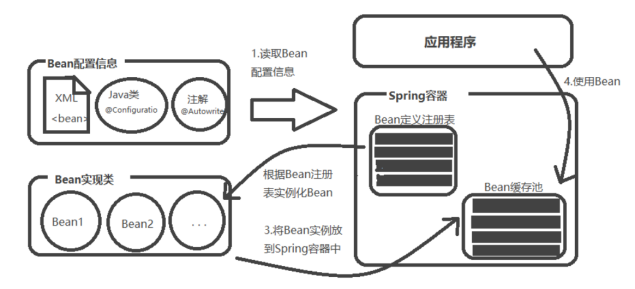
The Spring container is a super factory, and the Bean in the Spring container is the product of the factory.
For developers, the Spring framework mainly does two things:
(1) Develop Bean
(2) Configure Bean
1. Definition and alias of Bean
A bean is an object that is instantiated, assembled, and managed through the Spring IoC container.
It is created by the configuration metadata provided by the container.
The Bean definition contains information called configuration metadata. You need to know:
- How to create a Bean;
- Details of the Bean's life cycle;
- Bean dependencies.
Metadata: data describing data, such as column names of tables and parameters of < bean >, are used to describe data and object data.
full name
Zhang San
Li Si
Wang Wu
2. Relationship between bean and Spring container
The following figure shows the relationship between Bean and Spring container:

Spring configuration metadata
The Spring container is completely decoupled from the format of the configuration metadata actually written. There are three ways to provide configuration metadata to the Spring container:
- XML based configuration;
- Annotation based configuration;
- Java based configuration (configuration class).
Example 1: XML based configuration
<?xml version="1.0" encoding="UTF-8"?>
<beans xmlns="http://www.springframework.org/schema/beans"
    xmlns:xsi="http://www.w3.org/2001/XMLSchema-instance"
    xsi:schemaLocation="http://www.springframework.org/schema/beans
http://www.springframework.org/schema/beans/spring-beans-3.0.xsd">

   <bean id="user" class="cn.zhibang.User"></bean>
   <!-- anonymous bean -->
   <bean class="cn.zhibang.User"></bean>
   <!-- Lazy load during initialization(Delayed loading) -->
   <bean id="..." class="..." lazy-init="true"></bean>
   <!-- appoint Bean Method called during initialization -->
   <bean id="..." class="..." init-method="..."></bean>
   <!-- appoint Bean Method called when destroying -->
   <bean id="..." class="..." destroy-method="..."></bean>
</beans>
3. id and name in bean definition
3.1. id attribute
In the Bean managed by the Spring container, the id is the unique id, and two IDS with the same name cannot appear.
<bean id="user" class="com.alibaba.model.User"></bean>
If the same id appears in the Bean managed by the Spring container:
- If Spring is the default setting, the Bean with the same name will overwrite the previous one, and no exception will be reported.
- If the Spring settings cannot be overwritten with the same id, an exception will be thrown and the operation will be stopped.
3.2. name attribute
If a bean is only configured with the name attribute but not the ID attribute, the default is ID attribute = name attribute.
<bean name="user" class="com.alibaba.model.User"></bean>
Name = "user" here is equivalent to id = "user" name = "user".
Note: there can be < bean > with the same name???.
However, in the following cases, the latter will overwrite the former:
<bean name="user" class="com.alibaba.model.User"></bean>
<bean id="user" class="com.alibaba.model.User"></bean>
3.3. anonymous
<bean class="com.alibaba.model.User"></bean>
No name is set for the Bean. An exception will be reported when using:

4.Bean scope
When Spring defines a bean, you can set the scope attribute to declare the scope of the bean:
<bean id="..." class="..." scope="singleton">
......
</bean>
The Spring framework supports the following five scopes:
| Scope | describe |
|---|---|
| singleton | The default value is singleton mode. In the Spring IOC container, the Bean instance will generate only one instance. |
| prototype | Each time you call Bean from the container, getBean() returns a new instance, which is equivalent to executing new XxxBean (getBean) every time you call it (). |
| request | Each HTTP request creates a new Bean, and the scope is only applicable to the WebApplicationContext environment |
| session | The same HTTP Session shares a Bean. Different sessions use different beans. It is only applicable to the WebApplicationContext environment |
| global-session | It is generally used in Portlet application environment, but it is only applicable to WebApplicationContext environment |
5.Bean life cycle
The life cycle of spring beans refers to:
When a bean is instantiated, it needs to execute the initialization method to convert the bean to a usable state.
Similarly, when the bean is no longer needed, it is removed from the container (destruction method).
The Spring container can manage the life cycle of the Singleton scope. The Spring container can accurately know when the Bean is created, when the initialization is completed, and when the container is ready to destroy the Bean instance.
For the beans with prototype scope, the Spring container is only responsible for creating. After creation, it is handed over to the client code management, and the Spring container will no longer track its life cycle.
There are two main opportunities to manage Bean's life cycle behavior:
- After dependency injection (initialization callback)
- Before the Bean is about to be destroyed (destroy callback)
5.1. After dependency injection (initialization callback)
Spring provides two ways to perform specific behaviors after all Bean properties are set successfully.
- Using the init method attribute
<bean id="userBean" class="com.alibaba.model.UserBean" init-method="init"/>
Class definition:
public class UserBean {
   //Initialization method
   public void init() {
		System.out.println("Instantiation executes the initialization method...");
   }
}
When the project starts, add ApplicationContext XML instantiates beans one by one. When instantiating userbeans, execute init(), and output "instantiation is the execution of initialization method..."
- Implement InitializingBean interface (not recommended)
public class ExampleBean implements InitializingBean {
   //Rewrite method to complete initialization
   public void afterPropertiesSet() {
   }
}
5.2. Before the Bean is about to be destroyed (destroy callback)
- Using the destroy method property
<bean id="userBean" class="com.alibaba.model.UserBean" destroy-method="destroy"/>
Class definition:
public class UserBean {
   public void destroy() {
      System.out.println("Method of performing destruction...")
   }
}
- Implement the DisposableBean interface (not recommended)
public class UserBean implements DisposableBean {
   public void destroy() {
   }
}
5.3. Close hook
If you use the Spring IOC container in a non Web application, you need to register and close the hook. This ensures normal shutdown and releases all resources.
public static void main(String[] args) {
      AbstractApplicationContext context = new ClassPathXmlApplicationContext("Beans.xml");
      HelloWorld obj = (HelloWorld) context.getBean("helloWorld");
      obj.getMessage();
      context.registerShutdownHook();
}
5.4. Default initialization and destruction methods
If the initialization or destruction methods of many beans are the same, you do not need to configure the initialization and destruction methods for each Bean. You can configure the default initialization and destruction methods in.
<beans xmlns="http://www.springframework.org/schema/beans"
    xmlns:xsi="http://www.w3.org/2001/XMLSchema-instance"
    xsi:schemaLocation="http://www.springframework.org/schema/beans
    http://www.springframework.org/schema/beans/spring-beans-3.0.xsd"
    default-init-method="init"
    default-destroy-method="destroy">

   <bean id="..." class="..." init-method="init" destory-method="destroy">
   </bean>

<bean id="..." class="..." init-method="init" destory-method="destroy>
   </bean>

</beans>
6. Bean post processor
6.1. Bean definition inheritance
Definition of HelloWorld class:
public class HelloWorld {
   private String message1;
   private String message2;
   public void setMessage1(String message){
      this.message1  = message;
   }
   public void setMessage2(String message){
      this.message2  = message;
   }
   public void getMessage1(){
      System.out.println("World Message1 : " + message1);
   }
   public void getMessage2(){
      System.out.println("World Message2 : " + message2);
   }
}
Definition of HelloIndia class:
public class HelloIndia {
   private String message1;
   private String message2;
   private String message3;
   public void setMessage1(String message){
      this.message1  = message;
   }
   public void setMessage2(String message){
      this.message2  = message;
   }
   public void setMessage3(String message){
      this.message3  = message;
   }
   public void getMessage1(){
      System.out.println("India Message1 : " + message1);
   }
   public void getMessage2(){
      System.out.println("India Message2 : " + message2);
   }
   public void getMessage3(){
      System.out.println("India Message3 : " + message3);
   }
}
Bean profile:
<?xml version="1.0" encoding="UTF-8"?>
<beans xmlns="http://www.springframework.org/schema/beans"
xmlns:xsi="http://www.w3.org/2001/XMLSchema-instance"
xsi:schemaLocation="http://www.springframework.org/schema/beans
http://www.springframework.org/schema/beans/spring-beans-3.0.xsd">

<bean id="helloWorld" class="com.alibaba.model.HelloWorld">
<property name="message1" value="Hello World!"/>
<property name="message2" value="Hello Second World!"/>
</bean>
<!-- Give Way helloIndia inherit helloWorld -->
<bean id="helloIndia" class="com.alibaba.model.HelloIndia" parent="helloWorld">
<property name="message1" value="Hello India!"/>
<property name="message3" value="Namaste India!"/>
</bean>
</beans>
Test:
@Test
public void test() {
    ApplicationContext context = new ClassPathXmlApplicationContext("Beans.xml");
    HelloWorld objA = (HelloWorld) context.getBean("helloWorld");
    objA.getMessage1();
    objA.getMessage2();

    HelloIndia objB = (HelloIndia) context.getBean("helloIndia");
    objB.getMessage1();
    objB.getMessage2();
    objB.getMessage3();
}
result:
World Message1 : Hello World!
World Message2 : Hello Second World!
India Message1 : Hello India!
India Message2 : Hello Second World!
India Message3 : Namaste India!
7. Introduce Spring Dependent coordinates through maven
Just in POM Just introduce the spring context package into XML.
<dependency>
<groupId>org.springframework</groupId>
<artifactId>spring-context</artifactId>
<version>5.1.8.RELEASE</version>
</dependency>
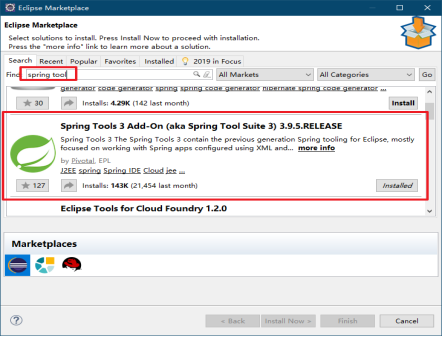
8. Spring tool plug-in installation (Eclipse)
Spring plug-in: Spring TOOL
Function: it is convenient to create spring xml files
Online installation steps: Help - > eclipse marketplace... - > search spring tool - > install after finding it.
