1, Concept and principle of routing
1. What is front-end routing?
Front end routing is the correspondence between the hash address (anchor link) and the component.
Hash address: the addresses in the url and beyond are called hash addresses

To get the hash address, use the location.hash method.
2. Working mode of front-end routing
How front end routing works:
- The user clicks the route link on the page;
- This causes the Hash value in the URL address bar to change;
- The front-end route monitors the change of Hash address;
- The front-end route renders the components corresponding to the current Hash address to the browser.

3. Underlying principle of front-end routing
The underlying principle of front-end routing is to listen to the onhashchange event of the browser.
Example
created() {
// As soon as the current App component is created, it will listen for the onhashchange event of the window object
  window.onhashchange = () => {
    console.log('I got it hash Change of address', location.hash)
    // The location.hash method is used to obtain the hash address
    switch (location.hash) {
      case '#/home':
        this.comName = 'Home'
        break
      case '#/movie':
        this.comName = 'Movie'
        break
      case '#/about':
        this.comName = 'About'
        break
    }
  }
},
2, Basic usage of Vue router
1. What is Vue router?
Vue router is the routing solution officially given by vue.js. It can only be used in combination with Vue project, and can easily manage the switching of components in SPA (Single Page Web Application single page rich application) project.
2. Vue router installation and configuration
- Install Vue router package;
npm i vue-router@3.5.2 -S
- Create routing module;
In the src source code directory, create a router/index.js routing module and initialize the following code:
// src/router/index.js is the routing module of the current project

// 1. Import Vue and vueroter packages
import Vue from 'vue'
import VueRouter from 'vue-router'

// 2. Call Vue.use() function to install vueroter as Vue's plug-in
// The Vue.use() function is used to install the plug-in
Vue.use(VueRouter)

// 3. Create an instance object of the route
const router = new VueRouter()

// 4. Instance object of outward shared route
export default router
- Import and mount the routing module;
import Vue from 'vue'
import App from './App.vue'
// The purpose of importing the routing module is to get the instance object of the route
import router from './router/index.js'

// Global style
import '@/assets/global.css'

Vue.config.productionTip = false

new Vue({
  render: h => h(App),
  // To use routing in Vue projects, you must mount it in the following ways
  router
}).$mount('#app')
During modular import, if a folder is given, the file named index.js under this folder will be imported by default.
Therefore, import router from '. / router/index.js' can be abbreviated as import router from'. / router '.
- Declare route links and placeholders.
App2.vue component
<template>
  <div class="app-container">
    <h1>App2 assembly</h1>

    <a href="#/Home "> Home Page</a>
    <a href="#/Movie "> Movie</a>
    <a href="#/About "> about</a>
    <hr />

    <!-- As long as it is installed and configured in the project vue-router,You can use router-view This component is -->
    <!-- router-view Role of: placeholder -->
    <router-view></router-view>

  </div>
</template>
In router/index.js
// src/router/index.js is the routing module of the current project

// 1. Import Vue and vueroter packages
import Vue from 'vue'
import VueRouter from 'vue-router'
// Import components
import Home from '@/components/Home.vue'
import Movie from '@/components/Movie.vue'
import About from '@/components/About.vue'

// 2. Call Vue.use() function to install vueroter as Vue's plug-in
Vue.use(VueRouter)

// 3. Create an instance object of the route
const router = new VueRouter({
  // routes is an array that defines the correspondence between "hash address" and "component"
  routes: [
    // Routing rules
    { path: '/home', component: Home },
    { path: '/movie', component: Movie },
    { path: '/about', component: About }
  ]
})

// 4. Instance object of outward shared route
export default router
After installing and configuring Vue router, you can use router link to replace the normal a link
<!-- When installed and configured vue-router After, you can use router-link To replace ordinary a Linked -->
<!-- <a href="#/Home "> Home Page < / a > -- >
<router-link to="/home">home page</router-link>
<!-- <a href="#/Movie "> movie < / a > -- >
<router-link to="/movie">film</router-link>
<!-- <a href="#/About "> about < / a > -- >
<router-link to="/about">about</router-link>
3, Common usage of routing
1. Route redirection
Routing redirection refers to forcing the user to jump to address C when accessing address A, so as to display A specific component page.
Specify a new routing address and set routing redirection through redirect of routing rules:
routes: [
    // Route redirection
    // When the user accesses / the, he / she will be forced to jump to the home page through the redirect attribute
    { path: '/', redirect: '/home' },
    // Routing rules
    { path: '/home', component: Home },
    { path: '/movie', component: Movie },
    { path: '/about', component: About }
]
2. Nested routing
Put two child components in the About sub component

<template>
  <div class="about-container">
    <h3>About assembly</h3>

    <!-- Child routing link -->
    <router-link to="/about/tab1">tab1</router-link>
    <router-link to="/about/tab2">tab2</router-link>
    <hr />

    <!-- Child route placeholder -->
    <router-view></router-view>
  </div>
</template>
In src/router/index.js, import the required components and use the children attribute to declare the sub routing rules
p.s. don't forget to import subcomponents
{
  path: '/about',
  component: About,
  children: [
    // The address of the sub route should not start with /
    { path: 'tab1', component: Tab1 },
    { path: 'tab2', component: Tab2 }
  ],
  redirect: '/about/tab1'
}
3. Default sub route
If the path value of a routing rule in the children array is an empty string, the routing rule is called "default sub route".
4. Dynamic route matching
Dynamic routing refers to defining the variable part of the Hash address as a parameter item, so as to improve the reusability of routing rules. Use the English colon (:) in Vue router to define the parameter items of the route.
Example
<router-link to="/movie/1">No home</router-link>
<router-link to="/movie/2">Chinatown detective</router-link>
<router-link to="/movie/3">Nobody</router-link>
{ path: '/movie/:mid', component: Movie }
<template>
  <div class="movie-container">
    <!-- this.$route Is the parameter object of the route -->
    <!-- this.$router Is the navigation object of the route -->
    <h3>Movie Components—— {{$route.params.mid}}</h3>
    <hr>
    <button @click="showThis">Print this</button>
  </div>
</template>
props:true enables props parameter transmission for routing
{ path: '/movie/:mid', component: Movie, props: true },
Configure props: ['mid'] in the Movie component to receive the passed parameters.
Notes on this.$route

Note 1: in the hash address, the parameter item after / is called "path parameter"
In the route parameter object, you need to use this.$route.params to access the path parameters
Note 2: in the hash address,? The following parameter items are called "query parameters"
In the route parameter object, you need to use this.$route.query to access the query parameters
Note 3: in this.$route, path is only the path part, fullPath is the full path, including query parameters
5. Declarative navigation & programmatic navigation
1) Declarative navigation
In a browser, clicking on a link to navigate is called declarative navigation. For example: a link,.
2) Programming navigation
In browser, the way of calling API method to realize navigation is called programming navigation.
-
this.$router.push('hash address'): jump to the specified hash address and add a history.
gotoM1() { // console.log(this) // Through the API of programmed navigation, the navigation jumps to the specified page this.$router.push('/Movie/1') } -
this.$router.replace('hash address'): jump to the specified hash address and replace the current history.
gotoM2() { // this.$router.replace('hash address'): jump to the specified hash address and replace the current history. this.$router.replace('/Movie/2') } -
this.$router.go('numeric '): you can go forward and backward in browsing history.
goback() {
  // go(-1) stands for one level back
  // If the value exceeds the upper limit, stay in place
  this.$router.go(-1)
}
Simplified syntax for $router.go()
- this.$router.forward(): advance one level
- this.$router.back(): back one layer
Note: when using the above methods in the line, omit this., otherwise an error will be reported.
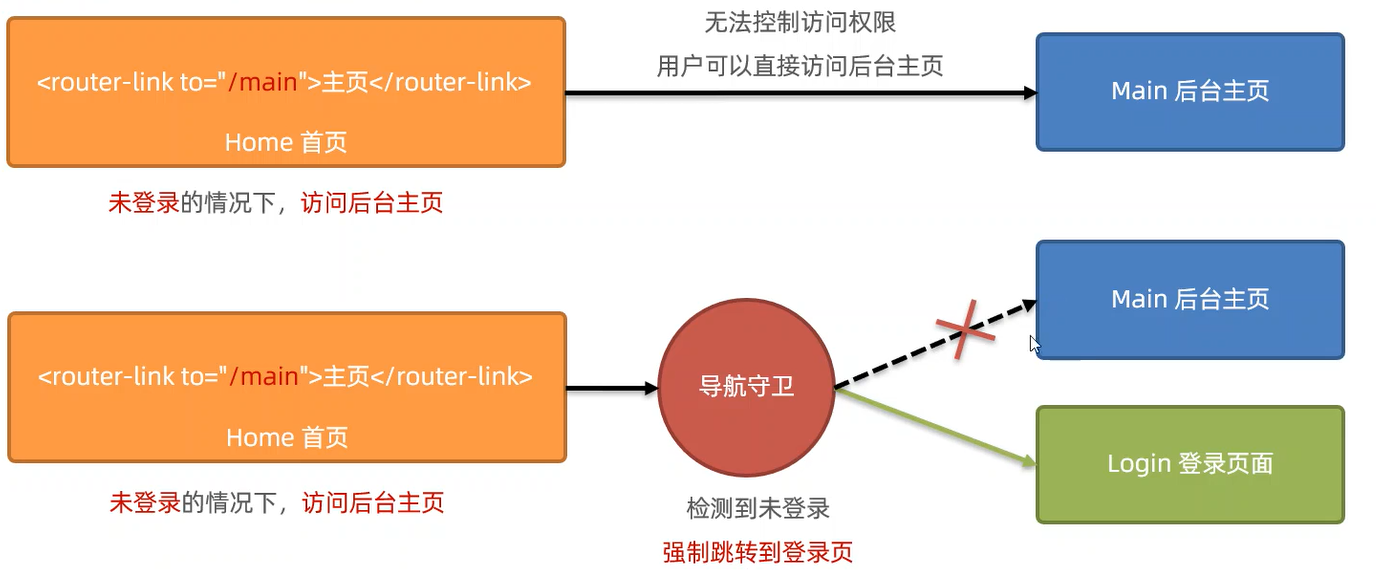
6. Navigation guard
The navigation guard can control the access rights of the route.

Global front guard
Every time the navigation jump of the route occurs, the global front guard will be triggered. Therefore, in the global front guard, programmers can control the access rights of each route.
Example
After creating the router sample object
router.beforeEach(function(to, from, next) {
  // To indicates the information of the route to be accessed
  // console.log(to);
  // from indicates the routing information object to leave
  console.log(from)
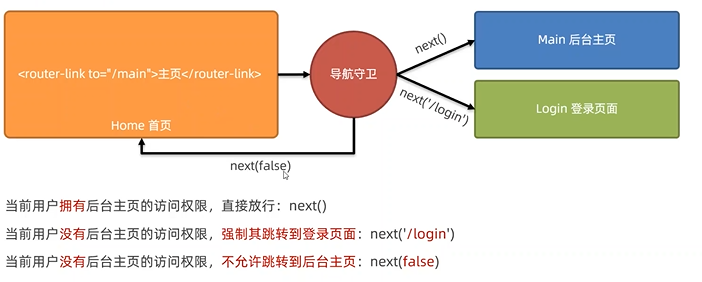
  // The next function means release
  next()
})
Three calling methods of next function

router.beforeEach(function(to, from, next) {
  // To indicates the information of the route to be accessed
  // from indicates the routing information object to leave
  console.log(from)
  // The next function means release

  // analysis
  // 1. Get the hash address that the user will access
  // 2. Judge whether the hash address is equal to / main
  // 2.1 if it is equal to / main, it proves that the access can be successful only after logging in
  // 2.2 if it is not equal to / main, you do not need to log in and release directly
  // 3. If the accessed address is / main, you need to read the token value in localStorage
  // 3.1 if there is a token, release it
  // 3.2 if there is no token, it is forced to jump to the / login login page
  if (to.path === '/main') {
    const token = localStorage.getItem('token')
    if (token) {
      next()
    } else {
      next('/login')
    }
  } else {
    next()
  }
})