@Author: Runsen
What is PyTorch?
This is a Python based scientific computing package for two groups of audiences:
NumPy is an alternative to take advantage of the power of GPU.
Provide a deep learning research platform with maximum flexibility and speed.
tensor
Tensors are similar to NumPy's n-dimensional array. In addition, tensors can also be used on GPU to speed up calculation.
Let's construct a simple tensor and check the output. First, let's see how we build a 5 × Uninitialized matrix of 3:
import torch
x = torch.empty(5, 3)
print(x)
The output is as follows:
tensor([[2.7298e+32, 4.5650e-41, 2.7298e+32],
        [4.5650e-41, 0.0000e+00, 0.0000e+00],
        [0.0000e+00, 0.0000e+00, 0.0000e+00],
        [0.0000e+00, 0.0000e+00, 0.0000e+00],
        [0.0000e+00, 0.0000e+00, 0.0000e+00]])
Now let's construct a randomly initialized matrix:
x = torch.rand(5, 3)
print(x)
Output:
tensor([[1.1608e-01, 9.8966e-01, 1.2705e-01],
        [2.8599e-01, 5.4429e-01, 3.7764e-01],
        [5.8646e-01, 1.0449e-02, 4.2655e-01],
        [2.2087e-01, 6.6702e-01, 5.1910e-01],
        [1.8414e-01, 2.0611e-01, 9.4652e-04]])
Construct tensors directly from data:
x = torch.tensor([5.5, 3])
print(x)
Output:
tensor([5.5000, 3.0000])
Create a unified long tensor.
x = torch.LongTensor(3, 4)
x

tensor([[94006673833344,   210453397554,   206158430253,   193273528374],
        [  214748364849,   210453397588,   249108103216,   223338299441],
        [  210453397562,   197568495665,   206158430257,   240518168626]])
Floating tensor.
x = torch.FloatTensor(3, 4)
x

tensor([[-3.1152e-18,  3.0670e-41,  3.5032e-44,  0.0000e+00],
        [        nan,  3.0670e-41,  1.7753e+28,  1.0795e+27],
        [ 1.0899e+27,  2.6223e+20,  1.7465e+19,  1.8888e+31]])
Create a tensor within a range
torch.arange(10, dtype=torch.float)

tensor([0., 1., 2., 3., 4., 5., 6., 7., 8., 9.])
Remodeling tensor
x = torch.arange(10, dtype=torch.float)
x

tensor([0., 1., 2., 3., 4., 5., 6., 7., 8., 9.])
use. view remodeling tensor.
x.view(2, 5)

tensor([[0., 1., 2., 3., 4.],
        [5., 6., 7., 8., 9.]])
-1. Automatically identify the dimension according to the size of the tensor.
x.view(5, -1)

tensor([[0., 1.],
        [2., 3.],
        [4., 5.],
        [6., 7.],
        [8., 9.]])
Change tensor axis
Changing the tensor axis: two methods view and permute
view changes the order of tensors, while permute only changes the axis.
x1 = torch.tensor([[1., 2., 3.], [4., 5., 6.]])
print("x1: \n", x1)
print("\nx1.shape: \n", x1.shape)
print("\nx1.view(3, -1): \n", x1.view(3 , -1))
print("\nx1.permute(1, 0): \n", x1.permute(1, 0))


x1:
 tensor([[1., 2., 3.],
        [4., 5., 6.]])

x1.shape:
 torch.Size([2, 3])

x1.view(3, -1):
 tensor([[1., 2.],
        [3., 4.],
        [5., 6.]])

x1.permute(1, 0):
 tensor([[1., 4.],
        [2., 5.],
        [3., 6.]])
Tensor operation
In the following example, we will look at the addition operation:
y = torch.rand(5, 3)
print(x + y)
Output:
tensor([[0.5429, 1.7372, 1.0293],
        [0.5418, 0.6088, 1.0718],
        [1.3894, 0.5148, 1.2892],
        [0.9626, 0.7522, 0.9633],
        [0.7547, 0.9931, 0.2709]])
Resize: if you want to adjust the shape of the tensor, you can use "torch.view":
x = torch.randn(4, 4)
y = x.view(16)
# Size - 1 is inferred from other dimensions
z = x.view(-1, 8)
print(x.size(), y.size(), z.size())
Output:
torch.Size([4, 4]) torch.Size([16]) torch.Size([2, 8])
Conversion of PyTorch and NumPy
NumPy is a library of Python programming language, which adds support for large and multi-dimensional arrays and matrices, as well as a large set of advanced mathematical functions to operate on these arrays.
It is easy to convert Tensor in Torch into NumPy array and vice versa!

The Torch Tensor and NumPy arrays will share their underlying memory locations, and changing one will change the other.
Convert the Torch tensor to a NumPy array:
a = torch.ones(5)
print(a)
Output: tensor([1., 1., 1., 1., 1.])
b = a.numpy()
print(b)
Output: [1., 1., 1., 1., 1.]
Let's perform a summation operation and check for changes in values:
a.add_(1)
print(a)
print(b)
Output:
tensor([2., 2., 2., 2., 2.])
[2. 2. 2. 2. 2.]
Convert NumPy array to Torch tensor:
import numpy as no
a = np.ones(5)
b = torch.from_numpy(a)
np.add(a, 1, out=a)
print(a)
print(b)
Output:
[2. 2. 2. 2. 2.]
tensor([2., 2., 2., 2., 2.], dtype=torch.float64)
So, as you can see, it's that simple!
Next, on this PyTorch tutorial blog, let's take a look at PyTorch's AutoGrad module.
AutoGrad
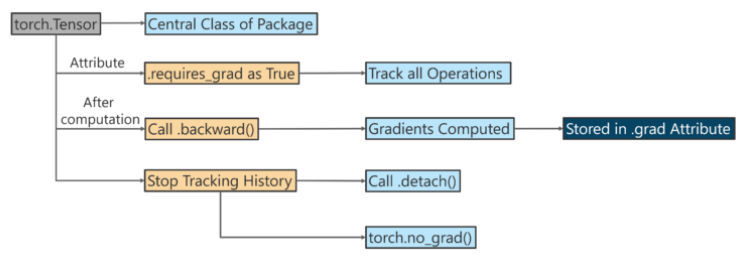
The autograd package provides automatic derivation for all operations on tensors.

It is a framework defined by run, which means that your back propagation is defined by how your code runs, and can be different for each iteration.
- torch.autograd.function (back propagation of function)
- torch.autograd.functional (back propagation of computational graph)
- torch.autograd.gradcheck (numerical gradient check)
- torch.autograd.anomaly_mode (detect error generation path during automatic derivation)
- torch.autograd.grad_mode (set whether gradient is required)
- model.eval() and torch no_ grad()
- torch.autograd.profiler (provides function level statistics)
Next, use Autograd for back propagation.
If requires_grad=True, the Tensor object tracks how it was created.
x = torch.tensor([1., 2., 3.], requires_grad = True)
print('x: ', x)
y = torch.tensor([10., 20., 30.], requires_grad = True)
print('y: ', y)
z = x + y
print('\nz = x + y')
print('z:', z)

x:  tensor([1., 2., 3.], requires_grad=True)
y:  tensor([10., 20., 30.], requires_grad=True)

z = x + y
z: tensor([11., 22., 33.], grad_fn=<AddBackward0>)
Because requires_grad=True, Z knows that it is generated by adding two tensors, z = x + y.
s = z.sum()
print(s)

tensor(66., grad_fn=<SumBackward0>)
s is created by the sum of its numbers. When we call backward(), back propagation runs from s. Then you can calculate the gradient.
s.backward()
print('x.grad: ', x.grad)
print('y.grad: ', y.grad)

x.grad:  tensor([1., 1., 1.])
y.grad:  tensor([1., 1., 1.])
The following example is the calculation of the derivative X / log
import torch
x = torch.tensor([0.5, 0.75], requires_grad=True)
# 1 / x
y = torch.log(x[0] * x[1])
y.backward()
x.grad # tensor([2.0000, 1.3333])