vue+nodejs+mongodb deployment project to alicloud
This is my final design. I wanted to learn about project deployment. After two days, I finally succeeded. Ha ha, the reference link of this deployment process is as follows. It's well written. I also took notes and introduced the process in more detail. Just follow the steps. I'm also the first deployment, ha ha.
https://segmentfault.com/a/1190000022921908
1. The project environment is as follows:
- Deployment time: April 20, 2020
- Local environment: windows 10
- Server: alicloud ECS, CentOS 8.0; It mainly uses the pagoda panel (this is a liunx visual management tool, which is very convenient), contains SSH terminal, and does not use xshell or xftp
- Front end project: Vue (V2.6) & Vue cli (v4.5)
- Backend project: node JS (v12.18.2, express framework)
- Database: MongoDB
2. Server preparation and configuration
1. Purchase server
I use the server for free trial. If it's a student, I can authenticate the student. If I buy a student discount, I have also authenticated it. But when I see a free trial, I go whoring for a month first. Ha ha ha
Trial link (seems to be available for the first time): https://free.aliyun.com/?spm=5176.21103406.J_6174043250.2.58cd597cGSa6NA&accounttraceid=f7f0b408034941c0906a059f25d9b2acntvv
Purchase link: https://www.aliyun.com/activity/new?spm=5176.12901015.1em2wirsb.d71.776e525cCmvyVF&scm=20140722.3873.4.3972
2. Server settings
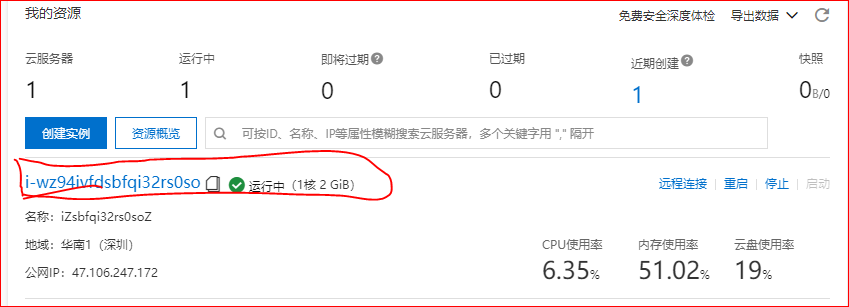
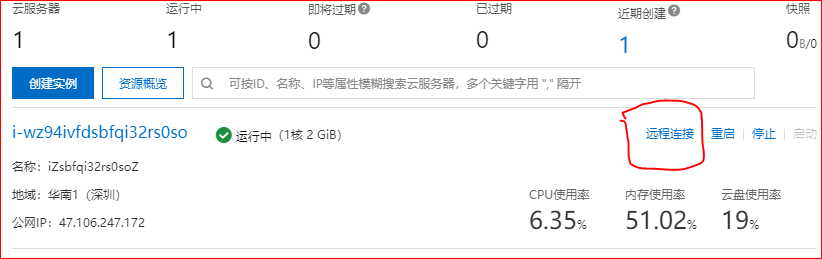
(1) Log in to alicloud, select console - > select cloud service ESC, and you can see your own server (if you can't see the instance, you need to select the region in the upper left corner of the page and select the purchased region "South China 1 (Shenzhen)"
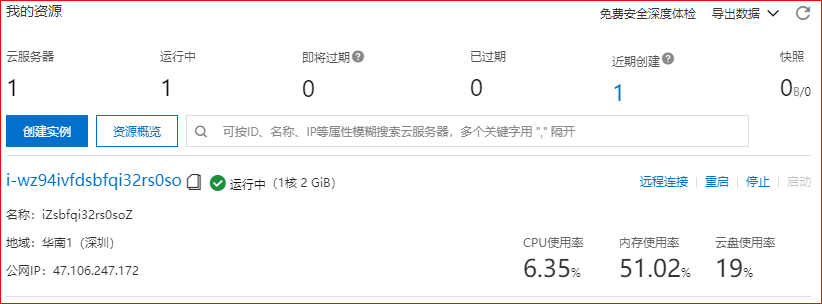
(2) Click the instance, go to the instance details, reset the password and configure the security group rules
Note: resetting the password is to connect to our server remotely and configure the security group rules to develop the port, so as to access the server
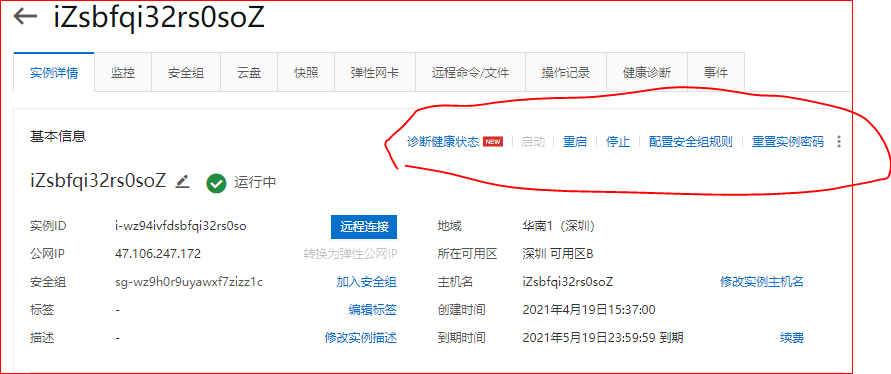
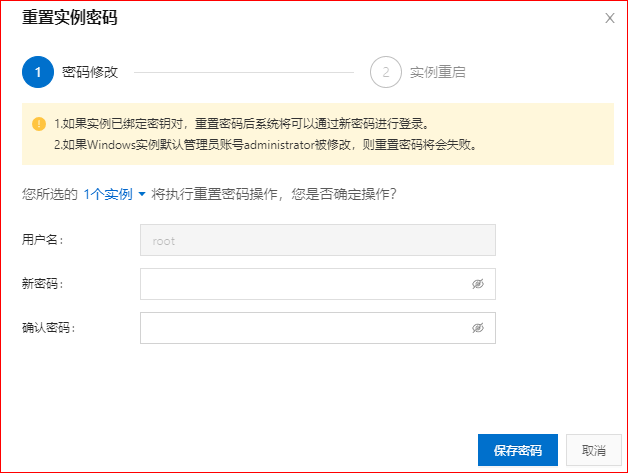
(3) Click reset password and enter the new password. Remember the user name here to facilitate remote connection later
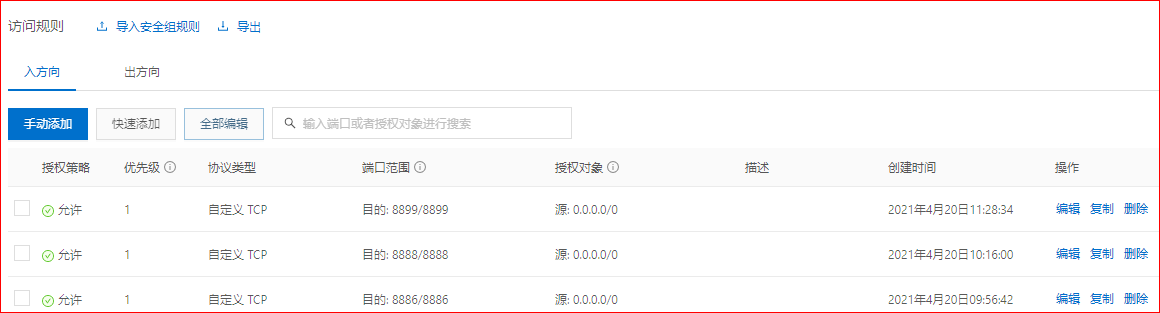
(4) Set security rules, click configure security group rules - > Click set rules, then add port 80 and port 8888 (this is the default of pagoda panel, add it first), and then add the port monitored by your own NodeJS. The authorized object is 0.0.0.0/0, which is the default
After configuring the restart instance, I remember I can restart it without restarting. Let's restart it.
(5) Remote connection
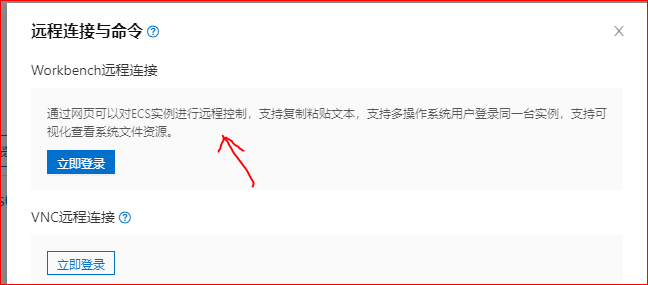
Here, you can directly select the remote connection provided by Alibaba cloud. In the instance, there is a remote connection on the right
1.Alibaba cloud's own remote connection
2.Xshell And other tools
3.fileZill The connection can send files
Select workbench - > log in now
The connection requires an account and password, which is the above-mentioned reset password. Enter the password and you will enter the linux terminal interface after successful connection
[external chain picture transfer failed. The source station may have anti-theft chain mechanism. It is recommended to save the picture and upload it directly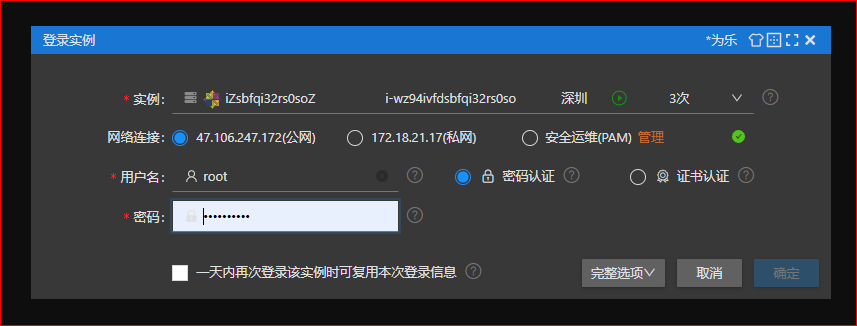
3. Install the pagoda panel
(1) Pagoda panel is a server management software to improve operation and maintenance efficiency. For us, the function is to visually operate and manage the website on the Linux server. It's very convenient to use. You don't need to knock commands one by one. Those who like to knock commands can use commands to operate
Reference tutorial: https://zhuanlan.zhihu.com/p/149675843 (this is very detailed, for centos) https://www.bt.cn/bbs/thread-19376-1-1.html (the version installation command is here)
1.Pagoda default port 8888 ,It needs to be added to the server security group (we have added it above, so we skip here)
2.centos Download address: yum install -y wget && wget -O install.sh http://download. bt.cn/install/install_ 6.0. sh && sh install. Sh (in the linux terminal that has just been successfully connected, the copy command enters execution and waits for download)
Download tips y/n , direct y , There will be a user name and password after the link is completed

This is my access address, user name and password. Remember it, then copy the link and visit it in the browser, and you will enter the login pagoda interface. If you forget your password next time, you can connect remotely and enter the command bt default ,You will come out of the pagoda to access the link and user name and password

Internet panel address: http://47.106.247.172:8888/d8577725
 Intranet panel address: http://172.18.21.17:8888/d8577725
username: cajvpqx // User name and password
password: 6c23ccd
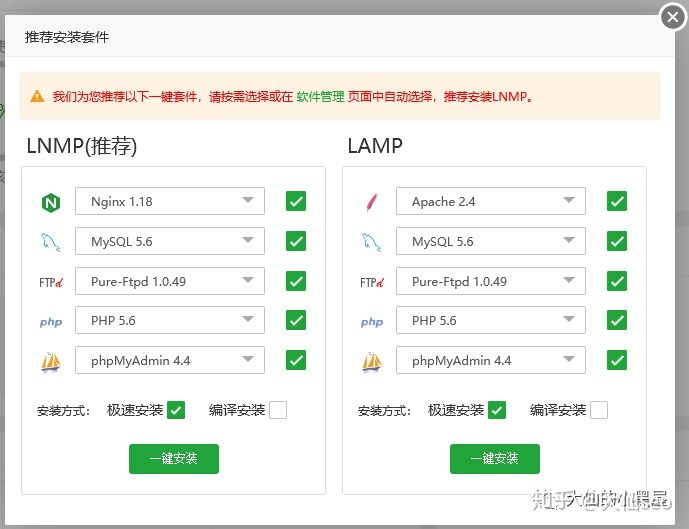
(2) Installation configuration
There will be recommended installation when I first enter the site. Instead of choosing fast installation, I choose compile installation. I chose LNMP and installed nginx, pure ftpd and mysql. Because the installation is a little slow, I didn't install php and can't use it now
Then modify the port. The default port of pagoda is 8888. In order to prevent violent cracking, we change the port to 8899
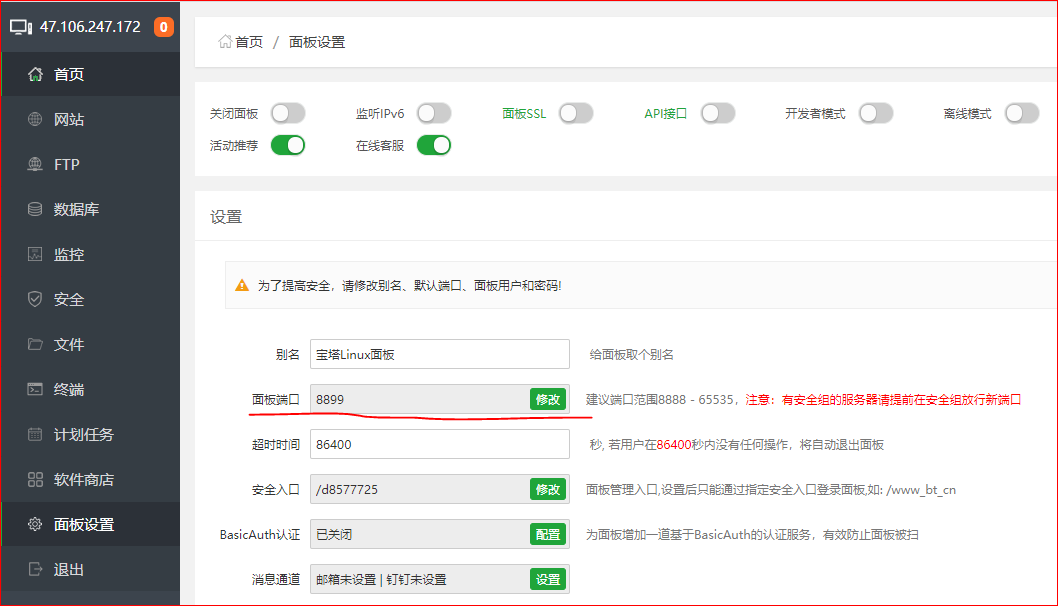
The port has been modified and needs to be added in the security group. Just click pagoda security - > enter the release port
4. Tools required for installation project
-
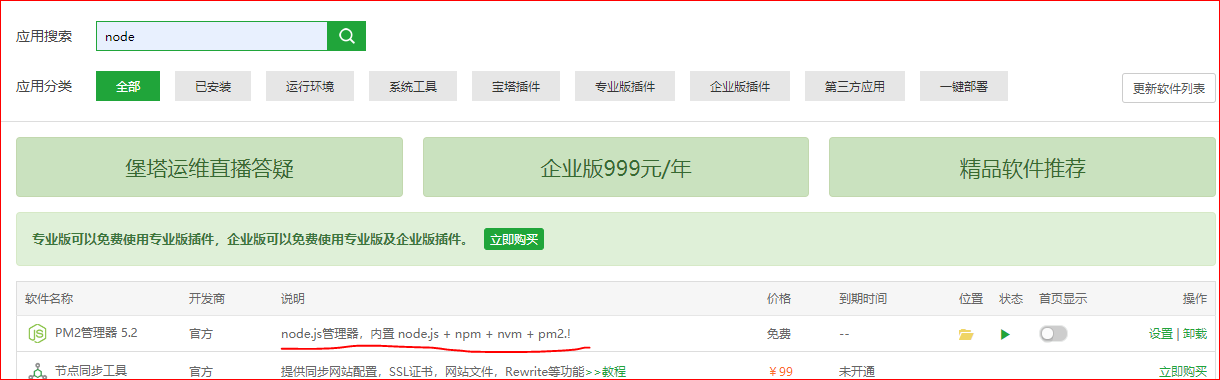
pm2: search and install pm2 (including node module)
-
mongoDB: search and install mongoDB (only one is found, just install it directly)
At this point, the server is basically ready. Here are the project related configurations.
3. Project configuration
(1) Nginx configuration
There are downloaded software under the software store. The software store - > select installed - > select nginx - > Settings - > configuration modification
Configure your own information below the installation. The configuration here is the proxy configuration. At that time, the front-end access will proxy into the local nodeJS interface
server
{
    listen 80; //The default http port needs to be opened in the security group rules, or you can set a port yourself. (port 80 is used for ECS instances as websites or Web application servers)
    server_name ********;  //Own server public IP
    index index.html index.htm index.php; // Default index HTML open
    root  /www/wwwroot/dist; //The folder where the project is located will be packaged as dist at the front end, so I will add dist directly here

   // #error_page   404   /404.html;
    include enable-php.conf;

    location /api/  // Write correctly / api /, and the interface starting with / api will proxy
    {
        proxy_pass http://127.0.0.1:8886/; // The domain name and port of the node service, the node interface address of the agent, and my listening port is 8886
    }
     error_page 404 /404.html;
        location = /40x.html { // Bad Web page configuration
    }

    error_page 500 502 503 504 /50x.html;
        location = /50x.html { // Bad Web page configuration
    }
}
//Put index. Under wwwroot/dist HTML, you can access this page through ****** public network IP (: port 80 is optional)
//Start nginx, which is a common command. We need to use the command to start it. It has been started by default. Here is also an interface startup. Ha ha, just learn about the command
nginx -t test nginx Is there any grammatical error
nginx start-up nginx
nginx -s reload restart nginx,modify nginx.conf Remember to restart after
 Other commands

ps -ef | grep nginx display nginx process
nginx -s stop stop it nginx
nginx -v see nginx edition
(2) Front end packaging Online
-
pack
-
In Vue config. JS to avoid missing resources
module.exports = { // Auto open outputDir: 'dist', // Package folder assetsDir: 'static', // Static resource directory publicPath: process.env.NODE_ENV === 'production' ? './' : '/', // Set index HTML file path. The Internet says to set this, but I still start with / when I package it devServer: { // Agent in development phase proxy: 'http://localhost:8886 ', / / I am the full agent port: '8088', open: true, overlay: { warnings: false, errors: true } }, -
In router / index Change the mode in JS to "hash". If it is history, it also needs to be combined with the back-end configuration. The official website also says that you can baidu yourself. I am hash
-
Change the axios baseURL, for example, Axios defaults. baseURL = “ http://localhost:8886 ”, change localhost: 8886 to ECS public IP, and add / api after it (consistent with the location of Nginx configuration above)
const service = axios.create({ baseURL: 'http://47.106.247.172:80/api / '/ / after configuring the proxy, you don't need to set this url. The default port is 80 //baseURl: process.env.NODE_ENV === 'production' ? 'http://47.106.247.172:80/api/': '' }) -
Execute the npm run build command to package. After packaging, we can directly open the index.exe file under the dist file HTML can't load resources. Don't worry. Just deploy it on the server
-
-
Upload to server
- In the pagoda panel, click "file" > enter the / www/wwwroot /dist folder > compress the dist folder and upload it
- Visit the public IP in the browser to see your front-end page
- In the pagoda panel, click "file" > enter the / www/wwwroot /dist folder > compress the dist folder and upload it
(3) Backend Node project online
-
In the pagoda panel, click "file" > enter the / www/wwwroot/dist folder > create a new folder server > upload the node file to this folder
-
Under the "security" interface in the pagoda panel, release the node service port, such as 8886 used in this project
-
In the "software store" interface in the pagoda panel, make relevant configuration
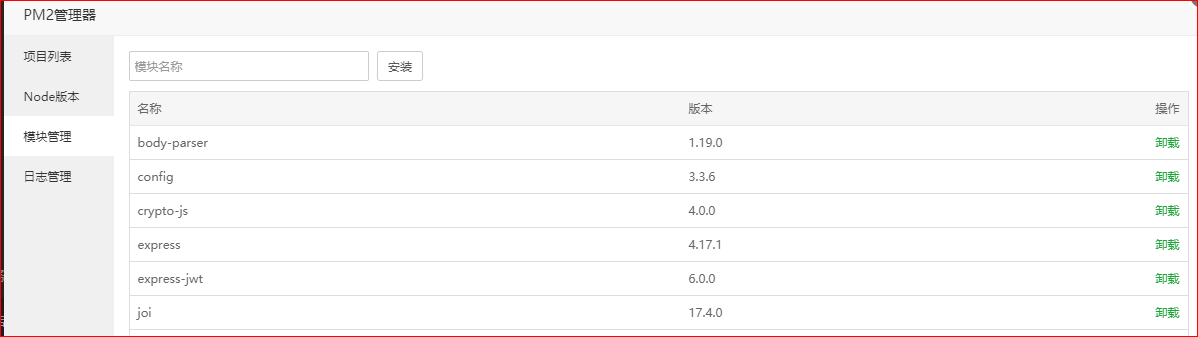
- pm2 configuration = > click "Settings" >
"Node version": switch to the local development version V12 18.2 (enter node -v in the cdm command of your computer to check your version)
"Module management": the third-party modules that depend on Mongoose, express, etc. will be installed in / www / server / NVM / versions / node / V12 18.2/lib/node_ modules/,
- pm2 configuration = > click "Settings" >
-
Notes for importing node files
-
If a third-party module is used, the module name cannot be written directly when it is imported into the file. You need to add / www / server / NVM / versions / node / V12 18.2/lib/node_ Modules /, taking mongoose as an example, const mongoose = require('/ www/server/nvm/versions/node/v12.18.2/lib/node_modules/mongoose')
// Like my app js
const { varifyToken, errorToken } = require('./utils/ejwt/checkToken');
const createToken = require('./utils/ejwt/token');
//Connect database
require('./model/connect');
const express = require('/www/server/nvm/versions/node/v12.18.2/lib/node_modules/express');
const app = express();
const bodyParser = require('/www/server/nvm/versions/node/v12.18.2/lib/node_modules/body-parser');
const multer = require('/www/server/nvm/versions/node/v12.18.2/lib/node_modules/multer'); // Third party introduction
const fs = require('fs');
const path = require('path'); // Self contained direct introduction
-
-
Fill in the relevant information in the "project list". My startup is app js
Startup file: / www / wwwroot / dist / server / APP js
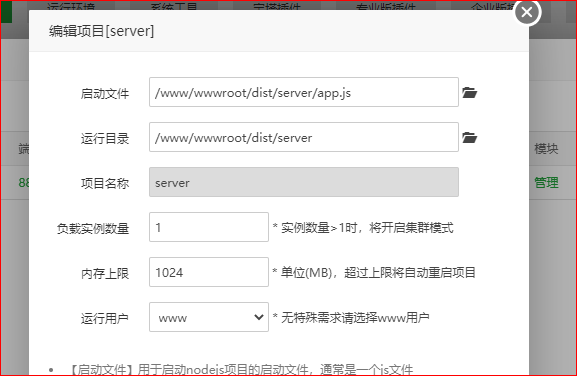
In this way, the node can be started by itself, but I don't see where I can check the startup status. This is a little annoying.
(4) Database setup and import
Now there are only databases left. We have installed MongoDB earlier. Now we want to import data
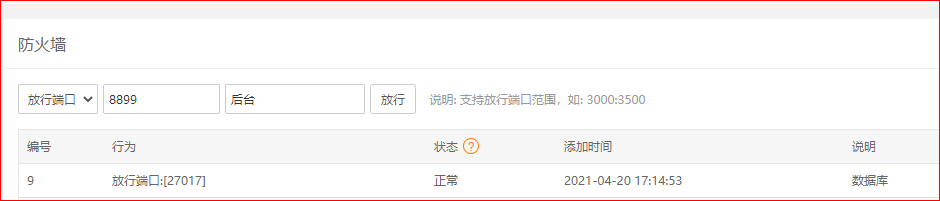
(1) In the pagoda 'security', the default port of release database is 27017
(2) Create database and user name and password permission. It depends on whether you need it or not. Because my local development has set the user name and password, I also want to add the database and add the user name and password, which is the same as the local user name and password.
show dbs // Show all databases
use admin // Switch to admin
db.createUser({user:'root',pwd:'root',roles:['userAdminAnyDatabase']}) // Administrator user
db.auth('root','root') // check
// Use your own database name (if the database exists, use the existing one. If it doesn't exist, it's good to create one. I'm here to create my database)
use ManageSystem
db.createUser({user:'root',pwd:'root',roles:['readWrite']}) // Add the user name and password. This is also true in my local area. Otherwise, I can't connect to node
If the permission is set, click "Settings" > "configuration file" > of MongoDB in the "software store" interface in the pagoda panel to make the following modifications
security:
authorization: enabled
(3) Mongodb imports and exports data (you can choose json or csv file format, I choose json)
A. Export your own database documents first (I export documents one by one here. I don't see the command of one-time export... Alas)
A1. Enter the bin directory of mongodb and configure the environment variable without entering
Open cmd (shortcut key: win + r, enter cmd), and then enter the bin directory of mongodb (or switch to the disk where mongodb is located in cmd and enter through cd D:\soft\worksort\MongoDB\bin)
A2. export
Command format:  mongoexport -d Database name -c Set name -o "Where do you want to export"
such as: I want to put my database test Medium user Export table to“ C:\Users\ddi\Desktop\db\user.json"
mongoexport -d test-c user -o "C:\Users\ddi\Desktop\db\user.json"

//If there is a user name and password, add: - u user name - p password

mongoexport -u root -p root -d ManageSystem -c gmcs -o "C:\Users\21202\Desktop\mydb\gmcs.json"

Export type default json,Can be specified as csv

mongoexport -u root -p root -d python -c car --file car --headerline --type csv -f field
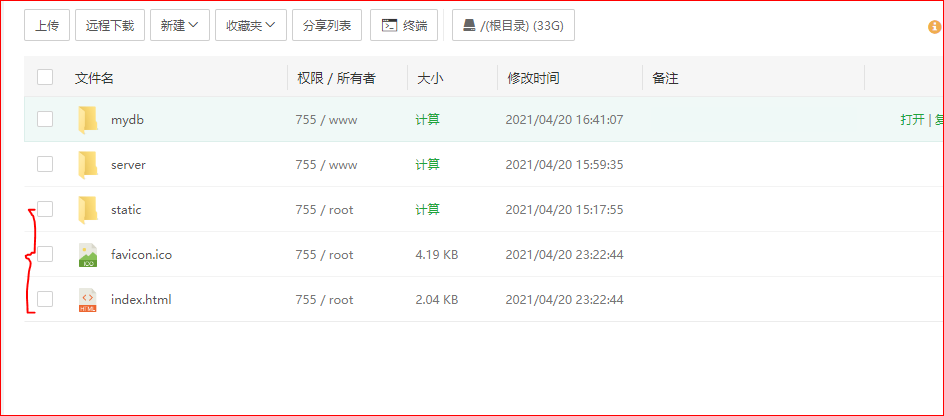
B. Export it locally, and then create a file under www/wwwroot/dist (I created mydb) to put the database file
- Then upload the database file (json or csv format) to the ECS / www/wwwrootdist/mydb folder
B1 import
Command format: mongoimport -d database name - c set name -- file "where to import from"
But here we also need to specify the host name and port number. Also, run the command directly. Don't run mongo first and then run the Import command. I've been in the pit, ha ha
//It becomes like this: mongoimport -h host name: Port - u user name - p password - d database name - c collection name -- file file address (e.g.: / www/wwwroot/reading/db/words.json)
such as: I want to export the above user.json Import to my database ManageSystem Below users aggregate, file Double quotation marks behind
mongoimport -h 127.0.0.1:27017 -u root -p root -d ManageSystem -c users --file "/www/wwwroot/mydb/user.json"

Then import the database one by one
At this point, the project has been deployed. You can access it normally. This is my Bi design
Conclusion: This is my first deployment, and I have encountered many problems in the process. The project has not been optimized yet. It is just that the deployment project is running, and I am glad to be successful. I have learned a lot. If you have any questions, you can comment and exchange.