1. Preface
It has been many years since the Book of the Dead Environment Demo was opened for download. At that time, due to limited technical power and shallow understanding of HDRP,
So this article has been stranded until now. Now the focus of work has shifted to UE. Unity also has some knowledge about the new version of HDRP, so it has a lot of feelings.
Book of the Dead - the Book of the Dead, is a Demo work displayed by unity in 2018.
It mainly shows the application of HDRP, source code modification, audio processing scheme, etc.
The Demo has been transferred to Baidu online disk:
Link: https://pan.baidu.com/s/1UBY0EcAGLwRJEW1VaDyUgQ
Extraction code: f47c
Open and use version: unity2018 2.21f1
2.Feature
Next, expand the technical content in the Feature folder in the Demo directly.
2.1 PropertyMaster
This module links Volume values with specific component objects throughout the project,
So explain in advance.

PropertyVolumeComponentBase and PropertyVolumeComponent in the script inherit from VolumeComponent
It inherits VolumeComponent, that is, it can be loaded in Volume, so the project inherits PropertyVolumeComponent
Those components of can also be mounted in the Volume:
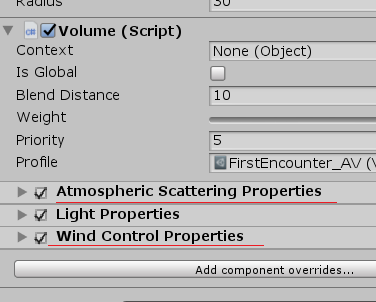
Volume is bound to general components and cannot be bound to specific objects in the scene or synchronized with values. At this time
The extended PropertyVolumeComponent works:
public abstract class PropertyVolumeComponent<X> : PropertyVolumeComponentBase
        where X : PropertyVolumeComponent<X> {
    static PropertyVolumeComponent() {
        PropertyMaster.componentTypes.Add(typeof(X));
    }
}
PropertyMaster.componentTypes will record all types that need to be bound to specific objects in the scene, and then do this step:
public void UpdateProperties() {//In the PropertyMaster class
    var manager = VolumeManager.instance;
    var stack = manager.stack;//Get the current Volume

    if (updateVolumes && volumeTrigger && volumeLayerMask != 0)
        manager.Update(volumeTrigger, volumeLayerMask);

    foreach (var type in componentTypes) {//Type just cached
        var component = (PropertyVolumeComponentBase) stack.GetComponent(type);

        if (component.active)
            component.OverrideProperties(this);
    }
}
PropertyMaster implements the IExposedPropertyTable interface. In the OverrideProperties of the above code,
Inject yourself, and then match the exposed reference with the Guid of the name to get the corresponding scene object.
For details about ExposedRenference, see this test: https://www.cnblogs.com/hont/p/15815344.html
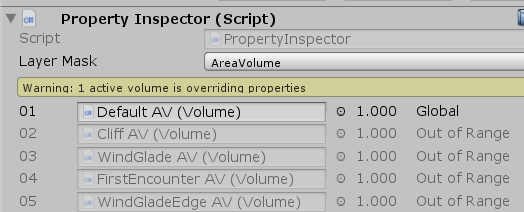
The PropertyInspector provides the Debug of Volume information and obtains the Volume belonging to the current Layer in the editor for easy viewing:
Finally, each hdrenderpipeline Onbeforecameracull updates the binding information once to ensure that the value of each frame is the latest.
In summary, the PropertyMaster approach is suitable for scene object decoupling of components such as URP RenderFeature and HDRP Custom Volume.
2.2 AxelF
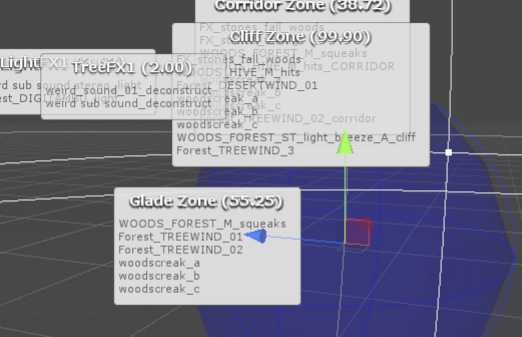
AxelF is a module for processing the sound part of the project. Check the audio environment configuration in the project; To open the scene file AudioZones:
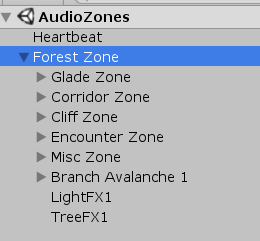
The module is divided into the following parts:
-
- Patch is the smallest unit of different audio objects, ScriptableObject object. Multiple sound sources can be embedded to set whether to play randomly, sequence, etc
- The spatial markers of different audio areas in the Zone store the static lists of all zones internally, which are uniformly updated in the Update of Heartbeat class. It also stores the reference of AudioEmitter. When the role enters the zone, AudioEmitter is triggered.
- AudioEmitter audio playback component, call Sequencer to play Patch when OnEnable.
- Heartbeat audio unified Update component is responsible for updating other parts, binding player locations, etc.
By placing different zones in the scene, the playback logic of the sound when the character reaches different positions is controlled.
The scene GUI Processing of this module is more interesting:
It uses the object location information to draw a HelpBox style GUI in the scene GUI part. For details, see the DrawZoneLabelStatic method.
Partial logic:
 m.y = l.y + 1f;
 EditorGUI.HelpBox(m, y.text, MessageType.None);
 EditorGUI.DropShadowLabel(l, x);
 GUI.color = c;
 Handles.EndGUI();
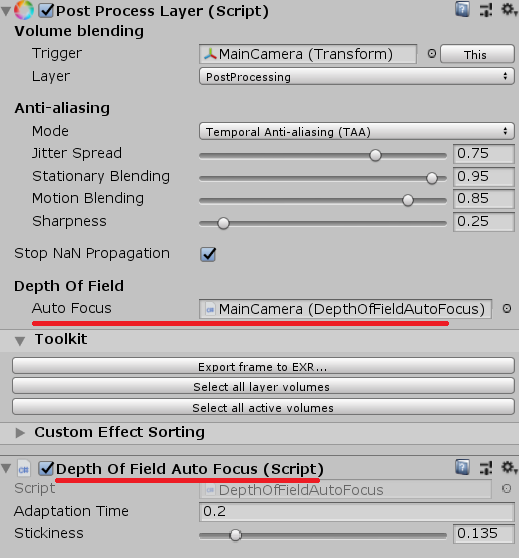
2.3 DepthOfFieldAutoFocus

(after the lens turns to the tree, the focal length is facing the tree, and the background is automatically virtualized)
The module has the following characteristics:
-
- The Compute Shader writes rwstructured buffer, and then passes in the seamless link of screen Shader
- After the Compute Shader passes in the rwstructuredbuffer, the data is not retrieved and automatically updated on the GPU side
- The IDepthOfFieldAutoFocus interface is added to modify the original depth of field function.
2.3.1 Compute Shader
At the C# end, input the parameters required for auto focusing in the part of ComputeShader (the number of threads of ComputeShader is 1, which will be discussed later):
void Init(float initialFocusDistance)
    {
        if (m_AutoFocusParamsCB == null)
        {
            m_AutoFocusParamsCB = new ComputeBuffer(1, 12);
            m_ResetHistory = true;
        }

        if (m_AutoFocusOutputCB == null)
            m_AutoFocusOutputCB = new ComputeBuffer(1, 8);
...
At the CS end, the latest focal length is obtained by comparing the depths of four oblique directions and interpolated and updated (the Depth method is also in this CS):
float3 duv = float3(1.0, 1.0, -1.0) * 0.01;
float focusDistance = Depth(0);
focusDistance = min(focusDistance, Depth( duv.xy));//1,1
focusDistance = min(focusDistance, Depth( duv.zy));//-1,1
focusDistance = min(focusDistance, Depth(-duv.zy));//1,-1
focusDistance = min(focusDistance, Depth(-duv.xy));//-1,-1

focusDistance = max(focusDistance, _FocalLength);
Then, the updated rwstructuredbuffer is directly written back to itself and is always updated on the GPU side:
AutoFocusParams params = _AutoFocusParams[0];
params.currentFocusDistance = SmoothDamp(params.currentFocusDistance, focusDistance, params.currentVelocity);
_AutoFocusParams[0] = params;
Final output:
Output(params.currentFocusDistance);
Then, in the post-processing stage, the shader depthoffield HLSL, get the data directly from the rwstructured buffer that has just been processed:
//custom-begin: autofocus
#if AUTO_FOCUS
    struct AutoFocusOutput
    {
        float focusDistance;
        float lensCoeff;
    };
    StructuredBuffer<AutoFocusOutput> _AutoFocusOutput : register(t3);

    float2 GetFocusDistanceAndLensCoeff()
    {
        return float2(_AutoFocusOutput[0].focusDistance, _AutoFocusOutput[0].lensCoeff);
    }
#else
Here, the transmission of focal length information is completed.
I opened Book of the Dead for the first time before. I didn't understand why a thread's information should also be done with Compute Shader. Later
After being exposed to the practice of directly losing the Shader after rwstructured buffer processing (structured buffer is not supported and must be RW), it is found that this use does save bandwidth,
In addition, since autofocus involves screen information reading, which is a good operation of GPU, Compute Shader is used in Demo.
2.3.2 modification of post-processing depth of field component
Although you can extend it yourself, it's better to directly change the Depth of View in post-processing, which is different from the modification keyword of rendering pipeline,
To view the modification, you need to search this keyword:
//custom-begin: autofocus
The modified part is located in_ In LocalPackages:
First, in postprocesslayer Fields are defined in CS:
//custom-begin: autofocus
        public Object depthOfFieldAutoFocus;
//custom-end
It is convenient to link the auto focus component directly to the PostProcessLayer:
Then an interface is defined:
//custom-begin: autofocus
    public interface IDepthOfFieldAutoFocus {
        void SetUpAutoFocusParams(CommandBuffer cmd, float focalLength /*in meters*/, float filmHeight, Camera cam, bool resetHistory);
    }
//custom-end
The reference of the auto focus component is also stored in the context. During the post-processing rendering of each frame, the interface method is called to update the auto focus logic:
public override void Render(PostProcessRenderContext context)
{
...
//custom-begin: autofocus
            if (context.depthOfFieldAutoFocus != null)
                context.depthOfFieldAutoFocus.SetUpAutoFocusParams(cmd, f, k_FilmHeight, context.camera, m_ResetHistory);
//custom-end
...
In the autofocus logic, Dispatch is called to update the ComputeShader every frame:
cmd.DispatchCompute(m_Compute, 0, 1, 1, 1);
2.4 GrassOcclusion
GrassOcclusion enhances the performance of vegetation in the picture by baking vegetation AO.
The file directory structure is as follows:
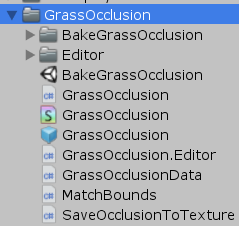
The module is divided into the following parts:
-
- The top view AO Texture of a single vegetation is baked by OcclusionProbes, generally 64x64
- The vegetation data of the whole scene are obtained through the terrain, and these individual vegetation AO maps are spliced to generate a 2048x2048 large AO map, which is then integrated in the shader
For the AO baking of a single vegetation, you can open the BakeGrassOcclusion scene to view it. It is baked through the OcclusionProbes and stored through the script SaveOcclusionToTexture.
Next, we will explain the baking of the large AO diagram of the whole scene.
2.4.1 large AO map baking of the whole scene
See prefab GrassOcclusion for parameter configuration:
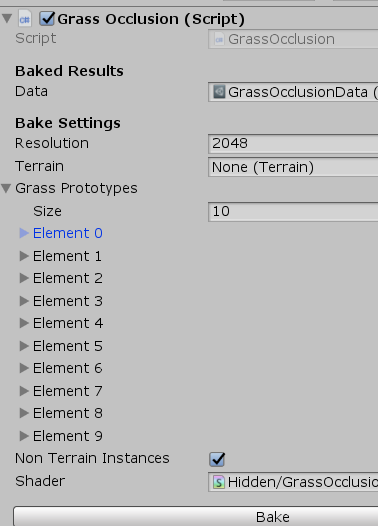
Grass Prototypes stores all baked individual vegetation references. Terrain links to the scene terrain file.
When you click Bake to Bake, you will enter grassocclusion Editor. The Bake function of CS.
First, prepare some variables and get all vegetation through the terrain:
TreeInstance[] instances = m_Terrain.terrainData.treeInstances;
TreePrototype[] prototypes = m_Terrain.terrainData.treePrototypes;
Here is a magic number for terrain scaling:
float magicalScaleConstant = 41.5f; //yea, I know
float terrainScale = magicalScaleConstant / m_Terrain.terrainData.size.x;
Then create an RT:
RenderTexture rt = RenderTexture.GetTemporary(m_Resolution, m_Resolution, 0, RenderTextureFormat.ARGB32, RenderTextureReadWrite.Linear);
Graphics.SetRenderTarget(rt);
Traverse all individual vegetation, and the matching operation will be carried out according to the rotation and other information of vegetation. We won't go deep here:
foreach(GrassPrototype p in m_GrassPrototypes)
            SplatOcclusion(p, instances, prototypes, m_Material, terrainScale, m_NonTerrainInstances, worldToLocal);
However, DrawProcedural in the splatoclusion function says a little:
Graphics.DrawProcedural(MeshTopology.Triangles, vertCount, instanceCount);
Here is how many instances there are, that is, how many drawing passes (in the baking stage) to draw one quadrilateral face at a time.
Finally, the height map will be saved by the way, and then uniformly stored in grassocclusion data (scriptable object).
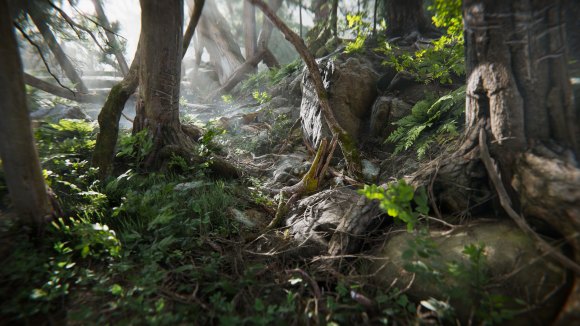
The specific data applied to the scene can be found in scenes / forest_ View under environmentsample.
2.4.2 application in rendering pipeline
The operation of GrassOcclusion is realized by changing the rendering pipeline. You can find keywords in the modified HDRP:
//forest-begin
When obtaining the Grass part AO, the global information passed in with the help of GrassOcclusion will be calculated. The logic code in HDRP Shader is as follows:
float SampleGrassOcclusion(float3 positionWS)
{
    float3 pos = mul(_GrassOcclusionWorldToLocal, float4(positionWS, 1)).xyz;
    float terrainHeight = tex2D(_GrassOcclusionHeightmap, pos.xz).a;
    float height = pos.y - terrainHeight * _GrassOcclusionHeightRange;

    UNITY_BRANCH
    if(height < _GrassOcclusionCullHeight)
    {
        float xz = lerp(1.0, tex2D(_GrassOcclusion, pos.xz).a, _GrassOcclusionAmountGrass);
        return saturate(xz + smoothstep(_GrassOcclusionHeightFadeBottom, _GrassOcclusionHeightFadeTop, height));

        // alternatively:
        // float amount = saturate(smoothstep(_GrassOcclusionHeightFade, 0, pos.y) * _GrassOcclusionAmount);
        // return lerp(1.0, tex2D(_GrassOcclusion, pos.xz).a, amount);
    }
    else
        return 1;
}
Finally, a gradient blending will be carried out according to the relative height, and some of the logic of OcclusionProbes will be explained below.
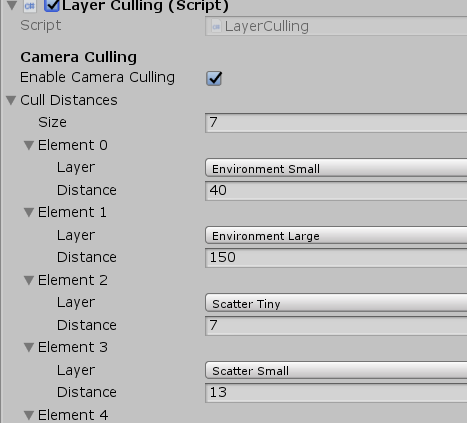
2.5 LayerCulling
LayerCulling mainly encapsulates the display distance control interfaces of different layers of Unity.
Unity has provided culling interfaces for different layers in very early versions:
Layer sight distance culling:
var distances = Enumerable
        .Repeat(Camera.main.farClipPlane, 32)
        .ToArray();
distances[12] = 3f;//Layer12 The culling distance is 3
testCamera.layerCullDistances = distances;//!You must assign a value to an array, otherwise it is invalid
testCamera.layerCullSpherical = true;//Whether to eliminate based on sphere
Layer directional light shadow culling:
testLight.layerShadowCullDistances = distances;
In the project scenario forest_ In environmentsample, search LayerCulling to find the corresponding culling configuration:
2.6 OcclusionProbes
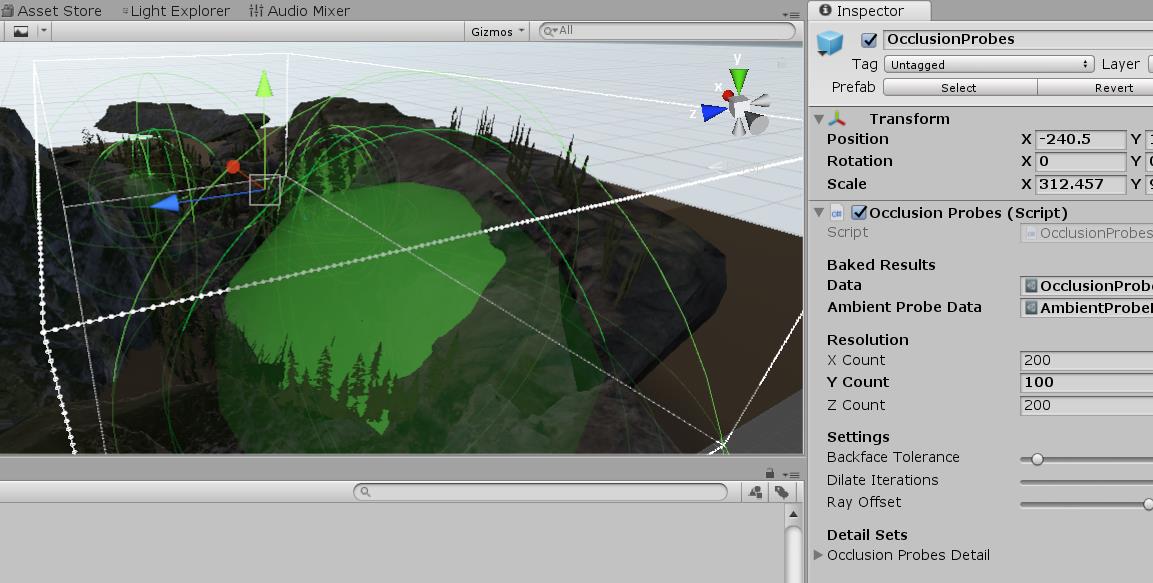
The previous GrassOcclusion used OcclusionProbes to bake the AO of a single vegetation, where the OcclusionProbes covered the whole scene,
Store the masking information of the scene into ScriptableObject.
This part mainly describes
-
- Call the internal interface to bake the masking probe and store it in Texture3D
- Unpack Unity environment SH and throw it into Shader together
- The Shader part integrates and calculates the AO value
First, we can start from the OcclusionProbes mounted in the scene, which will bind the Lightmapping baking interface:
void AddLightmapperCallbacks()
{
    Lightmapping.started += Started;
    Lightmapping.completed += Completed;
}
When baking starts, it will call the Started function, which will set the probe position and other initialization operations.
After baking, the Completed function is called.
The baked masking information can be directly obtained in the function:
Vector4[] results = new Vector4[count];
if (!UnityEditor.Experimental.Lightmapping.GetCustomBakeResults(results))
Then the Data and DataDetail will be converted into 3dtext for storage respectively (there is no Detail Data in the project):
Color32[] colorData = new Color32[length];
for (int i = 0; i < length; ++i)
{
    byte occ = (byte)Mathf.Clamp((int)(data[i].x * 255), 0, 255);
    colorData[i] = new Color32(occ, occ, occ, occ);
}
tex.SetPixels32(colorData);
In addition to the obscured 3DTexture information, OcclusionProbes also saves an environment SH for later participation in the calculation:
public AmbientProbeData m_AmbientProbeData;
This sh (spherical harmonic probe) is from rendersettings Obtained by ambientprobe and corrected:
 var ambientProbe = RenderSettings.ambientProbe;
 m_AmbientProbeData.sh = new Vector4[7];
 // LightProbes.GetShaderConstantsFromNormalizedSH(ref ambientProbe, m_AmbientProbeData.sh);
 GetShaderConstantsFromNormalizedSH(ref ambientProbe, m_AmbientProbeData.sh);
 EditorUtility.SetDirty(m_AmbientProbeData);
In this way, with SH and 3DTexture masking information, you can see how to integrate in Shader in the next step.
This part may not be important, because the Unity interface is called and the specific algorithm or code logic cannot be seen.
The following is the HDRP shader integration part.
In materiallutilities HLSL, in sampleclusionprobes, there are operations to obtain the Ao value of environment 3dtexture:
float SampleOcclusionProbes(float3 positionWS)
{
    // TODO: no full matrix mul needed, just scale and offset the pos (don't really need to support rotation)
    float occlusionProbes = 1;

    float3 pos = mul(_OcclusionProbesWorldToLocalDetail, float4(positionWS, 1)).xyz;

    UNITY_BRANCH
    if(all(pos > 0) && all(pos < 1))
    {
        occlusionProbes = tex3D(_OcclusionProbesDetail, pos).a;
    }
    else
    {
        pos = mul(_OcclusionProbesWorldToLocal, float4(positionWS, 1)).xyz;
        occlusionProbes = tex3D(_OcclusionProbes, pos).a;
    }

    return occlusionProbes;
}
Used here_ Occulusionprobesworldtolocaldetail, which converts the position to the local position, because the oclusionprobes object of the outside scene has been scaled
After you turn back to the local coordinates through this scaling, it is the value in the range of 0-1. This is a trick.
After obtaining the environment AO in 3DTexture, multiply it by the previously calculated GrassOcclusion to obtain skyOcclusion:
float SampleSkyOcclusion(float3 positionRWS, float2 terrainUV, out float grassOcclusion)
{
    float3 positionWS = GetAbsolutePositionWS(positionRWS);
    grassOcclusion = SampleGrassOcclusion(terrainUV);
    return grassOcclusion * SampleOcclusionProbes(positionWS);
}
And skyOcclusion is stored in surfaceData:
surfaceData.skyOcclusion = SampleSkyOcclusion(input.positionRWS, grassOcclusion);
I just said that the environment SH is also saved. In SampleBakedGI, I just multiply the calculated skyclosure by_ AmbientProbeSH,
Add it to the SH of the environment GI, that is, add the skylight information to the light probe sampled at the current scene position:
//forest-begin: sky occlusion
        #if SKY_OCCLUSION
            SHCoefficients[0] += _AmbientProbeSH[0] * skyOcclusion;
            SHCoefficients[1] += _AmbientProbeSH[1] * skyOcclusion;
            SHCoefficients[2] += _AmbientProbeSH[2] * skyOcclusion;
            SHCoefficients[3] += _AmbientProbeSH[3] * skyOcclusion;
            SHCoefficients[4] += _AmbientProbeSH[4] * skyOcclusion;
            SHCoefficients[5] += _AmbientProbeSH[5] * skyOcclusion;
            SHCoefficients[6] += _AmbientProbeSH[6] * skyOcclusion;
       #endif
//forest-end
Note 1: it's rough to multiply in demo.
Note 2: some calculations of SH stored in Unity are simplified on the CPU side, mainly because some constants of sh[6](l2,r0) are added to sh[0](l0,r0),
Through spherical harmonicsl2, the spherical harmonic transmitted into the shader in Unity will be converted automatically, and_ AmbientProbeSH is an external input, so do
Such a conversion. (this part of the data is relatively small and is not guaranteed to be correct)
I personally feel that the approach of OcclusionProbes is more like an experience scheme. It may make up for the shortcomings of the current GI scheme, but if you only rely on overlapping AO to improve the picture
, it's hard to say it's physically correct.
2.7 StaggeredCascade
Interleaved shadows mainly refer to the cascading of the following levels of CSM (cascaded shadows), which are split into different frames and updated separately.
This part is not expanded. If you are interested, you can search some information, which is also more.
2.8 TerrainFoley
Foley refers to hand-made sound effects through traditional methods( https://zhuanlan.zhihu.com/p/42927286 ), Foley here mainly refers to the character passing through the grass,
Or the sound effects heard around the character, and the logic that controls these sound effects.
The terrain Foley part mainly obtains the corresponding sound effect information of different parts of the terrain through the terrain API. Use the PlayerFoley class to monitor and update in real time.
For example, get the part of the current stepping position and footstep sound effect:
var terrainFoley = TerrainFoleyManager.current;
footstepIndex = _foleyMap.GetFoleyIndexAtPosition(position, terrainFoley.splatMap);
footstep = foley.footsteps[footstepIndex];
For details, please refer to terrainfoleymanager cs
3. Other concerns
3.1 HDRP modification
At that time, the version was not perfect, and the overall process was not driven by RenderGraph like the new version.
For modifications in the project, you can search keywords:
//forest-begin
For example, velocity buffer was added to gbbuffer to realize motion blur,
Now HDRP supports motion blur:
//forest-begin: G-Buffer motion vectors
                if(hdCamera.frameSettings.enableGBufferMotionVectors)
                    cmd.EnableShaderKeyword("GBUFFER_MOTION_VECTORS");
                else
                    cmd.DisableShaderKeyword("GBUFFER_MOTION_VECTORS");

                var gBuffers = m_GbufferManager.GetBuffersRTI(enableShadowMask);

                if(hdCamera.frameSettings.enableGBufferMotionVectors) {
                    m_GBuffersWithVelocity[0] = gBuffers[0];
                    m_GBuffersWithVelocity[1] = gBuffers[1];
                    m_GBuffersWithVelocity[2] = gBuffers[2];
                    m_GBuffersWithVelocity[3] = gBuffers[3];
                    m_GBuffersWithVelocity[4] = m_VelocityBuffer.nameID;
                    gBuffers = m_GBuffersWithVelocity;
                }

                HDUtils.SetRenderTarget(cmd, hdCamera, gBuffers, m_CameraDepthStencilBuffer);
//forest-end:
Many changes are more likely to supplement the unfinished functions of HDRP.
3.2 performance statistics
In miniprofiler CS, using an API newly provided by Unity at that time, you can directly output the Profile item in IMGUI:
RecorderEntry[] recordersList =
{
    new RecorderEntry() { name="RenderLoop.Draw" },
    new RecorderEntry() { name="Shadows.Draw" },
    new RecorderEntry() { name="RenderLoopNewBatcher.Draw" },
    new RecorderEntry() { name="ShadowLoopNewBatcher.Draw" },
    new RecorderEntry() { name="RenderLoopDevice.Idle" },
};
void Awake() {
    for(int i = 0; i < recordersList.Length; i++) {
        var sampler = Sampler.Get(recordersList[i].name);
        if(sampler != null) {
            recordersList[i].recorder = sampler.GetRecorder();
        }
    }
}
For details, you can search sampler Getrecorder().
3.3 application of object space normals
In order to prevent LOD jump, the vegetation in the project uses Object Space Normal Map(OSNM), and now the latest HDRP
This version directly provides options for normal space mode switching:
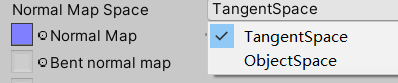
Imagine that the model has a face whose normals are offset 45 degrees upward by a normal map.
At this time, a lod level is added, and the patch is merged with another face to become a new face inclined upward,
If tangent space is used, the normal is offset 45 degrees upward from the original offset; Object space remains the same.