1. Questions:
Hechuang technology has registered the domain name www.mvsc.com for the enterprise website and deployed two Nginx website servers. In order to improve the response speed of this site when serving users in different regions, hechuang technology purchased CDN cache service from bluenews. According to the needs of cache distribution, hechuang technology applies to Xinnet, the domain name registrar, to change the resolution record, which is transferred to the DNS server of Bluex in the form of CNAME alias. The company is responsible for identifying the source address of Web users and distributing Web content to users through the nearest CDN cache node.
In order to improve the access speed of the Web site, the following objectives are required:
- improve the speed and stability of users' access to the Web through local cache cache
- eliminate the influence of network interconnection between regions and operators. Clients always choose the nearest server to obtain resources
- reduce the load on the Web server at the back-end origin site
- effectively prevent and reduce DDOS Attacks
2. Scheme:
According to the network architecture described in the requirements, the CDN content distribution network can be realized by combining Squid reverse proxy and DNS intelligent resolution, as shown in figure-1.
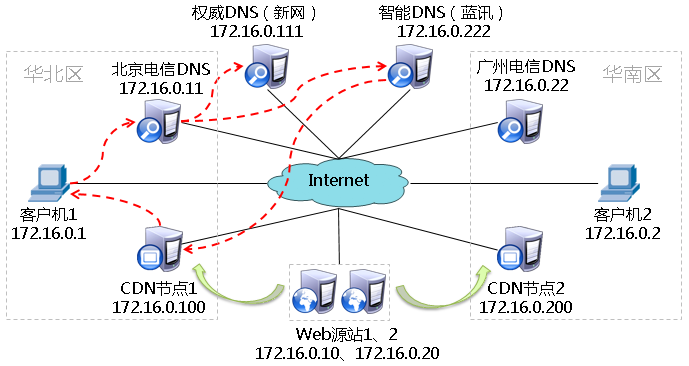
Figure-1
There are 10 servers involved:
- DNS server - domain name registrar (new network): 172.16.0.111/24, dns111.xinnet.com
- DNS server CDN service provider (blue News): 172.16.0.222/24, dns222.lxcdn.net
- DNS server - regional telecom service provider (Beijing): 172.16.0.11/24, bjdns
- DNS server - regional telecom service provider (Guangzhou): 172.16.0.22/24, gzdns
- reverse proxy server 1 -- Beijing CDN node (Lanxun): 172.16.0.100/24, squid100.lxcdn.net
- reverse proxy server 2 -- Guangzhou CDN node (Lanxun): 172.16.0.200/24, squid200.lxcdn.net
- Web source server 1 -- Hechuang Technology: 172.16.0.10/24, web10
- Web source server 2 -- Hechuang Technology: 172.16.0.20/24, web20
- test client 1 -- Beijing area: 172.16.0.1/24, pc01
- test client 2 -- Guangzhou: 172.16.0.1/24, pc01
In order to reduce the complexity of simulation implementation, this case can assign these 10 roles to four RHEL7 virtual machines, each of which has several roles, as shown in TABLE-1:
| Virtual machine number | Take on the role | host name | IP address / subnet mask |
| host1 |
Client 1 Beijing Telecom DNS |
pc01 bjdns |
172.16.0.1/24 172.16.0.11/24 |
| host2 |
Client 2 Guangzhou Telecom DNS |
pc02 gzdns |
172.16.0.2/24 172.16.0.22/24 |
| host3 |
Web origin 1 CDN cache node 1 New network DNS |
web10 squid100.lxcdn.net dns111.xinnet.com |
172.16.0.10/24 172.16.0.100/24 172.16.0.111/24 |
| host4 |
Web origin 2 CDN cache node 2 LAN Xun DNS |
web20 squid200.lxcdn.net dns222.xinnet.com |
172.16.0.20/24 172.16.0.20024 172.16.0.222/24 |
After completing this architecture, when the client resolves the domain name www.mvsc.com for the first time, the process is as follows:
Client > > > local DNS > > > new network DNS > > > DNS of CDN service provider > > > CDN cache node
The resolution result is the IP address of the nearest CDN cache node provided by the CDN service provider.
The final test result shall be:
- when visiting http://www.mvsc.com from pc01, respond by squid100.lxcdn.net
- respond by squid200.lxcdn.net when visiting http://www.mvsc.com from pc02
4. Steps:
To implement this case, follow the steps below.
Step 1: set the address and yum warehouse for the four virtual machines
- Configure the first virtual machine host1
-
Set the host name for easy distinction
[root@host1 ~]# echo "host1" > /etc/hostname [root@host1 ~]# cat /etc/hostname host1 [root@host1 ~]# hostname host1 [root@host1 ~]# hostname host1 -
Set IP address / mask
[root@host1 ~]# vim /etc/sysconfig/network-scripts/ifcfg-ens33 TYPE=Ethernet PROXY_METHOD=none BROWSER_ONLY=no BOOTPROTO=none DEFROUTE=yes IPV4_FAILURE_FATAL=no NAME=ens33 DEVICE=ens33 ONBOOT=yes IPADDR1=172.16.0.1 # First IP address PREFIX1=24 # Subnet mask for the first IP address IPADDR2=172.16.0.11 # Second IP address PREFIX2=24 # Subnet mask for the second IP address [root@host1 ~]# systemctl restart network [root@host1 ~]# ip address show 2: ens33: <BROADCAST,MULTICAST,UP,LOWER_UP> mtu 1500 qdisc pfifo_fast state UP group default qlen 1000 link/ether 00:0c:29:60:d4:78 brd ff:ff:ff:ff:ff:ff inet 172.16.0.1/24 brd 172.16.0.255 scope global noprefixroute ens33 valid_lft forever preferred_lft forever inet 172.16.0.11/24 brd 172.16.0.255 scope global secondary noprefixroute ens33 valid_lft forever preferred_lft forever inet6 fe80::20c:29ff:fe60:d478/64 scope link valid_lft forever preferred_lft forever -
Set the DNS server to use (each client pc01 and pc02 uses the open DNS server of ISP service provider in the local area, and other hosts can use the DNS server provided by CDN service provider.)
[root@host1 ~]# vim /etc/resolv.conf search mvsc.com nameserver 172.16.0.11 - Configure the yum warehouse (set the CD-ROM of the virtual machine to the CD-ROM image of RHEL7)
-
Configure the second virtual machine host2
- Set the host name for easy differentiation
[root@host2 ~]# echo host2 > /etc/hostname
[root@host2 ~]# hostname host2
[root@host2 ~]# hostname
host2
- Set IP address and mask
[root@host2 ~]# cat /etc/sysconfig/network-scripts/ifcfg-ens33
TYPE=Ethernet
PROXY_METHOD=none
BROWSER_ONLY=no
BOOTPROTO=none
DEFROUTE=yes
IPV4_FAILURE_FATAL=no
IPV6INIT=yes
IPV6_AUTOCONF=yes
IPV6_DEFROUTE=yes
IPV6_FAILURE_FATAL=no
IPV6_ADDR_GEN_MODE=stable-privacy
NAME=ens33
DEVICE=ens33
ONBOOT=yes
IPADDR1=172.16.0.2
PREFIX1=24
IPADDR2=172.16.0.22
PREFIX2=24
[root@host2 ~]# systemctl restart network
[root@host2 ~]# ip add list ens33
2: ens33: <BROADCAST,MULTICAST,UP,LOWER_UP> mtu 1500 qdisc pfifo_fast state UP group default qlen 1000
    link/ether 00:0c:29:b4:e7:1d brd ff:ff:ff:ff:ff:ff
    inet 172.16.0.2/24 brd 172.16.0.255 scope global noprefixroute ens33
       valid_lft forever preferred_lft forever
    inet 172.16.0.22/24 brd 172.16.0.255 scope global secondary noprefixroute ens33
       valid_lft forever preferred_lft forever
    inet6 fe80::151f:53d4:e8ef:5c2a/64 scope link noprefixroute
       valid_lft forever preferred_lft forever
    inet6 fe80::18bb:4063:3e2f:102a/64 scope link tentative noprefixroute dadfailed
       valid_lft forever preferred_lft forever
[root@host2 ~]# cat /etc/resolv.conf
search mvsc.com
nameserver 172.16.0.22
- Configure the yum warehouse (the same as the configuration operation of host1)
- Set the host name for easy differentiation
-
Configure the third virtual machine host3
- Set the host name for easy distinction
[root@host3 ~]# echo host3 > /etc/hostname
[root@host3 ~]# hostname host3
[root@host3 ~]# hostname
host3
- Set IP address
[root@host3 ~]# cat /etc/sysconfig/network-scripts/ifcfg-ens33
... ...
IPADDR1=172.16.0.10
PREFIX1=24
IPADDR2=172.16.0.100
PREFIX2=24
IPADDR3=172.16.0.111
PREFIX3=24
... ...
[root@host3 ~]# systemctl restart network
[root@host3 ~]# ip add list ens33
2: ens33: <BROADCAST,MULTICAST,UP,LOWER_UP> mtu 1500 qdisc pfifo_fast state UP group default qlen 1000
    link/ether 00:0c:29:e6:73:fd brd ff:ff:ff:ff:ff:ff
    inet 172.16.0.10/24 brd 172.16.0.255 scope global noprefixroute ens33
       valid_lft forever preferred_lft forever
    inet 172.16.0.100/24 brd 172.16.0.255 scope global secondary noprefixroute ens33
       valid_lft forever preferred_lft forever
    inet 172.16.0.111/24 brd 172.16.0.255 scope global secondary noprefixroute ens33
       valid_lft forever preferred_lft forever
    inet6 fe80::18bb:4063:3e2f:102a/64 scope link noprefixroute
       valid_lft forever preferred_lft forever
- Set the DNS server to be used (each client pc01 and pc02 uses the open DNS server of ISP service provider in the local area, and other hosts can use the DNS server provided by CDN service provider)
[root@host3 ~]# vim /etc/resolv.conf
search mvsc.com
nameserver 172.16.0.222
- Configure the yum warehouse (the same as the configuration operation of host1)
- Set the host name for easy distinction
-
Configure the fourth virtual machine host4
- Set the host name for easy distinction
[root@host4 ~]# echo host4 > /etc/hostname
[root@host4 ~]# hostname host4
[root@host4 ~]# hostname
host4
- Set IP address and mask
[root@host4 ~]# cat /etc/sysconfig/network-scripts/ifcfg-ens33
... ...
IPADDR1=172.16.0.20
PREFIX1=24
IPADDR2=172.16.0.200
PREFIX2=24
IPADDR3=172.16.0.222
PREFIX3=24
... ...
[root@host4 ~]# systemctl restart network
[root@host4 ~]# ip add list ens33
2: ens33: <BROADCAST,MULTICAST,UP,LOWER_UP> mtu 1500 qdisc pfifo_fast state UP group default qlen 1000
    link/ether 00:0c:29:0b:55:b7 brd ff:ff:ff:ff:ff:ff
    inet 172.16.0.20/24 brd 172.16.0.255 scope global noprefixroute ens33
       valid_lft forever preferred_lft forever
    inet 172.16.0.200/24 brd 172.16.0.255 scope global secondary noprefixroute ens33
       valid_lft forever preferred_lft forever
    inet 172.16.0.222/24 brd 172.16.0.255 scope global secondary noprefixroute ens33
       valid_lft forever preferred_lft forever
    inet6 fe80::d367:d4e8:d6c0:7fa0/64 scope link noprefixroute
       valid_lft forever preferred_lft forever
    inet6 fe80::151f:53d4:e8ef:5c2a/64 scope link tentative noprefixroute dadfailed
       valid_lft forever preferred_lft forever
    inet6 fe80::18bb:4063:3e2f:102a/64 scope link tentative noprefixroute dadfailed
       valid_lft forever preferred_lft forever
- Set up the DNS server to use
[root@host4 ~]# vim /etc/resolv.conf
search mvsc.com
nameserver 172.168.0.222
- Configure the yum warehouse (the same as the configuration operation of host1)
- Set the host name for easy distinction
Step 2: build two Web source sites
-
Deploy web10 site (host3)
- Add user, install dependency package
[root@host3 ~]# useradd -s /sbin/nologin nginx
[root@host3 ~]# yum -y install gcc pcre-devel zlib-devel openssl-devel
-
Compile and install nginx package
[root@host3 ~]# tar -xf nginx-1.15.8.tar.gz
[root@host3 ~]# cd nginx-1.15.8/
[root@host3 nginx-1.15.8]# ./configure --user=nginx --group=nginx --with-http_stub_status_module --with-http_ssl_module
[root@host3 nginx-1.15.8]# make
[root@host3 nginx-1.15.8]# make install
- Adjust the nginx service configuration (because in this exercise, Squid reverse agent will be run later on host3. In order to avoid port 80 conflict, you need to limit the listening IP address to the following.)
[root@host3 ~]# vim /usr/local/nginx/conf/nginx.conf
.. ..
http {
    .. ..
    server {
        listen             172.16.0.10:80;
        server_name  www.mvsc.com;
    .. ..
    }
}
[root@host3 ~]# echo "mvsc IT Group." > /usr/local/nginx/html/index.html    # Simplify the test Homepage
- Start nginx service network to ensure access
[root@host3 ~]# /usr/local/nginx/sbin/nginx
[root@host3 ~]# netstat -untalp | grep : 80
tcp        0      0 172.16.0.10:80         0.0.0.0:*               LISTEN      28062/nginx: master
[root@host3 ~]# curl http://172.16.0.10/    # Successfully visited web10
mvsc IT Group.
- Add user, install dependency package
-
Deploy web20 site (host4)
- Add user, install dependency package
[root@host4 ~]# useradd -s /sbin/nologin nginx
[root@host4 ~]# yum -y install gcc pcre-devel zlib-devel openssl-devel
- Compile and install nginx package (this can skip the source code compilation process and directly copy the nginx directory already installed by web10)
[root@host4 ~]# scp -r 172.16.0.10:/usr/local/nginx /usr/local/
root@172.16.0.10's password:     # Verify the password of the other party
... ...
[root@host4 ~]# ls /usr/local/nginx/    # Confirm copy results
client_body_temp  conf  fastcgi_temp  html  logs  proxy_temp  sbin  scgi_temp  uwsgi_temp
-
Adjust the nginx service configuration (because in this exercise, the Squid reverse agent will also run on host4. In order to avoid port 80 conflict, you need to limit the IP address you listen to.)
[root@host4 ~]# vim /usr/local/nginx/conf/nginx.conf
.. ..
http {
    .. ..
    server {
        listen             172.16.0.20:80;
        server_name  www.mvsc.com.cn;
        .. ..
    }
}
[root@host4 ~]# echo "mvsc IT Group." > /usr/local/nginx/html/index.html    # Simplify the test Homepage
- Start nginx service to ensure access
[root@host4 ~]# /usr/local/nginx/sbin/nginx
[root@host4 ~]# netstat -untalp | grep : 80
tcp        0      0 172.16.0.20:80         0.0.0.0:*               LISTEN      27828/nginx: master
[root@host4 ~]# curl http://172.16.0.20/    # Successfully visited web10
mvsc IT Group.
- Add user, install dependency package
Step 3: set up 2 CDN cache nodes
-
Deploy Beijing CDN node squid100.lxcdn.net server (host3)
- Install the squid agent package
[root@host3 ~]# yum -y install squid
- Modify the squid service configuration
[root@host3 ~]# vim /etc/squid/squid.conf
.. ..
http_access allow all    # Change the default policy from deny to allow
visible_hostname squid100.lxcdn.net    # Squid information settings
http_port 172.16.0.100:80 vhost    # Limit IP address to avoid conflicts with native nginx
cache_peer 172.16.0.10 parent 80 0 originserver
cache_peer 172.16.0.20 parent 80 0 originserver
.. .. - Start the squid service and confirm the listening result
[root@host3 ~]# systemctl restart squid
[root@host3 ~]# netstat -untalp | grep :80
tcp        0      0 172.16.0.100:80        0.0.0.0:*               LISTEN      34158/(squid-1)
tcp        0      0 172.16.0.10:80         0.0.0.0:*               LISTEN      28062/nginx: master
- Test the reverse agent squid100 to make sure it is available (access the 80 port of the reverse agent from the client pc01 to get the content of the target web page)
[root@host1 ~]# curl http://172.16.0.100/
mvsc IT Group.
Check the access log of the squid service, which records the event that pc01 accesses the upstream Web site through the proxy:
[root@host3 ~]# tail -1 /var/log/squid/access.log
1587353996.524      2 172.16.0.1 TCP_MISS/200 384 GET http://172.16.0.100/ - FIRSTUP_PARENT/172.16.0.10 text/html
- Install the squid agent package
-
Deploy Guangzhou CDN node squid200.lxcdn.net server (host4)
- Install the squid agent package
[root@host4 ~]# yum -y install squid
- Modify the squid service configuration
.. ..
http_access allow all    # Change the default policy from deny to allow
visible_hostname squid200.lxcdn.net    # Squid information settings
http_port 172.16.0.200:80 vhost    # Limit IP address to avoid conflicts with native nginx
cache_peer 172.16.0.10 parent 80 0 originserver
cache_peer 172.16.0.20 parent 80 0 originserver
.. ..
- Start the squid service and confirm the listening result
[root@host4 ~]# systemctl restart squid
[root@host4 ~]# netstat -nutlpa | grep :80
tcp        0      0 172.16.0.200:80        0.0.0.0:*               LISTEN      33018/(squid-1)
tcp        0      0 172.16.0.20:80         0.0.0.0:*               LISTEN      27828/nginx: master
- Test the reverse agent squid200 to make sure it is available (access the 80 port of the reverse agent from the client pc02 to get the content of the target web page)
[root@host2 ~]# curl http://172.16.0.200/
mvsc IT Group.
Check the access log of the squid service, which records the event that pc02 accesses the upstream Web site through a proxy
[root@host4 ~]# tail -1 /var/log/squid/access.log
1587354779.566      2 172.16.0.2 TCP_MISS/200 385 GET http://172.16.0.200/ - FIRSTUP_PARENT/172.16.0.20 text/html
- Install the squid agent package
Step 4: build DNS domain name distribution system
-
Deploy Beijing DNS - bjdns server (host1)
- Install bind and bind chroot packages
[root@host1 ~]# yum -y install bind bind-chroot
- Set up the / etc/named.conf configuration file (backup the default configuration, set up a new configuration, use this server as the cache DNS, no zone data file is required). To simplify the domain name hierarchy, the forwarder in this example can point to the new network DNS server.)
[root@host1 ~]# mv /etc/named.conf /etc/named.conf.origin
[root@host1 ~]# vim /etc/named.conf
options {
    directory "/var/named";
    forwarders { 172.16.0.111; };
};
- Start the named service
[root@host1 ~]# systemctl restart named
[root@host1 ~]# systemctl enable named
- Install bind and bind chroot packages
-
Deploy Guangzhou DNS - gzdns server (host2)
- The configuration operation is the same as bjdns.
-
Deploy new network DNS --- dns111.xinnet.com server (host3), simulate authoritative DNS
- Install bind and bind chroot packages
[root@host3 ~]# yum -y install bind bind-chroot
- Create the / etc/named.conf configuration file (add the secondary domain xinnet.com, mvsc.com, add the primary domain net, recursion is not allowed globally)
[root@host3 ~]# mv /etc/named.conf /etc/named.conf.origin   # Back up old configuration
[root@host3 ~]# vim /etc/named.conf   # Create new configuration
options {
 listen-on port 53 { 172.16.0.111; };
 directory "/var/named";
 recursion no;
};
zone "xinnet.com" IN {
 type master;
 file "xinnet.com.zone";
};
zone "net" IN {
 type master;
 file "net.zone";
};
zone "mvsc.com" IN {
 type master;
 file "mvsc.com.zone";
};
- Establish resolution record files for the above areas
- In the resolution record file of xinnet.com domain, set the A record to the DNS server of the new network:
[root@host3 ~]# vim /var/named/xinnet.com.zone
$TTL 1D
@       IN SOA  @ rname.invalid. (
                                        0       ; serial
                                        1D      ; refresh
                                        1H      ; retry
                                        1W      ; expire
                                        3H )    ; minimum
@       NS      dns111.xinnet.com.
dns111  A       172.16.0.111
- In the resolution record file of net domain, set the sub domain authorization, and authorize the lxcdn.net domain to the DNS server of blue communication for resolution:
[root@host3 ~]# vim /var/named/net.zone
$TTL 1D
@       IN SOA  @ rname.invalid. (
                                        0       ; serial
                                        1D      ; refresh
                                        1H      ; retry
                                        1W      ; expire
                                        3H )    ; minimum
@               NS      dns111.xinnet.com.
lxcdn.net.      NS      dns222.lxcdn.net.        # Specify subdomain and DNS server
dns222.lxcdn.net.       A       172.16.0.222   # Specify child DNS server address
- In the resolution record file of mvsc.com domain, set the website domain name www.mvsc.com of the customer company as CNAME alias, and the actual site is www.mvsc.com.lxcdn.net, so as to transfer to the blue DNS processing:
[root@host3 ~]# cat /var/named/mvsc.com.zone
$TTL 1D
@    IN SOA    @ rname.invalid. (
                    0    ; serial
                    1D    ; refresh
                    1H    ; retry
                    1W    ; expire
                    3H )    ; minimum
@    NS    dns111.xinnet.com.
www    CNAME    www.mvsc.com.lxcdn.net.
- In the resolution record file of xinnet.com domain, set the A record to the DNS server of the new network:
- Start the named service
[root@host3 ~]# systemctl restart named
[root@host3 ~]# systemctl enable named
- Install bind and bind chroot packages
-
Deploy DNS --- dns222.lxcdn.net server (host4) to realize intelligent separation and resolution
- Install bind and bind chroot packages
[root@host4 ~]# yum -y install bind bind-chroot
- Create the / etc/named.conf configuration file
[root@host4 ~]# mv /etc/named.conf /etc/named.conf.origin //Back up old configuration
[root@host4 ~]# vim /etc/named.conf //Create new configuration
options {
 listen-on port 53 { 172.16.0.222; };
 directory "/var/named";
 forwarders { 172.16.0.111; };
};
acl client1 {
 172.16.0.1; 172.16.0.11; #//Class I address, Beijing area DNS And clients
};
acl client2 {
 172.16.0.2; 172.16.0.22; #//The second kind of address, around Guangzhou DNS And clients
};
view "zone1" {
 match-clients { client1; }; #//Service class I address
 zone "mvsc.com.lxcdn.net" IN { #//Enterprise specific CDN Service Area
 type master;
 file "mvsc.com.lxcdn.net.zone1";
 };
 zone "lxcdn.net" IN { #//Define secondary authority domain lxcdn.net
 type master;
 file "lxcdn.net.zone";
 };
};
view "zone2" {
 match-clients { client2; any; }; #//Service class II address and any other client
 zone "mvsc.com.lxcdn.net" IN {
 type master;
 file "mvsc.com.lxcdn.net.zone2";
 };
 zone "lxcdn.net" IN {
 type master;
 file "lxcdn.net.zone";
 };
};
The client addresses in Beijing and Guangzhou are divided into two categories (each category includes direct query clients and other DNS servers that forward queries). The intelligent separation resolution is realized through view view. - Establish resolution record files for the above areas
- In the resolution record file of lxcdn.net domain, add the A record to the blue DNS server and two CDN cache node servers
[root@host4 ~]# vim /var/named/lxcdn.net.zone
$TTL 1D
@    IN SOA    @ rname.invalid. (
                    0    ; serial
                    1D    ; refresh
                    1H    ; retry
                    1W    ; expire
                    3H )    ; minimum
@    NS    dns222.lxcdn.net.
dns222    A    172.16.0.222
squid100    A    172.16.0.100
squid200    A    172.16.0.200
- For the CDN cache service domain mvsc.com.lxcdn.net, two parsing records are created, corresponding to two types of client addresses. In view 1, www.mvsc.com is resolved to the IP address of CDN node 1, squid100.lxcdn.net; in view 2, it is resolved to the IP address of CDN node 2, squid200.lxcdn.net.
[root@host4 ~]# vim /var/named/mvsc.com.lxcdn.net.zone1
$TTL 1D
@    IN SOA    @ rname.invalid. (
                    0    ; serial
                    1D    ; refresh
                    1H    ; retry
                    1W    ; expire
                    3H )    ; minimum
@    NS    dns222.lxcdn.net.
www    A    172.16.0.100     # Corresponding to CDN node 1 in Beijing
[root@host4 ~]# vim /var/named/mvsc.com.lxcdn.net.zone2
$TTL 1D
@    IN SOA    @ rname.invalid. (
                    0    ; serial
                    1D    ; refresh
                    1H    ; retry
                    1W    ; expire
                    3H )    ; minimum
@    NS    dns222.lxcdn.net.
www    A    172.16.0.200     # Corresponding to CDN node 2 in Guangzhou
- In the resolution record file of lxcdn.net domain, add the A record to the blue DNS server and two CDN cache node servers
- Start the named service
[root@host4 ~]# systemctl restart named     # Make sure to start the service
[root@host4 ~]# systemctl enable named     # Set to start automatically
- Install bind and bind chroot packages
-
Domain name resolution test
- Make sure the new network DNS (dns111) is available
[root@host1 ~]# nslookup dns111.xinnet.com 172.16.0.111 //Search Authority domain Server: 172.16.0.111 Address: 172.16.0.111#53
Name: dns111.xinnet.com Address: 172.16.0.111 - Make sure that blue DNS (dns222) is available
[root@host1 ~]# nslookup squid100.lxcdn.net 172.16.0.222 //Search Authority domain
Server: 172.16.0.222
Address: 172.16.0.222#53

Name: squid100.lxcdn.net
Address: 172.16.0.100
- Ensure that the resolution of DNS (dns222) is available
- Query from the client pc01 (first class address):
[root@host1 ~]# nslookup www.mvsc.com.lxcdn.net 172.16.0.222 //check CDN Subdomain
Server: 172.16.0.222
Address: 172.16.0.222#53

Name: www.mvsc.com.lxcdn.net
Address: 172.16.0.100
- Query from client pc02 (address of the second type):
[root@host2 ~]# nslookup www.mvsc.com.lxcdn.net 172.16.0.222
Server: 172.16.0.222
Address: 172.16.0.222#53

Name: www.mvsc.com.lxcdn.net
Address: 172.16.0.200
- Query from the client pc01 (first class address):
- Ensure zone DNS (bjdns, gzdns) is available
- Query the server bjdns:
[root@host1 ~]# nslookup dns111.xinnet.com 172.16.0.11
Server: 172.16.0.11
Address: 172.16.0.11#53

Non-authoritative answer:
Name: dns111.xinnet.com
Address: 172.16.0.111
- Query the server gzdns:
[root@host1 ~]# nslookup dns111.xinnet.com 172.16.0.22
Server: 172.16.0.22
Address: 172.16.0.22#53

Non-authoritative answer:
Name: dns111.xinnet.com
Address: 172.16.0.111
- Query the server bjdns:
-
Ensure that subdomain authorization (dns111 -- > dns222) is available
-
When testing the subdomain authorization, the client should normally be another DNS server, so you can't see the result with nslookup, just use the dig tool instead. Because the new network DNS does not provide recursion, when querying the sub domain FQDN, if the authorization is available, the available sub domain name, domain name and IP address information of the sub domain DNS will be informed.
[root@host1 ~]# dig @172.16.0.111 squid100.lxcdn.net
.. ..
;; QUESTION SECTION:
;squid100.lxcdn.net. IN A
;; AUTHORITY SECTION:
lxcdn.net. 86400 IN NS dns222.lxcdn.net.
;; ADDITIONAL SECTION:
dns222.lxcdn.net. 86400 IN A 172.16.0.222
.. ..
-
When testing the subdomain authorization, the client should normally be another DNS server, so you can't see the result with nslookup, just use the dig tool instead. Because the new network DNS does not provide recursion, when querying the sub domain FQDN, if the authorization is available, the available sub domain name, domain name and IP address information of the sub domain DNS will be informed.
- Ensure that the DNS resolution of the authoritative DNS CDN of the client zone DNS is available
- On the client pc01:
[root@host1 ~]# cat /etc/resolv.conf
search mvsc.com
nameserver 172.16.0.11
[root@host1 ~]# nslookup www.mvsc.com
Server: 172.16.0.11
Address: 172.16.0.11#53
Non-authoritative answer:
www.mvsc.com canonical name = www.mvsc.com.lxcdn.net.
Name: www.mvsc.com.lxcdn.net
Address: 172.16.0.100
- On the client pc02:
[root@host2 ~]# cat /etc/resolv.conf
search mvsc.com
nameserver 172.16.0.22
[root@host2 ~]# nslookup www.mvsc.com
Server: 172.16.0.22
Address: 172.16.0.22#53
Non-authoritative answer:
www.mvsc.com canonical name = www.mvsc.com.lxcdn.net.
Name: www.mvsc.com.lxcdn.net
Address: 172.16.0.200
- On the client pc01:
- Make sure the new network DNS (dns111) is available
Step 5: client access test
-
Visit www.mvsc.com from Beijing client pc01
- Visit the target website
[root@host1 ~]# curl http://www.mvsc.com/
mvsc IT Group.
- Viewing the agent log for squid100
[root@host3 ~]# tail -1 /var/log/squid/access.log
1587372823.987      0 172.16.0.1 TCP_MEM_HIT/200 393 GET http://www.mvsc.com/ - HIER_NONE/- text/html
- Visit the target website
-
Visit www.mvsc.com from Guangzhou client PC 02
-
Visit the target website
[root@host1 ~]# curl http://www.mvsc.com/
mvsc IT Group.
-
Viewing the agent log for squid100
[root@host4 ~]# tail -1 /var/log/squid/access.log
1587372973.113      0 172.16.0.2 TCP_MEM_HIT/200 394 GET http://www.mvsc.com/ - HIER_NONE/- text/html
-
Visit the target website