Before configuring the OpenStack Networking (sub) service, you must create a database, service credentials, and API endpoints.
Title to create a database, complete the following steps:
Connect to the database server as a user using the database access client: root
mysql -u root -p
Create database: neutron
MariaDB [(none)] CREATE DATABASE neutron;
Grant correct access to the database and replace with the appropriate Password: neutronNEUTRON_DBPASS
MariaDB [(none)]> GRANT ALL PRIVILEGES ON neutron.* TO 'neutron'@'localhost' IDENTIFIED BY 'neutron';
MariaDB [(none)]> GRANT ALL PRIVILEGES ON neutron.* TO 'neutron'@'%' IDENTIFIED BY 'neutron';
MariaDB [(none)]> GRANT ALL PRIVILEGES ON neutron.* TO 'neutron'@'tsw01' IDENTIFIED BY 'neutron';
Exit the database access client.
quit;
To create service credentials, complete the following steps:
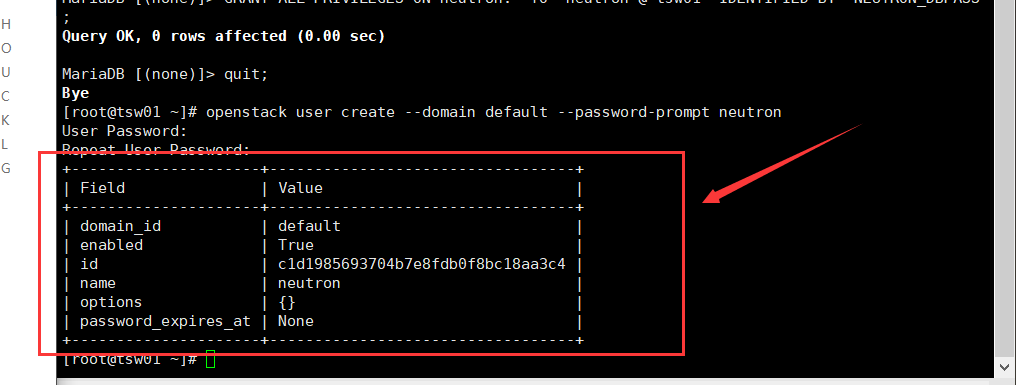
Create user: neutron
openstack user create --domain default --password-prompt neutron
Add role to user: adminneutron
openstack role add --project admin --user neutron admin

be careful
This command does not provide output.
Create service entity: neutron
openstack service create --name neutron --description "OpenStack Networking" network
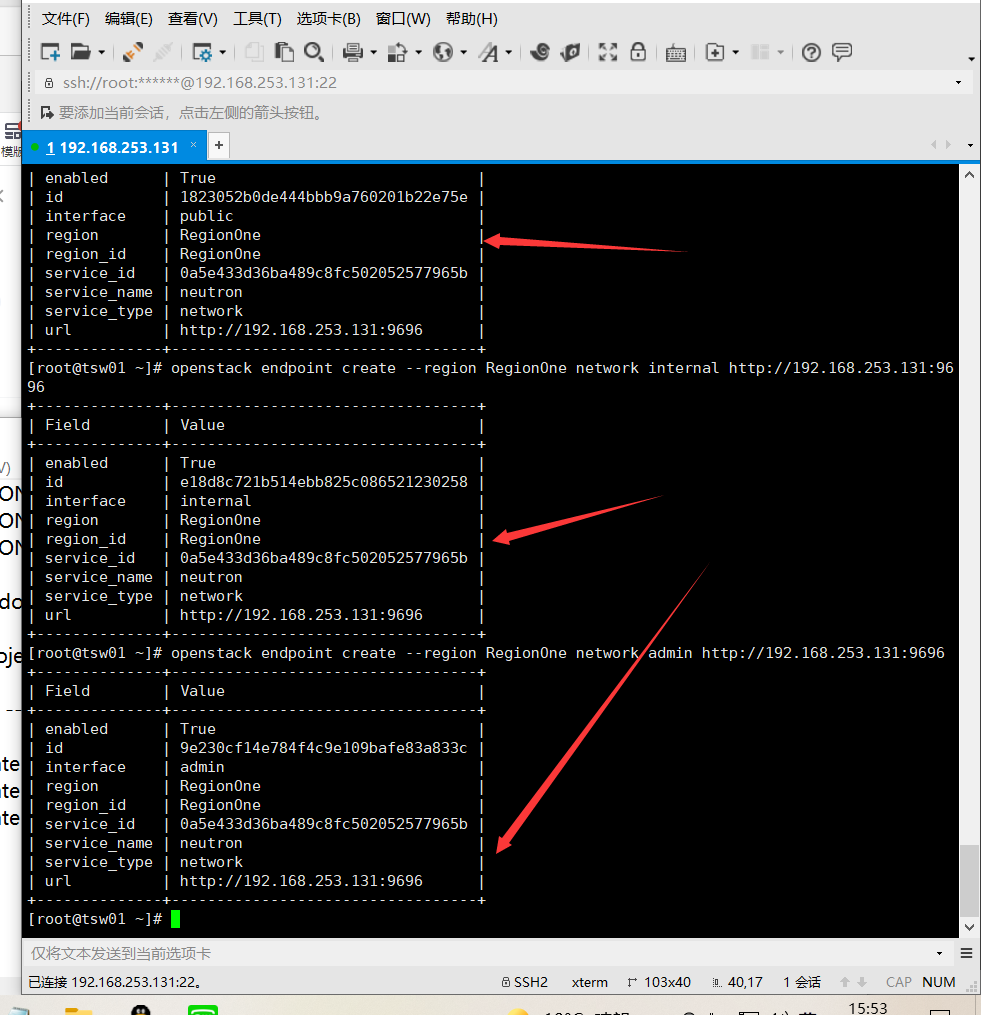
To create a web service API endpoint:
openstack endpoint create --region RegionOne network public http://192.168.253.131:9696
openstack endpoint create --region RegionOne network internal http://192.168.253.131:9696
openstack endpoint create --region RegionOne network admin http://192.168.253.131:9696
Network option 2: self service network
Update time: 20:17, December 10, 2021
Install and configure network components on the controller node.
Network option 2: self service network
Install and configure network components on the controller node.
----------Installation components
yum install -y openstack-neutron openstack-neutron-ml2 openstack-neutron-linuxbridge ebtables
Configure server components 
Edit the file and do the following: / etc / neutron / neutron conf
In this section, configure database access: [database]
[database]
connection =mysql+pymysql://neutron:neutron@192.168.253.131/neutron
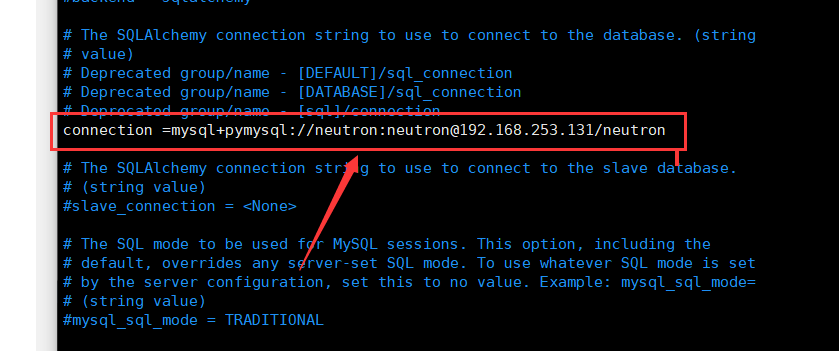
Comment out or delete any other options in this section. connection[database]
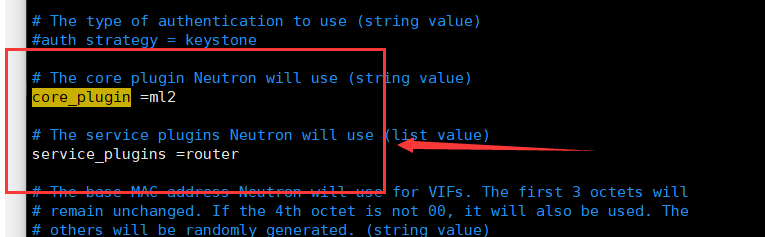
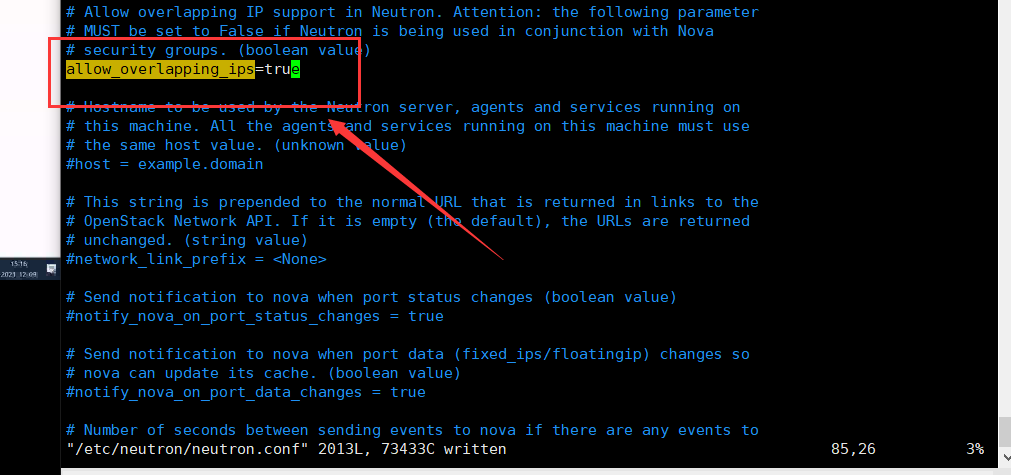
[DEFAULT]
core_plugin = ml2
service_plugins = router
allow_overlapping_ips = true
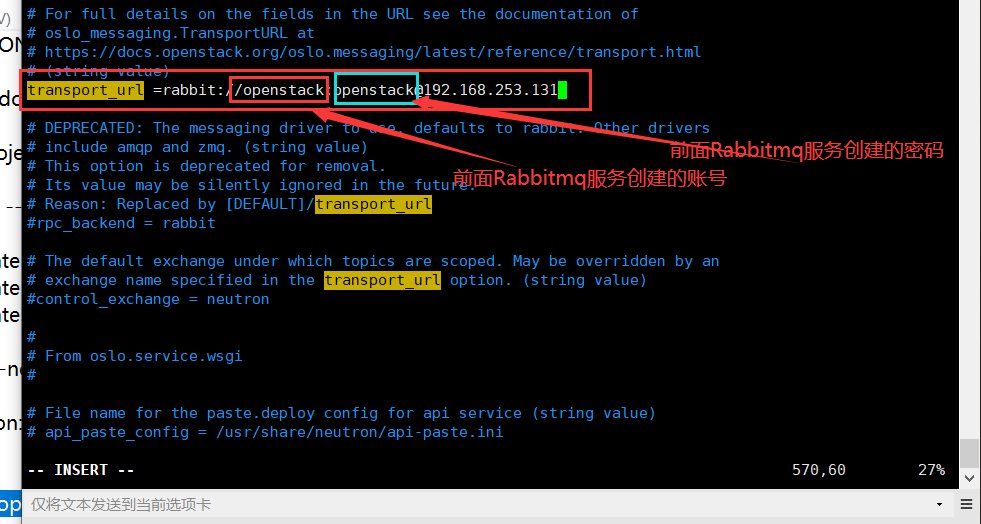
In this section, configure message queue access: [DEFAULT]RabbitMQ
[DEFAULT]
...
transport_url=rabbit://openstack:openstack@192.168.253.131
Replace with the password you selected for your account in RabbitMQ. RABBIT_PASSopenstack
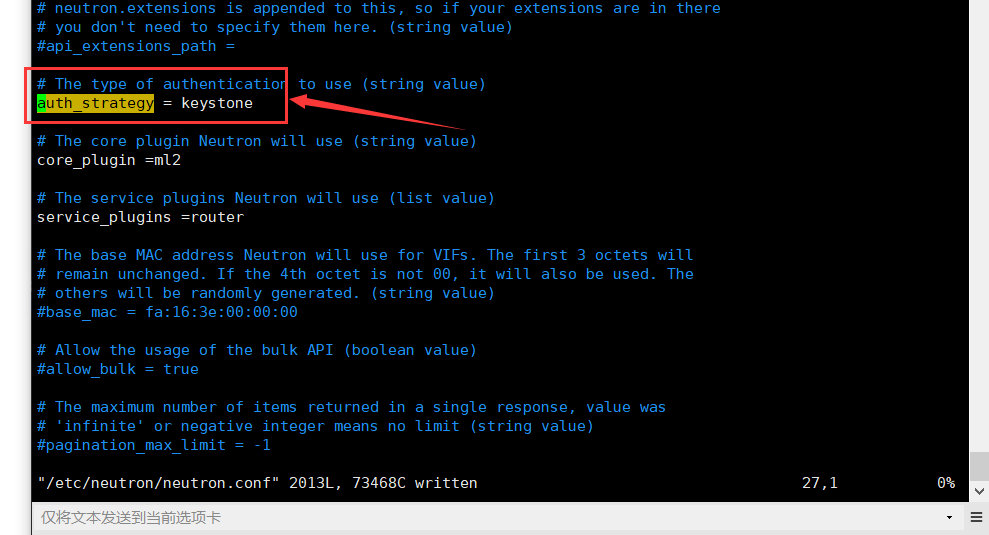
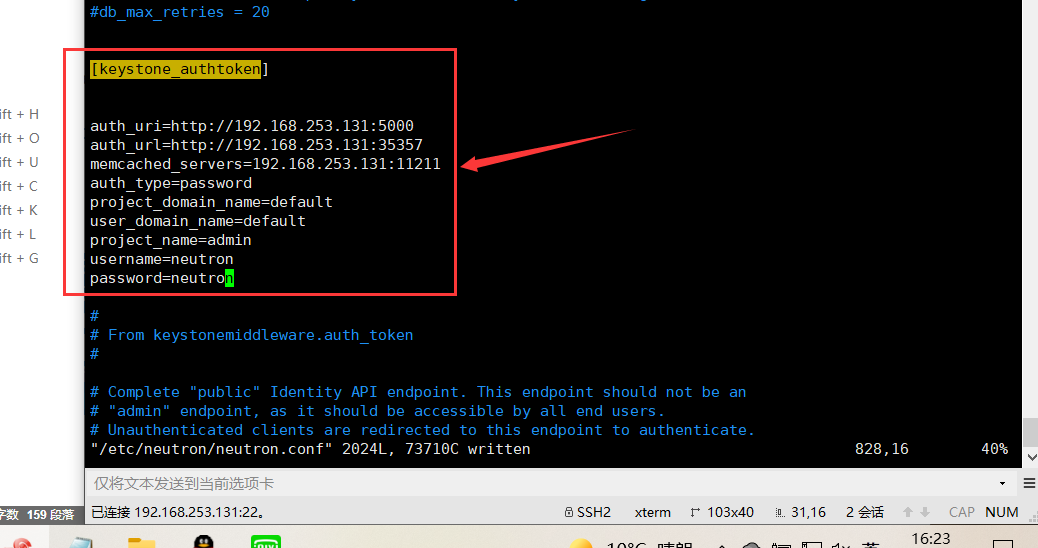
In the and sections, configure identity service access: [DEFAULT][keystone_authtoken]
[DEFAULT]
...
auth_strategy = keystone
[keystone_authtoken]
...
auth_uri=http://192.168.253.131:5000
auth_url=http://192.168.253.131:35357
memcached_servers=192.168.253.131:11211
auth_type=password
project_domain_name=default
user_domain_name=default
project_name=admin
username=neutron
password=neutron
Replace with the password you selected for the user in the identity service. NEUTRON_PASSneutron
be careful
Comment out or delete any other options in this section. [keystone_authtoken]
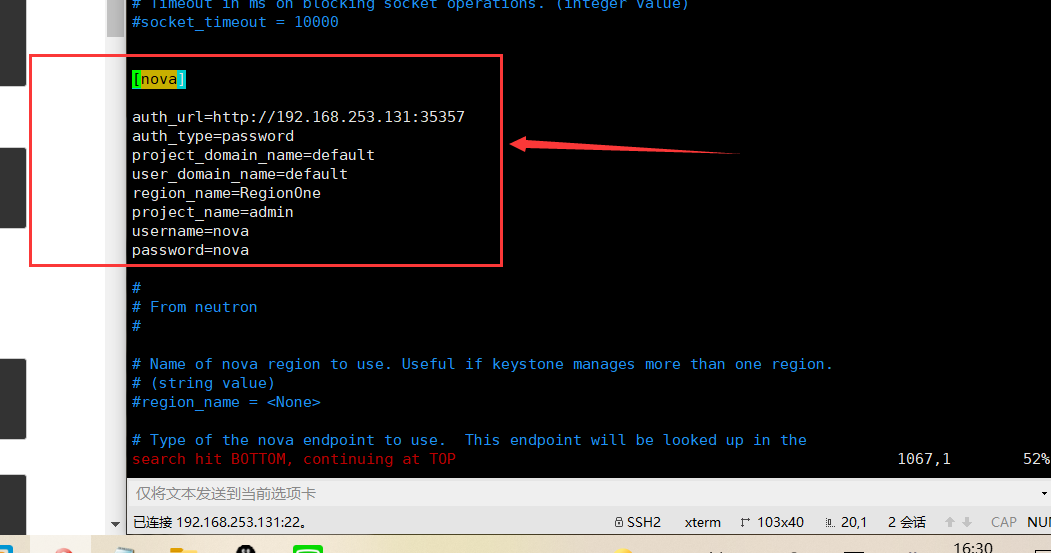
In the and sections, configure the network to notify the compute network of topology changes: [DEFAULT][nova]
[DEFAULT]
...
notify_nova_on_port_status_changes = true
notify_nova_on_port_data_changes = true

[nova]
...
auth_url=http://192.168.253.131:35357
auth_type=password
project_domain_name=default
user_domain_name=default
region_name=RegionOne
project_name=admin
username=nova
password=nova
Replace with the password you selected for the user in the identity service. NOVA_PASSnova
In this section, configure the locking path: [oslo_concurrency]
[oslo_concurrency]
...
lock_path = /var/lib/neutron/tmp

Configuring modular layer 2 (ML2) plug-ins 
ML2 plug-in uses Linux bridging mechanism to build layer 2 (bridging and switching) virtual network infrastructure for instances.
Edit the file and do the following: / etc/neutron/plugins/ml2/ml2_conf.ini
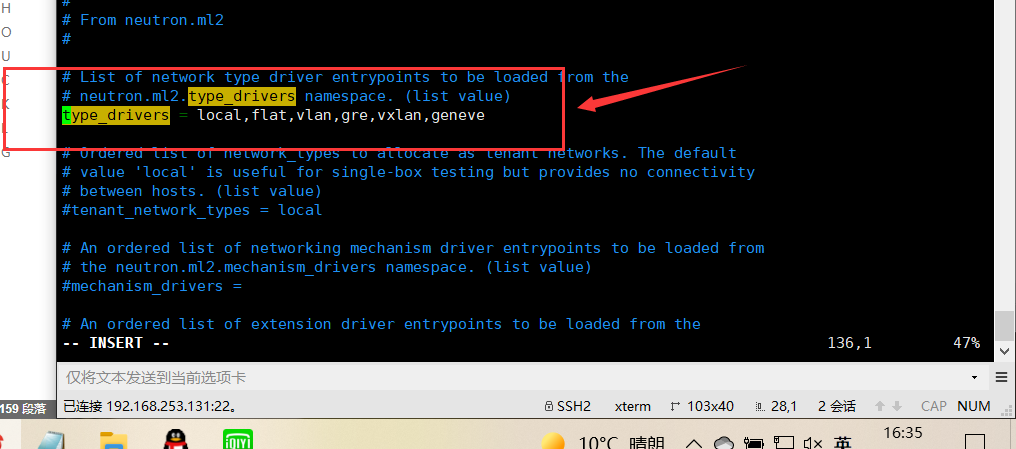
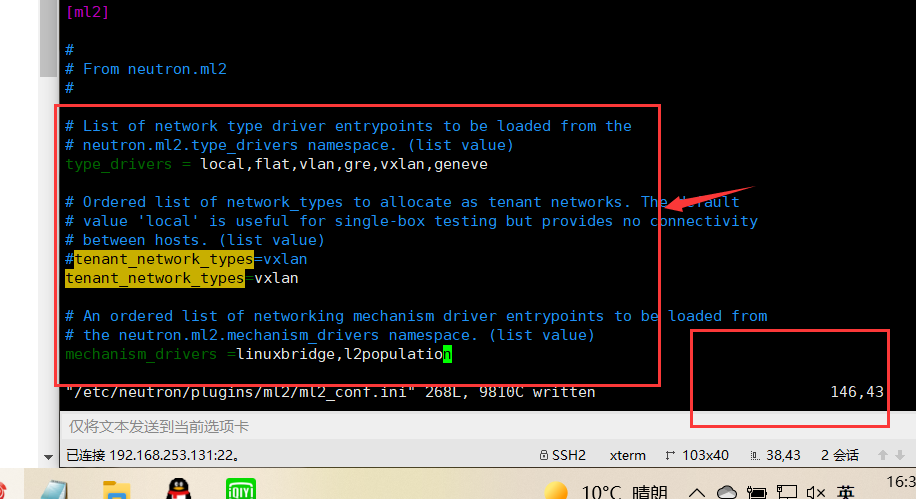
In this section, enable flat, VLAN, and VXLAN networks: [ml2]
[ml2]
...
type_drivers = local,flat,vlan,gre,vxlan,geneve
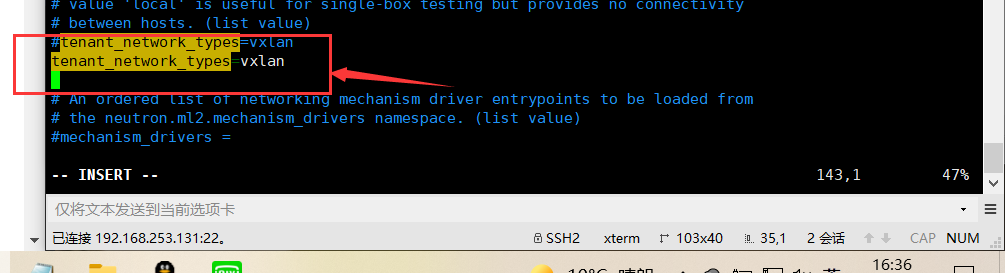
In this section, enable VXLAN self service network: [ml2]
[ml2]
...
tenant_network_types = vxlan
In this section, enable Linux bridging and layer 2 padding: [ml2]
[ml2]
...
mechanism_drivers = linuxbridge,l2population
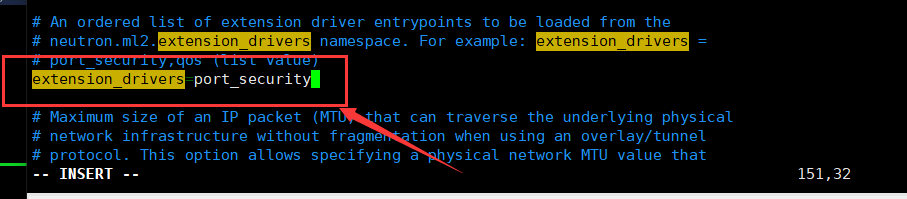
In this section, enable the port security extension driver: [ml2]
[ml2]
...
extension_drivers = port_security
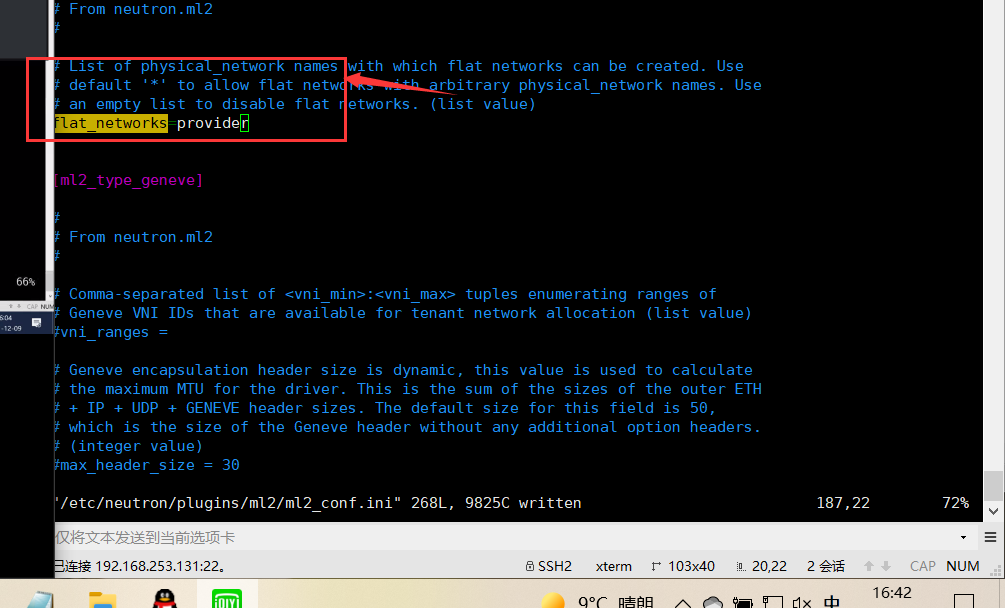
In this section, configure the provider virtual network as a flat network: [ml2_type_flat]
[ml2_type_flat]
...
flat_networks = provider
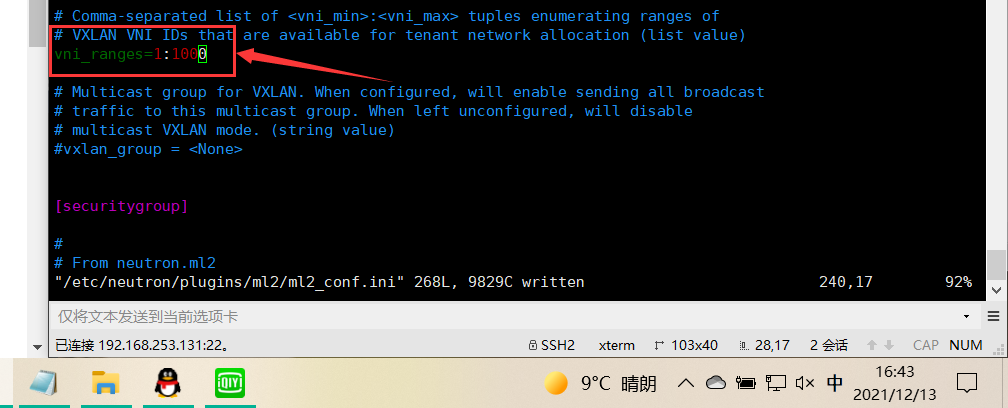
In this section, configure the VXLAN network identifier range for the self-service network: [ml2_type_vxlan]
[ml2_type_vxlan]
...
vni_ranges = 1:1000
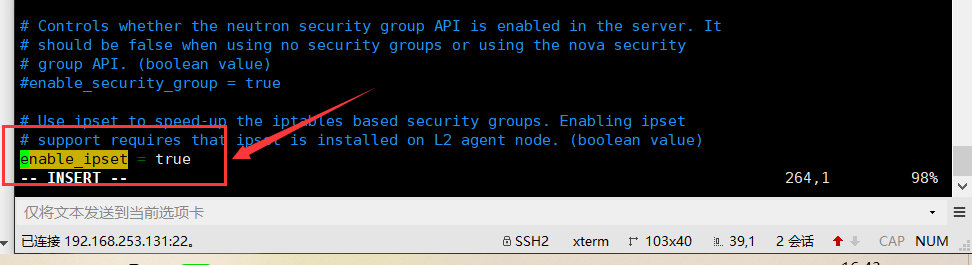
In this section, enable ipset to improve the efficiency of security group rules: [securitygroup]
[securitygroup]
...
enable_ipset = true
Configure Linux bridge agent 
The Linux bridging agent builds a layer 2 (bridging and switching) virtual network infrastructure for instances and handles security groups.
Edit the file and do the following: / etc/neutron/plugins/ml2/linuxbridge_agent.ini
In this section, map the provider virtual network to the provider physical network interface: [linux_bridge]
[linux_bridge]
physical_interface_mappings = provider:ens33

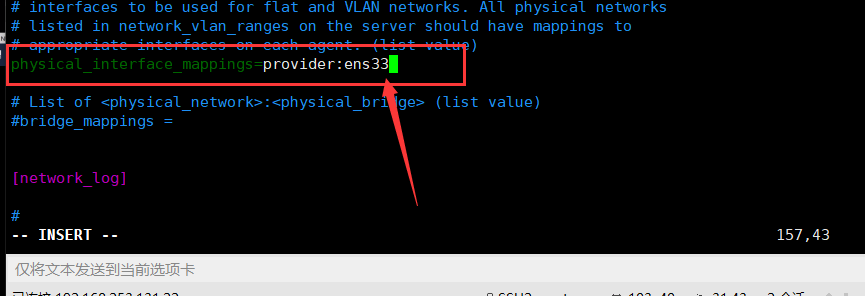
Replace with the name of the underlying provider physical network interface. For more information, see host network. PROVIDER_INTERFACE_NAME
In this section, enable vxlan overlay network, configure the IP address of the physical network interface handling overlay network, and enable layer 2 padding: [vxlan]
[vxlan]
enable_vxlan = true
local_ip =192.168.253.131
l2_population = true
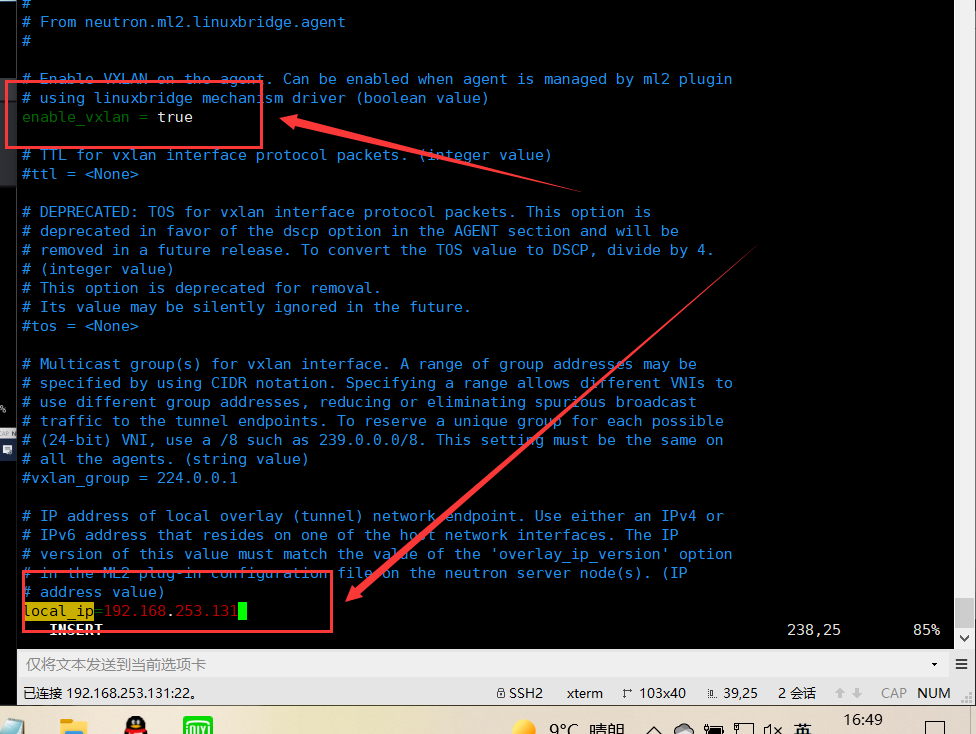

Replace with the IP address of the underlying physical network interface that handles the overlay network. The example architecture uses a management interface to tunnel traffic to other nodes. Therefore, replace with the management IP address of the controller node. For more information, see host network. OVERLAY_INTERFACE_IP_ADDRESSOVERLAY_INTERFACE_IP_ADDRESS
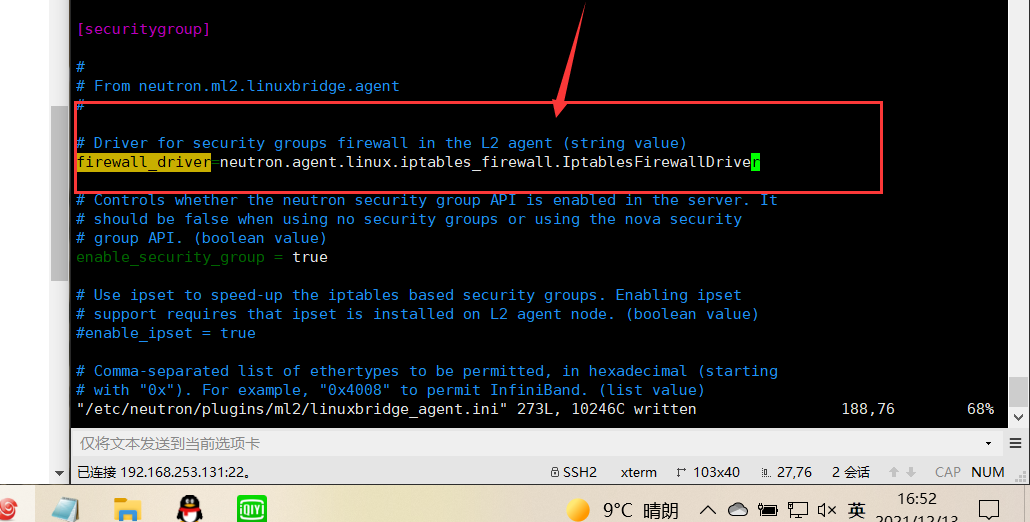
In this section, enable security groups and configure the Linux bridging iptables firewall driver: [securitygroup]
[securitygroup]
...
enable_security_group = true
firewall_driver = neutron.agent.linux.iptables_firewall.IptablesFirewallDriver
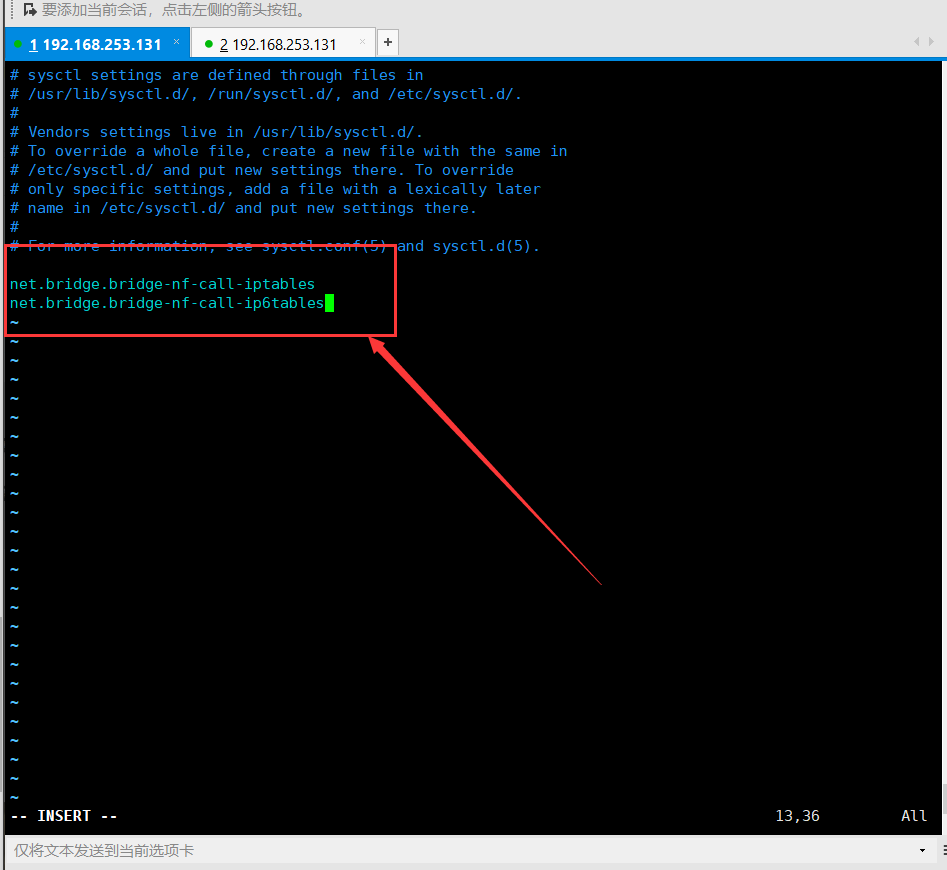
Ensure that your Linux operating system kernel supports the bridge filter: sysctl1 by verifying that all of the following values are set to:
vim /etc/sysctl.conf
net.bridge.bridge-nf-call-iptables
net.bridge.bridge-nf-call-ip6tables
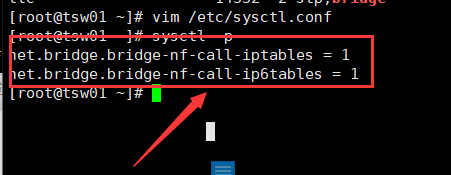
This command is viewed at the end
 sysctl -p
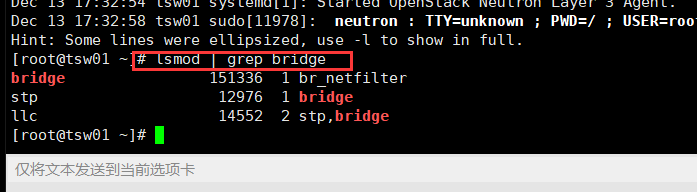
To enable network bridging support, you usually need to load the kernel module. For additional details on enabling this module, check the documentation for your operating system. br_netfilter
Configure layer 3 agent 
Layer 3 (L3) agents provide routing and NAT services for self-service virtual networks.
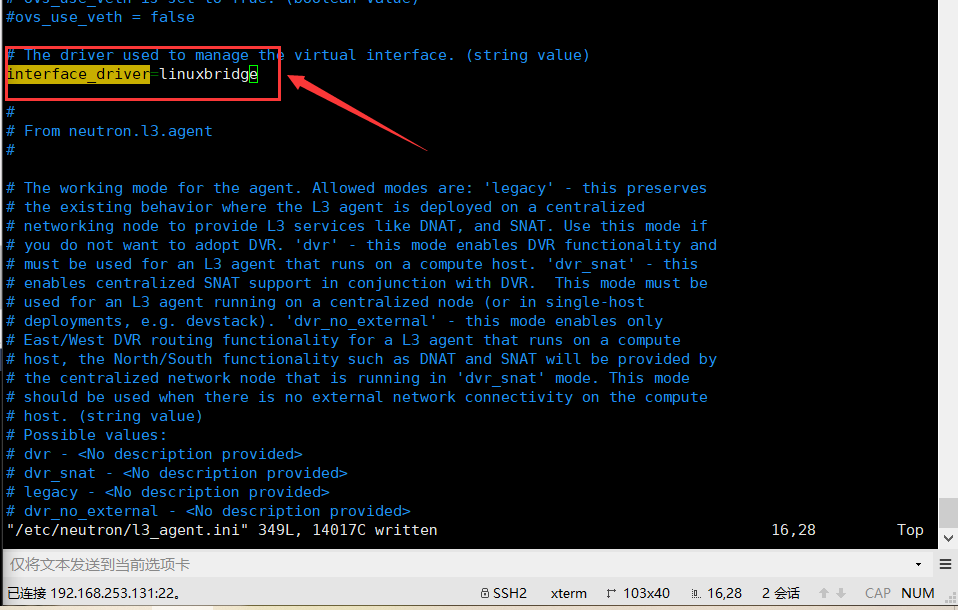
Edit the file and do the following: / etc/neutron/l3_agent.ini
In this section, configure the Linux bridge interface driver and external bridge: [DEFAULT]
[DEFAULT]
...
interface_driver = linuxbridge
Configure DHCP agent 
DHCP agent provides DHCP services for virtual networks.
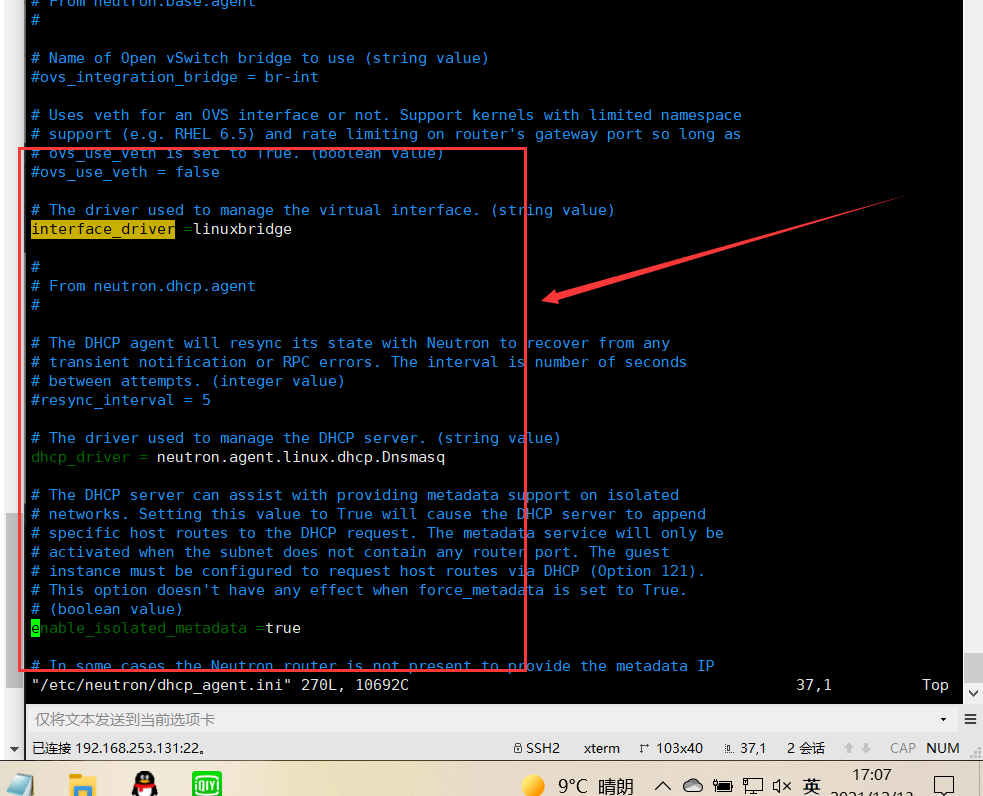
Edit the file and do the following: / etc/neutron/dhcp_agent.ini
In this section, configure the Linux bridge interface driver Dnsmasq DHCP driver and enable isolated metadata so that instances on the provider network can access metadata over the network: [DEFAULT]
[DEFAULT]
# ...
interface_driver = linuxbridge
dhcp_driver = neutron.agent.linux.dhcp.Dnsmasq
enable_isolated_metadata = true
Return to the network controller node configuration.
Configure metadata proxy 
The metadata agent provides configuration information, such as credentials for instances.
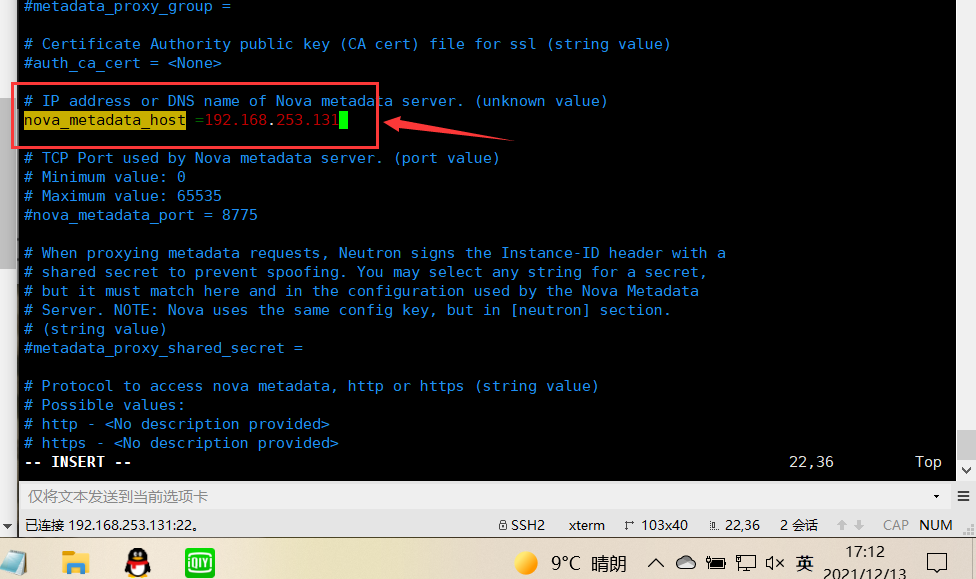
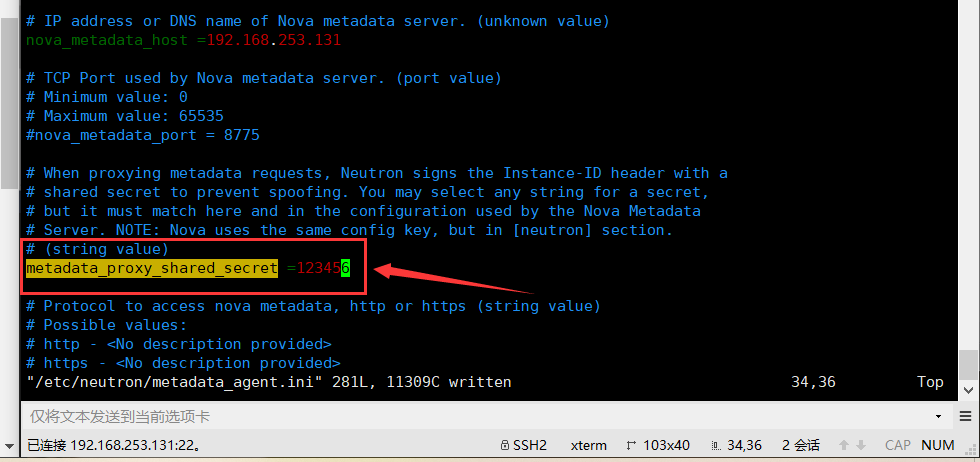
Edit the file and do the following: / etc/neutron/metadata_agent.ini
In this section, configure metadata host and shared key: [DEFAULT]
[DEFAULT]
...
nova_metadata_host = 192.168.253.131
metadata_proxy_shared_secret = 123456
Configure the computing service to use the network service 
Nova computing services must be installed to complete this step. For more details, see the computing installation guide under the installation guide section of the documentation website.
Edit the file and do the following: / etc / Nova / nova conf
In this section, configure access parameters, enable metadata proxy and configure key: [neutron]
[neutron]
...
url=http://192.168.253.131:9696
auth_url=http://192.168.253.131:35357
auth_type=password
project_domain_name=default
user_domain_name=default
region_name=RegionOne
project_name=admin
username=neutron
password=neutron
service_metadata_proxy=true
metadata_proxy_shared_secret=123456
Replace with the password you selected for the user in the identity service. NEUTRON_PASSneutron
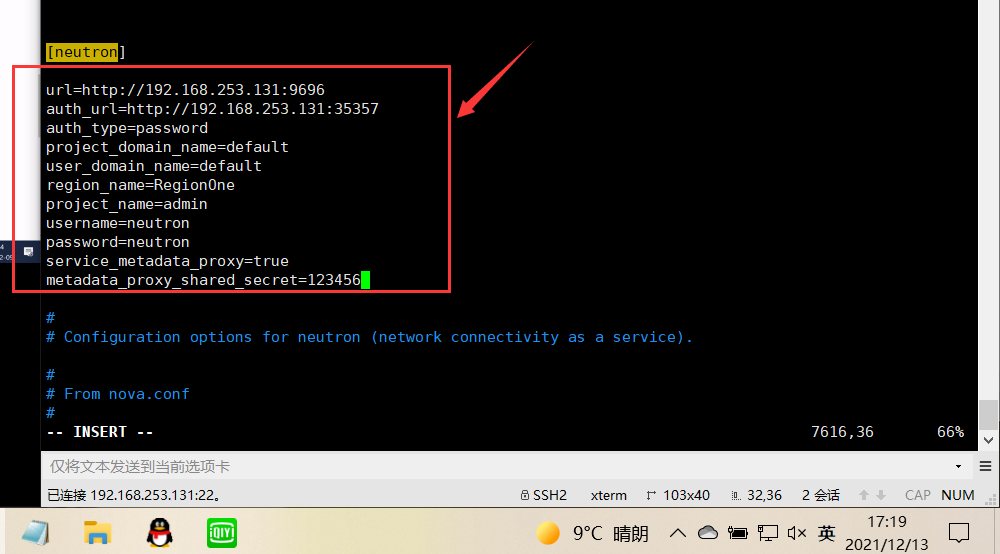
Replace with the secret selected for the metadata broker. METADATA_SECRET
Complete installation 
The network service initialization script requires a symbolic link to the ML2 plug-in configuration file. If the symbolic link does not exist, create it with the following command: / etc / neutron / plugin ini/etc/neutron/plugins/ml2/ml2_ conf.ini
ln -s /etc/neutron/plugins/ml2/ml2_conf.ini /etc/neutron/plugin.ini
Populate database:
neutron-db-manage --config-file /etc/neutron/neutron.conf --config-file /etc/neutron/plugins/ml2/ml2_conf.ini upgrade head
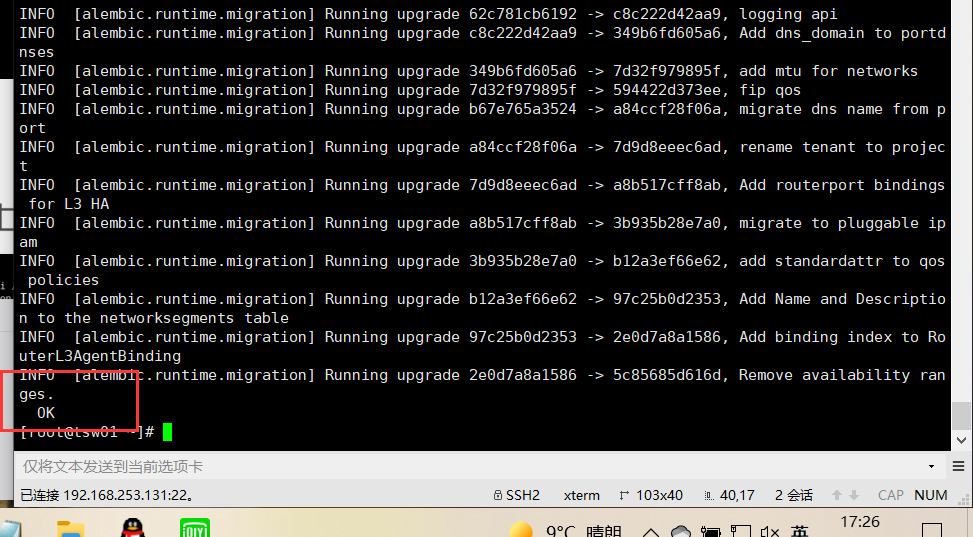
be careful
For the network, the database population is done later because the script requires a complete server and plug-in configuration file.
Restart the computing API service:
systemctl restart openstack-nova-api

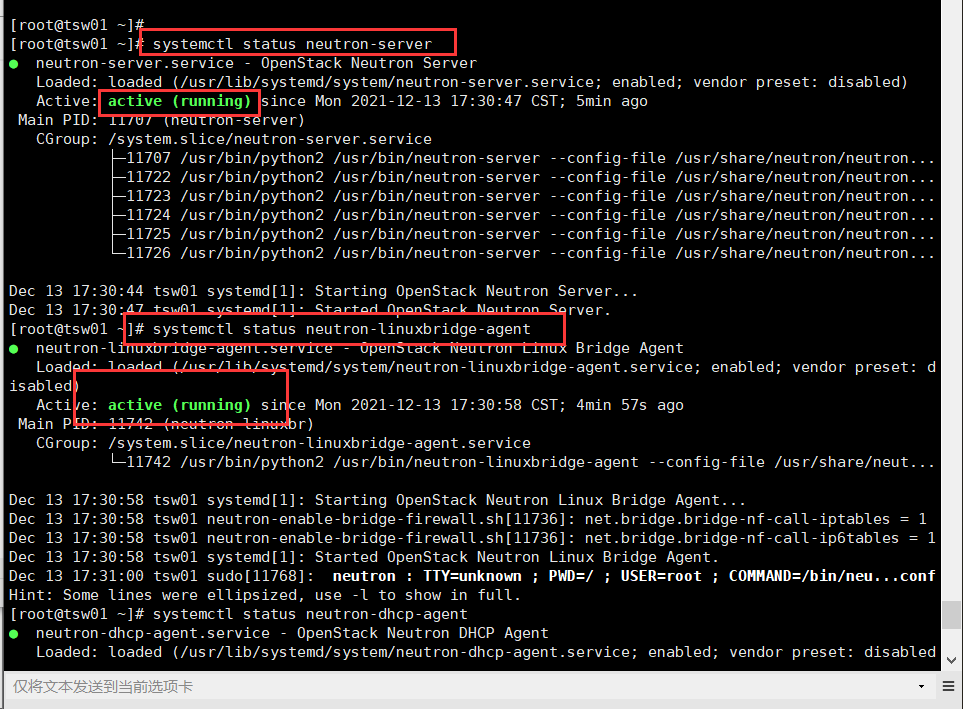
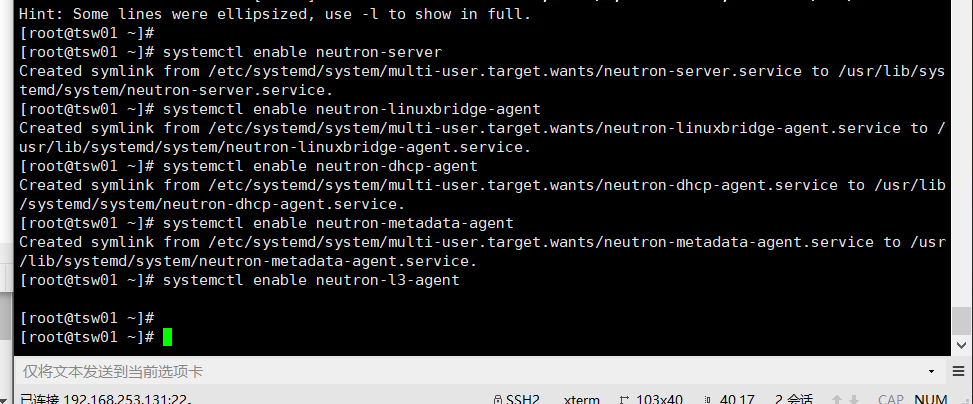
Start the network service and configure it to start when the system starts.
systemctl enable neutron-server
systemctl enable neutron-linuxbridge-agent
systemctl enable neutron-dhcp-agent
systemctl enable neutron-metadata-agent
systemctl enable neutron-l3-agent
systemctl start neutron-server
systemctl start neutron-linuxbridge-agent
systemctl start neutron-dhcp-agent
systemctl start neutron-metadata-agent
systemctl start neutron-l3-agent
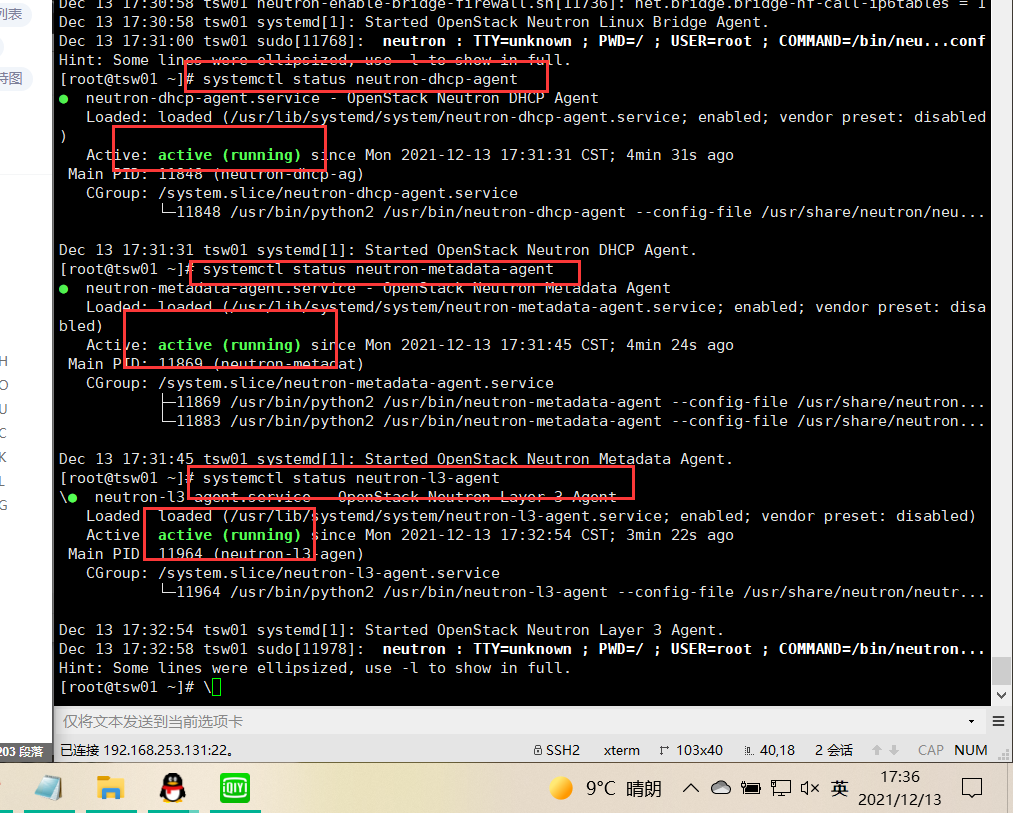
systemctl status neutron-server
systemctl status neutron-linuxbridge-agent
systemctl status neutron-dhcp-agent
systemctl status neutron-metadata-agent
systemctl status neutron-l3-agent