Introduction to K3S
K3s is a lightweight Kubernetes distribution. It is an open source application for managing containerization on multiple hosts in the cloud platform. Because it is only half the size of Kubernetes in terms of memory occupation, it is abbreviated as k3s.
In this article, I will show how to build K3S service cluster based on Rocky Linux step by step.
Step 1: prepare for construction
Let's first create three new instances on Virtualbox and set the network to bridge mode
As shown in the figure: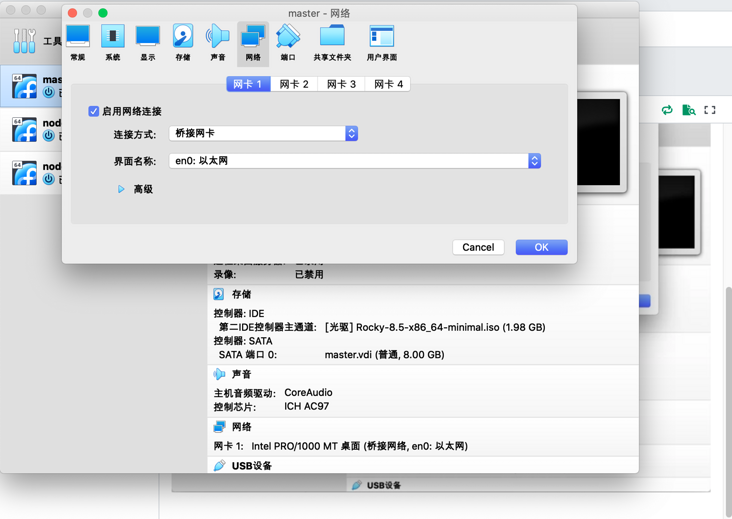
Then start and wait for the installation to complete
In this article, we configure the IP address on three instances by editing / etc/hosts
tee -a /etc/hosts<<EOF
192.168.1.90    master
192.168.1.91    node1
192.168.1.92    node2
EOF
In order to distinguish and view the node information later, we need to configure the hostname of each machine
Use the hostnamectl command, hostnamectl set hostname, and then use the hostname or hostnamectl status command to check whether the change takes effect
[root@localhost ~]# hostnamectl set-hostname master    #Here is the setting of master
[root@localhost ~]# hostname
master
Turn off the firewall and selinux
[root@master ~]# sed -i 's/^SELINUX=.*/SELINUX=disabled/g' /etc/selinux/config
[root@master ~]# systemctl stop firewalld && systemctl disable firewalld
Removed /etc/systemd/system/multi-user.target.wants/firewalld.service.
Removed /etc/systemd/system/dbus-org.fedoraproject.FirewallD1.service.
Use the dnf command to update all packages to the latest version
[root@master ~]# dnf update -y
[root@master ~]# reboot
You need to comment here to close the swap partition
[root@master ~]# cat /etc/fstab

#
# /etc/fstab
# Created by anaconda on Sat Feb 26 09:13:56 2022
#
# Accessible filesystems, by reference, are maintained under '/dev/disk/'.
# See man pages fstab(5), findfs(8), mount(8) and/or blkid(8) for more info.
#
# After editing this file, run 'systemctl daemon-reload' to update systemd
# units generated from this file.
#
/dev/mapper/rl-root     /                       xfs     defaults        0 0
UUID=a4c1024b-862b-49f9-befa-8e1cefd2e7b5 /boot                   xfs     defaults        0 0
# /dev/mapper/rl-swap     none                    swap    defaults        0 0
(optional) students with OCD like me can use this command to automatically filter and delete the kernel of the old version of the current system, and then restart
[root@master ~]# dnf remove $(rpm -qa | grep kernel | grep -v $(uname -r))
Step 2: install K3s
In the current master instance, execute
[root@master ~]# curl -sfL http://rancher-mirror.cnrancher.com/k3s/k3s-install.sh | INSTALL_K3S_MIRROR=cn sh -
complete!
[INFO]  Creating /usr/local/bin/kubectl symlink to k3s
[INFO]  Creating /usr/local/bin/crictl symlink to k3s
[INFO]  Creating /usr/local/bin/ctr symlink to k3s
[INFO]  Creating killall script /usr/local/bin/k3s-killall.sh
[INFO]  Creating uninstall script /usr/local/bin/k3s-uninstall.sh
[INFO]  env: Creating environment file /etc/systemd/system/k3s.service.env
[INFO]  systemd: Creating service file /etc/systemd/system/k3s.service
[INFO]  systemd: Enabling k3s unit
[INFO]  systemd: Starting k3s
[root@master ~]#
Use kubectl get nodes to verify that the installation is complete
[root@master ~]# kubectl get nodes
NAME     STATUS   ROLES                  AGE   VERSION
master   Ready    control-plane,master   60s   v1.22.6+k3s1
Here, it is recommended to set master k3s to startup
[root@master ~]# systemctl enable k3s
View the token of k3s server
[root@master ~]# cat /var/lib/rancher/k3s/server/node-token
K104415b7f79fdf3fd5bfde8f0c4d1f7be6de7f9d33de478e154931dfb8862fb2b9::server:801c4f3faf48d6ce25b95790f35a4ad0
In the work instance, execute the script
[root@node1 ~]# export K3S_URL="https://192.168.1.90:6443"
[root@node1 ~]# export K3S_TOKEN="K104415b7f79fdf3fd5bfde8f0c4d1f7be6de7f9d33de478e154931dfb8862fb2b9::server:801c4f3faf48d6ce25b95790f35a4ad0"
[root@node1 ~]# curl -sfL http://rancher-mirror.cnrancher.com/k3s/k3s-install.sh | INSTALL_K3S_MIRROR=cn K3S_URL=${K3S_URL} K3S_TOKEN=${K3S_TOKEN}  sh -
[INFO]  Creating /usr/local/bin/kubectl symlink to k3s
[INFO]  Creating /usr/local/bin/crictl symlink to k3s
[INFO]  Creating /usr/local/bin/ctr symlink to k3s
[INFO]  Creating killall script /usr/local/bin/k3s-killall.sh
[INFO]  Creating uninstall script /usr/local/bin/k3s-agent-uninstall.sh
[INFO]  env: Creating environment file /etc/systemd/system/k3s-agent.service.env
[INFO]  systemd: Creating service file /etc/systemd/system/k3s-agent.service
[INFO]  systemd: Enabling k3s-agent unit
[INFO]  systemd: Starting k3s-agent
It is also recommended to set the k3s agent to startup
[root@node1 ~]# systemctl enable k3s-agent
Return to the master instance and execute kubectl get nodes. We can view all current nodes
[root@master ~]# kubectl get nodes
NAME     STATUS   ROLES                  AGE     VERSION
master   Ready    control-plane,master   24m     v1.22.6+k3s1
node2    Ready    <none>                 4m28s   v1.22.6+k3s1
node1    Ready    <none>                 5m58s   v1.22.6+k3s1
Here, we can see that all work nodes have joined the k3s cluster
Step 3: deploy the Kubernetes dashboard
On the master instance, execute the script
[root@master dashboard]# wget https://raw.githubusercontent.com/kubernetes/dashboard/v2.5.0/aio/deploy/recommended.yaml -O kubernetes-dashboard.yaml
In this process, there is a high probability that the download cannot be completed due to the fluctuation of github network.
Here, I suggest opening in the browser https://raw.githubusercontent... Then open vim, copy and paste and save it to the master instance.
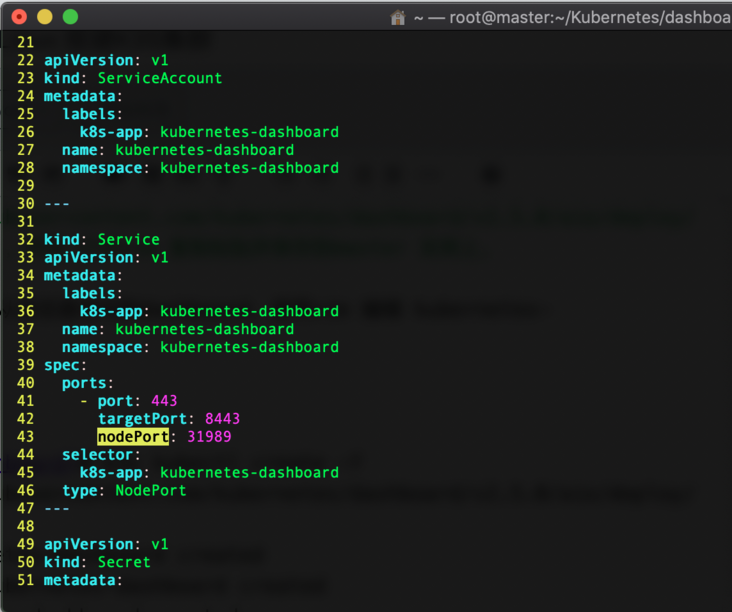
Modify and edit kubernetes dashboard Yaml, we set it to access the dashboard from the browser through the NodePort mode,
Add NodePort and open port 31989. Add type: NodePort
Run the k3s kubectl create -f command
[root@master dashboard]# k3s kubectl create -f kubernetes-dashboard.yaml
namespace/kubernetes-dashboard created
serviceaccount/kubernetes-dashboard created
service/kubernetes-dashboard created
secret/kubernetes-dashboard-certs created
secret/kubernetes-dashboard-csrf created
secret/kubernetes-dashboard-key-holder created
configmap/kubernetes-dashboard-settings created
role.rbac.authorization.k8s.io/kubernetes-dashboard created
clusterrole.rbac.authorization.k8s.io/kubernetes-dashboard created
rolebinding.rbac.authorization.k8s.io/kubernetes-dashboard created
clusterrolebinding.rbac.authorization.k8s.io/kubernetes-dashboard created
deployment.apps/kubernetes-dashboard created
service/dashboard-metrics-scraper created
deployment.apps/dashboard-metrics-scraper created
Check the current operation of all pods to find out which pods failed to run successfully
When the status status of these pod s is Running, we will continue to the next step
[root@master dashboard]# kubectl get pods --all-namespaces
NAMESPACE              NAME                                        READY   STATUS      RESTARTS      AGE
kube-system            coredns-96cc4f57d-79hbr                     1/1     Running     0             77m
kube-system            local-path-provisioner-84bb864455-mss9p     1/1     Running     0             77m
kube-system            helm-install-traefik-crd--1-6j2qm           0/1     Completed   0             77m
kube-system            metrics-server-ff9dbcb6c-skrzg              1/1     Running     0             77m
kube-system            helm-install-traefik--1-j5nc5               0/1     Completed   1             77m
kube-system            svclb-traefik-tmwwd                         2/2     Running     0             76m
kube-system            traefik-55fdc6d984-zg8k7                    1/1     Running     0             76m
kube-system            svclb-traefik-zjwnh                         2/2     Running     2 (23m ago)   58m
kube-system            svclb-traefik-vhg4f                         2/2     Running     2 (23m ago)   56m
kubernetes-dashboard   dashboard-metrics-scraper-c45b7869d-5bwql   1/1     Running     0             38s
kubernetes-dashboard   kubernetes-dashboard-764b4dd7-b82cj         1/1     Running     0             39s
Create the following resource profiles:
dashboard.admin-user.yml
apiVersion: v1
kind: ServiceAccount
metadata:
  name: admin-user
  namespace: kubernetes-dashboard
dashboard.admin-user-role.yml
apiVersion: rbac.authorization.k8s.io/v1
kind: ClusterRoleBinding
metadata:
  name: admin-user
roleRef:
  apiGroup: rbac.authorization.k8s.io
  kind: ClusterRole
  name: cluster-admin
subjects:
- kind: ServiceAccount
  name: admin-user
  namespace: kubernetes-dashboard
Deploy admin user configuration:
[root@master dashboard]# k3s kubectl create -f dashboard.admin-user.yml -f dashboard.admin-user-role.yml
serviceaccount/admin-user created
clusterrolebinding.rbac.authorization.k8s.io/admin-user created
Get Token token for login and access to Dashboard
[root@master dashboard]# k3s kubectl -n kubernetes-dashboard describe secret admin-user-token | grep '^token'
token:      eyJhbGciOiJSUzI1NiIsImtpZCI6IldNcGMzOVV0d2lSQjRKMnRPcl82X0xNb2FxeS0tUUVUa19uQ0VGQVpSRzAifQ.eyJpc3MiOiJrdWJlcm5ldGVzL3NlcnZpY2VhY2NvdW50Iiwia3ViZXJuZXRlcy5pby9zZXJ2aWNlYWNjb3VudC9uYW1lc3BhY2UiOiJrdWJlcm5ldGVzLWRhc2hib2FyZCIsImt1YmVybmV0ZXMuaW8vc2VydmljZWFjY291bnQvc2VjcmV0Lm5hbWUiOiJhZG1pbi11c2VyLXRva2VuLWxoOHg3Iiwia3ViZXJuZXRlcy5pby9zZXJ2aWNlYWNjb3VudC9zZXJ2aWNlLWFjY291bnQubmFtZSI6ImFkbWluLXVzZXIiLCJrdWJlcm5ldGVzLmlvL3NlcnZpY2VhY2NvdW50L3NlcnZpY2UtYWNjb3VudC51aWQiOiI4NTBmOGE2NC04ODI0LTRlZDUtYmUzOS1kZDZiZmFmZjA4YTYiLCJzdWIiOiJzeXN0ZW06c2VydmljZWFjY291bnQ6a3ViZXJuZXRlcy1kYXNoYm9hcmQ6YWRtaW4tdXNlciJ9.RPrZ9X63hnGtLiPz4ELGRPtFHm09WNwZlz0LaSXN2Hdw4_bpaSLFBqgpdr4wjJ7uVy-v2aVhCO1la6dPBoh_R3TQAEj5WFYmdt_9XJ9E6lwd4URb-y4MMXWAzZUgJNv06XEvCGlo_THQlgCssaqrDBZl1N-zs7bavbNNnSXk-VtTXiPuSKkiF5ijqXCDUkN1PJET0Y6o5j4zYOYi7AXeBCcZm7JSrRslx3SlcKM414Rcp52k30x4ahejQIDonp-jv6cltp3GfR18w0BGMc8x2rESVrZfmqH07S03lwMot20yQnZa8JQYco5gFfToDW06v_FD4AV38fwv3o1ZMz19ng
The execution agent accesses the kubernetes dashboard
[root@master dashboard]# k3s kubectl proxy
Starting to serve on 127.0.0.1:8001
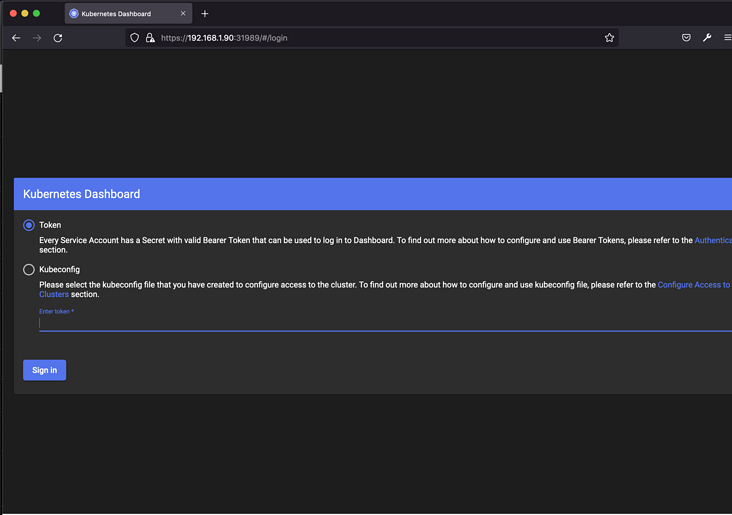
We open the browser to access https://192.168.1.90:31989
Because Chrome and Safari browsers have https certificate policy, they were forced to temporarily download Firefox
Here, we use the Token login method, so we need to fill in the Token obtained in the previous step
Enter the Kubernetes Dashboard, pull it to the bottom and find the Language in the Local Setting column. We choose Chinese for display
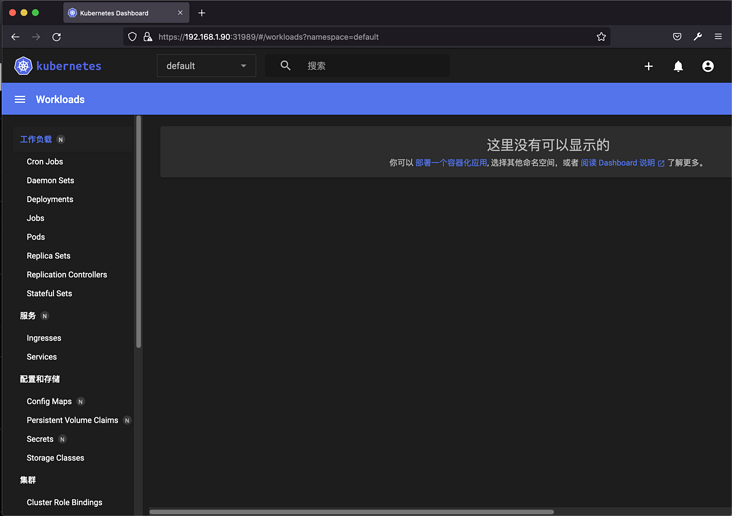
So far, the initial deployment of K3s cluster and dashboard has been completed, and the research will continue later.