Keepalived's design goal is to build a highly available LVS load balancing cluster that can call the ipvsadm tool to create virtual servers and manage server pools, not just as a dual hot standby. Using Keepalived to build LVS cluster is more convenient and easy to use. The main advantages are hot standby switching and availability improvement of LVS load dispatcher, health checking of nodes in server pool, automatic removal of invalid nodes and re-joining after recovery.
In the LVS cluster structure based on LVS (DR mode) +Keepalived implementation, there are at least two hot standby load dispatchers and more than two node servers. This experiment is based on the LVS cluster of DR mode, adding a load dispatcher, using Keepalived to realize the hot standby of master and slave dispatchers, so as to construct both negative and negative dispatchers. LVS Website Cluster Platform with Balanced Load and High Availability. Experiments are illustrated as follows: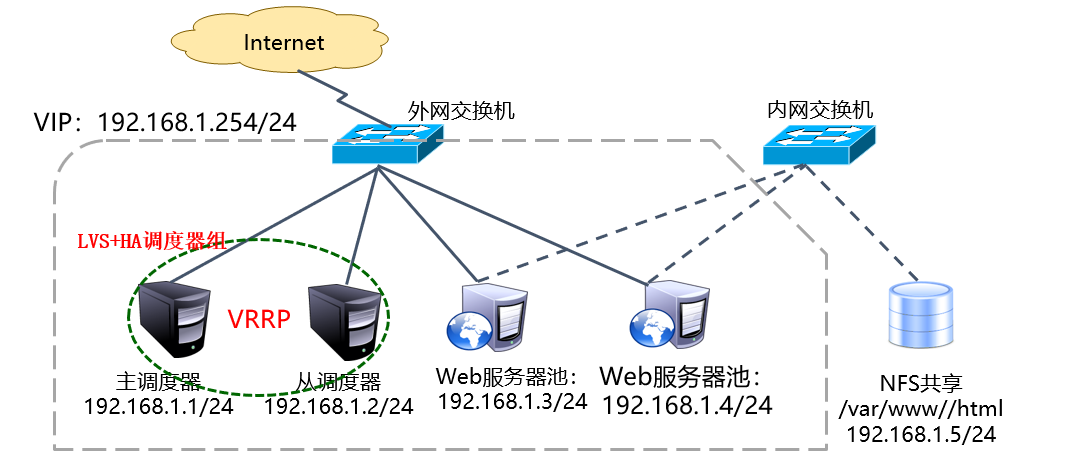
Because of the experimental environment, two Web site servers are built. NFS shared storage is on the same network segment as scheduler and Web node, which simplifies the experimental steps. In the actual production environment, under normal circumstances, shared storage can not be on the same network segment as scheduler and Web node, so it needs to be isolated by switch to increase the read and write operation of shared storage. In real environment, scheduler and Web node need at least two network cards to communicate with shared storage. The experimental environment has been simplified for a while. Everyone should be more considerate.
When using Keepalived to build LVS clusters, ipvsadm management tools are also needed (when viewing the effect of load scheduling). Most of the work is done automatically by Keepalived, and there is no need to execute ipvsadm manually (except for viewing and monitoring clusters). About how to build NFS shared storage, building NFS shared storage is very simple! This experiment is not done. Friends who are not clear about the NFS cluster can refer to the blog: LVS Load Balancing Cluster Construction NAT mode, can follow!!!
The experimental steps are as follows:
Configuration of master dispatcher
1. Global configuration, hot standby configuration
Firstly, the hot standby function is implemented mainly from the dispatcher, and the drift address uses the VIP address of the LVS cluster.
[root@localhost ~]# systemctl stop firewalld
[root@localhost ~]# setenforce 0
//Close firewalls and SELinux
[root@localhost ~]# yum -y install keepalived ipvsadm
//Install appropriate services and tools
[root@localhost ~]# vim /etc/keepalived/keepalived.conf
//Edit the Keepalived service configuration file
  //Configuration files have a lot less unnecessary things, such as the content of mail, to make it easier to understand the content of their configuration files.
global_defs {
   router_id LVS_DEVEL1                     //Main Scheduler Name
}

vrrp_instance VI_1 {
    state MASTER                               //Hot standby state of main dispatcher
    interface ens33
    virtual_router_id 1
    priority 100                                     //Priority of master scheduler
    advert_int 1
    authentication {                              //Hot standby authentication information for master and slave
        auth_type PASS
        auth_pass 1111
    }
    virtual_ipaddress {                        //Specify cluster VIP addresses (there can be multiple)
        192.168.1.254
    }
}
For a detailed description of the Keepalived service configuration file, you can refer to the blog: Using Keepalived to Realize Hot Detailed Interpretation of Dual Computer
2. Web Service Pool Configuration in Keepalived Configuration File
On the basis of Keepalived hot standby configuration, add "Virtual_server VIP port {...}" area to configure virtual server, which mainly includes setting parameters such as load dispatcher algorithm, clustering mode, health check interval, real server address and so on.
[root@localhost ~]# vim /etc/keepalived/keepalived.conf
                                           ..........................................
//Omitting global configuration and hot standby configuration of Keepalived configuration file
virtual_server 192.168.1.254 80 {                                 //Virtual Server Address (VIP), Port
    delay_loop 15                                                           //Interval time between health examinations (seconds)
    lb_algo rr                                                                  //Polling (rr) scheduling algorithm
    lb_kind DR                                                               //Direct Routing (DR) Cluster Mode of Work
    !  persistence_timeout 50
        //Connection retention time (seconds), "!" It means not enabled. To verify the effect, it is recommended to disable it.
    protocol TCP                                                            //The application service adopts TCP protocol.

    real_server 192.168.1.3 80 {                                  //Address of the first Web node
        weight 1                                                             //Weight of nodes
        TCP_CHECK {                                                  //Health examination methods
            connect_port 80                                            //Check the target port
            connect_timeout 3                                        //Connection timeout (seconds)
            nb_get_retry 3                                              //retry count
            delay_before_retry 4                                    //retry interval
        }
    }

    real_server 192.168.1.4 80 {                              //The address and port of the second Web node
        weight 1
        TCP_CHECK {
            connect_port 80
            connect_timeout 3
            nb_get_retry 3
            delay_before_retry 4
        }
    }
        //If there are multiple Web node servers, add them in turn!
}
//Pay attention to the'{}'of the configuration file, and modify it carefully.
[root@localhost ~]# systemctl start keepalived
//Start the Keepalived service
Configuration of slave scheduler
The configuration of slave scheduler is basically the same as that of master scheduler, including global configuration, hot standby configuration and server pool configuration. Only the router name (router_id), hot standby status (state) and priority (priority) need to be modified in the global configuration.
[root@localhost ~]# systemctl stop firewalld
[root@localhost ~]# setenforce 0
//Close firewalls and SELinux
[root@localhost ~]# yum -y install keepalived ipvsadm
//Install appropriate services and tools
[root@localhost ~]# vim /etc/keepalived/keepalived.conf
//Edit the Keepalived service configuration file
global_defs {
   router_id LVS_DEVEL2                        //Slave scheduler name
}

vrrp_instance VI_1 {
    state BACKUP                                    //Hot standby (standby)
    interface ens33
    virtual_router_id 1
    priority 99                                           //Priority from Scheduler
    advert_int 1
    authentication {
        auth_type PASS
        auth_pass 1111
    }
    virtual_ipaddress {
        192.168.1.254
    }
}

virtual_server 192.168.1.254 80 {
    delay_loop 15
    lb_algo rr
    lb_kind DR
    !  persistence_timeout 50
    protocol TCP

    real_server 192.168.1.3 80 {
        weight 1
        TCP_CHECK {
            connect_port 80
            connect_timeout 3
            nb_get_retry 3
            delay_before_retry 4
        }
    }

    real_server 192.168.1.4 80 {
        weight 1
        TCP_CHECK {
            connect_port 80
            connect_timeout 3
            nb_get_retry 3
            delay_before_retry 4
        }
    }
}
Except for the above tags, the rest is the same (must be the same) as the master scheduler!
[root@localhost ~]# systemctl start keepalived
// Start the Keepalived service
Configuration of Web Node Server
,
Depending on the cluster mode (DR or NAT) chosen, the configuration of the node server varies. This experiment takes DR mode as an example. In addition to adjusting the ARP response parameters of the / proc system, it also needs to configure the VIP address for the virtual interface (lo:0) and add a local route to the VIP. Refer to the blog article on how to build a Web Node Server in DR mode: LVS Load Balancing Cluster Construction DR mode, can follow!!!
The general steps are as follows:
[root@localhost ~]# systemctl stop firewalld
s[root@localhost ~]# setenforce 0
//Close Firewall and SELinux
[root@localhost ~]# yum -y install httpd
//Install http services
[root@localhost ~]# echo qqqqq > /var/www/html/index.html
[root@localhost ~]# systemctl start httpd
//Modify the home page content of the Web Node Server and start the http service
[root@localhost ~]# vim /etc/sysctl.conf
//Modify the kernel parameters and add the following
net.ipv4.conf.all.arp_ignore  =  1
net.ipv4.conf.all.arp_announce  =  2
net.ipv4.conf.default.arp_ignore  =  1
net.ipv4.conf.default.arp_announce = 2
net.ipv4.conf.lo.arp_ignore  =  1
net.ipv4.conf.lo.arp_announce  = 2
[root@localhost ~]# sysctl -p
//Loading kernel parameters
net.ipv4.conf.all.arp_ignore = 1
net.ipv4.conf.all.arp_announce = 2
net.ipv4.conf.default.arp_ignore = 1
net.ipv4.conf.default.arp_announce = 2
net.ipv4.conf.lo.arp_ignore = 1
net.ipv4.conf.lo.arp_announce = 2
[root@localhost ~]# cd /etc/sysconfig/network-scripts/
[root@localhost network-scripts]# cp ifcfg-lo ifcfg-lo:0
[root@localhost network-scripts]# vim ifcfg-lo:0
DEVICE=lo:0
IPADDR=192.168.1.254
NETMASK=255.255.255.255
ONBOOT=yes
NAME=loopback:0
[root@localhost network-scripts]# ifup lo
[root@localhost network-scripts]# ifconfig lo:0
lo:0: flags=73<UP,LOOPBACK,RUNNING>  mtu 65536
        inet 192.168.1.254  netmask 255.255.255.255
        loop  txqueuelen 1  (Local Loopback)
//Add virtual IP to local (lo) network card
[root@localhost ~]# route add -host 192.168.1.254 dev lo:0
//Add a local route to VIP
No matter how many Web node servers, they are the same configuration!
It is suggested that the home pages of two Web node servers should not be the same for testing! In the actual production environment, NFS shared storage (about how to build NFS shared storage mentioned at the beginning of the blog article) will be built to automatically synchronize the homepage content of the Web node server!
IV. Testing LVS (DR mode) +Keepalived High Availability Cluster
In client browsers, Web page content can be accessed normally through LVS (DR mode) +VIP address of Keepalived cluster (192.168.1.254). When either master or slave scheduler fails, Web site can still be accessed (it may need to refresh several times or reopen the browser); as long as the server pool has two or more servers. If more than two real Web node servers are available, the load balancing effect of visits can be achieved (and the load balancing effect is more obvious than that of LVS)! Self-verification!
On the master and slave schedulers, the fault handover process can be tracked according to the / var/log/messages log file. To view the load distribution, execute the following commands on the main dispatcher:
[root@localhost ~]# ipvsadm -ln
IP Virtual Server version 1.2.1 (size=4096)
Prot LocalAddress:Port Scheduler Flags
  -> RemoteAddress:Port           Forward Weight ActiveConn InActConn
TCP  192.168.1.254:80 rr
  -> 192.168.1.3:80               Route   1      1          0
  -> 192.168.1.4:80               Route   1      1          0
That's why you need to install the ipvsadm tool.
Finally, we can verify the robustness of LVS (DR mode) +Keepalived high availability load balancing cluster!
It is recommended to build NFS shared storage to ensure the consistency of Web node service content (which must be done in the real environment)!
———————— This is the end of the article. Thank you for reading.————————