and Build vue2 vue-router2 webpack3 Project from scratch In the same way, from a beginner's perspective, the contents of each step are described in detail, not in-depth discussion of the principles involved in the steps, but mainly how to operate.
Example project address in this article: https://github.com/qinshenxue/vue2-vue-router2-webpack4.
Initialize Project
Create a new project directory vue2-vue-router2-webpack4, execute NPM init-y under the directory to create a package.json, add the following necessary modules in package.json first:
{
  "name": "vue2-vue-router2-webpack4",
  "version": "1.0.0",
  "devDependencies": {
    "vue": "^2.5.17",
    "vue-loader": "^15.4.1",
    "vue-router": "^3.0.1",
    "vue-template-compiler": "^2.5.17",
    "webpack": "^4.17.1",
    "webpack-cli": "^3.1.0",
    "webpack-dev-server": "^3.1.6"
  }
}
Beginning with Webpack 4, command line tools (CLI s) need to be installed separately.
The new directory structure is as follows. The new directory and files are empty first. The next steps will explain what to add.
vue2-vue-router2-webpack4
    |-- package.json
    |-- index.html         // Visit Home Page
    |-- webpack.config.js  // Webpack Profile
    |-- src
        |-- views       // Vue Page Directory
        |-- main.js     // Entry Start Point
        |-- router.js   // vue-router configuration
        |-- app.vue     // Vue Root Component
Configure Webpack
Webpack reads webpack.config.js by default, and the file name cannot be changed at will, where entry is mandatory to configure and output.filename is mandatory to build.
module.exports = {
    mode: "development",
    entry: './src/main.js',
    output: {
        path: __dirname + '/dist',
        publicPath: '/static/',
        filename: 'build.js'
    }
}
Webpack 4 adds a mode l configuration item that supports the three optional configurations of "production" | "development" | "none", defaulting to "production".
The role of mode l can be summarized simply as reducing the configuration commonly used in each environment to one configuration.
The configuration behind development actually contains the following configuration.
module.exports = {
 devtool: 'eval',
 plugins: [
   new webpack.NamedModulesPlugin(),
   new webpack.NamedChunksPlugin(),
   new webpack.DefinePlugin({ "process.env.NODE_ENV": JSON.stringify("development") })  // Set environment variable to''development''
 ]
}
The configuration behind production actually contains the following configuration.
module.exports = {
  mode: 'production',
  plugins: [
    new UglifyJsPlugin(/* ... */),  // compress

    // Set the environment variable to''production''
    new webpack.DefinePlugin({ "process.env.NODE_ENV": JSON.stringify("production") }),

    // Scope elevation
    new webpack.optimize.ModuleConcatenationPlugin(),

    new webpack.NoEmitOnErrorsPlugin()
 ]
}
The webpack-dev-server does not require a configuration file, but simply uses the commands provided by its CLI.
"scripts": {
  "dev": "webpack-dev-server --hot --open"
}
Verify Configuration
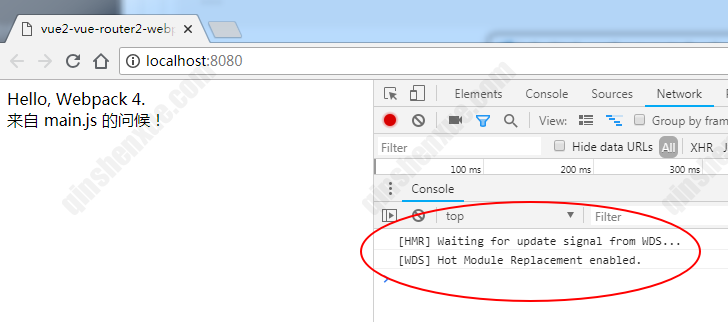
Add test code to index.html to introduce a packaged JavaScript file.
<body>
    Hello, Webpack 4.
    <br>
    <script src="/static/build.js"></script>
</body>
Add test code in main.js.
// main.js
document.write('Come from main.js Greetings!')
Execute the following command to install the dependent module and start the local server.
# Install Dependent Modules
npm install

# Start Local Server
npm run dev
After startup, the browser will open http://localhost:8080 automatically. If there are no errors in the console, the page correctly displays the contents of main.js and index.html, and the browser will refresh automatically after changing main.js, the configuration is OK.
Vue
Create a new page.
Create a new index.vue in the views directory.
<template>
    <div>
        //This is the {{page}} page
    </div>
</template>
<script>
export default {
    data: function () {
        return {
            page: 'index'
        }
    }
}
</script>
Configure Routing
Extract the parameters passed in by the vue-router instantiation to router.js as the routing configuration file.
import index from './views/index.vue'
export default {
    routes: [
        {
            path: '/index',
            component: index
        }
    ]
}
Modify Home Page
Add a mount element for the Vue root instance at index.html.
<body>
<div id="app"></div>
<script src="/static/build.js"></script>
</body>
Modify Entry
Complete routing configuration and initialize Vue instance in main.js.
import Vue from "vue"
import VueRouter from "vue-router"
import App from "./app.vue"
import routerConfig from "./router"
Vue.use(VueRouter)
const router = new VueRouter(routerConfig)
new Vue({
    el: "#app",
    router: router,
    render: h => h(App)
})
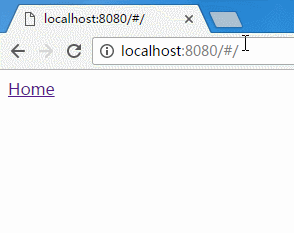
Add the routing link, routing view component to the root component app.vue.
<template>
    <div>
        <div>
            <router-link to="/index">Home</router-link>
        </div>
        <div>
            <router-view></router-view>
        </div>
    </div>
</template>
Configure loader
Configure the loader corresponding to the.vue file.
const VueLoaderPlugin = require('vue-loader/lib/plugin')

module.exports = {
    mode: "development",
    entry: './src/main.js',
    output: {
        path: __dirname + '/dist',
        publicPath: '/static/',
        filename: 'build.js'
    },
    module: {
        rules: [{
            test: /\.vue$/,
            use: ["vue-loader"]
        }]
    },
    plugins: [
        new VueLoaderPlugin()
    ]
}
vue-loader from v15.0.0 Beginning, configuration requires the introduction of vue-loader/lib/plugin and initialization in the plugins.Refer to the official documentation for details https://vue-loader.vuejs.org/zh/guide/#vue-cli.
Now that you have completed the steps required to access a page, you can start the local server (npm run dev) to test whether you can access/index properly.
Support CSS
Using CSS directly in the.vue file prompts You may need an appropriate loader to handle this file type. The CSS loader corresponds to css-loader.
npm install css-loader -D
Before vue-loader v15.0.0, you can use CSS in Vue files without configuring loader. You need to configure loader only when you need import or require CSS files. After v15.0.0, you need to configure loader yourself to avoid errors.
{
    test: /\.css$/,
    use: ["vue-style-loader", "css-loader"]
}
import './assets/css/style.css'
vue-style-loader is the dependencies of vue-loader, so you no longer need to install it yourself. css-loader is the peerDependencies of vue-loader and you need to install it yourself.
Supports CSS Preprocessing Language
Install the preprocessing language module and the corresponding loader as needed.
# less
npm install less less-loader -D

# sass
npm install node-sass sass-loader -D

# stylus
npm install stylus stylus-loader -D
Solutions for slow node-sass installation:
- Use Taobao mirror: npm set disturl https://npm.taobao.org/dist
- You can also set the node-sass mirror individually: npm set sass_binary_site http://cdn.npm.taobao.org/dist/node-sass
loader configuration for various preprocessing languages.
// less
{
    test: /\.less$/,
    use: ["vue-style-loader", "css-loader", "less-loader"]
}

// sass
{
    test: /\.s[ac]ss$/,
    use: ["vue-style-loader", "css-loader", "sass-loader"]
}

// stylus
{
    test: /\.styl$/,
    use: ["vue-style-loader", "css-loader", "stylus-loader"]
}
Use examples.
<style lang="less">
.view{
    color:red;
}
</style>

<style lang="sass">
.view{
    border-bottom:1px solid #ddd;
}
</style>

<style lang="styl">
.view
    margin-top:20px;
</style>
Supports pictures and icon fonts
Install the loader on which pictures and icon fonts depend.
npm install url-loader file-loader -D
Configure the loader for the picture and icon font.
{
    test: /\.(png|jpe?g|gif|svg)(\?.*)?$/,
    use: [{
        loader: "url-loader",
        options: {
            limit: 10000,
            name: 'images/[name].[hash:7].[ext]'    // Place all pictures in the images folder, [hash:7] anti-caching
        }
    }]
},
{
    test: /\.(woff2?|eot|ttf|otf)(\?.*)?$/,
    use: [{
        loader: "url-loader",
        options: {
            limit: 10000,
            name: 'fonts/[name].[hash:7].[ext]'    // Place fonts in the fonts folder
        }
    }]
}
structure
Build using commands provided by the Webpack CLI. Click to view Webpack command parameters
"build": "webpack --progress"
Execute npm run build to start building. When you finish, you can see that there are more dist directories in the project directory, which contain packaged JavaScript files, pictures, Icon Font files, but the packaged JavaScript files are not compressed, contain CSS code, and the syntax is not converted to ES5. These areWork needs to be done using the Webpack plug-in.
Using the Webpack plug-in
Babel
The official version of Babel 7 has been released and has changed from Babel 6 as follows:
- Node versions not in maintenance are no longer supported: 0.10, 0.12, 4, 5;
- Use the @babel namespace, so babel-core becomes @babel/core;
- Remove (and stop publishing) any annual presets (preset-es2015, etc.), @babel/preset-env replaces the need for these content;
- Remove the Stage preset (@babel/preset-stage-0, etc.) and remove the proposal from @babel/polyfill;
- Some packages have been renamed: any TC39 proposed plug-in is now a-proposal rather than a-transform, so @babel/plugin-transform-class-properties becomes @babel/plugin-proposal-class-properties;
- peerDependency is introduced in @babel/core for some user-oriented packages such as babel-loader, @babel/cli, and so on.
Install Babel.
npm install babel-loader @babel/core @babel/cli @babel/preset-env -D
Add the Babel configuration file babel.config.js.
const presets = [
    ["@babel/env", {
        targets: {
            ie: "9"
        },
        modules: false
    }]
]

module.exports = {
    presets
}
Configure babel-loader.
{
    test: /\.js$/,
    exclude: /node_modules/,
    use: ["babel-loader"]
}
compress
As mentioned above, when Webpack 4's new mode l configuration item is configured as'production', it already contains a compression plug-in (new UglifyJsPlugin()), so no additional configuration is required.
Extract CSS
extract-text-webpack-plugin does not support Webpack 4, instead extract CSS mini-css-extract-plugin
npm i mini-css-extract-plugin -D
Adjust the Webpack configuration as follows.
const MiniCssExtractPlugin = require("mini-css-extract-plugin");

module.exports = {
    //...
    module: {
        rules: [{
                test: /\.css$/,
                use: [MiniCssExtractPlugin.loader, "css-loader"]
            }, {
                test: /\.less$/,
                use: [MiniCssExtractPlugin.loader, "css-loader", "less-loader"]
            }, {
                test: /\.s[ac]ss$/,
                use: [MiniCssExtractPlugin.loader, "css-loader", "sass-loader"]
            }, {
                test: /\.styl$/,
                use: [MiniCssExtractPlugin.loader, "css-loader", "stylus-loader"]
            }
            //...
        ]
    },
    plugins: [
        // ...
        new MiniCssExtractPlugin({
            filename: 'css/style.css'
        })
    ]
}
vue-loader can extract CSS from vue file without separate configuration.You can see the effect by introducing a CSS file into index.html.
CSS Compression and Optimization
Install postcss-loader and PostCSS plug-ins.
npm install postcss-loader autoprefixer cssnano -D
The loader configuration is adjusted as follows.
{
    test: /\.css$/,
    use: [MiniCssExtractPlugin.loader, "css-loader", 'postcss-loader']
}, {
    test: /\.less$/,
    use: [MiniCssExtractPlugin.loader, "css-loader", 'postcss-loader', "less-loader"]
}, {
    test: /\.s[ac]ss$/,
    use: [MiniCssExtractPlugin.loader, "css-loader", 'postcss-loader', "sass-loader"]
}, {
    test: /\.styl$/,
    use: [MiniCssExtractPlugin.loader, "css-loader", 'postcss-loader', "stylus-loader"]
}
The postcss-loader is placed after the css-loader and before the loader of the CSS preprocessing language.
The new postcss-loader requires the configuration file postcss.config.js to introduce plug-ins.
module.exports = {
    plugins: [
        require('autoprefixer')({
            browsers: ['android > 4']
        }),
        require('cssnano')
    ]
}
PostCSS Plugin Category Search Site: http://postcss.parts/
Generate Home Page
Manual introduction of packaged JavaScript and CSS is cumbersome, and pages generated using the html-webpack-plugin plug-in automatically import packaged resources.
npm install html-webpack-plugin -D
Initialize the plug-in.
var HtmlWebpackPlugin = require('html-webpack-plugin')

plugins: [
    new HtmlWebpackPlugin({
        filename: 'index.html',
        template: 'index.tpl.html'
    })
]
index.tpl.html
<html>
<head>
    ...
</head>
<body>
    <div id="app"></div>
</body>
</html>
Separate Webpack Configuration
Separate development and production profiles to facilitate increased personalization in each environment.The Webpack official documentation also details how to add configuration files for multiple environments, with the following basic ideas.
- Write a basic configuration file (webpack.base.config.js)
- Use webpack-merge to merge this basic configuration with environment-specific configurations (webpack.dev.config.js, webpack.prod.config.js)
webpack.base.config.js is described below.
const VueLoaderPlugin = require('vue-loader/lib/plugin')
module.exports = {
    entry: './src/main.js',
    output: {
        filename: 'js/[name].js'
    },
    module: {
        rules: [{
                test: /\.vue$/,
                use: ["vue-loader"]
            }, {
                test: /\.js$/,
                exclude: /node_modules/,
                use: ["babel-loader"]
            }, {
                test: /\.(png|jpe?g|gif|svg)(\?.*)?$/,
                use: [{
                    loader: "url-loader",
                    options: {
                        limit: 10000,
                        name: 'images/[name].[hash:7].[ext]' // Place all pictures in the images folder, [hash:7] anti-caching
                    }
                }]
            },
            {
                test: /\.(woff2?|eot|ttf|otf)(\?.*)?$/,
                use: [{
                    loader: "url-loader",
                    options: {
                        limit: 10000,
                        name: 'fonts/[name].[hash:7].[ext]' // Place fonts in the fonts folder
                    }
                }]
            }
        ]
    },
    plugins: [
        new VueLoaderPlugin()
    ]
}
Extracting CSS is not typically configured for development environments, but for production environments, it is not included in the underlying configuration above.path and publicPath are generally different in development and production environments and are therefore not included in the underlying configuration.
The content of the development configuration file (webpack.dev.config.js) is as follows.
const merge = require("webpack-merge")
const HtmlWebpackPlugin = require("html-webpack-plugin")
const baseWebpackConfig = require("./webpack.base.config")
module.exports = merge(baseWebpackConfig, {
    mode: 'development',
    output: {
        publicPath: "/"
    },
    module: {
        rules: [{
            test: /\.css$/,
            use: ["vue-style-loader", "css-loader", 'postcss-loader']
        }, {
            test: /\.less$/,
            use: ["vue-style-loader", "css-loader", 'postcss-loader', "less-loader"]
        }, {
            test: /\.s[ac]ss$/,
            use: ["vue-style-loader", "css-loader", 'postcss-loader', "sass-loader"]
        }, {
            test: /\.styl$/,
            use: ["vue-style-loader", "css-loader", 'postcss-loader', "stylus-loader"]
        }]
    },
    plugins: [
        new HtmlWebpackPlugin({
            filename: "index.html",
            template: "index.tpl.html"
        })
    ]
})
The production configuration file (webpack.prod.config.js) contains the following.
const merge = require("webpack-merge")
const HtmlWebpackPlugin = require("html-webpack-plugin")
const MiniCssExtractPlugin = require("mini-css-extract-plugin")
const baseWebpackConfig = require("./webpack.base.config")
const path = require('path')
module.exports = merge(baseWebpackConfig, {
    mode: 'production',
    output: {
        path: path.resolve(__dirname, '../dist')
        publicPath: "/static/"
    },
    module: {
        rules: [{
            test: /\.css$/,
            use: [MiniCssExtractPlugin.loader, "css-loader", 'postcss-loader']
        }, {
            test: /\.less$/,
            use: [MiniCssExtractPlugin.loader, "css-loader", 'postcss-loader', "less-loader"]
        }, {
            test: /\.s[ac]ss$/,
            use: [MiniCssExtractPlugin.loader, "css-loader", 'postcss-loader', "sass-loader"]
        }, {
            test: /\.styl$/,
            use: [MiniCssExtractPlugin.loader, "css-loader", 'postcss-loader', "stylus-loader"]
        }]
    },
    plugins: [
        new MiniCssExtractPlugin({
            filename: 'css/style.css'
        }),
        new HtmlWebpackPlugin({
            filename: "index.html",
            template: "index.tpl.html"
        })
    ]
})
The commands for adding development and production builds to package.json are as follows.
"scripts": {
    "dev": "webpack-dev-server --progress --hot --open --config build/webpack.dev.config.js",
    "build": "webpack --progress --config build/webpack.prod.config.js",
}
This article address: https://www.qinshenxue.com/article/vue2-vue-router2-webpack4.html
Reprinted at: https://www.cnblogs.com/ITtt/p/10812875.html