Rook introduction
Rook is an open-source cloud storage choreographer that provides platforms, frameworks and support for various storage solutions for native integration with the cloud native environment.
Rook transforms the distributed storage system into a self managing, self expanding and self repairing storage service. It automates the deployment, boot, configuration, configuration, expansion, upgrade, migration, disaster recovery, monitoring, and resource management tasks of storage administrators.
In short, Rook is a group of Kubernetes operators, which can fully control the deployment, management and automatic recovery of a variety of data storage solutions (such as Ceph, EdgeFS, Minio and Cassandra).
So far, the most stable storage supported by Rook is still Ceph. This article will introduce how to use Rook to create and maintain Ceph clusters as the persistent storage of Kubernetes.
Environmental preparation
The K8s environment can be deployed by installing KubeSphere. I use the high availability solution.
Install KubeSphere on the public cloud reference document: Multi node installation
⚠️ Note: there are two data disks on the Kube node (5, 6, 7).
kube-master1   Ready    master   118d   v1.17.9
kube-master2   Ready    master   118d   v1.17.9
kube-master3   Ready    master   118d   v1.17.9
kube-node1     Ready    worker   118d   v1.17.9
kube-node2     Ready    worker   118d   v1.17.9
kube-node3     Ready    worker   111d   v1.17.9
kube-node4     Ready    worker   111d   v1.17.9
kube-node5     Ready    worker   11d    v1.17.9
kube-node6     Ready    worker   11d    v1.17.9
kube-node7     Ready    worker   11d    v1.17.9
Please ensure that lvm2 is installed on all node nodes before installation, otherwise an error will be reported.
Deploy and install Rook and Ceph clusters
1. Clone Rook warehouse to local
$ git clone -b release-1.4 https://github.com/rook/rook.git
2. Switch directories
$ cd /root/ceph/rook/cluster/examples/kubernetes/ceph
3. Deploy Rook and create CRD resources
$ kubectl create -f common.yaml -f operator.yaml
# explain:
# 1.comm.yaml mainly contains permission control and CRD resource definition
# 2.operator.yaml is the deloyment of the rook CEPH operator
4. Create Ceph cluster
$ kubectl create -f cluster.yaml
# Important note:
# The demo does not require customization. By default, Ceph cluster will dynamically identify unformatted new free hard disks on node nodes and automatically initialize these disks with OSD (at least three nodes are required, and each node has at least one free hard disk)
5. Check the pod status
$ kubectl get pod -n rook-ceph -o wide
NAME                                                   READY   STATUS      RESTARTS   AGE   IP               NODE         NOMINATED NODE   READINESS GATES
csi-cephfsplugin-5fw92                                 3/3     Running     6          12d   192.168.0.31     kube-node7   <none>           <none>
csi-cephfsplugin-78plf                                 3/3     Running     0          12d   192.168.0.134    kube-node1   <none>           <none>
csi-cephfsplugin-bkdl8                                 3/3     Running     3          12d   192.168.0.195    kube-node5   <none>           <none>
csi-cephfsplugin-provisioner-77f457bcb9-6w4cv          6/6     Running     0          12d   10.233.77.95     kube-node4   <none>           <none>
csi-cephfsplugin-provisioner-77f457bcb9-q7vxh          6/6     Running     0          12d   10.233.76.156    kube-node3   <none>           <none>
csi-cephfsplugin-rqb4d                                 3/3     Running     0          12d   192.168.0.183    kube-node4   <none>           <none>
csi-cephfsplugin-vmrfj                                 3/3     Running     0          12d   192.168.0.91     kube-node3   <none>           <none>
csi-cephfsplugin-wglsw                                 3/3     Running     3          12d   192.168.0.116    kube-node6   <none>           <none>
csi-rbdplugin-4m8hv                                    3/3     Running     0          12d   192.168.0.91     kube-node3   <none>           <none>
csi-rbdplugin-7wt45                                    3/3     Running     3          12d   192.168.0.195    kube-node5   <none>           <none>
csi-rbdplugin-bn5pn                                    3/3     Running     3          12d   192.168.0.116    kube-node6   <none>           <none>
csi-rbdplugin-hwl4b                                    3/3     Running     6          12d   192.168.0.31     kube-node7   <none>           <none>
csi-rbdplugin-provisioner-7897f5855-7m95p              6/6     Running     0          12d   10.233.77.94     kube-node4   <none>           <none>
csi-rbdplugin-provisioner-7897f5855-btwt5              6/6     Running     0          12d   10.233.76.155    kube-node3   <none>           <none>
csi-rbdplugin-qvksp                                    3/3     Running     0          12d   192.168.0.183    kube-node4   <none>           <none>
csi-rbdplugin-rr296                                    3/3     Running     0          12d   192.168.0.134    kube-node1   <none>           <none>
rook-ceph-crashcollector-kube-node1-64cf6f49fb-bx8lz   1/1     Running     0          12d   10.233.101.46    kube-node1   <none>           <none>
rook-ceph-crashcollector-kube-node3-575b75dc64-gxwtp   1/1     Running     0          12d   10.233.76.149    kube-node3   <none>           <none>
rook-ceph-crashcollector-kube-node4-78549d6d7f-9zz5q   1/1     Running     0          8d    10.233.77.226    kube-node4   <none>           <none>
rook-ceph-crashcollector-kube-node5-5db8557476-b8zp6   1/1     Running     1          11d   10.233.81.239    kube-node5   <none>           <none>
rook-ceph-crashcollector-kube-node6-78b7946769-8qh45   1/1     Running     0          8d    10.233.66.252    kube-node6   <none>           <none>
rook-ceph-crashcollector-kube-node7-78c97898fd-k85l4   1/1     Running     1          8d    10.233.111.33    kube-node7   <none>           <none>
rook-ceph-mds-myfs-a-86bdb684b6-4pbj7                  1/1     Running     0          8d    10.233.77.225    kube-node4   <none>           <none>
rook-ceph-mds-myfs-b-6697d66b7d-jgnkw                  1/1     Running     0          8d    10.233.66.250    kube-node6   <none>           <none>
rook-ceph-mgr-a-658db99d5b-jbrzh                       1/1     Running     0          12d   10.233.76.162    kube-node3   <none>           <none>
rook-ceph-mon-a-5cbf5947d8-vvfgf                       1/1     Running     1          12d   10.233.101.44    kube-node1   <none>           <none>
rook-ceph-mon-b-6495c96d9d-b82st                       1/1     Running     0          12d   10.233.76.144    kube-node3   <none>           <none>
rook-ceph-mon-d-dc4c6f4f9-rdfpg                        1/1     Running     1          12d   10.233.66.219    kube-node6   <none>           <none>
rook-ceph-operator-56fc54bb77-9rswg                    1/1     Running     0          12d   10.233.76.138    kube-node3   <none>           <none>
rook-ceph-osd-0-777979f6b4-jxtg9                       1/1     Running     1          11d   10.233.81.237    kube-node5   <none>           <none>
rook-ceph-osd-10-589487764d-8bmpd                      1/1     Running     0          8d    10.233.111.59    kube-node7   <none>           <none>
rook-ceph-osd-11-5b7dd4c7bc-m4nqz                      1/1     Running     0          8d    10.233.111.60    kube-node7   <none>           <none>
rook-ceph-osd-2-54cbf4d9d8-qn4z7                       1/1     Running     1          10d   10.233.66.222    kube-node6   <none>           <none>
rook-ceph-osd-6-c94cd566-ndgzd                         1/1     Running     1          10d   10.233.81.238    kube-node5   <none>           <none>
rook-ceph-osd-7-d8cdc94fd-v2lm8                        1/1     Running     0          9d    10.233.66.223    kube-node6   <none>           <none>
rook-ceph-osd-prepare-kube-node1-4bdch                 0/1     Completed   0          66m   10.233.101.91    kube-node1   <none>           <none>
rook-ceph-osd-prepare-kube-node3-bg4wk                 0/1     Completed   0          66m   10.233.76.252    kube-node3   <none>           <none>
rook-ceph-osd-prepare-kube-node4-r9dk4                 0/1     Completed   0          66m   10.233.77.107    kube-node4   <none>           <none>
rook-ceph-osd-prepare-kube-node5-rbvcn                 0/1     Completed   0          66m   10.233.81.73     kube-node5   <none>           <none>
rook-ceph-osd-prepare-kube-node5-rcngg                 0/1     Completed   5          10d   10.233.81.98     kube-node5   <none>           <none>
rook-ceph-osd-prepare-kube-node6-jc8cm                 0/1     Completed   0          66m   10.233.66.109    kube-node6   <none>           <none>
rook-ceph-osd-prepare-kube-node6-qsxrp                 0/1     Completed   0          11d   10.233.66.109    kube-node6   <none>           <none>
rook-ceph-osd-prepare-kube-node7-5c52p                 0/1     Completed   5          8d    10.233.111.58    kube-node7   <none>           <none>
rook-ceph-osd-prepare-kube-node7-h5d6c                 0/1     Completed   0          66m   10.233.111.110   kube-node7   <none>           <none>
rook-ceph-osd-prepare-kube-node7-tzvp5                 0/1     Completed   0          11d   10.233.111.102   kube-node7   <none>           <none>
rook-ceph-osd-prepare-kube-node7-wd6dt                 0/1     Completed   7          8d    10.233.111.56    kube-node7   <none>           <none>
rook-ceph-tools-64fc489556-5clvj                       1/1     Running     0          12d   10.233.77.118    kube-node4   <none>           <none>
rook-discover-6kbvg                                    1/1     Running     0          12d   10.233.101.42    kube-node1   <none>           <none>
rook-discover-7dr44                                    1/1     Running     2          12d   10.233.66.220    kube-node6   <none>           <none>
rook-discover-dqr82                                    1/1     Running     0          12d   10.233.77.74     kube-node4   <none>           <none>
rook-discover-gqppp                                    1/1     Running     0          12d   10.233.76.139    kube-node3   <none>           <none>
rook-discover-hdkxf                                    1/1     Running     1          12d   10.233.81.236    kube-node5   <none>           <none>
rook-discover-pzhsw                                    1/1     Running     3          12d   10.233.111.36    kube-node7   <none>           <none>
The above is the status of all components after the pod is completed. The pod at the beginning of look CEPH OSD prepare automatically senses the new attached hard disk of the cluster. As long as a new hard disk is attached to the cluster, the OSD will be triggered automatically.
6. Configure Ceph cluster dashboard
Ceph Dashboard is a built-in Web-based management and monitoring application that is part of the open source Ceph distribution. Various basic status information of Ceph cluster can be obtained through Dashboard.
The default ceph is the installed ceph dashboard. The SVC address of the installed ceph dashboard is service clusterIP and cannot be accessed externally. You need to create a service
$ kubectl apply -f dashboard-external-http.yaml
apiVersion: v1
kind: Service
metadata:
  name: rook-ceph-mgr-dashboard-external-https
  namespace: rook-ceph # namespace:cluster
  labels:
    app: rook-ceph-mgr
    rook_cluster: rook-ceph # namespace:cluster
spec:
  ports:
    - name: dashboard
      port: 7000
      protocol: TCP
      targetPort: 7000
  selector:
    app: rook-ceph-mgr
    rook_cluster: rook-ceph
  sessionAffinity: None
  type: NodePort
Note: since 8443 is an https access port and a certificate needs to be configured, this tutorial only shows that only 7000 is configured on the http access port
7. View svc status
$ kubectl get svc -n rook-ceph
NAME                                     TYPE        CLUSTER-IP      EXTERNAL-IP   PORT(S)             AGE
csi-cephfsplugin-metrics                 ClusterIP   10.233.3.172    <none>        8080/TCP,8081/TCP   12d
csi-rbdplugin-metrics                    ClusterIP   10.233.43.23    <none>        8080/TCP,8081/TCP   12d
rook-ceph-mgr                            ClusterIP   10.233.63.85    <none>        9283/TCP            12d
rook-ceph-mgr-dashboard                  ClusterIP   10.233.20.159   <none>        7000/TCP            12d
rook-ceph-mgr-dashboard-external-https   NodePort    10.233.56.73    <none>        7000:31357/TCP      12d
rook-ceph-mon-a                          ClusterIP   10.233.30.222   <none>        6789/TCP,3300/TCP   12d
rook-ceph-mon-b                          ClusterIP   10.233.55.25    <none>        6789/TCP,3300/TCP   12d
rook-ceph-mon-d                          ClusterIP   10.233.0.206    <none>        6789/TCP,3300/TCP   12d
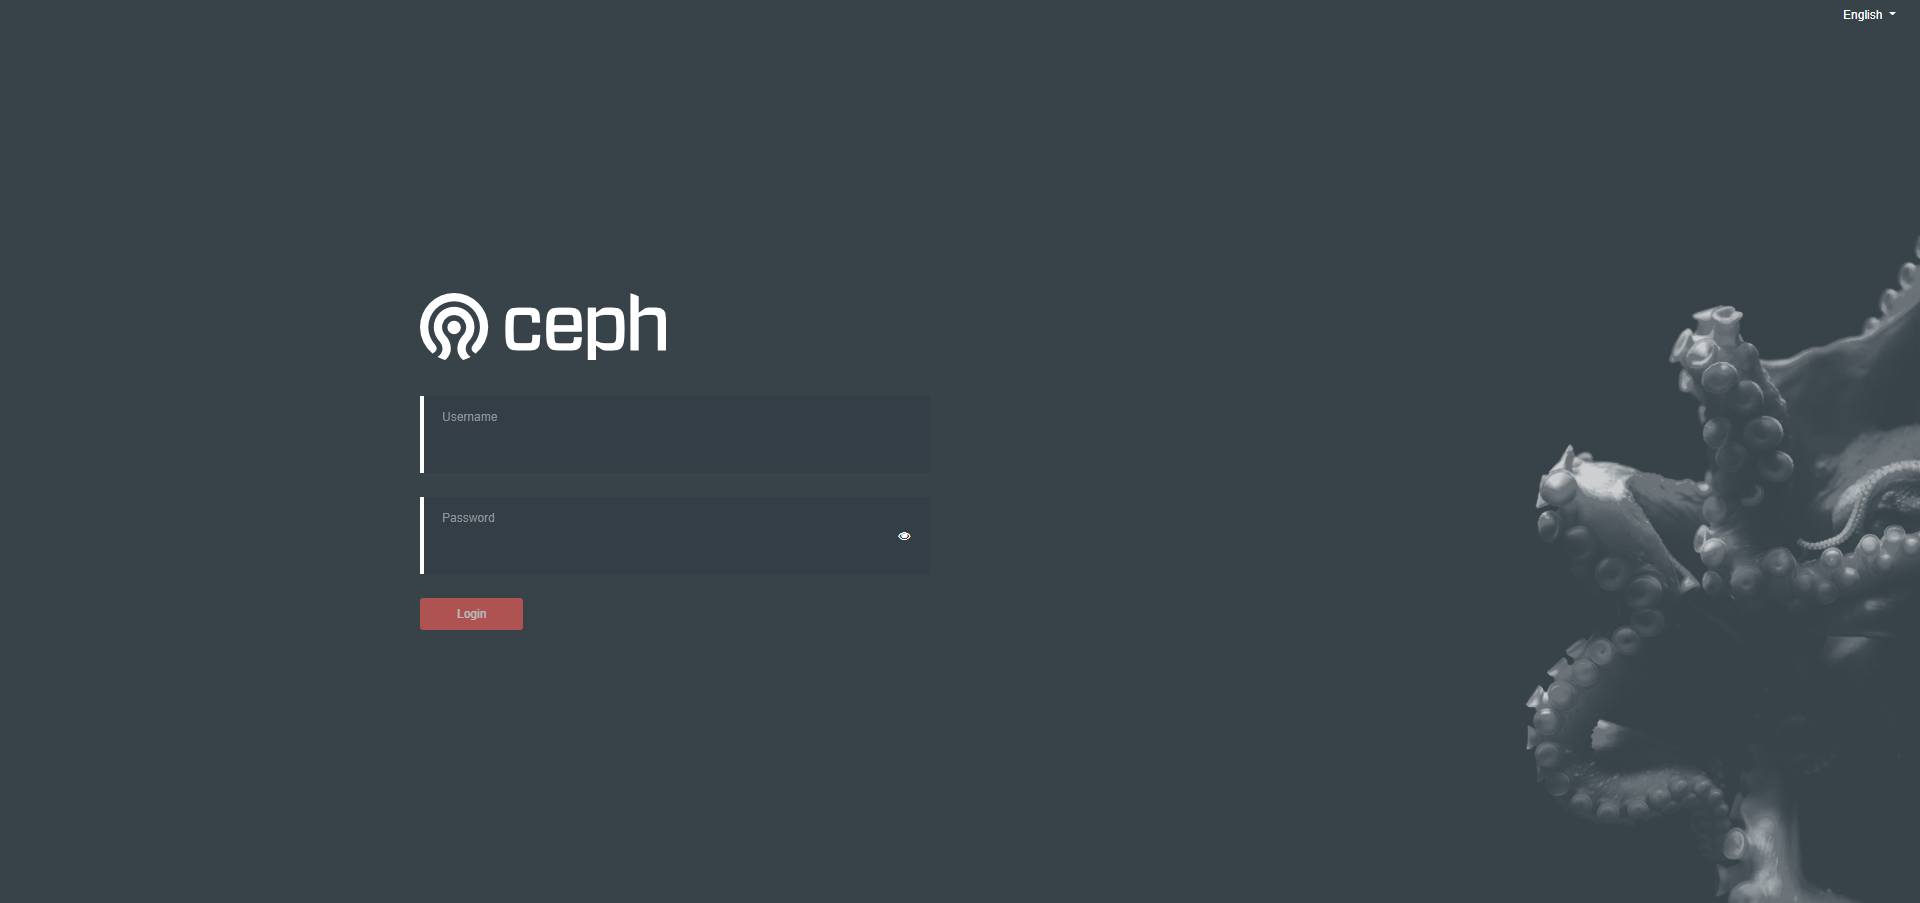
8. Verify access to dashboard
Open KubeSphere platform and open Internet service

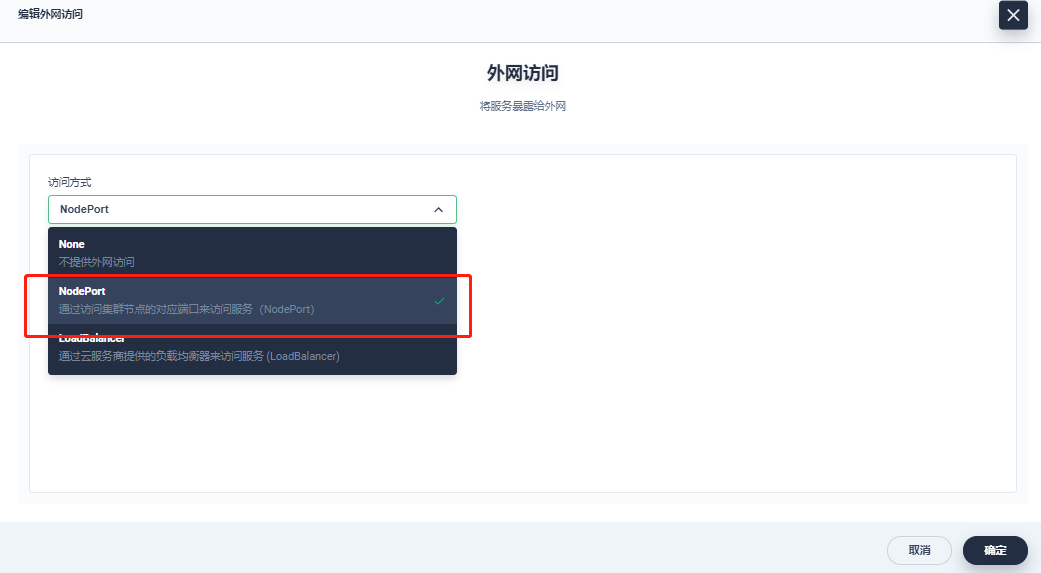
Access method:
http://{master1-ip:31357}
User name acquisition method:
$ kubectl -n rook-ceph get secret rook-ceph-dashboard-password -o jsonpath="{['data']['password']}"|base64 --decode && echo
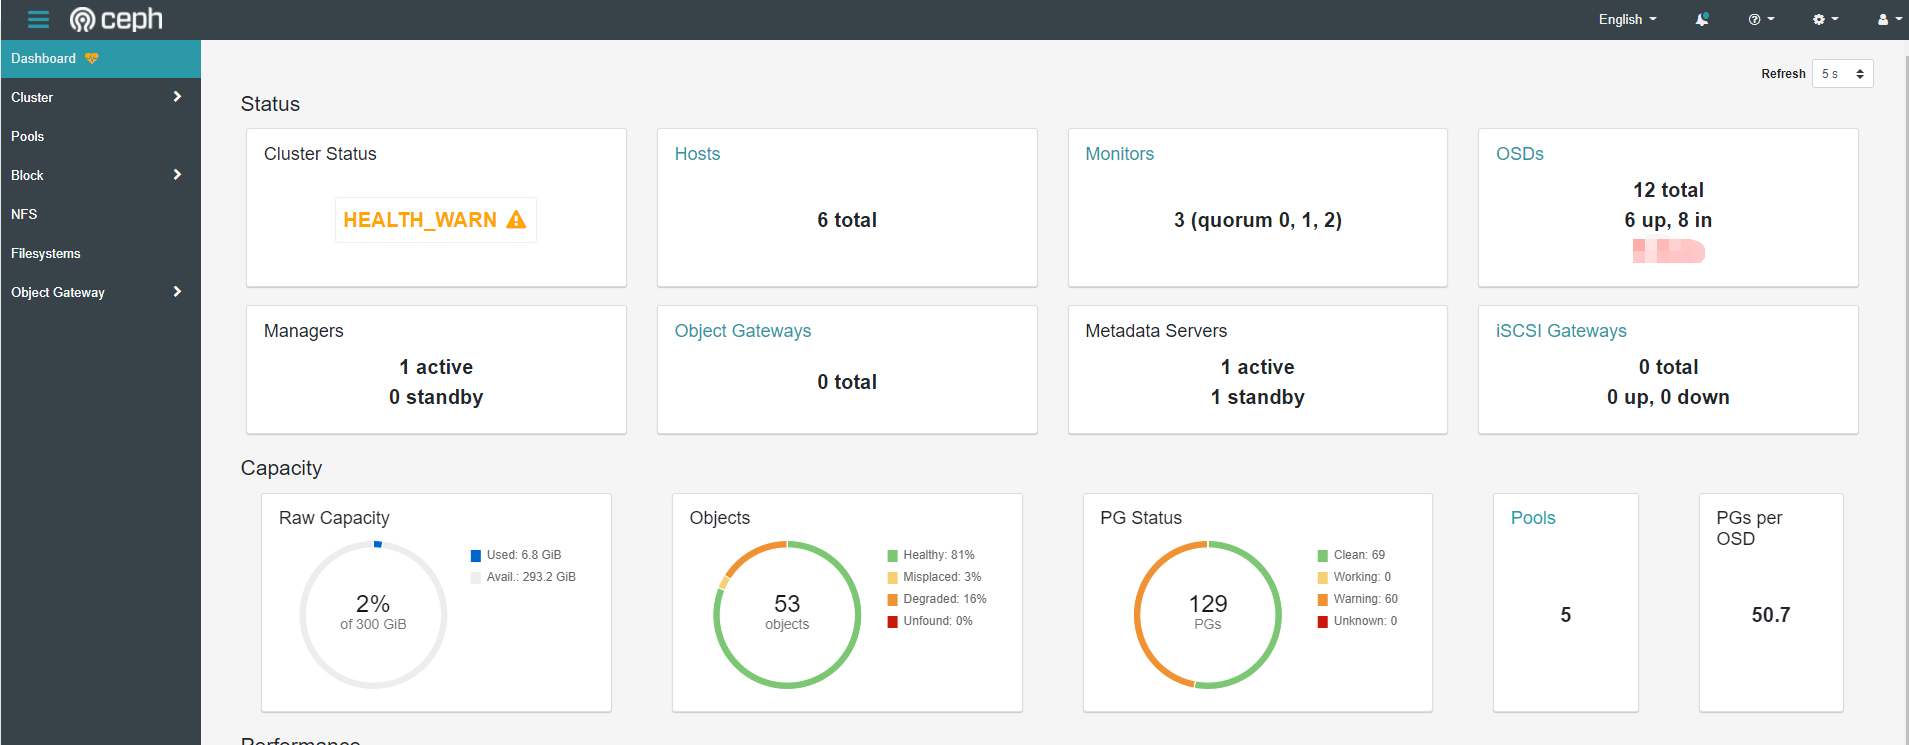
Description: dashboard displays health_ The specific causes of warn warnings can be viewed through seelog, generally osd down, insufficient pg, etc
9. Deploy the rook Toolkit
The Rook toolkit is a container that contains common tools for Rook debugging and testing
$ kubectl apply -f toolbox.yaml
Enter the toolbox to view Ceph cluster status
$ kubectl -n rook-ceph exec -it $(kubectl -n rook-ceph get pod -l "app=rook-ceph-tools" -o jsonpath='{.items[0].metadata.name}') -- bash
$ ceph -s
  cluster:
    id:     1457045a-4926-411f-8be8-c7a958351a38
    health: HEALTH_WARN
            mon a is low on available space
            2 osds down
            Degraded data redundancy: 25/159 objects degraded (15.723%), 16 pgs degraded, 51 pgs undersized
            3 daemons have recently crashed

  services:
    mon: 3 daemons, quorum a,b,d (age 9d)
    mgr: a(active, since 4h)
    mds: myfs:1 {0=myfs-b=up:active} 1 up:standby-replay
    osd: 12 osds: 6 up (since 8d), 8 in (since 8d); 9 remapped pgs

  data:
    pools:   5 pools, 129 pgs
    objects: 53 objects, 37 MiB
    usage:   6.8 GiB used, 293 GiB / 300 GiB avail
    pgs:     25/159 objects degraded (15.723%)
             5/159 objects misplaced (3.145%)
             69 active+clean
             35 active+undersized
             16 active+undersized+degraded
             9  active+clean+remapped
Toolbox related query commands
ceph status
ceph osd status
ceph df
rados df
Deploying StorageClass
1. Introduction to RBD block storage
Ceph can provide object storage, RADOSGW, block storage, RBD and file system storage at the same time. RBD is the abbreviation of RADOS Block Device. RBD block storage is the most stable and commonly used storage type. RBD block devices like disks can be mounted. The RBD block device has the characteristics of snapshot, multiple copies, cloning and consistency. The data is stored in multiple OSD s of Ceph cluster in a striped manner.

2. Create StorageClass
[root@kube-master1 rbd]# kubectl apply -f storageclass.yaml
3. View StorageClass deployment status

4. Create pvc
$ kubectl apply -f pvc.yaml
apiVersion: v1
kind: PersistentVolumeClaim
metadata:
  name: rbd-pvc
spec:
  accessModes:
    - ReadWriteOnce
  resources:
    requests:
      storage: 2Gi
  storageClassName: rook-ceph-block
~
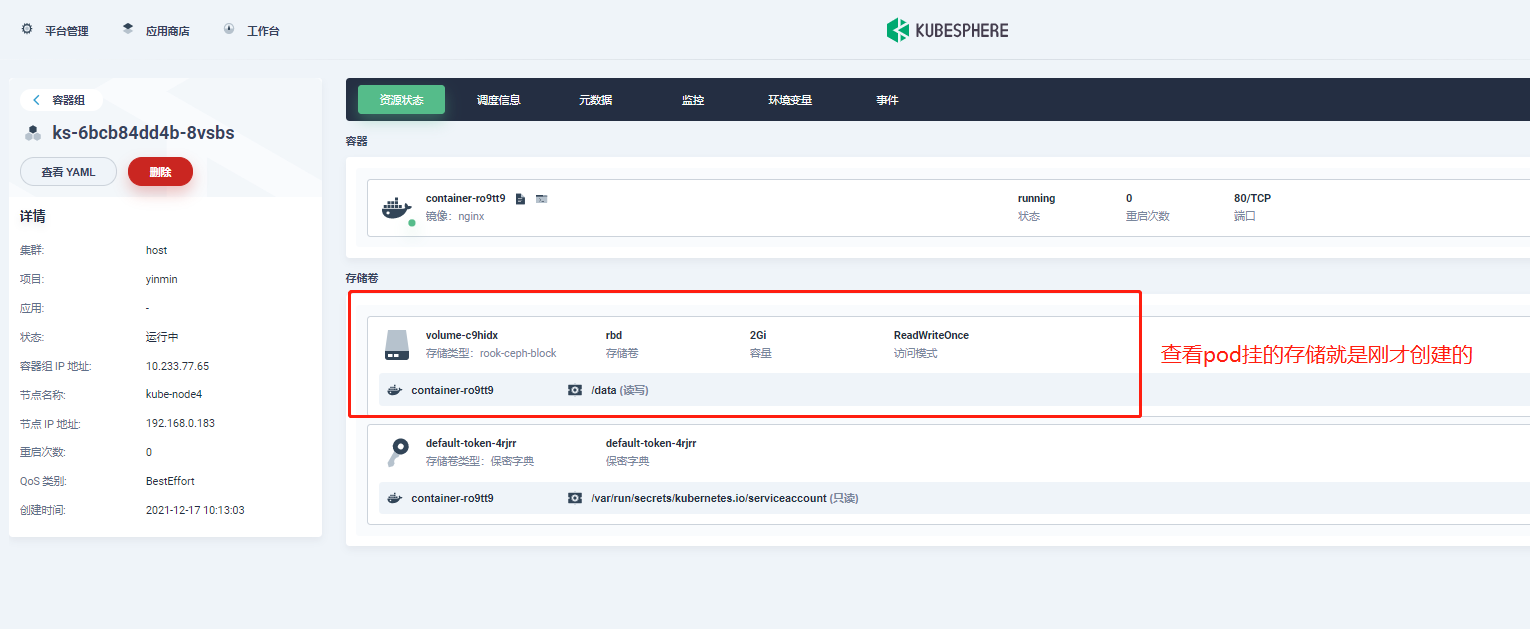
5. Create a pod with pvc
$ kubectl apply -f pod.yaml
apiVersion: v1
kind: Pod
metadata:
  name: csirbd-demo-pod
spec:
  containers:
    - name: web-server
      image: nginx
      volumeMounts:
        - name: mypvc
          mountPath: /var/lib/www/html
  volumes:
    - name: mypvc
      persistentVolumeClaim:
        claimName: rbd-pvc
        readOnly: false
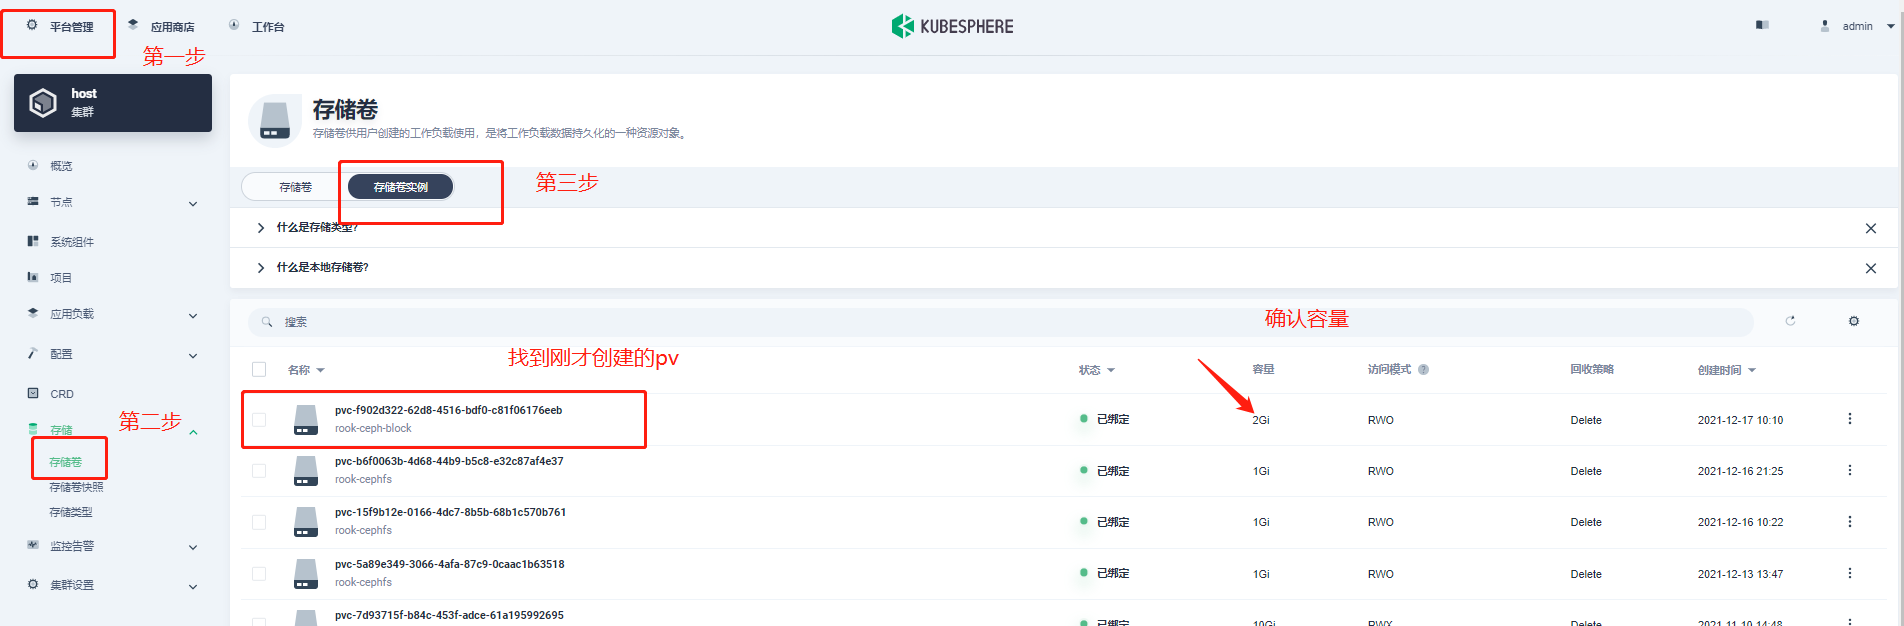
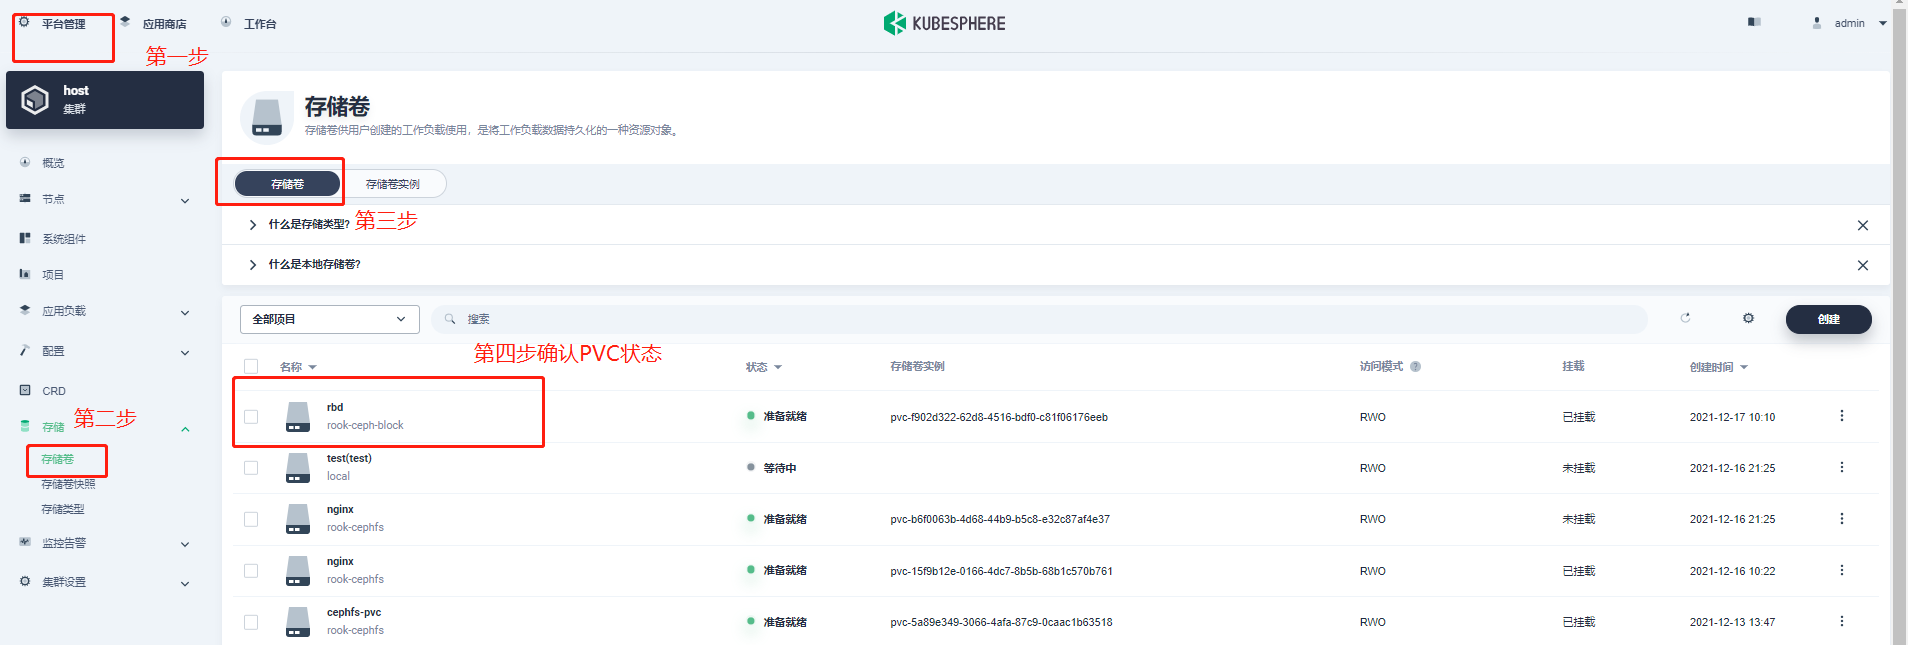
6. Check the status of pod, pvc and pv
summary
For students who first contact the rook+Ceph deployment experience, they need to know more and encounter more pits. I hope the above deployment process records can help you.
1.Ceph cluster always indicates that there is no disk available for osd
A: there have been several cases here. Check whether the attached data disk has been used before. Although it has been formatted, the previous raid information still exists? You can use the following script to clean up and mount after formatting.
#!/usr/bin/env bash
DISK="/dev/vdc"  #Modify your drive letter information as needed

# Zap the disk to a fresh, usable state (zap-all is important, b/c MBR has to be clean)

# You will have to run this step for all disks.
sgdisk --zap-all $DISK

# Clean hdds with dd
dd if=/dev/zero of="$DISK" bs=1M count=100 oflag=direct,dsync

# Clean disks such as ssd with blkdiscard instead of dd
blkdiscard $DISK

# These steps only have to be run once on each node
# If rook sets up osds using ceph-volume, teardown leaves some devices mapped that lock the disks.
ls /dev/mapper/ceph-* | xargs -I% -- dmsetup remove %

# ceph-volume setup can leave ceph-<UUID> directories in /dev and /dev/mapper (unnecessary clutter)
rm -rf /dev/ceph-*
rm -rf /dev/mapper/ceph--*

# Inform the OS of partition table changes
partprobe $DISK
~
2. What storage types does CEPH support?
Answer: rdb block storage, cephfs file storage, s3 object storage, etc
3. How to check all kinds of pits during deployment?
A: it is strongly recommended to check relevant documents through the official websites of rook and ceph for troubleshooting
4. Failed to access dashboard
A: if it is a KubeSphere or K8s built by the public cloud, please release the nodeport port in the security group
This article is composed of blog one article multi posting platform OpenWrite release!