target
Build an iOS development environment for Flutter under Mac
Basic environment
To install and run fluent, your development environment must meet the following minimum requirements:
- Operating system: MacOS (64 bit)
- Disk space: 700 MB (excluding Xcode or Android Studio disk space)
- Tools: fluent relies on the following command line tools
bash, mkdir, rm, git, curl, unzip, which
Use mirror
Since access to Flutter in China may sometimes be restricted, Flutter has officially built a temporary image for Chinese developers. You can add the following environment variables to the user's environment variables (run the following commands on the command line):
export PUB_HOSTED_URL=https://pub.flutter-io.cn
export FLUTTER_STORAGE_BASE_URL=https://storage.flutter-io.cn
Or, edit / Users / your user name / bash_profile

Build iOS environment
Install Xcode
To develop the fluent application on iOS platform, you need a Mac device with Xcode installed.
-
adopt Direct download Or through Mac App Store To install the latest stable version of Xcode;
-
Configure Xcode command line tools by running the following command on the command line:
$ sudo xcode-select -- switch /Applications/Xcode.app/Contents/Developer
$ sudo xcodebuild -runFirstLaunch
When you install the latest version of Xcode, in most cases, the above path is the same. However, if you have different versions of Xcode installed, you may want to change the path in the above command.
-
Run Xcode once or enter the command sudox code build license to ensure that you have agreed to the Xcode license agreement.
After installing Xcode, you can run the fluent application on iOS real machine or simulator.
iOS simulator
If you want to run and test the fluent application in the iOS simulator, start the simulator through Spotlight or the following command:
$ open -a Simulator
iOS environment dependency
You need some additional tools to install your Flutter application to iOS real devices.
-
install homebrew (if brew is already installed, skip this step)
-
Open the terminal and run these commands to install the tools used to install the fluent application to the iOS device
The following installation takes a long time (possibly more than 10 minutes) and requires patience
brew update
brew install --HEAD libimobiledevice
brew install ideviceinstaller ios-deploy cocoapods
pod setup
If any of these commands fails with errors, run brew doctor and follow the instructions to resolve the problem
Installing the Flutter SDK
-
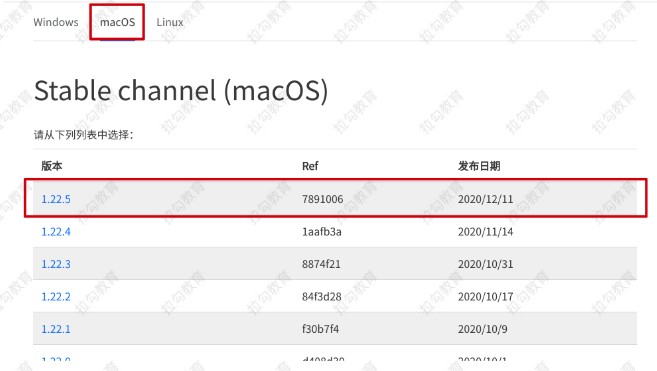
Go to the official website of flutter to download
Download address:- https://flutter.dev/docs/development/tools/sdk/releases
- https://flutter.cn/docs/development/tools/sdk/releases (domestic mirror address)
Or download through git
git clone -b beta https://github.com/flutter/flutter.git
-
Unzip the installation package to the directory you want to install, such as:
cd ~/myapp
unzip ~/Downloads/flutter_macos_1.22.5-stable.zip

#Name the extracted directory fluent and copy it to / Users/liuchangtao/myapp/
#The final path is / users / liuchangtao / myapp / fluent
-
Add the fluent path to the path:
# Open bash_profile
vim ~/.bash_profiles

# Add variables in the fluent environment (at the end, add the following code)
export PATH="$PATH:/Users/liuchangtao/myapp/flutter/bin"

# Save exit: wq

# Update variables in the environment
source ~/.bash_profile
Please replace the above flutter path with your own flutter path
-
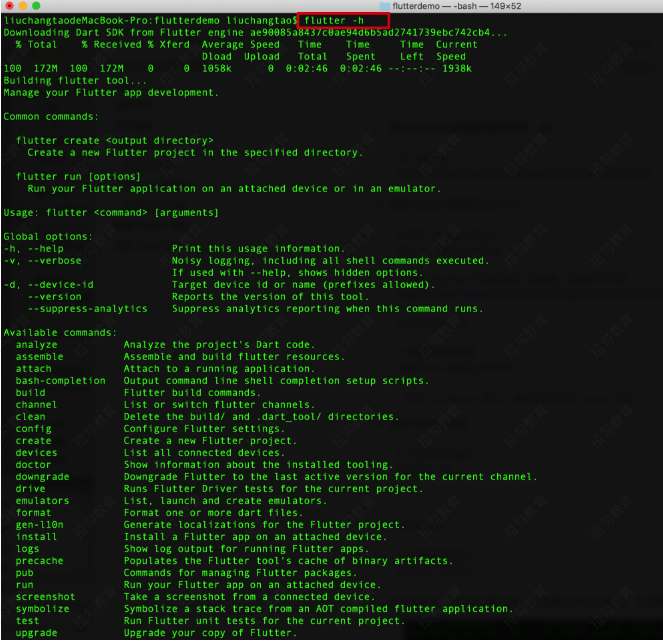
Verify the fluent command
# On the command line, enter
flutter -h
Some content will be downloaded during the first run
-
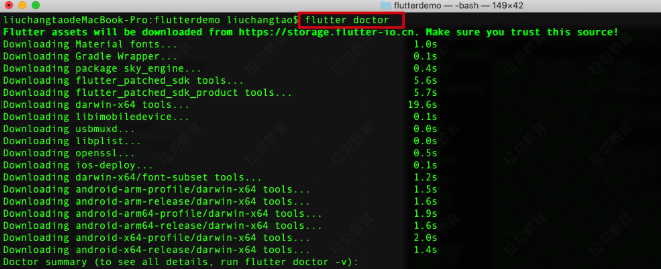
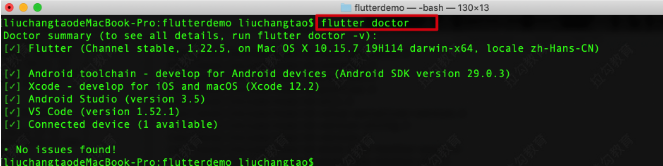
Detect the flitter
# On the command line, enter
flutter doctor
When it first runs, it downloads its own dependencies and compiles itself, which may take a while (running later will be much faster)
If Android or iOS has dependency missing. Please download Android Studio or VS Code, and then download the fluent plug-in in the corresponding IDE. The installation process is the same as that under Windows (refer to the Windows environment setup. md of fluent)
The following is a screenshot of successful configuration:
Create a fluent app
Use the following steps to create your first fluent app and test it:
-
Create a new fluent application by running the following command:
$ flutter create flutterdemo
-
The above command creates a directory of flutterdemo, which contains the initial application template of Flutter. Switch the path to this directory:
$ cd flutterdemo
-
Make sure the simulator is already running:
# View current simulator
$ flutter emulators
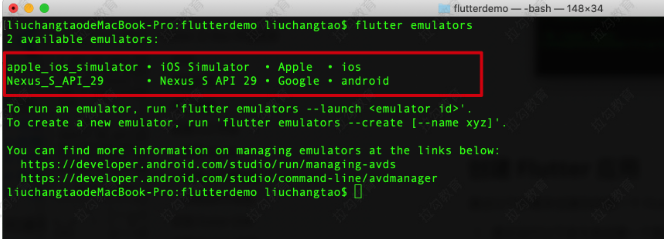
# Start simulator
$ flutter emulator --launch apple_ios_simulator # ios simulator
# perhaps
$ flutter emulator --launch Nexus_S_API_29 # Andorid simulator
-
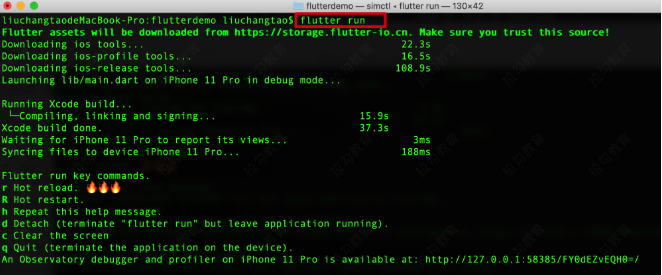
Run fluent
# To execute the project project, if multiple devices are connected, you need - d < device ID > to execute a simulator
$ flutter run
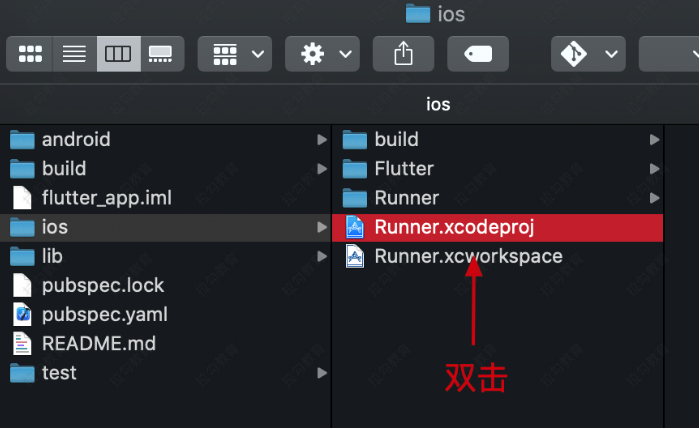
Open the shutter project with Xcode
Double click IOS / runner.exe in the Flutter project directory xcodeproj
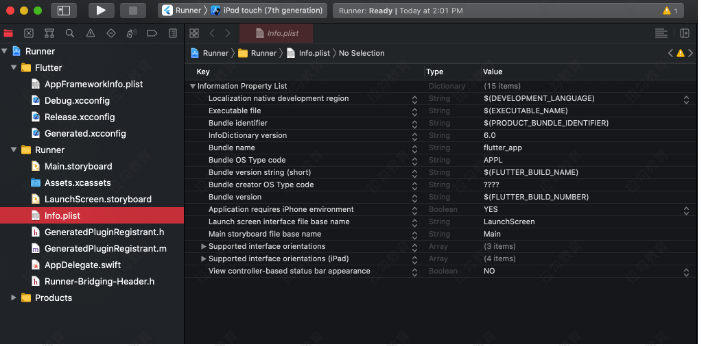
iOS profile
The configuration file under iOS is iOS / Runner / info Plist (equivalent to android/src/main/AndroidManifest.xml). We can configure permission, language, subject and other information in iOS configuration file. There are generally two editing methods:
-
Edit in VS Code
Info in VS Code Plist is an XML file. For example, common permission settings are:<key>NSLocationWhenInUseUsageDescription</key> <string>App Your consent is required,To access the location during use</string> <key>NSLocationAlwaysUsageDescription</key> <string>App Your consent is required,To always access the location</string> <key>NSPhotoLibraryUsageDescription</key> <string>App Your consent is required,To access the album</string> <key>NSCameraUsageDescription</key> <string>App Your consent is required,To access the camera</string> <key>NSMicrophoneUsageDescription</key> <string>App Your consent is required,To access the microphone</string> <key>NSLocationUsageDescription</key> <string>App Your consent is required,To access the location</string> <key>NSCalendarsUsageDescription</key> <string>App Your consent is required,To access the calendar</string> <key>NSRemindersUsageDescription</key> <string>App Your consent is required,To access reminders</string> <key>NSMotionUsageDescription</key> <string>App Your consent is required,To access sports and fitness</string> <key>NSHealthUpdateUsageDescription</key> <string>App Your consent is required,To access health updates</string> <key>NSHealthShareUsageDescription</key> <string>App Your consent is required,To access health sharing</string> <key>NSBluetoothPeripheralUsageDescription</key> <string>App Your consent is required,To access Bluetooth</string> <key>NSAppleMusicUsageDescription</key> <string>App Your consent is required,To access the media database</string>
-
Edit in Xcode
Xcode provides an editable list that allows us to add, delete, and edit specific configuration items.