1, Set up each node of the cluster
Prepare five nodes, which are:
192.168.154.150
192.168.154.151
192.168.154.152
192.168.154.153
192.168.154.155
For the convenience of operation, only the first three nodes are prepared here
Construction of rabbitmq cluster image mode
1) Stop each node service
rabbitmqctl stop
2) File synchronization
Select 76, 77 and 78 as Master (here 76 is Master), that is to say, we need to synchronize the cookie files of 76 to 77 and 78, enter the / var/lib/rabbitmq directory of 76, change the permissions of / var/lib/rabbitmq/.erlang.cookie file to 777, and then copy the. erlang.cookie file to other nodes remotely. Finally, we need to change the permissions of all cookie files Limit to 400
scp .erlang.cookie 192.168.154.151:/var/lib/rabbitmq/
scp is a safe remote file copy command based on ssh login in linux system
3) Cluster node start
rabbitmq-server -detached
lsof -i:5672
4) slave nodes join the cluster
77 node
rabbitmqctl stop_app
rabbitmqctl join_cluster [--ram] dongge02
rabbitmqctl start_app
lsof -i:5672
78 node
rabbitmqctl stop_app
rabbitmqctl join_cluster dongge023
rabbitmqctl start_app
lsof -i:5672
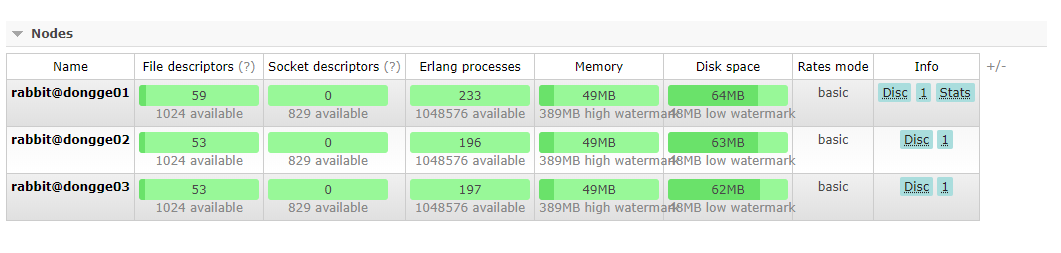
5) Access the control console corresponding to any node to view the cluster information
Access address http://192.168.154.150:15672/
6) Configure mirror queues
Set the mirror queue policy on any node to realize the synchronization of each node
rabbitmqctl set_policy ha-all "^" '{"ha-mode":"all"}'
Other orders
To move out of a cluster node, you can use rabbitmqctl to get cluster node dongge01
To modify the cluster name (the default is the host name of the first node), you can use rabbitmqctl set "cluster" name newname
To view the status of a cluster, rabbitmqctl cluster? Status

Possible problems
rabbitmqctl join_cluster rabbit@dongge01
Clustering node rabbit@dongge02 with rabbit@dongge01 ...
Error: unable to connect to nodes [rabbit@dongge01]: nodedown

DIAGNOSTICS
===========

attempted to contact: [rabbit@dongge01]

rabbit@dongge01:
  * unable to connect to epmd (port 4369) on dongge01: nxdomain (non-existing domain)


current node details:
- node name: 'rabbitmq-cli-83@dongge02'
- home dir: /var/lib/rabbitmq
- cookie hash: aC0Gq/wYO5LTAlBUZWA/CQ==
Solution
Cluster nodes need to be able to access each other, so the hosts file of each cluster node should contain the information of all nodes in the cluster to ensure mutual analysis
vim /etc/hosts
IP rabbit@rabbitmq-node1
IP rabbit@rabbitmq-node2
IP rabbit@rabbitmq-node3
Then restart rabbitmq in each node
2, Build load balancing component haproxy
Download dependency package
yum install gcc vim wget
Download haproxy
wget http://www.haproxy.org/download/1.6/src/haproxy-1.6.5.tar.gz
Extract to the specified directory
tar -zxvf haproxy-1.6.5.tar.gz -C /usr/local
Enter the directory for compilation and installation
cd /usr/local/haproxy-1.6.5
make TARGET=linux31 PREFIX=/usr/local/haproxy
make install PREFIX=/usr/local/haproxy
mkdir /etc/haproxy
Grant authority
groupadd -r -g 149 haproxy
useradd -g haproxy -r -s /sbin/nologin -u 149 haproxy
create profile
touch /etc/haproxy/haproxy.cfg
151-haproxy
global
log 127.0.0.1 local0 info
maxconn 5120
chroot /usr/local/haproxy
uid 99
gid 99
daemon
quiet
nbproc 20
pidfile /var/run/haproxy.pid

defaults
log global
# Pattern
mode tcp
#if you set mode to tcp,then you nust change tcplog into httplog
option tcplog
option dontlognull
retries 3
option redispatch
maxconn 2000
contimeout 5s
     ##If the client idle timeout is 60 seconds, HA initiates the reconnection mechanism
     clitimeout 60s
     ##HA initiates reconnection when the server link timeout is 15 seconds
     srvtimeout 15s
#front-end IP for consumers and producters

listen rabbitmq_cluster
bind 0.0.0.0:5672
#Configure TCP mode
mode tcp
#balance url_param userid
#balance url_param session_id check_post 64
#balance hdr(User-Agent)
#balance hdr(host)
#balance hdr(Host) use_domain_only
#balance rdp-cookie
#balance leastconn
#balance source //ip
#Simple polling
balance roundrobin
#rabbitmq Cluster node configuration #inter checks the health of mq cluster every five seconds, proves that the server is available correctly twice, and fails twice to prove that the server is unavailable, and configures the active and standby mechanisms
        server dongge01 192.168.154.150:5672 check inter 5000 rise 2 fall 2
        server dongge02 192.168.154.151:5672 check inter 5000 rise 2 fall 2
        server dongge03 192.168.154.152:5672 check inter 5000 rise 2 fall 2
#Configure haproxy web monitoring to view statistics
listen stats
bind 192.168.154.151:8100
mode http
option httplog
stats enable
#Set the monitoring address of haproxy to http: / / localhost: 8100 / rabbitmq stats
stats uri /rabbitmq-stats
stats refresh 5s
152-haproxy
global
	log 127.0.0.1 local0 info
	maxconn 5120
	chroot /usr/local/haproxy
	uid 99
	gid 99
	daemon
	quiet
	nbproc 20
	pidfile /var/run/haproxy.pid

defaults
	log global
	# Pattern
	mode tcp
	#if you set mode to tcp,then you nust change tcplog into httplog
	option tcplog
	option dontlognull
	retries 3
	option redispatch
	maxconn 2000
	contimeout 5s
     ##HA initiates reconnection when the client idle timeout is 60 seconds
     clitimeout 60s
     ##HA initiates reconnection when the server link timeout is 15 seconds
     srvtimeout 15s
#front-end IP for consumers and producters

listen rabbitmq_cluster
	bind 0.0.0.0:5672
	#Configure TCP mode
	mode tcp
	#balance url_param userid
	#balance url_param session_id check_post 64
	#balance hdr(User-Agent)
	#balance hdr(host)
	#balance hdr(Host) use_domain_only
	#balance rdp-cookie
	#balance leastconn
	#balance source //ip
	#Simple polling
	balance roundrobin
	#rabbitmq Cluster node configuration #inter checks the health of mq cluster every five seconds, proves that the server is available correctly twice, and fails twice to prove that the server is unavailable, and configures the active and standby mechanisms
        server dongge01 192.168.154.150:5672 check inter 5000 rise 2 fall 2
        server dongge02 192.168.154.151:5672 check inter 5000 rise 2 fall 2
        server dongge03 192.168.154.152:5672 check inter 5000 rise 2 fall 2
#Configure haproxy web monitoring to view statistics
listen stats
	bind 192.168.154.152:8100
	mode http
	option httplog
	stats enable
	#Set the monitoring address of haproxy to http: / / localhost: 8100 / rabbitmq stats
	stats uri /rabbitmq-stats
	stats refresh 5s
Start haproxy
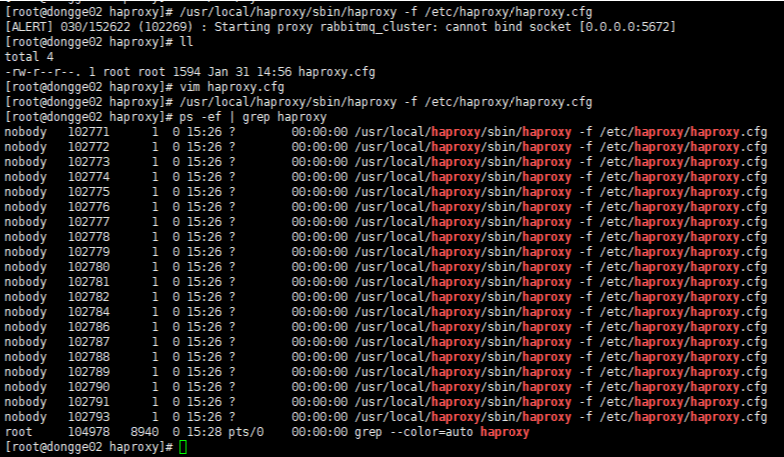
/usr/local/haproxy/sbin/haproxy -f /etc/haproxy/haproxy.cfg
Description: - f indicates the specified configuration file, that is, the file under a specific path
View haproxy process status
ps -ef | grep haproxy
Note: the haproxy service is better on a new server or a node server (a new port needs to be bound, such as 5671, because the node service already occupies 5672 port). vim /etc/haproxy/haproxy.cfg is enough
https://blog.csdn.net/hanzhuang12345/article/details/94779142
Visit haproxy
Monitor rmq nodes: http://192.168.154.151:8100/rabbitmq-stats
3, Build a highly available component preserved
Install required packages
yum install -y openssl openssl-devel
download
wget http://www.keepalived.org/software/keepalived-1.2.18.tar.gz
Decompress, compile and install
tar -zxvf keepalived-1.2.18.tar.gz -C /usr/local/
cd keepalived-1.2.18/ && ./configure --prefix=/usr/local/keepalived
make && make install
//Install keepalived as a Linux system service, because the default installation path of keepalived is not used (default path: / usr/local). After the installation, some modifications need to be done
//First, create a folder and copy the keepalived configuration file:
mkdir /etc/keepalived
cp /usr/local/keepalived/etc/keepalived/keepalived.conf /etc/keepalived/
//Then copy the maintained script file:
cp /usr/local/keepalived/etc/rc.d/init.d/keepalived /etc/init.d/
cp /usr/local/keepalived/etc/sysconfig/keepalived /etc/sysconfig/
//Delete soft link
rm -f /usr/sbin/keepalived
ln -s /usr/local/sbin/keepalived /usr/sbin/
rm -f /sbin/keepalived
ln -s /usr/local/keepalived/sbin/keepalived /sbin/
//You can set chkconfig maintained on. Now we have finished the installation!
chkconfig keepalived on
keepalived configuration
Modify the configuration file in the newly created keepalived directory
vim /etc/keepalived/keepalived.conf
151 service node
! Configuration File for keepalived

global_defs {
   router_id donnge02  ##String identifying the node, usually hostname

}

vrrp_script chk_haproxy {
    script "/etc/keepalived/haproxy_check.sh"  ##Script execution location
    interval 2  ##Test interval
    weight -20  ##If the conditions are met, the weight will be reduced by 20
}

vrrp_instance VI_1 {
    state MASTER  ## The primary node is MASTER and the BACKUP node is BACKUP
    interface ens33 ## The network interface (network card) that binds the virtual IP is the same as the network interface where the IP address of the local machine is located
    virtual_router_id 151  ## Virtual route ID number (the primary and secondary nodes must be the same)
    mcast_src_ip 192.168.154.151 ## Local ip address
    priority 100  ##Priority configuration (values of 0-254)
    nopreempt
    advert_int 1  ## The multicast information sending interval must be the same between the two nodes. The default is 1s
authentication {  ## Authentication matching
        auth_type PASS
        auth_pass wxd
    }

    track_script {
        chk_haproxy
    }

    virtual_ipaddress {
        192.168.154.70  ## Virtual ip, multiple can be specified
    }
}
152 service node
! Configuration File for keepalived

global_defs {
   router_id dongge03  ##String identifying the node, usually hostname

}

vrrp_script chk_haproxy {
    script "/etc/keepalived/haproxy_check.sh"  ##Script execution location
    interval 2  ##Test interval
    weight -20  ##If the conditions are met, the weight will be reduced by 20
}

vrrp_instance VI_1 {
    state BACKUP  ## The primary node is MASTER and the BACKUP node is BACKUP
    interface ens33 ## The network interface (network card) that binds the virtual IP is the same as the network interface where the IP address of the local machine is located
    virtual_router_id 151  ## Virtual route ID number (the primary and secondary nodes must be the same)
    mcast_src_ip 192.168.154.152  ## Local ip address
    priority 90  ##Priority configuration (values of 0-254)
    nopreempt
    advert_int 1  ## The multicast information sending interval must be the same between the two nodes. The default is 1s
authentication {  ## Authentication matching
        auth_type PASS
        auth_pass wxd
    }

    track_script {
        chk_haproxy
    }

    virtual_ipaddress {
        192.168.154.70  ## Virtual ip, multiple can be specified
    }
}
Script haproxy_check.sh
The location of the added file is / etc / maintained / haproxy_check.sh (the contents of 151 and 152 node files are the same)
#!/bin/bash
COUNT=`ps -C haproxy --no-header |wc -l`
if [ $COUNT -eq 0 ];then
    /usr/local/haproxy/sbin/haproxy -f /etc/haproxy/haproxy.cfg
    sleep 2
    if [ `ps -C haproxy --no-header |wc -l` -eq 0 ];then
        killall keepalived
    fi
fi
haproxy_check.sh script authorization, giving executable permission
chmod +x /etc/keepalived/haproxy_check.sh
Start keepalived
After we start two haproxy nodes, we can start the keepalived service program
//View status
ps -ef | grep haproxy
//Start the keepalived of two machines
service keepalived start | stop | status | restart
ps -ef | grep keepalived
Copy multiple files to the specified directory
cp haproxy_check.sh keepalived.conf /etc/keepalived
ip a views all ip addresses, including the virtual ip configured in the keepalived mode (the virtual ip address now exists on the 151 master node)