1. Install Strngswan
yum install strongswan
systemctl enable strongswan
systemctl start strongswan
2. Creating Certificates
strongswan pki --gen --outform pem > ca.key.pem
strongswan pki --self --in ca.key.pem --dn "C=CN, O=iSoft, CN=iSoft wendell CA" --ca --lifetime 3650 --outform pem > ca.cert.pem

strongswan pki --gen --outform pem > server.key.pem
strongswan pki --pub --in server.key.pem --outform pem > server.pub.pem
strongswan pki --issue --lifetime 3601 --cacert ca.cert.pem --cakey ca.key.pem --in server.pub.pem --dn "C=CN, O=iSoft, CN=iSoft wendell CA" --san="Your IP" --san="Fill in your domain name at will" --flag serve    rAuth --flag ikeIntermediate --outform pem > server.cert.pem
Note: The dn filled in must be the same. In creating server.cert.pem, it is necessary to write more san. If one is written, the error of ike authentication certificate unacceptable will be reported when connecting.
If you only need a password to log in, the certificate above will be created.
Create Client Certificate
strongswan pki --gen --outform pem > client.key.pem
strongswan pki --pub --in client.key.pem --outform pem > client.pub.pem
strongswan pki --issue --lifetime 1200 --cacert ca.cert.pem --cakey ca.key.pem --in client.pub.pem --dn "C=CN, O=iSoft, CN=iSoft wendell CA" --outform pem > client.cert.pem

openssl pkcs12 -export -inkey client.key.pem -in client.cert.pem -name "iSoft wendell Client Cert" -certfile ca.cert.pem -caname "iSoft wendell CA" -out client.cert.p12
3. Installation Certificate
cp -r ca.key.pem /etc/strongswan/ipsec.d/private/
cp -r ca.cert.pem /etc/strongswan/ipsec.d/cacerts/
cp -r server.cert.pem /etc/strongswan/ipsec.d/certs/
cp -r server.pub.pem /etc/strongswan/ipsec.d/certs/
cp -r server.key.pem /etc/strongswan/ipsec.d/private/
cp -r client.cert.pem /etc/strongswan/ipsec.d/certs/
cp -r client.key.pem /etc/strongswan/ipsec.d/private/
Copy CA certificate (ca.cert.pem), client certificate (client.cert.pem) and. p12 certificate (client.cert.p12) with FTP to the client.
4. Configuring VPN
vim /etc/strongswan/ipsec.confconfig setup
#Cache Certificate Revocation List
#<em>cachecrls = yes</em>
#Are Certificate Revocation Rules Strictly Implemented
# strictcrlpolicy=yes
#If the same user logs in repeatedly on different devices, yes disconnects the old connection and creates a new connection; no maintains the old connection and sends notifications; never and no do not send notifications.
uniqueids=no
#Configure the root certificate. If you don't use the certificate revocation list, you don't need this section. Name% default and all configuration sections will inherit it.
#ca %default
#Certificate revocation list url, which can be LDAP, http, or file path
#crluri = <uri>
#Define a connection item named% default and all connections will inherit it
conn %default
#Whether compression is enabled or not, yes indicates that compression will be enabled if it is supported.
compress = yes
#When an unexpected disconnect occurs, try to hold, hold, and reconnect until the timeout occurs.
dpdaction = hold
#Attempt to reconnect after accidental disconnection
dpddelay = 30s
#Overtime after accidental disconnection only works on IKEv1
dpdtimeout = 60s
#Length of idle time, disconnect after exceeding.
inactivity = 300s
#Data Transfer Protocol Encryption Algorithms List
esp = aes256-sha256,aes256-sha1,3des-sha1!
#List of Encryption Algorithms for Key Exchange Protocol
ike = aes256-sha1-modp1024,aes128-sha1-modp1024,3des-sha1-modp1024!
#Default key exchange algorithm, ike is automatic, IKEv2 is preferred
keyexchange = ike
#Server-side public network ip, which can be the magic word% any, means to extract from the local IP address table.
left = %any
#Client ip, ibid.
right = %any
#Specify the dns of the server and client, separated by ",".
leftdns = 8.8.8.8,8.8.4.4
rightdns = 8.8.8.8,8.8.4.4
#The port used by the server for ike authentication is 500 by default. If nat forwarding is used, 4500 is used.
#leftikeport = <port>
#Server-side virtual ip address
#leftsourceip = %config
#Client virtual ip segment
rightsourceip = 10.1.0.0/24
#Server terminal subnet, magic word 0.0.0/0. If the virtual IP address is assigned to the client, that means to do iptables forwarding later, then the server must use magic word.
leftsubnet = 0.0.0.0/0
#rightsubnet = <ip subnet>[[<proto/port>]][,...]
conn IKEv2-BASE
#Server-side root certificate DN name
leftca = "C=CN, O=ITnmg, CN=ITnmg StrongSwan CA"
#Server certificates, which can be in PEM or DER format
leftcert = server.cert.pem
#No client certificate path specified
#rightcert = <path>
#Specify the public key of the server certificate
leftsigkey = server.pub.pem
#rightsigkey = <raw public key> | <path to public key>
#Whether to send server certificate to client
leftsendcert = always
#Client does not send certificates
rightsendcert = never
#Server-side authentication method, using certificates
leftauth = pubkey
#Client authentication uses EAP extension authentication, which seems eap-mschapv2 is more general
rightauth = eap-mschapv2
#Server id, can be arbitrarily specified, default to the subject of the server certificate, can also be the magic word% any, indicating anything line.
leftid = Your IP address
#Client id, arbitrary
rightid = %any
#ios, mac os, win7+, linux
conn IKEv2-EAP
also=IKEv2-BASE
#Specify client eap id
eap_identity = %any
#Do not automatically reset the key
rekey = no
#Open IKE message fragmentation
fragmentation = yes
#How to handle this connection item when the service starts. add to the connection table.
auto = addNote: leftid = your IP address, this IP address, with the certificate above - san= "your IP", consistent
5. Modifying dns configuration
/etc/strongswan/strongswan.d/charon.confcharon {
duplicheck.enable = no #Connect multiple devices at the same time and turn off redundancy checks.
# windows public dns
dns1 = 8.8.8.8
dns2 = 8.8.4.4
#The following is the log output. Please close the production environment.
filelog {
/var/log/charon.log {
# add a timestamp prefix
time_format = %b %e %T
# prepend connection name, simplifies grepping
ike_name = yes
# overwrite existing files
append = no
# increase default loglevel for all daemon subsystems
default = 1
# flush each line to disk
flush_line = yes
}
}
}vim /etc/strongswan/strongswan.conf 1 # strongswan.conf - strongSwan configuration file
2 #
3 # Refer to the strongswan.conf(5) manpage for details
4 #
5 # Configuration changes should be made in the included files
6
7 charon {
8 load_modular = yes
9 duplicheck.enable = no
10 compress = yes
11 plugins {
12 include strongswan.d/charon/*.conf
13 }
14 dns1 = 8.8.8.8
15 nbns1 =8.8.4.4
16 }
17
18 include strongswan.d/*.conf6. Configuring Users and Passwords
vim /etc/strongswan/ipsec.secrets 1 # ipsec.secrets - strongSwan IPsec secrets file
2 #Server-side private key when using certificate validation
3 #Format: RSA < private key file > [< passphrase > |% prompt]
4 : RSA server.key.pem
5
6 #Using the default encryption key, the longer the better
7 #Format [< ID selectors >]: PSK < secret >
8 %any %any : PSK "wendell"
9
10 #EAP in the same format as psk
11 wendell %any : EAP "wendell"
12
13 #XAUTH mode, only applicable to IKEv1
14 #Format [<servername>] <username>: XAUTH "<password>"
15 wendell %any : XAUTH "wendell"7. Open Kernel Forwarding
/etc/sysctl.confnet.ipv4.ip_forward = 1
net.ipv6.conf.all.forwarding=18. Configuring Fire Protection
vim /usr/lib/firewalld/services/strongswan.xml<?xml version="1.0" encoding="utf-8"?>
<service>
<short>Strongswan</short>
<description>Strongswan VPN</description>
<port protocol="udp" port="500,4500"/>
</service>Add a service to the current area and turn on Forwarding
#The following command does not specify the -- zone parameter, which is for the default area public
#Adding services to regions
firewall-cmd --permanen --add-service=strongswan


#Enable ip camouflage
firewall-cmd --permanen --add-rich-rule='rule family="ipv4" source address="10.1.0.0/16" masquerade'

#Add nat forwarding
firewall-cmd --permanen --add-rich-rule='rule family="ipv4" source address="10.1.0.0/16" forward-port port="4500" protocol="udp" to-port="4500"'
firewall-cmd --permanen --add-rich-rule='rule family="ipv4" source address="10.1.0.0/16" forward-port port="500" protocol="udp" to-port="500"'

#Reloading Firewall Configuration
firewall-cmd --reload
In addition to the firewall-cmd command, you can add the above rules in another way.
vim /etc/firewalld/zones/public.xml 1 <?xml version="1.0" encoding="utf-8"?>
2 <zone>
3 <short>Public</short>
4 <description>For use in public areas. You do not trust the other computers on networks to not harm your computer. Only selected incoming connections are accepted.</description>
5 <interface name="eth0"/>
6 <service name="ssh"/>
7 <service name="dhcpv6-client"/>
8 <service name="ipsec"/>
9 <service name="strongswan"/>
10 <port protocol="tcp" port="1723"/>
11 <port protocol="tcp" port="47"/>
12 <port protocol="tcp" port="1701"/>
13 <port protocol="tcp" port="22"/>
14 <masquerade/>
15 <rule family="ipv4">
16 <source address="10.1.0.0/16"/>
17 <masquerade/>
18 </rule>
19 <rule family="ipv4">
20 <source address="10.1.0.0/16"/>
21 <forward-port to-port="4500" protocol="udp" port="4500"/>
22 </rule>
23 <rule family="ipv4">
24 <source address="10.1.0.0/16"/>
25 <forward-port to-port="500" protocol="udp" port="500"/>
26 </rule>
27 </zone>At this point, the server configuration has been completed.
firewall-cmd --reload #Reloading Firewall Configuration
strongswan stop #Stop service using strongswan's own command
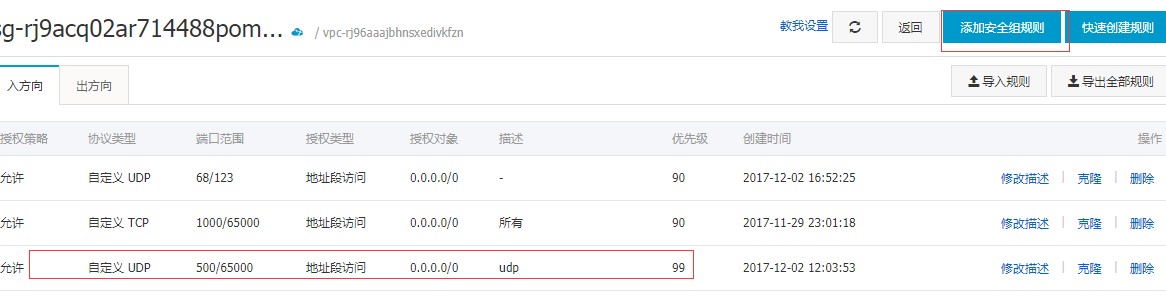
systemctl start strongswan #Start the service with the system CTL command9. Opening the Port of Aliyun 

10. Client Configuration
IOS:
Import CA Certificate First
Export the ca.cert.pem created before by ftp, send mail as attachment to mailbox, log in mailbox in ios browser, download attachment, install Ca certificate.
- Using IKEv2 + EAP authentication
Find "Settings - > VPN - > Add Configuration" on your phone, and select IKEv2.
Description: Feel free to fill in
Server: fill in url or ip
Remote ID: Fill in url or ip
User authentication: username
User Name: EAP Item User Name
Password: EAP entry password
2. Using IKEv2 + Client Certificate Authentication
Send the previous. p12 certificate (including ca certificate) to the mailbox and open it on the mobile phone. Import it into the mobile phone (the password of the certificate set before is needed at this time).
Find "Settings - > VPN - > Add Configuration" on your phone, and select IKEv2.
Description: Feel free to fill in
Server: fill in url or ip
Remote ID: Fill in url or ip
User authentication: certificate
Certificate: Select the installed client certificate
3. Using IKEv2 + Preset Key Authentication
Find "Settings - > VPN - > Add Configuration" on your phone, and select IKEv2.
Description: Feel free to fill in
Server: fill in url or ip
Remote ID: Fill in url or ip
User authentication: none
Use Certificate:
Key: PSK key
Windows 10
Import Certificate:
Rename CA root certificate ca.cert.pem to ca.cert.crt
win+r runs mmc;
File > Add Delete Management Unit;
Select "Certificate" from the available management unit and click Add to confirm.
In the control node, expand the Certificate Trusted Certificate Authorization Certificate, right-click All Tasks to import.
Connect:
Control Panel - "Network and Sharing Center" - "Setting up New Connections or Networks" - "Connecting to Workspace" - "Using My Internet Connections"
Internet address writes server IP or URL.
Write the description casually.
The EAP that was configured before the username password was written.
Determine
Go to Control Panel Network and Internet Network Connection
Right-click on the new VPN connection and switch to the Security tab
VPN Type Selection IKEv2
Data Encryption Selects "Need Encryption"
Identity authentication needs to be said here, if you want to use EAP authentication, choose "Microsoft: secure password (EAP-MSCHAP v2)"; if you want to use private certificate authentication, choose "use computer certificate".
Switch to the Network tab and double-click Internet Protocol Version 4 to open the properties window.
Click on the "Advanced" button and check "Use the default gateway on the remote network" to confirm exit.
VPN Configuration Completed
Reference resources:
https://raymii.org/s/tutorials/IPSEC_vpn_with_CentOS_7.html