preface
The purpose of writing this article is to record your learning process so that you can review and refer to the relevant knowledge points in the future.
1, Modify Makefile and add compiler
Enter the unzipped BusyBox directory, open the top-level Makefile, and add ARCH and cross_ The value of compile is as follows:
CROSS_COMPILE ?=arm-linux-gnueabi-
...
ARCH ?= arm
2, Configure BusyBox
Like compiling Uboot and Linux kernel, we need to configure BusyBox by default, and use the following commands to configure BusyBox:
make defconfig
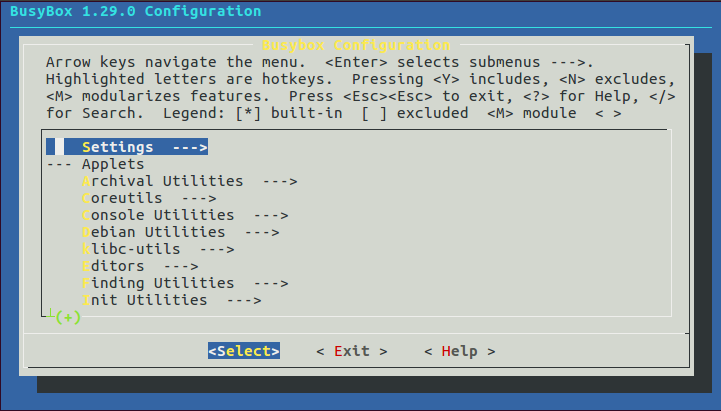
BusyBox also supports graphical configuration. Through graphical configuration, we can further select the functions we want, and enter the following command to open the graphical configuration interface:
make menuconfig
3, Compile BusyBox
After BusyBox is configured, we can compile. We can specify the storage directory of the compilation results. Here, I want to store the compilation structure in the rootfs directory under the nfs folder to mount the root file system through nfs. Enter the following command:
make
make install CONFIG_PREFIX=/home/xzj/Linux/nfs/rootfs
4, Add lib library to root file system
1. Add library files to the "/ lib" directory of rootfs
Enter the rootfs directory where BusyBox is installed, and use the command mkdir lib to create the Lib folder.
The lib folder is created. Where does the library file come from? The lib library file is obtained from the cross compiler. When we built the cross compiler environment, we stored the cross compiler in the "/ usr/local/arm /" directory. There are many library files in the cross compiler. As beginners, we certainly don't know what these library files do. Since I don't know, simply and roughly put all the library files into our root file system. The root file system must be very large, but we are in the learning stage and can't cut it. Let's take practice as the purpose first.
Enter the directory corresponding to the following path:
cd /usr/local/arm/gcc-linaro-7.5.0-2019.12-x86_64_arm-linux-gnueabi/arm-linux-gnueabi/libc/lib
Use the following command to convert all so and in this directory a files are copied to rootfs/lib Directory:
cp *.so* *.a /home/xzj/Linux/nfs/rootfs/lib/ -d
Here, use - d to copy the dynamic library files and their links in the Lib library to the rootfs/lib directory. Here is a special library file: LD Linux armhf so. 3. It is a soft connection file, which is equivalent to a shortcut under Windows. Because it is a "shortcut", the program cannot be executed in the root file system, so we need LD Linux armhf so. 3. Complete the counter attack and change from "shortcut" to "original". The method is very simple, that is, re copy LD Linux armhf so. 3. Just don't copy the soft link.
rm /home/xzj/Linux/nfs/rootfs/lib/ld-linux-armhf.so.3
cp ld-linux-armhf.so.3 /home/xzj/Linux/nfs/rootfs/lib/
Continue to the following directory:
cd /usr/local/arm/gcc-linaro-7.5.0-2019.12-x86_64_arm-linux-gnueabi/arm-linux-gnueabi/lib
There are also many so and in this directory a library file. We also copy it to the rootfs/lib directory. The command is as follows:
cp *.so* *.a /home/xzj/Linux/nfs/rootfs/lib/ -d
2. Add library files to the "usr/lib" directory of rootfs
Create a directory named lib under the usr directory of rootfs, and then enter the following directory:
cd /usr/local/arm/gcc-linaro-7.5.0-2019.12-x86_64_arm-linux-gnueabi/arm-linux-gnueabi/libc/usr/lib
Put so and in this directory Copy the a library files to the rootfs/usr/lib directory. The command is as follows:
cp *.so* *.a /home/xzj/Linux/nfs/rootfs/usr/lib/ -d
5, Create another folder
Create other folders in the root file system, such as dev, proc, mnt, sys, tmp, and root.
cd /home/xzj/Linux/nfs/rootfs
mkdir dev proc mnt sys tmp root
6, Create / etc / init D / RCS file
rcS is a shell script. Some services need to be started after the Linux kernel is started, and rcS is a script file that specifies which files to start. Create in / fs.init D / rcS file, and then enter the following contents in rcS:
#!/bin/sh

PATH=/sbin:/bin:/usr/sbin:/usr/bin:$PATH       //The PATH environment variable stores the directory where the executable file may exist, so that when we execute some commands or executable files, we will not prompt the error that the file cannot be found
LD_LIBRARY_PATH=$LD_LIBRARY_PATH:/lib:/usr/lib //LD_ LIBRARY_ The path environment variable holds the directory where the library files are located
export PATH LD_LIBRARY_PATH					   //Using export to export the above environment variables is equivalent to declaring some "global variables"

mount -a 									   //Use the mount command to mount all file systems specified by the file / etc/fstab

mkdir /dev/pts								   //Create directory / dev/pts
mount -t devpts devpts /dev/pts				   //Then mount devpts to the / dev/pts directory

//Use mdev to manage hot swap devices. Through the following two lines, the Linux kernel can automatically create device nodes in the / dev directory
//For details about mdev, please refer to docs / mdev.com in busybox Txt document
echo /sbin/mdev > /proc/sys/kernel/hotplug
mdev -s
Create the file / etc / init D / RCS must be given executable permission in the future!
chmod 777 rcS
7, Create / etc/fstab file
The mount command is used in rcS to mount all file systems. These file systems are specified by the file / etc/fstab, so the / etc/fstab file is created in rootfs. Fstab automatically configures which partitions need to be mounted automatically after Linux starts up.
The format of fstab is as follows:
#<file system> <mount point> <type> <options> <dump> <pass>

<file system>: The special device to be mounted can also be a block device, such as/dev/sda wait.
<mount point>: Mount point.
<type>: File system type, such as ext2,ext3,proc,romfs,tmpfs wait.
<options>: Mount options, in Ubuntu Medium input“ man mount"Command to view specific options. General make
 use defaults,That is, the default option, defaults Contains rw,suid, dev, exec, auto, nouser and async.
<dump>: If it is 1, backup is allowed. If it is 0, backup is not allowed. Generally, backup is not allowed, so it is set to 0.
<pass>: Disk check setting, 0 means no check. root directory'/'Set to 1, others cannot be set to 1,
Other partitions start with 2. Generally not fstab Mount the root directory in, so it is generally set to 0 here.
According to the above format, enter the following contents in the fstab file:
#<file system> <mount point> <type> <options> <dump> <pass>
proc           /proc 	     proc   defaults  0      0
tmpfs 	       /dev          tmpfs  defaults  0      0
sysfs 	       /sys          sysfs  defaults  0      0
8, Create / etc/inittab file
In the last blog post, we already know that inittab is an application configuration file. If there is no such file, the default configuration will be used. We do not use the default configuration here, so we need to create the inittab file ourselves. Its structure was also mentioned in the previous blog post, as shown below:
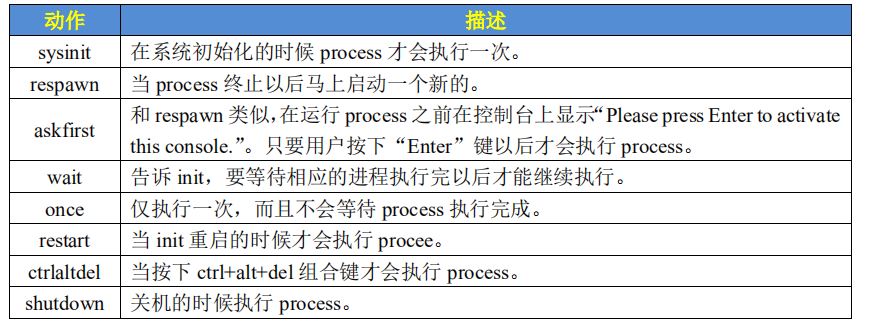
<id>:<runlevels>:<action>:<process>

<id>: The identifier of each instruction cannot be repeated. But for busybox of init For example,<id>Has special significance. about busybox for<id>use
 To specify the control of the startup process tty,Generally, we use serial port or LCD Screen set to control tty. <runlevels>: yes busybox It's completely useless for me, so it's empty.
<action>: Action, used to specify<process>Possible actions. busybox The supported actions are shown in the following figure
<process>: Specific actions, such as programs, scripts or commands.
Actions supported by busybox:
According to the above format, enter the following contents in the inittab file:
# etc/inittab
::sysinit:/etc/init.d/rcS
console::askfirst:-/bin/sh
::restart:/sbin/init
::ctrlaltdel:/sbin/reboot
::shutdown:/bin/umount -a -r 7 ::shutdown:/sbin/swapoff -a
The meaning of each line has been explained in the previous blog post.
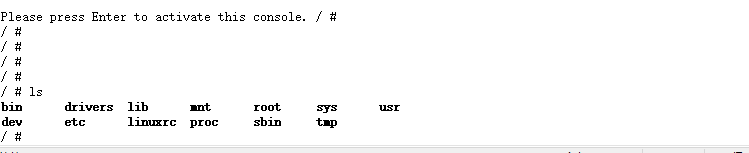
9, Test root file system
Through the above steps, the root file system has been built. The next step is to test the built root file system. I use NFS mount to test the root file system. First, set the environment variable in uboot, and the value of root will be set in the bootargs environment variable, so we can change the value of root to NFS mount. There are corresponding documents in the Linux kernel source code to explain how to set it. The document is documentation / filesystems / NFS / nfsroot Txt in the following format:
root=/dev/nfs nfsroot=[<server-ip>:]<root-dir>[,<nfs-options>] \
ip=<client-ip>:<server-ip>:<gw-ip>:<netmask>:<hostname>:<device>:<autoconf>:<dns0-ip>:<dns1-ip>

<server-ip>: The server IP The address of the host where the root file system is stored IP Address, that's Ubuntu of IP Address,
Like mine Ubuntu host IP The address is 192.168.0.112.
<root-dir>: The storage path of the root file system, such as mine/home/xzj/Linux/nfs/rootfs.
<nfs-options>: NFS Other optional options for are generally not set.
<client-ip>: client IP Address, which is the address of our development board IP Address, Linux It will be used after the kernel starts
 this IP Address to configure the development board. My development board ip Set to 192.168.0.113.
<server-ip>: The server IP The address has been mentioned earlier.
<gw-ip>: Gateway address, mine is 192.168.0.1.
<netmask>: Subnet mask, mine is 255.255.255.0.
<hostname>: The name of the client, which is generally not set, can be left blank.
<device>: The device name, that is, the network card name, is generally eth0,eth1....,My development board network card name is eth0.
<autoconf>: Automatic configuration, generally not used, so it is set to off.
<dns0-ip>: DNS0 The server IP Address, not used.
<dns1-ip>: DNS1 The server IP Address, not used.
According to the above format, the root value of the bootargs environment variable is as follows:
root=/dev/nfs nfsroot=192.168.0.112:/home/xzj/Linux/nfs/rootfs,proto=tcp rw ip=192.168.0.113:192.168.0.112:192.168.0.1:255.255.255.0::eth0:off
Then go to the server and start NFS service, that is, ubuntu. The command is as follows:
sudo /etc/init.d/nfs-kernel-server restart
Finally, restart the development board and wait to enter the root file system.