SSO client design
Next, the implementation of SSO client security authentication is encapsulated through the module merchant security, so that each client application accessing SSO can refer to it.
Project management configuration for security certification
The project management of SSO client security authentication uses the following dependency configuration:
<dependencies>
<dependency>
<groupId>com.demo</groupId>
<artifactId>merchant-client</artifactId><version>${project.version)</version></dependency>
<dependency>
<groupId>org.springframework.cloud</groupId>
<artifactId>spring-cloud-starter-oauth2</artifactId></dependency>
<dependency>
<groupId>org.springframework.boot</groupId>
<artifactId>spring-boot-starter-data-redis</artifactId></dependency>
</dependencies>
This configuration not only refers to the Spring Cloud OAuth 2 component to realize the security management and authentication functions of the application, but also refers to the merchant client module to provide the function of calling the merchant service interface, and the Spring Boot Redis component to provide the function of using cache.
Configuration class of security authentication project
Enabling the authentication function of Spring Security in the SSO client is mainly realized through a configuration class. As shown in the following code, we create a configuration class SecurityConfiguration, which inherits from
WebSecurityConfigurerAdapter:
@Configuration
@EnableOAuth2Sso
@EnableConfigurationProperties (SecuritySettings.class)
public class SecurityConfiguration extends webSecurityConfigurerAdapter{
@Autowired
private AuthenticationManager authenticationManager;@Autowired
private SecuritySettings settings;
@Autowired
private RoleRestService roleRestService;@Autowired
private RedisCache redisCache;
@Bean(name = BeanIds.AUTHENT ICATION MANAGER)Goverride
public AuthenticationManager authenticationManagerBean() throws Excepti
return super.authenticationManagerBean();
)
@override
public void configure(HttpSecurity http) throws Exception
http.antMatcher("/**")
.authorizeRequests()
.antMatchers( "/login**").permitAll()
.antMatchers(settings.getPermitall()). permitAll()
.anyRequest()
.authenticated()
.and ().csrf().requireCsrfProtectionMatcher (csrfSecurityRequest
Matcher())
.csrfTokenRepository (csrfTokenRepository()) .and()
.addFilterAfter (csrfHeaderFilter(),CsrfFilter.class).logout()
.logoutUrl("/logout").permitAll()
.logoutSuccessUrl(settings.getLogoutsuccssurl()).and()
.exceptionHandling().accessDeniedPage (settings.getDeniedpage();
}
@Bean
public CustomFilterSecurityInterceptor customFilter() throws Exception t
CustomFilterSecurityInterceptor customFilter = new
CustomFilterSecurityInterceptor();
customFilter.setSecurityMetadataSource (securityMetadataSource());customFilter.setAccessDecisionManager(accessDecisionManager());
customFilter.setAuthenticationManager(authenticationManager);
return customFilter;
}
@Bean
public CustomAccessDecisionManager accessDecisionManager() {
return new CustomAccessDecisionManager();
}
@Bean
public CustomSecurityMetadataSource securitywetadataSource(){
return new CustomSecurityMetadataSource(roleRestService,redisCache) ;
}
}
This configuration class mainly realizes the following functions:
(1) Use the annotation @ EnableOAuth2Sso to enable the SSO client function of the application.
(2) Use some custom security configurations by overriding the configure method. Among them, SecuritySettings is a custom configuration class, which provides setting parameters such as link configuration upon successful exit, link configuration allowed and link configuration denied.
(3) In the configuration, several other custom designs starting with custom are introduced through a custom filter customFilter, including security management metadata and permission management verification.
Authority management verification design
The design of user authority verification is mainly composed of two parts: security resource metadata management and user access resource authority inspection.
Create a security resource metadata management class
CustomSecurityMetadataSource realizes the design of security resource metadata management. The code is as follows:
public class CustomSecurityMetadataSource implementsFilterInvocationSecurityMetadatasource{
private static final Logger logger =
LoggerFactory.getLogger (CustomSecurityMetadataSource.class);
public static final String MERCHANT CENTER ROLES ALL="MERCHANT_ CENTER ROLES ALL";
private PathMatcher pathMatcher = new AntPathMatcher();
private RoleRestService roleRestService;private RedisCache rediscache;
coverride
public Collection<ConfigAttribute> getAllConfigAttributes()
return null;
public CustomSecurityMetadataSource (RoleRestService roleRestSeRedisCache redisCache) {
super();
this.roleRestService = roleRestService;this.redisCache = redisCache;
private List<RoleQ0> loadResourceWithRoles()i
String roles = roleRestService.findList();
List<RoleQ0> list = new Gson().fromJson (roles, new
TypeToken<List<RoleQ0>>() {]}.getType());
if(list !=null) {
redisCache.set (MERCHANT_CENTER_ROLES_ALL + "LIST",list,
180);
}
return list;
}
@override
public Collection<configAttribute> getAttributes(0bject object)
throws IllegalArgumentException {
String url = ((FilterInvocation) object).getRequestUrl();
//logger.info("request resource:
er.info("Request resources:"
url);
//First get the role list from the cache
0bject objects = redisCache.get (MERCHANT CENTER ROLES ALL + "LIST");List<RoleQo> roleQoList = null;
if(CommonUtils.isNull(objects)) {
roleQoList = loadResourceWithRoles();/ /If the cache does not exist, the API Middle reading angle
//Color list
]else{
roleQoList=(List<RoleQo>)objects;
}
Collection<ConfigAttribute> roles = new ArrayList<>();//List of roles with permission
//Check the resources of each role. If they match the requested resources, they will be added to the role list. Provide basis for later permission check
if(roleQoList !=null && roleQoList.size() >0){
for (RoleQo role0o :roleQoList) {//Circular role list
List<ResourceQo> resourceQos = roleQo.getResources();if(resourceQos != null &&resourceQos.size() >0)
for (ResourceQo resourceQo :resourceQos){//Circular resource list
if(resourceQo .getUrl()!=null &&
pathMatcher.match (resourceQo. getUr1()+"/**",url)){
ConfigAttribute attribute =new
SecurityConfig(roleQo.getName());
roles.add(attribute);
logger.debug("Add permission role list===Role resources:{,Role name:
{}=-=", resourceQo.getUrl(),roleQo.getName ());
break;
}
}
}
}
}
return roles;
}
}
In this design, mainly through rewriting
The getAttributes method of FilterInvocationSecurityMetadataSource checks whether there are matching permission settings in the role list of the system from the URL resources accessed by the user.
If it exists,
Then it will be stored in a role list of security metadata. This list will provide the basis for later permission check
It can be seen from here that for a resource, if we do not specify which role can be accessed, all users can access it.
Because the metadata management of resources uses the method of dynamic loading, the permission management of users can also be updated online. At the same time, the access performance of metadata is improved with the help of cache technology.
With the metadata management of security resources, we can check the user's behavior in real time.
Create an implementation class for permission check
CustomAccessDecisionManager, which checks whether a user has permission to access resources in real time. This class implements AccessDecisionManager. The code is as follows:
public class CustomAccessDecisionManager implements AccessDecisionManager {
private static final Logger logger =
LoggerFactory.getLogger (CustomAccessDecisionManager.class);
@Override
public void decide (Authentication authentication,0bject object,
Collection<ConfigAttribute>configAttributes)
throws AccessDeniedException,InsufficientAuthenticationExceptionif(configAttributes == nul1){
return;
}
//Get the role set required for requesting resources from CustomSecurityMetadataSource (getAttributes). Iterator < configattribute > iterator = configattributes iterator();
while (iterator.hasNext()){
ConfigAttribute configAttribute= iterator.next();//Roles with access to resources
String needRole = configAttribute.getAttribute();logger.debug("Roles with permissions:" +needRole);
//Check whether there are matching roles in the permissions owned by the user
for (GrantedAuthority ga : authentication.getAuthorities())1
if (needRole.equals(ga.getAuthority())) {
return;
}
}
}
//If all user roles do not match, the user does not have permission
throw new AccessDeniedException("No access!");
}
}
In this design, the role in the security management metadata is compared with the user's role by rewriting the decision method of access decision manager. If the user's role matches the role of the metadata, it indicates that the user has access rights, otherwise the user has no access rights.
Client application access sso
With the security management encapsulation of SSO client, for a Web application that needs to access sso, you can use the function of SSO by adding a reference to the security management component of SSO client in the project management configuration of the application.
Let's take merchant web as an example. Other Web UI applications can access SSO by referring to this method. In the merchant management background, the client applications that need to access SSO include inventory management, order management, logistics management, etc., which can be determined according to the actual needs.
First, reference the encapsulated component of SSO client security management in project configuration management. The code is as follows:
<!--Single sign on--><dependency>
<groupId>com.demo</groupId>
<artifactId>merchant-security</artifactId><version>${project.version)</version>
</dependency>
Because it is referenced in the same project, the version number of the project is used. If it is referenced by other applications, change the above version to 2.1-SNAPSHOT.
Secondly, in the application configuration file application YML uses the following settings:
spring:redis:
host: 127.0.0.1port: 6379
security:
oauth2:
client:
client-id: ssoclient
client-secret: ssosecret
access-token-uri: http://localhost:8000/oauth/token
user-authorization-uri: http://localhost:8000/oauth/authorizeresource:
token-info-uri:http://localhost:8000/oauth/check token
securityconfig:
logoutsuccssurl:/tosignoutpermitall:
- /test/large★
- /actuator/*large deniedpage: /deny
ssohome: http://localhost:8000/
redis uses the local server, security Oauth2 configuration items are some configuration parameters used by Spring Cloud OAuth2 components. We use these parameters to set clientld and clientSecret, that is, the client ID and key set in the SSO server design configuration class. accessTokenUri and userAuthorizationUri are used to specify the endpoint for obtaining tokens and authenticating, respectively.
The settings under the securityconfig configuration item are set by several custom configuration parameters provided by the configuration class SecuritySettings. Among them, ssohome provides a link to the SSO home page for the client application accessing SSO.
In addition to the above configurations, for Web applications connected to sso, some adjustments need to be made in data editing and management to ensure that the creation and editing of data can be submitted normally. In addition, applications connected to SSO can also automatically assign menus according to user permissions.
Related settings for cross site requests
After using Spring Security, you must add the relevant settings of Cross Site Request Forgery defense in the page to submit the form normally when creating or editing data. Otherwise, the request for form submission will be denied access.
First, unify in the page template loyout Add the following code to the header of HTML:
<meta name=" csrf" th:content="${csrf.token}"/>
<meta name=" csrf header" th:content="$ { csrf,headerName }"/>
Then in a public call public.js Add the following code to receive the transfer parameters from the page:
$(function (){
var token = $("meta [name='_csrf']").attr( "content");
var header = $ ("meta[name='csrf header']").attr("content");$ (document).ajaxSend(function (e, xhr, options) {
xhr.setRequestHeader (header, token);
});
});
The purpose of this is to enable the background to verify the legitimacy of page form submission, so as to protect the data submission.
Automatically assign menus according to user permissions
By logging in the user's associated object, we can obtain a user's menu list, so that the user's system menu can be automatically assigned according to the user's permission.
The implementation method shown below is used in the application home controller UserController:
@Controller
@RequestMapping("/user")
public class UserController extends BaseController{
CRequestMapping("/index")
public String index (ModelMap model,Principal user, HttpServletRequestrequest) throws Exception {
List<ModelQo> menus = super.getModels(user.getName(), request);model.addAttribute("menus", menus);
model .addAttribute("user",user);
model .addAttribute("ssohome", ssohome);return "user/index";
}
}
Among them, getModels is the specific implementation of obtaining user menu, and the code is as follows:
public abstract class BaseController {
private PathMatcher pathMatcher = new AntpathMatcher();
@Autowired
private UserRestService userService;
@value("${spring. application.name} ")private string serviceName;
public List<ModelQo> getModels (String userName,HttpServletRequestrequest){
//Get user object according to login user
String json = userService.findByName (userName) ;
UserQo user = new Gson().fromJson (json,UserQo.class);
//Obtain the list of modules (secondary menu) according to the matching classification
List<ModelQo> modelList = new ArrayEist<>();List<Long>modelIds = new ArrayList<>();
for(RoleQo role : user.getRoles()){
for(ResourceQo resource : role.getResources()){
String link = resource.getModel().getKind ().getLink ();//Category top
//Menu link
//Get the module list and remove the duplicate
if(! modelIds.contains (resource.getModel().getId())
& & pathMatcher.match(serviceName, link)){
modelList.add(resource. getModel ());
modelIds.add(resource.getModel().get Id());
}
}
}
return modelList;
}
}
First, find out the list of resources associated with users from their roles; Then find out the module objects matching the current application name from each resource. Finally, the module list obtained after de rearrangement is an application menu system.
By using this module list, you can NAV on the navigation page of the application HTML uses the design as shown below to cycle the output menu:
<ul>
<li th:each="model:$ {menus}"><a th:classappend="${page ==
'$ {model.host}' ? 'currentPageNav': '')"th:href="e{${model.host}}"th: text="$ {model.name } "></a></li>
</ul>
Through these designs, the function of automatically assigning menus according to user permissions can be realized. After completing the above development, you can test it.
First, confirm that the registry has been started, and then start the merchant rest API Application, merchant SSO application and merchant web application respectively.
After all applications are started successfully, open the link of the merchant system Web application through the browser: http://localhost:8081
After opening the link, enter the user name and password generated in the previous unit test in the pop-up login interface to log in.
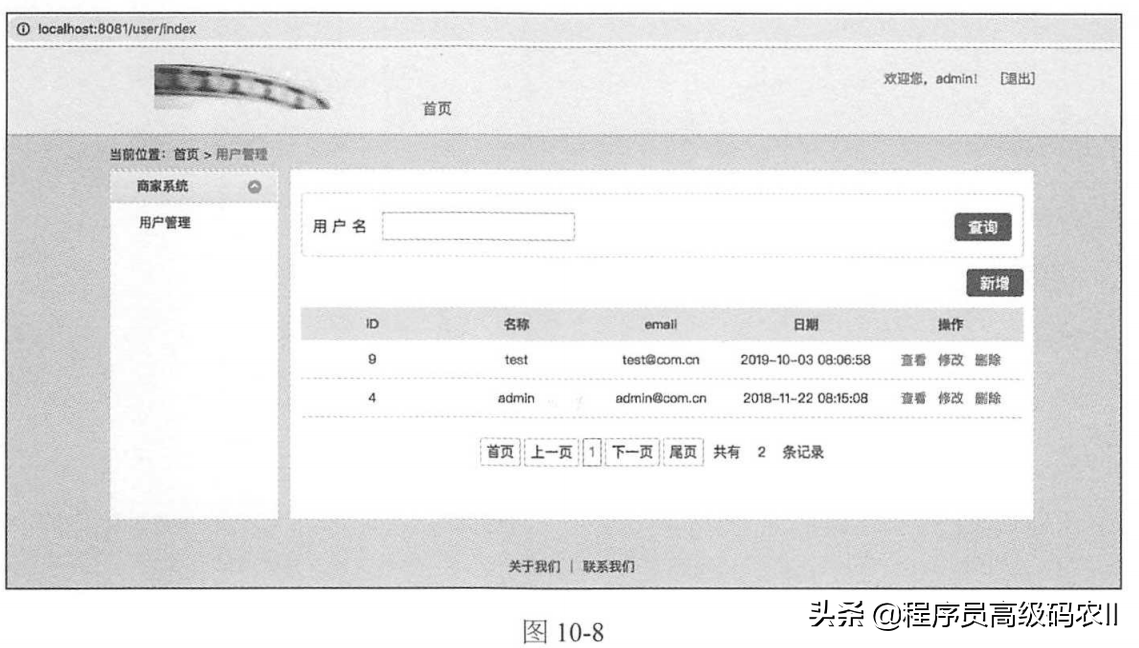
After successful login, you can open the home page of merchant web application of merchant system.
The merchant system has only one user management function, so its home page is shown in Figure 10-8. Here, the merchant administrator can operate user management.
Summary
This chapter can be used in the distributed micro service application group information team platform through the first knowledge limit management of business rag partnership version. Through unified permission management, business users can use any other connected information in the distributed environment
Application. In a more perfect way, the background design of business management combines various decentralized microservice applications into a functional whole, which fully reflects the powerful advantages of microservice architecture design.
Among them, the merchant authority system design establishes a three-level menu system based on accessing resources, and combines user authority and menu into an organic whole through the relationship between roles and resources.
The role of the merchant and the management configuration of its menu must be operated by the platform operator. In the development of the platform management background in the next chapter, the function of managing the permission configuration of merchants will be realized.
This article explains the content of business management background and SSO design: SSO client design
- The next article will explain the platform management background and business menu resource management;
- Friends who think the article is good can forward this article and pay attention to the Xiaobian;
- Thank you for your support!