C# learning
introduction
0.0 C# in visual studio 2019 environment
1. Basic data types
1.1 create C# console application and run it
1. Click file - > New - > project

2. Select console application - > click Next - >
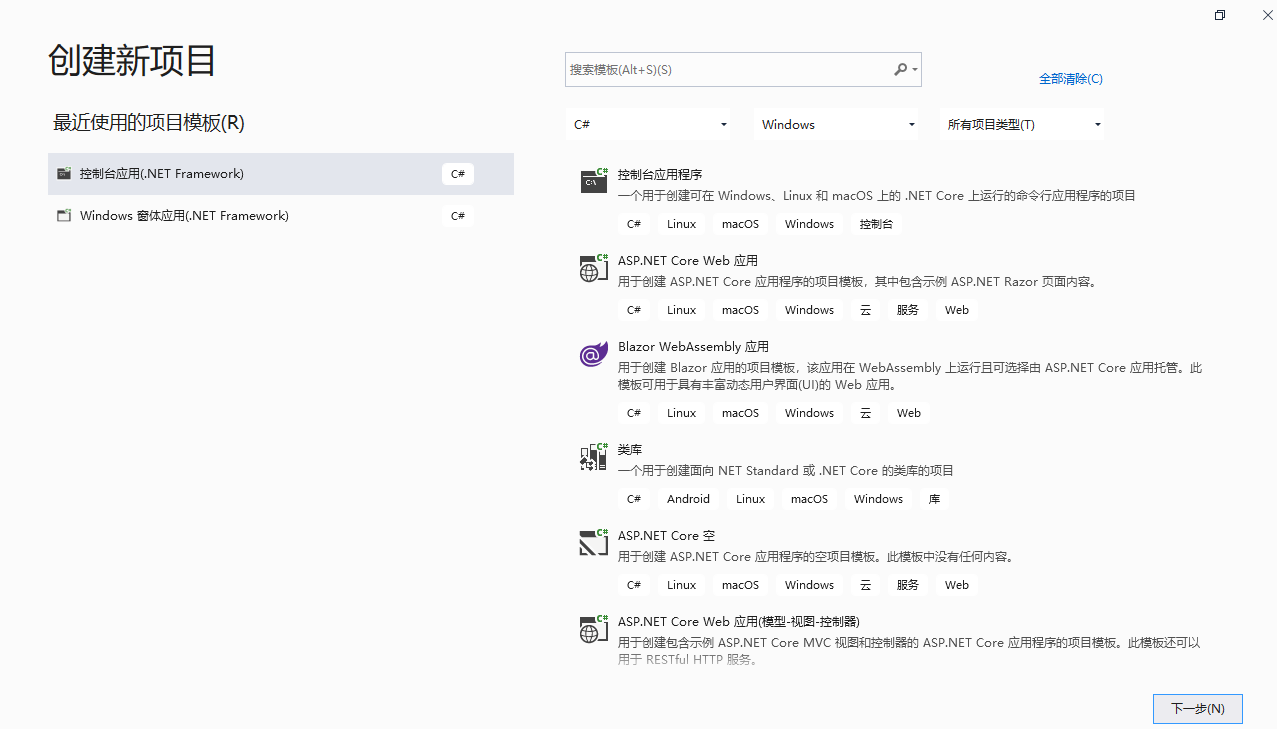
3. You can change the project name - > project solution - > select the appropriate architecture - > click create
 4. After opening, type the following program, and the comments are the explanation of data type and precautions
using System;
using System.Collections.Generic;
using System.Linq;
using System.Text;
using System.Threading.Tasks;
//1.using namespace uses some class library files
//Namespace: namespace:


//Namespace: used for zone classification

namespace ConsoleApp1
{//Class is a class
    class Program
    {
        //Static: static; void: no type is returned; Main: door; string[] args: parameter;
        //There is also a door in the program; Unable to move, it is the entrance of the program; The parameter is the doorman. You need to register
        static void Main(string[] args)
        {
            //Data type;
            int age = 18;
            float height = 1.8F;//F should be added after float type;
            double weight = 120;//c# is the default decimal and is of double type
            char flag = 'Y';//Character type that encloses data in single quotes
            bool biaozhi = true; //bool: true and false
            //String type:
            String name = "zhangsan";//String is double quotation mark;
            //Write line wrap
            Console.Write(name);
            Console.Write(age);
        }
    }
}
5. Enter the above program and click Run
How to run: there is a "start debugging" in the debugging menu at the top, and the shortcut key is F5; But it will flash by
Don't want to flash: Ctrl+F5L: start debugging
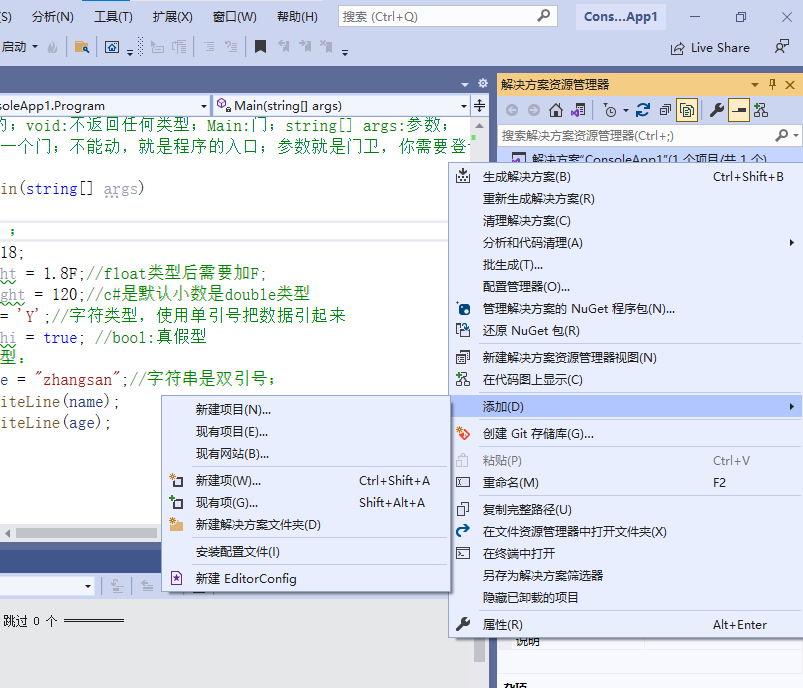
1.2 add a new console application in the same solution
1. Click solution - > Add - > new project - > pop up console to operate
1.3 basic input and output statements
using System;
using System.Collections.Generic;
using System.Linq;
using System.Text;
using System.Threading.Tasks;

namespace ConsoleApp2
{
    class Program
    {
        static void Main(string[] args)
        {
            //1. Define variables and assign values;
            Console.Write("Please enter the radius of the circle:");
            double r;
            r = Console.Read();
            const double PI = 3.1415926;//Constants are defined using const; Constant name: uppercase;
            double s = PI * r * r;
            Console.WriteLine(r + "The area is" + s);
        }
    }
}
1.4 placeholders
Before that, use + to connect variables and strings;
{0}, {1} – > variable 1, variable 2
Output rules: see code snippet
Keywords: int.Parse (Console.ReadLine()); the read data is forcibly converted to 32 integer
using System;
using System.Collections.Generic;
using System.Linq;
using System.Text;
using System.Threading.Tasks;

namespace ConsoleApp3
{
    class Program
    {
        static void Main(string[] args)
        {
            //Placeholder: add, subtract, multiply, and divide two numbers
            int num1, num2;
            Console.WriteLine("Please enter the number 1:");
            num1 = int.Parse(Console.ReadLine()); //Convert string to int type;
            Console.WriteLine("Please enter the number 2:");
            num2 = int.Parse(Console.ReadLine()); //Convert string to int type;
            //2. Output rule: {0} corresponds to the first variable and {1} corresponds to the second variable
            Console.WriteLine("{0}+{1}={2}", num1, num2, (num1 + num2));
            Console.WriteLine("{0}*{1}={2}", num1, num2, (num1 * num2));
           // Console.ReadLine(); / / add this to prevent the command line window from flashing
        }
    }
}
1.5 string and cast
1.5.1 string related operations
Key operations: whether to include, find, replace, insert, delete, case conversion, string formatting
using System;
using System.Collections.Generic;
using System.Linq;
using System.Text;
using System.Threading.Tasks;

namespace ConsoleApp5
{
    class Program
    {
        static void Main(string[] args)
        {

            String str = "It's a fine day today. I was criticized by my teacher";
            Console.WriteLine(str.Contains("Nest tender fold"));//Returns whether the string is included. If TRUE, False, and vice versa
            Console.WriteLine(str.EndsWith("Tender fold"));//Returns whether it ends with something
            Console.WriteLine(str.StartsWith("today"));//Returns whether it starts with something
            Console.WriteLine(str.IndexOf("individual"));//Returns the first occurrence of this character
            Console.WriteLine(str.Insert(3, "Sunny innocence is"));//Inserts a character at the specified position
            Console.WriteLine(str.LastIndexOf("individual"));//Returns the position of the last occurrence of this character
            Console.WriteLine(str.Remove(3));//Delete all strings after position 3
            Console.WriteLine(str.Replace("Nest tender fold", "Wo Nen Ye")); //The corresponding string replacement nest tender stack is replaced by nest tender
            Console.WriteLine("Abcd".ToUpper());//Convert to uppercase
            Console.WriteLine("ABCd".ToLower());//Convert to lowercase
            Console.WriteLine(str.Substring(3, 5));//3: Starting position 5; intercepted length
            //Format string: {0}, {1}, {2}
            //Format (string plus placeholder, value 1, value 2,..., value n)
            String name = "Zhao Junjie";
            int age = 88;

            String str2 = String.Format("Our monitor is{0},Age:{1}", name, age);
            //The whole formatted string can be used by the console and games; winform can also be used;
            //More convenient value transmission
            Console.WriteLine(str2);
            Console.Read();

        }
    }
}
1.5.2 type conversion
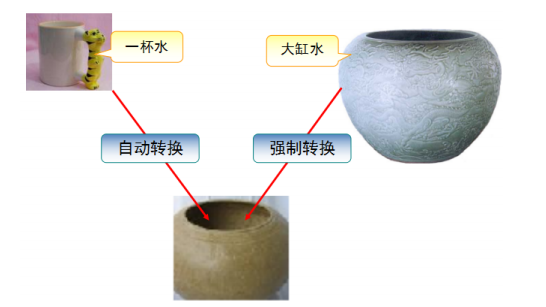
1. Image Illustration of type conversion
Implicit conversion: it can be automatically converted from small to large. For example, int - > double will not report an error
If you convert from large to small, an error will be reported. For example, double - > int cannot be compiled. In this case, you need to force (display) conversion
Display conversion: cast, see code
Type conversion: convert string to integer int. parse (s) see code
using System;
using System.Collections.Generic;
using System.Linq;
using System.Text;
using System.Threading.Tasks;

namespace ConsoleApp6
{
    /// <summary>
    ///Type conversion: C# type; integer - > floating point; string type
    /// </summary>
    class Program
    {
        static void Main(string[] args)
        {
            //1. Implicit conversion (automatic conversion)
            int age = 20;
            double age2 = age;
            Console.WriteLine(age);
            Console.WriteLine(age2);
            //2. Display conversion
            double height = 20.89;
            int height2 = (int)height;//Because the double type is relatively large
            //Add a small type before the large type
            Console.WriteLine(height);
            Console.WriteLine(height2);//The problem is data loss
            //3. Type conversion:
            String s = "22";
            int num2 = int.Parse(s);//parse (string parameter)
            Console.WriteLine(num2);

            int num3 = Convert.ToInt32(s);
            Console.WriteLine(num3); //The result output is 22

        }

    }
}
1.6 array format usage
Syntax format: data type [] array name = new data type length []
int[] age = new int[3];//The length of the array is 3;
Assignment of array:
Array name [subscript] = value
score[0] = 88;
using System;
using System.Collections.Generic;
using System.Linq;
using System.Text;
using System.Threading.Tasks;

namespace ConsoleApp7
{
    class Program
    {
        static void Main(string[] args)
        {
           //1. Define array length
            String[] names = new String[5];
            int[] salary = new int[5];
            // String[] names = new String[5] {"on", "Fa Shunfeng", "launch point of", "ADA", "zoom in"}; / / curly braces define the array
            //  for (int i = 0; i < names.Length; i++)
            //  {

            //    Console.WriteLine(names[i]);
            // }
            //2. Input
            for (int i = 0; i < names.Length; i++)
            {
                Console.WriteLine("Please enter page{0}Names of students:", i + 1);
                names[i] = Console.ReadLine();
                Console.WriteLine("Please enter page{0}Salary of students:", i + 1);
                salary[i] = int.Parse(Console.ReadLine()); //int.Parse(s) type conversion converts a character type to an integer type
            }

            //3. Output
            for (int i = 0; i < names.Length; i++)
            {
                Console.WriteLine("name:{0} Salary:{1}", names[i],salary[i]); //Output name and salary with placeholder
            }

        }
    }
}
2. Form control
2.1 concept of form and creation of form application
Windows: windows; visualization window;
2. Create a new project - > select windows form application (. Net framework) - > click Next - > write the corresponding name and storage location

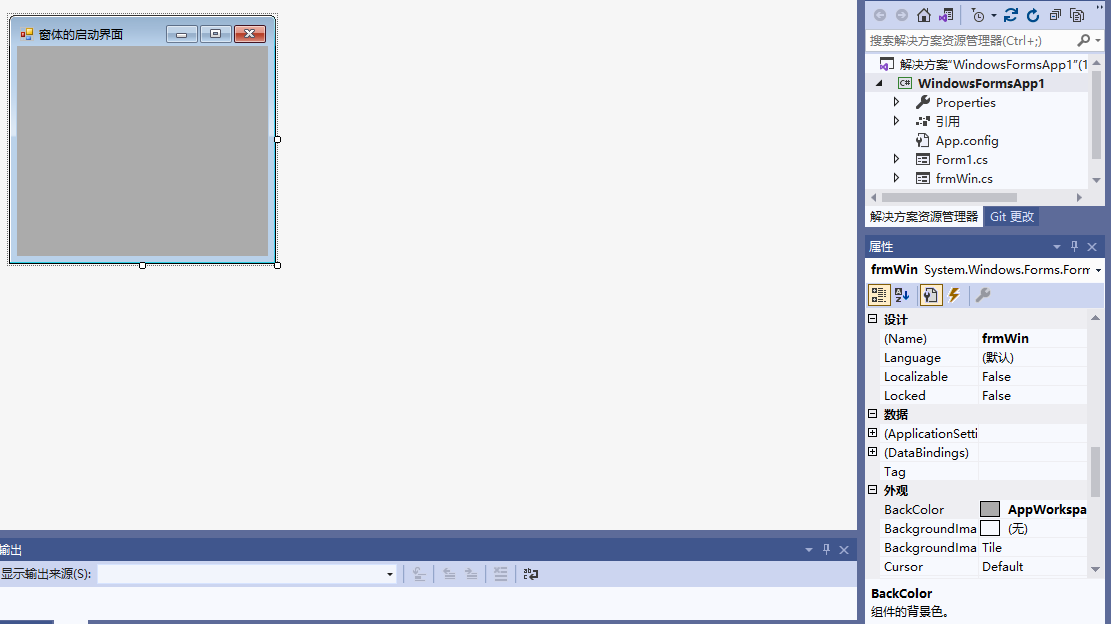
2.2 create a new form application in the solution and change some properties
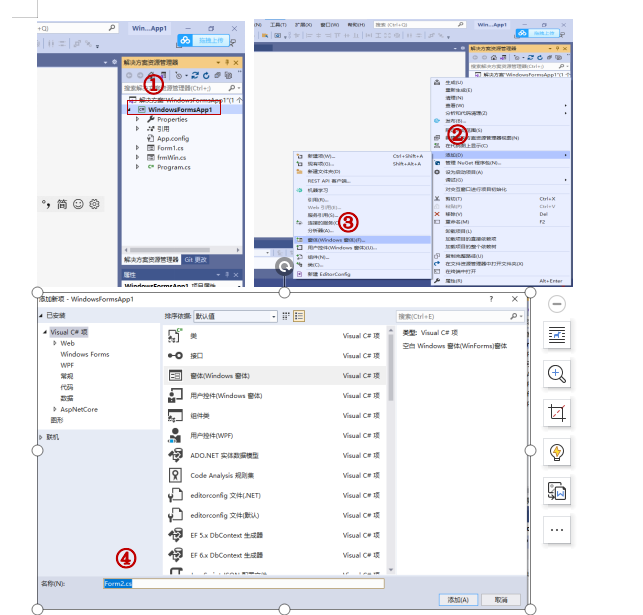
1. Click ① - project name > Click ② add - > Click ③ windows form - > Click ④ to change the name of window form application
2. Many things in the form application can be changed in the properties (right click the form - > click the properties to change the relevant contents, such as the title text and BackColor of the form)

3. To start the written form, you need to use the form application on new in the main program
4. The start position of the form can also be set in the properties of the form: startPosition:CenterScreen. All kinds of things can be used; MaxmizeBox: whether the maximize button is available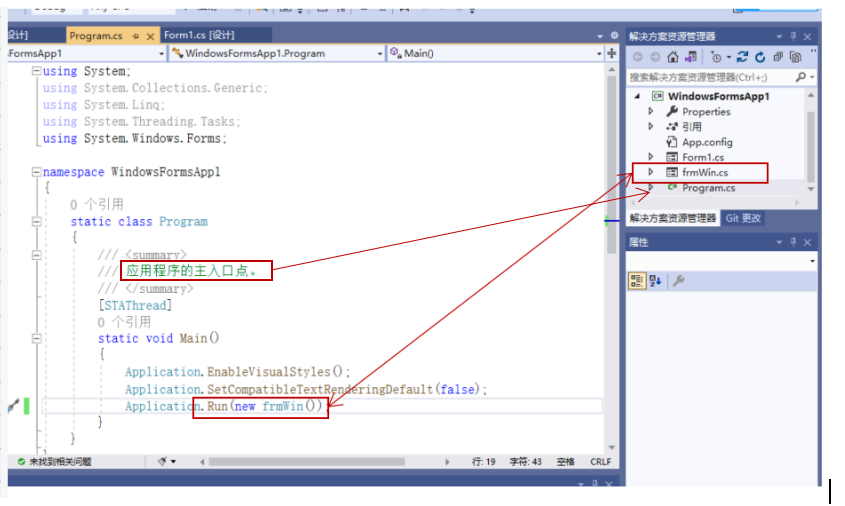
2.3 create a login interface
2.3.1 toolbox
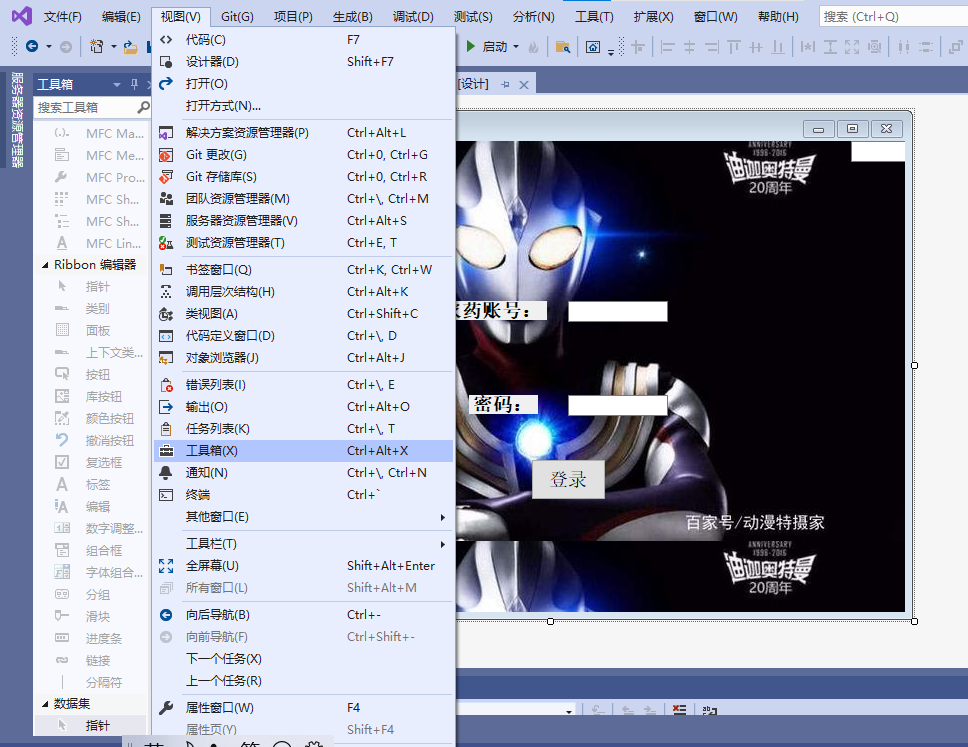
1. Call out the toolbox interface - > click View in the menu bar - > Click toolbox to see the toolbox
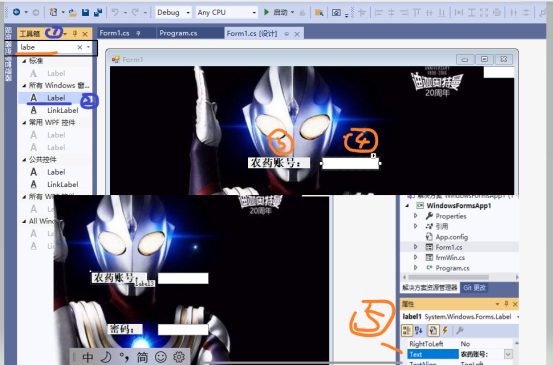
2. The toolbox can add various controls. For example, enter label at ① to call up the label control to the form, and right-click to change various properties of the control.
① : add a search bar to the toolbox
② : select a control and press and hold crtl to add controls continuously
③ : label control
④ : txtBox control
⑤ : the properties of the control, (the color, position, name of the control, and the content displayed in the control text. Note that the control name is different from the content displayed in the control text)
The function that is called after pressing the login button.
        private void button1_Click(object sender, EventArgs e)
        {
            // MessageBox.Show(txtName.Text); / / pop up box;
            // MessageBox.Show(txtPwd.Text); / / pop up box;


            String name = txtName.Text;//Define two variables to accept the user name text box and password box
            String pwd = txtPwd.Text;

            if (name.Equals("83193980") && pwd.Equals("88889999"))
            {
                MessageBox.Show("Login succeeded");
            }
            else
            {
                MessageBox.Show("Login failed");

            }

        }
2.4 list box and list combination
2.4.1 list box
1. Select the project under the solution - > right click - > add form application - > change the name to firmListBox to create it
2. enter ListBox in the toolbox, list the box in the form, right-click the list box, and view properties.
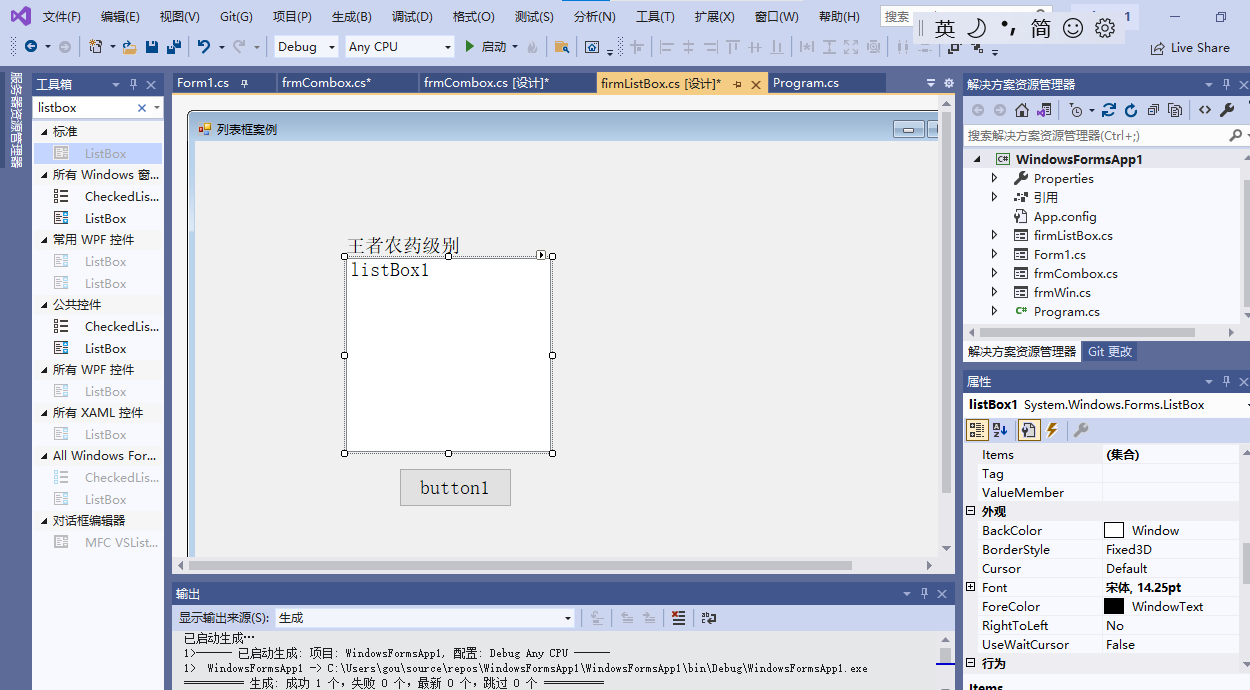
3. Click the window to enter the event loading (firmListBox_Load()), and the following code can be loaded.
Key view code: listBox1.Items.Add("bronze"); listBox1.SelectedIndex listBox1.Items.Count listBox1.SelectedItem
using System;
using System.Collections.Generic;
using System.ComponentModel;
using System.Data;
using System.Drawing;
using System.Linq;
using System.Text;
using System.Threading.Tasks;
using System.Windows.Forms;
namespace WindowsFormsApp1
{
public partial class firmListBox : Form
{
public firmListBox()
{
InitializeComponent();
}
private void checkedListBox1_SelectedIndexChanged(object sender, EventArgs e)
{
}
/// <summary>
///Load: load event; If it is not displayed, load it into memory first;
/// </summary>
/// <param name="sender"></param>
/// <param name="e"></param>
private void firmListBox_Load(object sender, EventArgs e)
{
//attribute
//1.Item: items: a collection of all items
listBox1.Items.Add("bronze");
listBox1.Items.Add("silver");
listBox1.Items.Add("gold");
listBox1.Items.Add("Diamonds");
listBox1.Items.Add("King");
//2.
}
private void label1_Click(object sender, EventArgs e)
{
}
private void listBox1_SelectedIndexChanged(object sender, EventArgs e)
{
}
/// <summary>
///Double Click the button here and Click will appear
/// </summary>
/// <param name="sender"></param>
/// <param name="e"></param>
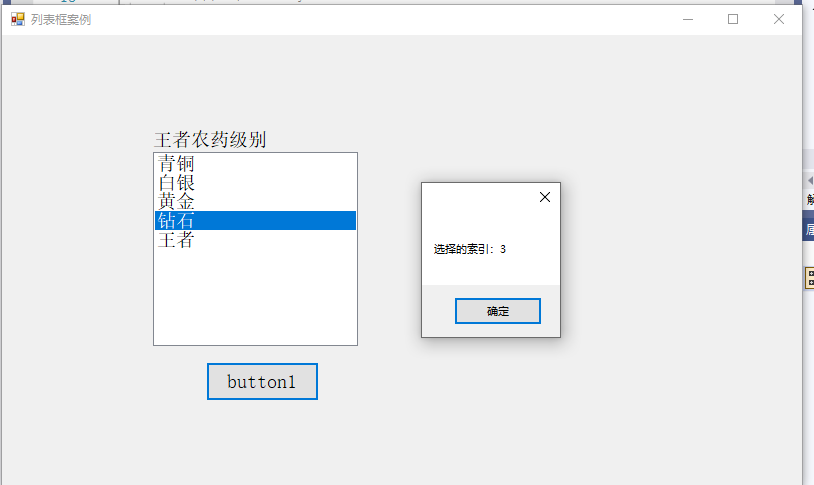
private void btnXuanze_Click(object sender, EventArgs e)
{
MessageBox.Show("Selected index:" + listBox1.SelectedIndex);
//When there is no choice, it is - 1: from; 0 start; Length to items - 1
MessageBox.Show("Number of list items:" + listBox1.Items.Count); //number;
MessageBox.Show("Your choice is:" + listBox1.SelectedItem); //Selected items
}
private void listBox2_SelectedIndexChanged(object sender, EventArgs e)
{
}
}
}
The execution effect is as follows. Note that the form to be executed should be added to the main function before execution

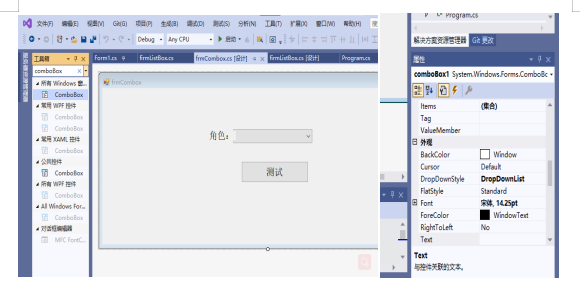
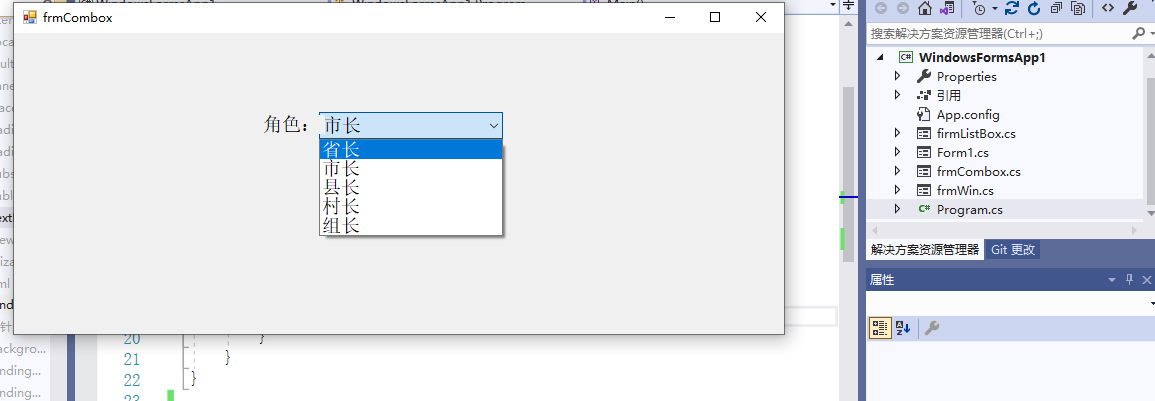
2.4.2 list combination
Add corresponding controls to the toolbar as in 2.4.1. Note that the options in the list combination control can not be changed. You need to change the things in DropDownStyle to
DropDownList.
Run code:
using System;
using System.Collections.Generic;
using System.ComponentModel;
using System.Data;
using System.Drawing;
using System.Linq;
using System.Text;
using System.Threading.Tasks;
using System.Windows.Forms;

namespace WindowsFormsApp1
{
    public partial class frmCombox : Form
    {
        public frmCombox()
        {
            InitializeComponent();
        }
        /// <summary>
        ///Loading events for forms
        /// </summary>
        /// <param name="sender"></param>
        /// <param name="e"></param>
        private void frmCombox_Load(object sender, EventArgs e)  //comboBox control loading event
        {
            comboBox1.Items.Add("Governor");
            comboBox1.Items.Add("mayor");
            comboBox1.Items.Add("county magistrate");
            comboBox1.Items.Add("village head");
            comboBox1.Items.Add("group leader");

        }
        private void label1_Click(object sender, EventArgs e)
        {

        }

        private void button1_Click(object sender, EventArgs e)
        {

        }
    }
}
Operation results:
2.5 picture box
2.5.1 toolbox related controls
1.Panel
2.PictureBox
Add order: add the Panel first, and then add the PictureBox on the Panel. As shown in the figure, the large box is the PictureBox in the Panel. You can add pictures
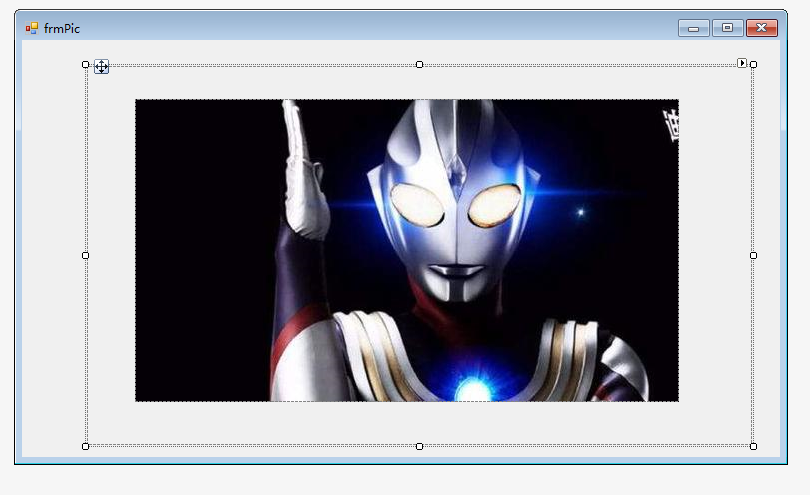
2.5.2 make an album
Related knowledge points: how to display multiple pictures in chronological order on the form
1. Click the project under solution (windowsFormsApp1)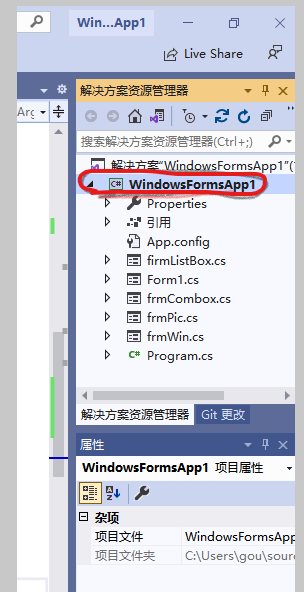
2. Right click to pop up the following interface. Click to open the folder in the file explorer

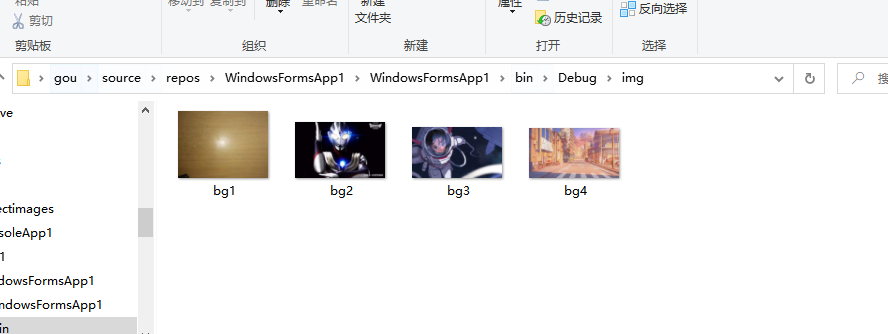
3. After opening the folder, the following interface pops up, click Bin - > debug - > img (need to create) - > add the picture to be displayed in img - > change the name of the picture to display with string
4. Find a button control and add the following code
    private void button1_Click(object sender, EventArgs e)
        {
            //There is such an attribute;
            // MessageBox.Show(pictureBox1.Image);
            i++;
            //pictureBox1.ImageLocation = "img/bg2.jpg";
            pictureBox1.ImageLocation = String.Format("img/bg{0}.jpg", i); //The ImageLocation property adds a picture path
            if (i == 3)
            {
                i = 0;
            }

        }
2.6 about C#(vs2019) code structure
using System;
using System.Collections.Generic;
using System.ComponentModel;
using System.Data;
using System.Drawing;
using System.Linq;
using System.Text;
using System.Threading.Tasks;
using System.Windows.Forms;
//1.using some class library files using namespace
//2.namespace: namespace; Distinguish different spaces
namespace WindowsFormsApp1
{
    //Public: public partial: some class classes;
    public partial class frmPic : Form
    {
2.7 call between forms and use of message box
Function Description: one login interface is form 1, and one photo album interface is form 2. After successful login, form 1 jumps to form 2 interface, hides form 1, and automatically returns to form 1 after form 2 is closed.
Call the relevant code of the form:
new a form control, and then display it.
 Form1 myPic = new Form1(); //For a new form, Form1 needs a new form
       myPic.Show();//Just show it
       this.Hide();  //Hide this window
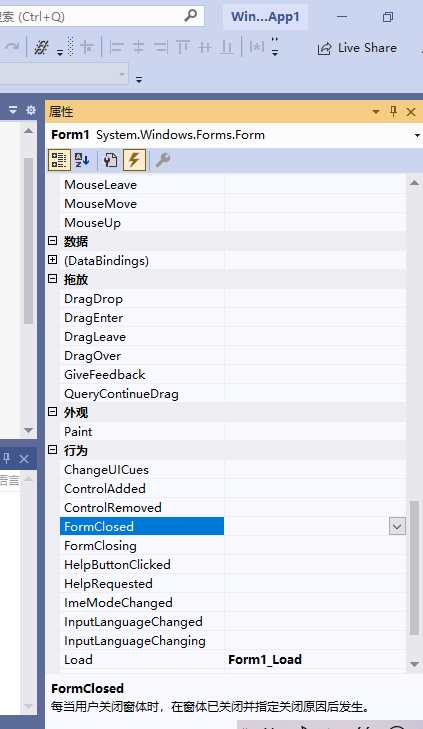
To add events to the form, you can click the lightning logo in the form property bar. Double click and click in to see the following code.
   private void frmPic_FormClosed(object sender, FormClosedEventArgs e)
        {
            Form1 myPic = new Form1(); //new form is required for the form
            myPic.Show();//Just show it
            this.Hide();  //Hide this window
           //You can also use Application.exit(); The application exited.
           //You can also pop up a message box when you close the window
             //Whether to close the pop-up dialog box when closing
            DialogResult result = MessageBox.Show("Close");
            Console.WriteLine(result);
        }
2.8 use of message box
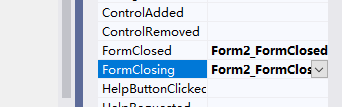
Steps: 1. Right click the form – > select Properties – > find the Lightning Arrow (indicating an event) – > add FormClosing (see the following figure. Double click to enter the interface of adding code)
2. Add the following code:
Code e: event parameter object. See the parameter FormClosingEventArgs e in the first line of the code
e.Cancel in event form2_ It cannot be used in formclosed because this event indicates that it has been cancelled. It is meaningless to ask again whether to cancel.
   private void Form2_FormClosing(object sender, FormClosingEventArgs e)
        {
            //MessageBox: message box + 20 overloads
            DialogResult result = MessageBox.Show("Nest tender father", "Prompt message", MessageBoxButtons.YesNo, MessageBoxIcon.Question);
            if (result == DialogResult.Yes)
            {
                //Events to be closed; The cancel attribute is false; It's off
                e.Cancel = false;  //e.Cancel in form2_ Cannot be used in formclosed. It needs to be in form2_ Used in formclosing

            }
            else
            {
                e.Cancel = true;

            }

        }
3 linked database
3.1 preparation of database link
Database: MySql SqlSever
ADO.NET database connection C# is a language in the. NET platform
access database object
Usage in MySql
Connection: database connection object MySQL connection
C# connecting to the database is to add, delete, modify and query MySQL command data
Command:sql command execution object (addition, deletion and modification) MySQL dataadapater
DataAdapater: data adapter (data query object)
MySql is an independent server. A machine needs a network connection, so it needs to have its own address
Connection string: server = localhost port = 3306 database = SMX_ DB (which database to connect to) uid=root pwd=123456
Where is the server, which database to access in the server, and what identity to connect (account and password)
open() opens the link
close() closes the link
3.1.1MySql installation
Detailed installation tutorial
3.1.2 C# MySql test
Welcome to the Markdown editor
Hello! This is the welcome page displayed by the Markdown editor for the first time. If you want to learn how to use the Markdown editor, you can read this article carefully to understand the basic grammar of Markdown.
New changes
We have expanded some functions and syntax support for the Markdown editor. In addition to the standard Markdown editor functions, we have added the following new functions to help you blog with it:
- The new interface design will bring a new writing experience;
- Set your favorite code highlight style in the creation center, and Markdown will display the selected highlight style of code slice display;
- The picture drag function is added. You can drag local pictures directly to the editing area for direct display;
- New KaTeX mathematical formula syntax;
- Added mermaid syntax supporting Gantt chart 1 Function;
- The function of multi screen editing Markdown article is added;
- Functions such as focus writing mode, preview mode, concise writing mode and synchronous wheel setting in left and right areas are added. The function button is located between the editing area and preview area;
- Added check list function.
Function shortcut
Undo: Ctrl/Command + Z
Redo: Ctrl/Command + Y
Bold: Ctrl/Command + B
Italic: Ctrl/Command + I
Title: Ctrl/Command + Shift + H
Unordered list: Ctrl/Command + Shift + U
Ordered list: Ctrl/Command + Shift + O
Checklist: Ctrl/Command + Shift + C
Insert code: Ctrl/Command + Shift + K
Insert link: Ctrl/Command + Shift + L
Insert picture: Ctrl/Command + Shift + G
Find: Ctrl/Command + F
Replace: Ctrl/Command + G
Creating a reasonable title is helpful to the generation of the directory
Directly input once #, and press space to generate level 1 title.
After entering twice #, and pressing space, a level 2 title will be generated.
By analogy, we support level 6 titles. It helps to generate a perfect directory after using TOC syntax.
How to change the style of text
Emphasize text emphasize text
Bold text bold text
Tag text
Delete text
Reference text
H2O is a liquid.
210 the result is 1024
Insert links and pictures
Link: link.
Picture: 
Pictures with dimensions:
Centered picture: 
Centered and sized picture:
Of course, in order to make users more convenient, we have added the image drag function.
How to insert a beautiful piece of code
go Blog settings Page, select a code slice highlighting style you like, and the same highlighted code slice is shown below
// An highlighted block
var foo = 'bar';
Generate a list that suits you
- project
- project
- project
- project
- Item 1
- Item 2
- Item 3
- Planning tasks
- Complete the task
Create a table
A simple table is created as follows:
| project | Value |
|---|---|
| computer | $1600 |
| mobile phone | $12 |
| catheter | $1 |
The setting content is centered, left and right
Use: ---------: Center
Use: --------- left
Usage -----------: right
| First column | Second column | Third column |
|---|---|---|
| First column text centered | The text in the second column is on the right | The text in the third column is left |
SmartyPants
SmartyPants converts ASCII punctuation characters to "smart" printed punctuation HTML entities. For example:
| TYPE | ASCII | HTML |
|---|---|---|
| Single backticks | 'Isn't this fun?' | 'Isn't this fun?' |
| Quotes | "Isn't this fun?" | "Isn't this fun?" |
| Dashes | -- is en-dash, --- is em-dash | – is en-dash, — is em-dash |
Create a custom list
Markdown Text-to- HTML conversion tool Authors John LukeHow to create a footnote
A text with footnotes. 2
Annotations are also essential
Markdown converts text to HTML.
KaTeX mathematical formula
You can render LaTeX mathematical expressions using KaTeX:
Gamma formula display Γ ( n ) = ( n − 1 ) ! ∀ n ∈ N \Gamma(n) = (n-1)!\quad\forall n\in\mathbb N Γ (n)=(n−1)! ∀ N ∈ N is through Euler integral
Γ ( z ) = ∫ 0 ∞ t z − 1 e − t d t . \Gamma(z) = \int_0^\infty t^{z-1}e^{-t}dt\,. Γ(z)=∫0∞tz−1e−tdt.
You can find more information about LaTeX mathematical expressions here.
New Gantt chart features to enrich your articles
- For Gantt chart syntax, refer to here,
UML diagram
UML diagrams can be used for rendering. Mermaid For example, a sequence diagram is generated as follows:
This will produce a flowchart.:
- For Mermaid syntax, see here,
FLowchart
We will still support the flowchart of flowchart:
- For Flowchart syntax, refer to here.
Export and import
export
If you want to try this editor, you can edit it at will in this article. When you have finished writing an article, find the article export in the upper toolbar and generate a. md file or. html file for local saving.
Import
If you want to load an. md file you have written, you can select the import function in the upper toolbar to import the file with the corresponding extension,
Continue your creation.
Explanation of footnotes ↩︎