catalogue
15. Decoration mode
Decoration mode: dynamically add some additional functions to an object. It wraps the real object by creating a wrapper object, that is, decoration. For the newly added functions, the decorator mode is more flexible than the production subclass.
Consider using decoration mode in the following cases:
1. You need to extend the functionality of a class or add additional responsibilities to a class.
2. You need to dynamically add functions to an object, and these functions can be dynamically revoked.
3. It is necessary to add a large number of functions generated by the arrangement and combination of some basic functions, so as to make the inheritance relationship unrealistic.
3. When the method of generating subclasses cannot be used for expansion. In one case, there may be a large number of independent extensions. In order to support each combination, a large number of subclasses will be generated, resulting in an explosive increase in the number of subclasses. Another possibility is that the class definition is hidden or cannot be used to generate subclasses.
/*
 * Key code: 1. The Component class plays an abstract role and should not be implemented concretely. 2. The modifier class references and inherits the Component class, and the specific extension class overrides the parent class method.
 */
#include <iostream>

using namespace std;

//Abstract Component role: give an abstract interface to specify the object ready to receive additional responsibilities.
class Component
{
public:
    virtual ~Component(){}

    virtual void configuration() = 0;
};

//Concrete Component role: define a class that will receive additional responsibilities.
class Car : public Component
{
public:
    void configuration() override
    {
        cout << "A Car" << endl;
    }
};

//Decorator role: hold an instance of a Component object and implement an interface consistent with the abstract Component interface.
class DecorateCar : public Component
{
public:
    DecorateCar(Component* car) : m_pCar(car){}

    void configuration() override
    {
        m_pCar->configuration();
    }

private:
    Component* m_pCar;
};

//Concrete Decorator role: responsible for adding additional responsibilities to component objects.
class DecorateLED : public DecorateCar
{
public:
    DecorateLED(Component* car) : DecorateCar(car){}

    void configuration() override
    {
        DecorateCar::configuration();
        addLED();
   }

private:
    void addLED()
    {
        cout << "Install LED" << endl;
    }

};

//Concrete Decorator role: responsible for adding additional responsibilities to component objects.
class DecoratePC : public DecorateCar
{
public:
    DecoratePC(Component* car) : DecorateCar(car){}

    void configuration() override
    {
        DecorateCar::configuration();
        addPC();
    }

private:
    void addPC()
    {
        cout << "Install PC" << endl;
    }
};

//Concrete Decorator role: responsible for adding additional responsibilities to component objects.
class DecorateEPB : public DecorateCar
{
public:
    DecorateEPB(Component* car) : DecorateCar(car){}

    void configuration() override
    {
        DecorateCar::configuration();
        addEPB();
    }

private:
    void addEPB()
    {
        cout << "Install Electrical Park Brake" << endl;
    }
};

int main()
{
    Car* car = new Car;
    DecorateLED* ledCar = new DecorateLED(car);
    DecoratePC* pcCar = new DecoratePC(ledCar);
    DecorateEPB* epbCar = new DecorateEPB(pcCar);

    epbCar->configuration();

    delete epbCar;
    epbCar = nullptr;

    delete pcCar;
    pcCar = nullptr;

    delete ledCar;
    ledCar = nullptr;

    delete car;
    car = nullptr;

    return 0;
}
15.1 example 2
Dynamically add some additional responsibilities to an object. In terms of adding functions, decoration mode is more flexible than generating subclasses.
Sometimes we want to add some functionality to an object rather than an entire class.
For example, there is a mobile phone that allows you to add features to the mobile phone, such as adding pendant, screen film, etc. A flexible design method is to embed the mobile phone into another object, which completes the addition of features. We call the embedded object decoration. This decoration is consistent with the component interface it decorates, so it is transparent to customers who use the component. The UML diagram of decoration pattern is given below.
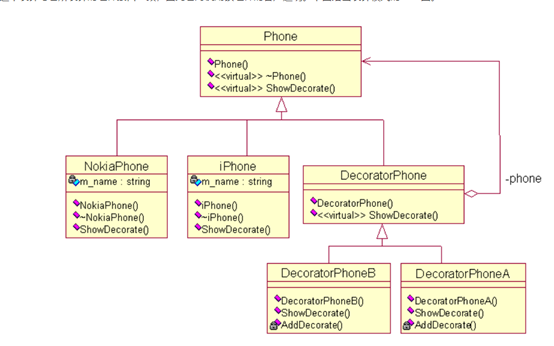
In this design, the decorative functions of mobile phones are independent and can be developed independently, which simplifies the design of specific mobile phones. The following is the implementation of the Phone class:
//Public abstract class
class Phone
{
public:
	Phone() {}
	virtual ~Phone() {}
	virtual void ShowDecorate() {}
};


Specific definition of mobile phone class:
//Specific mobile phones
class iPhone : public Phone
{
private:
	string m_name; //Mobile name
public:
	iPhone(string name): m_name(name){}
	~iPhone() {}
	void ShowDecorate() { cout<<m_name<<"Decoration of"<<endl;}
};

//Specific mobile phones
class NokiaPhone : public Phone
{
private:
	string m_name;
public:
	NokiaPhone(string name): m_name(name){}
	~NokiaPhone() {}
	void ShowDecorate() { cout<<m_name<<"Decoration of"<<endl;}
};


Implementation of decoration class:
//Decoration
class DecoratorPhone : public Phone
{
private:
	Phone *m_phone;  //Mobile phone to be decorated
public:
	DecoratorPhone(Phone *phone): m_phone(phone) {}
	virtual void ShowDecorate() { m_phone->ShowDecorate(); }
};

//Specific decoration
class DecoratorPhoneA : public DecoratorPhone
{
public:
	DecoratorPhoneA(Phone *phone) : DecoratorPhone(phone) {}
	void ShowDecorate() { DecoratorPhone::ShowDecorate(); AddDecorate(); }
private:
	void AddDecorate() { cout<<"Add Pendant"<<endl; } //Added decoration
};

//Specific decoration
class DecoratorPhoneB : public DecoratorPhone
{
public:
	DecoratorPhoneB(Phone *phone) : DecoratorPhone(phone) {}
	void ShowDecorate() { DecoratorPhone::ShowDecorate(); AddDecorate(); }
private:
	void AddDecorate() { cout<<"Screen film"<<endl; } //Added decoration
};

// Customer usage:
int main()
{
	Phone *iphone = new NokiaPhone("6300");
	Phone *dpa = new DecoratorPhoneA(iphone); //Decoration, add Pendant
	Phone *dpb = new DecoratorPhoneB(dpa);    //Decorative film, screen
	dpb->ShowDecorate();
	delete dpa;
	delete dpb;
	delete iphone;
	return 0;
}
Decoration pattern provides a more flexible way to add responsibilities to objects. You can add and delete responsibilities at runtime by adding and separating methods and decorating. Decoration mode provides a "pay as you go" method to add responsibilities. Instead of trying to support all predictable features in a complex customizable class, you can define a simple class and gradually add functionality to it with decorative classes. Complex functions can be combined from simple components. [DP]
In this example, we define two specific mobile phone classes, iPhone class and Nokia phone class, and add features to them through separate decoration classes to combine complex functions.
15.2 example 3
For example: coffee shop.
There are two components:
Provide interface - calculate cost.
Coffee: components
Basic coffee;
Derived from: ground coffee, American coffee and so on.
Ornaments: components
Milk;
Matcha;
...;
When the user orders A meal, first select A coffee A, then add A and B, and constantly decorate the coffee with decorations. Finally, call the interface -- computation cost. That is, you can get the price of (coffee A + material A + material B +...).
reference material: https://blog.csdn.net/wuzhekai1985/article/details/6672614
reference material: https://www.cnblogs.com/chengjundu/p/8473564.html
Reference: Head First design pattern