preface
nowpaper, known as a father, is a fan of shooting games. From the earliest Doom to Quake, and then all the way CS, medal of honor, call of duty and watch pioneer, FPS games have always fascinated me.
For the shooting game, a good bullet shooting effect is definitely the core experience of the shooting game. At present, my favorite game with shooting sense, speed sense and strike sense is the watch pioneer.
http://mpvideo.qpic.cn/0bc3eeaemaaa6aaaz76jhbqvaiodiyqqarqa.f10003.mp4?dis_k=ce5d82a63c43eb4c3f4c051825e63b9f&dis_t=1642670601&vid=wxv_2197640309403156482&format_id=10003&support_redirect=0&mmversion=false
Although the details of the moment when bullets shoot out and hit the wall are insignificant, they are absolutely the key to improving the quality of the game. How can this experience be realized in game development?
Today, dad will try it. Let's recreate the bullet shooting effect of the guard pioneer in Cocos Creator.
The art and TA of "watch pioneer" are definitely not comparable to those of me. Therefore, I think I can make a 75 point effect in this video, mainly to explain and study how to achieve it in creator 3. The weapons in "watch pioneer" are too sci-fi, so we can only learn from its bullet expressiveness.
Project material and source code
❝ cool gunfire strike implementation
https://store.cocos.com/app/detail/3473 Note: it is only the assets in the video, and does not include the contents related to the combination of shooting range, first person, third person and official figures ❞
❝ for the Online beta address, please select 3D shooting effect http://www.pktgame.com/ 19 ❞
effect
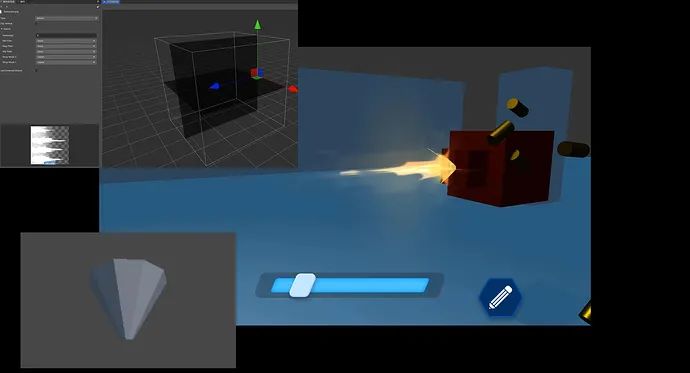
Let's see what the finished product looks like first.
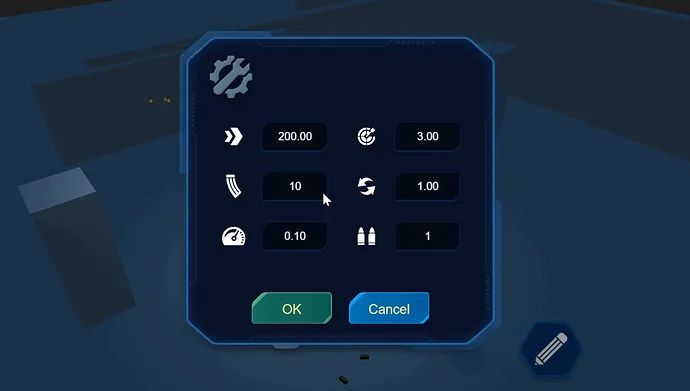
This is a simulated shooting range. The angle of the sliding rod can be adjusted, and the parameters can be adjusted on the setting interface.
The settable items include six parameters: bullet speed, offset, bullet capacity, refill time, firing speed and number of bullets per shot, which can basically cover all kinds of conventional shooting firearms.
In order to demonstrate, the firearms did not make too complex models, but directly replaced by blocks.
In the first person and third person test scenarios, you can see the actual application effect more clearly
Animation 2
Special effect principle
In terms of special effects, we need to disassemble. If we can achieve such a bullet shooting effect, we need the following aspects: the flame sprayed at the muzzle, the trajectory of the bullet, the special effects after hitting the target, and the sound effect if possible
Animation 3
Muzzle flame
The firelight sprayed from the muzzle, let's refer to the actual effect
It is composed of a scattered flame and a scattered outer ring, and a halo will be brought when spraying. In this way, it is represented by at least two particle systems. One particle system is used to produce jet fire. The core data in the parameters is Bursts. The life cycle of this fire particle is actually very short.
Therefore, Bursts should be used to express its short-term tension, and all subsequent special effects should be handled in the same way. Note that there are bug s in Bursts module in version 3.3.0 and the number of count s cannot be displayed, so it needs to be produced in versions after 3.3.2.
The specific parameters are not listed. This is a very time-consuming work. Let's see its specific composition through slow speed.
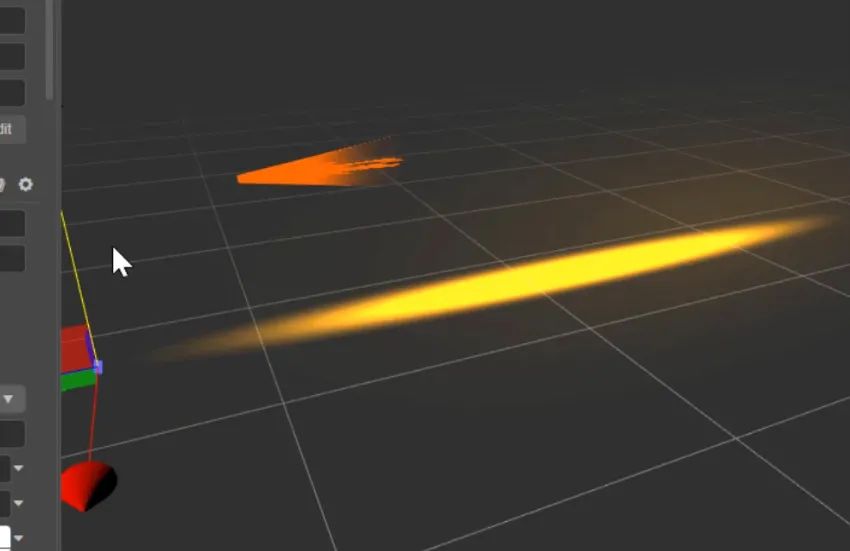
The muzzle flame is a cross patch. Give a particle material a random rotation, and use the mapping animation module to switch the texture.
The splash flame is an animation process of a trumpet model from small to large, while the halo uses a large explosive particle to create a visual effect caused by instantaneous flashing.
Flying bullet
The trajectory of bullet flight is relatively simple. It is composed of two main parts, one is impact particle and the other is tail particle.
The impact particle is represented by a horn model, which is basically the same as the jet particle of the gunfire, but it is represented in the form of cyclic flicker.
Trailing particles are single circular particles elongated on the Z-axis. They are also generated by Bursts to represent unstable light fluctuations in flight
Hit effects
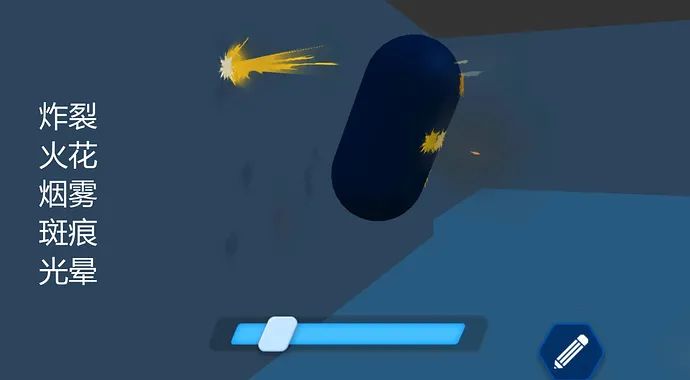
The effect of hitting the wall is the most complex of all particle effects. It consists of explosion, spark, smoke, stain and halo. Explain the principle one by one through decomposition.
The burst effect is the sputtering at the time of hit. It is realized by using two open model particles and can be treated in the same way as gunfire jet, but it is reduced by one circle.
The spark is the most difficult. I use a conical jet module, which splashes several particles randomly, and it also has the physical characteristics of gravity. In addition, the size is also a difficult problem. It is too big to be true, too small to see clearly. It takes a lot of effort to adjust it.
The performance of smoke is good. It only needs a simple rising particle. However, it is difficult to adjust its value naturally...
After studying the hit marks, it is found that many game expression methods are double-layer overlap, one hit point layer and one diffusion point layer. The hit points will disappear soon and the diffusion points will gradually disappear.
To be more detailed, different maps are used to represent scars according to the surface material of the object. For this, I also use the shader with digestion effect. In this regard, I don't want to increase the complexity, so I don't need the shader, but directly deal with the particle effect of gradual disappearance.
Code logic
Before writing code, let's do a functional requirements analysis and use the following brain diagram to show what we need.
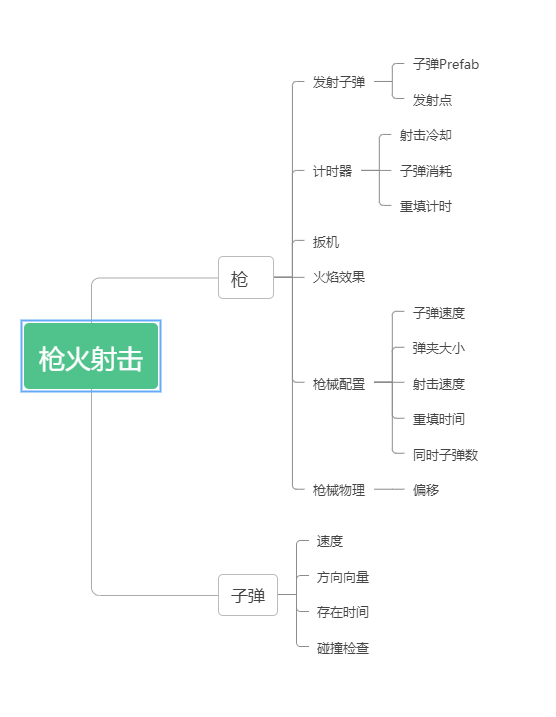
The most basic is the gun and bullet. The main function of the gun code is to launch bullets. It creates bullets through Prefab and launches them from the launch point. The launch process needs trigger control, and the corresponding jet effect will be generated. The gunfire effect can reuse a particle effect instead of generating it every time.
If we want to make a real sense of gun shooting, we need to subdivide the parameters of guns. Let's see how rich various parameters of shooting games are.
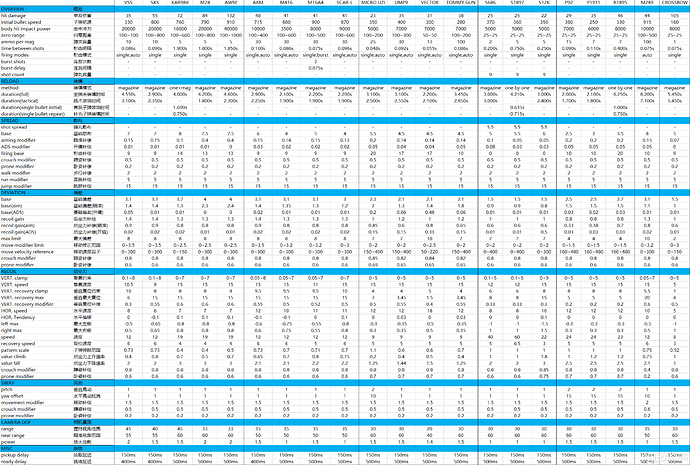
This is a parameter list of chicken eating game. Various parameter combinations become various guns.
Here, I only use the most representative five shooting parameters and one shooting offset physical parameter. These combinations are enough for us to make most conventional guns.
The demand for bullets need not be so subdivided. It only needs speed, moving direction vector and existence time. Its main function is to deal with movement and collision inspection.
Bullet algorithm principle
Let's first think about the two conventional development methods of shooting in game development.
- The first is radiographic examination
- The second is physical collision
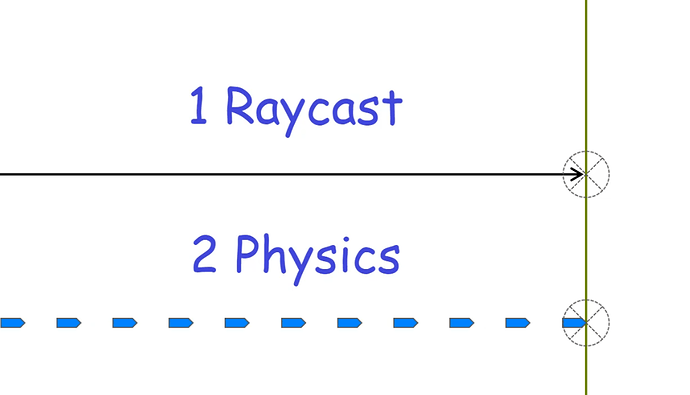
Let's first talk about the first ray inspection idea. When the gun points to the direction after shooting, a ray will appear. The point where the ray hits the model is the hit point. Then we make two schemes on this basis.

One is direct hit. There is no bullet. That is to say, it directly hits the target at the moment of shooting without considering the problem of speed. This is no problem for close distance, but for long distance... If you want to see the trajectory, it's impossible.
Second, generate a bullet in the world, calculate an interpolation motion according to the distance between the launch point and the hit point and the flight speed of the bullet, and let the flying particles fly along it to the target. But you will find a fatal problem. If the bullet is too slow and an object suddenly appears in the middle of its trajectory, it will not hit the object.
The first kind of radiographic examination seems not perfect. After all, the bullet hit the target and did not happen at the same time as the firing. So can bullet collision be used?
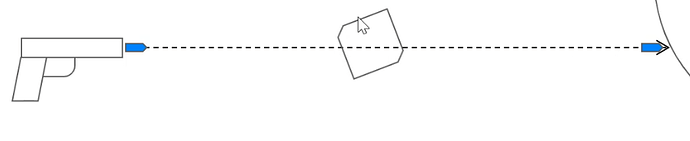
What the bullet encounters in flight is what it is, but the collision in the high-speed moving physical world cannot be simply handled in this way, because the game world is not the real world, for example, it may wear a mold, or the collision point may be inconsistent with the expected hit point.
Animation 5
❝ it looks like a dead end ❞
So, which is more appropriate? If so, what do you do?
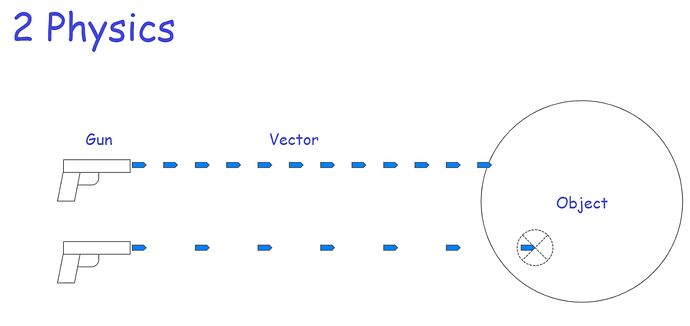
The best solution is to combine the two, or to be exact, take a part of each.
When firing, we still let the bullet generate and fly according to the predetermined trajectory. Of course, the bullet can be visible or invisible. Usually, for the game experience, we will get a particle special effect to make the flight process visible. Should we use physical collision inspection during the bullet flight?

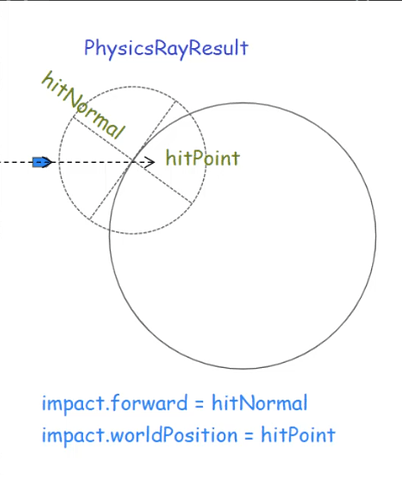
In fact, it's not. We should use radiographic inspection. Yes, it's to let the bullet conduct radiographic inspection, not the radiation emitted by the transmitter. Why? Let's look at it this way. When the bullet is flying, the trajectory of its next point can be predicted. From the point of the current frame to the point of the next frame, this is a ray. If this ray hits any qualified collision body, it can be determined that it is hit. Because the X-ray examination can clearly get the collision point information (physicsray result), it can be used as the bullet life point of the next frame. Of course, you can also add physical collision bodies to increase the authenticity, such as the impact of bullet gravity and wind force, which requires additional calculations. If you have the opportunity to fill the pit, with this idea, we can write code according to it.
Bullet code
For the script code of bullet component, speed and vector variables are required for calculation and processing.
Among them, we do the following processing for vector. When it is assigned, we calculate the speed once and mark how far it should go in a unit time. This is to avoid additional calculation.
Add vector movement in Update, and check whether the next frame will collide with any rigid body after the movement.
We write an inspection method. According to the principle mentioned above, we lead out a ray through the calculation of step length and vector, and use it to check whether there is a collision in front of it in the physical world. If there is a collision, we will deal with the collision logic.
"Code of BulletSc.ts"
import { _decorator, Component,  Vec3, v3, geometry, physics, RigidBody, game } from 'cc';
import { AutoRecycleSc } from './AutoRecycleSc';
import { ImpactHelperSc } from './ImpactHelperSc';
const { ccclass, property } = _decorator;

@ccclass('BulletSc')
export class BulletSc extends Component {

    private _speed: number = 200;
    public get speed(): number {
        return this._speed;
    }
    public set speed(v: number) {
        this._speed = v;
        if (this._vector) {
            this._vector = this._vector.normalize().multiplyScalar(this.speed);
        }
    }
    private _vector: Vec3 = null;
    setVector(v: Vec3) {
        this._vector = v.clone().multiplyScalar(this.speed);
        this.node.forward = v;
        BulletSc.preCheck(this, this.speed / 60);
    }
    private _vec3 = v3();

    update(deltaTime: number) {
        if (this._vector) {
            Vec3.multiplyScalar(this._vec3, this._vector, deltaTime);
            this.node.position = this.node.position.add(this._vec3);
            BulletSc.preCheck(this, this._vec3.length());
        }
    }
    private static preCheck(b: BulletSc, len: number) {
        const p = b.node.worldPosition;
        const v = b._vector;
        const ray = geometry.Ray.create(p.x, p.y, p.z, v.x, v.y, v.z);
        const phy = physics.PhysicsSystem.instance;
        if (phy.raycast(ray, 0xffffff, len)) {
            if (phy.raycastResults.length > 0) {
                let result = phy.raycastResults[0];
                game.emit(ImpactHelperSc.AddImpactEvent,b,result);
                if (result.collider.getComponent(RigidBody)) {
                    result.collider.getComponent(RigidBody).applyForce(b._vector, result.hitPoint);
                }
                if (b.getComponent(AutoRecycleSc))
                    b.getComponent(AutoRecycleSc).recycle();
            }
        }
    }
}
The calculation method of dealing with collision determination is not unique to each object, so using static method will be a good choice.
The position of the set vector should also be determined once, because sometimes it is very fast. When it is created, it moves first in the next frame and flies directly to a far place, and then it may be wrong to check. Therefore, it should be determined at the moment of bullet generation to avoid die penetration.
In addition, we will create an automatic recycling script, which can be hung on bullets, scars, cartridge cases, etc. in the future.
Through a delay time variable, objects can be automatically recycled at the right time. With this script, the function of object pool recycle bin can be easily extended in the future, which will not be repeated in this paper.
import { _decorator, Component, Node } from 'cc';
const { ccclass, property } = _decorator;
@ccclass('AutoRecycleSc')
export class AutoRecycleSc extends Component {
    @property
    deltaTime = 5;

    update (dt: number) {
        this.deltaTime -= dt;
        if(this.deltaTime <=0){
            this.recycle();
        }
    }
    recycle(){
        this.deltaTime = 1000;
        this.node.destroy();
    }
}
Gun logic
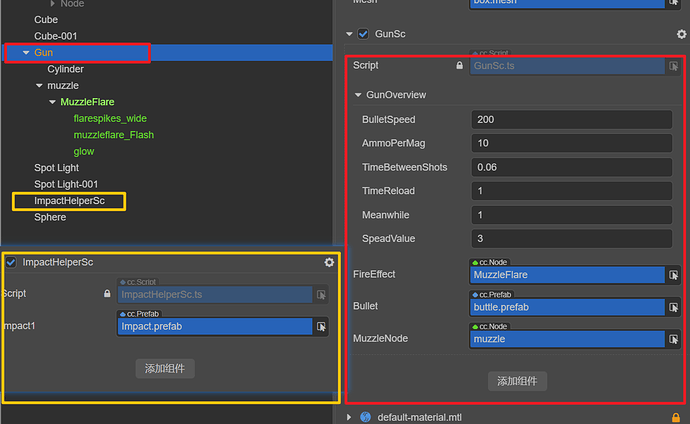
The component script of the firearm uses ccclass to create a configuration item GunOverView, which contains an overview of the firearm, including bullet speed, clip size, firing speed, refill time, number of bullets at the same time, and range parameters of offset vibration. Through external reference attributes, you can obtain firearm effects, bullet firing points, and preforms of bullets, These are the corresponding references that need to be obtained from the scene or project.
@ccclass("gun_overview")
export class GunOverView {
    @property
    bulletSpeed = 200;
    @property
    ammoPerMag: number = 10;
    @property
    timeBetweenShots: number = 0.3;
    @property
    timeReload: number = 1;
    @property
    meanwhile: number = 1;
    @property
    speadValue: number = 1;
}
Three variables are used to process the firing status and calculate the cache. A counter is used to calculate firing, bullet consumption and retiming.
isShotting = true;
private vec3: Vec3 = v3();
private timer: Timer = new Timer();
// other class
class Timer {
    shot: number = 0;
    ammo: number = 0;
    reload: number = 0;
}
In the shooting method, the number of bullets fired at the same time is cycled to create bullets and encapsulate the createBullet.
createBullet() {
// to create bullet
}
The direction of the muzzle is the vector along which the bullet will fly.
When the bullet is created, set the starting position, set the speed, and recalculate the flight vector.
Because another important experience parameter is vibration. Rotate the flight vector randomly according to the angle.
Here we use vector transformation and quaternion multiplication to obtain a new vector.
The new vector is the direction of the bullet, so we can set it to the vector in the bullet script.
// ... Part
@property(GunOverView)
gunOverview: GunOverView = new GunOverView();
@property(Node)
fireEffect: Node = null;
@property(Prefab)
bullet: Prefab = null;
@property(Node)
muzzleNode: Node = null;
// ... Part
createBullet() {
    this.vec3 = this.muzzleNode.forward.clone();
    const b = instantiate(this.bullet);
    director.getScene().addChild(b);
    b.setWorldPosition(this.muzzleNode.worldPosition);
    b.setWorldRotation(this.muzzleNode.worldRotation);
    b.getComponent(BulletSc).speed = this.gunOverview.bulletSpeed;
    let rot = this._quat;
    const speadValue = this.gunOverview.speadValue;
    Quat.fromEuler(rot, (Math.random() * 2 - 1) * speadValue,
        (Math.random() * 2 - 1) * speadValue, (Math.random() * 2 - 1) * speadValue);
    Vec3.transformQuat(this.vec3,this.vec3.normalize(),rot);
    b.forward = this.vec3;
    b.getComponent(BulletSc).setVector(b.forward);
    b.worldScale = this.muzzleNode.worldScale;
}
// ... Part
The timer is calculated in Update to launch according to the shooting conditions. When the number of bullets is sufficient, the shooting cooling time is calculated.
When the firing behavior occurs, the bullet consumption increases. When the maximum is reached, reload is triggered. This is the overall process.
Many of these codes can be extracted, such as shooting, creating bullets, resetting States, and so on.
update(dt:number){
    if(!this.isShotting)return;
    if(this.timer.ammo > 0){
        this.timer.shot += dt;
        if(this.timer.shot >= this.gunOverview.timeBetweenShots){
            this.timer.shot = 0;
            this.shot();
            this.timer.ammo -= 1;
            this.timer.reload = 0;
            if(this.timer.ammo <=0){
                //Refill
            }
        }
    }else{
        if(this.timer.reload >= this.gunOverview.timeReload){
            this.timer.ammo = this.gunOverview.ammoPerMag;
            this.timer.reload = 0;
        }
        this.timer.reload += dt;
    }
}
resetState(){
    this.timer.shot = this.timer.ammo = this.timer.reload = 0;
}
In the shooting method, we will try to call the particle system. At present, I use a way of traversing sub nodes to play particle effects.
So I also want to write a class of particle effect helper, which can use particleeffecthhelper in multiple places ts.
import { ParticleSystem,Node } from "cc";
export module ParticleEffectHelper{
    export function Play(node:Node){
        const arr = node.getComponentsInChildren(ParticleSystem);
        for(let a of arr){
            a.stop();
            a.play();
        }
    }
}
Hit performance
As we mentioned earlier, when we hit, we can get the collision point. In addition to generating scar effects at the position of the collision point, it is also necessary to determine the orientation and rotation of the generated surface according to the normal of the collision surface.
To do this, you need to write a life point management component script, which is used to add a hit effect for the appropriate collision point.
For example, in the game, if you hit the wall, you have to deal with the scar. If you hit the enemy, you will directly drag the liquid.
Therefore, in this component script, we handle collision events by listening to an added collision message. The event receiving parameters include bullet information and ray information of physical hit points.
Here, calculate and process the special effect position and orientation of the hit point. The ray hit test contains the hit normal information, and the orientation of the hit special effect can follow the normal direction.
Finally, add the generated special effects to the target object. Now go back to the bullet script, add event dispatch for its hit, and tell the hit help script to hit the target.
ImpactHelperSc.ts
import { _decorator, Component, Node, Prefab, game, PhysicsRayResult, instantiate } from 'cc';
import { BulletSc } from './BulletSc';
const { ccclass, property } = _decorator;

@ccclass('ImpactHelperSc')
export class ImpactHelperSc extends Component {
    public static AddImpactEvent:string = "AddImpactEvent";
    @property(Prefab)
    impact1:Prefab = null;

    start () {
        game.on(ImpactHelperSc.AddImpactEvent,<any>this.onAddImpactEvent,this);
    }
    private onAddImpactEvent(b:BulletSc,e:PhysicsRayResult) {
        const impact = instantiate(this.impact1);
        impact.worldPosition = e.hitPoint.add(e.hitNormal.multiplyScalar(0.01));
        impact.forward=e.hitNormal.multiplyScalar(-1);
        impact.scale = b.node.scale;
        impact.setParent(e.collider.node,true);

    }
}
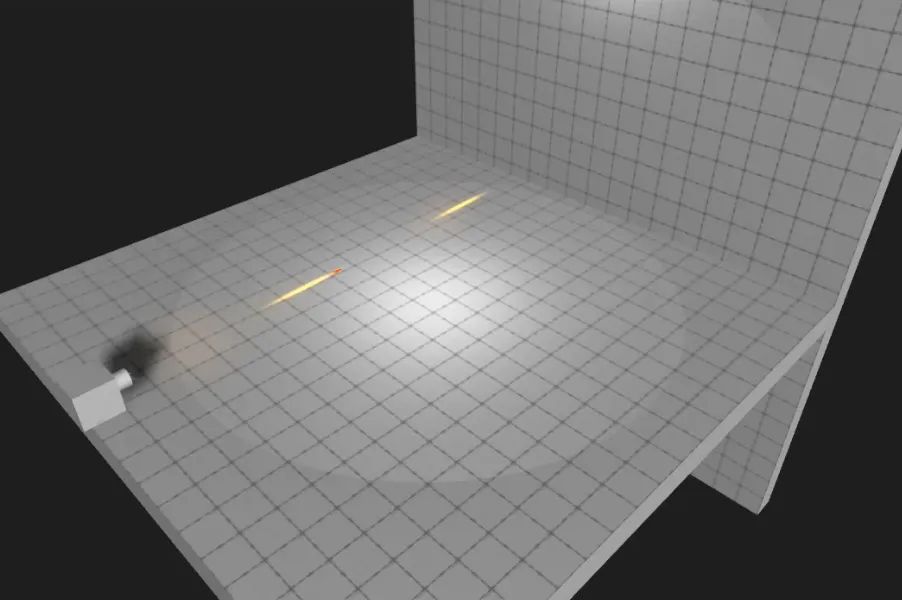
Now return to the Creator, simply splice the gun shooting points, and then place a wall.
Since the default scene of Creator is too much to say, I have to adjust it manually to achieve satisfactory results.
Make a simple gun launcher that looks almost like it. Make a bullet Prefab, put special effects, and hang the bullet component script and automatic recycling script. Then take some time to correct it.
Add the help script ImpactHelperSc to a scene node, and then add the prefab of the hit point to its reference item.
Now try the effect, add a free control script to the camera, and fly closer to see how it works.
In order to confirm the accuracy of the location and orientation of the crater point, get a ball, and you can see that the special effect of the hit point is still very good.
Although there is a big gap with the watchman pioneer, it has provided special effects ideas. In fact, there is more room for optimization.
Animation 6
matters needing attention
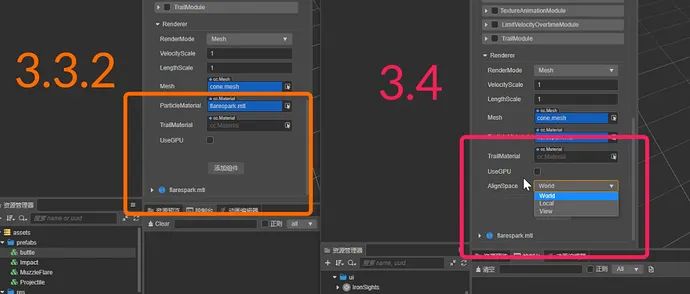
Please note that creator 3 is used in the video production of this special effect Version 3.2.
Due to the problem of particle shader operation, the code block in the official engine does not support rotating with nodes when processing model particles. This problem has no solution to me.
However, Hyun ye, a big man in the Creator technology group, gave timely help and provided a correct code block. Otherwise, I can't complete it at all. I would like to express my special thanks here.

In version 3.4, the problem that the particle effect mentioned in this video cannot rotate with it has been solved. This particle system update allows particles to specify a reference coordinate system, so there is no need to replace the code block.
end
I'm Nowpaper, a dad in the mixed game industry. Thank you for reading. If you like this article and support it on station B and cocos forum, it's a great encouragement to me. See you next time!