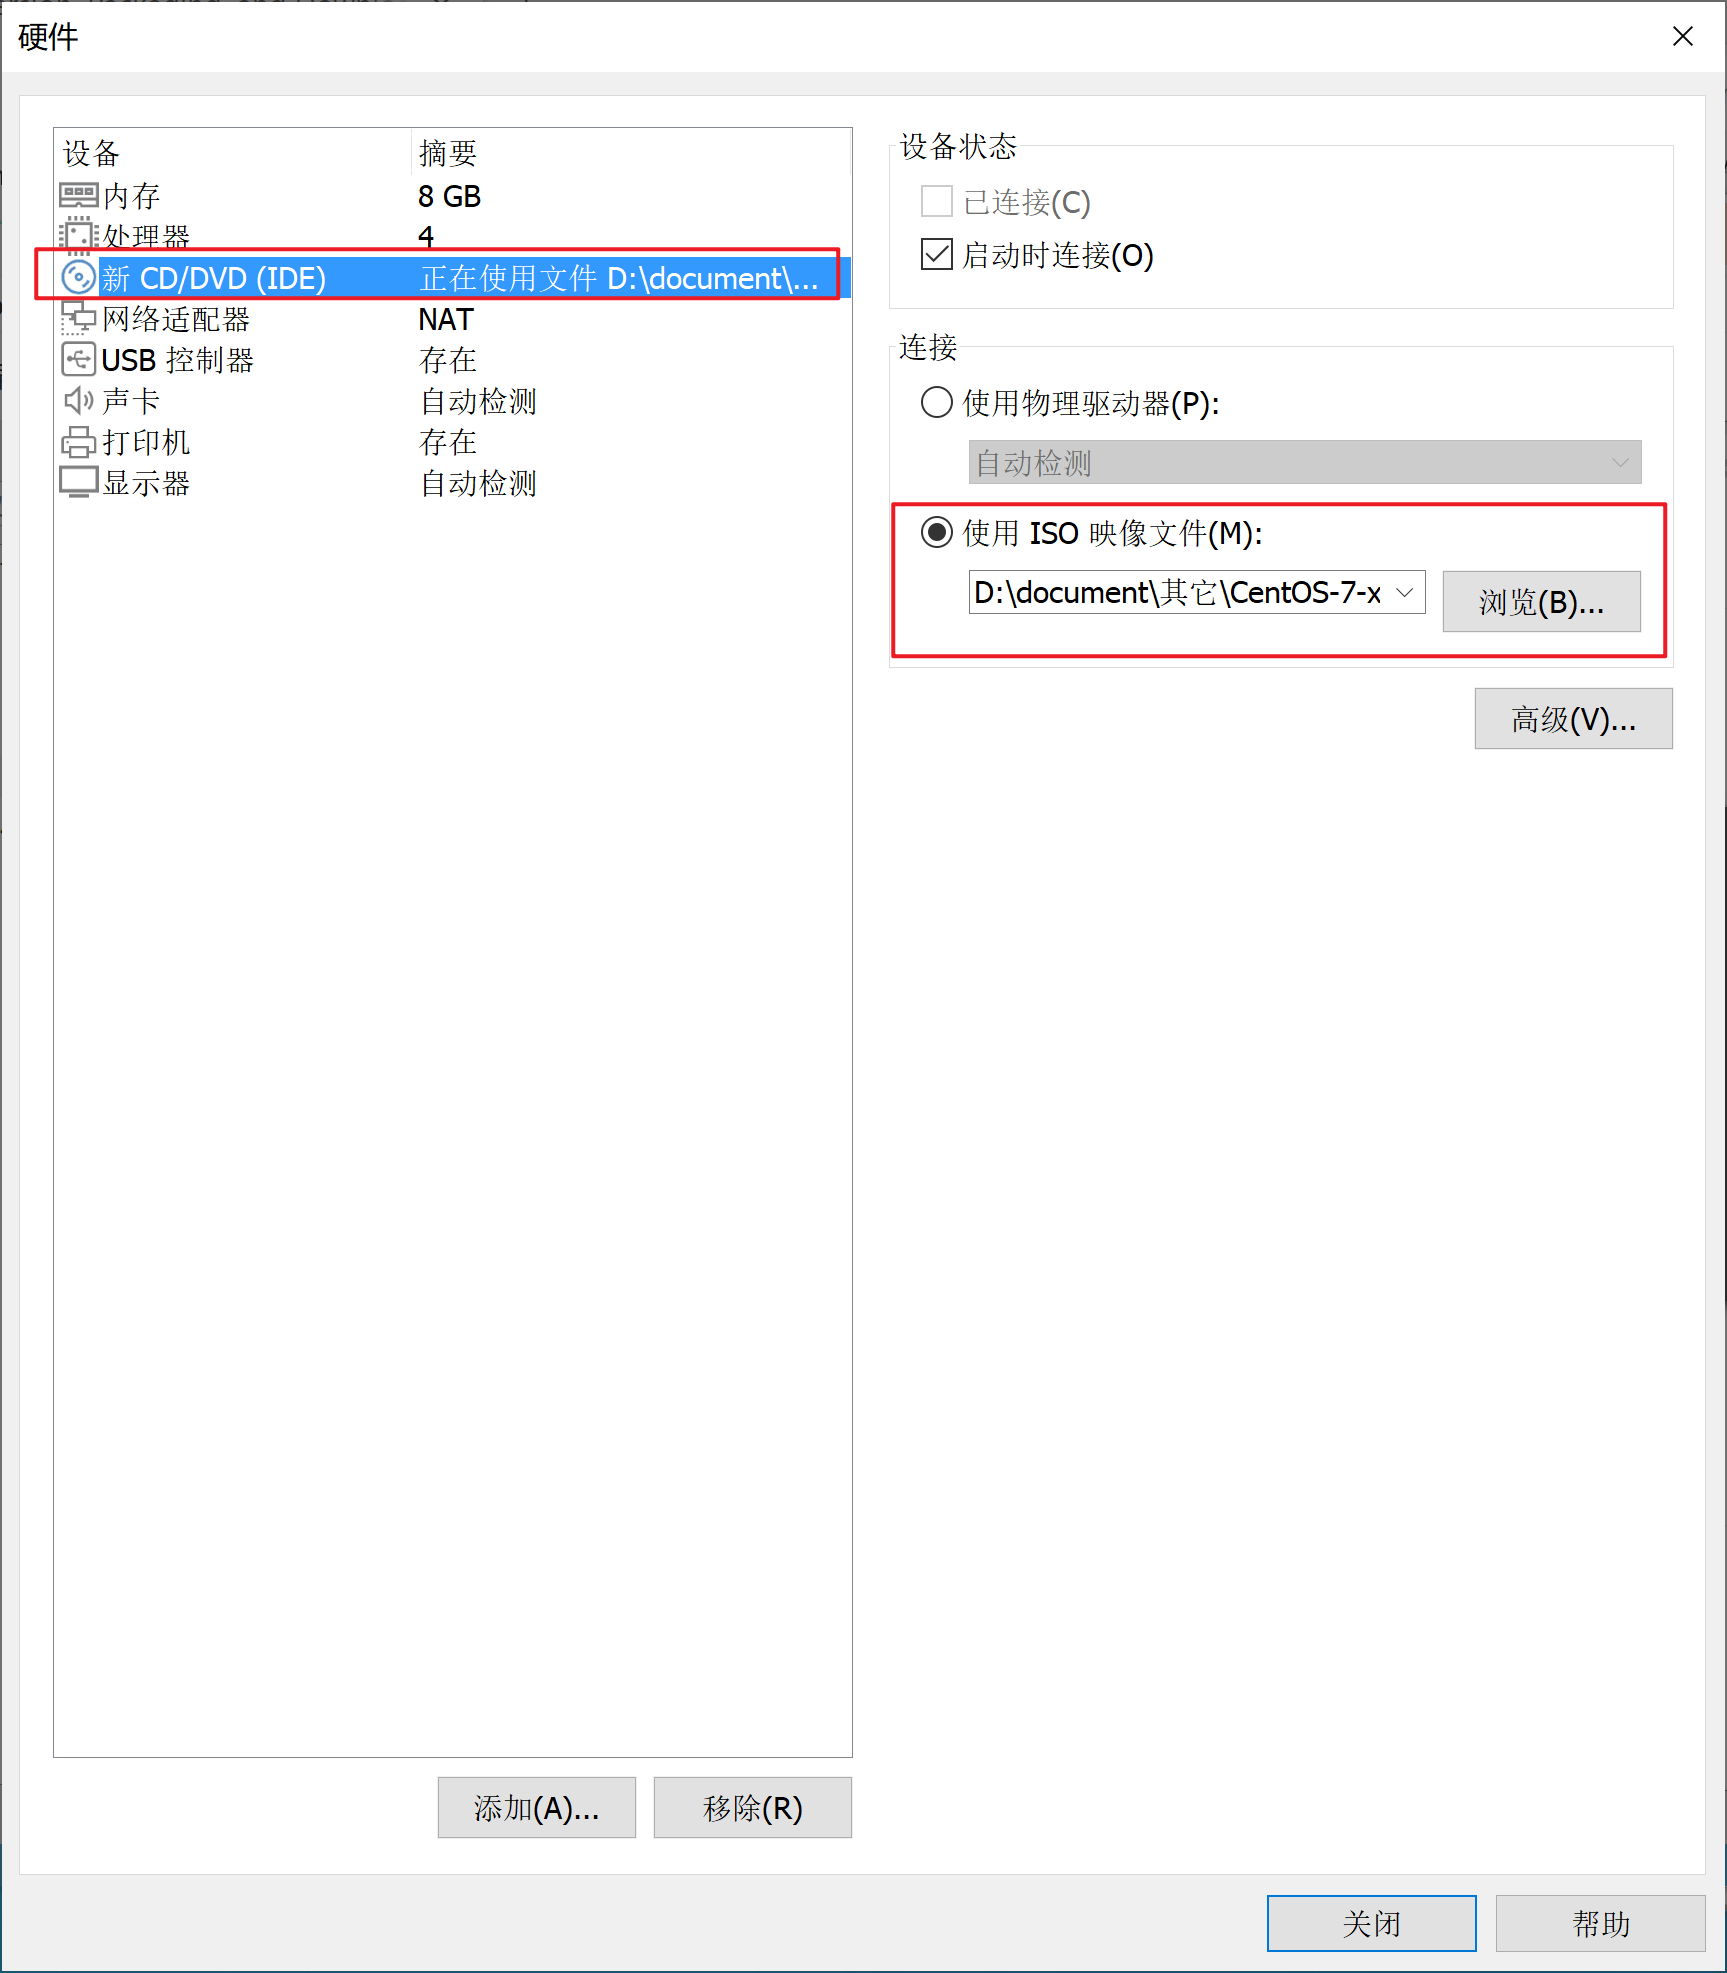
Software packages required during deployment
Link: https://pan.baidu.com/s/1UajMORVvQ_VSLOdVkJWYQQ Extraction code: e28y
Link: https://pan.baidu.com/s/1dMj8JEaRIOaXP53W2kF_mQ
Extraction code: xbyo
a key:
- Sets the host name in FQDN format
- Turn off firewall
- Turn off ipv6
- Configure local http service
- Configure local storage
- The mysql jdbc driver needs to be protected under the / usr/share/java and / opt/cloudera/cm/lib paths
- Just select a node to install cloud manager, and the agent does not need to be configured manually
- The cdh parcel file, manitest JSON to / opt / cloudera / parcel repo/
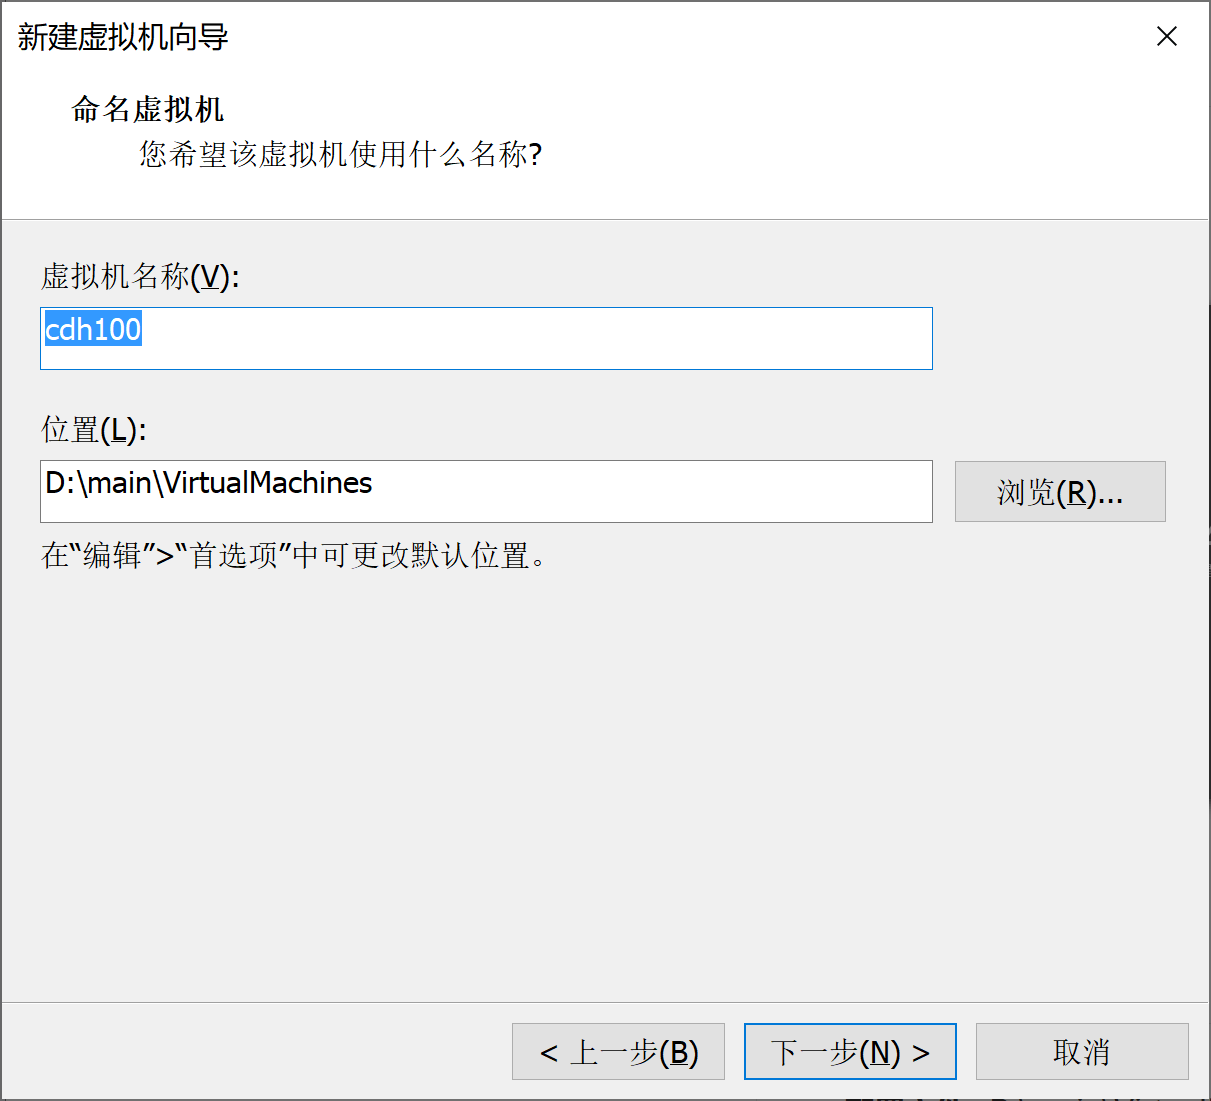
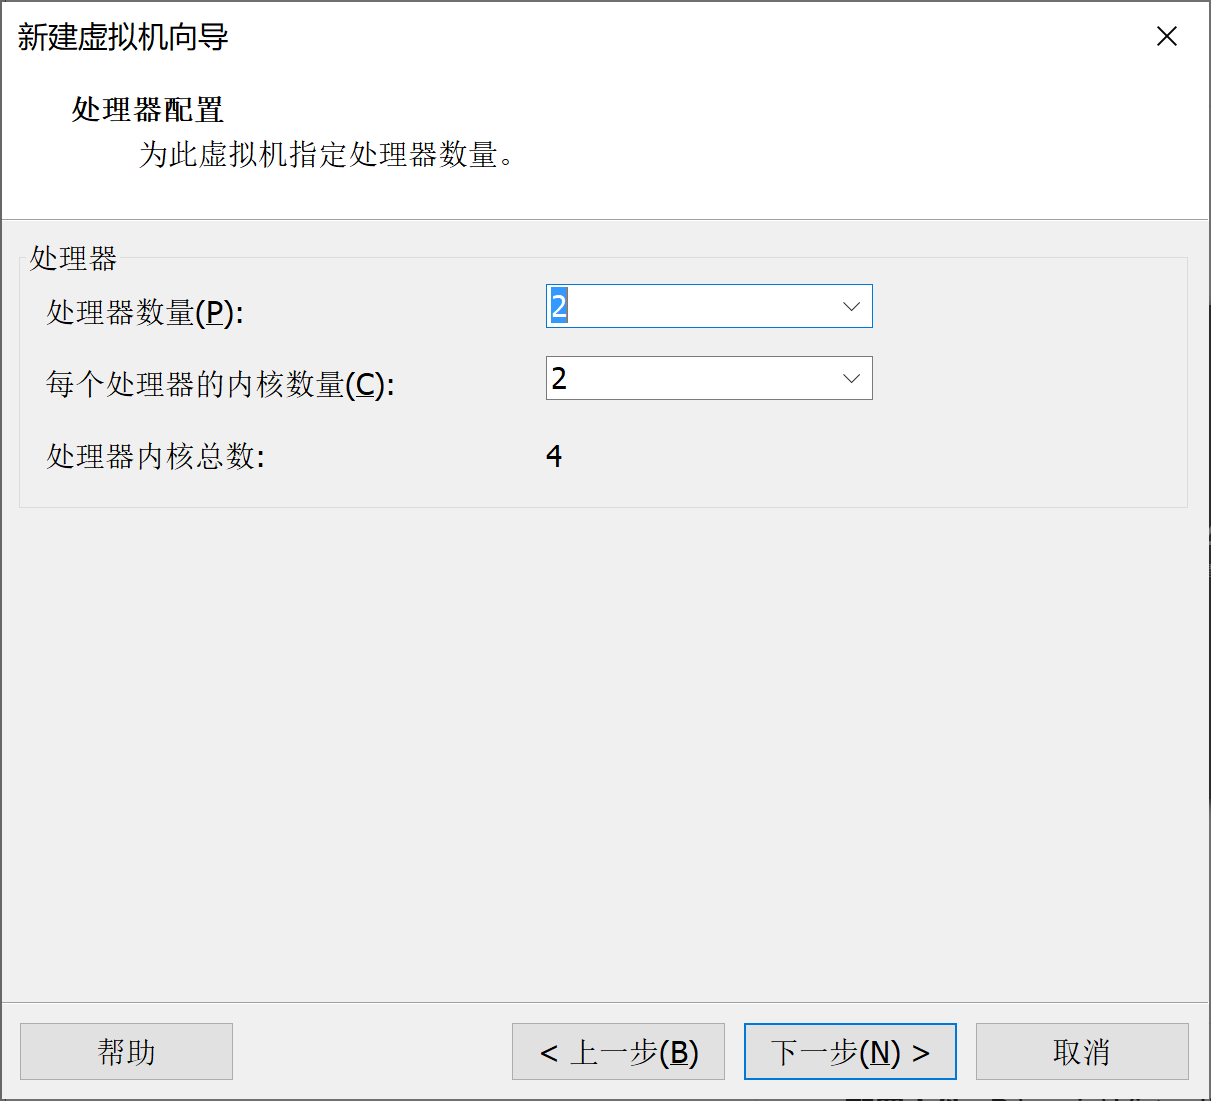
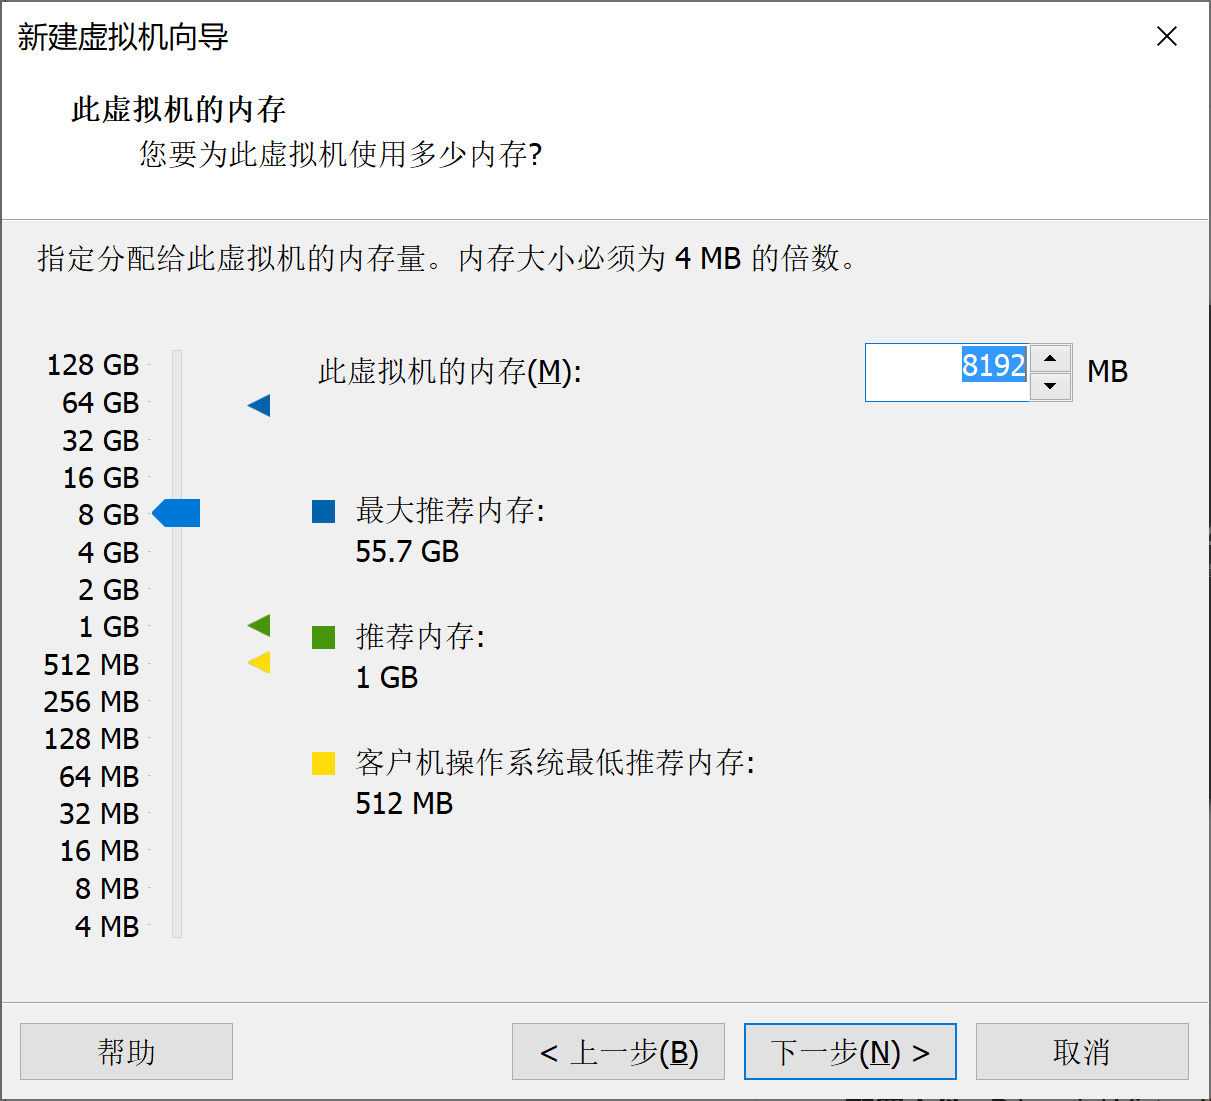
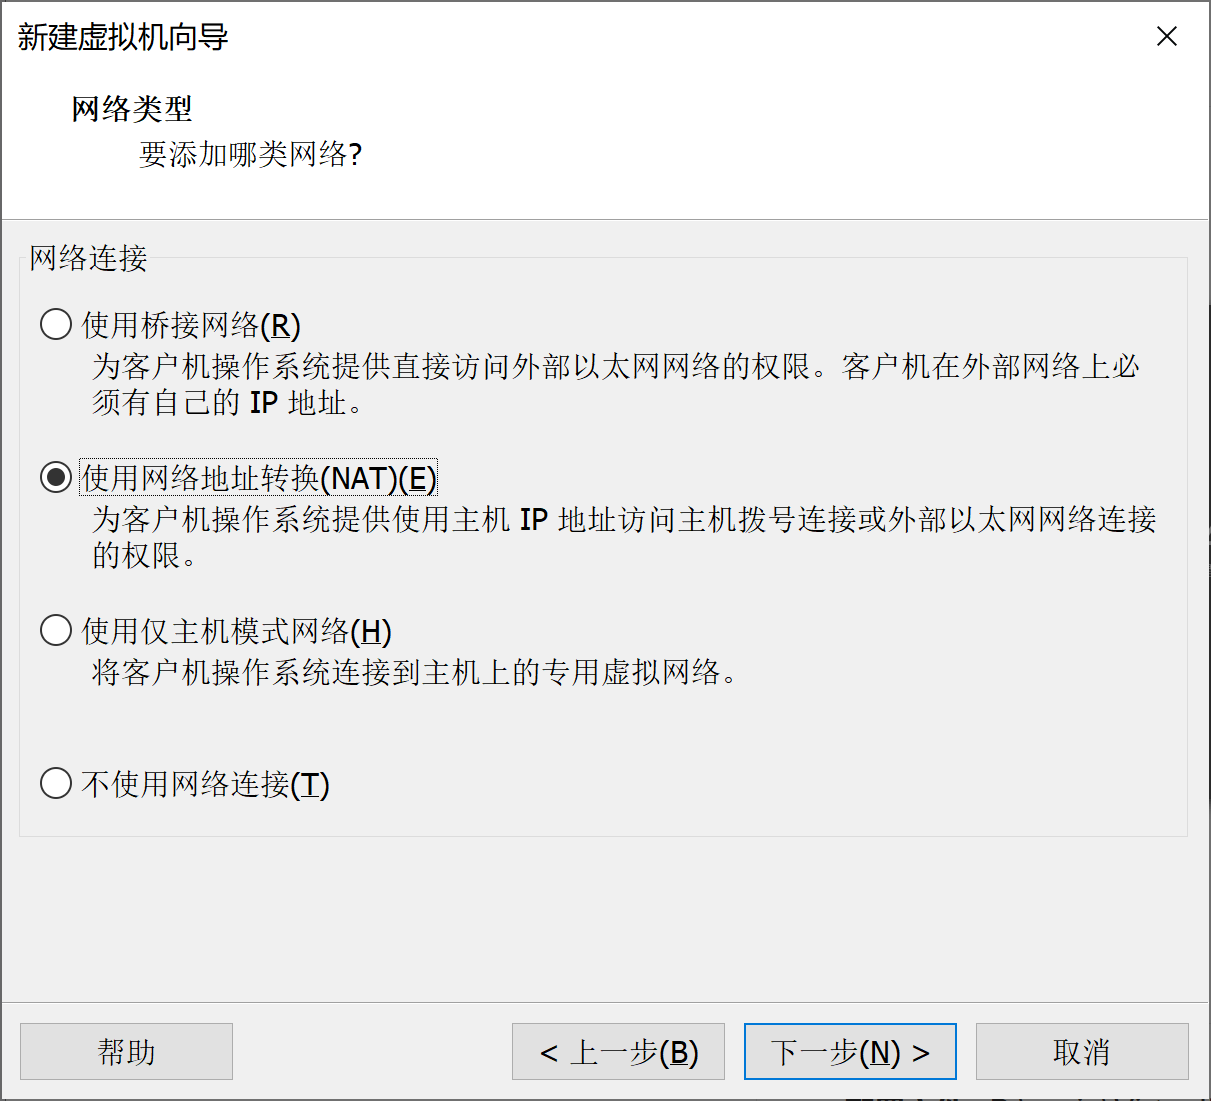
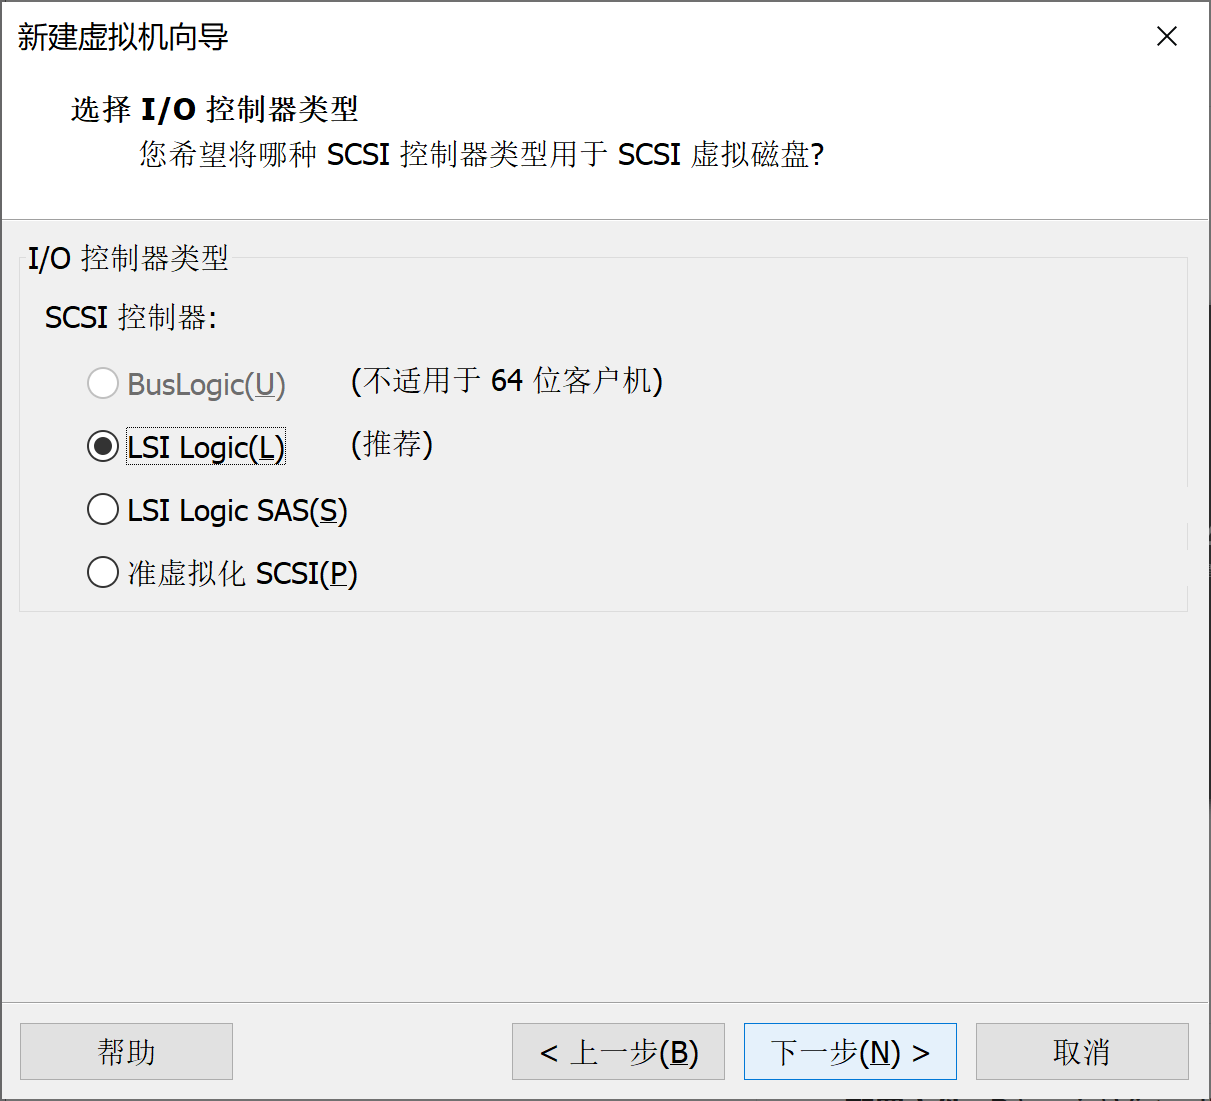
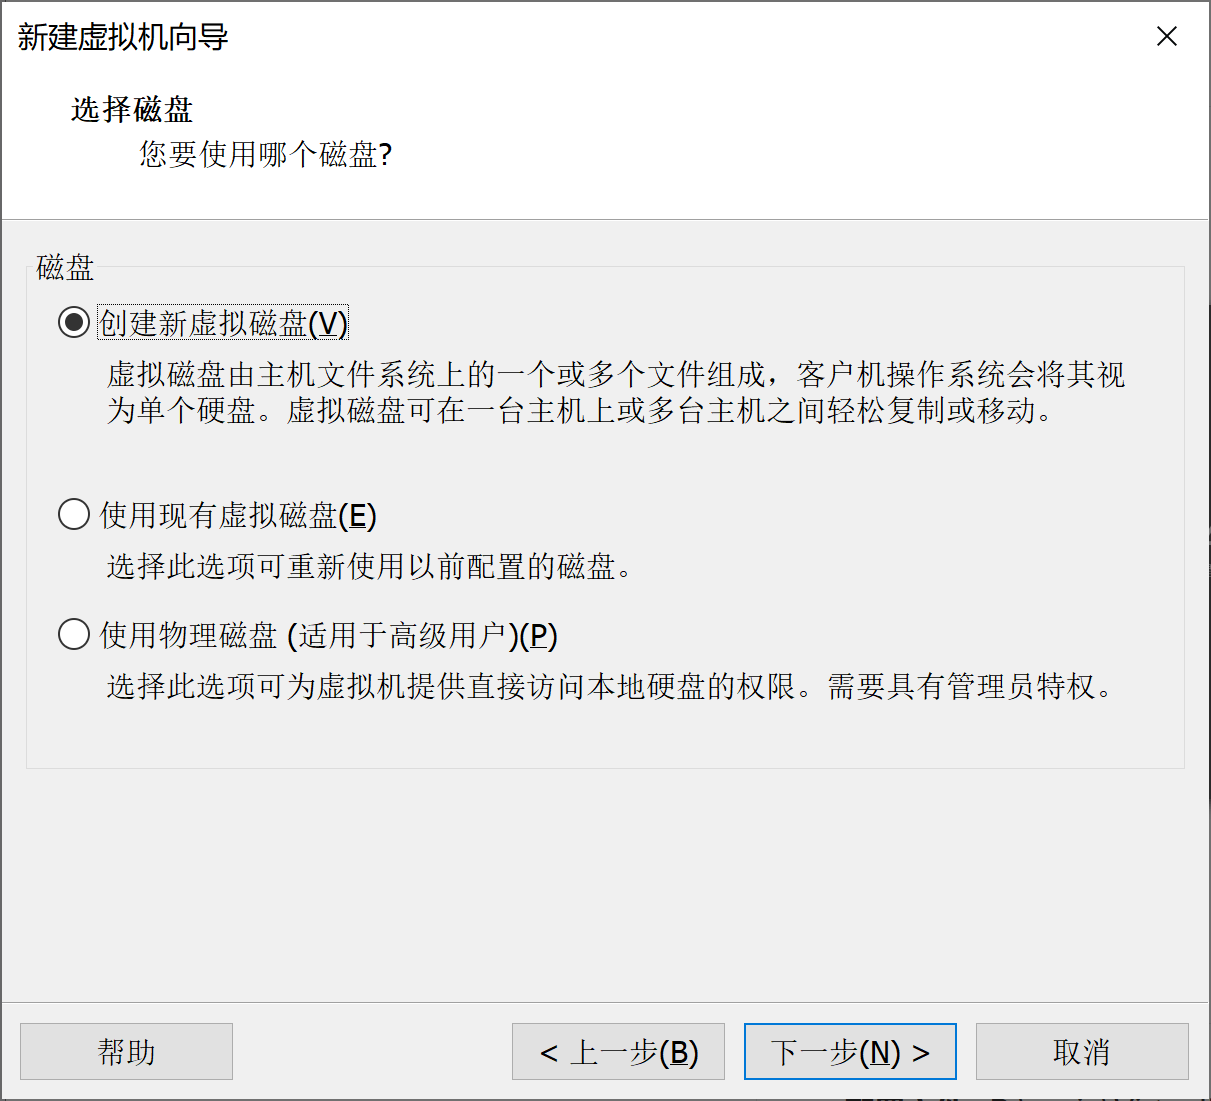
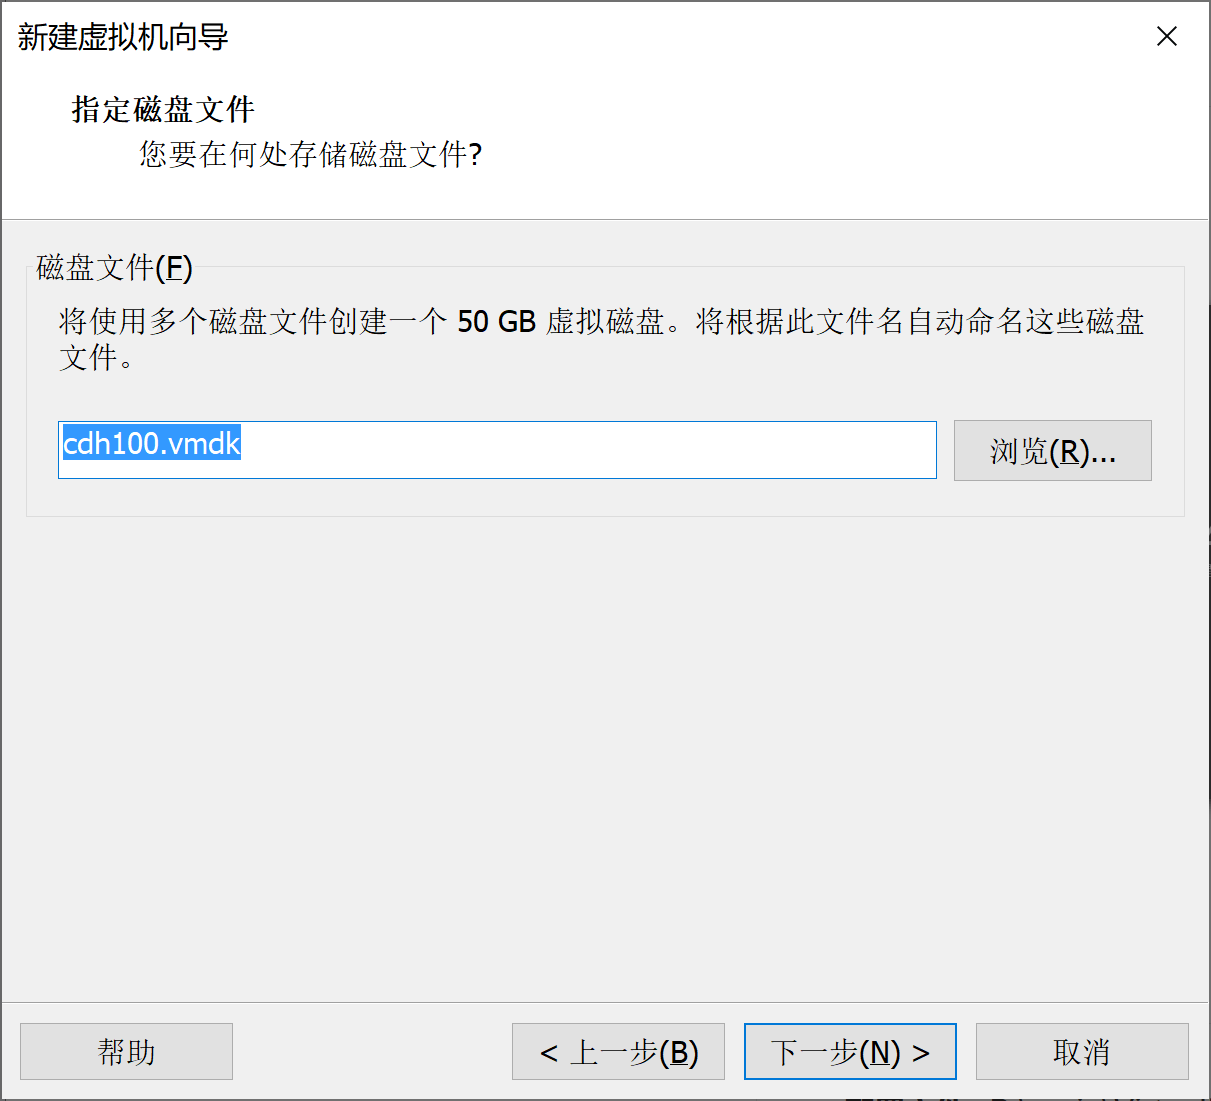
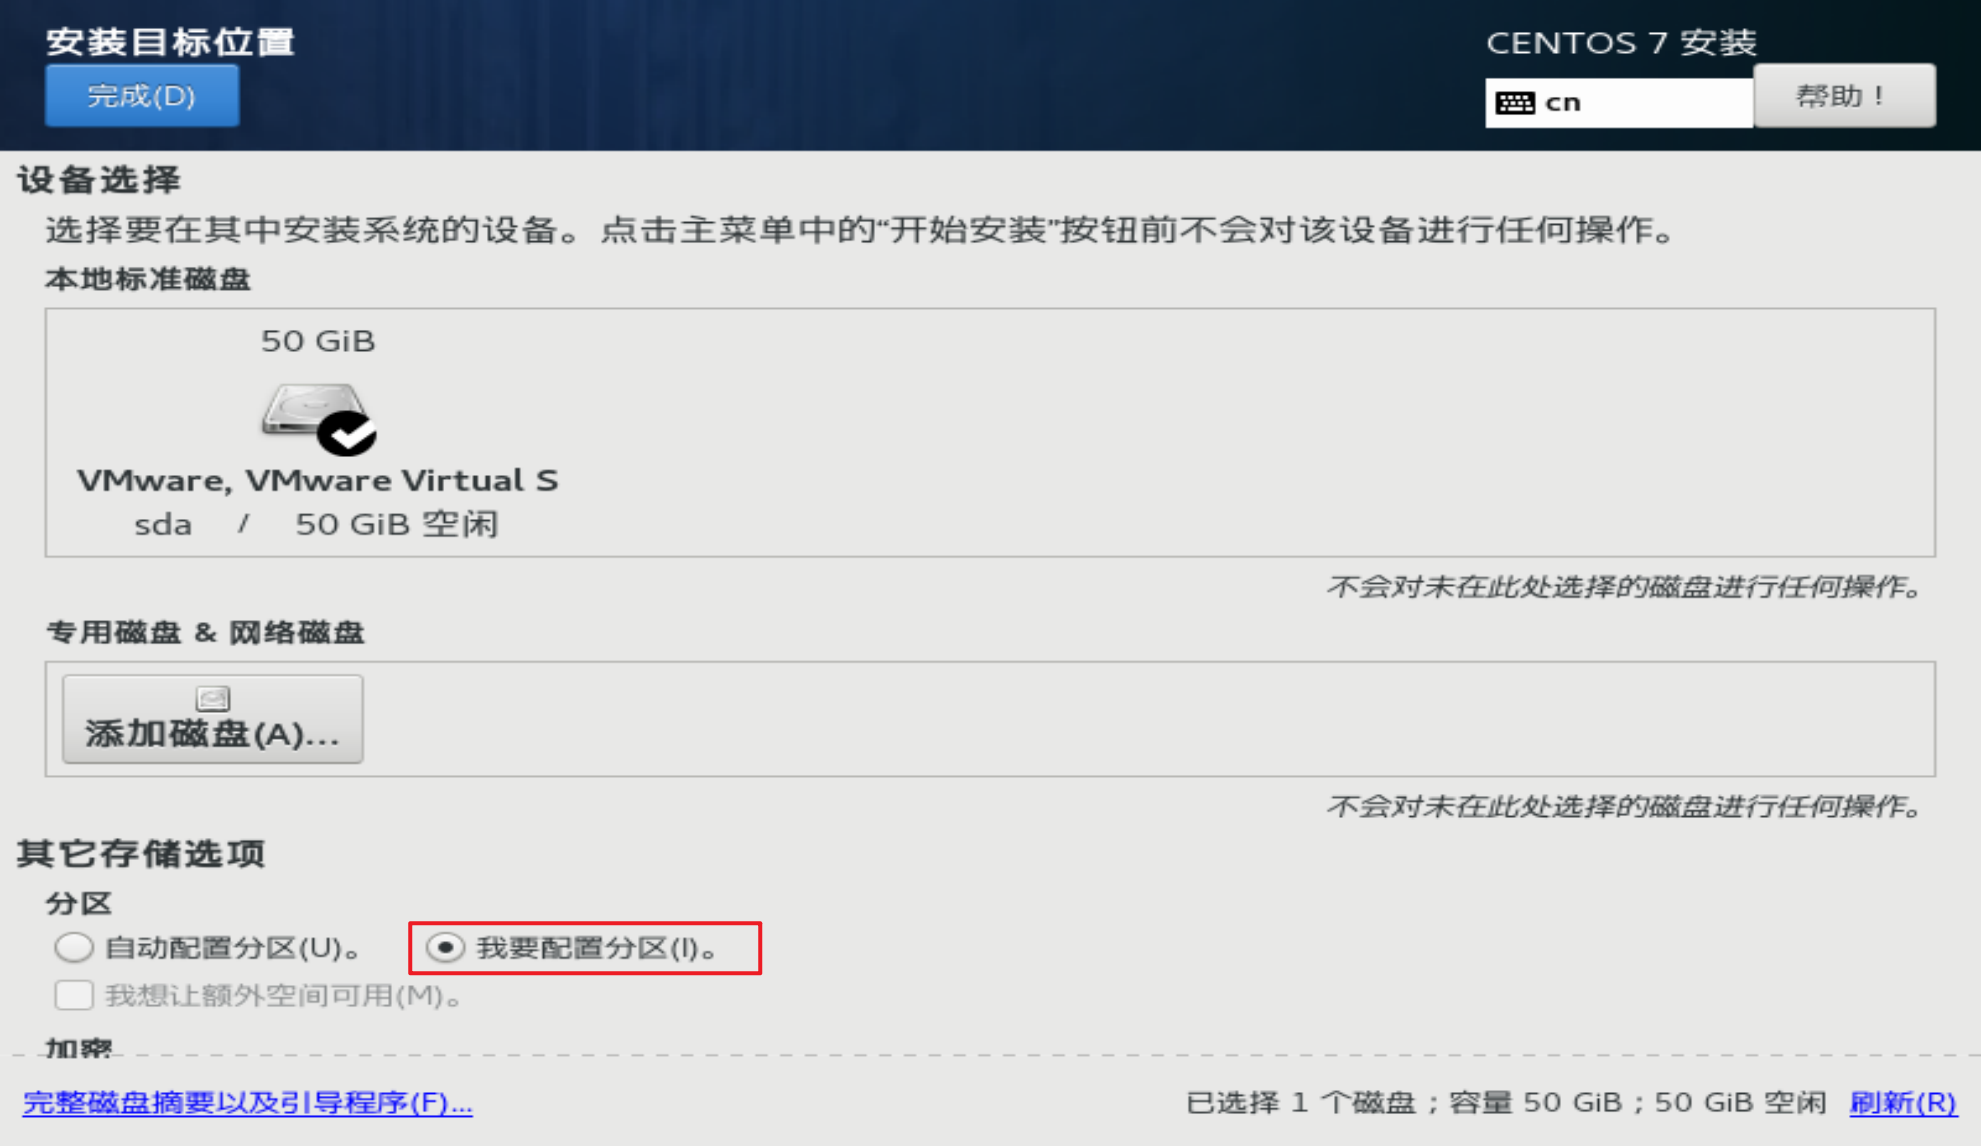
Hardware preparation
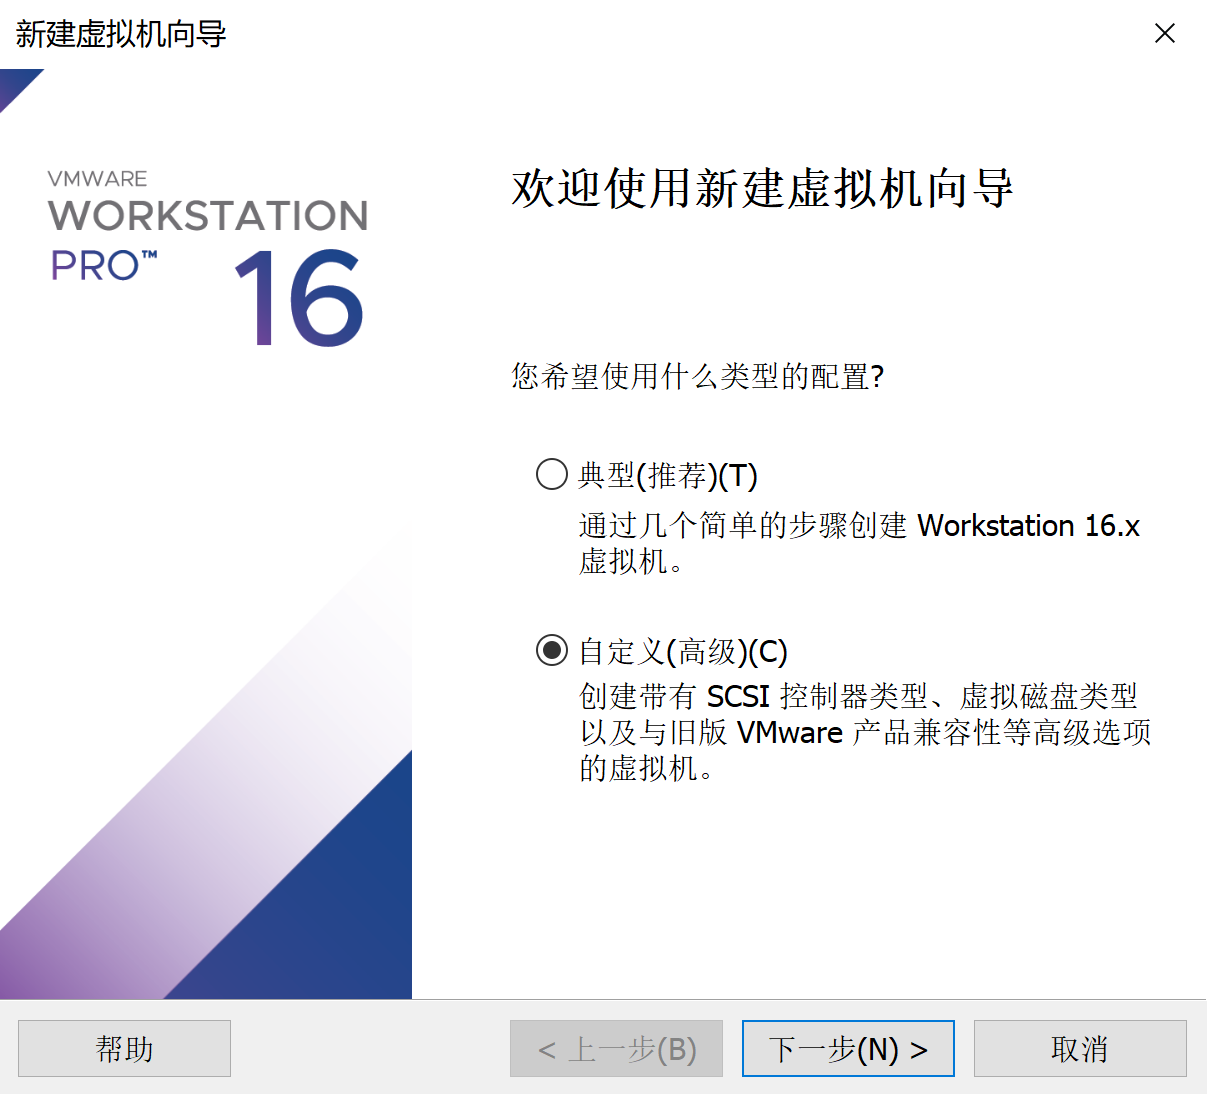
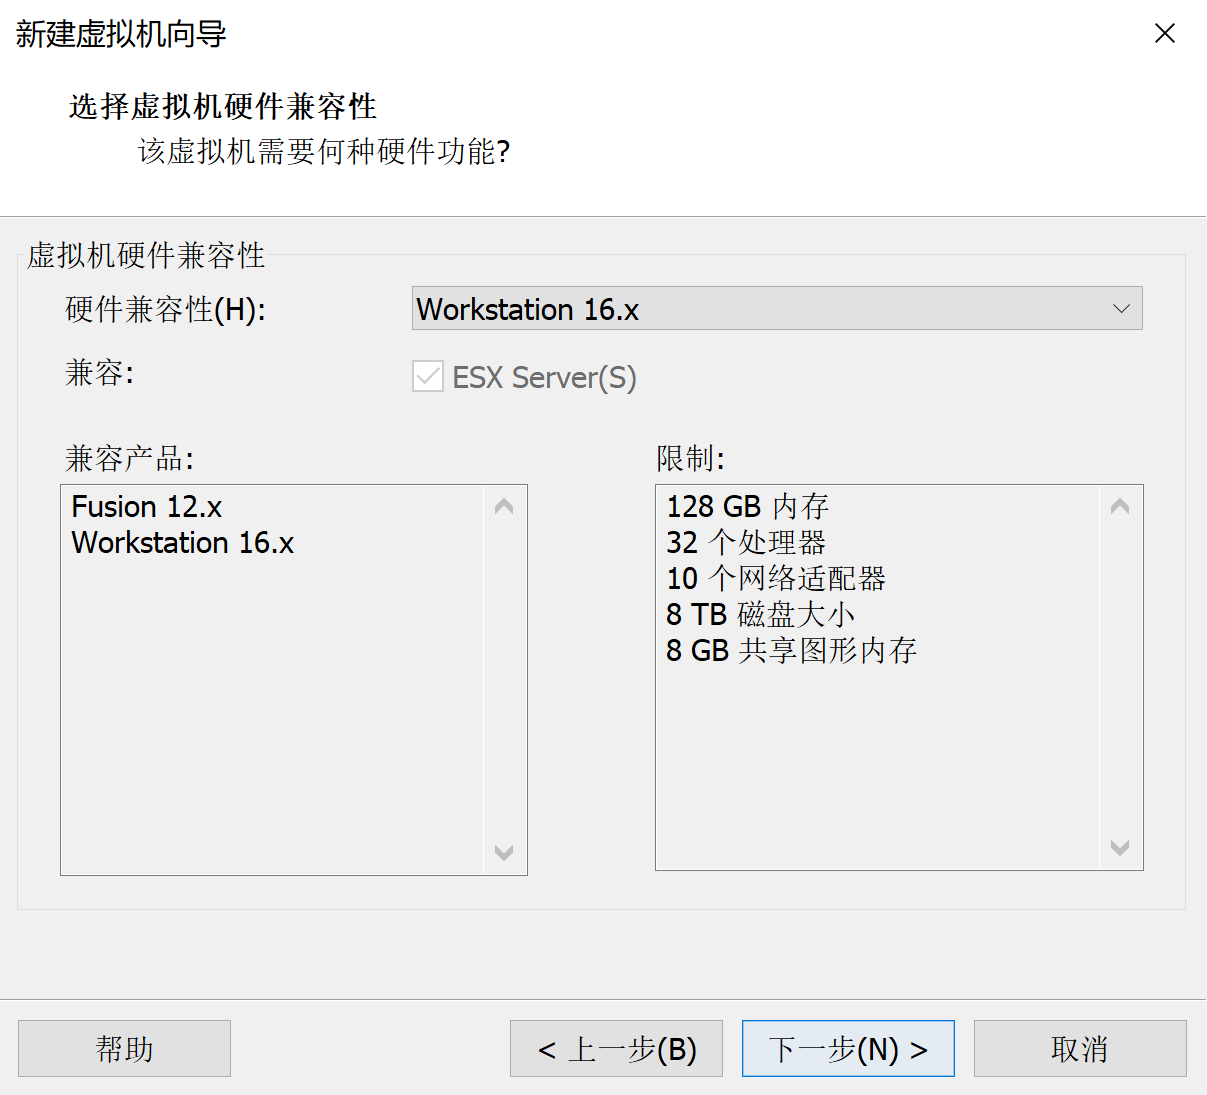
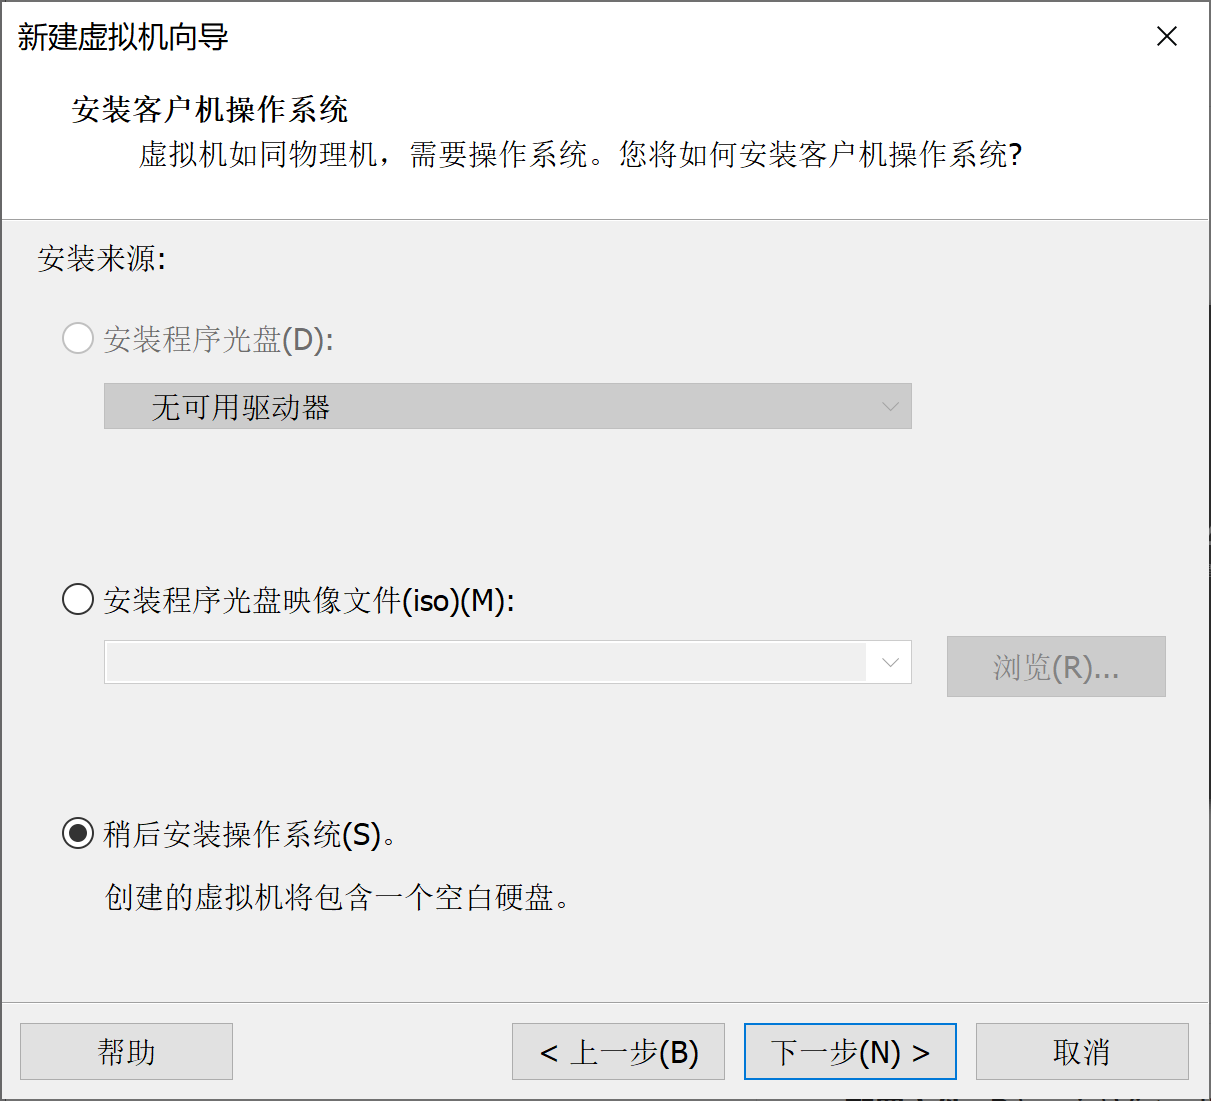
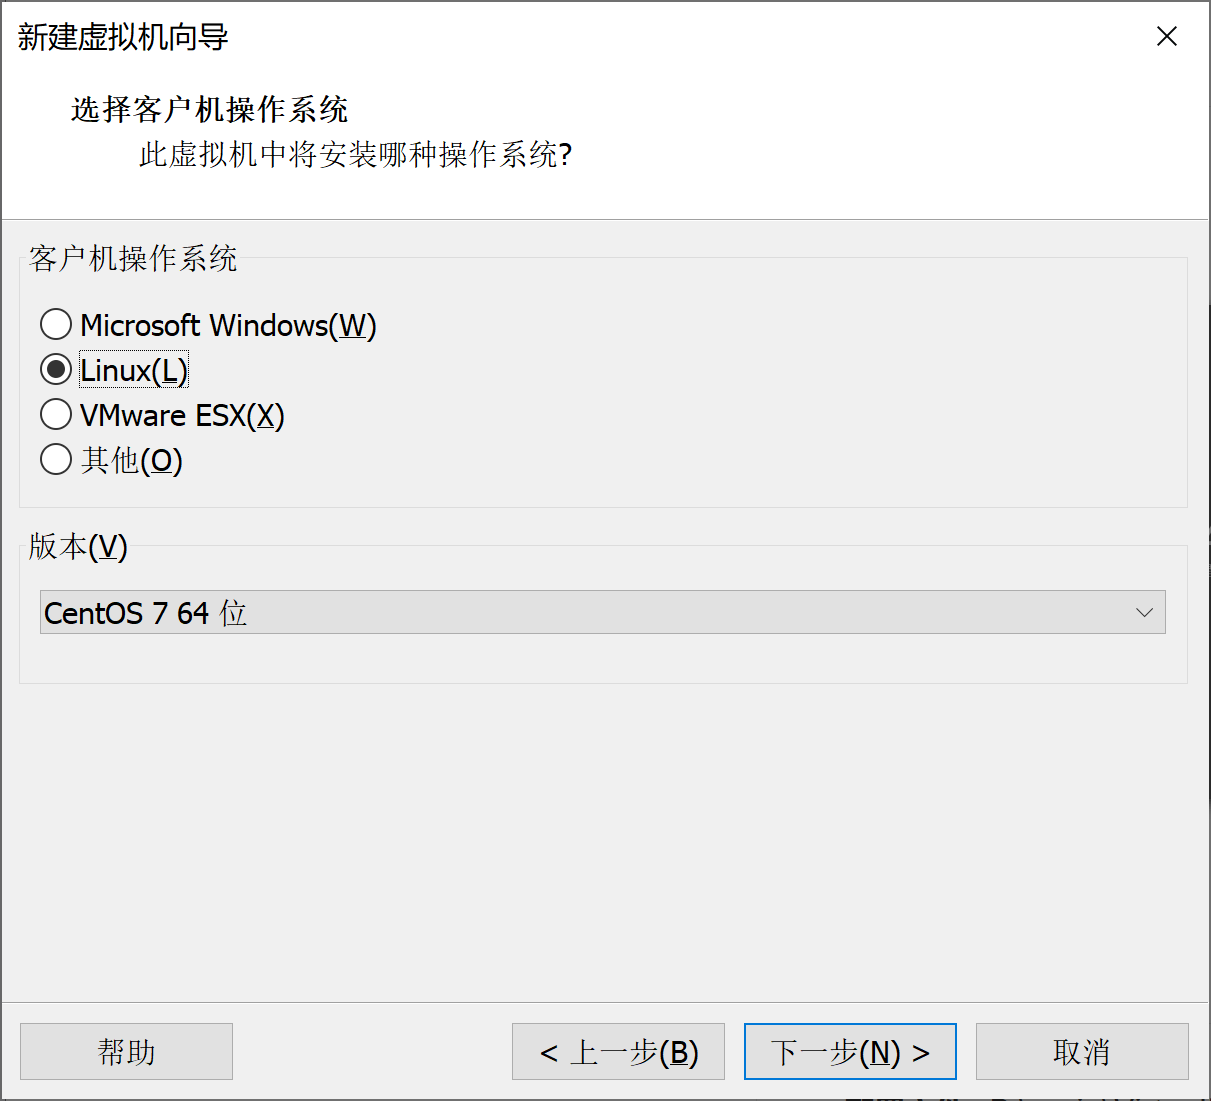
Virtual machine solution

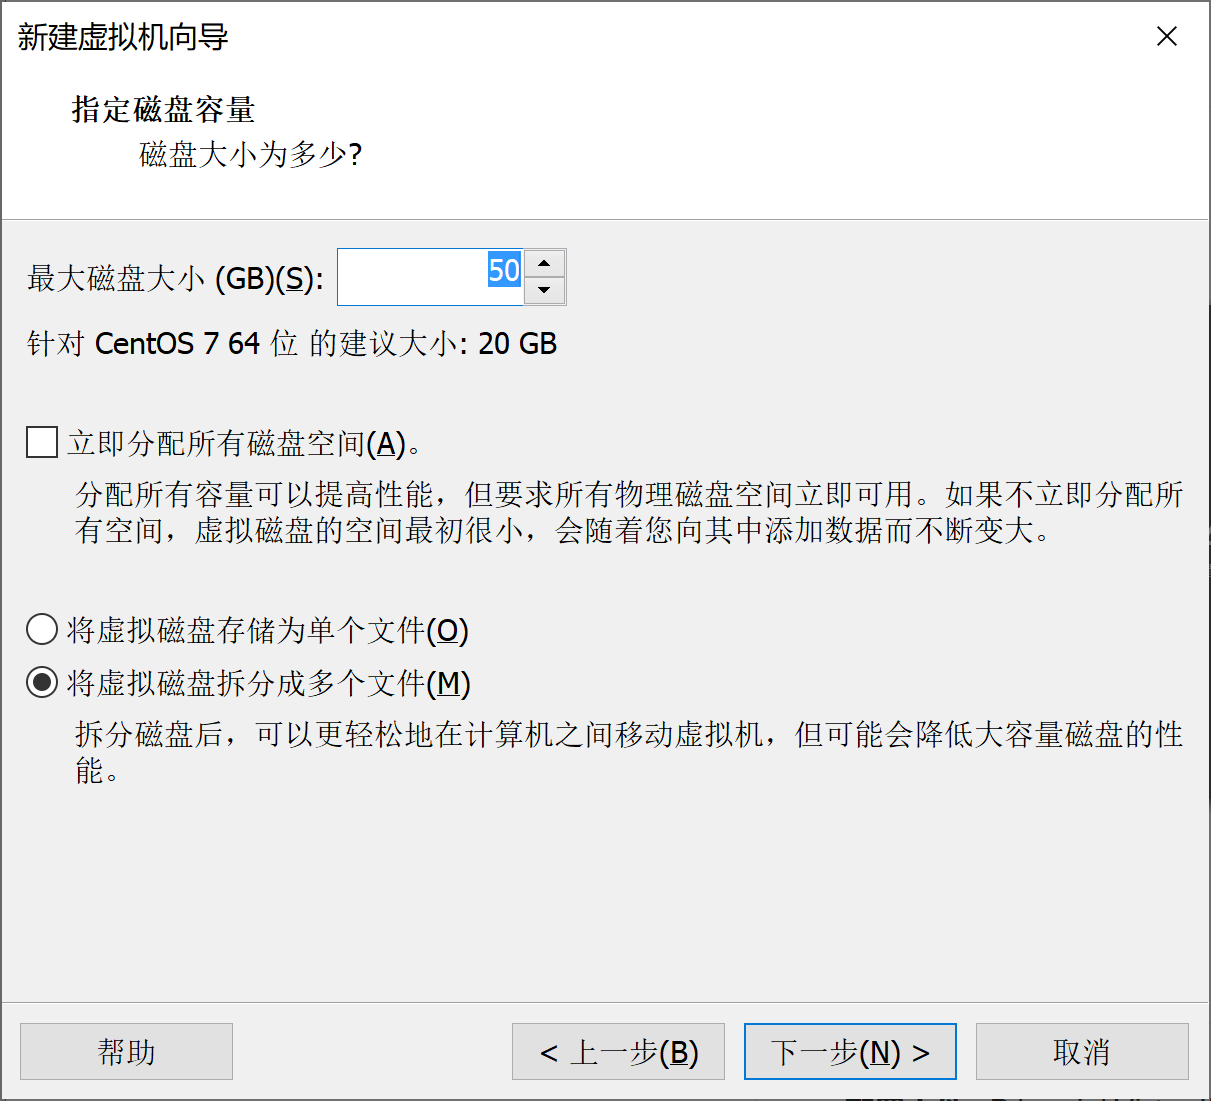
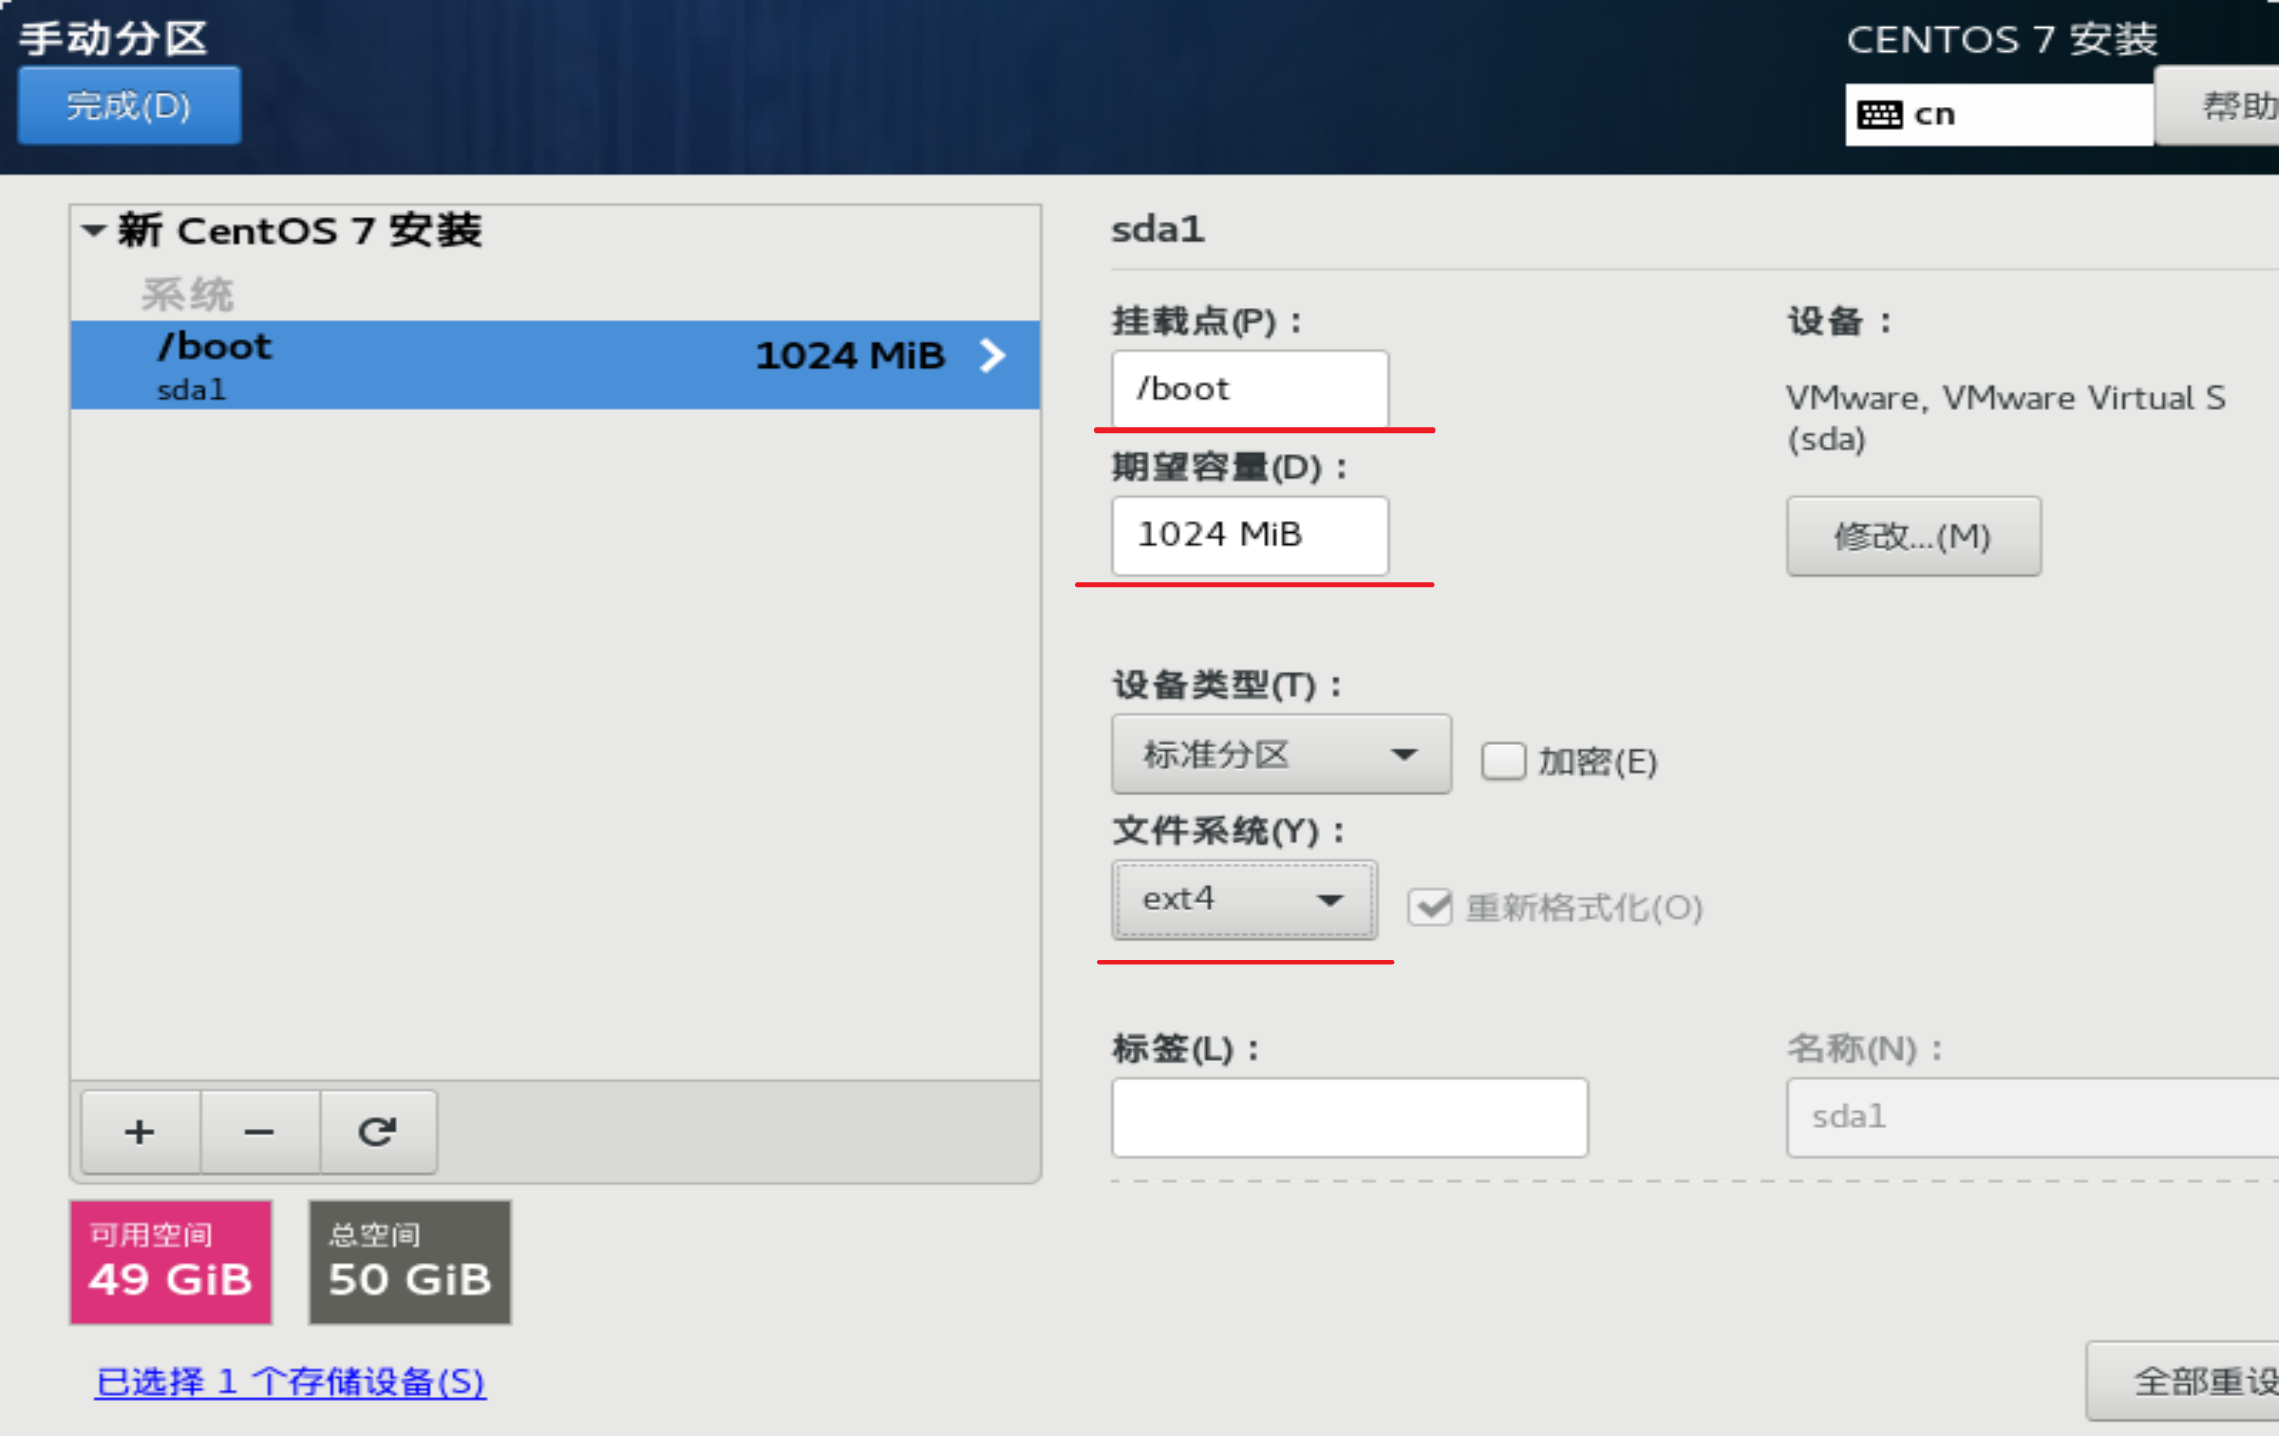
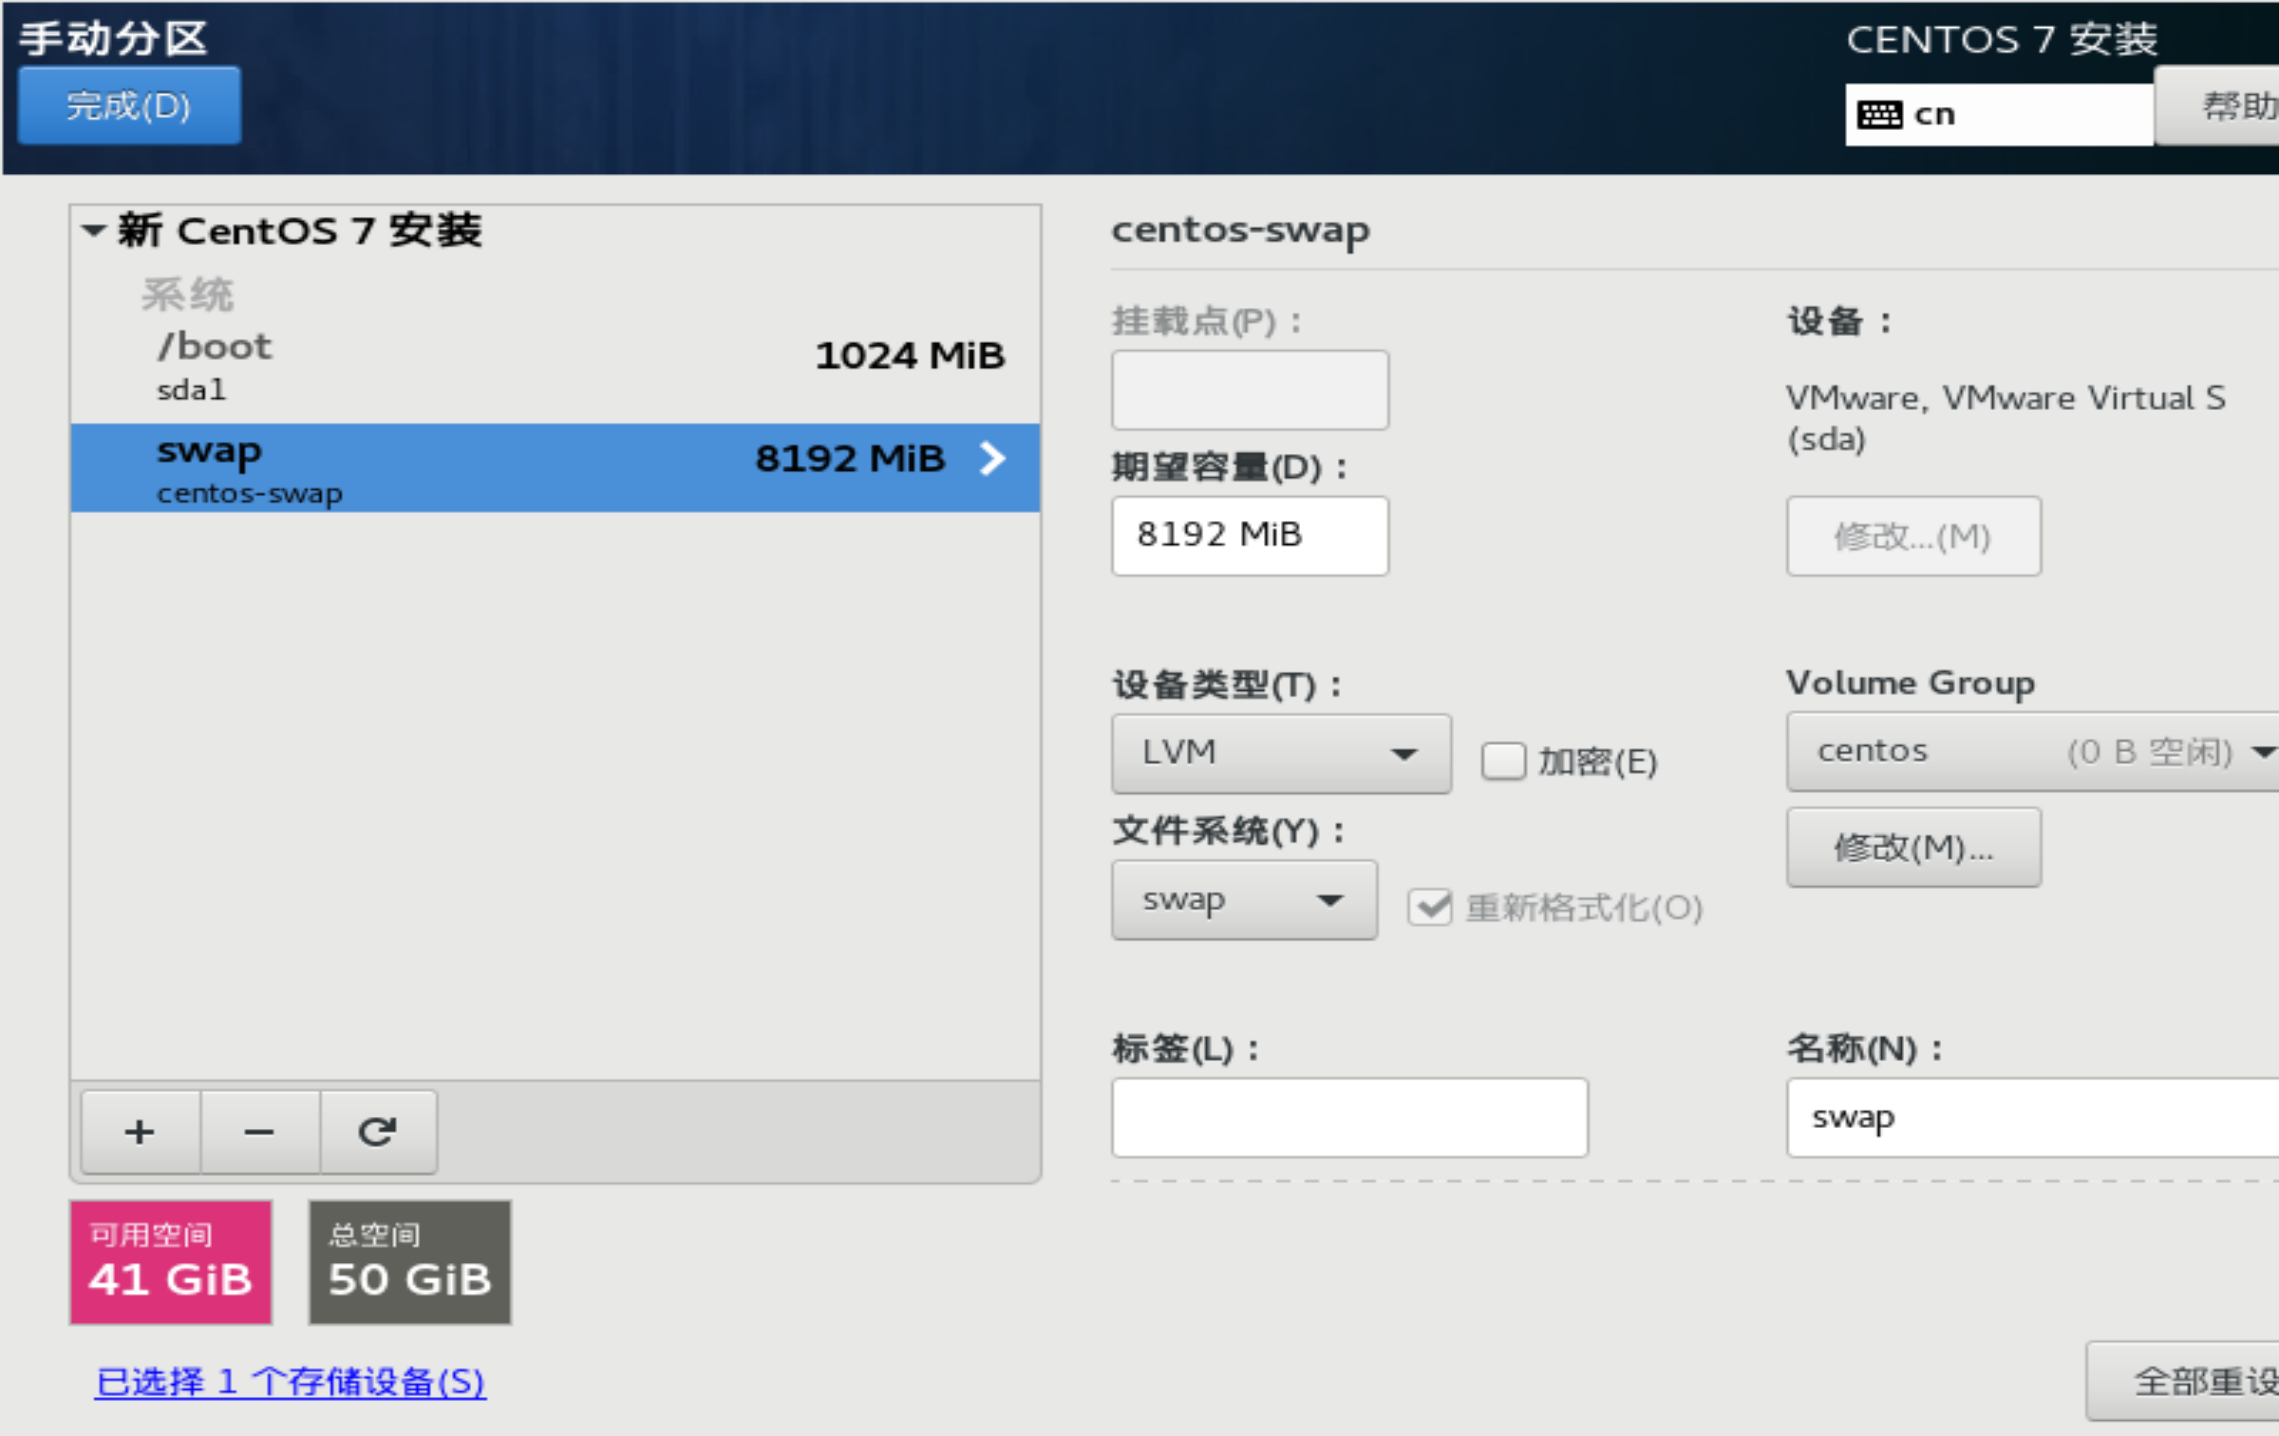
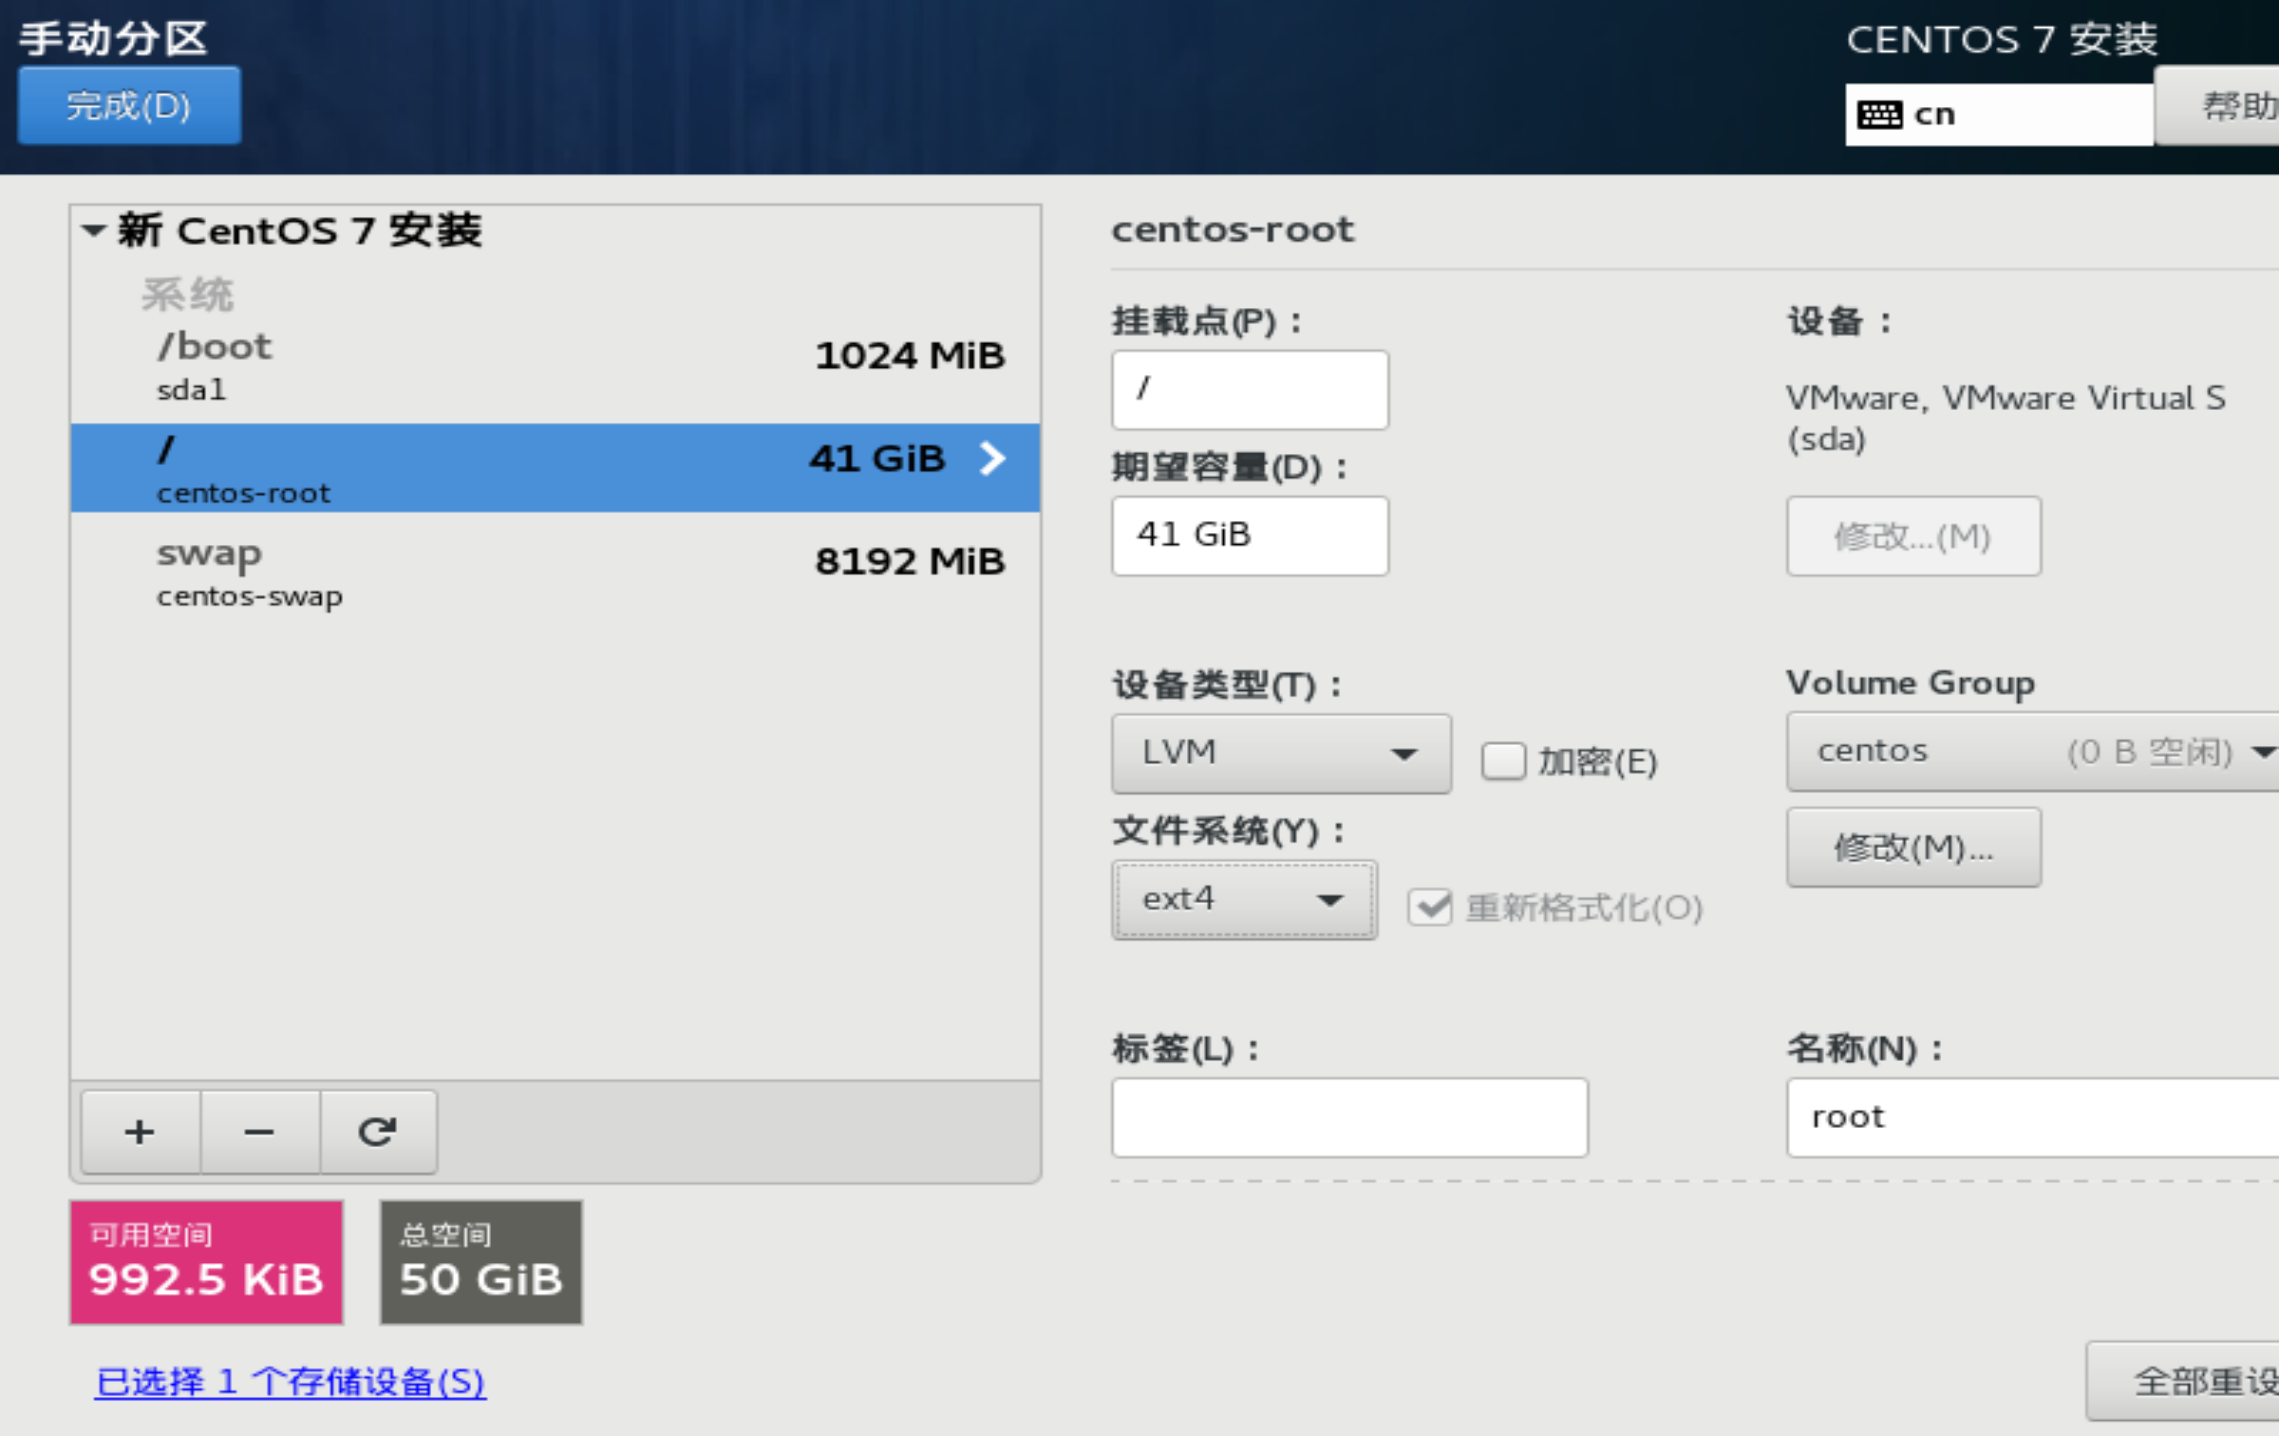
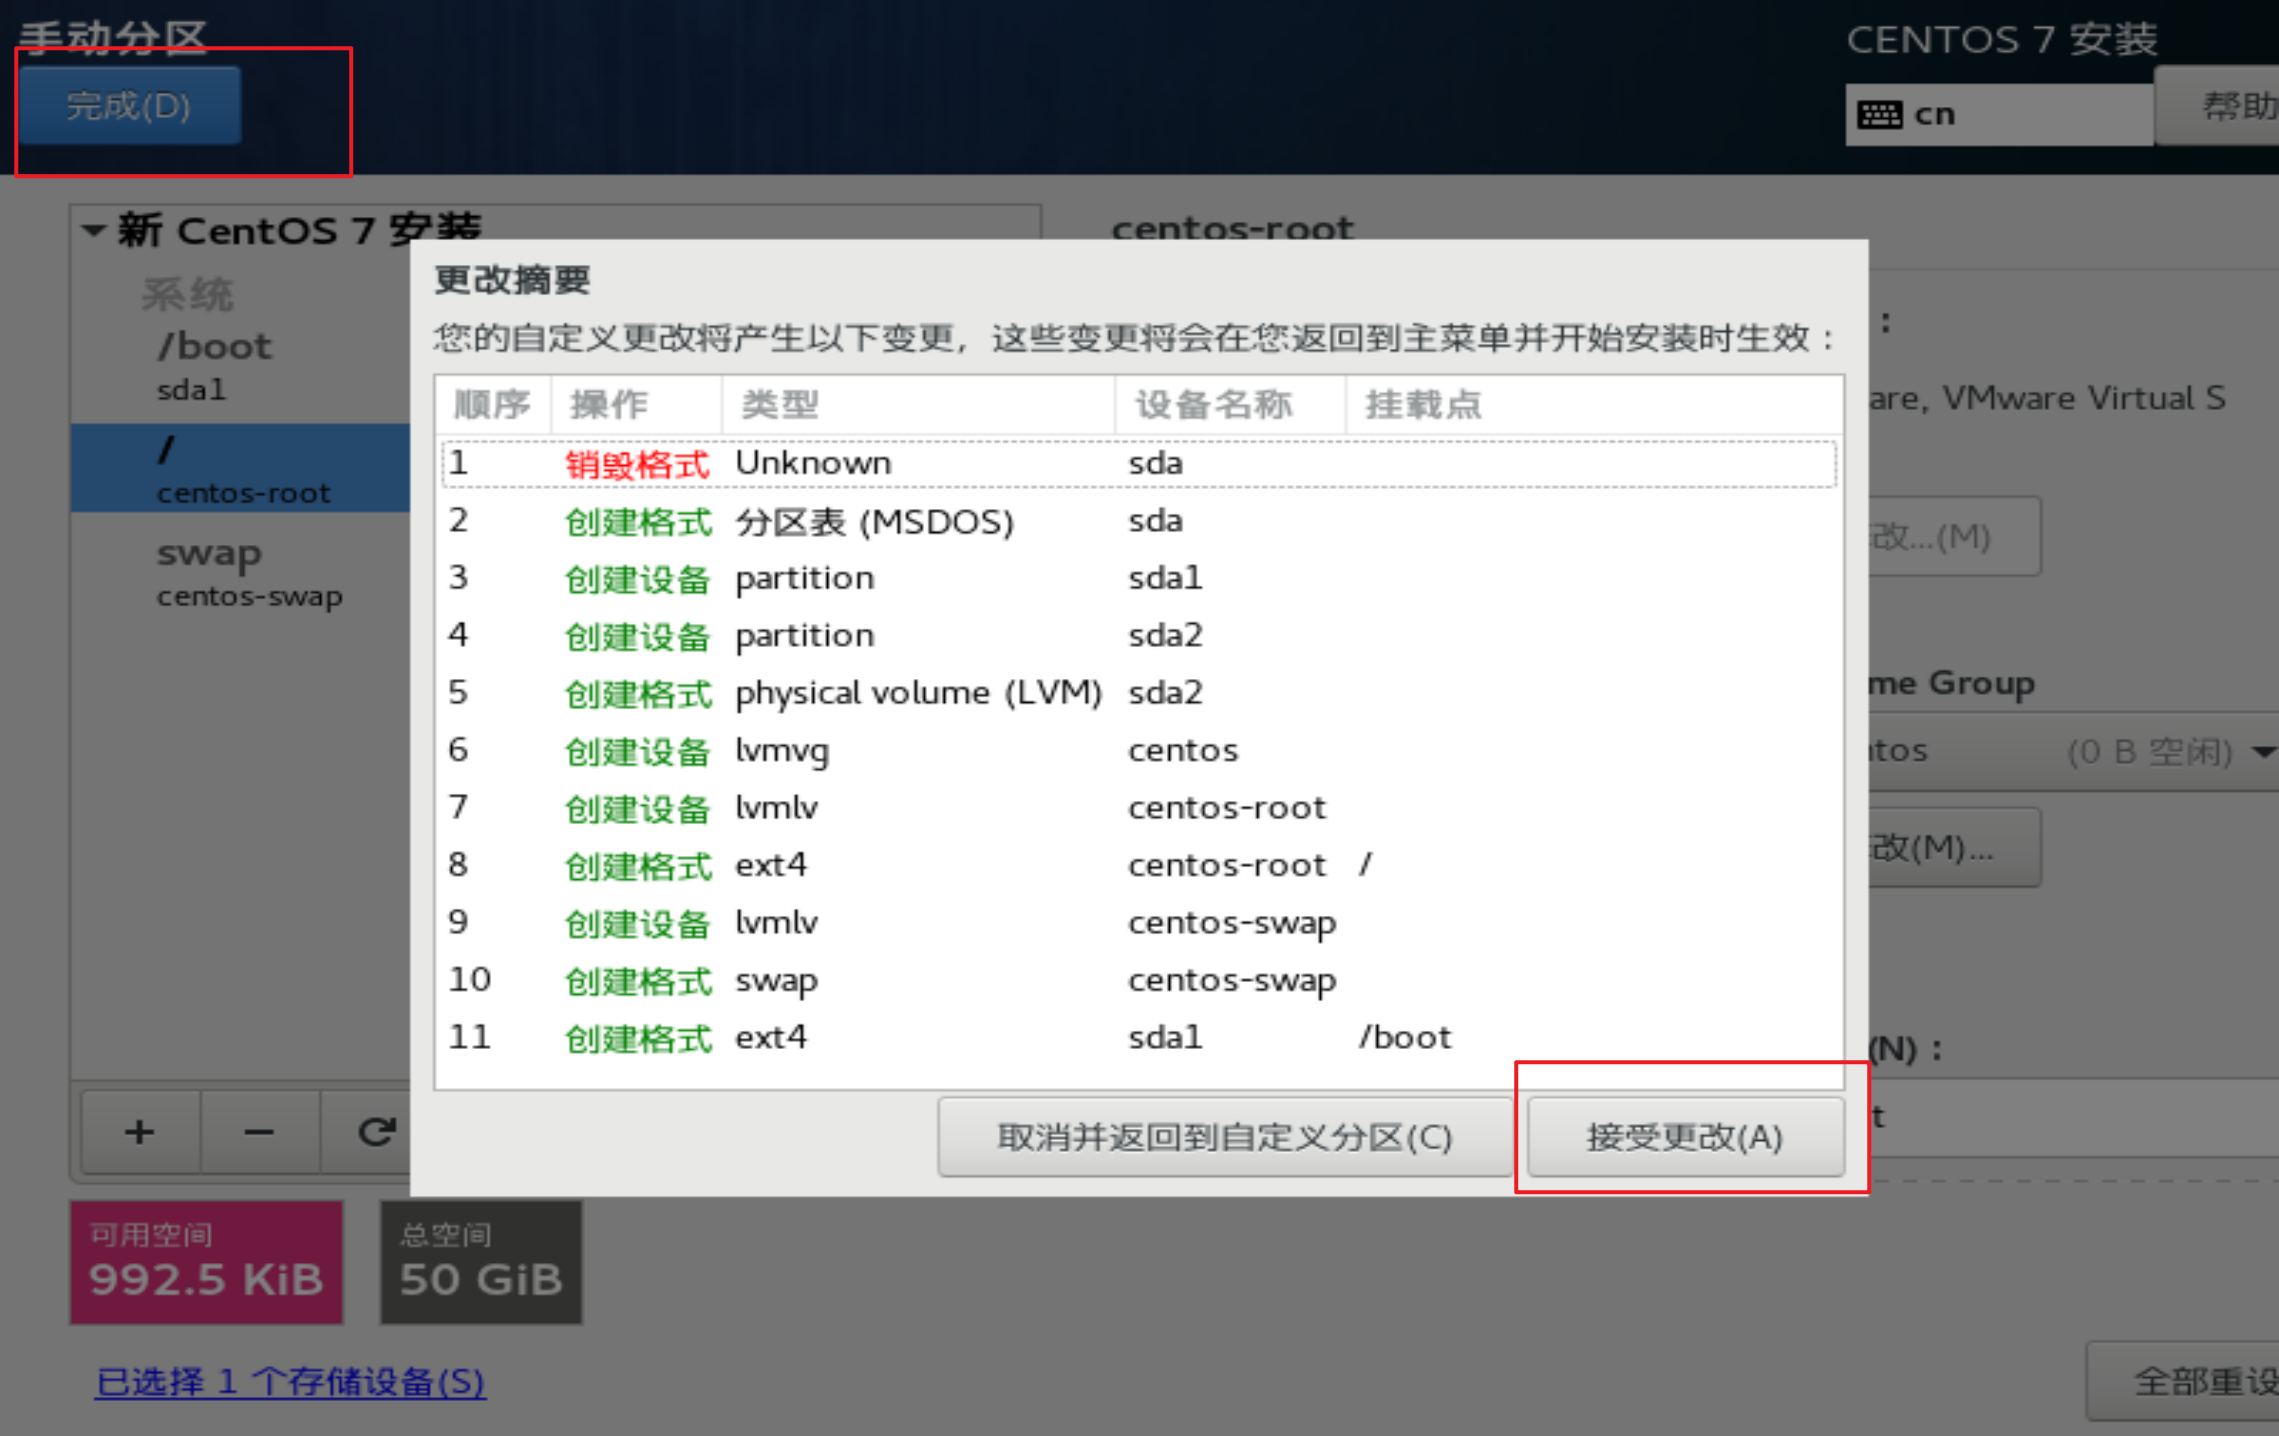
Hard disk partition scheme
/boot
The partition that loads the system boot boot program, which is used when the system starts
Swap partition
When the system memory is insufficient, use the space in the swap partition as standby memory
/
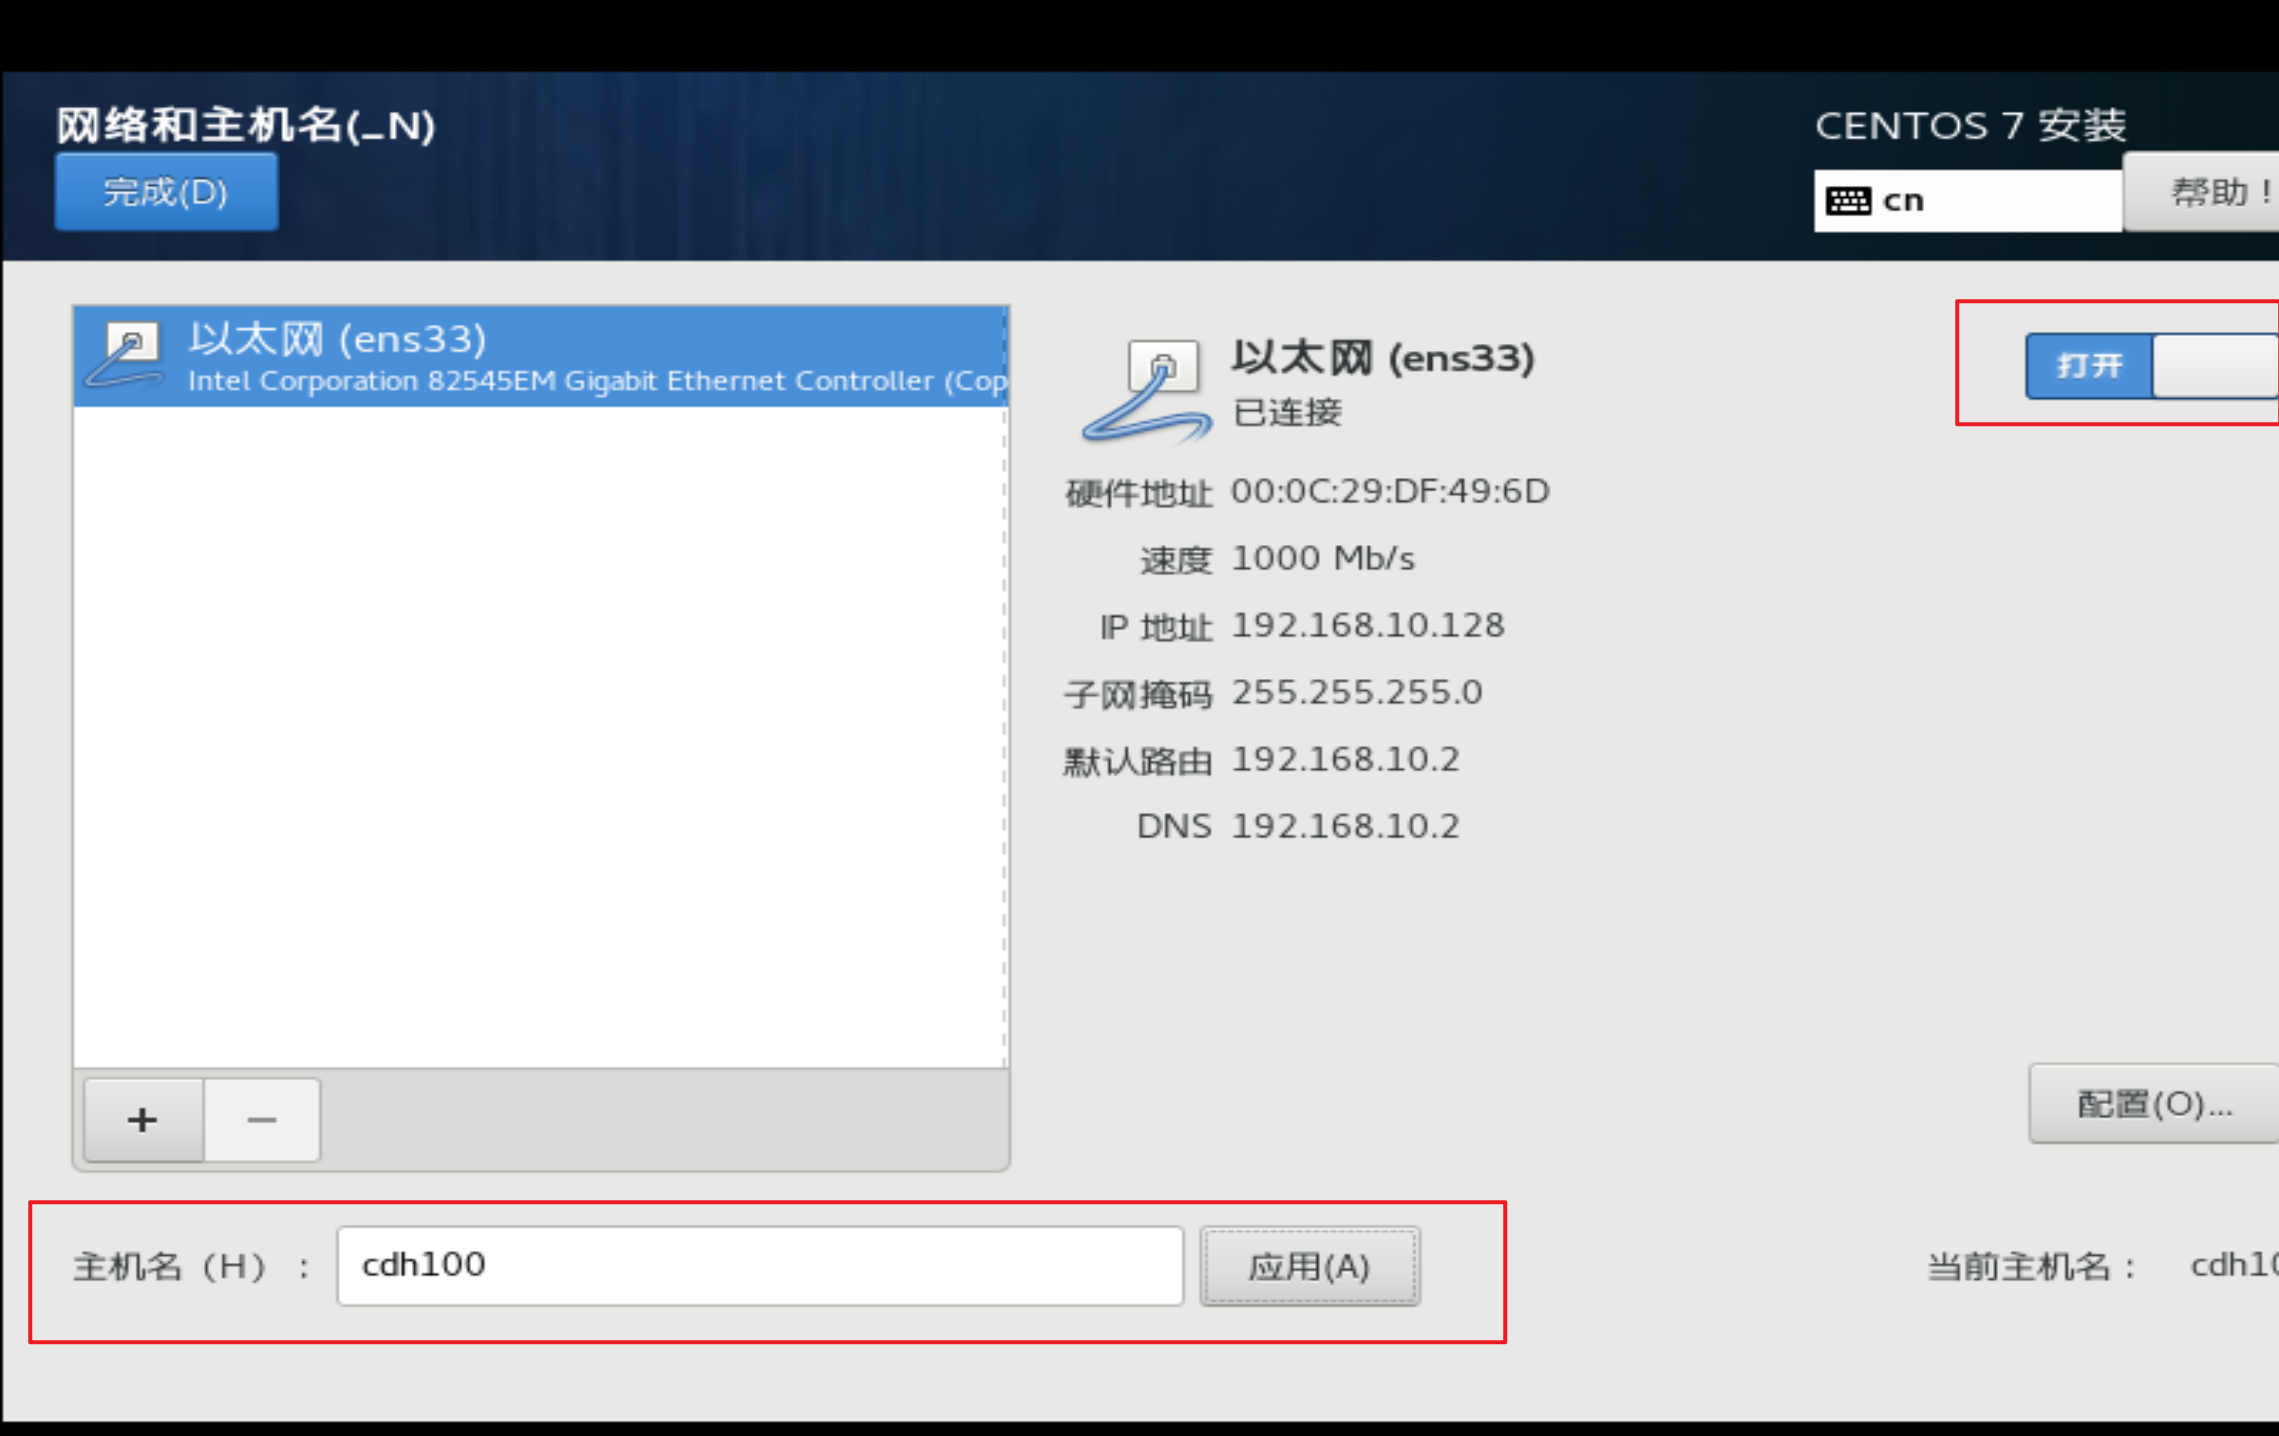
network configuration
You can simply configure and modify the host name in this interface. Further modifications will be made in the network card configuration file later
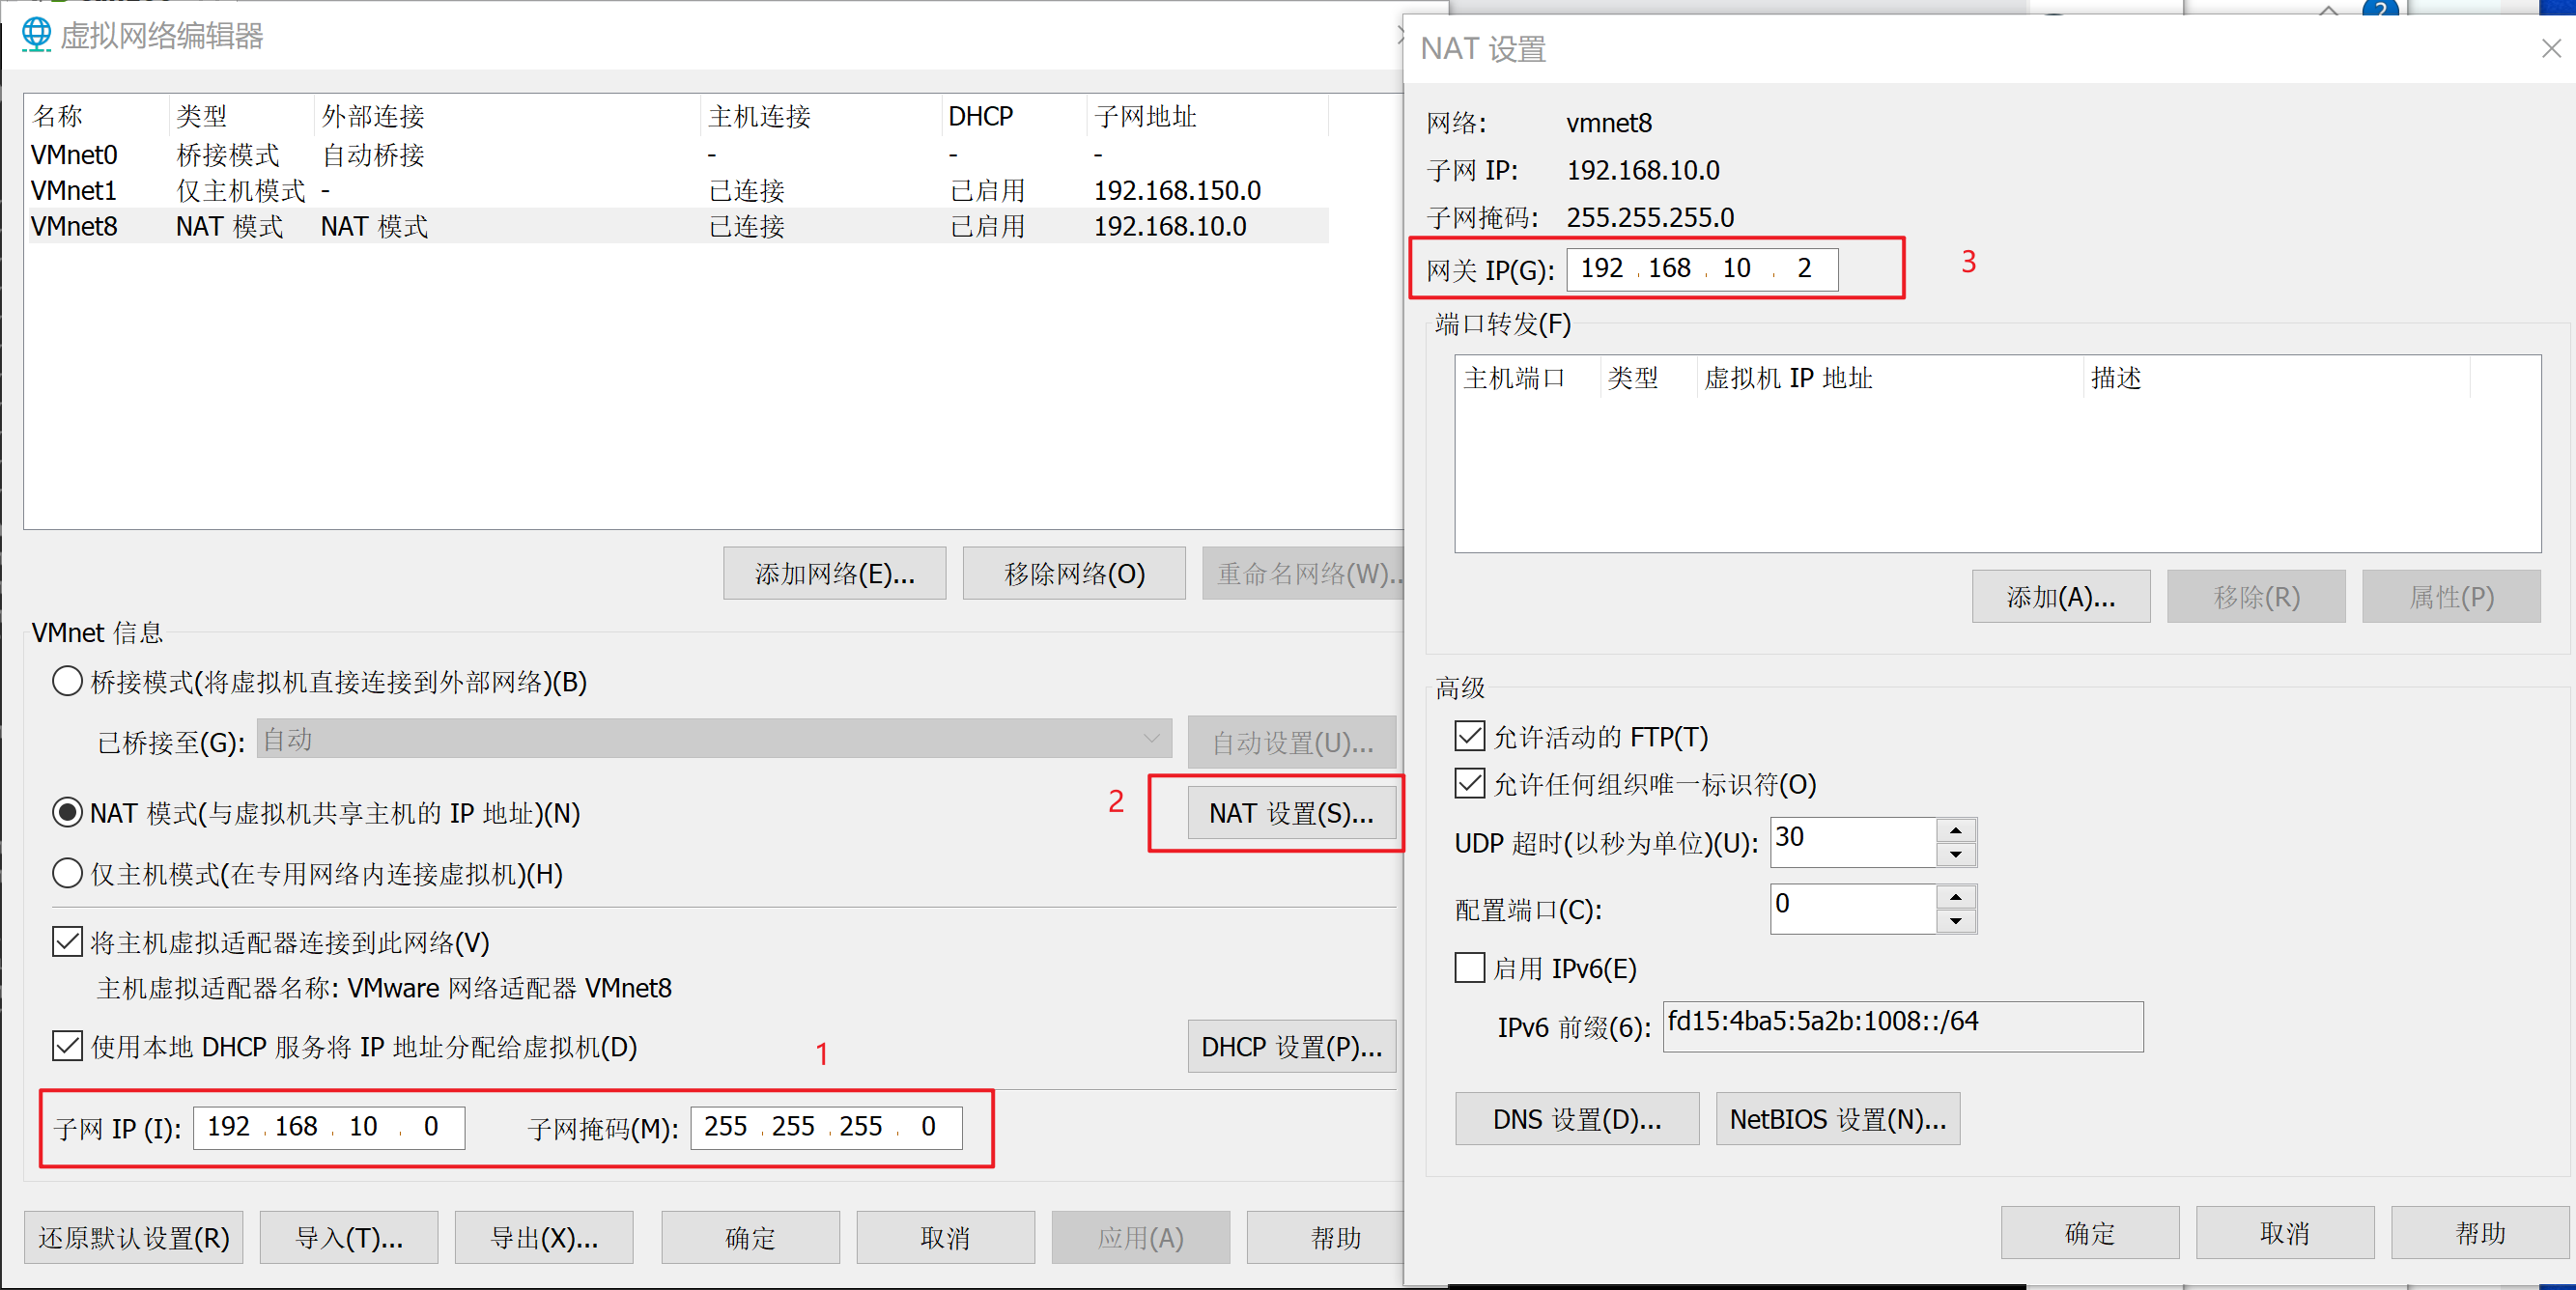
Configuring virtual networks for vmware
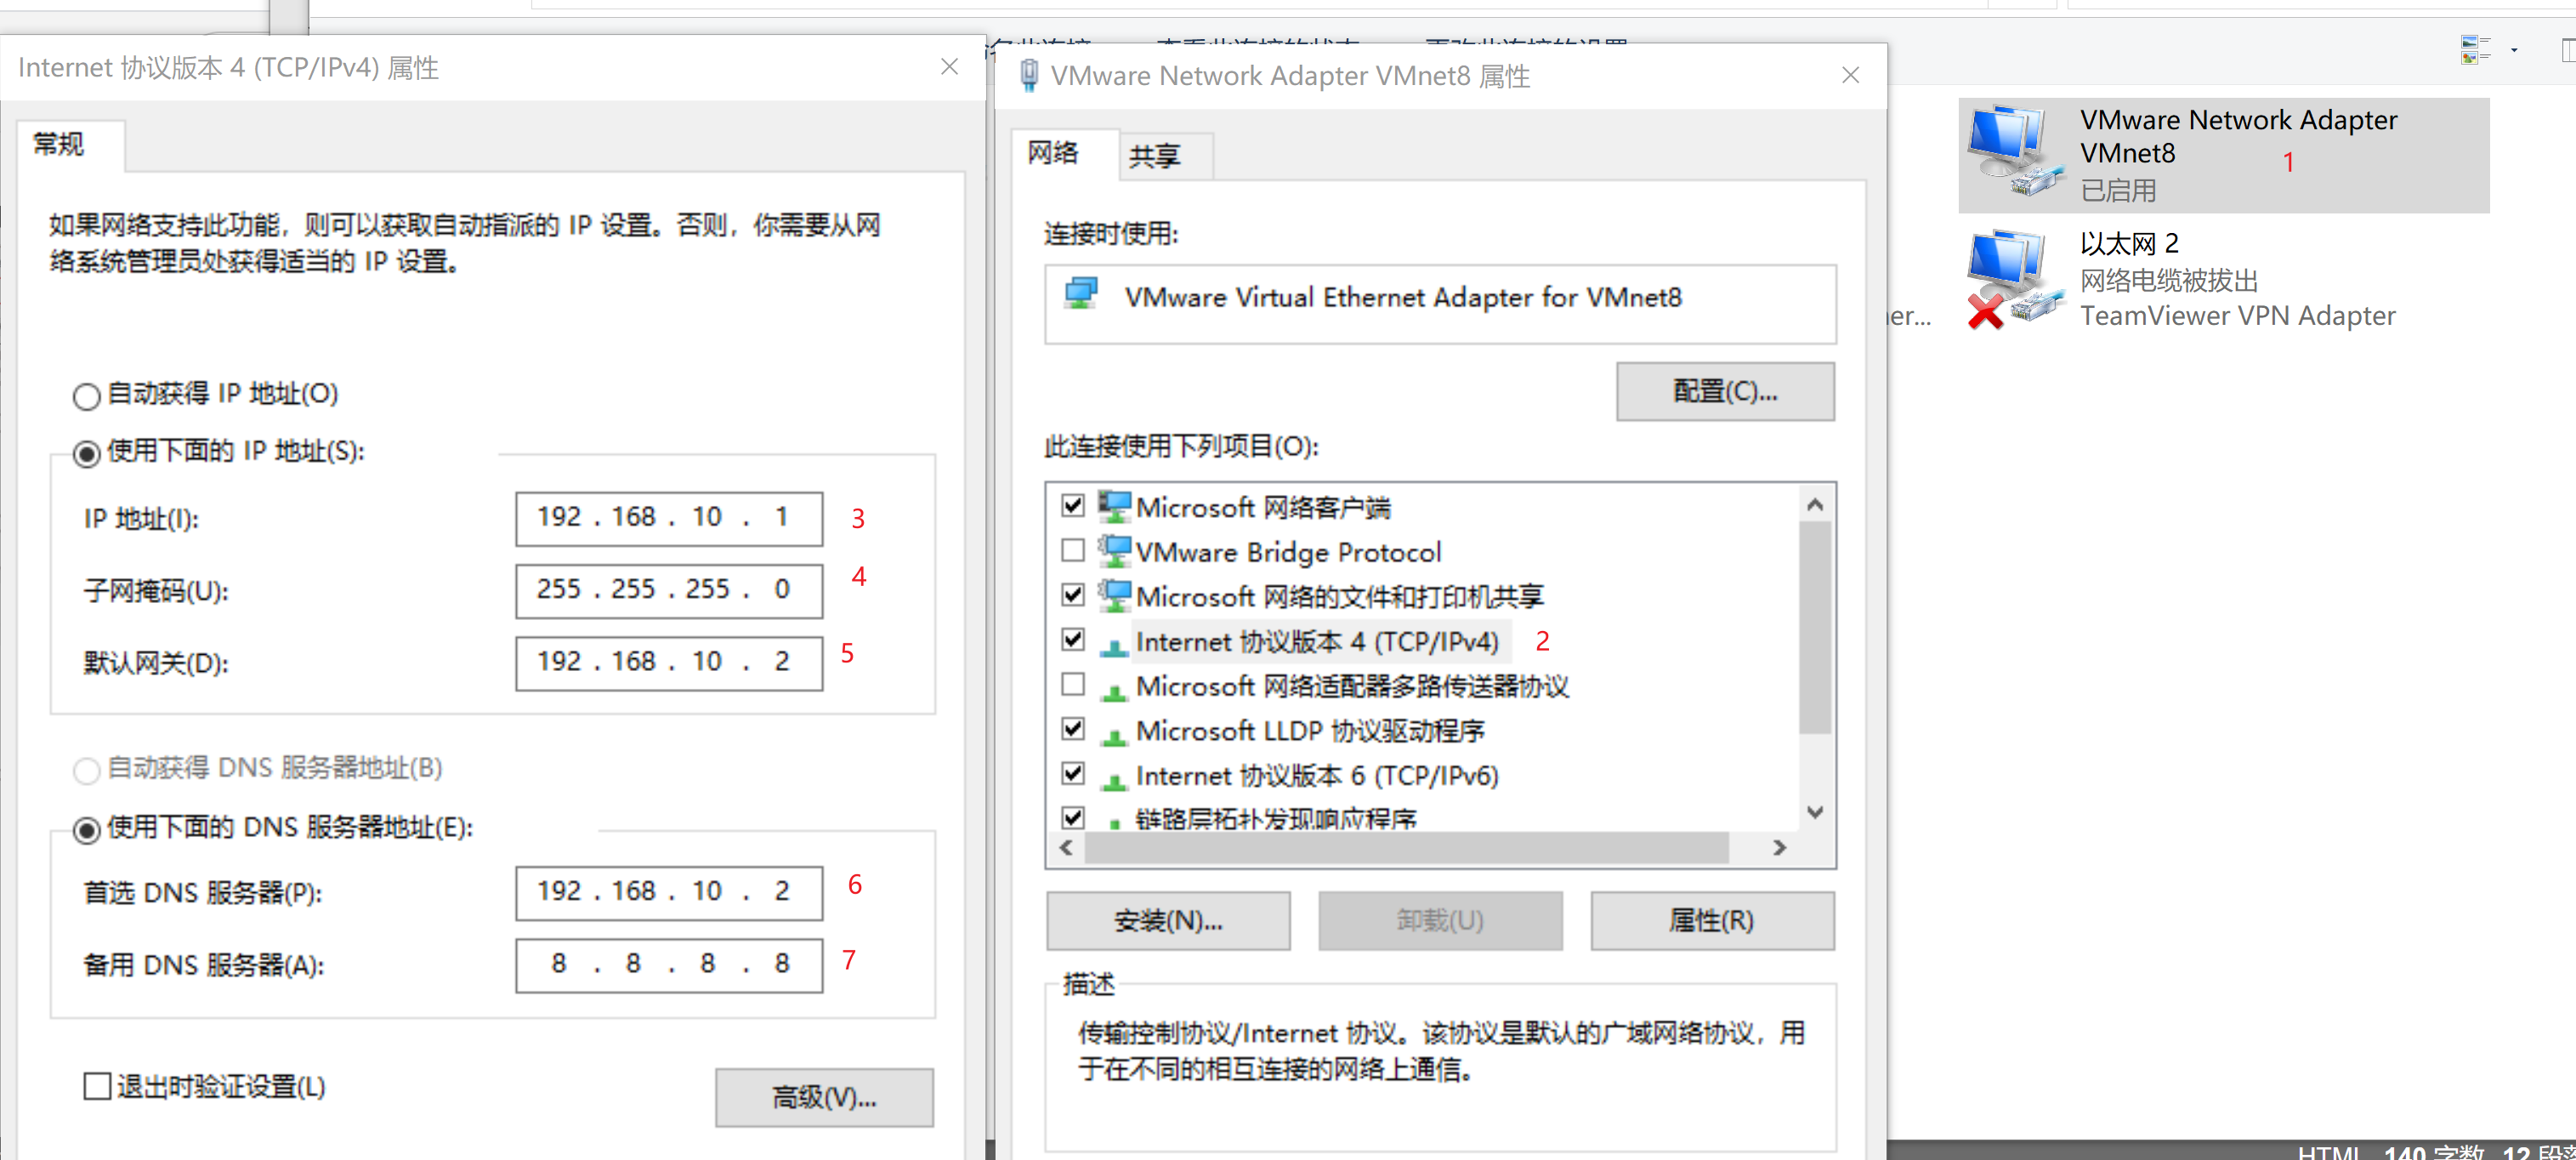
Configure the network of Win10
Configure the network card configuration of the virtual machine
yum install -y epel-release
yum install -y vim
su root
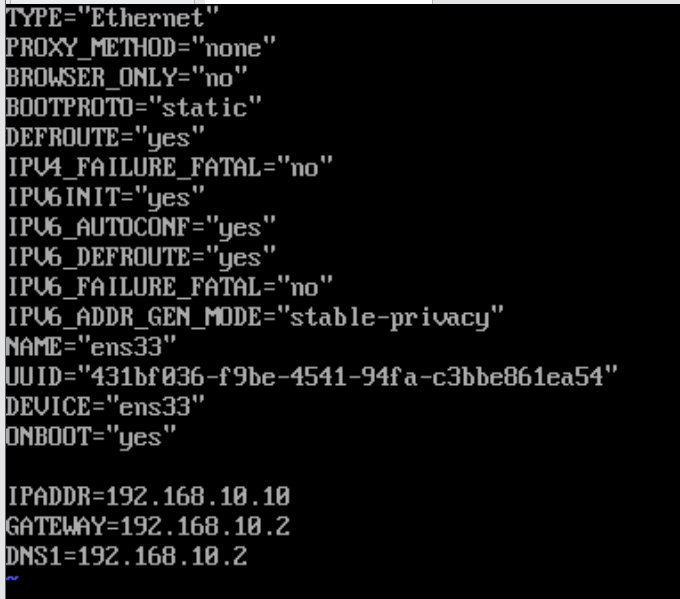
vim /etc/sysconfig/network-scripts/ifcfg-ens33
Set BOOTPROTO to static
Add at the end of the file
IPADDR=192.168.10.10
GATEWAY=192.168.10.2
DNS1=192.168.10.2
hostnamectl set-hostname v100.virtualmachine.com
Modify the host name to V100 virtualmachine. com
Configure ip address and hostname mapping
vim /etc/hosts
192.168.10.10 v100.virtualmachine.com cdh100
192.168.10.11 v101.virtualmachine.com cdh101
192.168.10.12 v102.virtualmachine.com cdh102
192.168.10.13 v103.virtualmachine.com cdh103
192.168.10.14 v104.virtualmachine.com cdh104
192.168.10.15 v105.virtualmachine.com cdh105
192.168.10.16 v106.virtualmachine.com cdh106
192.168.10.17 v107.virtualmachine.com cdh107
192.168.10.18 v108.virtualmachine.com cdh108
192.168.10.19 v109.virtualmachine.com cdh109
192.168.10.20 v110.virtualmachine.com cdh110
reboot restart
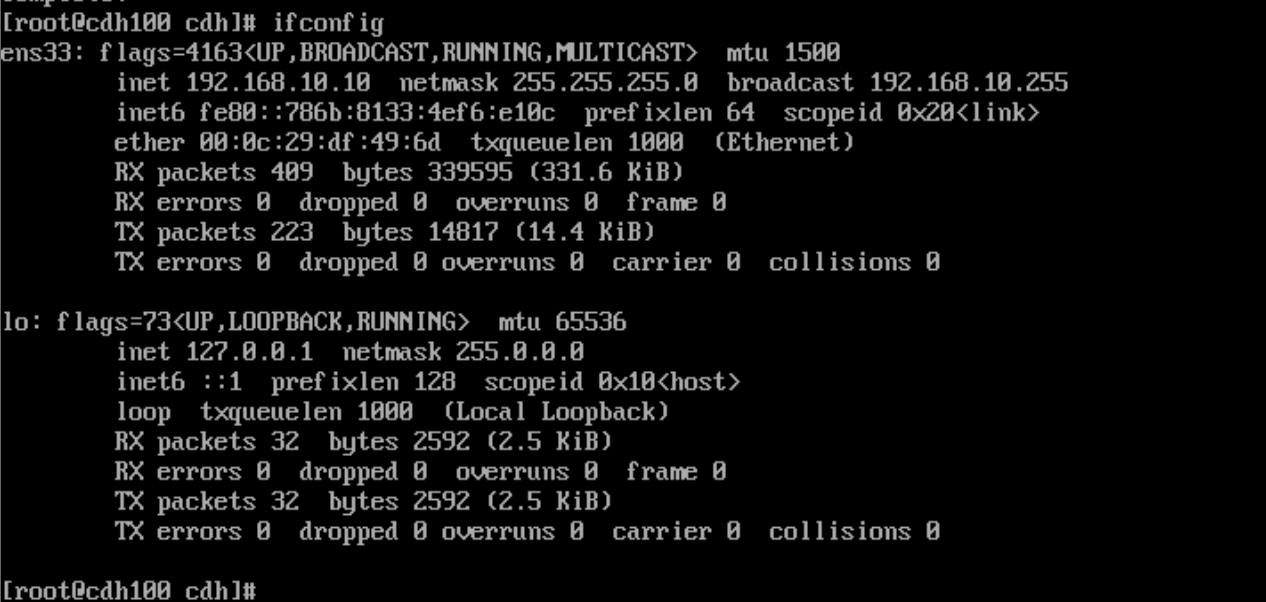
yum install -y net-tools
ifconfig to check whether the configuration is effective
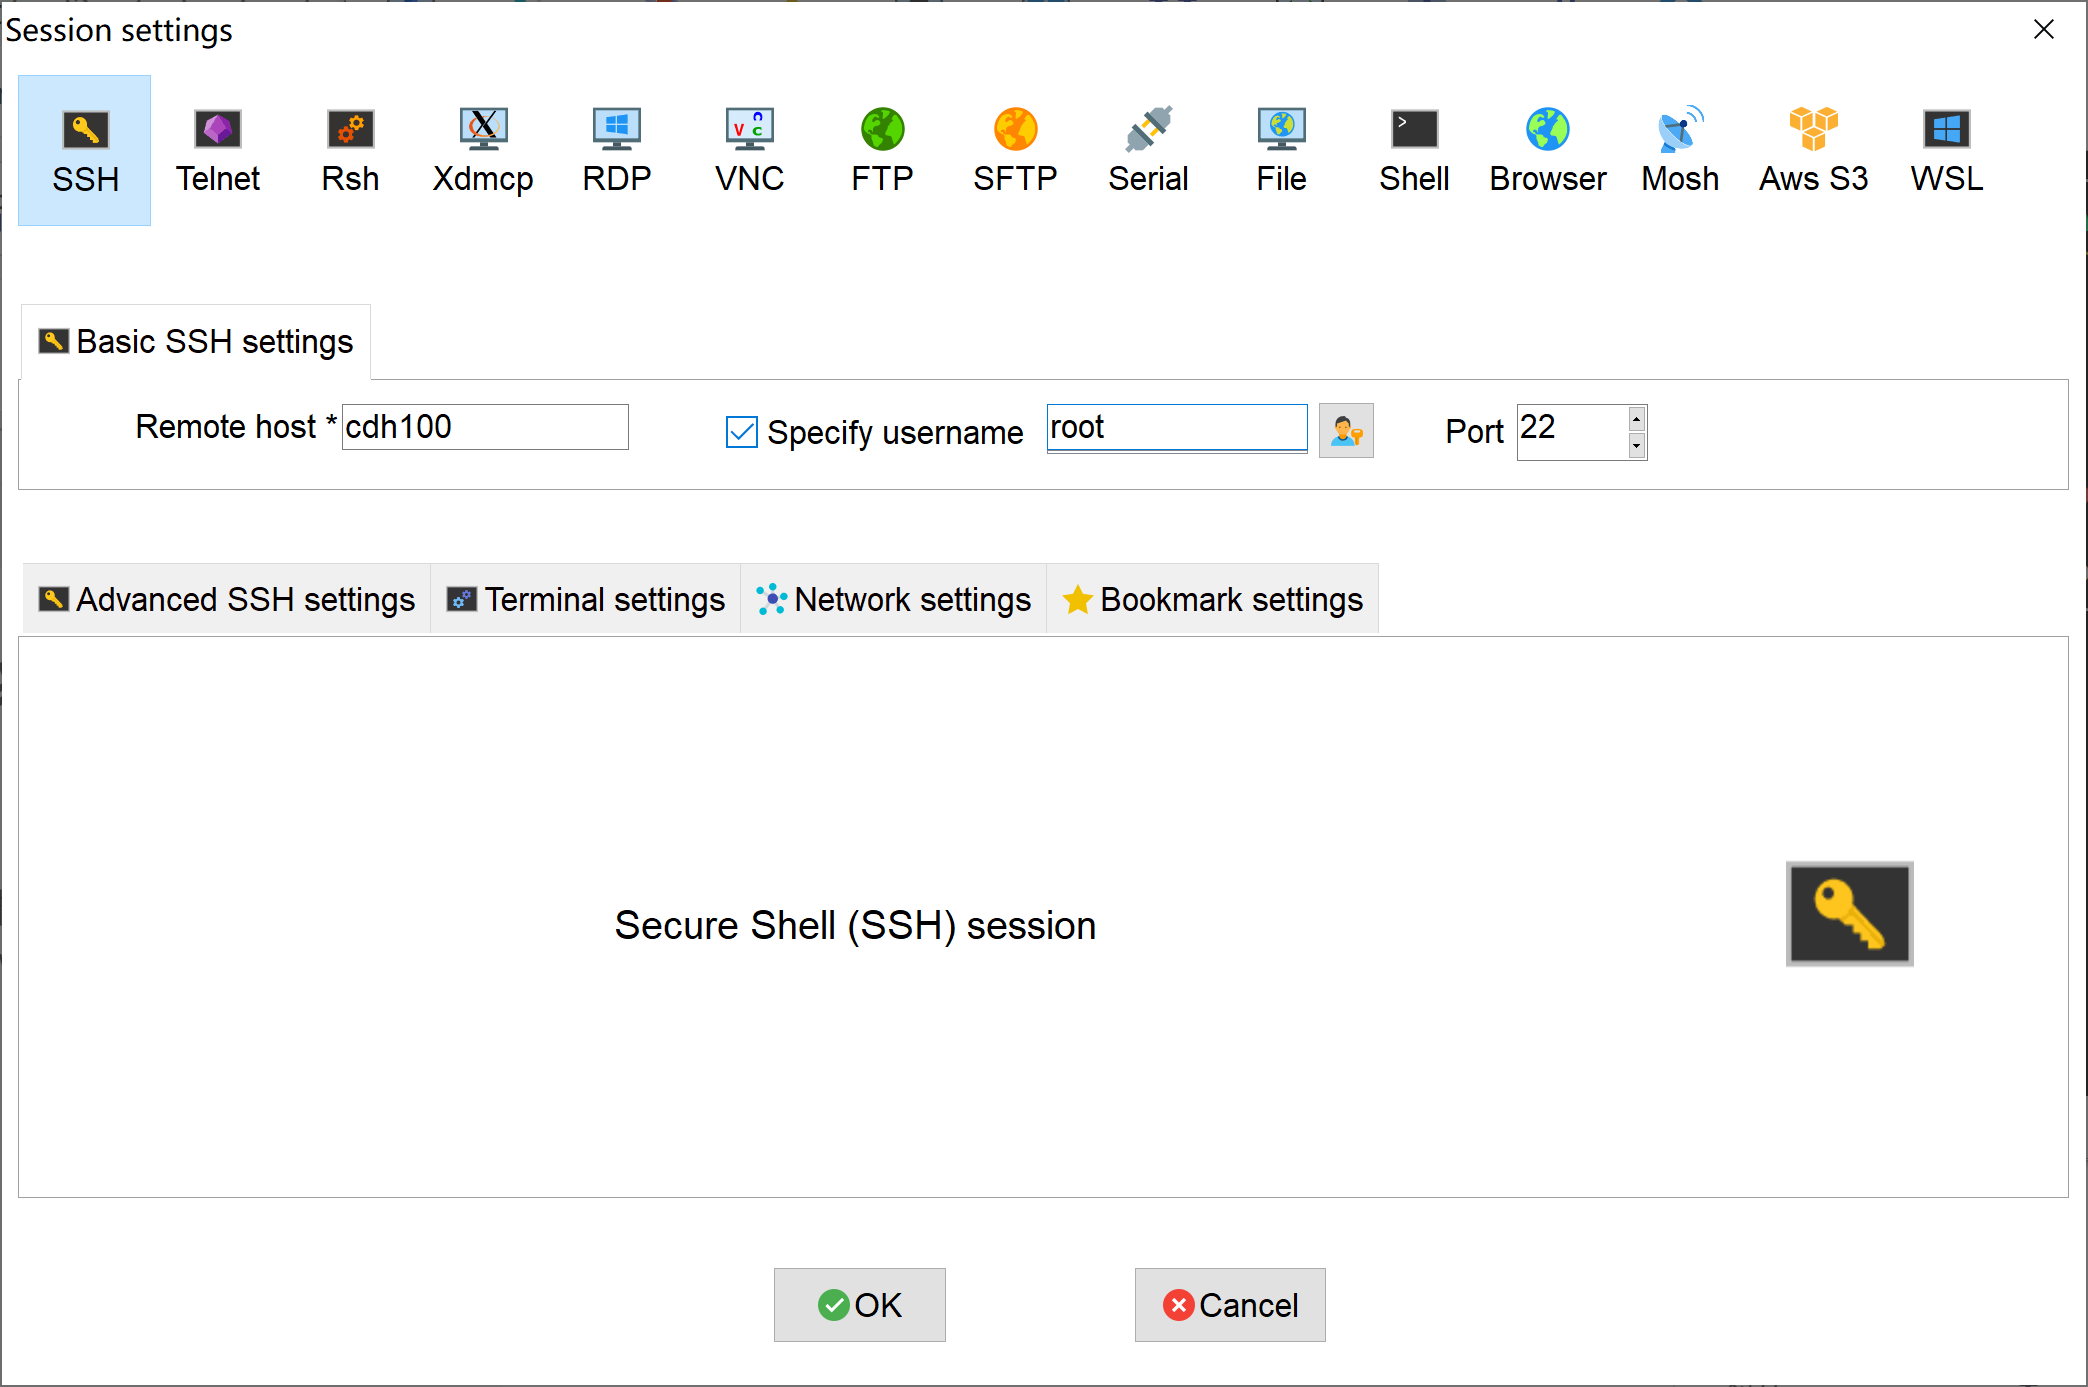
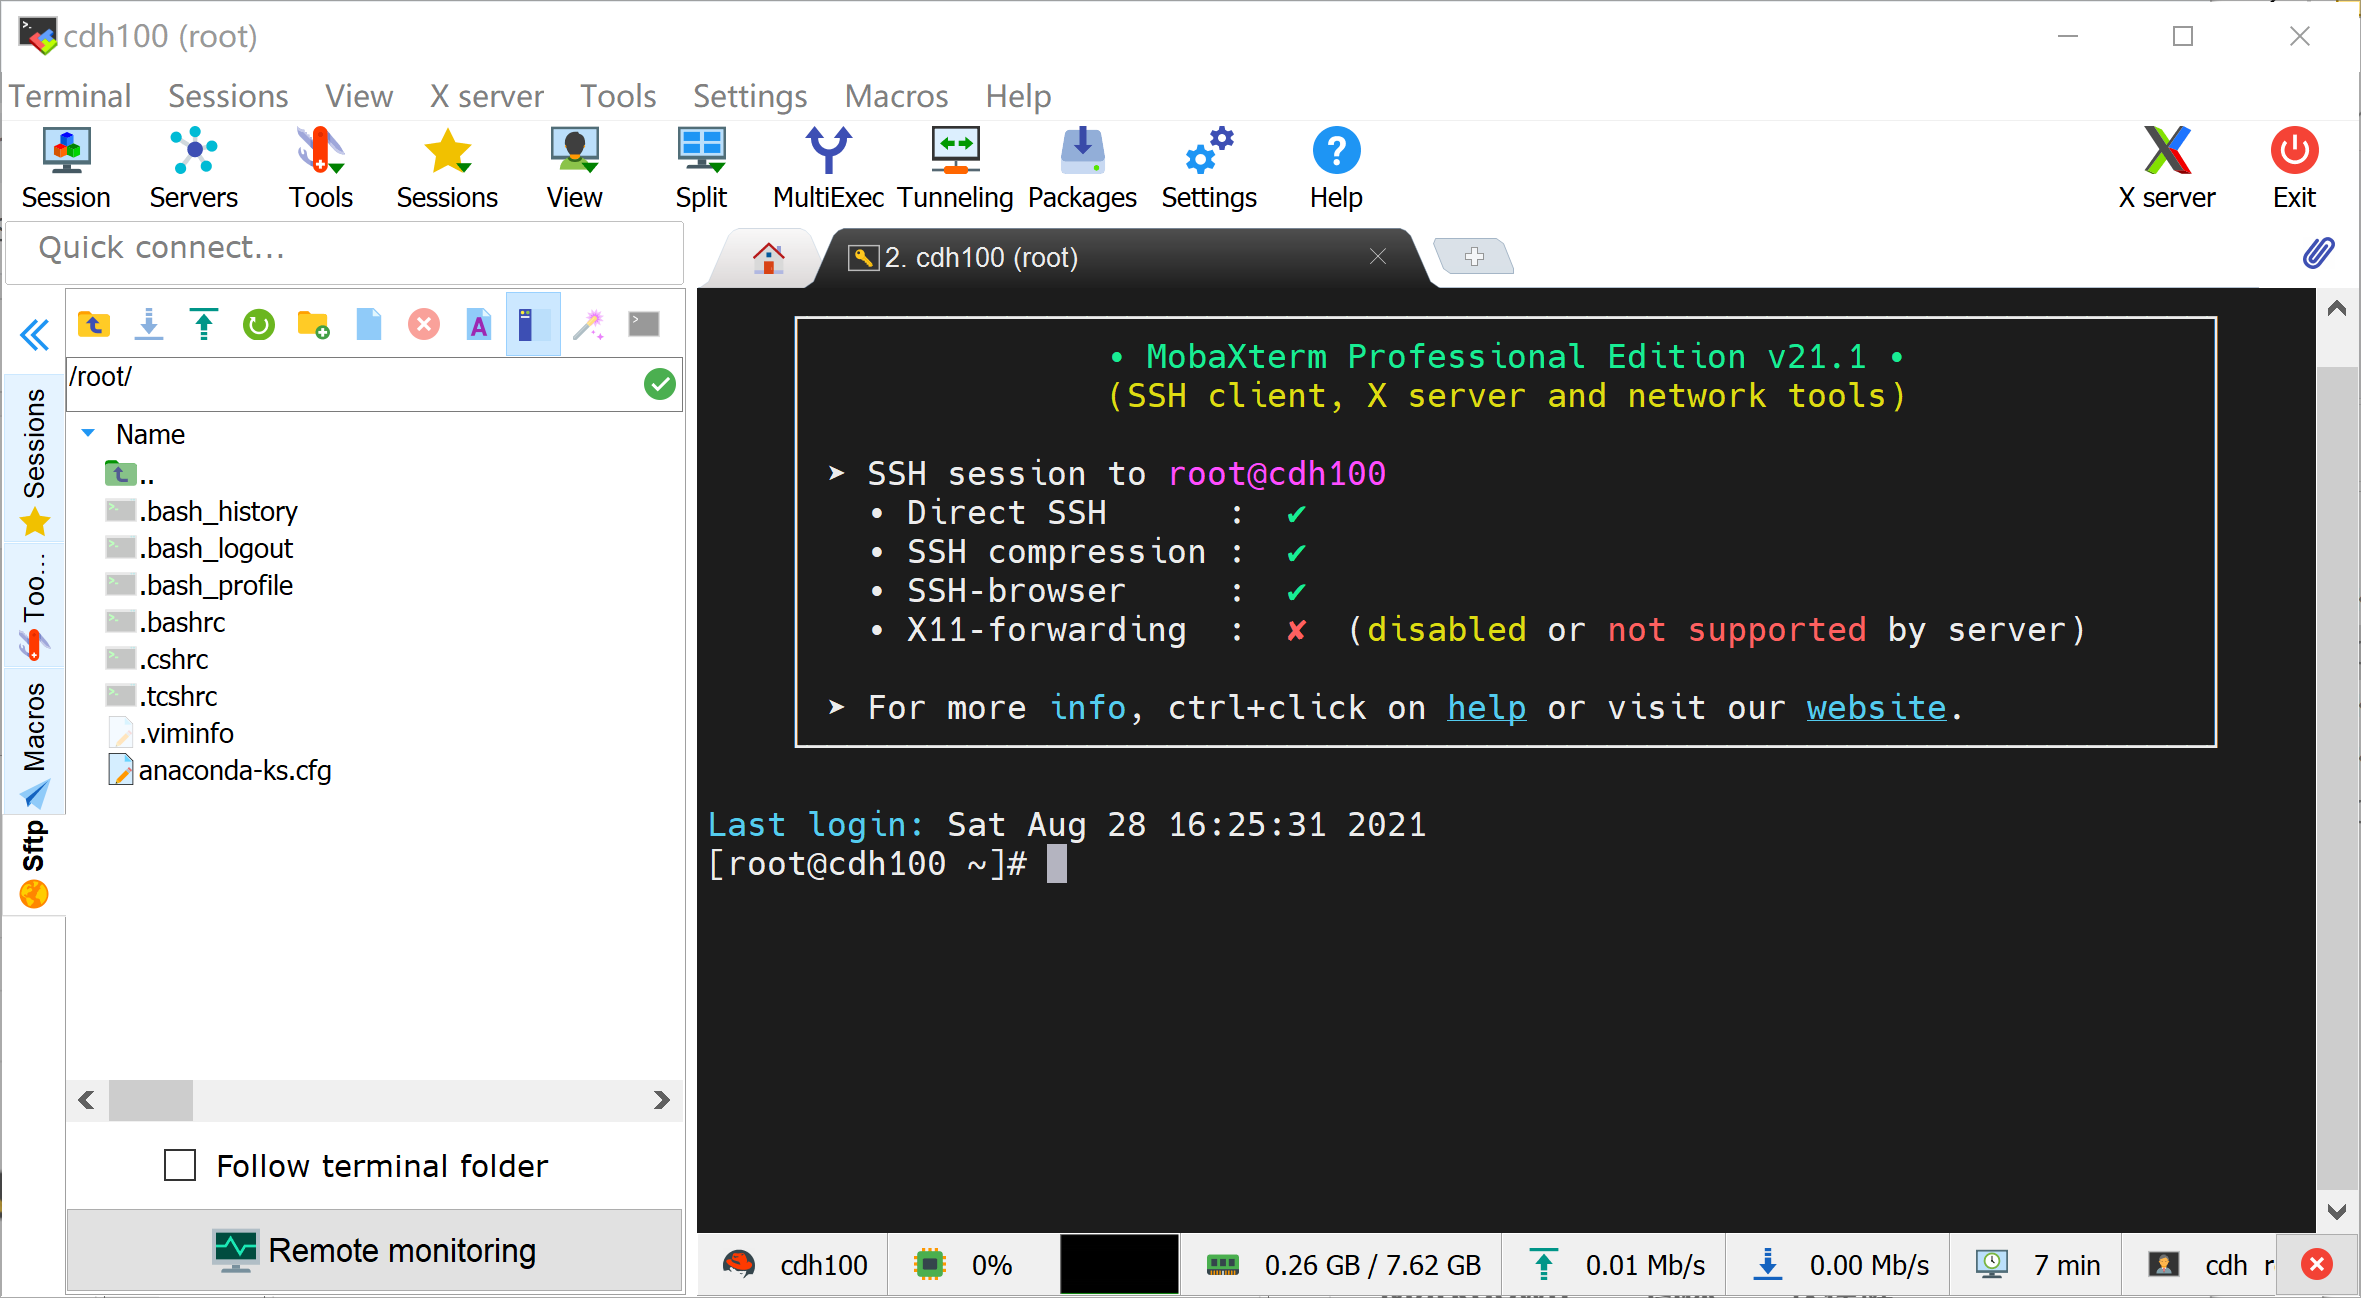
Connect virtual machines through ssh tools
Here I recommend Mobxaterm
Add ip and hostname mapping in win10 hosts file
C:\Windows\System32\drivers\etc\hosts
Add root privileges for user cdh
sudo vim /etc/sudoers
Add the following to the line after% wheel ALL=(ALL) ALL
cdh ALL=(ALL) NOPASSWD:ALL
Clone virtual machine
Select full clone
Based on cdh100, cdh101, cdh102, cdh103 and cdh104 were cloned
Modify the hostname, network card ip address on each machine
deploy
matters needing attention
Configure network name
- CDH only supports IPv4, not IPv6. centos7 turns off IPv6: https://blog.csdn.net/bluishglc/article/details/41390785
- Set the hostname to the unique name of the machine
hostnamectl set-hostname v100.virtualmachine.com - Modify the / etc/hosts file. After the ip address, you need to use the name in FQDN format
(for example, myhost-1.example.com) instead of an unqualified host name (for example, myhost-1). The canonical name is the first entry after the IP address. - Edit / etc/sysconfig/network to use only the FQDN of this host:
HOSTNAME=v100.virtualmachine.com - Verify that each host is consistently identified to the network
uname -a
yum install -y bind-utilsLinux v100.virtualmachine.com 3.10.0-957.el7.x86_64 #1 SMP Thu Nov 8 23:39:32 UTC 2018 x86_64 x86_64 x86_64 GNU/Linux
/sbin/ifconfig
host -v -t A $(hostname)ens33: flags=4163<UP,BROADCAST,RUNNING,MULTICAST> mtu 1500 inet 192.168.10.10 netmask 255.255.255.0 broadcast 192.168.10.255Trying "v100.virtualmachine.com" Received 109 bytes from 192.168.10.2#53 in 401 ms Trying "v100.virtualmachine.com.virtualmachine.com" Host v100.virtualmachine.com not found: 3(NXDOMAIN) Received 128 bytes from 192.168.10.2#53 in 387 ms
Turn off firewall
Save the current rule configuration
iptables-save > ~/firewall.rules
Turn off and disable firewall
systemctl disable firewalld
systemctl stop firewalld
Set SELinux mode
Check SELinux status
getenforce
If you output forcing, you need to execute the following command
cp /etc/selinux/config /etc/selinux/config.back
vim /etc/selinux/config
Modify SELINUX=enforcing to SELINUX=permissive
Exit after saving
reboot the device or execute setenforce0 to disable SELinux immediately
Enable NTP service
yum install -y ntp
vim /etc/ntp.conf configure NTP server address (use default)
systemctl start ntpd
Set startup and self startup
systemctl enable ntpd
Synchronize ntp server time
ntpdate -u 0.centos.pool.ntp.org
Synchronize the hardware clock with the system clock
hwclock --systohc
Install python2 7 or earlier
centos 7 usually comes with
python -V
Python 2.7.5
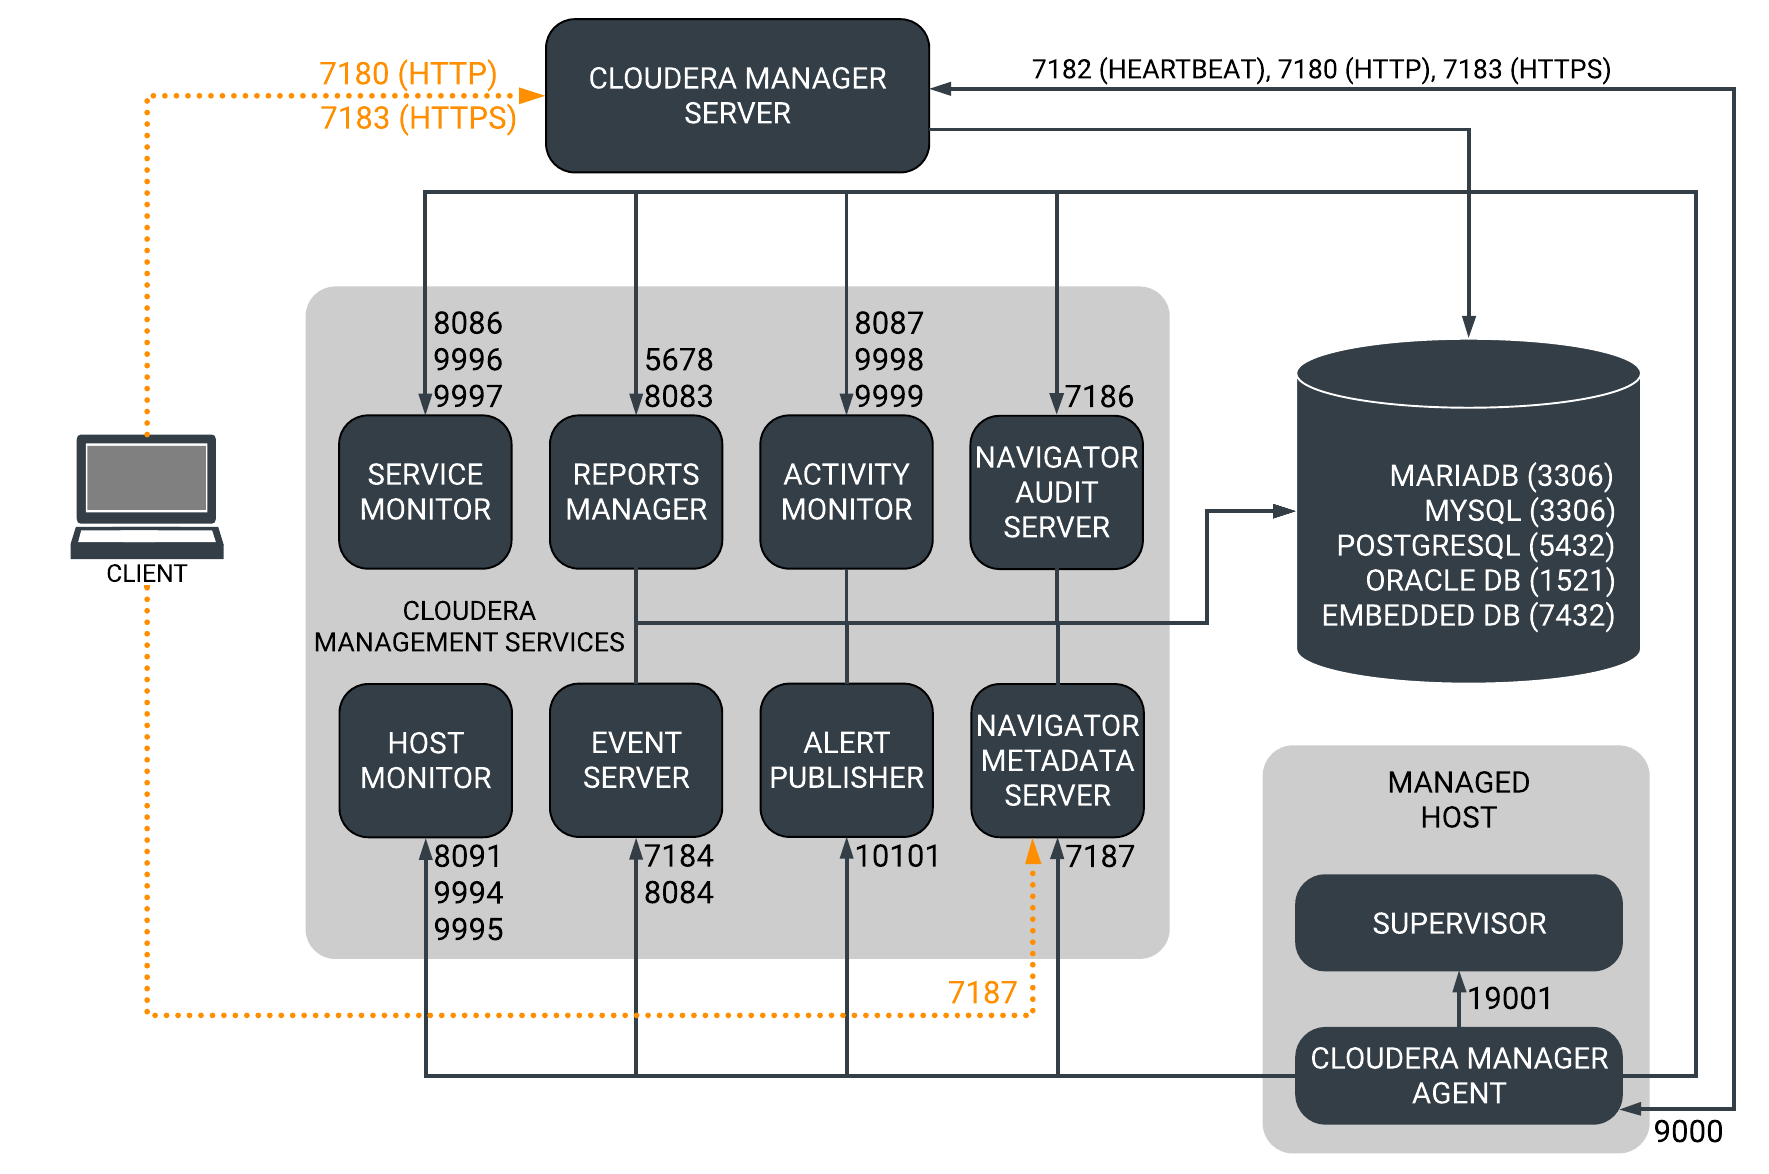
Ports to be occupied by CDH
Install http and set up local http services
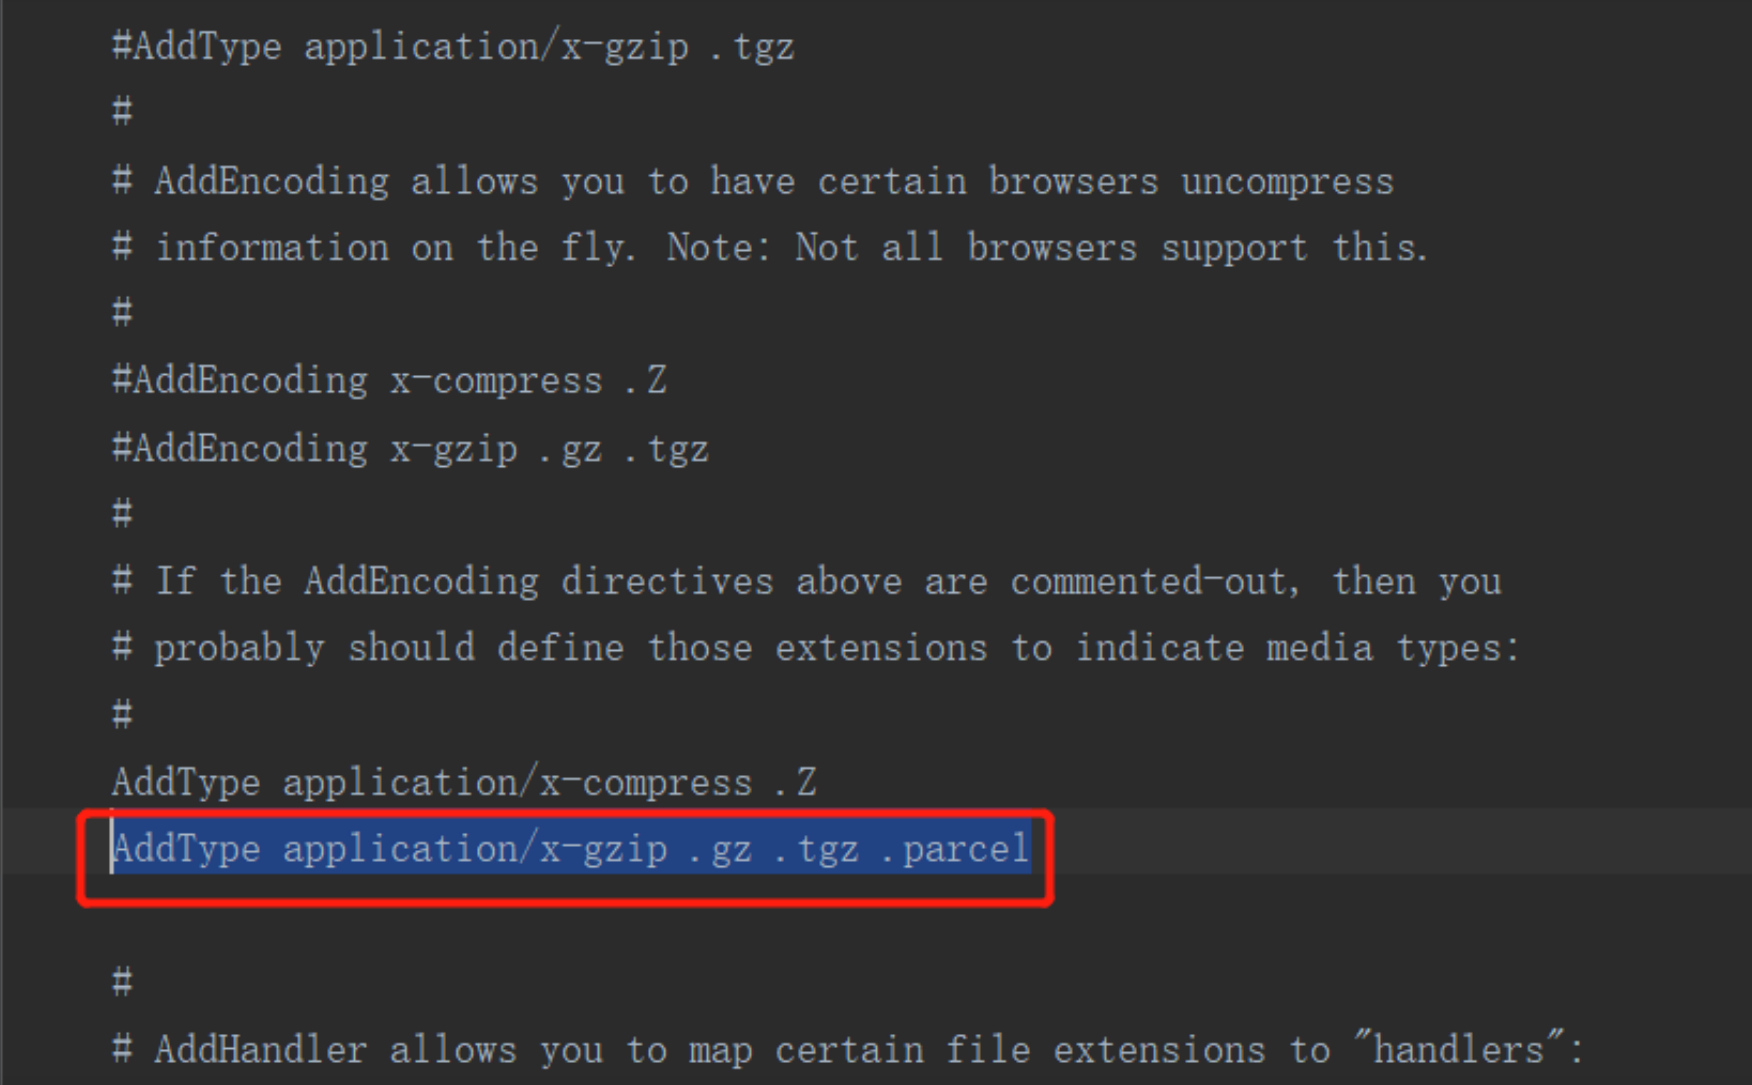
# Installing httpd, installing local warehouse and Cloudera Manager Server all depend on httpd
sudo yum -y install httpd createrepo
 Configure startup and self startup
systemctl enable httpd
# Start httpd
sudo systemctl start httpd
# View httpd status
service httpd status

# If an error is reported during installation: Delta RPMs disabled because /usr/bin/applydeltarpm not installed Then install deltarpm
# yum provides '*/applydeltarpm'
# yum -y  install deltarpm


# Edit the Apache HTTP Server configuration file (/ etc/httpd/conf/httpd.conf) and add the following content in the < ifmodule mime_module > tag: AddType application / x-gzip. GZ. Tgz. Parcel
vim /etc/httpd/conf/httpd.conf

# Added content
AddType application/x-gzip .gz .tgz .parcel

# Restart the httpd service and modify the path where the httpd file is stored. Make sure that the directory of the new path exists
sudo systemctl restart httpd
<IfModule mime_module>
    #
    # TypesConfig points to the file containing the mapping list
    # File extension to MIME type.
    #
    TypesConfig /etc/mime.types

    #
    # AddType allows you to add or override MIME configurations
    # The file specified in TypesConfig for a specific file type.
    #
    #AddType application / x-gzip tgz
    #
    # AddEncoding allows you to unzip some browsers
    # Instant messaging. Note: not all browsers support this feature.
    #
    #AddEncoding x-compress .Z
    #AddEncoding x-gzip .gz .tgz
    #
    # If the AddEncoding instruction above is commented out, you
    # You should probably define these extensions to indicate the media type:
    #
    AddType application program/x-compress .Z
    Add type application/x-gzip .gz .tgz .parcel

    #
    # AddHandler allows you to map certain file extensions to handlers:
    # Operation independent of file type. These can be built into the server
    # Or add an Action directive (see below)
    #
    # To use CGI scripts outside the ScriptAliased Directory:
    #(you also need to add "ExecCGI" to the Options directive.)
    #
    #AddHandler cgi-script .cgi

    # For type mapping (negotiation resources):
    #AddHandler type mapping variable

    #
    # Filters allow you to process content before sending it to the client.
    #
    # Analysis shtml file to get server-side include (SSI):
    #(you also need to add "Includes" to the Options directive.)
    #
    Add type text/html .shtml
    AddOutputFilter include .shtml
</IfModule>
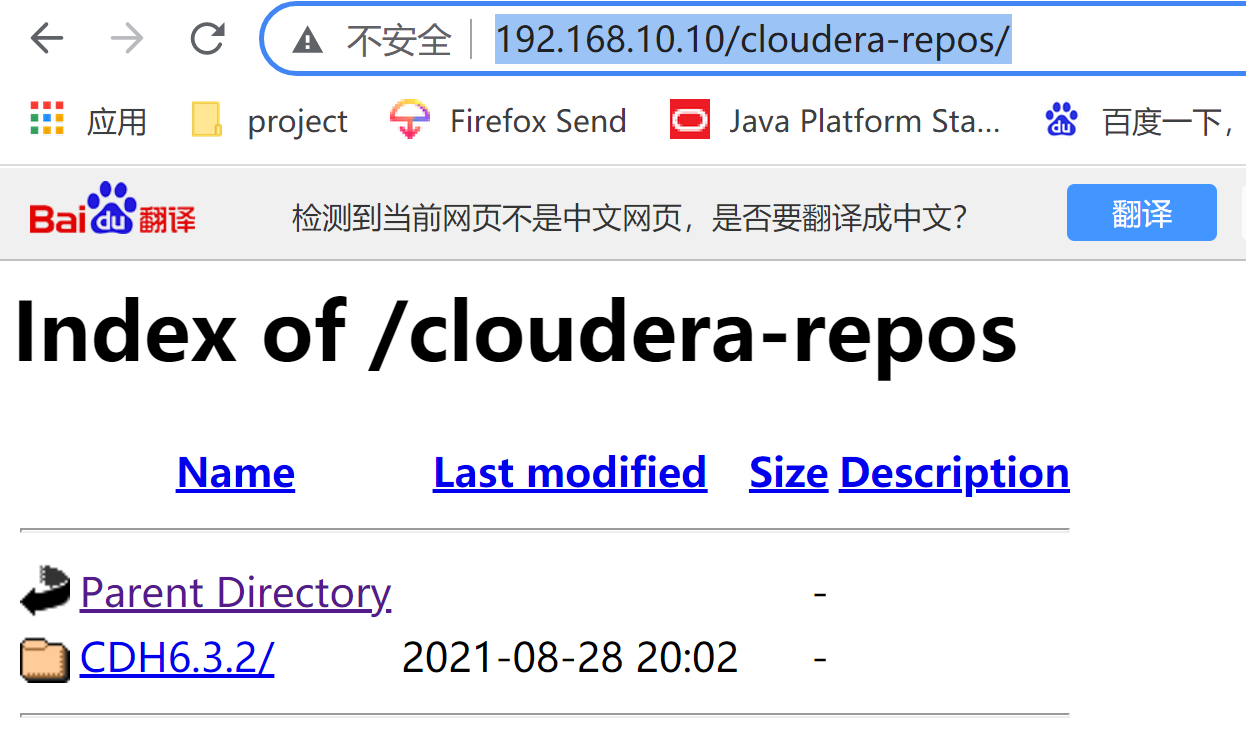
Configure CDH local repository
mkdir -p /var/www/html/cloudera-repos
cdh 6.3.2 download connection
Link: https://pan.baidu.com/s/1dMj8JEaRIOaXP53W2kF_mQ
Extraction code: xbyo
Put the downloaded software package in the / var / www / HTML / cloudera repos path
[root@v100 ~]# cd /var/www/html/cloudera-repos/
[root@v100 cloudera-repos]# createrepo .
Spawning worker 0 with 2 pkgs
Spawning worker 1 with 2 pkgs
Spawning worker 2 with 1 pkgs
Spawning worker 3 with 1 pkgs
Workers Finished
Saving Primary metadata
Saving file lists metadata
Saving other metadata
Generating sqlite DBs
Sqlite DBs complete
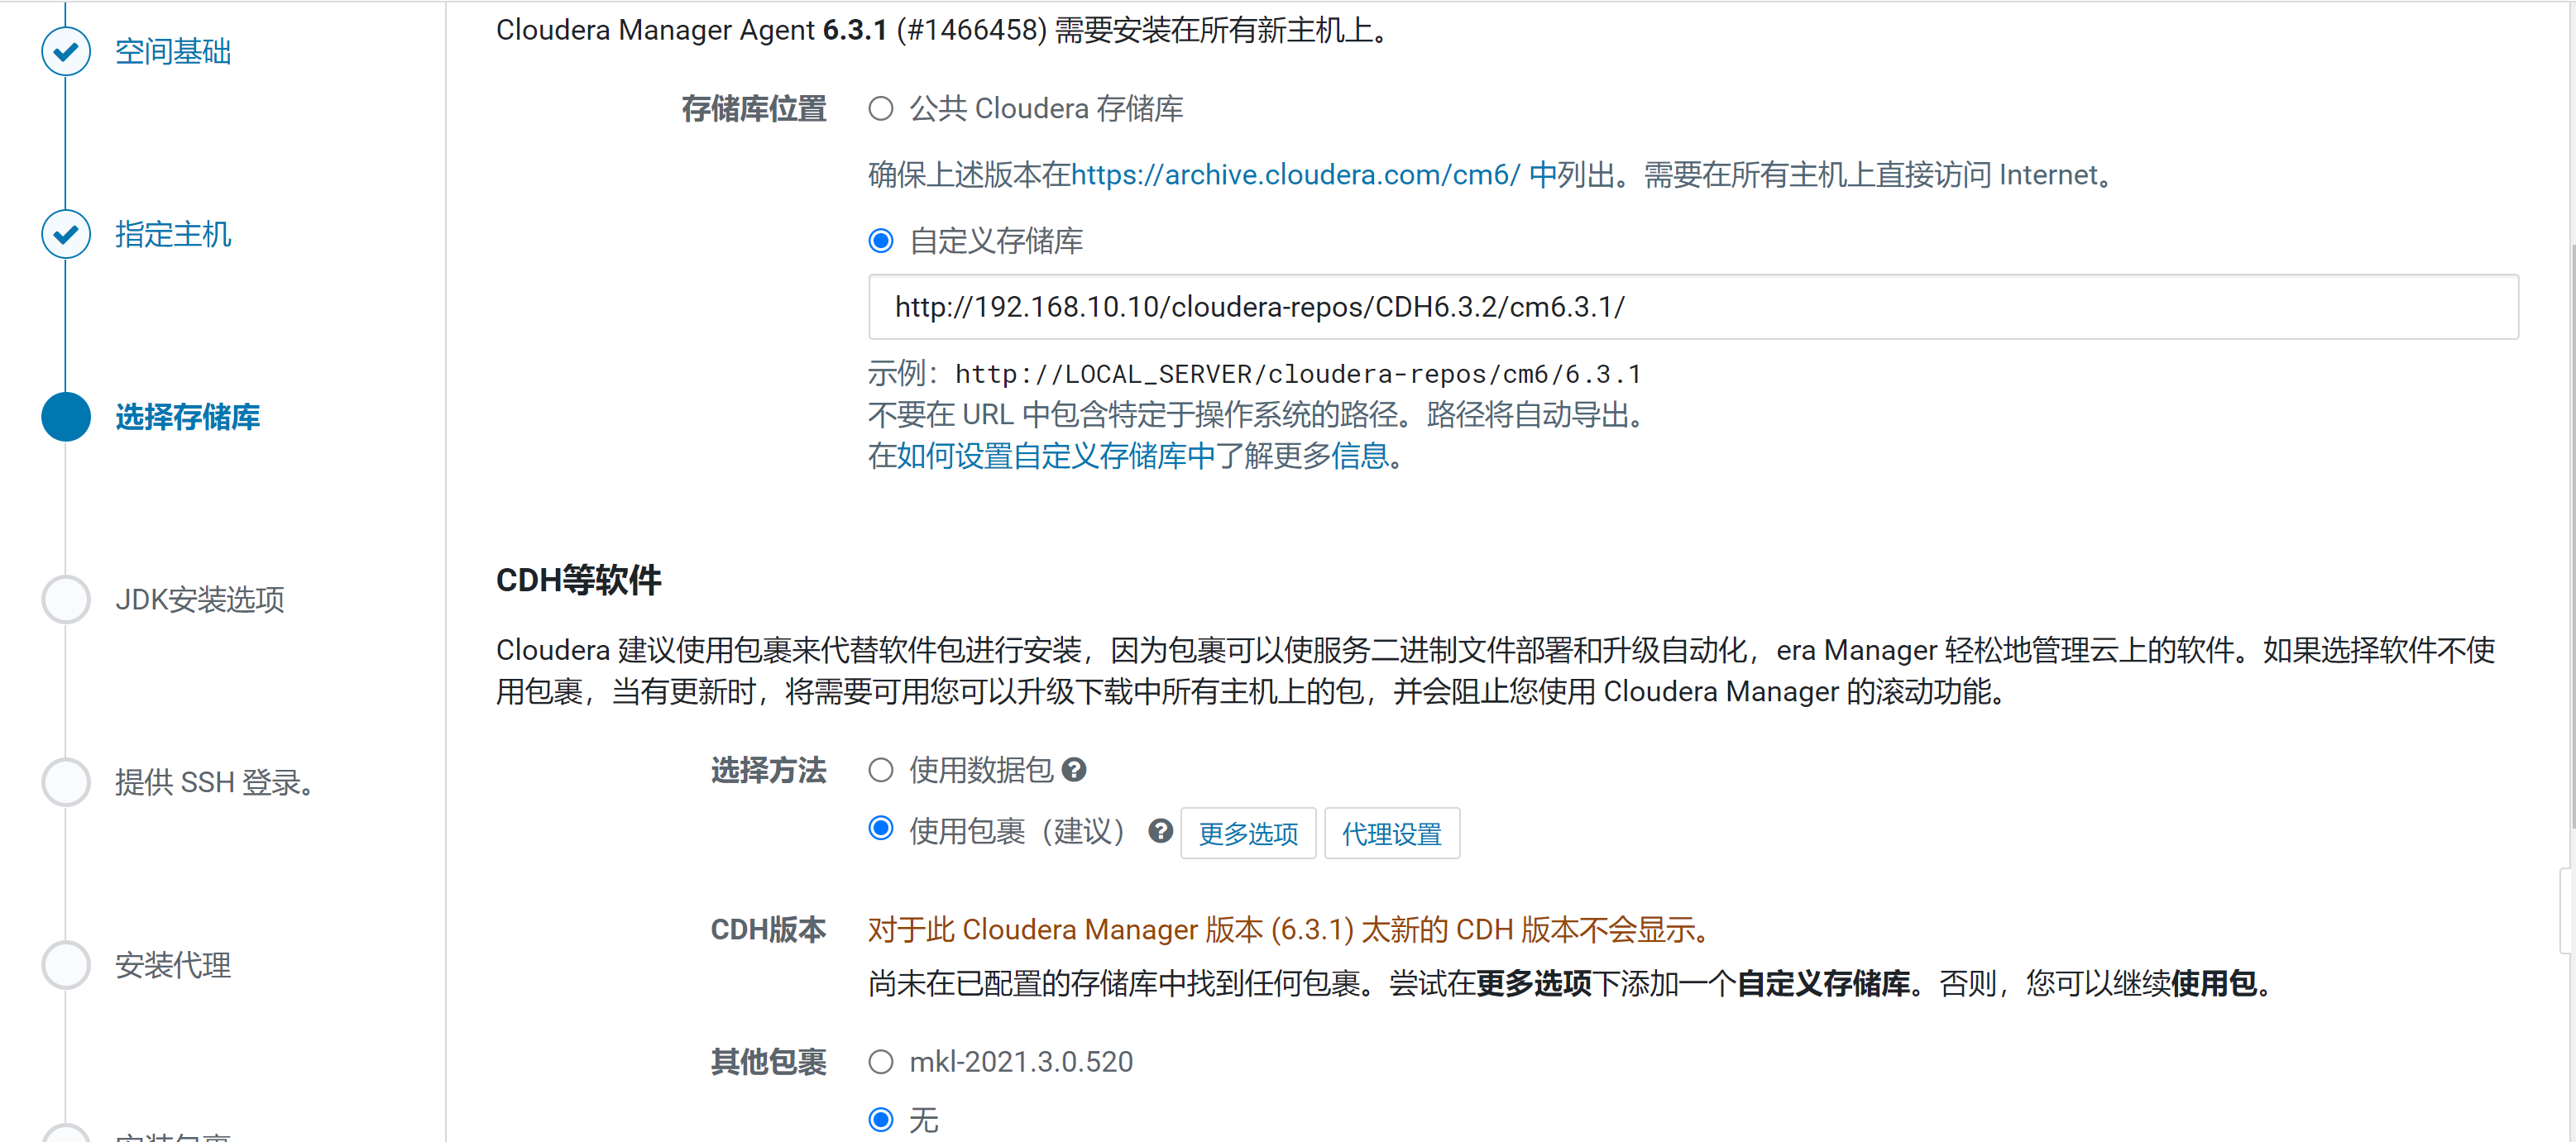
# Create / etc / yum.com repos. d/cloudera-repo. Repo file
vim /etc/yum.repos.d/cloudera-repo.repo

# cloudera-repo. The contents of the repo file are as follows, < Web_ Server > is the host name or ip address of the parcel warehouse server
[cloudera-repo]
name=cloudera-repo
baseurl=http://192.168.10.10/cloudera-repos/
enabled=1
gpgcheck=0
yum clean all && yum makecache
Add / etc / yum.com repos. d/cloudera-repo. After repo is distributed to other machines
rsync -av /etc/yum.repos.d/cloudera-repo.repo /etc/yum.repos.d/cloudera-repo.repo
Execute Yum clean all & & Yum makecache respectively
Installing Cloudera Manager
- Configure yum source warehouse
- Through the local warehouse installation method, yum has been configured to install the local library. There is no need to deal with this step;
- Install JDK. The previous steps have been installed. There is no need to deal with this step;
Installing Cloudera Manager Packages
After configuring the yum local warehouse source on the machine where CM needs to be installed, execute the following command
yum install -y cloudera-manager-daemons cloudera-manager-agent cloudera-manager-server
This step is the key point. Otherwise, when configuring the cluster Agent in the Web page, you will be prompted that the installation file cannot be copied
After installing CM, the cloudera directory will appear under / opt /. Upload the cdh parcel file and manitest JSON to / opt / cloudera / parcel repo/
cd /opt/cloudera/parcel-repo/
Generate sha file
sha1sum CDH-6.3.2-1.cdh6.3.2.p0.1605554-el7.parcel | awk '{ print $1 }' > CDH-6.3.2-1.cdh6.3.2.p0.1605554-el7.parcel.sha
chown -R cloudera-scm:cloudera-scm /opt/cloudera/parcel-repo/*
Install the agent (this step is ignored and will be carried out later in the Web page)
The agent does not need to be installed manually. The steps of installing agent are shown on the Web boot page later.
Install Cloudera Manager agent on all servers that need cm server monitoring
sudo yum -y install cloudera-manager-daemons cloudera-manager-agent
Agent configuration file: VIM / etc / cloudera SCM agent / config ini
server_host=localhost
Change to: Server_ Host = CDH1 (host of CM server)
Configure mysql
# Download the MySQL driver and copy it to the path / opt/cloudera/cm/lib /
cp /opt/software/mysql-connector-java-8.0.26/mysql-connector-java-8.0.26.jar /opt/cloudera/cm/lib/
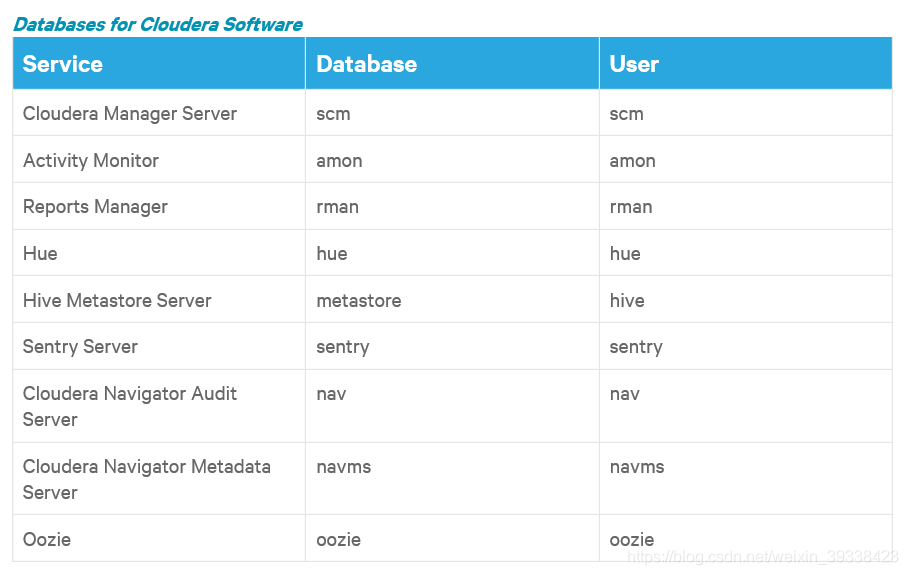
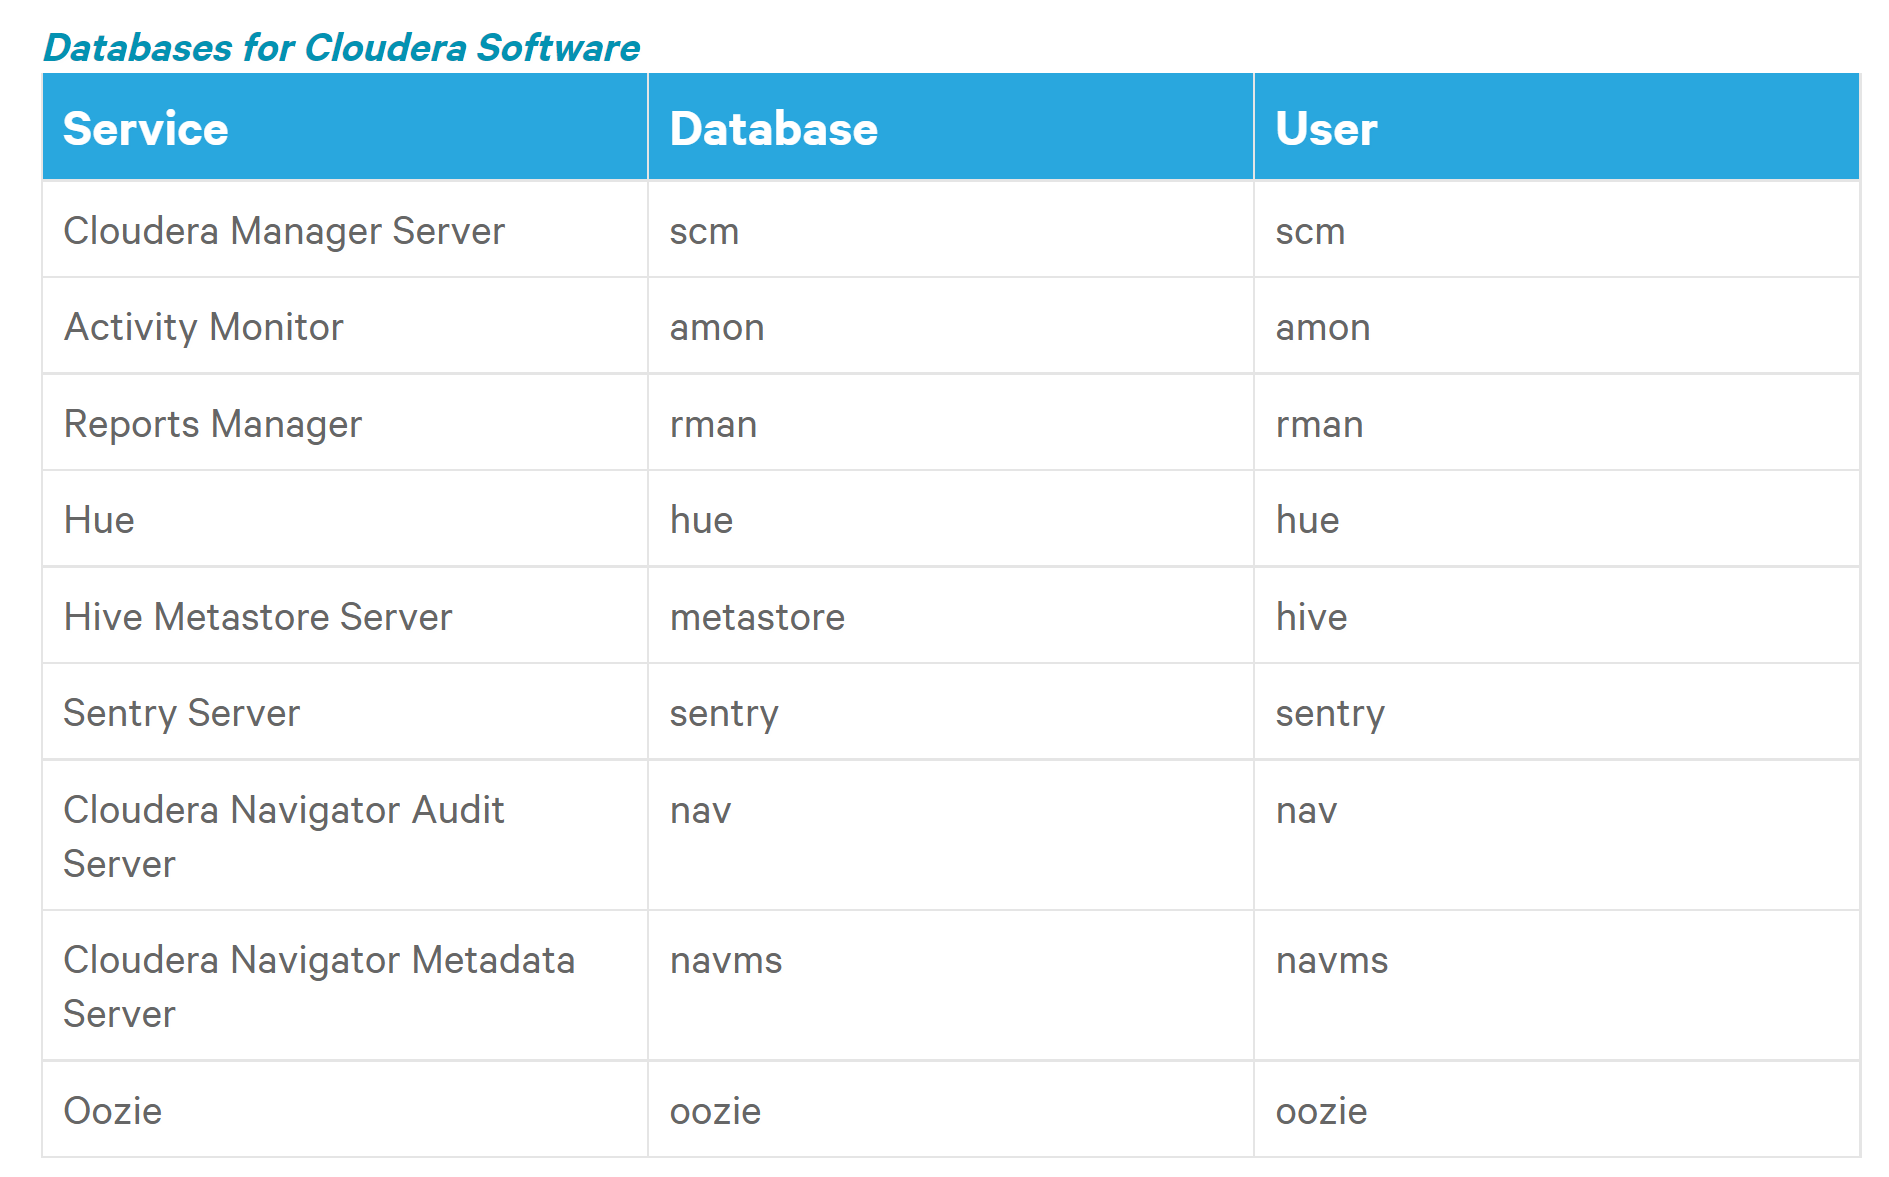
Create the database required for the cloudera component
CREATE DATABASE scm DEFAULT CHARACTER SET utf8 DEFAULT COLLATE utf8_general_ci;
CREATE DATABASE amon DEFAULT CHARACTER SET utf8 DEFAULT COLLATE utf8_general_ci;
CREATE DATABASE rman DEFAULT CHARACTER SET utf8 DEFAULT COLLATE utf8_general_ci;
CREATE DATABASE hue DEFAULT CHARACTER SET utf8 DEFAULT COLLATE utf8_general_ci;
CREATE DATABASE metastore DEFAULT CHARACTER SET utf8 DEFAULT COLLATE utf8_general_ci;
CREATE DATABASE sentry DEFAULT CHARACTER SET utf8 DEFAULT COLLATE utf8_general_ci;
CREATE DATABASE nav DEFAULT CHARACTER SET utf8 DEFAULT COLLATE utf8_general_ci;
CREATE DATABASE navms DEFAULT CHARACTER SET utf8 DEFAULT COLLATE utf8_general_ci;
CREATE DATABASE oozie DEFAULT CHARACTER SET utf8 DEFAULT COLLATE utf8_general_ci;
use mysql;
GRANT ALL ON scm.* TO 'scm'@'%' IDENTIFIED BY 'scm@123';
GRANT ALL ON amon.* TO 'amon'@'%' IDENTIFIED BY ' amon@123';
GRANT ALL ON rman.* TO 'rman'@'%' IDENTIFIED BY 'rman@123';
GRANT ALL ON hue.* TO 'hue'@'%' IDENTIFIED BY 'hue@123';
GRANT ALL ON metastore.* TO 'metastore'@'%' IDENTIFIED BY 'metastore@123';
GRANT ALL ON sentry.* TO 'sentry'@'%' IDENTIFIED BY 'sentry@123';
GRANT ALL ON nav.* TO 'nav'@'%' IDENTIFIED BY 'nav@123';
GRANT ALL ON navms.* TO 'navms'@'%' IDENTIFIED BY 'navms@123';
GRANT ALL ON oozie.* TO 'oozie'@'%' IDENTIFIED BY 'oozie@123';
flush privileges;
Setting up Cloudera Manager database
Rationale: Cloudera Manager Server contains a script that can create and configure databases for itself. The script contains:
Create and configure a database for use by Cloudera Manager Server, and create and configure user accounts for Cloudera Manager Server. This part of the configuration can only be configured on the CM Server master node, and the slave node does not need to be configured.
Running SCM on Cloudera Manager Server_ prepare_ database. SH script,
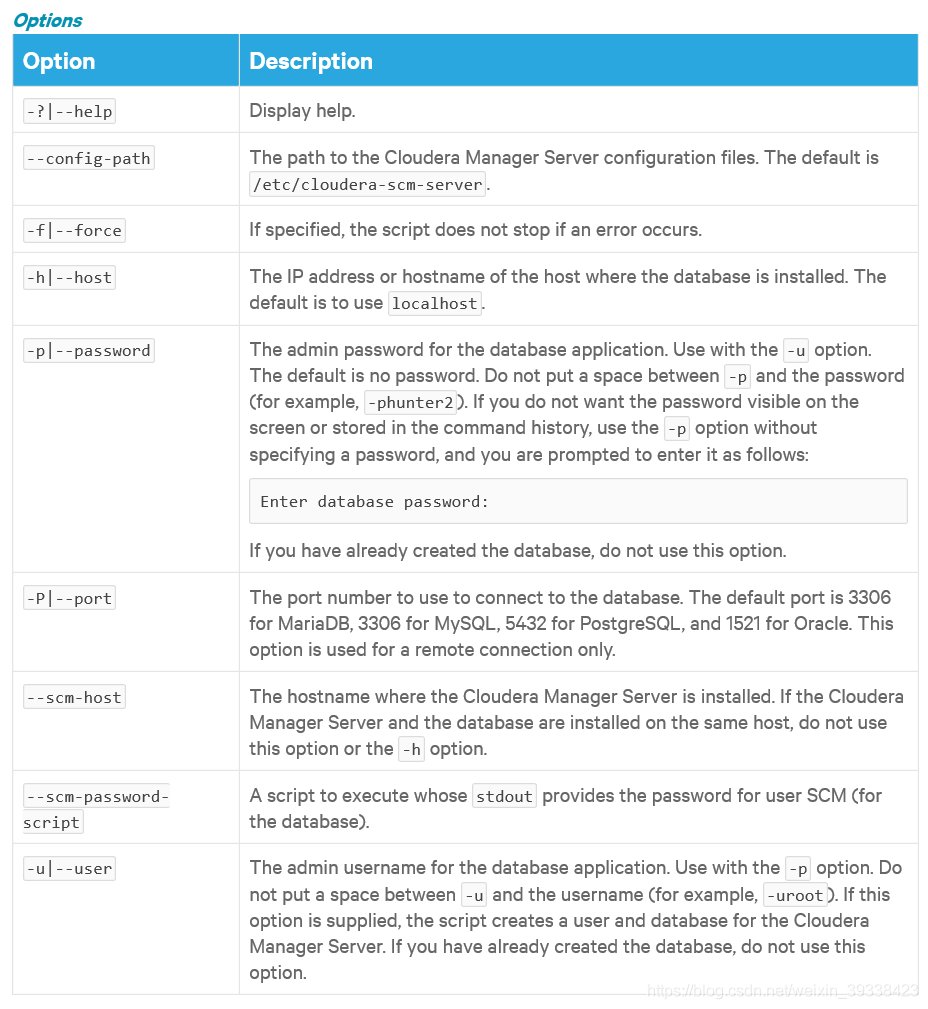
Command format: sudo /opt/cloudera/cm/schema/scm_prepare_database.sh [options]
The user name, password and database name in the command are from MySQL installed and configured in the previous step. Refer to the document: setting Cloudera Manager database
The meaning of parameters is shown in the figure below:
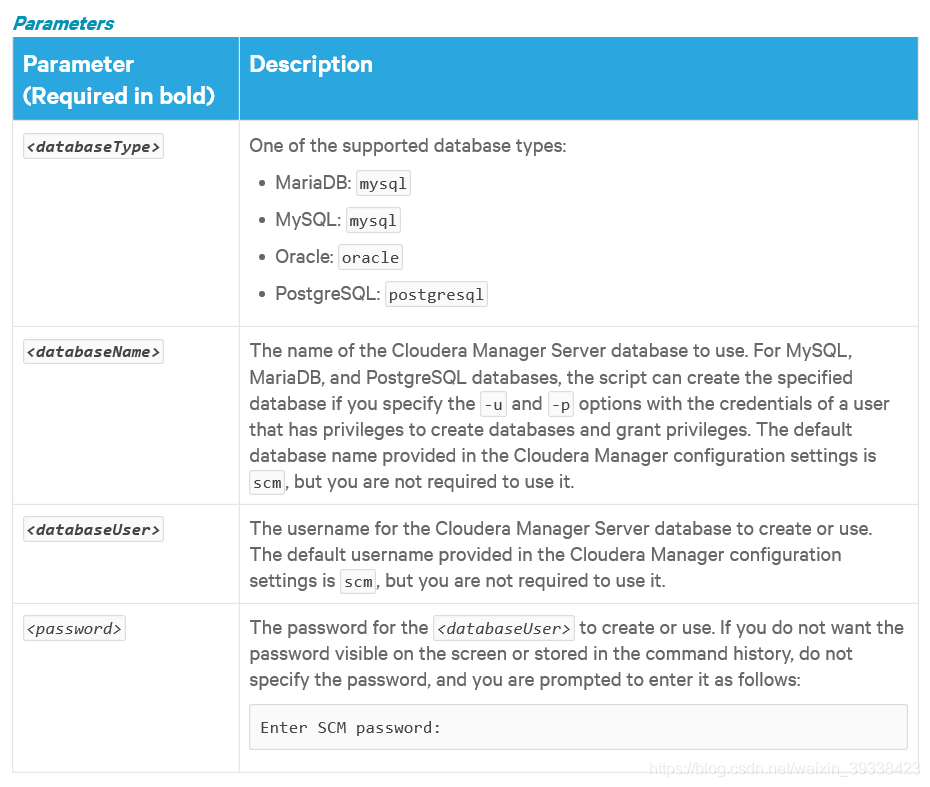
Execute the command to set the Cloudera Manager database (mysql I installed with docker)
/opt/cloudera/cm/schema/scm_prepare_database.sh mysql -h 192.168.10.11 scm scm
The mismatch between the jdk version and the mysql JDBC version will cause the following errors
[root@v101 ~]# /opt/cloudera/cm/schema/scm_prepare_database.sh mysql -h 192.168.10.11 scm scm
Enter SCM password:
JAVA_HOME=/usr/lib/jvm/java-1.8.0-openjdk-1.8.0.302.b08-0.el7_9.x86_64
Verifying that we can write to /etc/cloudera-scm-server
Creating SCM configuration file in /etc/cloudera-scm-server
Executing:  /usr/lib/jvm/java-1.8.0-openjdk-1.8.0.302.b08-0.el7_9.x86_64/bin/java -cp /usr/share/java/mysql-connector-java.jar:/usr/share/java/oracle-connector-java.jar:/usr/share/java/postgresql-connector-java.jar:/opt/cloudera/cm/schema/../lib/* com.cloudera.enterprise.dbutil.DbCommandExecutor /etc/cloudera-scm-server/db.properties com.cloudera.cmf.db.
Sat Aug 28 21:58:58 CST 2021 WARN: Establishing SSL connection without server's identity verification is not recommended. According to MySQL 5.5.45+, 5.6.26+ and 5.7.6+ requirements SSL connection must be established by default if explicit option isn't set. For compliance with existing applications not using SSL the verifyServerCertificate property is set to 'false'. You need either to explicitly disable SSL by setting useSSL=false, or set useSSL=true and provide truststore for server certificate verification.
2021-08-28 21:58:58,976 [main] ERROR com.cloudera.enterprise.dbutil.DbCommandExecutor  - Error when connecting to database.
com.mysql.jdbc.exceptions.jdbc4.CommunicationsException: Communications link failure

The last packet successfully received from the server was 79 milliseconds ago.  The last packet sent successfully to the server was 74 milliseconds ago.
        at sun.reflect.NativeConstructorAccessorImpl.newInstance0(Native Method)
        at sun.reflect.NativeConstructorAccessorImpl.newInstance(NativeConstructorAccessorImpl.java:62)
        at sun.reflect.DelegatingConstructorAccessorImpl.newInstance(DelegatingConstructorAccessorImpl.java:45)
        at java.lang.reflect.Constructor.newInstance(Constructor.java:423)
        at com.mysql.jdbc.Util.handleNewInstance(Util.java:425)
        at com.mysql.jdbc.SQLError.createCommunicationsException(SQLError.java:990)
        at com.mysql.jdbc.ExportControlled.transformSocketToSSLSocket(ExportControlled.java:201)
        at com.mysql.jdbc.MysqlIO.negotiateSSLConnection(MysqlIO.java:4912)
        at com.mysql.jdbc.MysqlIO.proceedHandshakeWithPluggableAuthentication(MysqlIO.java:1663)
        at com.mysql.jdbc.MysqlIO.doHandshake(MysqlIO.java:1224)
        at com.mysql.jdbc.ConnectionImpl.coreConnect(ConnectionImpl.java:2190)
        at com.mysql.jdbc.ConnectionImpl.connectOneTryOnly(ConnectionImpl.java:2221)
        at com.mysql.jdbc.ConnectionImpl.createNewIO(ConnectionImpl.java:2016)
        at com.mysql.jdbc.ConnectionImpl.<init>(ConnectionImpl.java:776)
        at com.mysql.jdbc.JDBC4Connection.<init>(JDBC4Connection.java:47)
        at sun.reflect.NativeConstructorAccessorImpl.newInstance0(Native Method)
        at sun.reflect.NativeConstructorAccessorImpl.newInstance(NativeConstructorAccessorImpl.java:62)
        at sun.reflect.DelegatingConstructorAccessorImpl.newInstance(DelegatingConstructorAccessorImpl.java:45)
        at java.lang.reflect.Constructor.newInstance(Constructor.java:423)
        at com.mysql.jdbc.Util.handleNewInstance(Util.java:425)
        at com.mysql.jdbc.ConnectionImpl.getInstance(ConnectionImpl.java:386)
        at com.mysql.jdbc.NonRegisteringDriver.connect(NonRegisteringDriver.java:330)
        at java.sql.DriverManager.getConnection(DriverManager.java:664)
        at java.sql.DriverManager.getConnection(DriverManager.java:247)
        at com.cloudera.enterprise.dbutil.DbCommandExecutor.testDbConnection(DbCommandExecutor.java:263)
        at com.cloudera.enterprise.dbutil.DbCommandExecutor.main(DbCommandExecutor.java:139)
Caused by: javax.net.ssl.SSLHandshakeException: No appropriate protocol (protocol is disabled or cipher suites are inappropriate)
        at sun.security.ssl.HandshakeContext.<init>(HandshakeContext.java:171)
        at sun.security.ssl.ClientHandshakeContext.<init>(ClientHandshakeContext.java:98)
        at sun.security.ssl.TransportContext.kickstart(TransportContext.java:220)
        at sun.security.ssl.SSLSocketImpl.startHandshake(SSLSocketImpl.java:428)
        at com.mysql.jdbc.ExportControlled.transformSocketToSSLSocket(ExportControlled.java:186)
        ... 19 more
2021-08-28 21:58:58,985 [main] ERROR com.cloudera.enterprise.dbutil.DbCommandExecutor  - Exiting with exit code 4
--> Error 4, giving up (use --force if you wish to ignore the error)
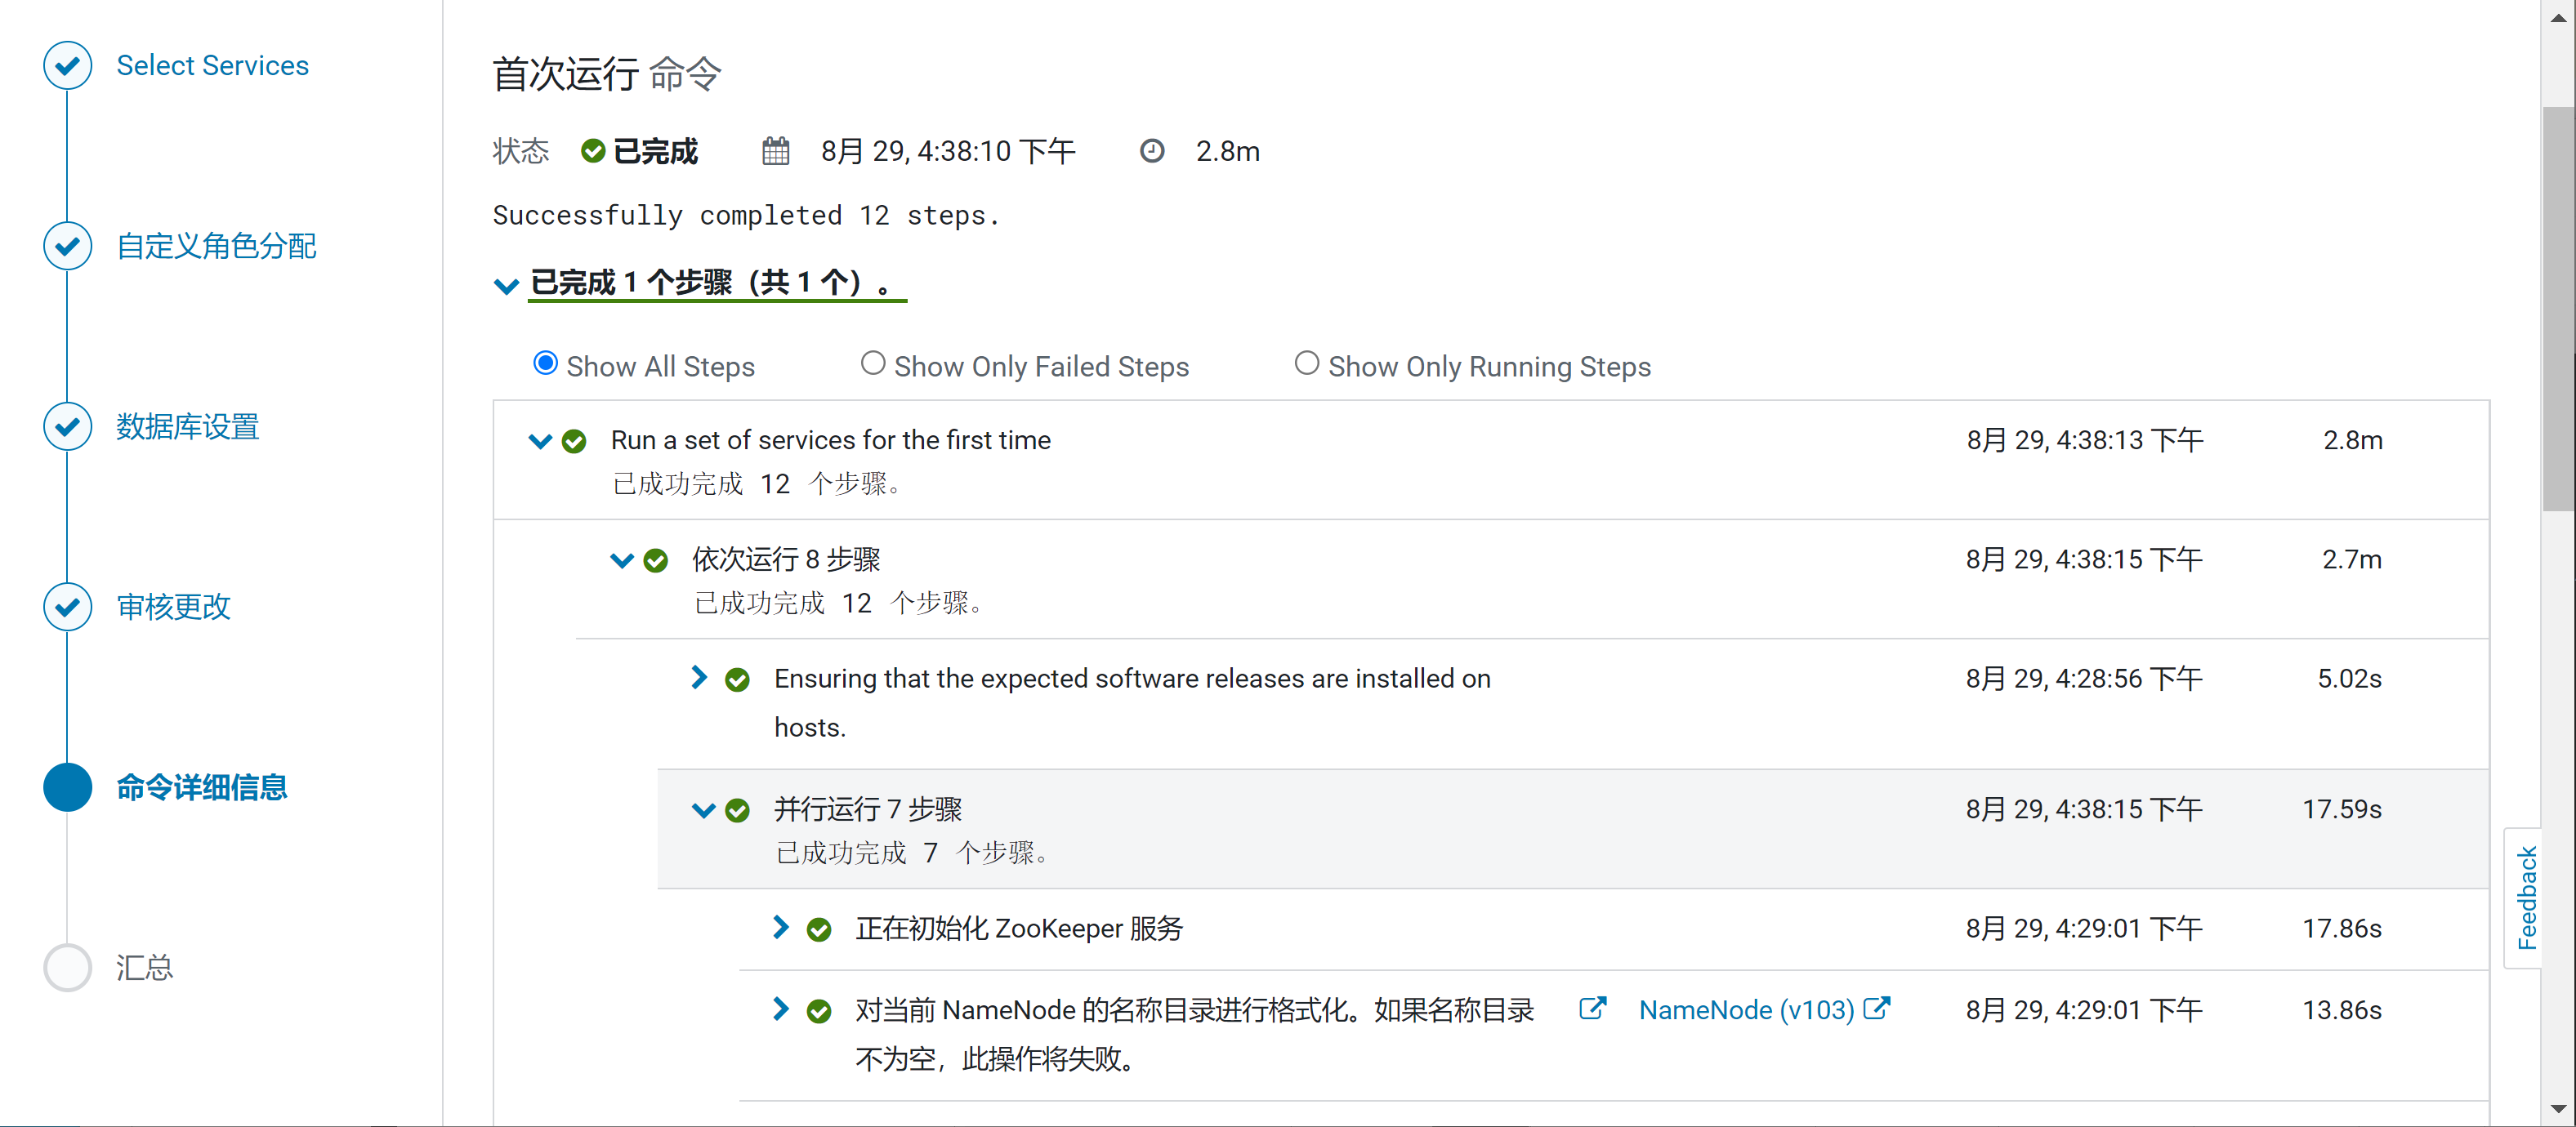
Installing CDH
# Start CM Server, start command:
[root@v101 parcel-repo]# systemctl start cloudera-scm-server & systemctl enable cloudera-scm-server

# To observe the startup process, run the following command on the CM Server host:
sudo tail -f /var/log/cloudera-scm-server/cloudera-scm-server.log
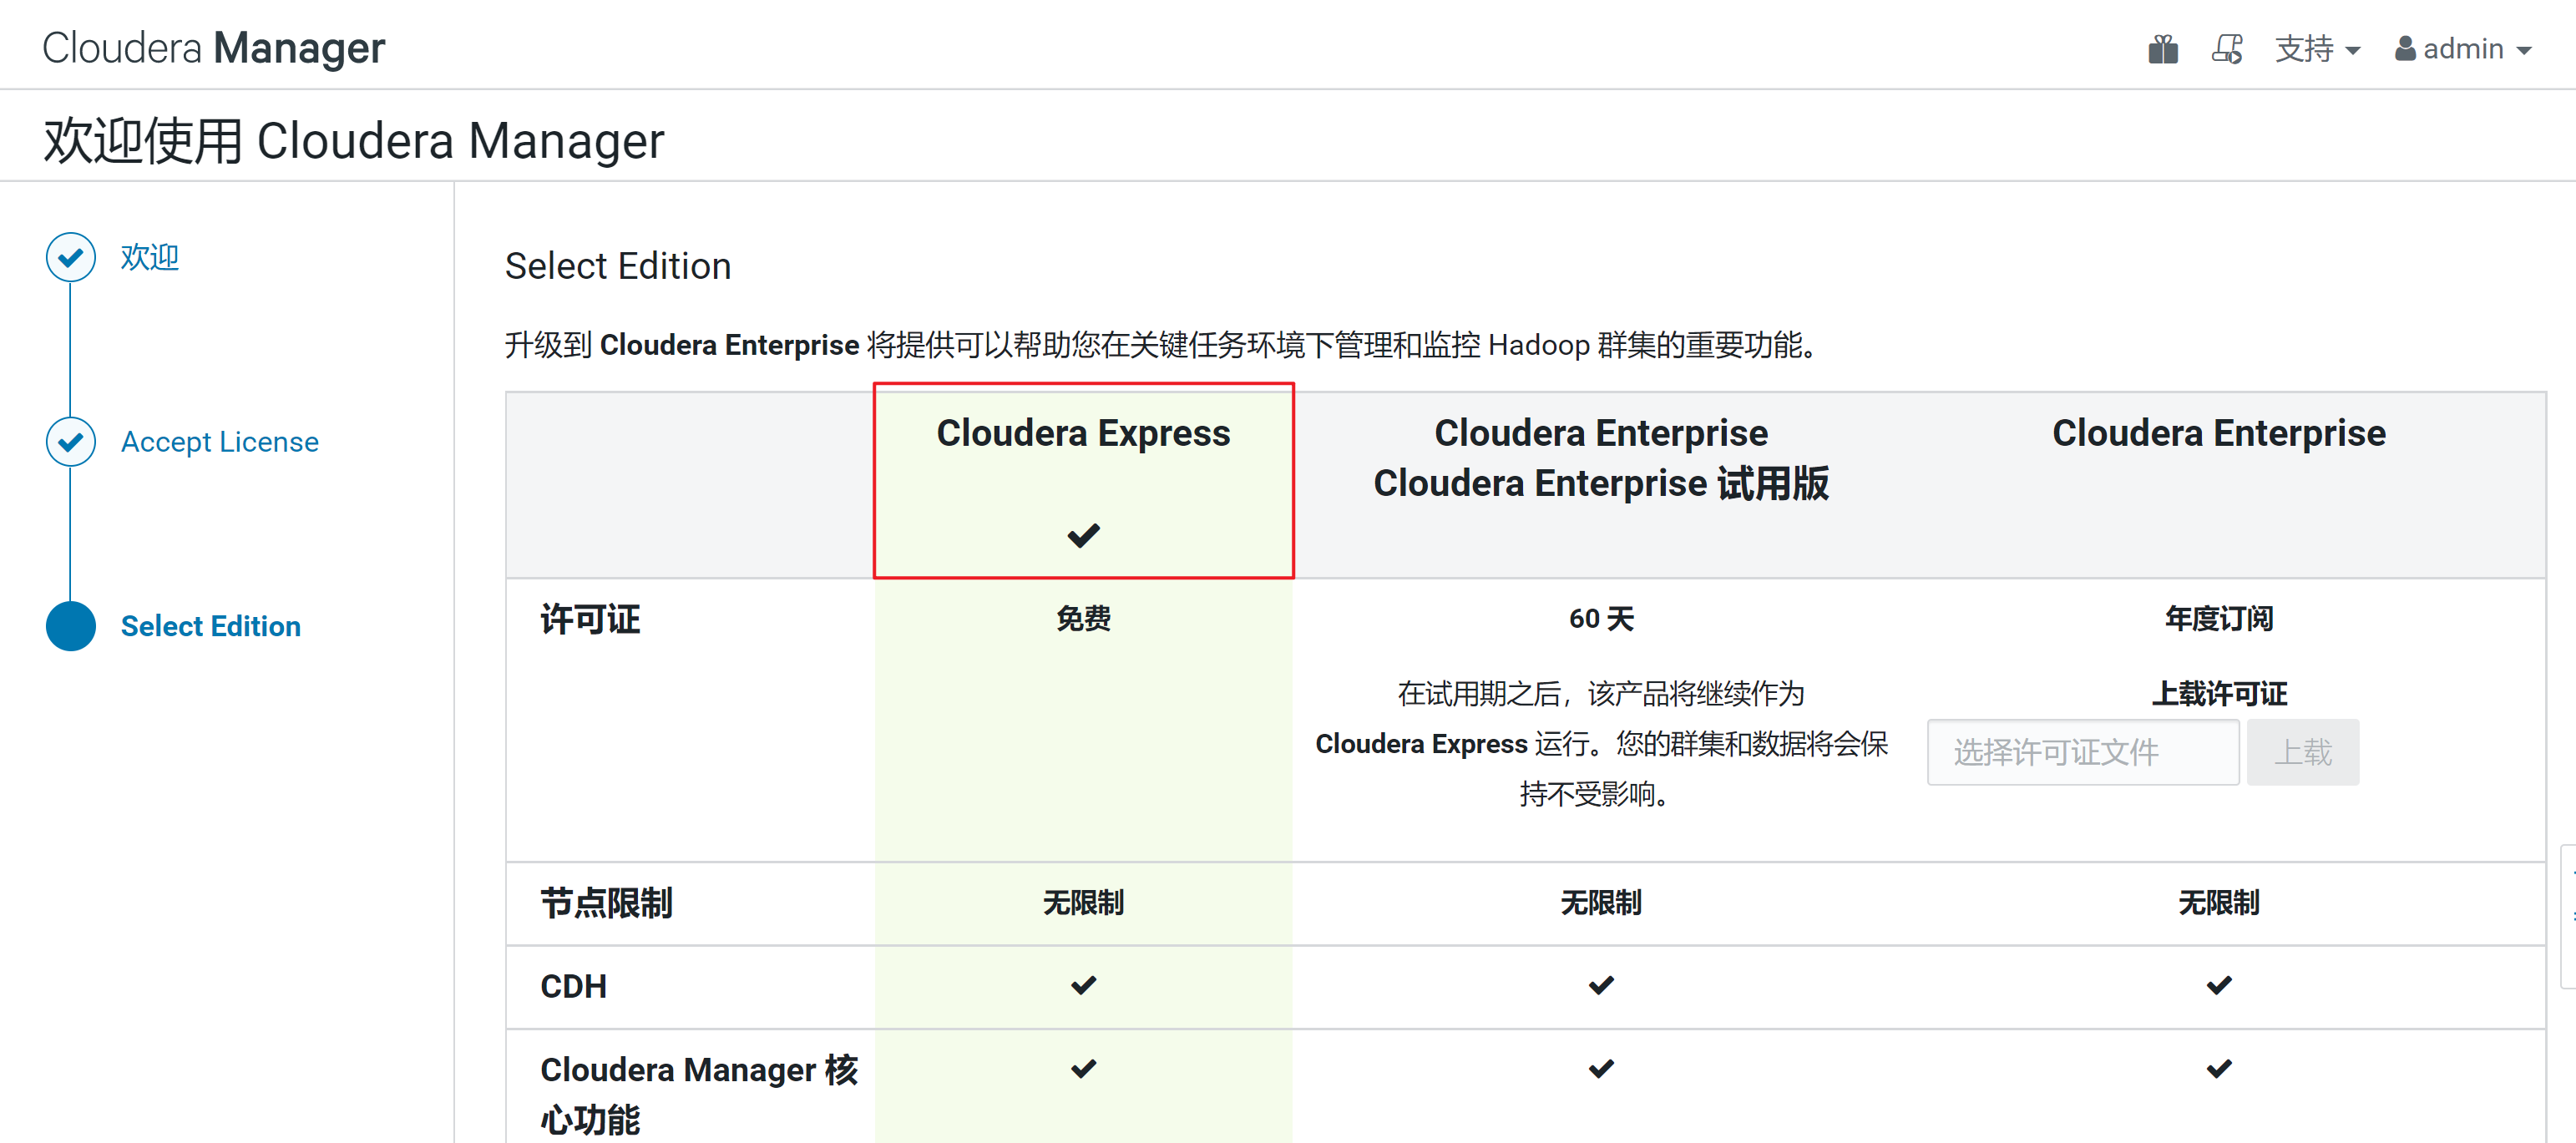
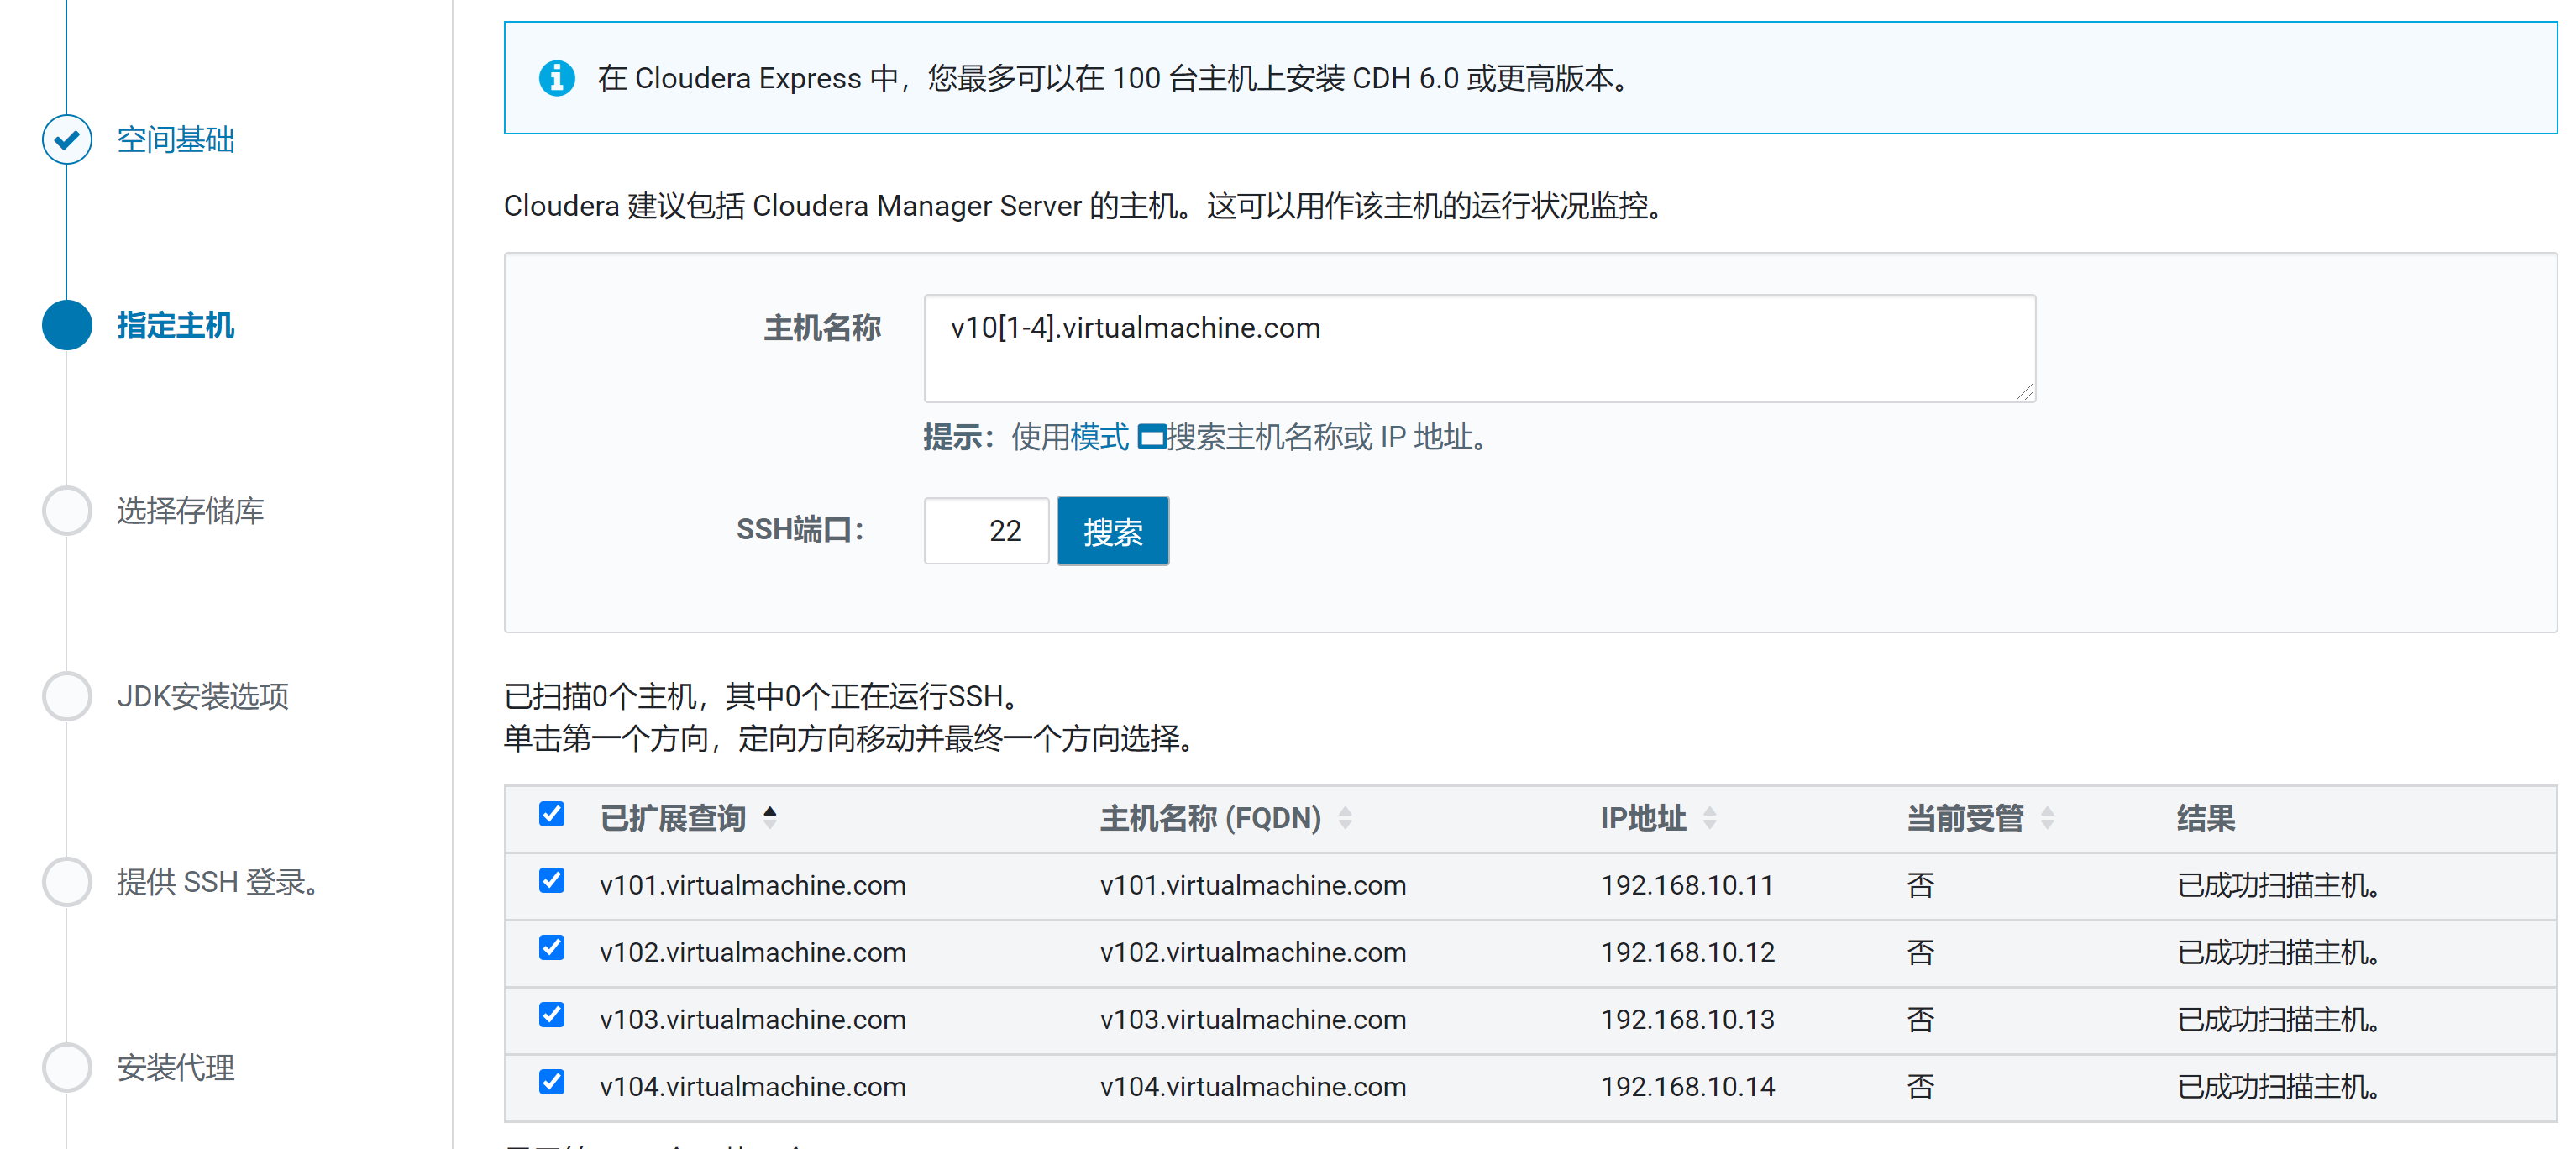
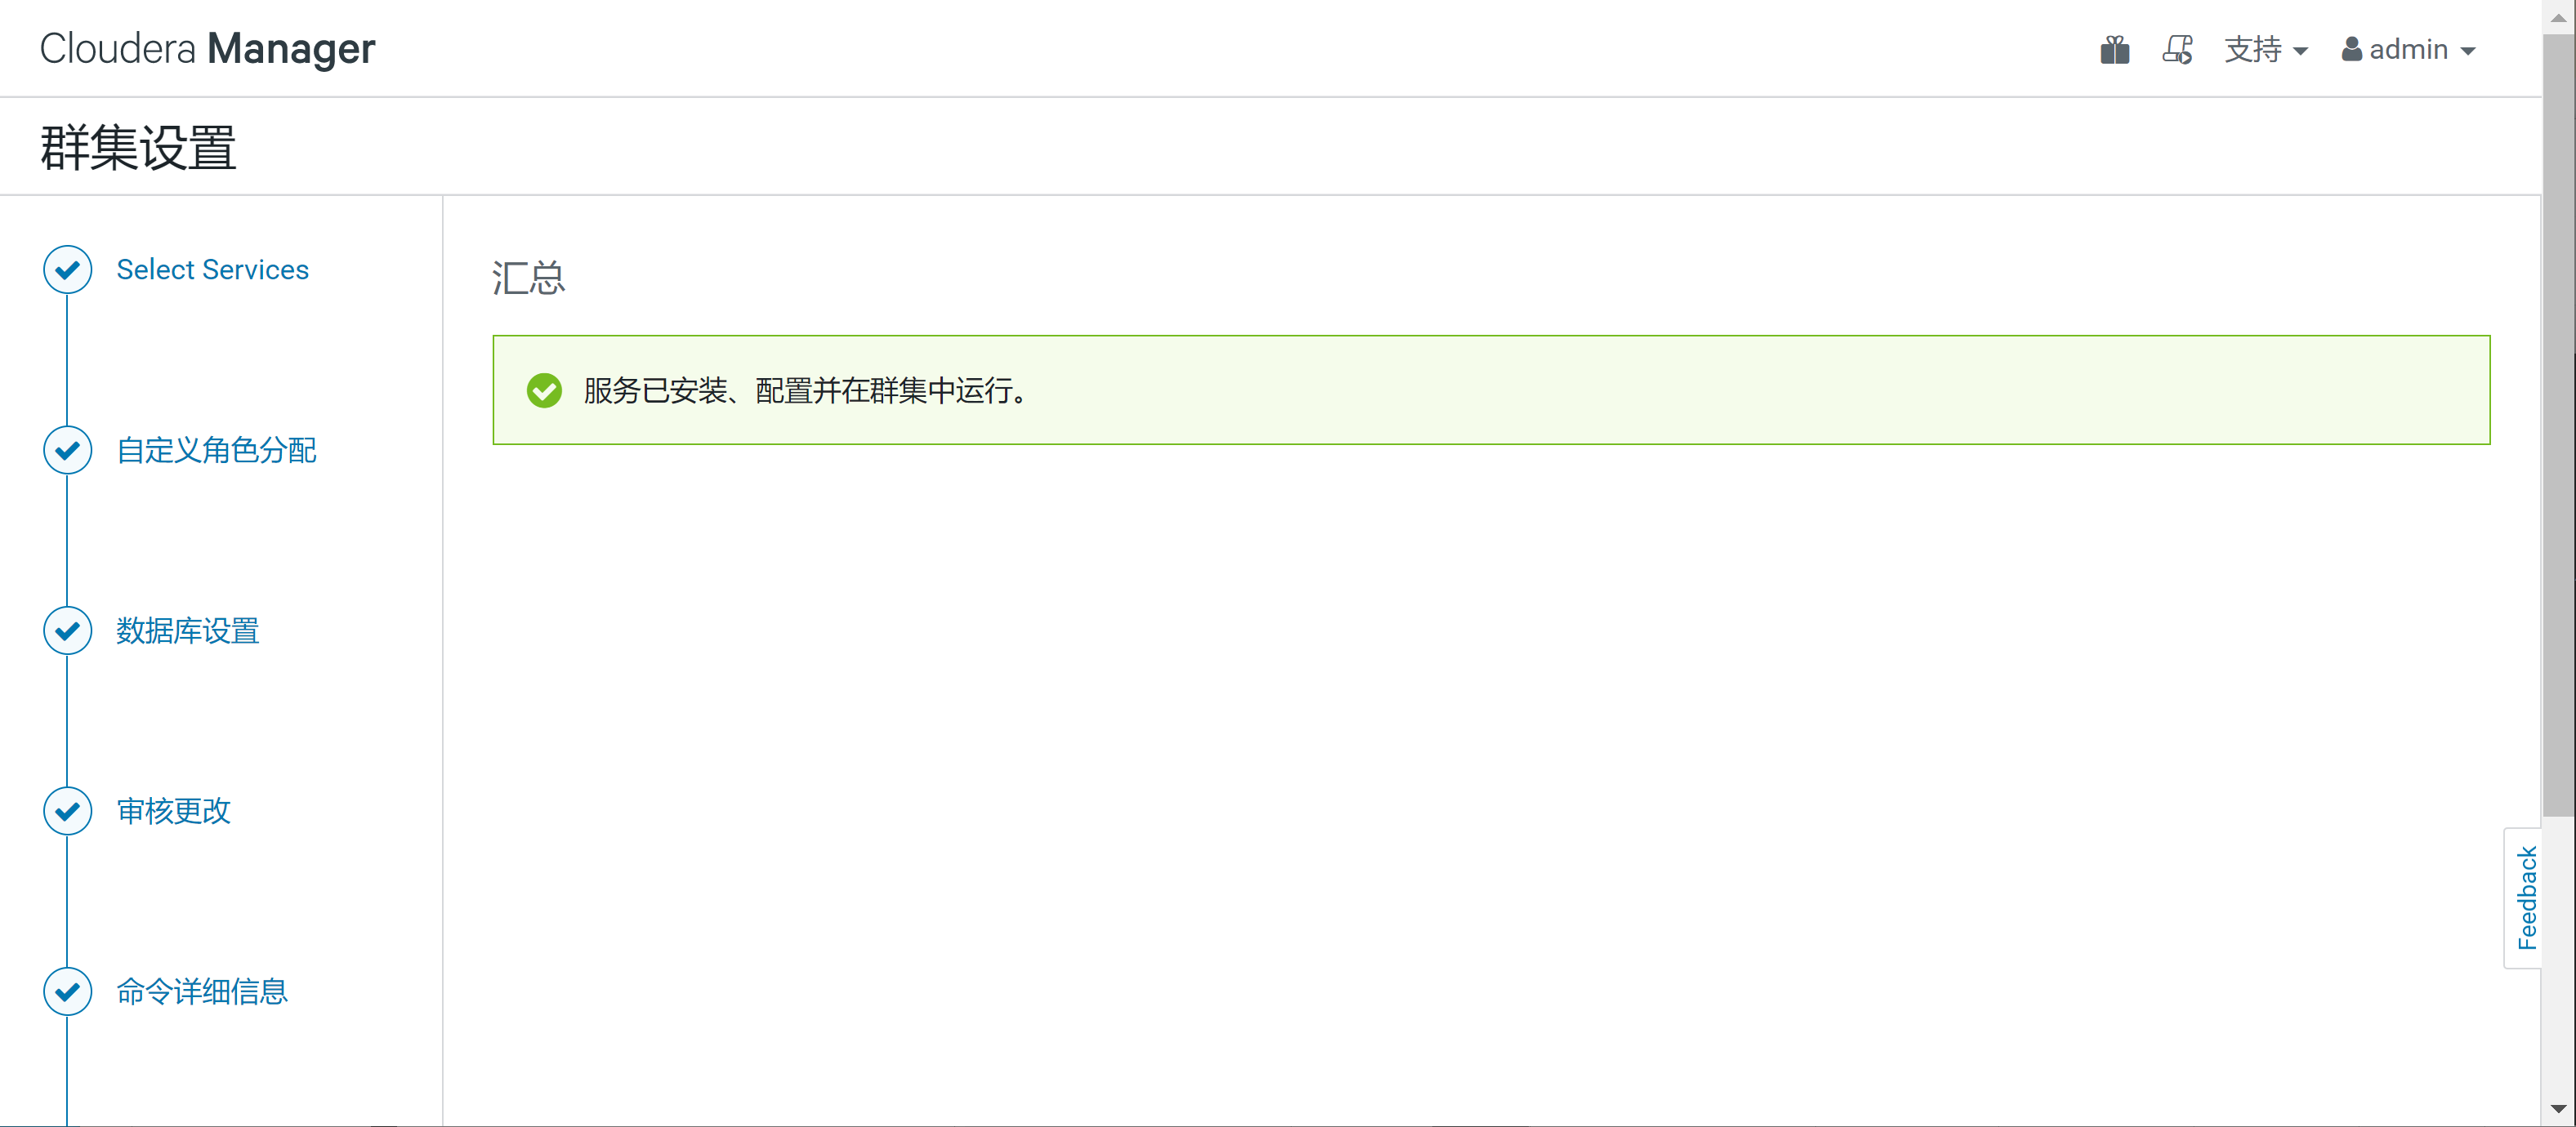
Access after successful startup: http: / / < server_ Host >: 7180. Log in to the CM Server management platform. The first login user name and password are admin by default. After logging in, the installation wizard will start and guide us through the configuration of each step.
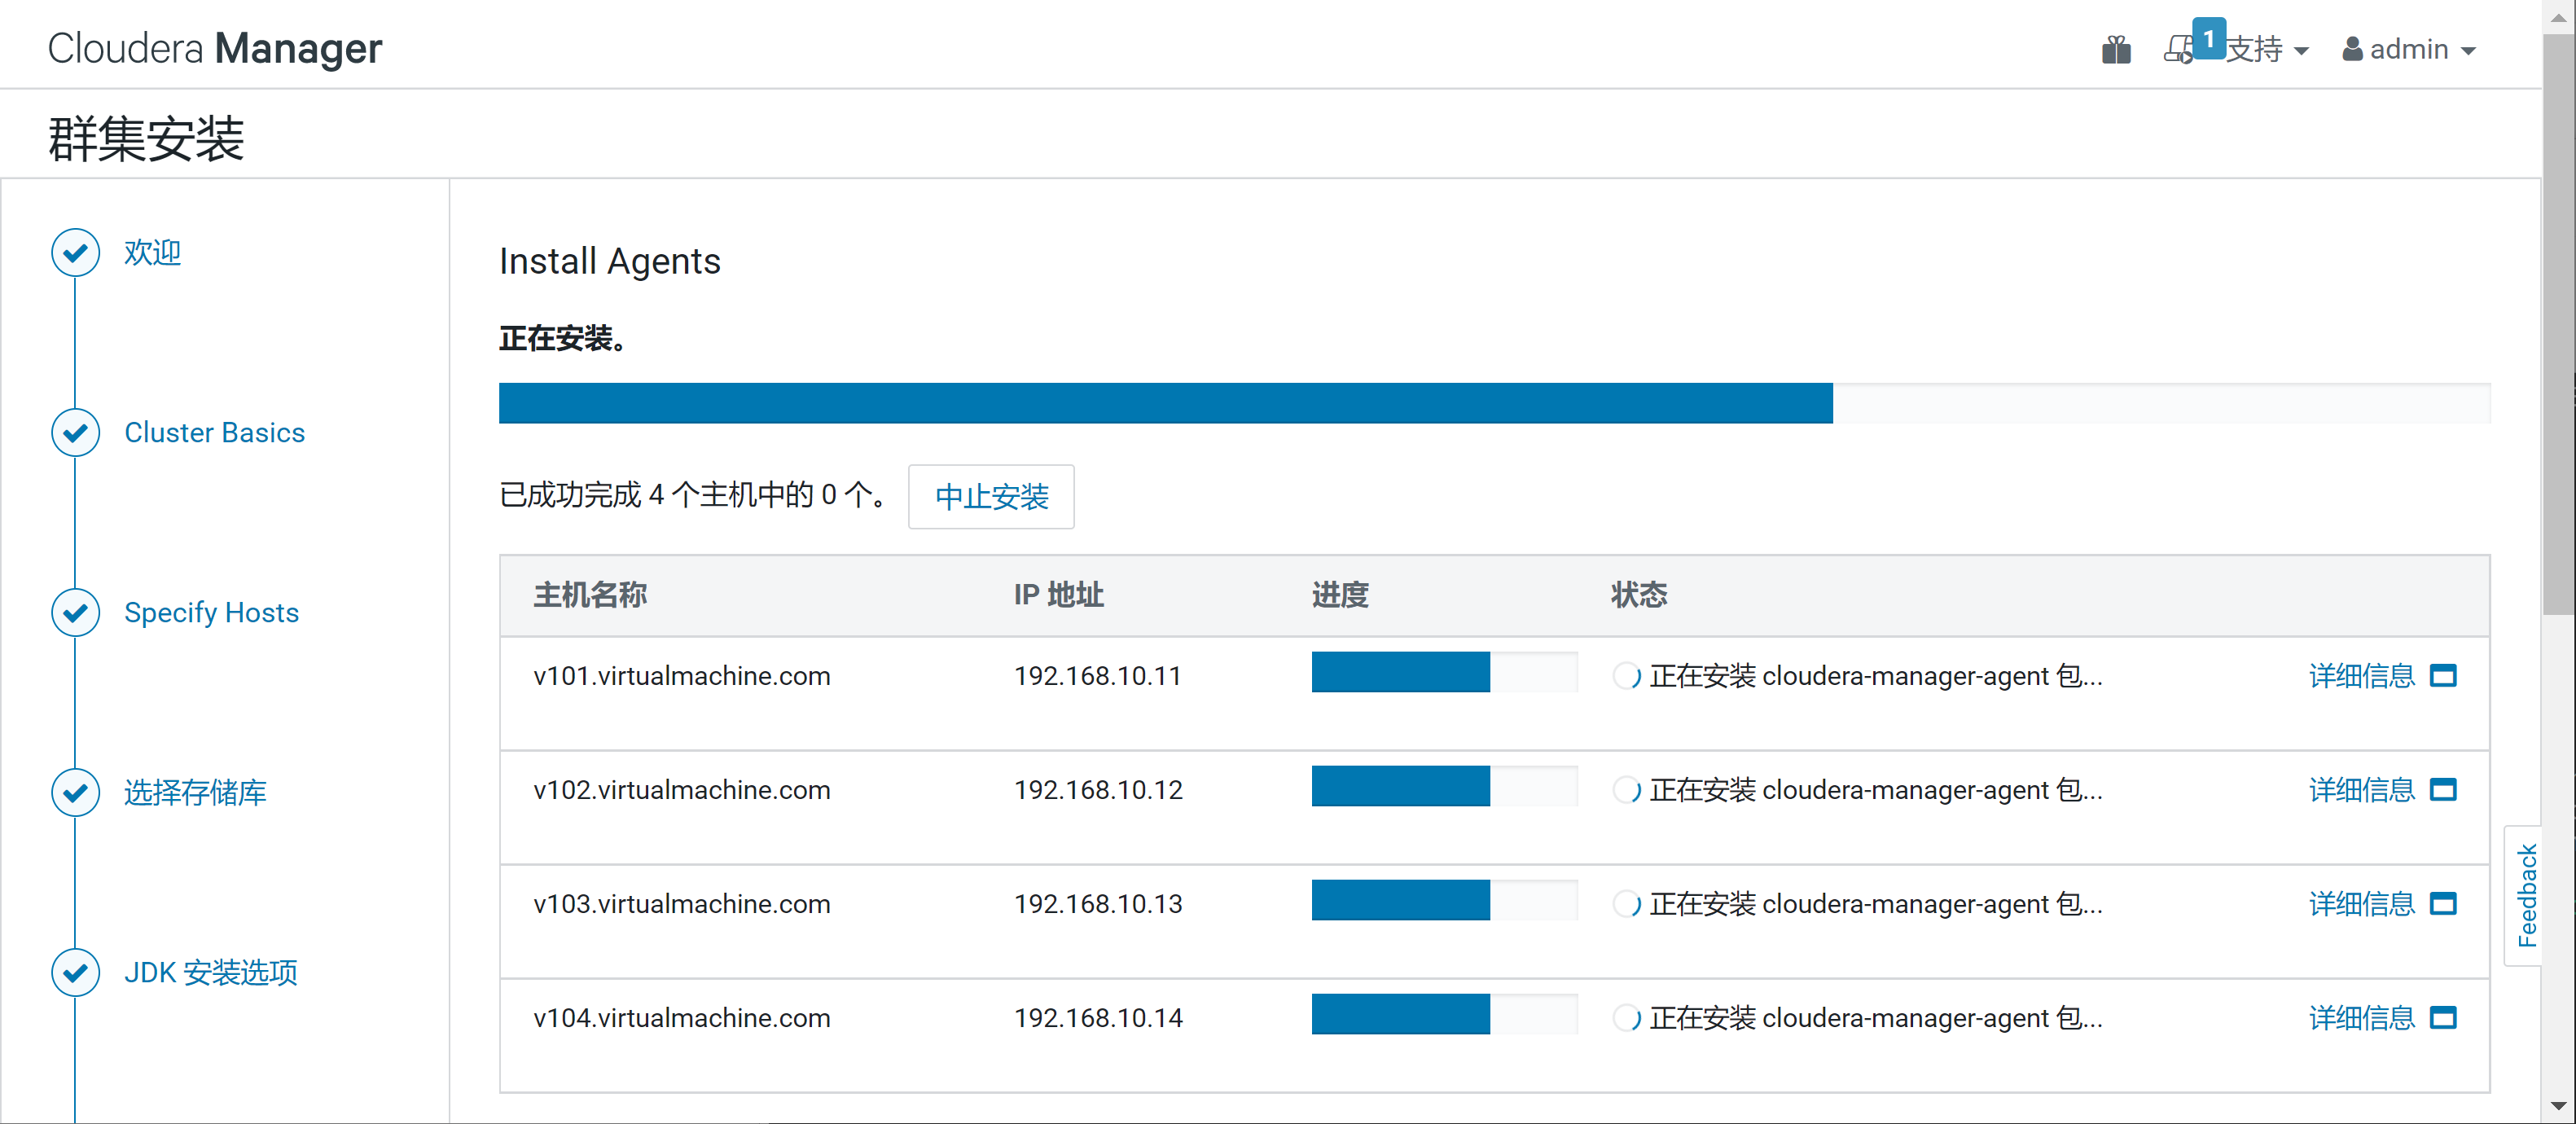
Errors encountered during deployment
Unable to copy installation package
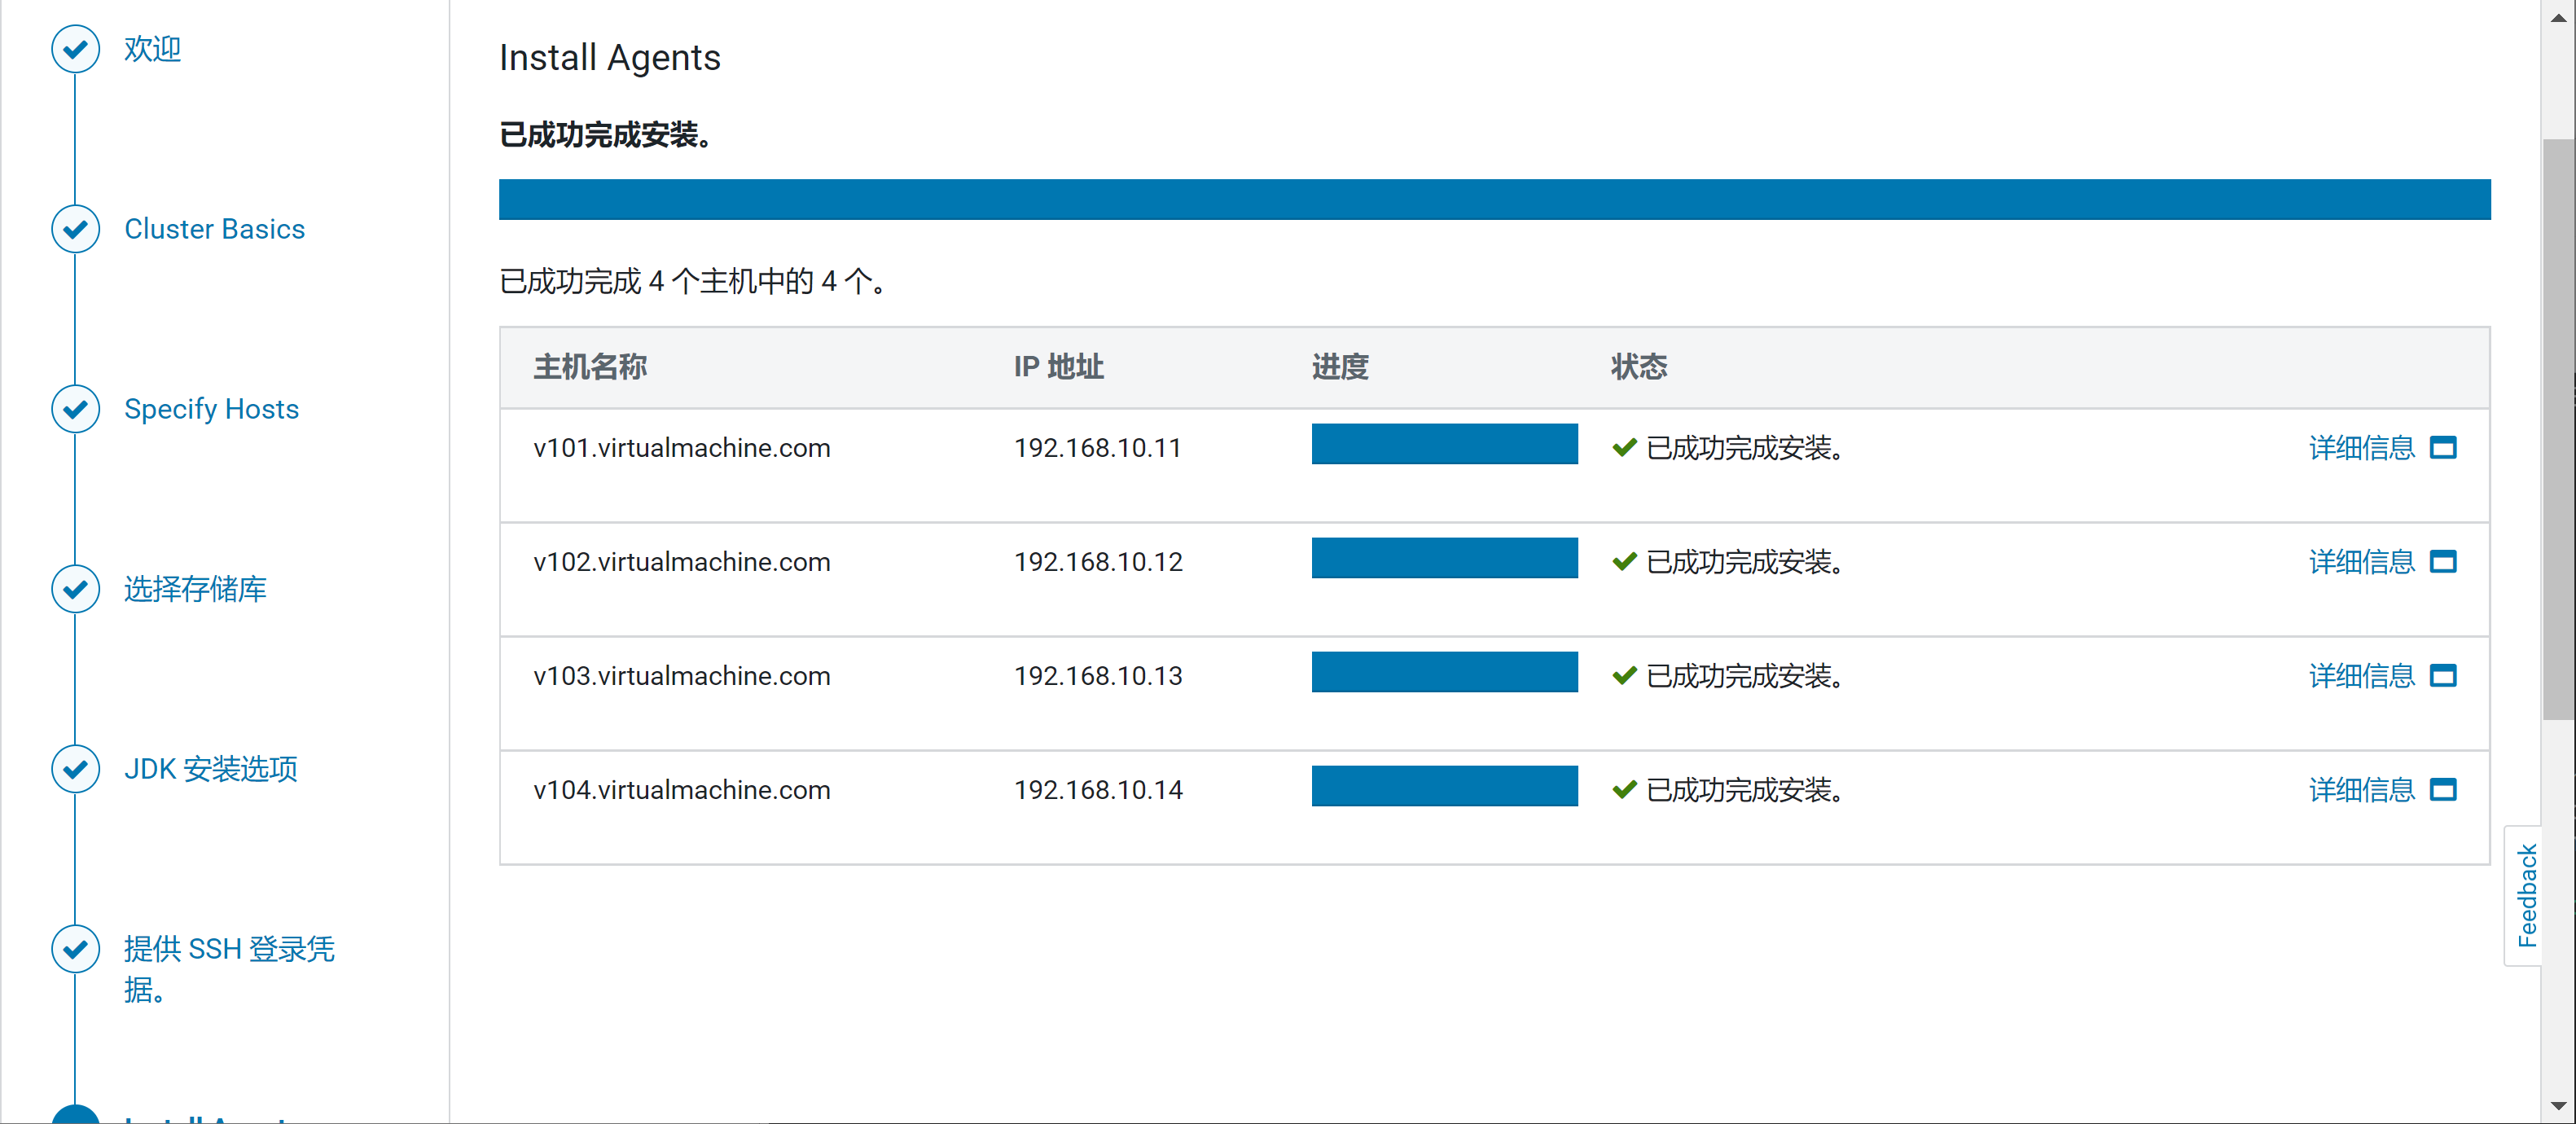
Install Agents
Missing allkeys ASC will prompt that the installation package cannot be copied
cloudera-manager-agent must have version=6.3.1 and build=1466458
Missing rpm installation package will prompt
The cdh parcel file and manitest.xml file need to be JSON to / opt / cloudera / parcel repo / path of CM server server

Prompt that the host is in poor health

Delete cm under the agent directory_ Guid file and restart the agent service recovery of the failed node.
# cd /var/lib/cloudera-scm-agent/
cm_guid        response.avro  uuid
[# rm -rf cm_guid
# service cloudera-scm-agent restart
Stopping cloudera-scm-agent:                               [  OK  ]
Starting cloudera-scm-agent:                               [  OK  ]
Then refresh the web page
https://blog.csdn.net/Post_Yuan/article/details/79101618
Failed to create database table
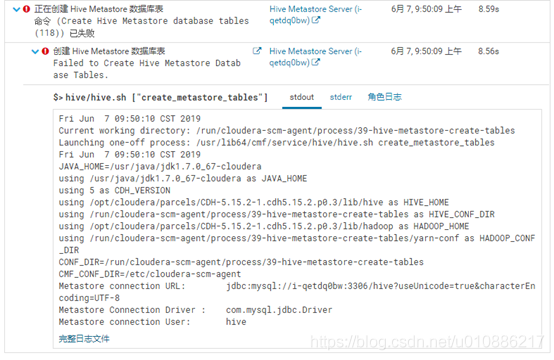
Copy mysql JDBC to the / usr/share/java path of each machine
And change the name to MySQL connector Java jar
cp mysql-connector-java-8.0.26.jar /usr/share/java/mysql-connector-java.jar
https://blog.csdn.net/u010886217/article/details/91127275
reference material
https://zhuanlan.zhihu.com/p/100314645
CM6 under centos7 3.1+CDH6. 3.2 installation and deployment
https://blog.csdn.net/weixin_40004348/article/details/106886347
Deploy Hadoop using Cloudera's CDH: the first step is to configure the package warehouse - package file
https://www.shangyouw.cn/wenjian/arc60902.html
Install Cloudera Enterprise 6.3 on RHEL7 / 3
https://zhuanlan.zhihu.com/p/100314645