I. Explanation
_
2. Installation of Virtual Machine (CentOS 7 is used in this paper)
_1. In this paper, CetnOS7 installation and deployment is adopted.
2. jdk1.8
3. Hadoop 2.7.3
| hostname | ip |
|---|---|
| master | 10.10.1.3 |
| slave1 | 10.10.1.4 |
3. Install jdk, configure firewall, SSH
- Modify hostname
There is a big difference between centos7 modifying hostname and centos6.5.
10.10.1.3 as master machine and 10.10.1.4 as slave 1 machine.[hadoop@slave1 .ssh]$ hostnamectl set-hostname slave1 -
Modify hosts file
[hadoop@master ~]$ vim /etc/hosts
If there is no vim command, execute Yum install-y vim installation10.10.1.3 master 10.10.1.4 slave1 #At the end of the hosts file, both machines need to be added. -
Install jdk
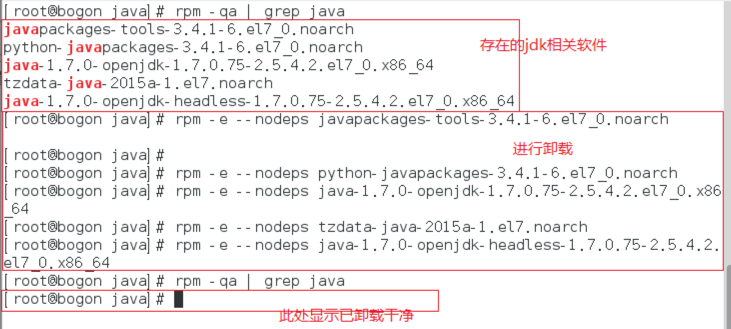
3.1 Uninstall System with openjdk
3.1.1. The built-in jdk commands of the uninstall system are as follows:rpm -qa | grep javaThe jdk version name that already exists in the system is listed.
3.1.2. Uninstall using uninstall commands:Rpm-e -- nodeps JDK name
3.2 jdk installation
3.2.1. Download jdk version to home directory
3.2.2. Decompression installation, decompression installation commands are as follows:Rpm-ivh RPM file name
3.2.3. Execution completed represents successful installation. The default installation directory is:
/usr/java/jdk1.8.0_913.3 Configuring environment variables
3.3.1. After successful installation of rpm, you can see the installed version by using java-version:
3.3.2. To be safe, you still need to configure profile files under root and hadoop users. Enter the following commands:vim /etc/profileAppend at the end of the article
export JAVA_HOME=/usr/java/jdk1.8.0_91
export CLASSPATH=.:$JAVA_HOME/jre/lib/rt.jar:$JAVA_HOME/lib/dt.jar:$JAVA_HOME/lib/tools.jar
export PATH=$PATH:$JAVA_HOME/bin
Switch users: su hadoop, and execute commands:
vim ~/.bashrcAppend at the end of the article
export JAVA_HOME=/usr/java/jdk1.8.0_91
export CLASSPATH=.:$JAVA_HOME/jre/lib/rt.jar:$JAVA_HOME/lib/dt.jar:$JAVA_HOME/lib/tools.jar
export PATH=$PATH:$JAVA_HOME/bin
The environment variable configuration is completed at this point.
-
Configure ssh secret-free login
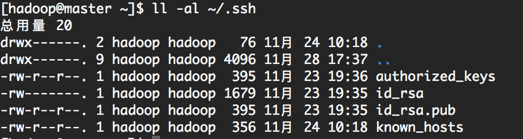
4.1. Generating key[hadoop@master ~]$ ssh-keygen -t rsaEnter all the way after you enter the above command, and you can generate. ssh files in the current user directory. Each machine should be set up.
4.2. Merge public keys into authorized_keys file. On the Master server, enter the. SSH directory and merge through the SSH command.
[hadoop@master ~]$ cat id_rsa.pub>> authorized_keys4.3. Slve1 Node Increases master Secret-Free Landing
[hadoop@master ~]$ ssh-copy-id hadoop@10.10.1.44.4. Testing ssh landing

The landing was successful and the setup was completed. -
Close the firewall
Because hadoop requires too many open ports, the firewall is temporarily closed here. To close the firewall, you must use the following command under the root user:#Close the firewall [root@master ~]$ systemctl stop firewalld.service #Turn off boot and self-start [root@master ~]$ systemctl disable firewalld.service
IV. Installation of Hadoop
- Download and unzip to the / usr/local/hadoop directory, and empower the hadoop directory to hadoop users.
[root@master ~]$ chown -R haddop:hadoop /usr/local/hadoop/ - Create a Data Storage Directory
[hadoop@master ~]$ cd /usr/local/hadoop [hadoop@master ~]$ mkdir tmp [hadoop@master ~]$ mkdir -p hdfs/data hdfs/name - Modify the core-site.xml file
<configuration> <property> <name>fs.default.name</name> <value>hdfs://master:9000</value> </property> <property> <name>io.file.buffer.size</name> <value>131072</value> </property> <property> <name>hadoop.tmp.dir</name> <value>file:/home/hadoop/tmp</value> <description>Abase for other temporary directories.</description> </property> </configuration> -
Modify the hdfs-site.xml file
<configuration> <property> <name>dfs.namenode.secondary.http-address</name> <value>linux-node1:9001</value> <description># View HDFS status </description> through the web interface </property> <property> <name>dfs.namenode.name.dir</name> <value>file:/home/hadoop/dfs/name</value> </property> <property> <name>dfs.datanode.data.dir</name> <value>file:/home/hadoop/dfs/data</value> </property> <property> <name>dfs.replication</name> <value>2</value> <description># Each Block has two backups </description> </property> <property> <name>dfs.webhdfs.enabled</name> <value>true</value> </property> </configuration> -
Modify mapred-site.xml
This is the configuration of MapReduce task. Because Hadoop 2.x uses the yarn framework, to achieve distributed deployment, yarn must be configured under the mapreduce.framework.name attribute. mapred.map.tasks and mapred.reduce.tasks are the number of tasks for map and reduce, respectively.<configuration> <property> <name>mapreduce.framework.name</name> <value>yarn</value> </property> <property> <name>mapreduce.jobhistory.address</name> <value>master:10020</value> </property> <property> <name>mapreduce.jobhistory.webapp.address</name> <value>master:19888</value> </property> </configuration> -
Configuration node yarn-site.xml
<configuration> <!-- Site specific YARN configuration properties --> <property> <name>yarn.nodemanager.aux-services</name> <value>mapreduce_shuffle</value> </property> <property> <name>yarn.nodemanager.aux-services.mapreduce.shuffle.class</name> <value>org.apache.hadoop.mapred.ShuffleHandler</value> </property> <property> <name>yarn.resourcemanager.address</name> <value>master:8032</value> </property> <property> <name>yarn.resourcemanager.scheduler.address</name> <value>master:8030</value> </property> <property> <name>yarn.resourcemanager.resource-tracker.address</name> <value>master:8031</value> </property> <property> <name>yarn.resourcemanager.admin.address</name> <value>master:8033</value> </property> <property> <name>yarn.resourcemanager.webapp.address</name> <value>master:8088</value> </property> <property> <name>yarn.nodemanager.resource.memory-mb</name> <value>8192</value> </property> </configuration> -
Configure hadoop environment variables
[root@master ~]$  vim /etc/profile
#Replace the previously modified java environment variable.
export JAVA_HOME=/usr/java/jdk1.8.0_91
export CLASSPATH=.:$JAVA_HOME/jre/lib/rt.jar:$JAVA_HOME/lib/dt.jar:$JAVA_HOME/lib/tools.jar
export HADOOP_HOME=/usr/local/hadoop
export PATH=$PATH:$JAVA_HOME/bin:$HADOOP_HOME/bin:$HADOOP_HOME/sbin
[hadoop@master ~]$ vim ~/.bashrc export JAVA_HOME=/usr/java/jdk1.8.0_91 export CLASSPATH=.:$JAVA_HOME/jre/lib/rt.jar:$JAVA_HOME/lib/dt.jar:$JAVA_HOME/lib/tools.jar export HADOOP_HOME=/usr/local/hadoop export PATH=$PATH:$JAVA_HOME/bin:$HADOOP_HOME/bin:$HADOOP_HOME/sbinThis is the end of the configuration.
As for the JAVA_HOME of hadoop-env.sh and yarn-env.sh, which was written in some tutorials, this problem does not exist as long as the profile of root and Hadoop users is set up after testing.
-
Copy the hadoop configuration file to the slave1 node.
[hadoop@master ~]$ scp -r /usr/local/hadoop/ slave1:/home/hadoop/
V. Starting Clusters
- Initialize NameNode with hadoop users on master node
[hadoop@master ~]$ hdfs namenode –format #After executing the console output, you see that Exiting with status 0 means that the formatting is successful. - Start hadoop
#Start hdfs [hadoop@master ~]$ start-dfs.sh #Start yarn Distributed Computing Framework [hadoop@master ~]$ start-yarn.sh - Start the job history service to see the status of mapreduce
[hadoop@master ~]$ mr-jobhistory-daemon.sh start historyserver -
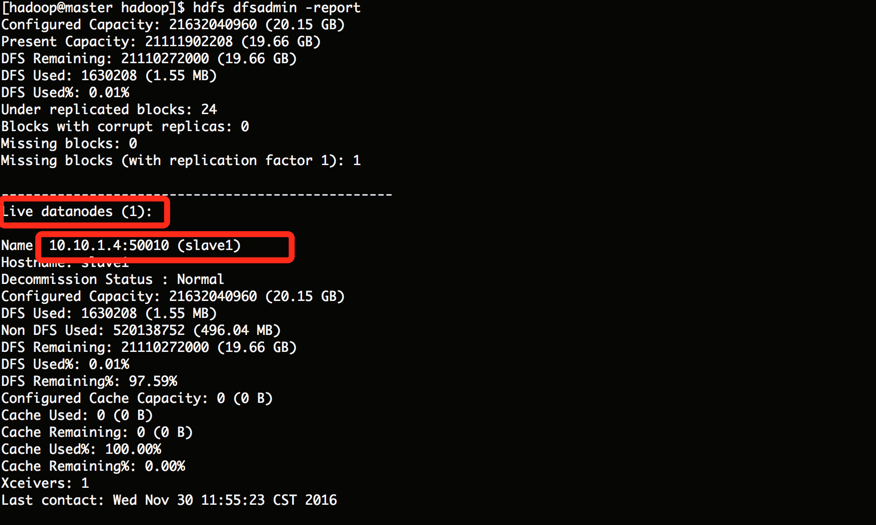
View HDFS Distributed File System Status
-
Verify that the startup is successful
[hadoop@master ~]$ jps

-
web page view hadoop cluster status
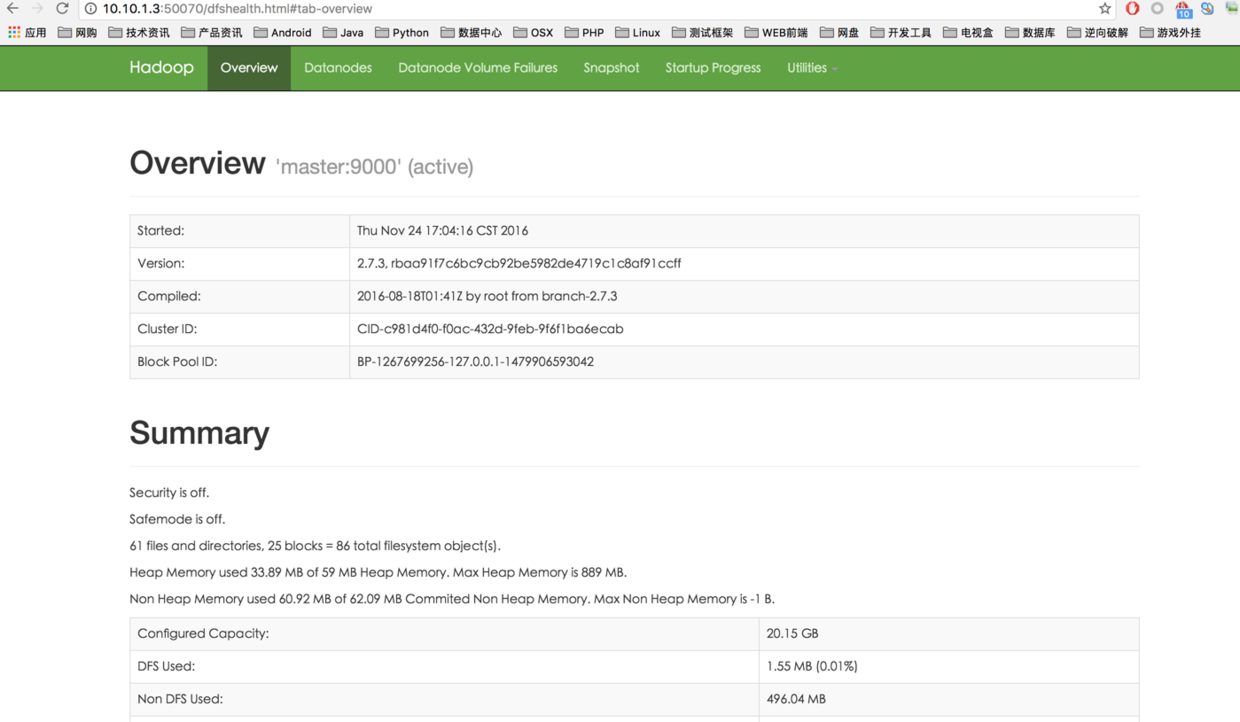

Note that the port numbers are different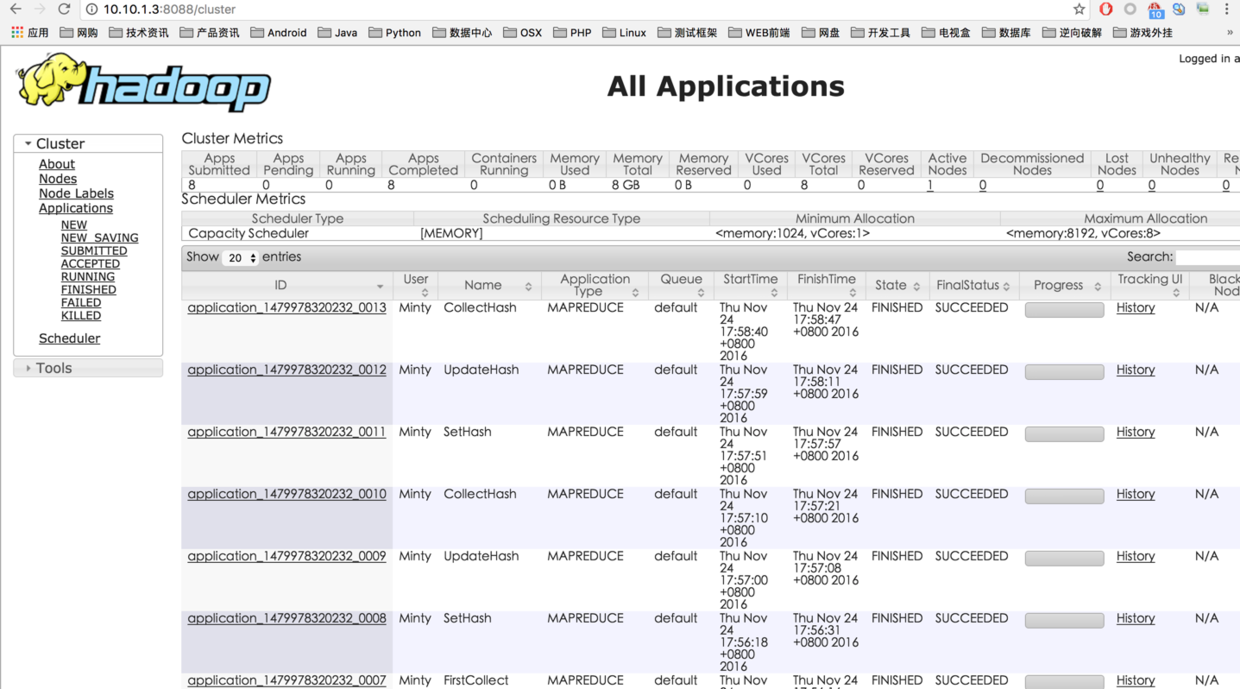
Successful start-up