1, Environmental preparation before installation
1. Operating system: CentOS 7.6 (virtual machine, IP: 192.168.172.151)
(1) Operating system turn off firewall:
[root@local151 ~]# systemctl stop firewalld.service
[root@local151 ~]# systemctl disable firewalld.service
[root@local151 ~]# systemctl status firewalld.service
● firewalld.service - firewalld - dynamic firewall daemon
   Loaded: loaded (/usr/lib/systemd/system/firewalld.service; disabled; vendor preset: enabled)
   Active: inactive (dead)
     Docs: man:firewalld(1)
(2) Check system time zone:
[root@local151 ~]# date -R
Mon, 24 May 2021 09:46:32 +0800
Time zone is mainly used to ensure that all nodes are in the same time zone during cluster installation. In addition, the system time should be consistent.
(3) Close selinux
[root@local151 ~]# cat /etc/sysconfig/selinux

# This file controls the state of SELinux on the system.
# SELINUX= can take one of these three values:
#     enforcing - SELinux security policy is enforced.
#     permissive - SELinux prints warnings instead of enforcing.
#     disabled - No SELinux policy is loaded.
SELINUX=disabled   # Set to disabled
# SELINUXTYPE= can take one of three values:
#     targeted - Targeted processes are protected,
#     minimum - Modification of targeted policy. Only selected processes are protected.
#     mls - Multi Level Security protection.
SELINUXTYPE=targeted
After setting, you need to restart the operating system to take effect. You can also handle it temporarily:
setenforce 0
You can query Linux configuration selinux for details.
(4) Modify the hosts file and add the host name and IP mapping:
[root@local151 ~]# hostname
local151
[root@local151 ~]# cat /etc/hosts
127.0.0.1   localhost localhost.localdomain localhost4 localhost4.localdomain4
::1         localhost localhost.localdomain localhost6 localhost6.localdomain6
192.168.172.151	local151
(5) Turn off the operating system swap partition (official recommendation):
[root@local151 ~]# cat /etc/fstab

#
# /etc/fstab
# Created by anaconda on Wed Feb  3 10:10:08 2021
#
# Accessible filesystems, by reference, are maintained under '/dev/disk'
# See man pages fstab(5), findfs(8), mount(8) and/or blkid(8) for more info
#
/dev/mapper/centos-root /                       xfs     defaults        0 0
UUID=fcfca156-8754-48a7-bc9f-490f54e23ccc /boot                   xfs     defaults        0 0
#/dev/mapper/centos-swap swap                    swap    defaults        0 0
Restart the operating system after modification. If not, you can manually close swap after modification:
[root@local151 ~]# free -m
              total        used        free      shared  buff/cache   available
Mem:           3771         409        2253          14        1107        3036
Swap:          4096         0          4096
[root@local151 ~]# swapoff -a
[root@local151 ~]# free -m
              total        used        free      shared  buff/cache   available
Mem:           3771         409        2253          14        1107        3036
Swap:             0           0           0
2.openGuess installation package: opengauss-2.0.0-centos-64bit-all tar. gz
Download address: openGuess official website
The package contains multiple files:
openGauss-2.0.0-CentOS-64bit-om.sha256
openGauss-2.0.0-CentOS-64bit-om.tar.gz
openGauss-2.0.0-CentOS-64bit.sha256
openGauss-2.0.0-CentOS-64bit.tar.bz2
upgrade_sql.sha256
upgrade_sql.tar.gz
Upload the downloaded installation package to the deployment server.
Briefly learn about openGuess installation users and user groups:
dbgrp: when initializing the installation environment, the user group to which the installation user specified by the - G parameter belongs. If the user group does not exist, it will be created automatically, or you can create the user group in advance. Executing GS_ Permission is checked when preinstall script. gs_ The preinstall script will automatically give users in this group access and execution permissions to the installation directory and data directory.
Create dbgrp user group command:
groupadd dbgrp
omm: the operating system user specified and automatically created by the - U parameter when initializing the installation environment. If the user already exists, please clean up the user or replace the initialization user. In terms of security, the group to which this user belongs is planned as follows:
Group: dbgrp
2, Install openGuess
1. Initialize the operating system environment configuration
(1) Configure network kernel parameters
[root@local151 ~]# vim /etc/sysctl.conf
......
# Add the following parameters
net.ipv4.ip_local_port_range = 26000 65500
net.ipv4.tcp_rmem = 4096 87380 4194304
net.ipv4.tcp_wmem = 4096 16384 4194304
net.ipv4.conf. ens33.rp_filter = 1
net.ipv4.tcp_fin_timeout=60
net.ipv4.tcp_retries1=5
net.ipv4.tcp_syn_retries=5
net.sctp.path_max_retrans=10
net.sctp.max_init_retransmits=10

[root@local151 ~]# sysctl -p     # Validate kernel parameters
The parameters in the official document are as follows:
net.ipv4.tcp_max_tw_buckets = 10000
net.ipv4.tcp_tw_reuse = 1
net.ipv4.tcp_tw_recycle = 1
net.ipv4.tcp_keepalive_time = 30
net.ipv4.tcp_keepalive_probes = 9
net.ipv4.tcp_keepalive_intvl = 30
net.ipv4.tcp_retries1 = 5
net.ipv4.tcp_syn_retries = 5
net.ipv4.tcp_synack_retries = 5
net.sctp.path_max_retrans = 10
net.sctp.max_init_retransmits = 10
net.sctp.association_max_retrans = 10
net.sctp.hb_interval = 30000
net.ipv4.tcp_retries2 = 12
vm.overcommit_memory = 0
net.sctp.sndbuf_policy = 0
net.sctp.rcvbuf_policy = 0
net.sctp.sctp_mem = 94500000 915000000 927000000
net.sctp.sctp_rmem = 8192 250000 16777216
net.sctp.sctp_wmem = 8192 250000 16777216
net.ipv4.tcp_rmem = 8192 250000 16777216
net.ipv4.tcp_wmem = 8192 250000 16777216
net.core.wmem_max = 21299200
net.core.rmem_max = 21299200
net.core.wmem_default = 21299200
net.core.rmem_default = 21299200
net.ipv4.ip_local_port_range = 26000-65535
kernel.sem = 250 6400000 1000 25600
vm.min_free_kbytes = # 5% of total system memory
net.core.somaxconn = 65535
net.ipv4.tcp_syncookies = 1
net.sctp.addip_enable = 0
net.core.netdev_max_backlog = 65535
net.ipv4.tcp_max_syn_backlog = 65535
net.ipv4.tcp_fin_timeout = 60
kernel.shmall = 1.15292E+18
kernel.shmmax = 1.84467E+19
net.ipv4.tcp_sack = 1
net.ipv4.tcp_timestamps = 1
vm.extfrag_threshold = 500
vm.overcommit_ratio = 90
(2) Modify file system kernel parameters
[root@local151 ~]# echo "* soft nofile 1000000" >>/etc/security/limits.conf
[root@local151 ~]# echo "* hard nofile 1000000" >>/etc/security/limits.conf
[root@local151 ~]# echo "* soft nproc unlimited" >>/etc/security/limits.conf
[root@local151 ~]# echo "* hard nproc unlimited" >>/etc/security/limits.conf
(3) Install dependent packages
[root@local151 ~]# yum install -y libaio-devel flex bison ncurses-devel glibc-devel patch redhat-lsb-core readline-devel openssl* java-1.8.0-openjdk* psmisc bzip2 python3 python3-devel lksctp*
The above is installed when the yum source of Tsinghua mirror station is configured online. If it is an offline installation, all installation packages and dependent packages need to be downloaded and uploaded to the server to configure a custom Yum source for installation.
2. Initialize the installation environment
(1) Create installation package storage directory:
[root@local151 ~]# mkdir -p /data/software/openGauss
[root@local151 ~]# chmod 755 -R /data/software
(2) Install the package opengauss-2.0.0-centos-64bit-all tar. GZ upload to the directory created in the previous step. Unzip.
[root@local151 openGauss]# tar -zxvf openGauss-2.0.0-CentOS-64bit-all.tar.gz
[root@local151 openGauss]# tar -zxvf openGauss-2.0.0-CentOS-64bit-om.tar.gz
Continue to unzip the OM installation package, and the script subdirectory will be automatically generated under the path of / data/software/openGauss, and GS will be generated under the script directory_ Preinstall and other om tool scripts.
(3) Create xml configuration file
[root@local151 ~]# cd /data/software/openGauss/
[root@local151 openGauss]# vim clusterconfig.xml
<?xml version="2.0" encoding="UTF-8"?>
<ROOT>
    <!-- openGauss Overall information -->
    <CLUSTER>
        <!-- Database name -->
        <PARAM name="clusterName" value="dbCluster" />
        <!-- Database node name(hostname) -->
        <PARAM name="nodeNames" value="local151" />
        <!-- Database installation directory-->
        <PARAM name="gaussdbAppPath" value="/data/huawei/install/app" />
        <!-- Log directory-->
        <PARAM name="gaussdbLogPath" value="/data/huawei/log/omm" />
        <!-- Temporary file directory-->
        <PARAM name="tmpMppdbPath" value="/data/huawei/tmp" />
        <!-- Database tools catalog-->
        <PARAM name="gaussdbToolPath" value="/data/huawei/install/om" />
        <!-- database core File directory-->
        <PARAM name="corePath" value="/data/huawei/corefile" />
        <!-- node IP,One to one correspondence with database node name list -->
        <PARAM name="backIp1s" value="192.168.172.151"/>
    </CLUSTER>
    <!-- Node deployment information on each server -->
    <DEVICELIST>
        <!-- Deployment information on node 1 -->
        <DEVICE sn="node1">
            <!-- Host name of node 1 -->
            <PARAM name="name" value="local151"/>
            <!-- Where node 1 is located AZ and AZ priority -->
            <PARAM name="azName" value="AZ1"/>
            <PARAM name="azPriority" value="1"/>
            <!-- Node 1 IP,If the server has only one network card available, the backIP1 and sshIP1 Configure to the same IP -->
            <PARAM name="backIp1" value="192.168.172.151"/>
            <PARAM name="sshIp1" value="192.168.172.151"/>

	    <!--dbnode-->
	    <PARAM name="dataNum" value="1"/>
	    <PARAM name="dataPortBase" value="26000"/>
	    <PARAM name="dataNode1" value="/data/huawei/install/data/dn"/>
            <PARAM name="dataNode1_syncNum" value="0"/>
        </DEVICE>
    </DEVICELIST>
</ROOT>
Note: the xml file should be in the same level directory as the decompressed directory. The directory under / data/huawei should not be created in advance, especially the database installation directory. If it is created in advance, the command GS will be used_ Preinstall reports an error.
(4) Enter script directory
cd /opt/software/openGauss/script
Use gs_preinstall prepares the installation environment, uses the interactive mode to execute the pre installation, and automatically creates the root user mutual trust and openGauss user mutual trust during the execution. omm is the database administrator (also the operating system user running openGauss), dbgrp is the group name of the operating system user running openGauss, / data / software / openGauss / clusterconfig XML is the path of openGauss configuration file. During execution, the user selects whether to create mutual trust according to the prompt, and enters the password of root user or omm user of the operating system:
(it should be noted that the xml file and the decompressed om package file execute the following commands in the same directory.)
[root@local151 script]# ./gs_preinstall -U omm -G dbgrp -X /data/software/openGauss/clusterconfig.xml
Parsing the configuration file.
Successfully parsed the configuration file.
Installing the tools on the local node.
Successfully installed the tools on the local node.
Setting pssh path
Successfully set core path.
Are you sure you want to create the user[omm] and create trust for it (yes/no)? yes  # Enter yes
Please enter password for cluster user.
Password:      # Enter the password as prompted
Please enter password for cluster user again.
Password:      # Enter the password as prompted
Successfully created [omm] user on all nodes.
Preparing SSH service.
Successfully prepared SSH service.
Checking OS software.
Successfully check os software.
Checking OS version.
Successfully checked OS version.
Creating cluster's path.
Successfully created cluster's path.
Setting SCTP service.
Successfully set SCTP service.
Set and check OS parameter.
Setting OS parameters.
Successfully set OS parameters.
Warning: Installation environment contains some warning messages.
Please get more details by "/data/software/openGauss/script/gs_checkos -i A -h local151 --detail".
Set and check OS parameter completed.
Preparing CRON service.
Successfully prepared CRON service.
Setting user environmental variables.
Successfully set user environmental variables.
Setting the dynamic link library.
Successfully set the dynamic link library.
Setting Core file
Successfully set core path.
Setting pssh path
Successfully set pssh path.
Set ARM Optimization.
No need to set ARM Optimization.
Fixing server package owner.
Setting finish flag.
Successfully set finish flag.
Preinstallation succeeded.
2. Execute database installation
(1) Switch to the omm user. After 1 - (4) is executed successfully, the environment variable of openGuess will be written to the omm user's automatically Under bashrc:
[root@local151 openGauss]# su - omm
Last login: Mon May 24 13:41:34 CST 2021 on pts/0
[omm@local151 ~]$ cat .bashrc
# .bashrc

# Source global definitions
if [ -f /etc/bashrc ]; then
	. /etc/bashrc
fi

# Uncomment the following line if you don't like systemctl's auto-paging feature:
# export SYSTEMD_PAGER=

# User specific aliases and functions
export GPHOME=/data/huawei/install/om
export PATH=$GPHOME/script/gspylib/pssh/bin:$GPHOME/script:$PATH
export LD_LIBRARY_PATH=$GPHOME/lib:$LD_LIBRARY_PATH
export PYTHONPATH=$GPHOME/lib
export GAUSSHOME=/data/huawei/install/app
export PATH=$GAUSSHOME/bin:$PATH
export LD_LIBRARY_PATH=$GAUSSHOME/lib:$LD_LIBRARY_PATH
export S3_CLIENT_CRT_FILE=$GAUSSHOME/lib/client.crt
export GAUSS_VERSION=2.0.0
export PGHOST=/data/huawei/tmp
export GAUSSLOG=/data/huawei/log/omm/omm
umask 077
export GAUSS_ENV=2
export GS_CLUSTER_NAME=dbCluster
(2) Use gs_install install openGauss.
[omm@local151 ~]$ gs_install -X /data/software/openGauss/clusterconfig.xml
Parsing the configuration file.
Check preinstall on every node.
Successfully checked preinstall on every node.
Creating the backup directory.
Successfully created the backup directory.
begin deploy..
Installing the cluster.
begin prepare Install Cluster..
Checking the installation environment on all nodes.
begin install Cluster..
Installing applications on all nodes.
Successfully installed APP.
begin init Instance..
encrypt cipher and rand files for database.
Please enter password for database:         # Enter database password
Please repeat for database:
begin to create CA cert files
The sslcert will be generated in /data/huawei/install/app/share/sslcert/om
Cluster installation is completed.
Configuring.
Deleting instances from all nodes.
Successfully deleted instances from all nodes.
Checking node configuration on all nodes.
Initializing instances on all nodes.
Updating instance configuration on all nodes.
Check consistence of memCheck and coresCheck on database nodes.
Configuring pg_hba on all nodes.
Configuration is completed.
Successfully started cluster.
Successfully installed application.
end deploy..
(3) Check openGuess status after successful installation:
[omm@local151 ~]$ gs_om -t status
-----------------------------------------------------------------------

cluster_name    : dbCluster
cluster_state   : Normal
redistributing  : No

-----------------------------------------------------------------------
After the database installation is completed, a database named postgres is generated by default. You can connect to the database the first time you connect to it. postgres is the name of the database to be connected, and 26000 is the port number of the database master node, that is, the value of dataPortBase in the XML configuration file. Please replace according to the actual situation.
[omm@local151 ~]$ gsql -d postgres -p 26000 -r
gsql ((openGauss 2.0.0 build 78689da9) compiled at 2021-03-31 21:04:03 commit 0 last mr  )
Non-SSL connection (SSL connection is recommended when requiring high-security)
Type "help" for help.

postgres=# \l
                          List of databases
   Name    | Owner | Encoding  | Collate | Ctype | Access privileges
-----------+-------+-----------+---------+-------+-------------------
 postgres  | omm   | SQL_ASCII | C       | C     |
 template0 | omm   | SQL_ASCII | C       | C     | =c/omm           +
           |       |           |         |       | omm=CTc/omm
 template1 | omm   | SQL_ASCII | C       | C     | =c/omm           +
           |       |           |         |       | omm=CTc/omm
(3 rows)

postgres=#
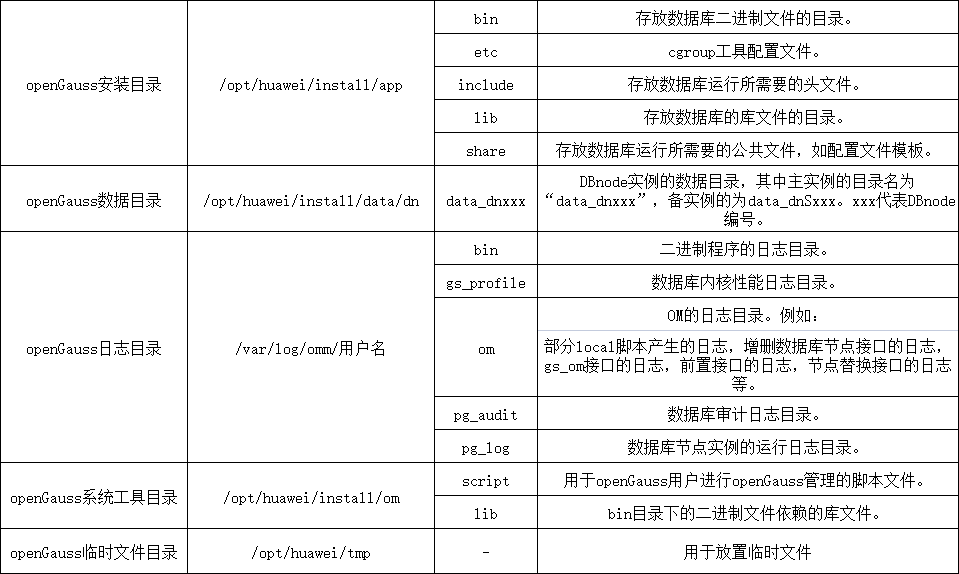
3, Introduction to relevant directories of openGuess database