FastDFS
1. Introduction to FastDFS
FastDFS is an open source distributed file system. It manages files. Its functions include file storage, file synchronization, file access (file upload, file download), etc. It solves the problems of mass storage and load balancing. It is especially suitable for online services based on documents, such as photo album websites, video websites and so on.
FastDFS server has two roles, tracker and storage node
- The tracker is mainly responsible for scheduling and load balancing
- The storage node stores files and completes all the functions of file management: storage, synchronization and providing access interface.
FastDFS manages the meta data of files. The so-called meta data of files is the related attributes of files, expressed in the form of key value pairs. For example, width=1024, where key is width and value is 1024. The meta data of the file is the attribute list of the file, which can contain multiple key value pairs.
FastDFS system architecture
As shown in the figure below:
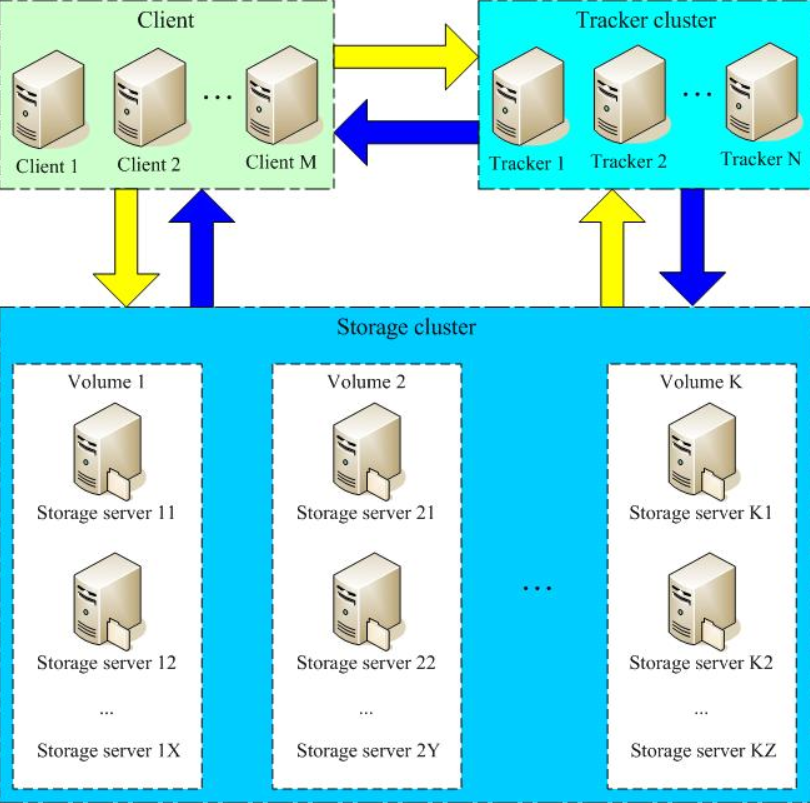
The tracker and storage node can be composed of one or more servers. The servers in the tracker and storage node can be added or offline at any time without affecting the online service. All servers in the tracker are peer-to-peer and can be added or reduced at any time according to the pressure of the server.
In order to support large capacity, storage nodes (servers) adopt the organization mode of volume division (or grouping). The storage system is composed of one or more volumes. The files between volumes are independent of each other. The accumulation of all volume capacities is the file capacity of the whole storage system. A volume can be composed of one or more storage servers.
2. FastDFS installation
Install libfastcommon
libfastcommon is a basic class library for fastdfs
#download
wget https://github.com/happyfish100/libfastcommon/archive/V1.0.43.tar.gz

#decompression
tar -zxvf V1.0.43.tar.gz

#Enter directory
cd libfastcommon-1.0.43/

# compile
./make.sh

# install
./make.sh install
If you are prompted that gcc is not installed, directly use the yum command to install gcc
#Install gcc
yum install -y gcc gcc-c++
Install FastDFS
# download
wget https://github.com/happyfish100/fastdfs/archive/V6.06.tar.gz

# decompression
tar -zxvf V6.06.tar.gz

# Enter directory
cd fastdfs-6.06/

# compile
./make.sh

# install
./make.sh install
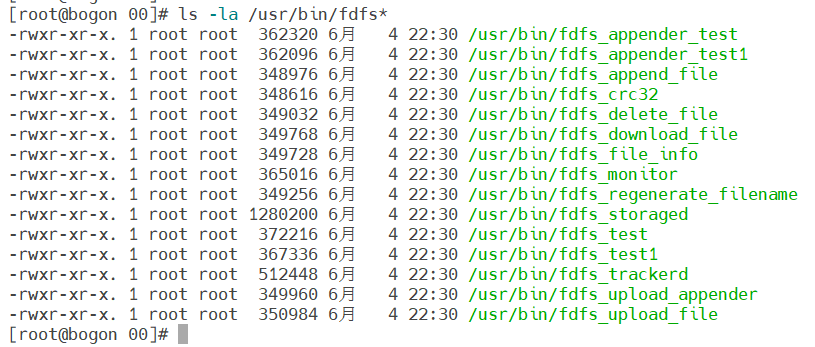
View installation results
ls -la /usr/bin/fdfs*
After the above commands are executed successfully, you can see several commands
tracker configuration
Find the file in the directory / etc/fdfs folder, tracker Conf.sample, copy and name it tracker conf
#Copy and rename files
cp tracker.conf.sample tracker.conf

#Edit tracker Conf file
vim tracker.conf

#Modify the following configuration
# The default port used by tracker is 22122, which can be modified
port = 22122

# The directory of user-defined tracker files. This directory must be created first, or an error will be reported when starting
base_path = /usr/local/fastdfs/tracker
Start tracker
/usr/bin/fdfs_trackerd /etc/fdfs/tracker.conf start
- /usr/bin/fdfs_ Tracker: tracker service
- /etc/fdfs/tracker.conf: tracker configuration file
Enter the log file to view the log. If there is no error, it indicates that the startup is successful
tail -f /usr/local/fastdfs/tracker/logs/trackerd.log
storage configuration
Find the file in the directory / etc/fdfs, storage Conf.sample, copy and name it storage conf
#Copy and rename files
cp storage.conf.sample storage.conf

#Edit storage conf
vim storage.conf

#Edit the following configuration
# Storage group name. Files in storage with the same group name will be synchronized
group_name = group1

# The port used by storage is 23000 by default
port = 23000

# The directory of the storage file. This directory must be created first, or an error will be reported when starting
base_path = /usr/local/fastdfs/storage

# storage specifies the number of directories for saving files. The default value is 1. Multiple can be configured, which is the same as the following store_path[N] correspondence
store_path_count = 1

# storage the directory where the file is saved_ path_ When count = 1, write store here_ path0
# When store_ path_ When the value of count is greater than 1, the store here_ Path [n] should also be increased accordingly,
store_path0 = /usr/local/fastdfs/storage

# Specify the IP and port of the tracker server and modify it according to its own trackerIP
# Note that 127.0.0.1 cannot be used here, otherwise an error will be reported when starting
tracker_server = 192.168.0.105:22122
Start storage
/usr/bin/fdfs_storaged /etc/fdfs/storage.conf start
- /usr/bin/fdfs_ Stored: storage service
- /etc/fdfs/storage.conf: storage configuration file
Check the log. If no error is reported, it indicates that the startup is successful
tail -f /usr/local/fastdfs/storage/logs/storaged.log
3. DFS test
Find the file in the directory / etc/fdfs folder, client Conf.sample, copy and name it client conf
#Copy the file and rename it client conf
cp client.conf.sample client.conf

#Edit file
vim client.conf

#Modify the following configuration
base_path=/usr/local/fastdfs/client

tracker_server = 192.168.0.105:22122
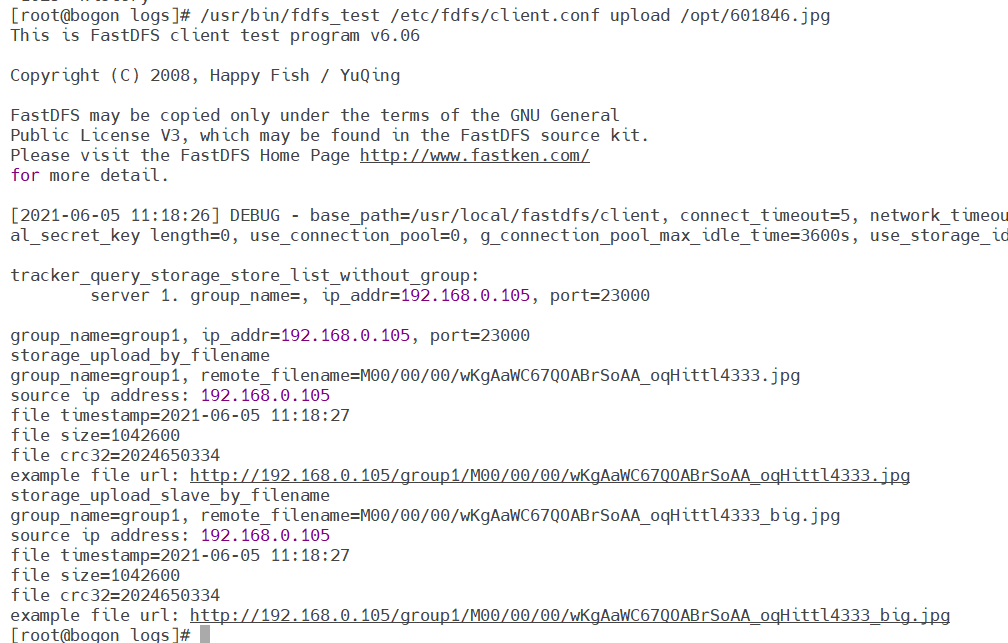
Copy a file to the / opt directory, test it, and execute the following command
/usr/bin/fdfs_test /etc/fdfs/client.conf upload /opt/601846.jpg
The results are as follows, indicating that the construction is successful