A hadoop pseudo-distributed environment is built using virtual machines to simulate a small-scale cluster for learning.
Install a centos7 system in the virtual machine
| ip | host name |
|---|---|
| 192.168.158.30 | hadoop.master |
1. Installing the java environment I installed JDK 1.8
Installation method: https://blog.csdn.net/ltgsoldier 1/article/details/97780445
I installed jdk in the following directory:
/usr/java/jdk1.8.0_221
Configure java environment variables:
export JAVA_HOME=/usr/java/jdk1.8.0_221
export JRE_HOME=${JAVA_HOME}/jre
export CLASSPATH=.:${JAVA_HOME}/lib:${JRE_HOME}/lib
export PATH=${JAVA_HOME}/bin:$PATH
2. Modify the host name because it is pseudo-distributed, so it can also not be set up.
hostnamectl set-hostname hadoop.master           # Use of this command will take effect immediately and restart will take effect.
hostname                                         #Check to see if the modification is complete
3. Modify / etc/hosts to read as follows
192.168.158.30 hadoop.master
192.168.158.30 localhost          #This is added to allow other hosts on port 8088 to access only locally by default.
4. Close the firewall
systemctl stop firewalld                           #Close the firewall
systemctl disable firewalld                        #Turn on and disable firewall
5. Set ssh passwordless login
Although pseudo-distributed, hadoop still needs ssh to start daemons as distributed
yum -y install openssh-clients                 #Install ssh
ssh-keygen -t rsa                              #Always press Enter to generate the secret key
ssh-copy-id hadoop.master                      #Send to cdh.slave1 node
ssh localhost                                  #Testing for login
6. Download hadoop
Download address: https://hadoop.apache.org/releases.html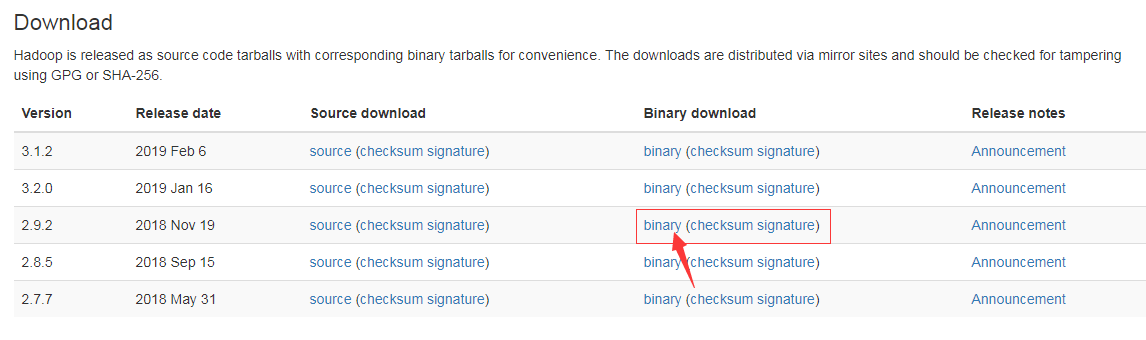
I downloaded version 2.9.2 and clicked on binary to go to the download page.
You can download either address.
#download
wget http://mirror.bit.edu.cn/apache/hadoop/common/hadoop-2.9.2/hadoop-2.9.2.tar.gz
7. Decompression Installation
mkdir /usr/hadoop                              #Create installation directory
tar -zxvf hadoop-2.9.2.tar.gz -C /usr/hadoop   #Unzip to installation directory
8. Add hadoop to environment variables
vi /etc/profile.d/hadoop.sh         #Add edit files
#Add the following to hadoop.sh
export HADOOP_HOME=/usr/hadoop/hadoop-2.9.2
export PATH=${HADOOP_HOME}/bin:${HADOOP_HOME}/sbin:$HADOOP_HOME/sbin:$PATH

#Make Modified Environmental Variables Effective
source /etc/profile
#Test whether hadoop works
hadoop version
9. Configure hadoop
Pseudo-distributed configuration requires four files to be configured
/usr/hadoop/hadoop-2.9.2/etc/hadoop #Configuration file location
core-site.xml
<?xml version="1.0"?>
<!-- core-site.xml -->
<configuration>
  <property>
    <name>fs.defaultFS</name>
    <value>hdfs://localhost/</value>
  </property>
</configuration>
hdfs-site.xml
<?xml version="1.0"?>
<!-- hdfs-site.xml -->
<configuration>
  <property>
    <name>dfs.replication</name>
    <value>1</value>
  </property>
</configuration>
mapred-site.xml needs to modify the file name first
mv mapred-site.xml.template mapred-site.xml

<?xml version="1.0"?>
<!-- mapred-site.xml -->
<configuration>
  <property>
    <name>mapreduce.framework.name</name>
    <value>yarn</value>
  </property>
</configuration>
yarn-site.xml
<?xml version="1.0"?>
<!-- yarn-site.xml -->
<configuration>
  <property>
    <name>yarn.resourcemanager.hostname</name>
    <value>localhost</value>
  </property>
  <property>
    <name>yarn.nodemanager.aux-services</name>
    <value>mapreduce_shuffle</value>
  </property>
</configuration>
10. Formatting HDFS File System
To run hadoop for the first time, you need to format the HDFS file system
hdfs namenode -format