1. Experimental environment
1.1 problems
Four virtual machines are prepared, three of which are used as storage cluster nodes and one is installed as client to realize the following functions:
- Create 1 client virtual machine
- Create 3 storage cluster virtual machines
- Configure host name, IP address, YUM source
- Modify the hostname of all hosts
- Configure password less SSH connection
- Configure NTP time synchronization
- Create virtual machine disk
1.2 scheme
Four virtual machines, one client and three storage cluster servers are used. The topology is shown in figure-1.
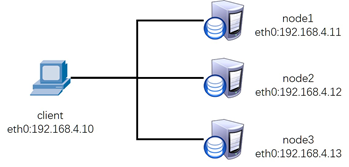
Figure-1
The host names and corresponding IP addresses of all hosts are shown in TABLE-1.
Note: the YUM source of all host basic system discs must be configured in advance.
TABLE-1 host name and corresponding IP address

Ceph component architecture is shown in figure-2.
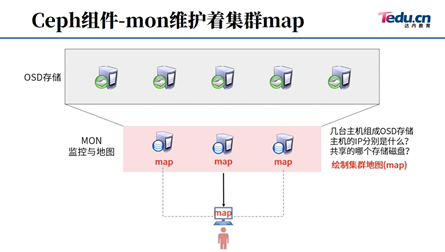
Figure-2
Ceph will cut the data, as shown in figure-3.
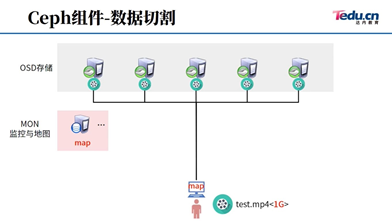
Figure-3
Ceph's idea of reading and writing data randomly is shown in figure-4.
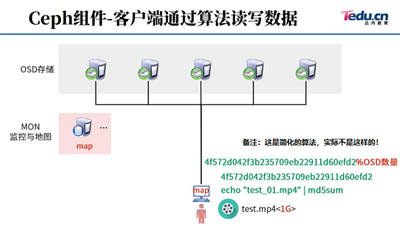
Figure-4
Ceph cluster structure is shown in figure-5.
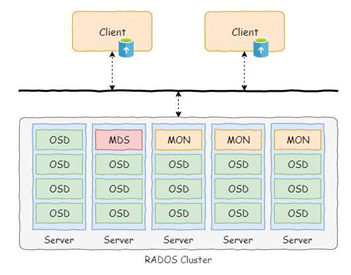
Figure-5
1.3 steps
To implement this case, you need to follow the following steps.
Step 1: preparation before installation
1) Configure the yum source server for all nodes.
Put CEPH 10 in the second stage material of the real machine ISO is mounted to the / var/ftp/ceph directory to provide YUM source for all virtual machines.
# mkdir  /var/ftp/ceph
# mount -t  iso9660   /.../ceph10.iso   /var/ftp/ceph           #You can't copy
2) Add disks to the virtual machine:
In addition to the client client, all three ceph servers add two 20G disks.
[root@client ~]# lsblk                 #No additional disks
[root@node1 ~]# lsblk                  #2 more disks
[root@node2 ~]# lsblk                  #2 more disks
[root@node3 ~]# lsblk                  #2 more disks
3) Set up firewall and SELinux for all hosts (this step can be ignored if it is turned off)
[root@client ~]# firewall-cmd --set-default-zone=trusted
[root@client ~]# sed -i '/SELINUX/s/enforcing/permissive/' /etc/selinux/config
[root@client ~]# setenforce 0
[root@node1 ~]# firewall-cmd --set-default-zone=trusted
[root@node1 ~]# sed -i '/SELINUX/s/enforcing/permissive/' /etc/selinux/config
[root@node1 ~]# setenforce 0
[root@node2 ~]# firewall-cmd --set-default-zone=trusted
[root@node2 ~]# sed -i '/SELINUX/s/enforcing/permissive/' /etc/selinux/config
[root@node2 ~]# setenforce 0
[root@node3 ~]# firewall-cmd --set-default-zone=trusted
[root@node3 ~]# sed -i '/SELINUX/s/enforcing/permissive/' /etc/selinux/config
[root@node3 ~]# setenforce 0
4) Configure password free connection (including remote connection without password), and operate in node1.
[root@node1 ~]# ssh-keygen   -f /root/.ssh/id_rsa    -N ''
#-f file name followed by the key (which file do you want to create the key to)
#-N '' means no key is configured for the key (password cannot be configured for the key)
[root@node1 ~]# for i in 10  11  12  13
 do
     ssh-copy-id  192.168.4.$i
 done
#Pass the key to 192.168.0 through SSH copy ID 4.10,192.168. 4.11,192.168. 4.12,192.168. four point one three
5) Modify / etc/hosts and synchronize to all hosts.
Note: the domain name resolved by: / etc/hosts should be consistent with the local host name!!!!
 [root@node1 ~]# vim /etc/hosts     #Modify the file and manually add the following contents (do not delete the original contents of the file)
... ...
192.168.4.10  client
192.168.4.11     node1
192.168.4.12     node2
192.168.4.13     node3
Tip: the domain name resolved by: / etc/hosts must be consistent with the local host name!!!
Copy the / etc/hosts file to all other hosts (client, node1, node2, node3)
[root@node1 ~]# for i in client node1  node2  node3
do
scp  /etc/hosts   $i:/etc/
done
6) To modify all nodes, you need to configure the YUM source and synchronize to all hosts.
[root@node1 ~]# vim /etc/yum.repos.d/ceph.repo    #Create a new YUM source configuration file, as follows
[mon]
name=mon
baseurl=ftp://192.168.4.254/ceph/MON
gpgcheck=0
[osd]
name=osd
baseurl=ftp://192.168.4.254/ceph/OSD
gpgcheck=0
[tools]
name=tools
baseurl=ftp://192.168.4.254/ceph/Tools
gpgcheck=0
[root@node1 ~]# yum clean all               #wipe cache
[root@node1 ~]# yum repolist                #Verify the number of YUM source software
 Source identification            Source name                    state
Dvd                redhat                    9,911
Mon                mon                        41
Osd                osd                        28
Tools            tools                    33
repolist: 10,013
[root@node1 ~]# for i in  client  node1  node2  node3
do
scp  /etc/yum.repos.d/ceph.repo   $i:/etc/yum.repos.d/
done
7) Install ceph related software packages for all nodes.
[root@node1 ceph-cluster]# for i in node1 node2 node3
do
    ssh  $i "yum -y install ceph-mon ceph-osd ceph-mds ceph-radosgw"
done
8) Client host configures NTP server.
[root@client ~]# yum -y install chrony
[root@client ~]# vim /etc/chrony.conf
    allow 192.168.4.0/24        #About 26 lines
    local stratum 10            #About 29 lines (just uncomment)
[root@client ~]# systemctl restart chronyd
9) node1, node2 and node3 modify NTP client configuration.
[root@node1 ~]# yum -y install chrony
[root@node1 ~]# vim /etc/chrony.conf
server 192.168.4.10   iburst              #In the second line of the configuration file, add a new line manually
[root@node1 ~]# systemctl restart chronyd
[root@node1 ~]# chronyc sources -v        #View the synchronization results, which should be^*
[root@node2 ~]# yum -y install chrony
[root@node2 ~]# vim /etc/chrony.conf
server 192.168.4.10   iburst              #In the second line of the configuration file, add a new line manually
[root@node2 ~]# systemctl restart chronyd
[root@node2 ~]# chronyc sources -v            #View the synchronization results, which should be^*
[root@node3 ~]# yum -y install chrony
[root@node3 ~]# vim /etc/chrony.conf
server 192.168.4.10   iburst              #In the second line of the configuration file, add a new line manually
[root@node3 ~]# systemctl restart chronyd
[root@node3 ~]# chronyc sources -v       #View the synchronization results, which should be^*
2. Deploy ceph cluster
2.1 problems
Following exercise 1, deploy Ceph cluster server to achieve the following objectives:
- Install the deployment tool CEPH deploy
- Create ceph cluster
- Prepare log disk partition
- Create OSD storage space
- Check ceph status and verify
2.2 steps
To implement this case, you need to follow the following steps.
Step 1: install the deployment software CEPH deploy
1) Install the deployment tool in node1 and learn the syntax format of the tool.
[root@node1 ~]#  yum -y install ceph-deploy
[root@node1 ~]#  ceph-deploy  --help
[root@node1 ~]#  ceph-deploy mon --help
2) Create a directory (the directory name can be arbitrary, and the recommendation is consistent with the case)
[root@node1 ~]#  mkdir ceph-cluster
[root@node1 ~]#  cd ceph-cluster/
Step 2: deploy Ceph cluster
1) Create Ceph cluster configuration and generate Ceph configuration file (ceph.conf) in Ceph cluster directory.
In CEPH Define who the monitor host is in the conf configuration file.
[root@node1 ceph-cluster]# ceph-deploy new node1 node2 node3
[root@node1 ceph-cluster]# vim ceph.conf        #Do not modify the original content, add a line at the end of the file
rbd_default_features = 1
#The function of COW hierarchical snapshot is enabled by default
2) Initialize the mon service of all nodes, that is, start the mon service.
Copy the configuration file of the current directory to the / etc/ceph / directory of all nodes and start the mon service.
[root@node1 ceph-cluster]# ceph-deploy mon create-initial
#Configuration file CEPH There are three mon IP S in conf, and the CEPH deploy script knows who it should be remote
- View your own service on each node host (note that the service name of each host is different)
[root@node1 ceph-cluster]# systemctl status ceph-mon@node1
[root@node2 ~]# systemctl status ceph-mon@node2
[root@node3 ~]# systemctl status ceph-mon@node3
#Note: the administrator can start, restart, stop and view the status
#Reminder: these services can only be started three times in 30 minutes, and an error will be reported if they exceed
#StartLimitInterval=30min
#StartLimitBurst=3
#/ usr / lib / SYSTEMd / system / CEPH is defined in this file- mon@.service
#If you modify the file, you need to execute the command# Systemctl daemon reload reload configuration
4) Check the status of ceph cluster (the current status should be health HEALTH_ERR)
[root@node1 ceph-cluster]# ceph -s
[prompt]: if the ceph cluster cannot be successfully deployed, you can clean up the cluster software and related data through the following commands (note that these operations will delete all ceph software and configuration files of node1-node3 hosts, and you don't need to operate!!).
[root@node1 ceph-cluster]# ceph-deploy  purge  node1  node2  node3
[root@node1 ceph-cluster]# ceph-deploy  purgedata  node1  node2  node3
Step 3: create an OSD
- Initialize emptying disk data (node1 operation only).
Initialize the disk and set the format of all disk partitions to GPT format (fill in the disk name according to the actual situation).
[root@node1 ceph-cluster]# ceph-deploy disk  zap  node1:vdb   node1:vdc
[root@node1 ceph-cluster]# ceph-deploy disk  zap  node2:vdb   node2:vdc
[root@node1 ceph-cluster]# ceph-deploy disk  zap  node3:vdb   node3:vdc
#It is equivalent to ssh Remote node1. Execute parted / dev / VDB mktable GPT on node1
#Other hosts operate the same
#CEPH deploy is a script that automatically ssh Remote and automatically create gpt partitions
Thinking questions?
# vim test.sh
#!/bin/bash
case $1 in
user)
     useradd -u 1000 $2;;
disk)
     parted  /dev/$2  mktable  gpt;;
esac
# chmod +x test.sh
# ./test.sh  user  jerry
# ./test.sh  disk  vdc
If the above script does not specify an account UID, why does it automatically create a user with UID 1000?
Executing the above script does not specify the disk partition table type. Why is the partition table type created gpt?
What if the above script does not give the parameter of location variable during execution?
2) Create OSD storage space (node1 operation only)
Important: many students will make mistakes here! Input host name and device name incorrectly!!!
Remote all node hosts, create partitions, format disks, Mount disks, and start osd services to share disks.
[root@node1 ceph-cluster]# ceph-deploy osd create node1:vdb  node1:vdc
#Each disk is automatically divided into two partitions; A fixed 5G size; One for all remaining capacity
#5G partition is Journal log cache; All remaining space is data disk.
[root@node1 ceph-cluster]# ceph-deploy osd create node2:vdb  node2:vdc
[root@node1 ceph-cluster]# ceph-deploy osd create node3:vdb  node3:vdc
Reminder: CEPH deploy is a script. The script will automatically create partitions, format and mount!
How to verify the partition? How to verify formatting? How to verify the mount?
[root@node1 ~]# df -Th
[root@node2 ~]# df -Th
[root@node3 ~]# df -Th
Question: what is the difference between lsblk and df commands?
3) Check the OSD service status on three different hosts, and you can start, close and restart the service.
Note: pay attention to the host name below!!!
[root@node1 ~]# systemctl status ceph-osd@0
[root@node2 ~]# systemctl status ceph-osd@2
[root@node3 ~]# systemctl status ceph-osd@4
#Note: the administrator can start, restart, stop and view the status
#Reminder: these services can only be started three times in 30 minutes, and an error will be reported if they exceed
#StartLimitInterval=30min
#StartLimitBurst=3
#/ usr / lib / SYSTEMd / system / CEPH is defined in this file- osd@.service
#If you modify the file, you need to execute the command# Systemctl daemon reload reload configuration
Common errors and solutions (non essential operation).
When using osd create to create an OSD storage space, the following error message appears:
[ceph_deploy][ERROR ] RuntimeError: bootstrap-osd keyring not found; run 'gatherkeys'
You can use the following command to repair the file and reconfigure the key file of ceph:
[root@node1 ceph-cluster]# ceph-deploy gatherkeys node1 node2 node3
Step 4: validation test
- View cluster status.
[root@node1 ~]#  ceph  -s
[root@node1 ~]#  ceph   osd   tree
2) Common errors (non mandatory actions).
If the viewing status contains the following information:
health: HEALTH_WARN
        clock skew detected on  node2, node3...
clock skew indicates that the time is not synchronized. Solution: please use NTP time synchronization for all hosts first!!!
Ceph requires that the time difference of all hosts should not exceed 0.05s, otherwise WARN will be prompted.
If the status still fails, you can try to execute the following command to restart all ceph services:
[root@node1 ~]# systemctl restart ceph.target
3. Create Ceph block storage
3.1 problems
Following exercise 1, use the block storage function of Ceph cluster to achieve the following objectives:
- Create a block storage mirror
- Client mapping image
- delete mirror
3.2 steps
To implement this case, you need to follow the following steps.
Step 1: create a mirror
1) View the storage pool. The default storage pool name is rbd.
[root@node1 ~]# ceph osd lspools
0 rbd,
#The results show that the name of the shared pool is rbd, the number of the shared pool is 0, and the English vocabulary is pool (pond, pond)
2) Create image, view image
[root@node1 ~]# rbd create demo-image --size 10G
#Create a demo image image. Here, the name of the image created by demo image can be any character.
#Size you can specify the image size
[root@node1 ~]# rbd create rbd/jacob  --size 10G
#Create an image named jacob (rbd/jacob) in the rbd pool. The image name can be arbitrary
[root@node1 ~]# rbd list                    #List all mirrors
[root@node1 ~]# rbd info demo-image        #View the details of the demo image image
rbd image 'demo-image':
    size 10240 MB in 2560 objects
    order 22 (4096 kB objects)
    block_name_prefix: rbd_data.d3aa2ae8944a
    format: 2
    features: layering
Step 2: dynamic adjustment
1) Expansion capacity
[root@node1 ~]# rbd resize --size 15G jacob
#Adjust the size of jacob image. jacob is the name of the image, and size specifies the expansion to 15G
[root@node1 ~]# rbd info jacob
2) Reduce capacity
[root@node1 ~]# rbd resize --size 7G jacob --allow-shrink
#English Vocabulary: allow, shrink
[root@node1 ~]# rbd info jacob
#View the details of jacob's image (jacob is the image created earlier)
Step 3: access through KRBD
The Linux kernel can directly access Ceph block storage, and KVM can access Ceph block storage with the help of librbd.
The client access structure is shown in figure-6.
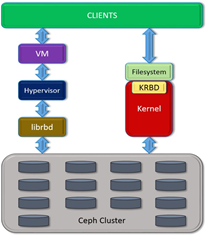
Figure-6
1) Client access via KRBD
#The client needs to install CEPH common package
#Copy the configuration file (otherwise you don't know where the cluster is)
#Copy connection key (otherwise, no connection permission)
[root@client ~]# yum -y  install ceph-common
[root@client ~]# scp 192.168.4.11:/etc/ceph/ceph.conf  /etc/ceph/
[root@client ~]# scp 192.168.4.11:/etc/ceph/ceph.client.admin.keyring \
/etc/ceph/
[root@client ~]# rbd map  jacob          #The client accesses the jacob shared image of the mapping server
[root@client ~]#  lsblk                   #View results (one more disk)
[root@client ~]# rbd showmapped          #View the correspondence between the disk name and the shared image name
id pool image snap device
0  rbd  jacob -    /dev/rbd0
- Client format and mount partition
[root@client ~]# mkfs.xfs /dev/rbd0                     #Formatted as xfs
[root@client ~]# mount /dev/rbd0 /mnt/                  #Mount (can be mounted to any directory)
[root@client ~]# echo "test" > /mnt/test.txt           #Write data
Step 4: delete the image
1) Client unmapping disk
[root@client ~]# umount /mnt                      #uninstall
[root@client ~]# rbd showmapped                  #View the correspondence between the disk name and the shared image name
id pool image        snap device
0  rbd  jacob        -    /dev/rbd0
[root@client ~]# rbd unmap /dev/rbd0            #Unmap disk
Additional information: Ceph operation idea (knowledge summary)
1, Preparation:
IP, hostname, hosts resolution, ssh key, time synchronization, yum source, firewall, selinux
2, Deploy ceph:
1. Install software
  ceph-deploy(script)
  ceph-mon  ceph-osd  ceph-mds  ceph-radosgw(colony)
2. Modify the configuration and start the service mon
  mkdir  catalogue cd catalogue
  ceph-deploy  new  node1   node2   node3  (Generate profile)
  ceph-deploy  mon  create-initial  (Copy configuration file and start mon service)
3. Start osd service to share hard disk
  ceph-deploy  disk  zap   host name:Disk name  ...  ...
  ceph-deploy  osd  create  host name:disk   ...  ...
3, Ideas for using Ceph:
1. Block sharing
  The server: rbd  create  Create a shared image
  client: install cpeh-common;  cp Profiles and keys
          rbd  map  |  rbd  unmap
Additional knowledge (how to delete an OSD, the following assumption is to delete osd.4)
ceph osd tree
ceph osd out osd.4
ceph osd tree
ceph -s
ceph osd crush remove osd.4
ceph auth del osd.4
ceph -s
ceph osd rm osd.4
 Finally, find the corresponding host, umount hold osd.4 Corresponding disk unmount
Exercise
1 write out Ceph core components?
- OSDs: storage devices
- Monitors: cluster monitoring component
- MDSs: stores the metadata of the file system (this component is not required for object storage and block storage)
- RadosGW: object storage gateway
2 what tools can be used to quickly deploy Ceph cluster storage?
ceph-deploy.
3 commands for Linux clients to access Ceph block storage devices?
rbd map image name.
In case of infringement, please contact the author to delete