The theme of this article is "Ceph use series - Ceph RGW use", welcome to pay attention.
Ceph RGW introduction
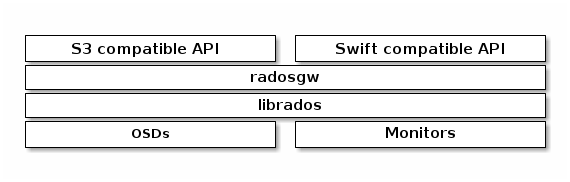
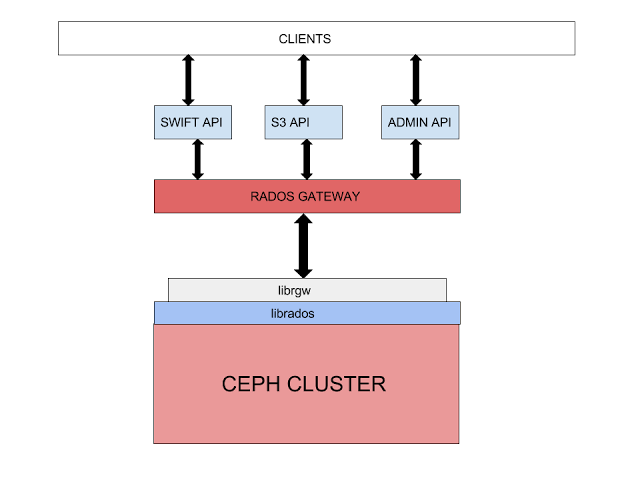
Ceph object gateway is an object storage interface built on librados, which aims to provide a RESTful gateway to Ceph storage cluster for applications. Ceph object storage uses the Ceph object gateway daemons (radosgw), which is an HTTP server for interaction with Ceph storage cluster. There are many ways to express it. The old version of Ceph, such as apache2 and Nginx, is used. After the Hammer version, Ceph uses civetweb to replace the original version of apache2 and use it as the default HTTP server, while in Nautilus version, it uses the default beast as the HTTP server.
It provides OpenStack Swift and Amazon S3 compatible interfaces, which are described as follows:
-
S3 compatible interface: this object storage interface is compatible with most subsets of Amazon S3 RESTful API.
-
Swift compatible interface: this docking storage interface is compatible with most subsets of OpenStack Swift API.
S3 and swift APIs share the same namespace, so you can use both APIs to access the same data.
In fact, in addition to the two access interfaces mentioned above, Ceph also has an admin API, which manages the object storage through the rest api. The command line is in the form of radosgw admin, which can be used to create users, delete users, list users and other operations. The diagram is as follows:
Using radosgw admin to manage RGW
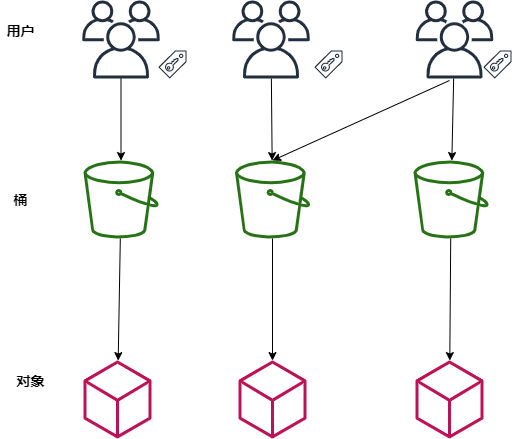
There are four concepts in Ceph RGW object storage:
User: the user that the object store should use. A user has one or more buckets. The user accounts provided by RGW include AK (AccessKeyId) and SK (SecretAccessKeyID). The identity of the sender of a request is verified by using AK and SK symmetric encryption.
-
Bucket: a bucket is a container for storing objects in RGW. Object storage provides a flat storage mode based on bucket and object. All objects in bucket are in the same logical level, eliminating the multi-level tree directory structure in file system.
-
Object: object is the basic unit of data storage in RGW. An object is actually a collection of file data and its related attribute information (metadata). The data uploaded to RGW by users are stored in buckets in the form of objects.
-
Access key (AK/SK):RGW supports authentication and authentication through AK/SK authentication, that is, using Access Key ID (AK) / Secret Access Key (SK) encryption to verify the identity of a request sender.
There are two types of user accounts:
-
User: as s3 interface user;
-
Sub user: as the swift interface user, the sub user is attached to the user.
Radosgw admin creates users.
#radosgw-admin user create --uid="testuser" --display-name="First User"{"user_id": "testuser","display_name": "First User","email": "","suspended": 0,"max_buckets": 1000,"subusers": [],"keys": [{"user": "testuser","access_key": "H1YNZV2D6E1X5PGAOSZ7","secret_key": "MasCiG6OJvEpXRTye4Ptz13SAI2dv5s3zUDXLO26"}],"swift_keys": [],"caps": [],"op_mask": "read, write, delete","default_placement": "","default_storage_class": "","placement_tags": [],"bucket_quota": {"enabled": false,"check_on_raw": false,"max_size": -1,"max_size_kb": 0,"max_objects": -1},"user_quota": {"enabled": false,"check_on_raw": false,"max_size": -1,"max_size_kb": 0,"max_objects": -1},"temp_url_keys": [],"type": "rgw","mfa_ids": []}
Create a child user.
#radosgw-admin subuser create --uid=testuser --subuser=testuser:swift --access=full{"user_id": "testuser","display_name": "First User","email": "","suspended": 0,"max_buckets": 1000,"subusers": [{"id": "testuser:swift","permissions": "full-control"}],"keys": [{"user": "testuser","access_key": "H1YNZV2D6E1X5PGAOSZ7","secret_key": "MasCiG6OJvEpXRTye4Ptz13SAI2dv5s3zUDXLO26"}],"swift_keys": [{"user": "testuser:swift","secret_key": "yahhi4lK5eJIw0cMg0cSm1ylRcncbAEGzQoximrw"}],"caps": [],"op_mask": "read, write, delete","default_placement": "","default_storage_class": "","placement_tags": [],"bucket_quota": {"enabled": false,"check_on_raw": false,"max_size": -1,"max_size_kb": 0,"max_objects": -1},"user_quota": {"enabled": false,"check_on_raw": false,"max_size": -1,"max_size_kb": 0,"max_objects": -1},"temp_url_keys": [],"type": "rgw","mfa_ids": []}
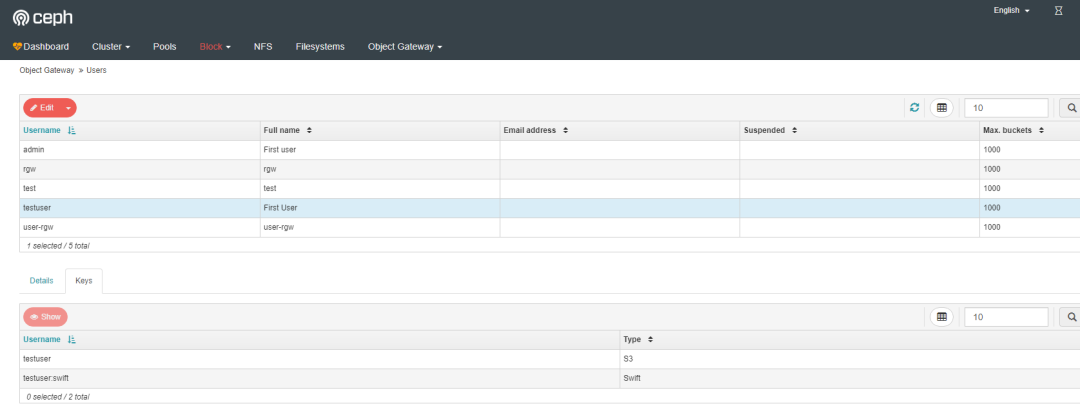
View users.
# radosgw-admin user list["user-rgw","rgw","admin","test","testuser"]
View user details.
# radosgw-admin user info --uid test{"user_id": "test","display_name": "test","email": "","suspended": 0,"max_buckets": 1000,"subusers": [],"keys": [...................................................
More can be viewed using - h.
#radosgw-admin -husage: radosgw-admin <cmd> [options...]commands:user create create a new useruser modify modify useruser info get user infouser rm remove useruser suspend suspend a useruser enable re-enable user after suspensionuser check check user infouser stats show user stats as accounted by quota subsystemuser list list userscaps add add user capabilitiescaps rm remove user capabilitiessubuser create create a new subusersubuser modify modify subusersubuser rm remove subuserkey create create access keykey rm remove access keybucket list list buckets (specify --allow-unordered for..............................................
Using Ceph Dashboard to operate RGW
Ceph Dashboard now supports the following three functions:
-
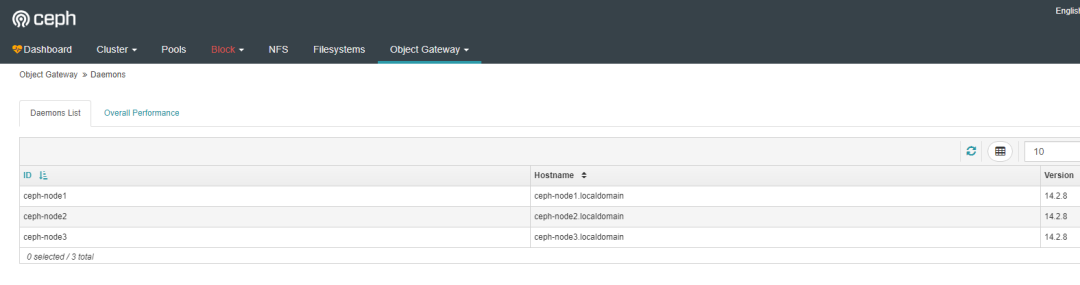
View RGW hosts
-
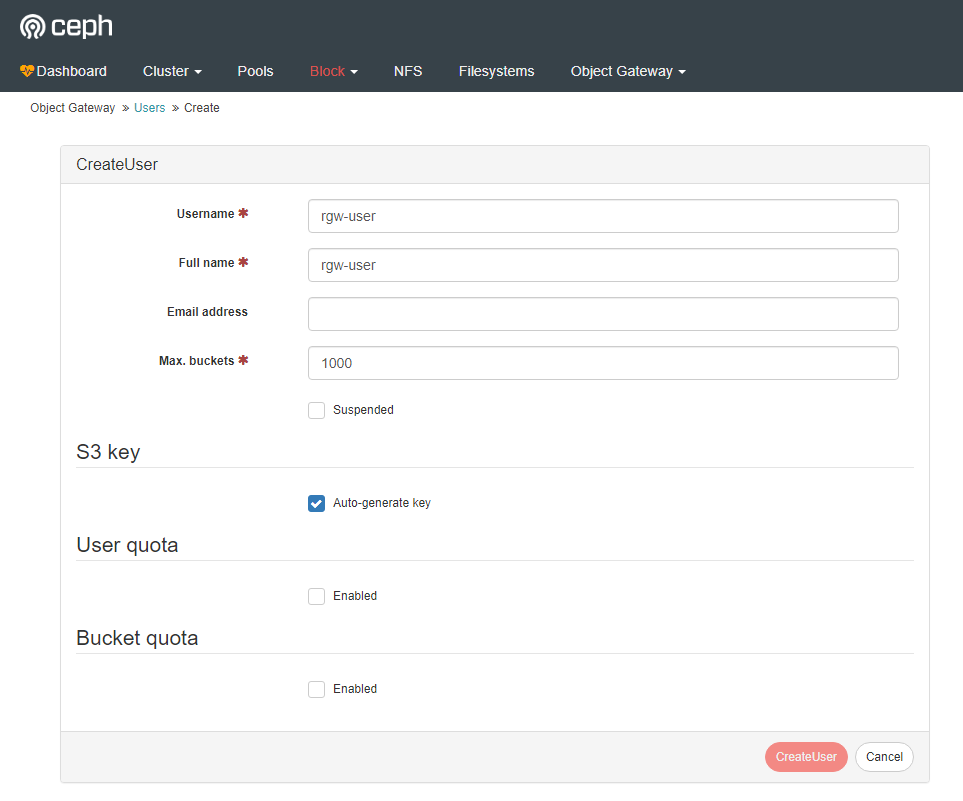
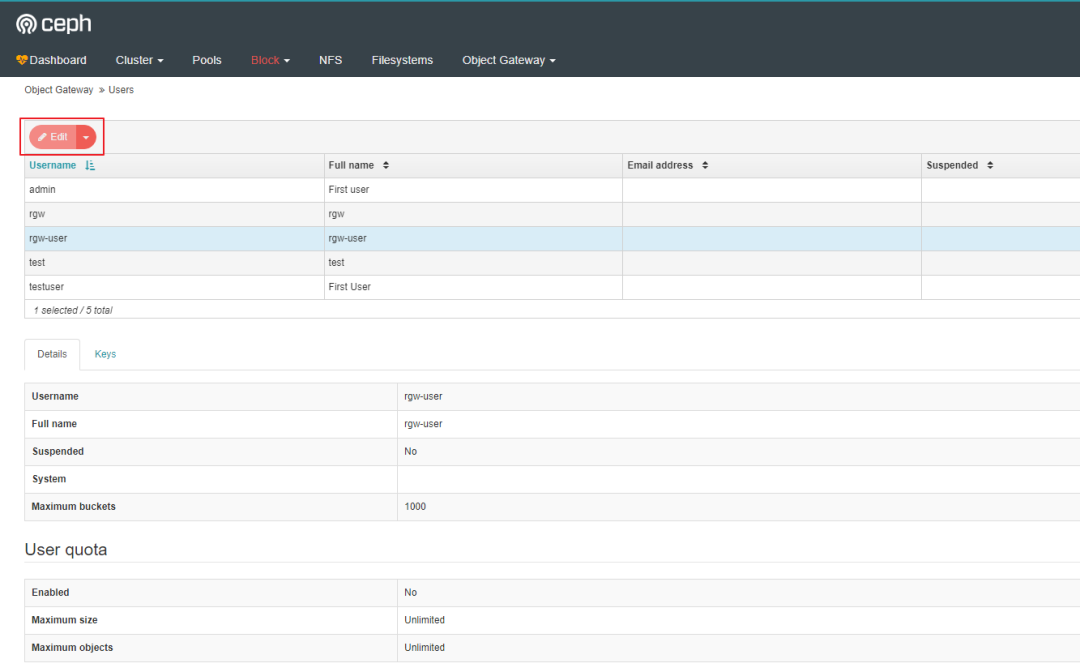
Manage users
-
Management barrel
Ceph Dashboard does not support uploading and downloading objects at present. It can only be implemented through s3 or swift interface. For details, see the following.
The following is the view RGW host interface.
Create a new user.
Create a subuser.
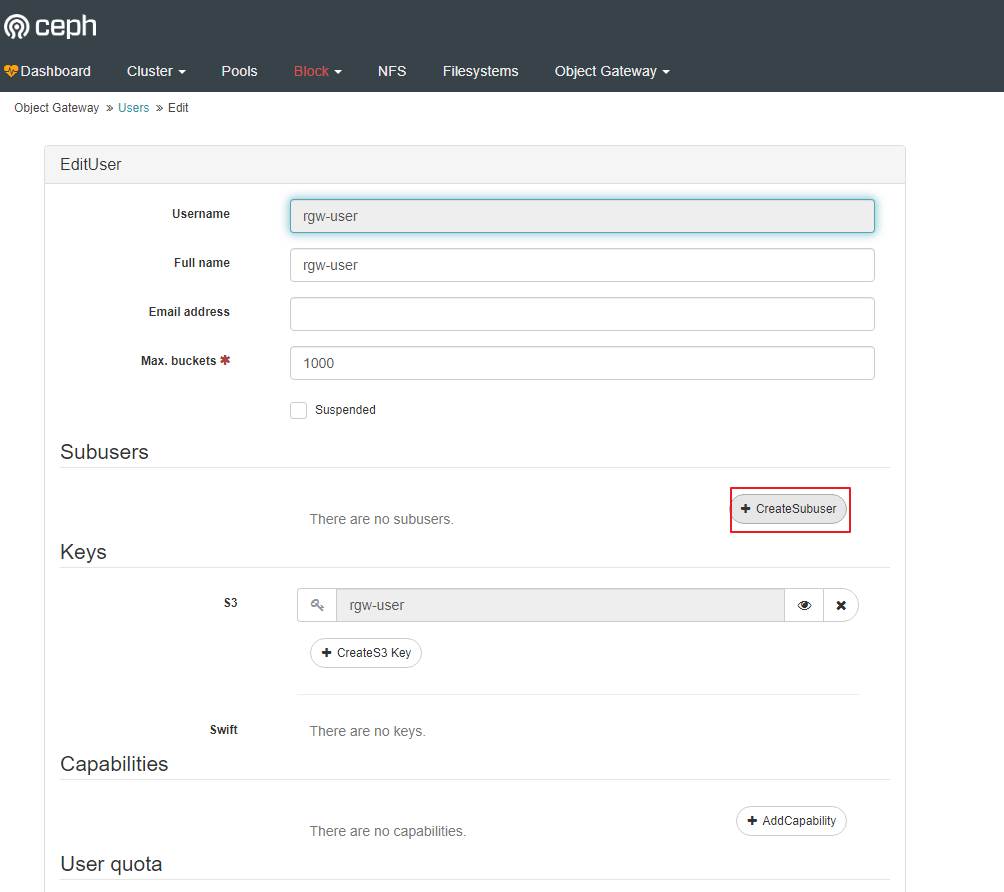
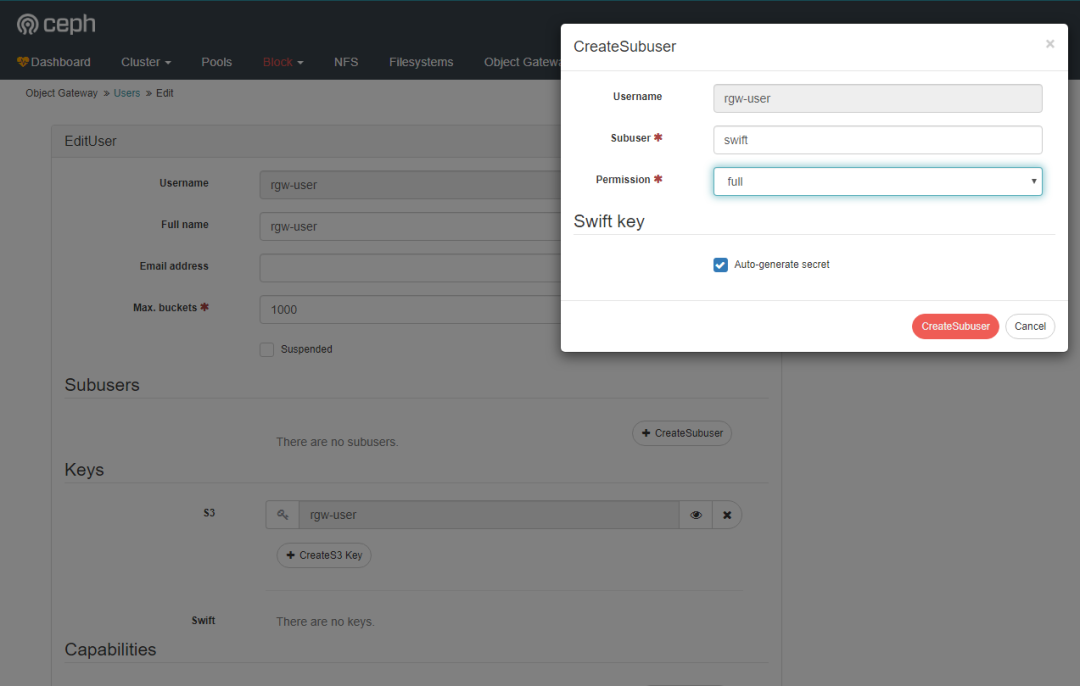
You can see that the child user is attached to the user.
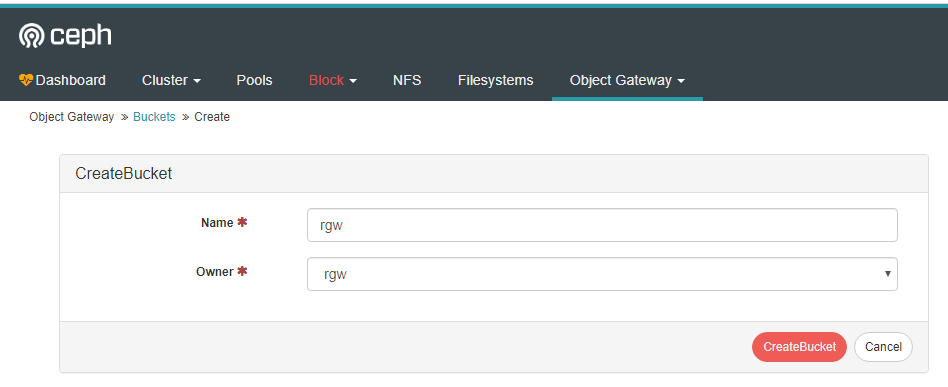
Create bucket interface.
Using s3 interface to operate RGW
5.1: install s3cmd
To use s3 interface to access rgw, we need to install aws s3cmd command-line client tool, which is an Amazon S3 command-line tool. It can not only upload, download and synchronize, but also set permissions.
Download and s3cmd tool.
Because s3cmd is written in python, install the pip tool first.
# yum -y install python-pip
Install s3cmd. Because pip uses foreign source by default, it is easy to fail to download. Therefore, add the command to temporarily use domestic source, and use - i to specify the domestic source address.
#pip install s3cmd -i https://pypi.tuna.tsinghua.edu.cn/simple
View the s3cmd version.
#s3cmd --versions3cmd version 2.1.0
Configure the s3cmd configuration file, which will create the. s3cfg file in the / root directory. The contents of the file include the contents filled in the wizard. You can also generate an empty configuration file all the way to the next step, edit the configuration file directly, or fill in the content according to the wizard prompts.
#s3cmd --configureEnter new values or accept defaults in brackets with Enter.Refer to user manual for detailed description of all options.Access key and Secret key are your identifiers for Amazon S3. Leave them empty for using the env variables.Access Key: YC57G2R9XJIMNG825UQPSecret Key: PEDoHiveAUhEciOeeKFYLkaArlhtSy5mBMfWhWesDefault Region [US]:Use "s3.amazonaws.com" for S3 Endpoint and not modify it to the target Amazon S3.S3 Endpoint [s3.amazonaws.com]: 192.168.123.172:7480Use "%(bucket)s.s3.amazonaws.com" to the target Amazon S3. "%(bucket)s" and "%(location)s" vars can be usedif the target S3 system supports dns based buckets.DNS-style bucket+hostname:port template for accessing a bucket [%(bucket)s.s3.amazonaws.com]: 192.168.123.172:7480/%(bucket)Encryption password is used to protect your files from readingby unauthorized persons while in transfer to S3Encryption password:Path to GPG program [/usr/bin/gpg]:When using secure HTTPS protocol all communication with Amazon S3servers is protected from 3rd party eavesdropping. This method isslower than plain HTTP, and can only be proxied with Python 2.7 or newerUse HTTPS protocol [Yes]: noOn some networks all internet access must go through a HTTP proxy.Try setting it here if you can't connect to S3 directlyHTTP Proxy server name:New settings:Access Key: YC57G2R9XJIMNG825UQPSecret Key: PEDoHiveAUhEciOeeKFYLkaArlhtSy5mBMfWhWesDefault Region: USS3 Endpoint: 192.168.123.172:7480DNS-style bucket+hostname:port template for accessing a bucket: 192.168.123.172:7480/%(bucket)Encryption password:Path to GPG program: /usr/bin/gpgUse HTTPS protocol: FalseHTTP Proxy server name:HTTP Proxy server port: 0Test access with supplied credentials? [Y/n]Please wait, attempting to list all buckets...Success. Your access key and secret key worked fine :-)Now verifying that encryption works...Not configured. Never mind.Save settings? [y/N] yConfiguration saved to '/root/.s3cfg'
The s3cf configuration file is produced. If there are any settings with errors, you can also edit the configuration file directly.
#vi /root/.s3cfg[default]access_key = YC57G2R9XJIMNG825UQPaccess_token = PEDoHiveAUhEciOeeKFYLkaArlhtSy5mBMfWhWescloudfront_host = 192.168.123.172:7480host_base = 192.168.123.172:7480host_bucket = 192.168.123.172:7480/%(bucket)
5.2: Test s3 interface access
Test S3 access.
#yum install python-boto
Create a new Python script.
#vi s3test.py
Add the following to the file.
#!/usr/bin/python# -*- coding:utf-8 -*-import boto.s3.connectionaccess_key = 'YC57G2R9XJIMNG825UQP'secret_key ='PEDoHiveAUhEciOeeKFYLkaArlhtSy5mBMfWhWes'conn = boto.connect_s3(aws_access_key_id=access_key,aws_secret_access_key=secret_key,host='ceph-node1',port=7480,is_secure=False,calling_format=boto.s3.connection.OrdinaryCallingFormat(),)bucket = conn.create_bucket('my-new-bucket')for bucket in conn.get_all_buckets():print"{name} {created}".format(name=bucket.name,created=bucket.creation_date,)
Replace the host with the host name of the host you have configured for the gateway service, such as gateway host. Change access_ Replace key with the correct value, and set secret_ Replace key with the correct value.
Run this script
#python s3test.py
The output is similar to the following, indicating that connecting rgw object with s3 interface is successful.
# python s3test.pyceph-rgw 2020-05-03T08:29:44.240Zmy-new-bucket 2020-03-14T10:21:03.179Znew-bucket-510d1576 2020-03-16T13:20:59.151Znew-bucket-6c11b821 2020-03-14T10:37:11.406Znextcloud 2020-05-03T04:32:28.547Zrgw-test 2020-05-02T13:17:02.184Ztest 2020-03-12T14:55:47.827Ztest3 2020-03-14T10:45:54.065Ztest4 2020-03-14T10:46:03.714Ztest5 2020-03-14T10:46:37.318Ztest6 2020-03-14T10:47:46.755Ztest7 2020-03-14T10:51:50.559Ztest8 2020-03-14T10:53:02.755Ztest9 2020-05-02T14:15:04.193Z
5.3: use s3cmd to operate rgw
Use s3cmd to create a bucket.
# s3cmd mb s3://ceph-rgwBucket 's3://ceph-rgw/' created
Upload the file to the rgw object store.
#s3cmd put prometheus-2.16.0.linux-amd64.tar.gz s3://ceph-rgwWARNING: Could not refresh roleWARNING: Could not refresh roleWARNING: Could not refresh roleupload: 'prometheus-2.16.0.linux-amd64.tar.gz' -> 's3://ceph-rgw/prometheus-2.16.0.linux-amd64.tar.gz' [part 1 of 4, 15MB] [1 of 1]15728640 of 15728640 100% in 0s 29.05 MB/s doneWARNING: Could not refresh roleupload: 'prometheus-2.16.0.linux-amd64.tar.gz' -> 's3://ceph-rgw/prometheus-2.16.0.linux-amd64.tar.gz' [part 2 of 4, 15MB] [1 of 1]15728640 of 15728640 100% in 0s 36.41 MB/s doneWARNING: Could not refresh roleupload: 'prometheus-2.16.0.linux-amd64.tar.gz' -> 's3://ceph-rgw/prometheus-2.16.0.linux-amd64.tar.gz' [part 3 of 4, 15MB] [1 of 1]15728640 of 15728640 100% in 0s 36.27 MB/s doneWARNING: Could not refresh roleupload: 'prometheus-2.16.0.linux-amd64.tar.gz' -> 's3://ceph-rgw/prometheus-2.16.0.linux-amd64.tar.gz' [part 4 of 4, 11MB] [1 of 1]12422595 of 12422595 100% in 0s 31.92 MB/s doneWARNING: Could not refresh role
View objects in the bucket.
#s3cmd ls s3://ceph-rgwWARNING: Could not refresh roleWARNING: Could not refresh role2020-05-03 08:48 59608515 s3://ceph-rgw/prometheus-2.16.0.linux-amd64.tar.gz
Download object
#s3cmd get s3://ceph-rgw/prometheus-2.16.0.linux-amd64.tar.gz prometheus-2.16.0.linux-amd64.tar.gz.bakdownload: 's3://ceph-rgw/prometheus-2.16.0.linux-amd64.tar.gz' -> 'prometheus-2.16.0.linux-amd64.tar.gz.bak' [1 of 1]59608515 of 59608515 100% in 0s 142.89 MB/s done
To delete objects in a bucket, you can use the rm or del commands.
#s3cmd rm s3://ceph-rgw/prometheus-2.16.0.linux-amd64.tar.gzWARNING: Could not refresh roleWARNING: Could not refresh roledelete: 's3://ceph-rgw/prometheus-2.16.0.linux-amd64.tar.gz'
View the space occupied by objects
#s3cmd du -H s3://ceph-rgw/prometheus-2.16.0.linux-amd64.tar.gz56.8471097946M 1 objects s3://ceph-rgw/prometheus-2.16.0.linux-amd64.tar.gz
Refer to s3cmd help for more commands.
Using s3fs to access RGW
S3FS is a file system based on FUSE, which allows Linux and Mac Os X to mount the buckets of S3 in the local file system. S3FS can keep the original object format. S3FS is a large subset of POSIX, including read / write files, directories, symbolic links, patterns, uid/gid and extended attributes, and is compatible with Amazon S3, Google cloud storage and other S3 based object storage.
For applications that used to use local directories to access data, such as applications that use local disks or network shared disks to save data, if users want to put data on S3, they need to modify the data access method, such as using S3 SDK or CLI to access the data stored in S3. In order to make the user's original application system directly use S3 service without modification, it is necessary to mount the S3 bucket as a directory on the local operating system of the user's server. Common mount tools include s3fs and SubCloud. This paper mainly demonstrates the use of s3fs.
S3fs is a file system based on FUSE. It allows Linux and Mac Os X to mount the buckets of S3 in the local file system. S3fs can keep the original object format.
Warm reminder:
S3fs can be used to mount the S3 bucket in the directory of the user's local operating system conveniently. However, because s3fs is actually based on the directory access interface provided by Amazon S3 service, it can't simply equate the directory mounted by s3fs with the directory of the local operating system. There are similar scenarios for users to mount S3 buckets using S3f3 and directly access S3 services. It is applicable to save (upload) and read (download) file objects of different sizes at one time. It is not suitable for making random changes to saved files frequently, because each local change and saving of file content will cause s3fs to upload a new file to Amazon S3 to replace the original file. In terms of access performance, indirect access to Amazon S3 storage services through operating system directory is not as efficient as direct access using SDK or CLI interface.
Install s3fs
#yum install epel-release#yum install s3fs-fuse
View version
#s3fs --versionAmazon Simple Storage Service File System V1.86 (commit:unknown) with OpenSSLCopyright (C) 2010 Randy Rizun <rrizun@gmail.com>License GPL2: GNU GPL version 2 <https://gnu.org/licenses/gpl.html>This is free software: you are free to change and redistribute it.There is NO WARRANTY, to the extent permitted by law.
Configure key
The key file can be stored at the following two addresses:
-
Under the user's home directory. / passwd-s3fs((i.e. ${HOME}/.passwd-s3fs))
-
/ etc/passwd-s3fs file
Command format: s3fs [S3 bucket name] [local directory name] - o passwd_file = [key file name] - o url=[RGW address] - o use_path_request_style
Generate mount directory, which must be empty.
#mkdir /home/s3fs
Use s3fs to mount the bucket
#s3fs ceph-rgw /home/s3fs -o passwd_file=~/.passwd-s3fs -o use_path_request_style -o url=http://192.168.123.172:7480
-
url (required): object gateway service ip and port number
-
passwd_file: this option is not used if the key file is stored in the two places mentioned above
-
use_path_request_style (required): path access mode is used, otherwise the bucket cannot be mounted normally.
Check whether the mount is successful
#df -hFilesystem Size Used Avail Use% Mounted ondevtmpfs 967M 0 967M 0% /devtmpfs 981M 0 981M 0% /dev/shmtmpfs 981M 8.8M 972M 1% /runtmpfs 981M 0 981M 0% /sys/fs/cgroup/dev/mapper/centos-root 17G 2.1G 15G 12% //dev/sda1 1014M 176M 839M 18% /boottmpfs 981M 24K 981M 1% /var/lib/ceph/osd/ceph-8tmpfs 981M 24K 981M 1% /var/lib/ceph/osd/ceph-4tmpfs 981M 24K 981M 1% /var/lib/ceph/osd/ceph-1tmpfs 981M 24K 981M 1% /var/lib/ceph/osd/ceph-9tmpfs 197M 0 197M 0% /run/user/0s3fs 256T 0 256T 0% /home/s3fs
View catalog contents
#cd /home/s3fs/# lsprometheus-2.16.0.linux-amd64.tar.gz
Power on auto mount
Add the following to the fstab file.
#vi /etc/fstabs3fs#ceph-rgw /home/s3fs fuse _netdev,allow_other,use_path_request_style,url=http://192.168.123.172:7480 0 0
-o allow_ The other parameter is used to set that the mount directory can be used by any user logging on to the server, and can be used to create an NFS/SMB share.
Uninstall directory
#umount /home/s3fs/
For other commands, please refer to s3fs help.
With S3fs, the shared S3 bucket can be directly mounted in the local directory of the user server, and the application can directly use the S3 storage service without modification. This way can be used as a temporary solution to quickly migrate traditional applications to the RGW platform, Then gradually adjust the implementation of S3 data access, and finally modify to use SDK or CLI to access S3 storage services efficiently and more safely.
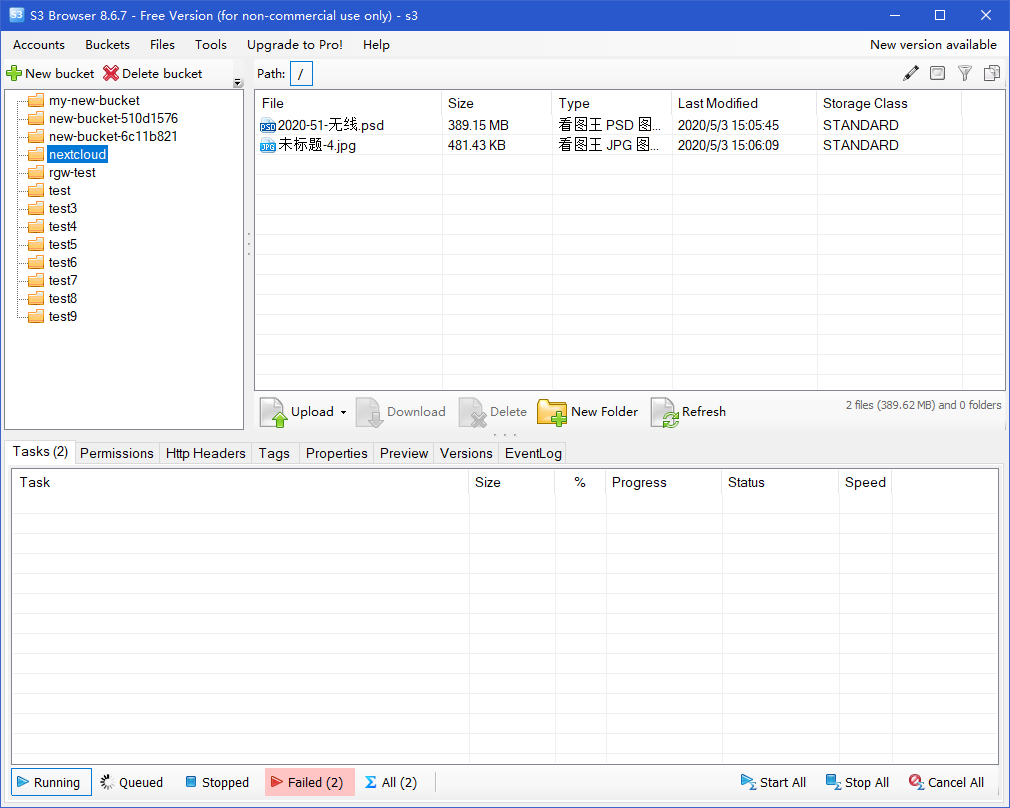
Using S3 Browser to access RGW
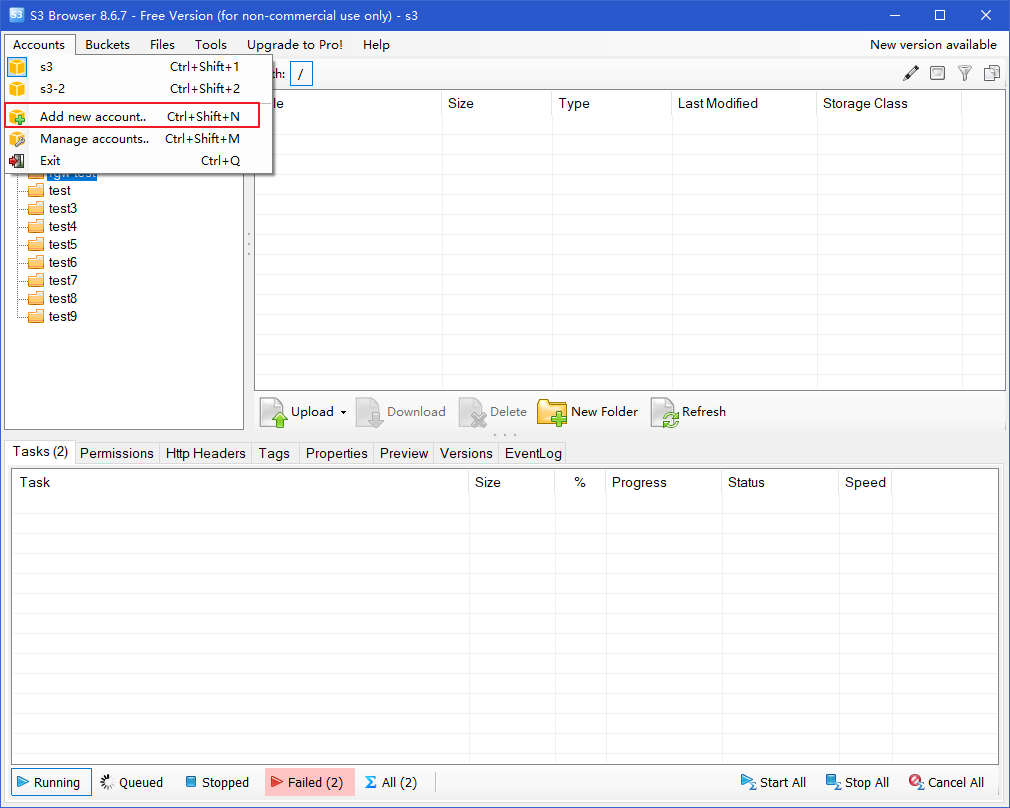
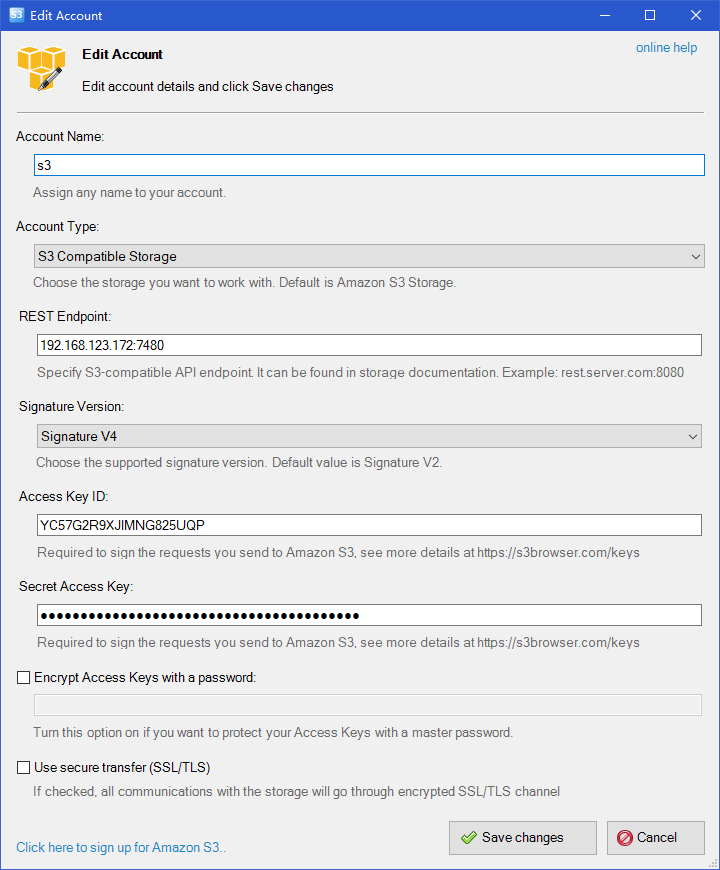
Open s3 browser and click "add new account".
Enter the following, noting that the signature version is V4.
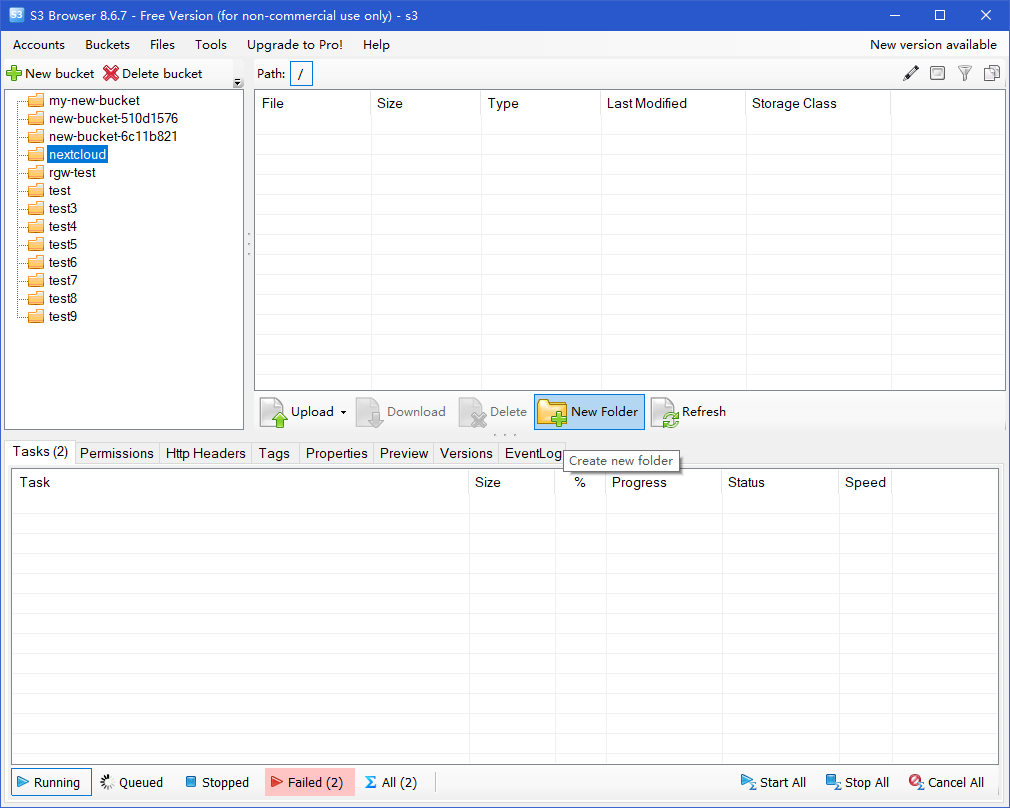
View all buckets in the rgw object store.
Using swift interface to operate RGW
Install swift command-line tool and configure swift installation source. Since swift is a component of openstack, it is configured as openstack source here. Of course, there are also commands for installing swift directly. You do not need to configure openstack source, but I did not use that method to install successfully. This paper also uses the method to configure openstack source.
#vi openstack.repo[openstack]name=openstackbaseurl=https://mirrors.cloud.tencent.com/centos/7.7.1908/cloud/x86_64/openstack-train/gpgcheck=0gpgkey=file:///etc/pki/rpm-gpg/RPM-GPG-KEY-CentOS-7
Install the swift command tool.
#yum install python2-swiftclient
View swiftclient version.
#swift --versionpython-swiftclient 3.8.1
View child user names and keys.
#radosgw-admin user info --uid testuser["user-rgw","rgw","admin","test10","test","testuser"]#radosgw-admin user info --uid testuser................................................................................"swift_keys": [{"user": "testuser:swift","secret_key": "yahhi4lK5eJIw0cMg0cSm1ylRcncbAEGzQoximrw"}],..................................................................................
Use the swift command to view the state of the rgw object store.
#swift -A http://192.168.123.172:7480/auth/v1.0 -U testuser:swift -K "yahhi4lK5eJIw0cMg0cSm1ylRcncbAEGzQoximrw" statAccount: v1Containers: 0Objects: 0Bytes: 0Objects in policy "default-placement-bytes": 0Bytes in policy "default-placement-bytes": 0Containers in policy "default-placement": 0Objects in policy "default-placement": 0Bytes in policy "default-placement": 0Accept-Ranges: bytesConnection: Keep-AliveX-Timestamp: 1588493556.96500X-Account-Bytes-Used-Actual: 0X-Trans-Id: tx0000000000000000003c8-005eae7cf4-f2b7f-defaultContent-Type: text/plain; charset=utf-8X-Openstack-Request-Id: tx0000000000000000003c8-005eae7cf4-f2b7f-default
But you need to input a long command each time, so you can reduce the command each time by setting environment variables. Of course, you need to store the following content in the user's environment variables file, such as. bashrc file, to make it permanent.
Replace the following USER and KEY with the actual values.
#export ST_AUTH=http://production01.acme.com/auth/v1.0export ST_USER=user01export ST_KEY=password
Now you can manipulate the object store with a short command.
Create bucket
#swift post bucket
Upload file to bucket
Create bucket and upload file to rgw bucket
#swift upload bucket ceph-iscsi-config-2.7-1.el7.noarch.rpm#swift list bucketceph-iscsi-config-2.7-1.el7.noarch.rpm
Warm reminder:
The upload command uploads the file to the specified bucket. If there is a bucket name, it will be uploaded directly to the specified bucket. If there is no bucket name, it will create a new bucket and upload the object to the bucket
View the objects in the specified bucket. You can view all objects without the bucket name.
#swift list bucket
Download object from specified bucket
#swift download bucket ceph-iscsi-config-2.7-1.el7.noarch.rpmceph-iscsi-config-2.7-1.el7.noarch.rpm [auth 0.004s, headers 0.008s, total 0.009s, 17.761 MB/s]
View objects in the specified bucket.
#swift stat bucket ceph-iscsi-config-2.7-1.el7.noarch.rpmAccount: v1Container: bucketObject: ceph-iscsi-config-2.7-1.el7.noarch.rpmContent Type: application/x-rpmContent Length: 94632Last Modified: Tue, 05 May 2020 14:42:34 GMTETag: 86f3c320ed3b5c2ea8389710c31b7997Meta Mtime: 1583988649.031517Accept-Ranges: bytesConnection: Keep-AliveX-Timestamp: 1588689754.31758X-Trans-Id: tx0000000000000000000ce-005eb1801f-fc7b1-defaultX-Openstack-Request-Id: tx0000000000000000000ce-005eb1801f-fc7b1-default
Delete the object.
#swift delete bucket ceph-iscsi-config-2.7-1.el7.noarch.rpmceph-iscsi-config-2.7-1.el7.noarch.rpm
For more commands, refer to the swift help.
Using CloudBerry to access RGW
Open the cloudberry explorer.
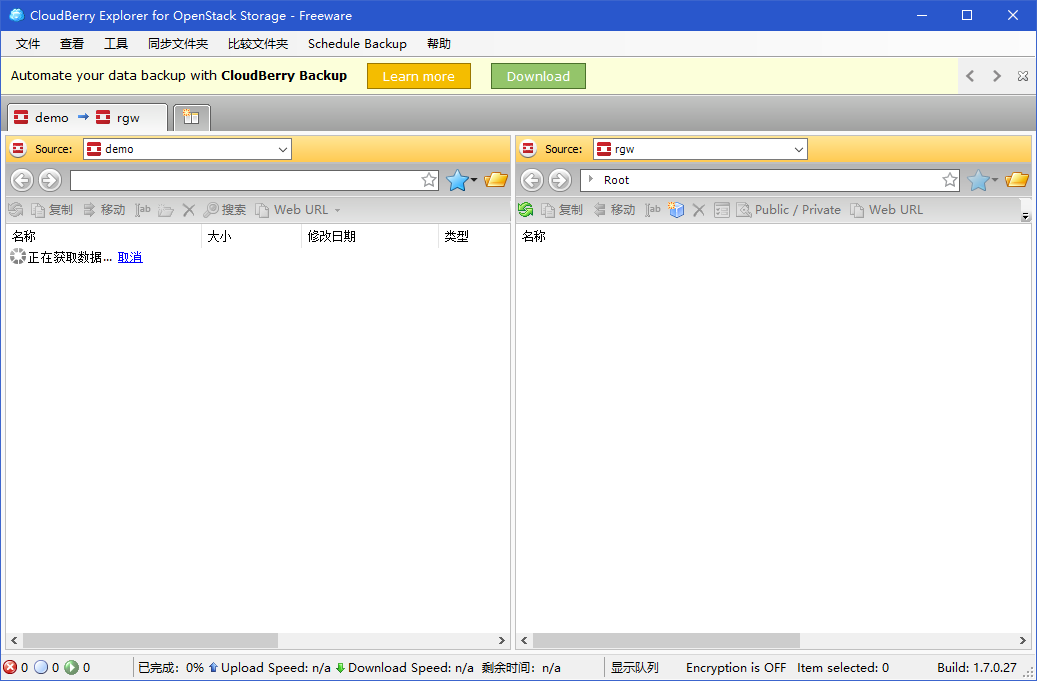
Set up an account.
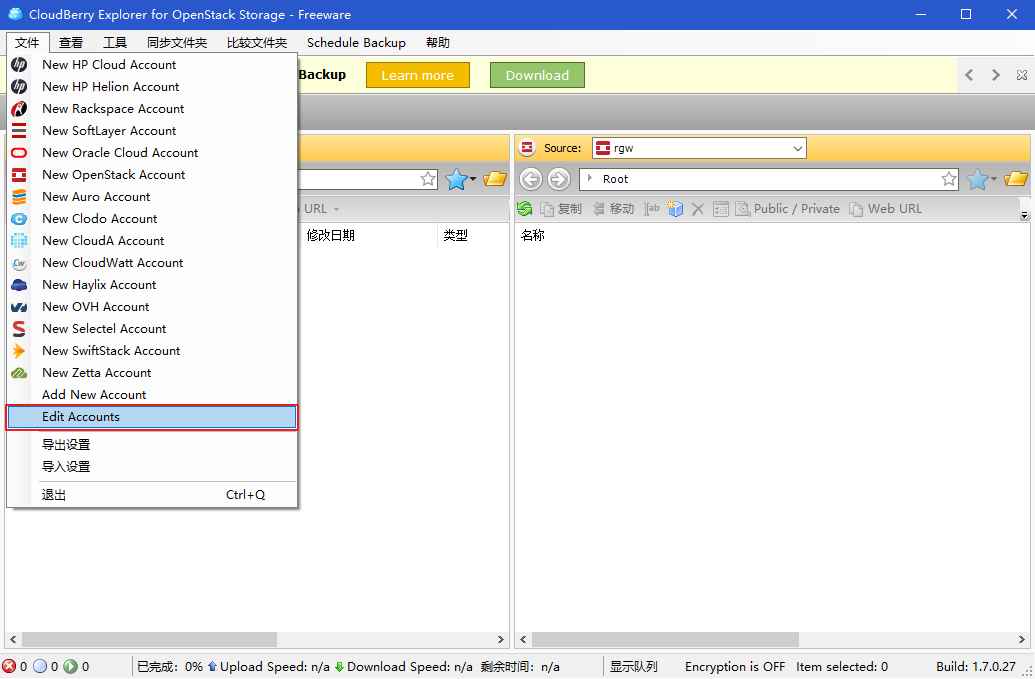
Click add storage.
Enter details as follows, using the testuser:swift Sub user and key.
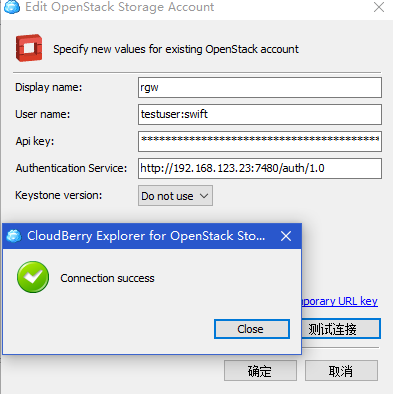
Warm reminder:
Pay attention to the auth keyword in the address bar. It is necessary that no one can connect to it
Note that "do not user" is used in keystone version
Nextcloud application access Ceph RGW
10.1: introduction to nextcloud
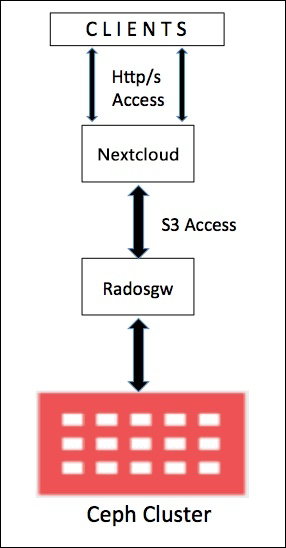
The above shows that many graphics or command-line tools are used to operate RGW object storage. In fact, the most commonly used RGW is through application programs. In this section, Nextcloud, a netdisk application software, is used to configure its back-end storage to use RGW object storage to provide users with netdisk applications. The file uploaded by users is stored in RGW object storage. The schematic diagram is as follows:
10.2: install nextcloud
To simplify the installation process, this article uses the snap tool to install nextcloud
Configure the epel source.
#yum install epel-release
Install the snapd tool.
#yum install snapd
Configure snapd socket.
#systemctl enable --now snapd.socket
Configure soft links
# ln -s /var/lib/snapd/snap /snap
Install nextcloud through snap.
# snap install nextcloud
View nextcloud apps that the source has installed through snap.
#snap listName Version Rev Tracking Publisher Notescore 16-2.44.3 9066 stable canonical✓ corenextcloud 18.0.4snap1 20498 stable nextcloud✓ -
The next cloud installed by snap uses port 80 by default. Enter the IP address to open the next cloud configuration interface.
Set the user name and password, and click finish.
10.3: configure nextcloud
After installation, open the nextcloud user interface.
Configure nextcloud to use rgw storage, and click the Apply button.
Select "external storage support" in the disabled application and click enable.
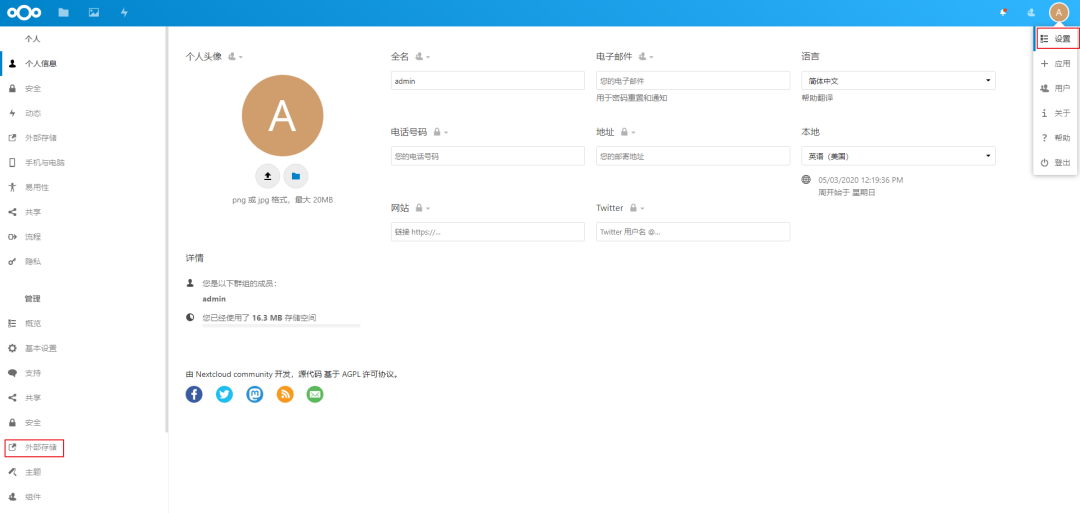
After completion, click settings to view "external storage" in the function menu on the left.
Create the nextcloud bucket.
# s3cmd mb s3://nextcloudBucket 's3://nextcloud/' created
View the barrel.
# s3cmd ls |grep nextcloud2020-05-03 04:32 s3://nextcloud
Configure nextcloud to use s3 to access the rgw object store, fill in the directory name, and check the enable path. When a green icon appears on the left, it indicates that the connection is successful.
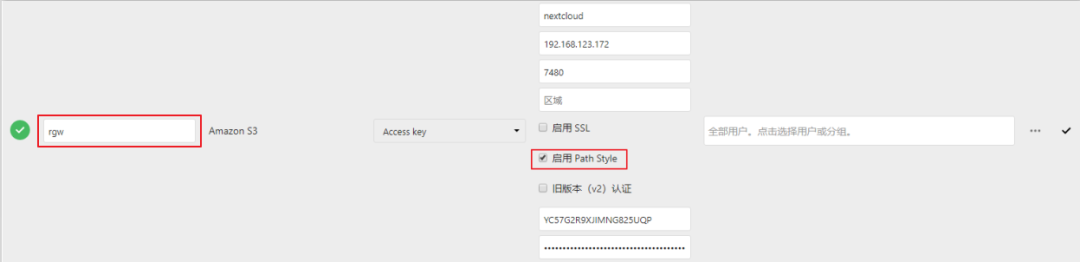
Warm reminder:
When path style is enabled, a request is made using http://hostname.domain/bucket . Only those in this format can be successfully docked (default is http://bucket.hostname.domain ).
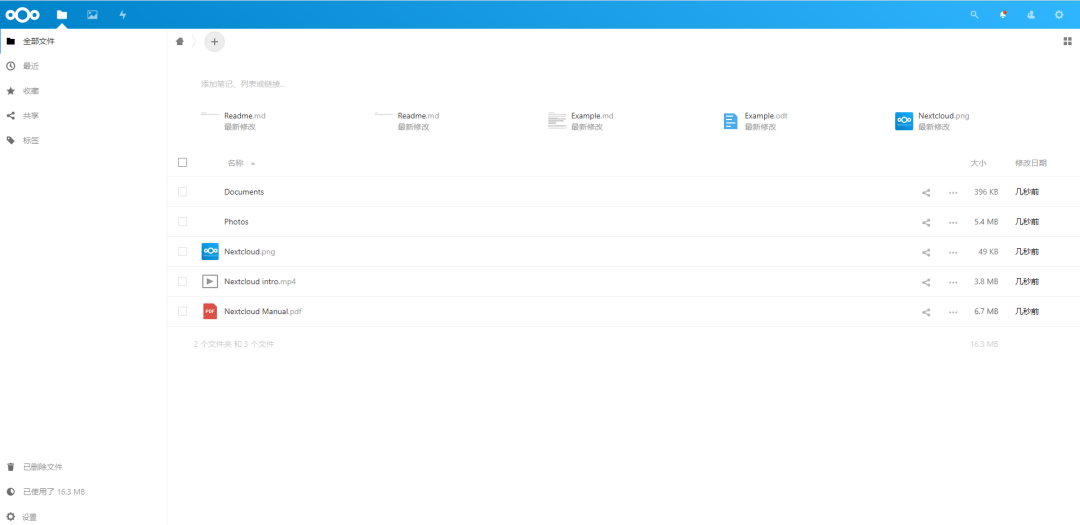
Back to the next cloud interface, you can see that there is an rgw target. Only files uploaded to the directory will be stored in the rgw storage using the s3 interface.
After uploading the file to the rgw directory, view the objects in the corresponding bucket.
At this point, nextcloud uses s3 docking to use rgw. Of course, nextcloud also supports using swift interface to dock nextcloud, but only the swift installed in OpenStack cannot be a separate swift, because the keystone version must be written in the interface where nextcloud configures the swift interface.
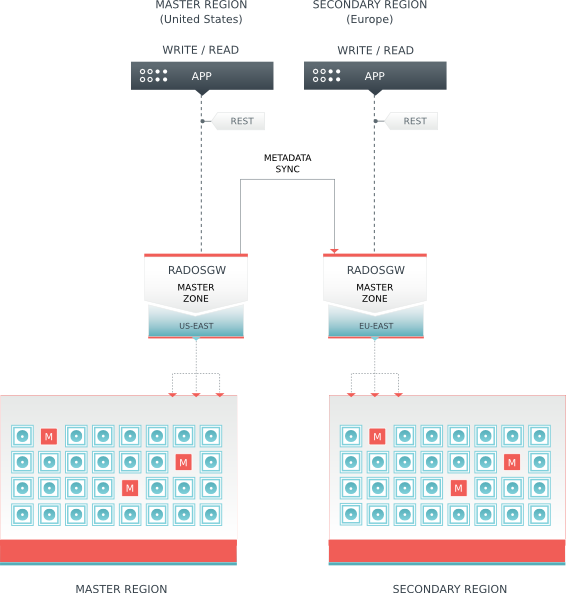
Of course, the use of RGW is not only mentioned above, but also Multisite scene, which involves a lot of content.