The brand data table corresponds to PMS brand in the database gulimall PMS
Data table structure
| Field name | Field type | Field length | Not null | Primary key | notes |
|---|---|---|---|---|---|
| brand_id | bigint | 20 | √ | √ | Brand id |
| name | char | 50 | Brand name | ||
| logo | varchar | 2000 | Brand logo address | ||
| descript | longtext | introduce | |||
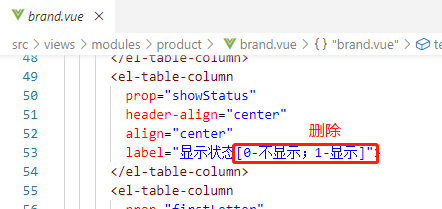
| show_status | tinyint | 4 | Display status [0-not displayed; 1-displayed] | ||
| first_letter | char | 1 | Retrieve initials | ||
| sort | int | 11 | sort |
In the previous three-level classification, you can design your own interface to add, delete, modify and query. In fact, in the code generated by the Ren generator of reverse engineering, the addition, deletion, modification and query interface of the corresponding data table will be generated.
1. Add brand management menu
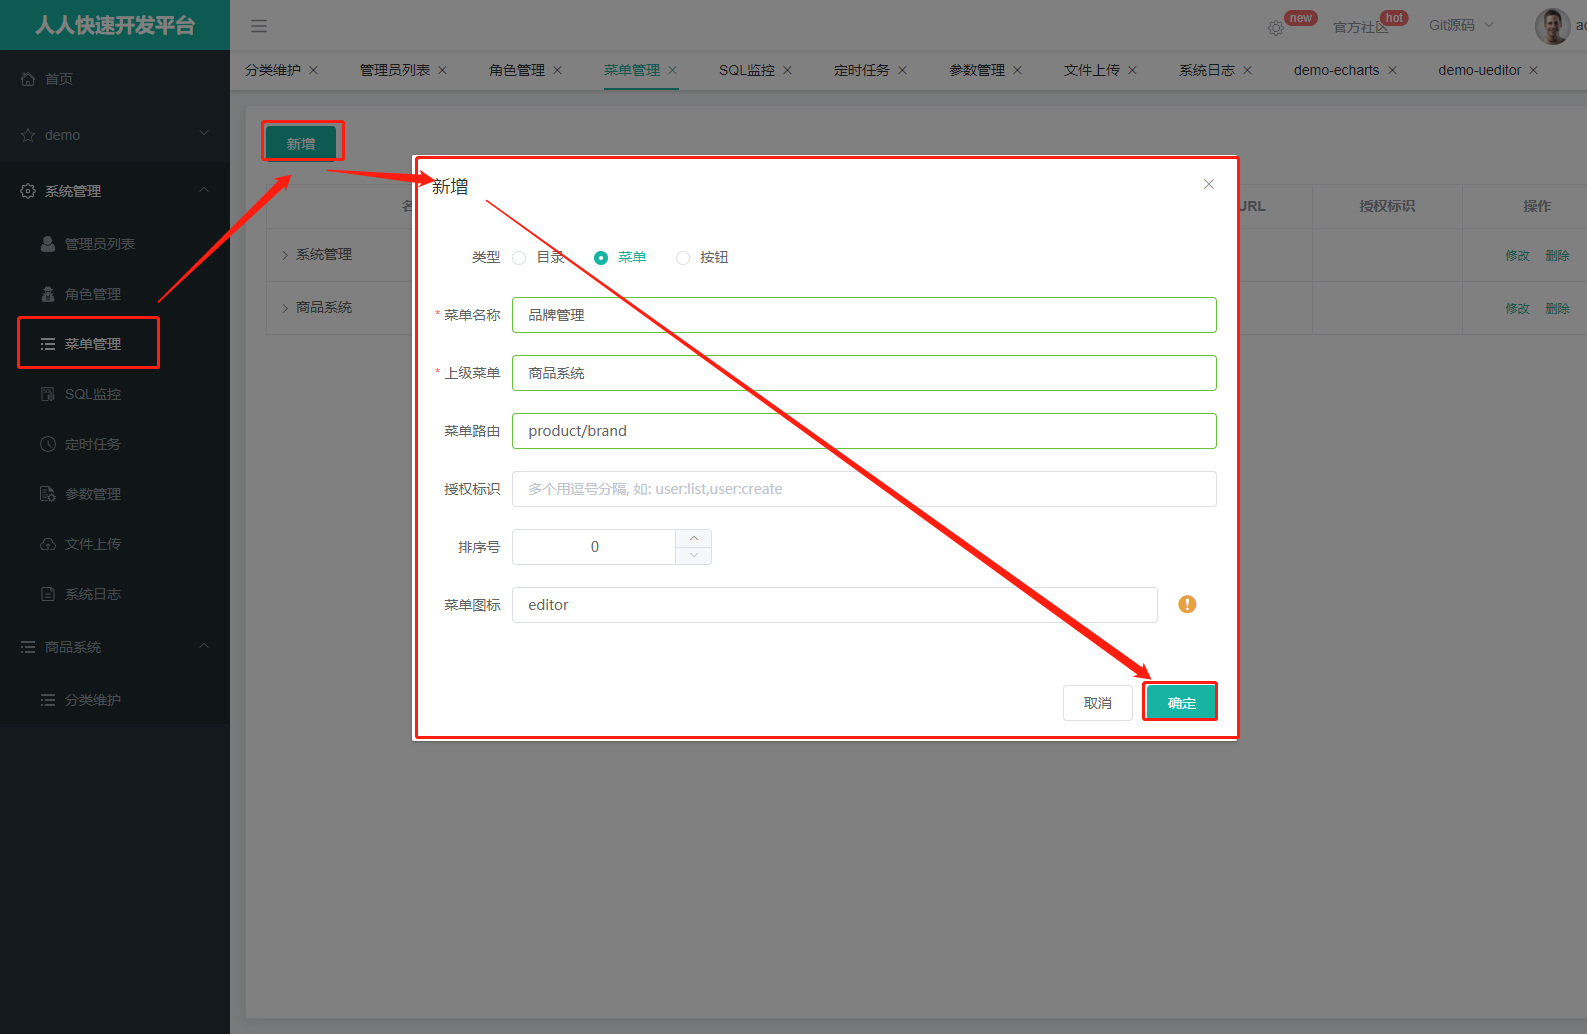
2. Set up the basic addition, deletion, modification and query interface
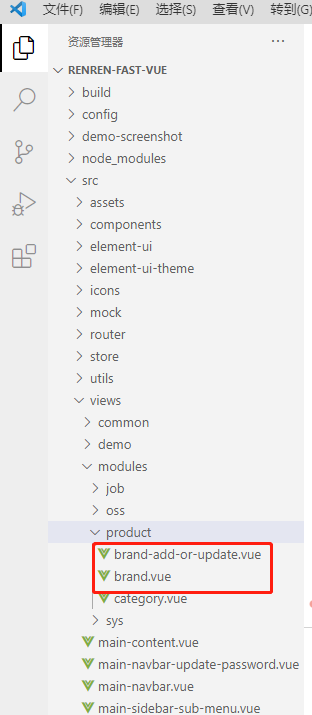
Using reverse generated code
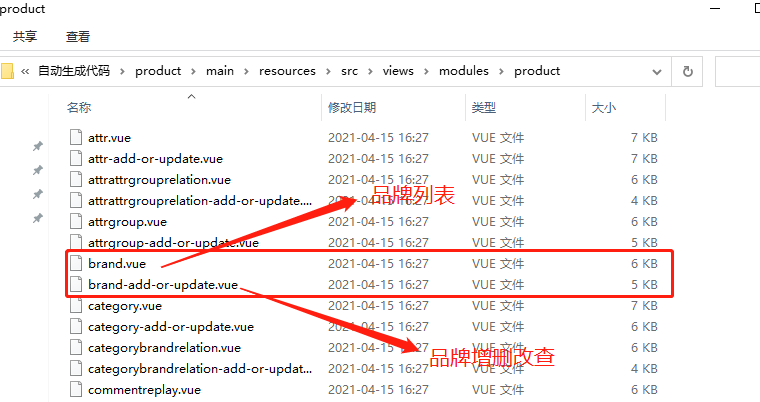
Copy the two vue interfaces to modules/product
Restart the project, open the brand maintenance interface, and the basic addition, deletion, modification and inspection are ready
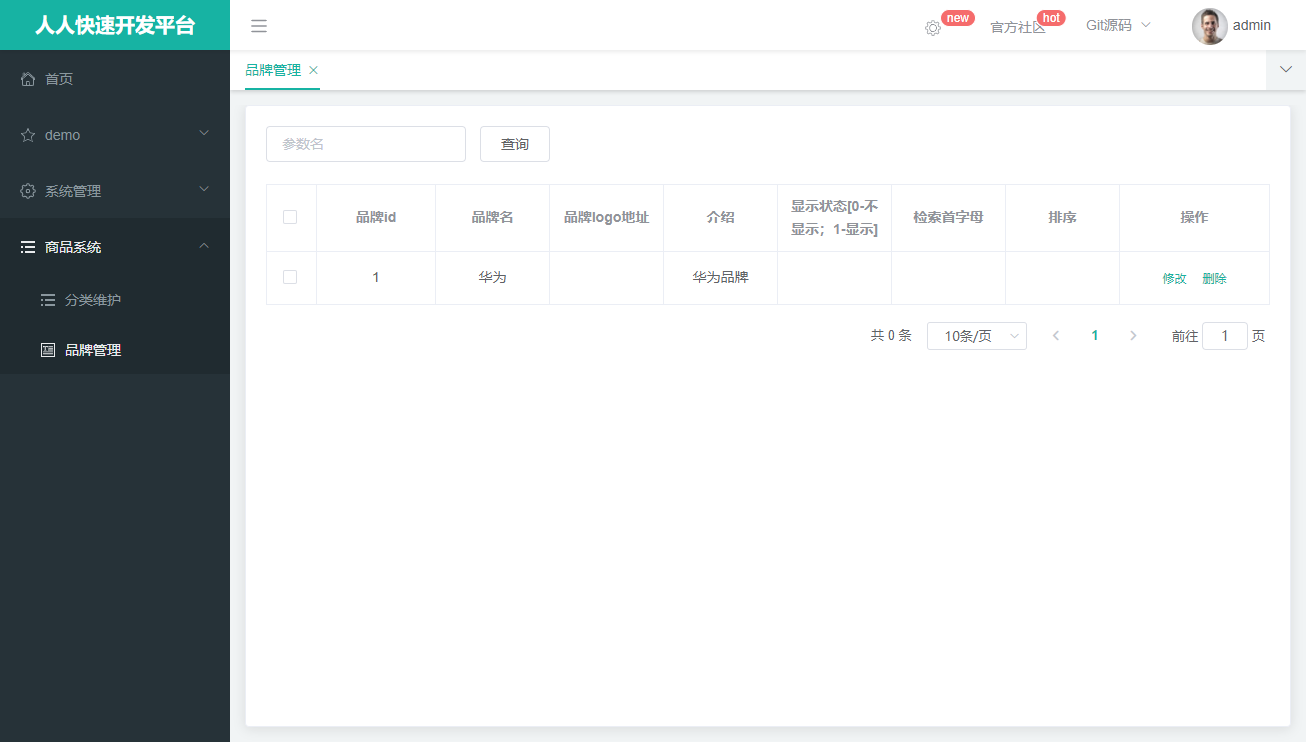
Because the system will control permissions by default, some buttons will judge whether to display permissions
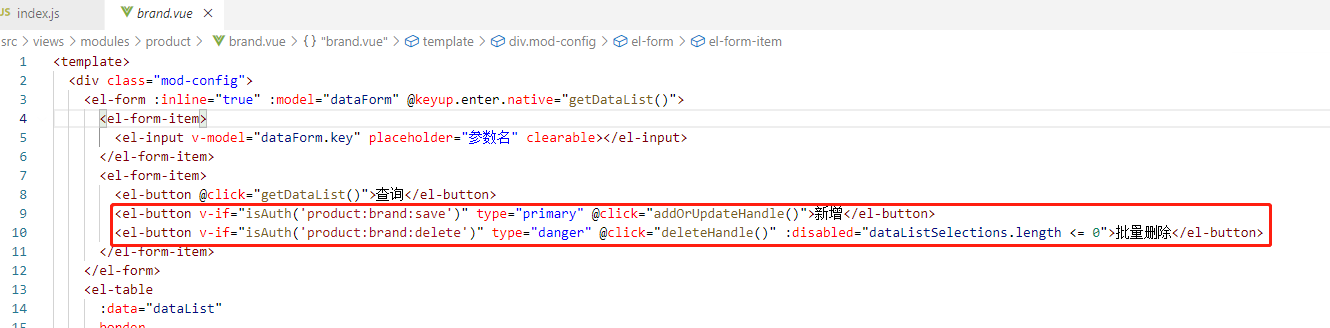
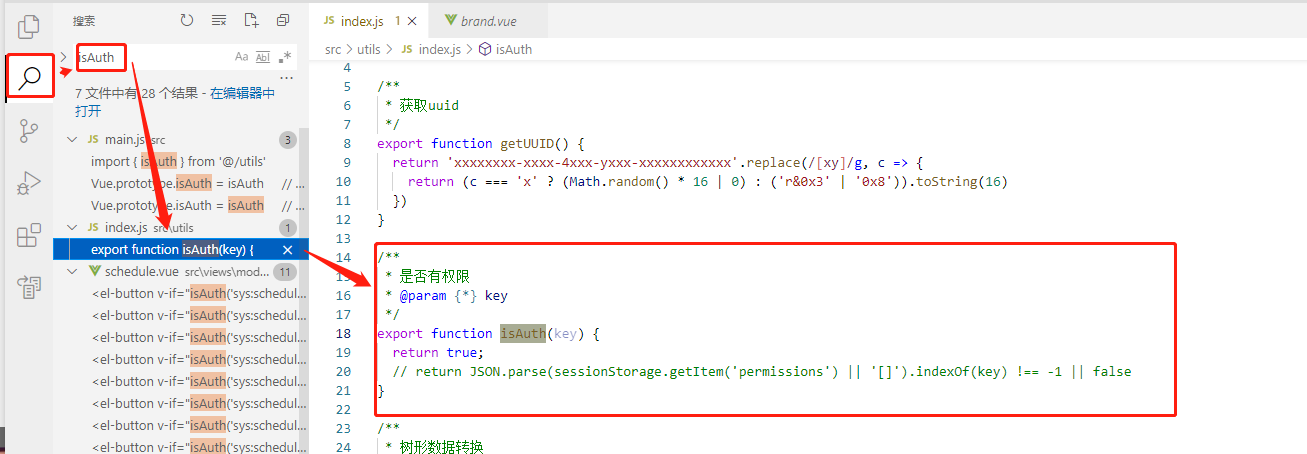
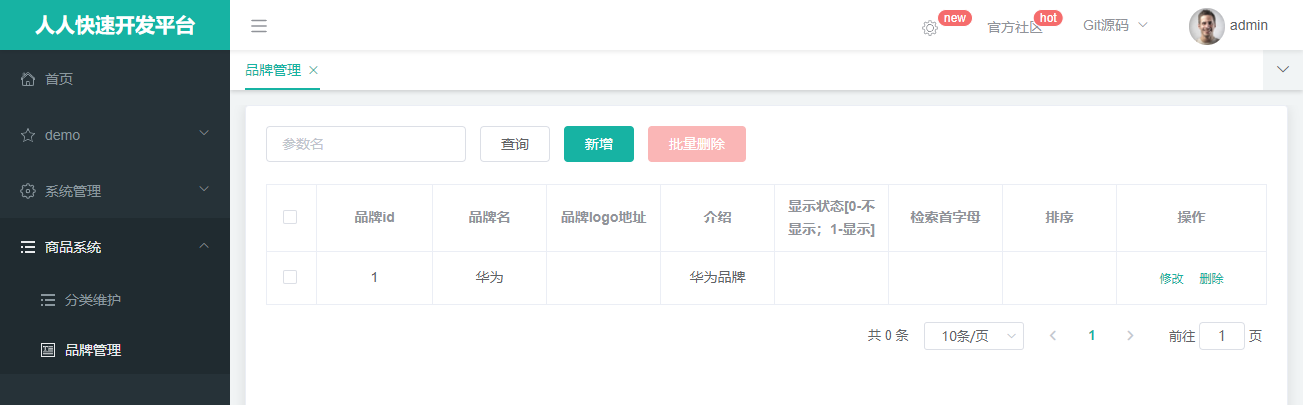
Set permission control to always return true
Review the page effect
3. Optimization details - display status [0-not display; 1-display]
-
Delete [0-do not show; 1-show]
-
List brand Vue display status
-
Brand add or update Vue display status

-
-
Change the display status to be controlled by the switch component
-
List brand Vue display status
<el-table-column prop="showStatus" header-align="center" align="center" label="Display status" > <template slot-scope="scope"> <el-switch v-model="scope.row.showStatus" active-color="#13ce66" inactive-color="#ff4949" > </el-switch> </template> </el-table-column> -
Brand add or update Vue display status
<el-form-item label="Display status" prop="showStatus"> <el-switch v-model="dataForm.showStatus" active-color="#13ce66" inactive-color="#ff4949" > </el-switch> </el-form-item> -
effect

-
-
Listen for Switch component click events
-
List brand Vue display status
<el-switch
  v-model="scope.row.showStatus"
  active-color="#13ce66"
  inactive-color="#ff4949"
  @change="updateBrandStatus(scope.row)"
  :active-value="1"
  :inactive-value="0"
>
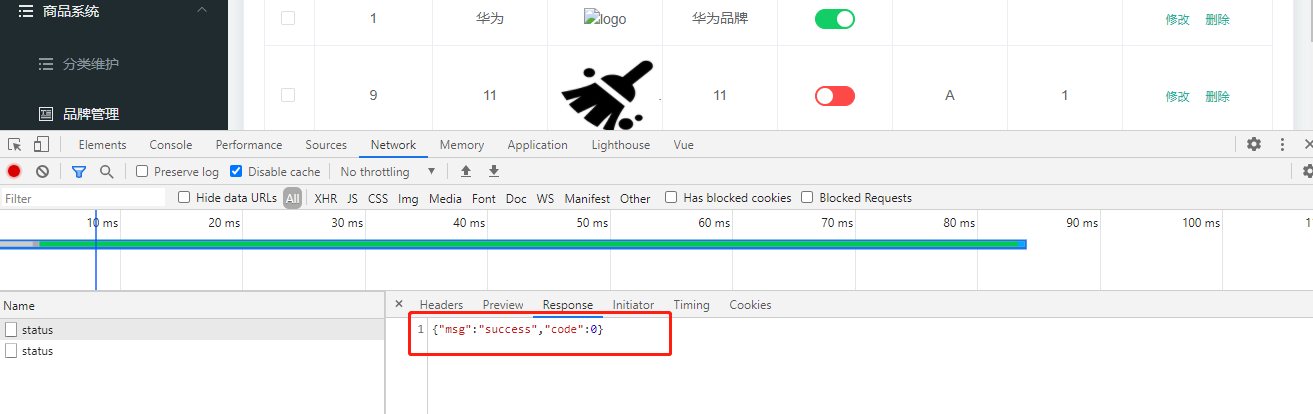
Directly use the product/brand/update interface in the reverse generated code to update the data
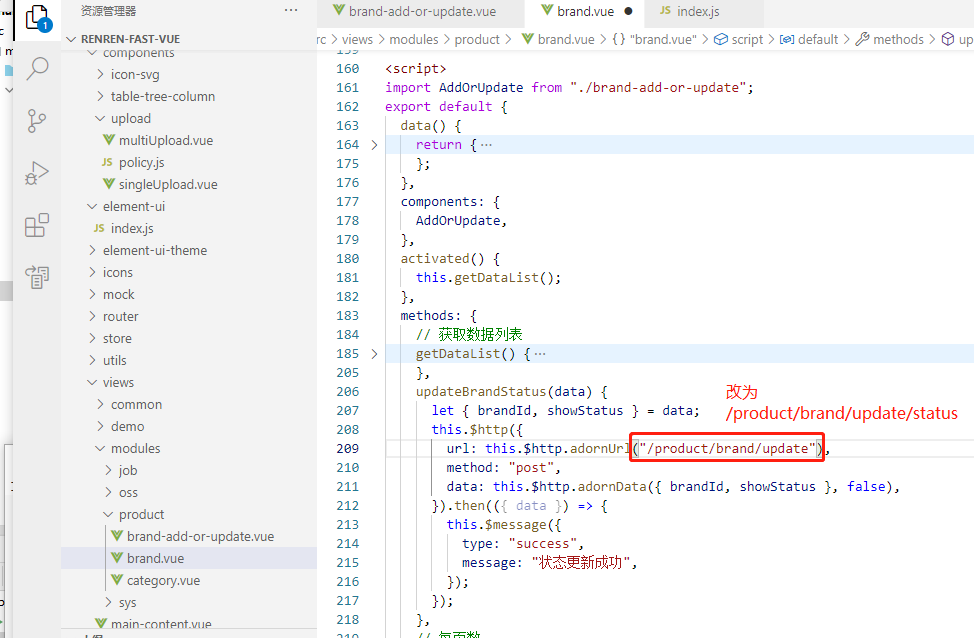
updateBrandStatus(data) {
  let { brandId, showStatus } = data;
  this.$http({
    url: this.$http.adornUrl("/product/brand/update"),
    method: "post",
    data: this.$http.adornData({ brandId, showStatus }, false),
  }).then(({ data }) => {
    this.$message({
      type: "success",
      message: "Status update succeeded",
    });
  });
},
-
4. File upload

Distributed file upload processes all file storage services in a unified location.
4.1 Alibaba cloud object storage OSS
4.1.1. brief introduction
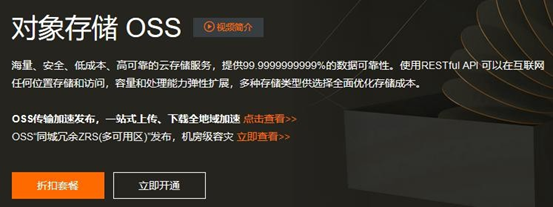
Object Storage Service (OSS) is a massive, safe, low-cost and highly reliable cloud storage service, which is suitable for storing any type of files. Flexible expansion of capacity and processing capacity, multiple storage types to choose from, and comprehensively optimize the storage cost.
4.1.2. Use steps
-
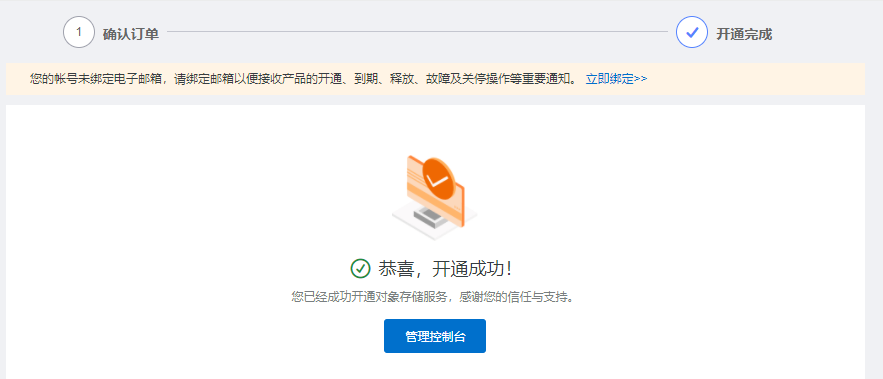
Activate Alibaba cloud object storage service https://www.aliyun.com/product/oss
Enter the console to view API documents
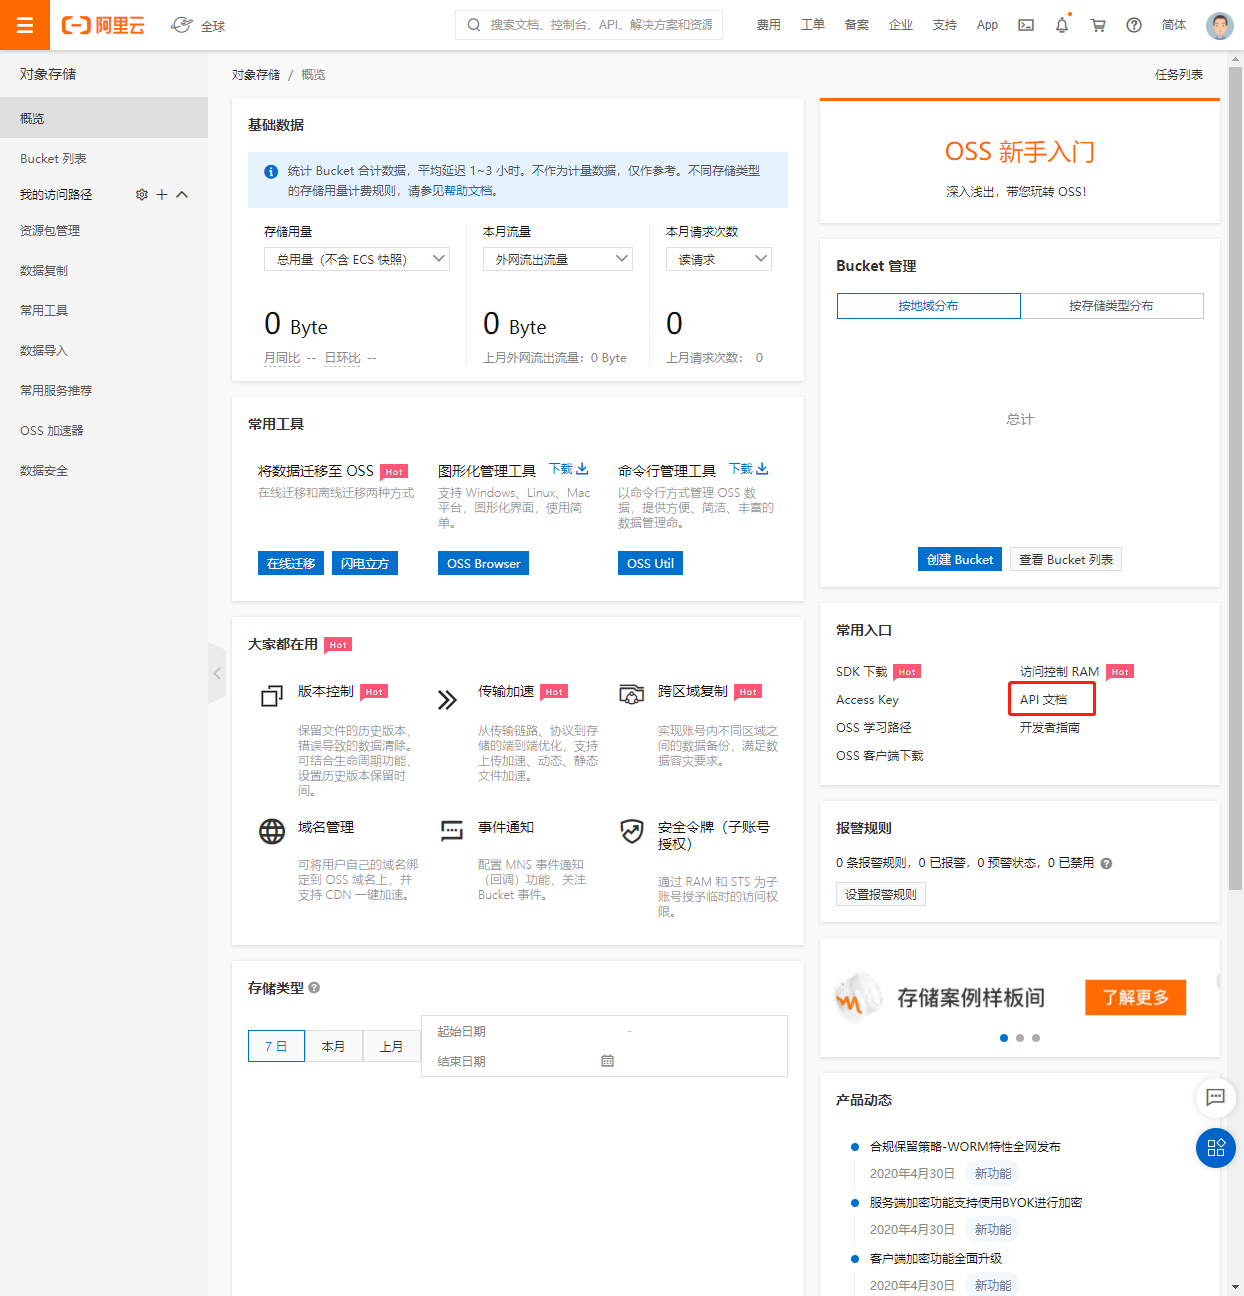
Resource terminology
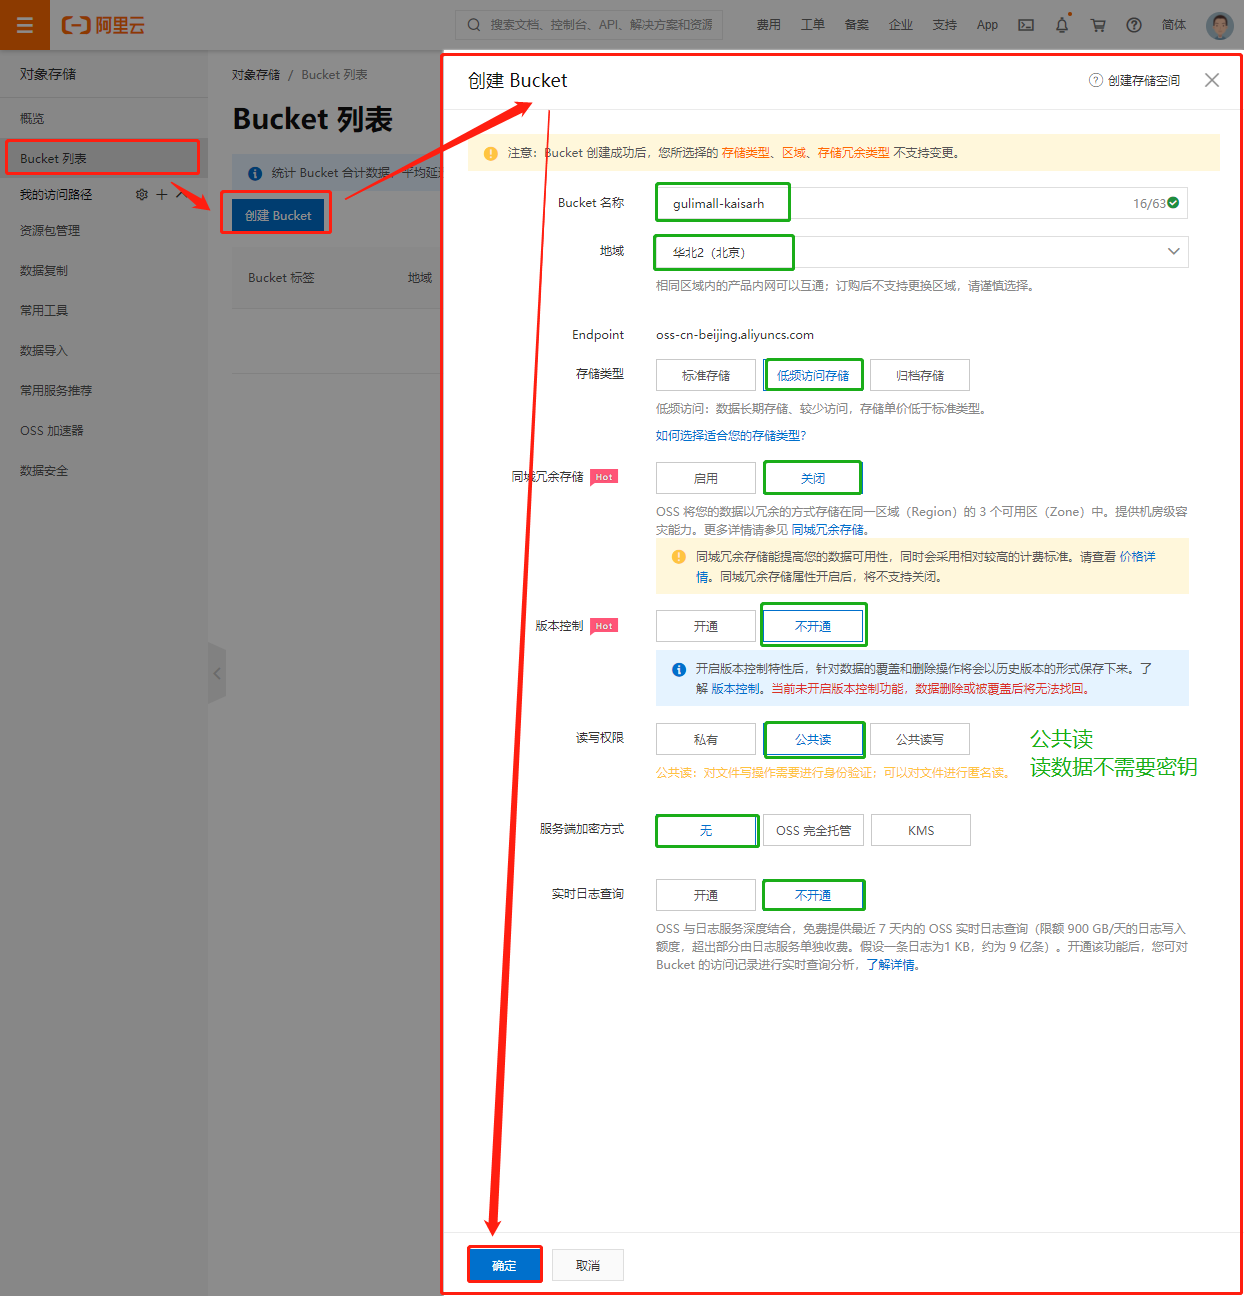
chinese english explain storage space Bucket Storage space is the container you use to store objects. All objects must belong to a storage space. Object / file Object Object is the basic unit of OSS to store Data, also known as OSS file. The object is composed of Object Meta, user Data and file name (Key). The object is identified by a unique Key inside the storage space. region Region Region indicates the physical location of the OSS data center. You can comprehensively select the region of data storage according to expenses, request sources, etc. Please check for details OSS opened regions. Access domain name Endpoint Endpoint indicates the access domain name of OSS external services. OSS provides services in the form of HTTP RESTful API. When accessing different regions, different domain names are required. The domain names needed to access the same region through intranet and extranet are also different. For details, see Endpoint corresponding to each Region. Key access AccessKey AccessKey, aka for short, refers to the AccessKeyId and AccessKeySecret used in access authentication. OSS verifies the identity of the sender of a request by using AccessKeyId and AccessKeySecret symmetric encryption. AccessKeyId is used to identify the user. AccessKeySecret is the key used by the user to encrypt the signature string and OSS to verify the signature string. AccessKeySecret must be confidential. Recommendation: create a Bucket for a project.
-
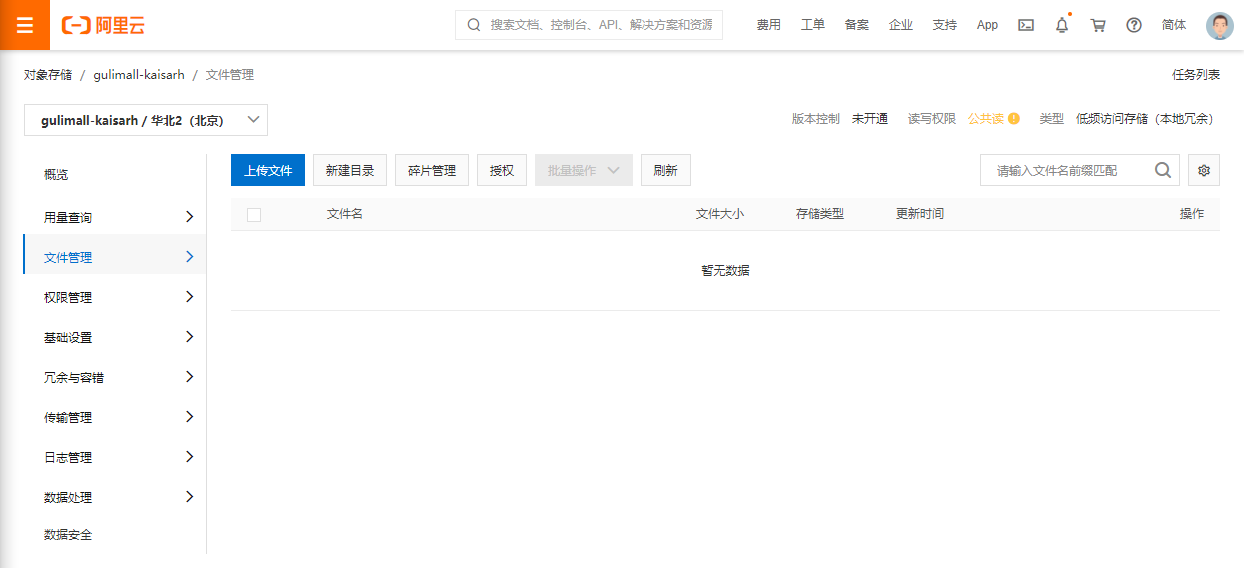
Create Bucket
4.2. Image upload method
4.2.1. Method 1: normal upload method
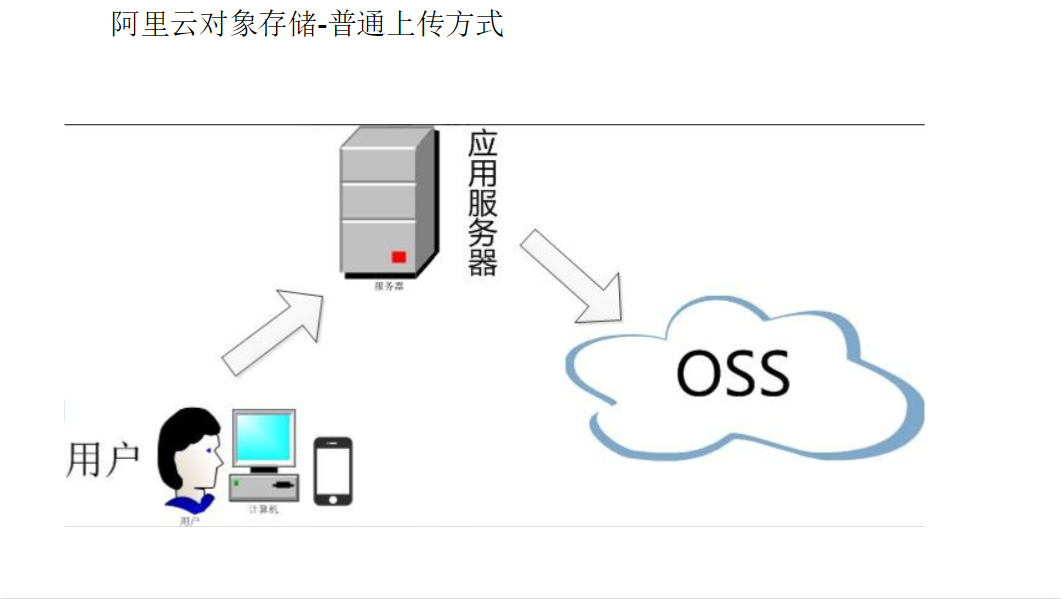
In this way, users have to upload through their own application server for additional operations.
4.2.2. Method 1: direct transmission after signing by the server

4.2.3. The project is uploaded
- Alibaba cloud storage object account and password are stored in its own application server
- First, send the token to the front-end server according to the anti-counterfeiting Policy and the anti-counterfeiting Policy
- The front-end carries an anti-counterfeiting signature to access OSS. If the upload request is received correctly.
4.3. File upload implementation
4.3.1. Install SDK and introduce dependency
<dependency>
    <groupId>com.aliyun.oss</groupId>
    <artifactId>aliyun-sdk-oss</artifactId>
    <version>3.10.2</version>
</dependency>

4.3.2. Test file upload
-
Copy file upload code
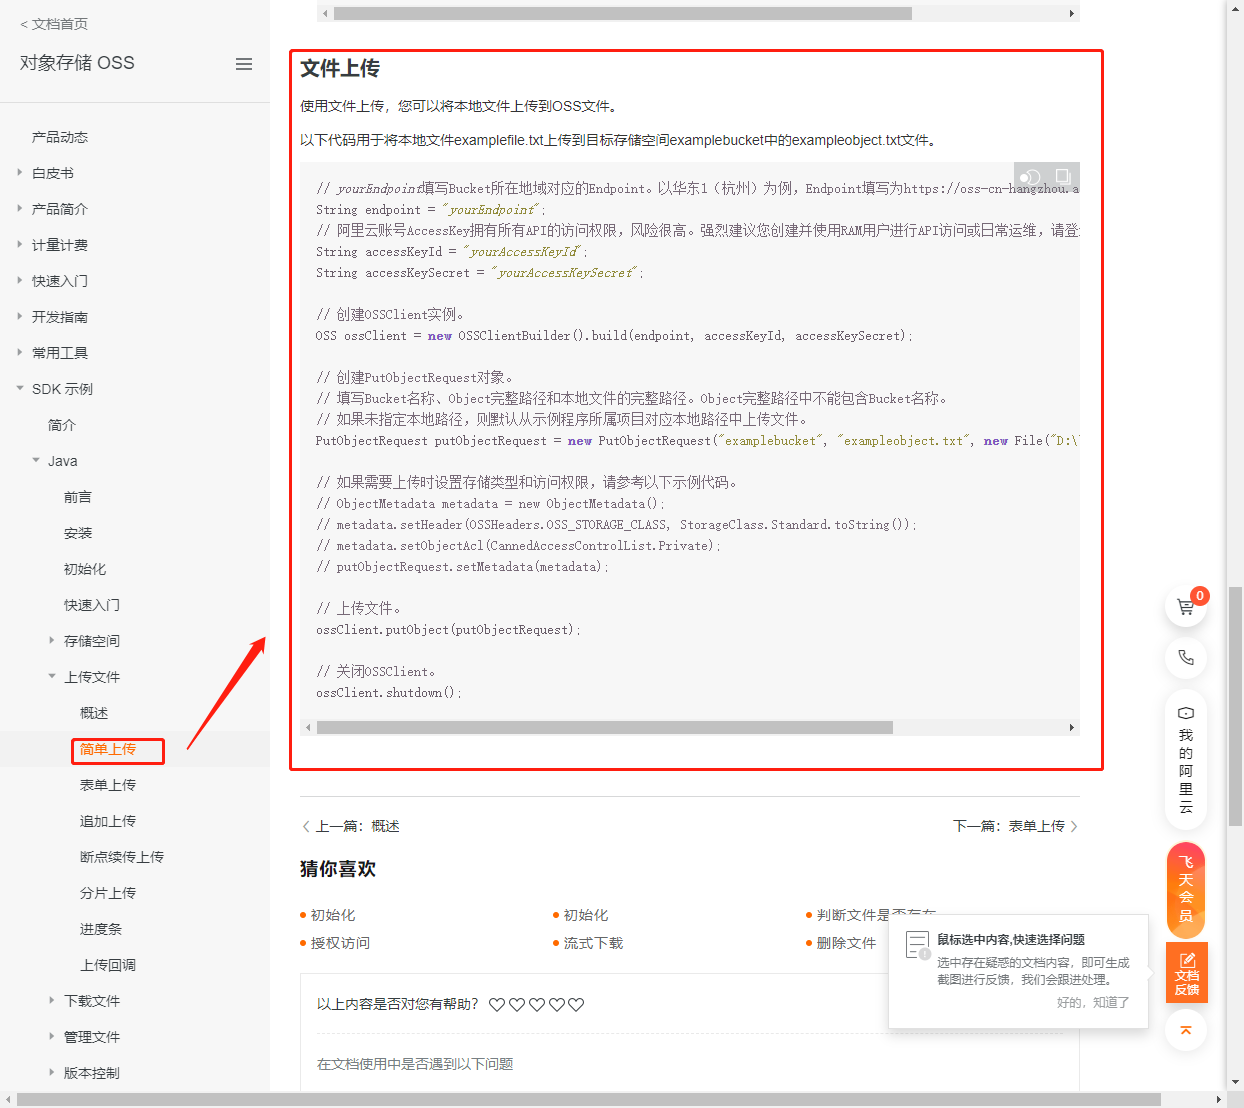
// yourEndpoint fill in the Endpoint corresponding to the region where the Bucket is located. Take East China 1 (Hangzhou) as an example, and the Endpoint is filled in as https://oss-cn-hangzhou.aliyuncs.com . String endpoint = "yourEndpoint"; // Alibaba cloud account AccessKey has access rights to all APIs, and the risk is very high. It is strongly recommended that you create and use RAM users for API access or daily operation and maintenance. Please log in to RAM console to create RAM users. String accessKeyId = "yourAccessKeyId"; String accessKeySecret = "yourAccessKeySecret"; // Create an OSSClient instance. OSS ossClient = new OSSClientBuilder().build(endpoint, accessKeyId, accessKeySecret); // Create a PutObjectRequest object. // Fill in the bucket name, the full path of the Object and the full path of the local file. Bucket name cannot be included in the full path of Object. // If no local path is specified, the file will be uploaded from the local path corresponding to the project to which the sample program belongs by default. PutObjectRequest putObjectRequest = new PutObjectRequest("examplebucket", "exampleobject.txt", new File("D:\\localpath\\examplefile.txt")); // If you need to set the storage type and access permission when uploading, please refer to the following example code. // ObjectMetadata metadata = new ObjectMetadata(); // metadata.setHeader(OSSHeaders.OSS_STORAGE_CLASS, StorageClass.Standard.toString()); // metadata.setObjectAcl(CannedAccessControlList.Private); // putObjectRequest.setMetadata(metadata); // Upload files. ossClient.putObject(putObjectRequest); // Close the OSSClient. ossClient.shutdown(); -
parameter
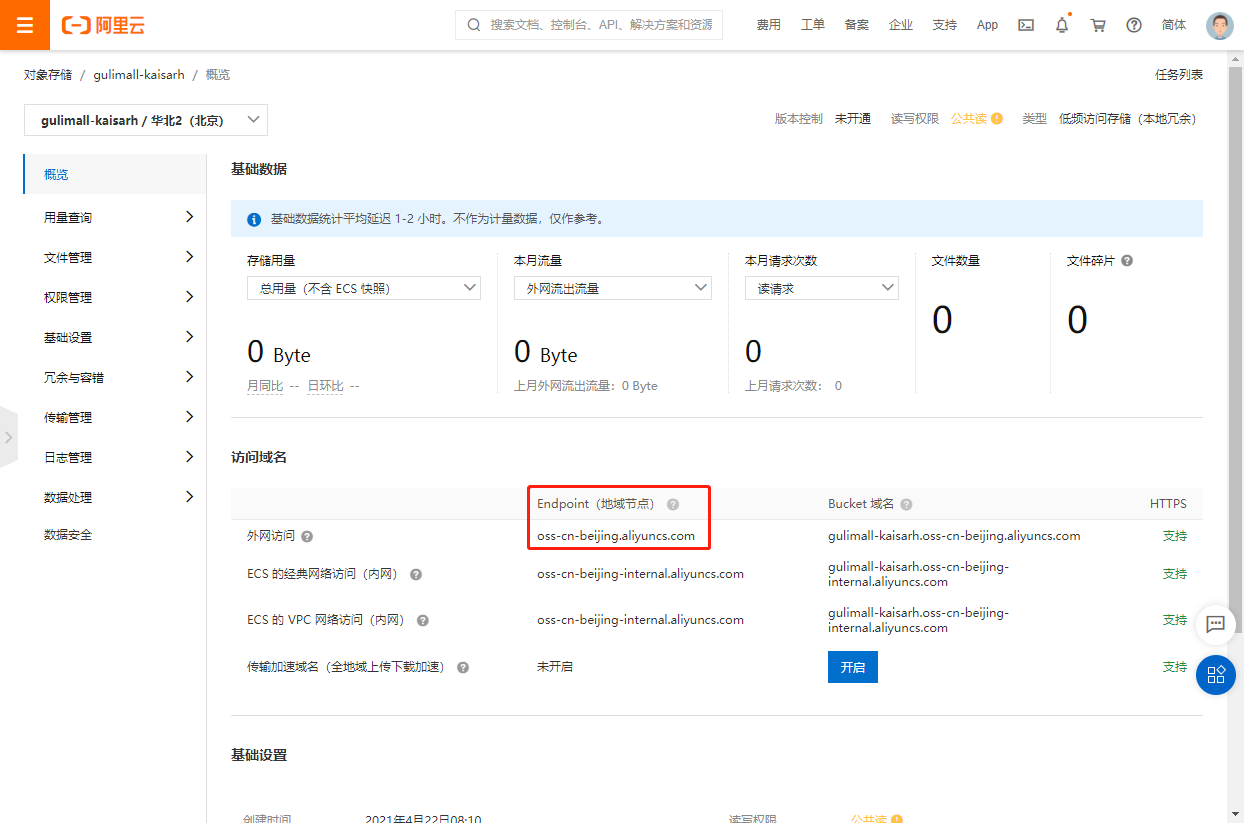
endpoint: regional node
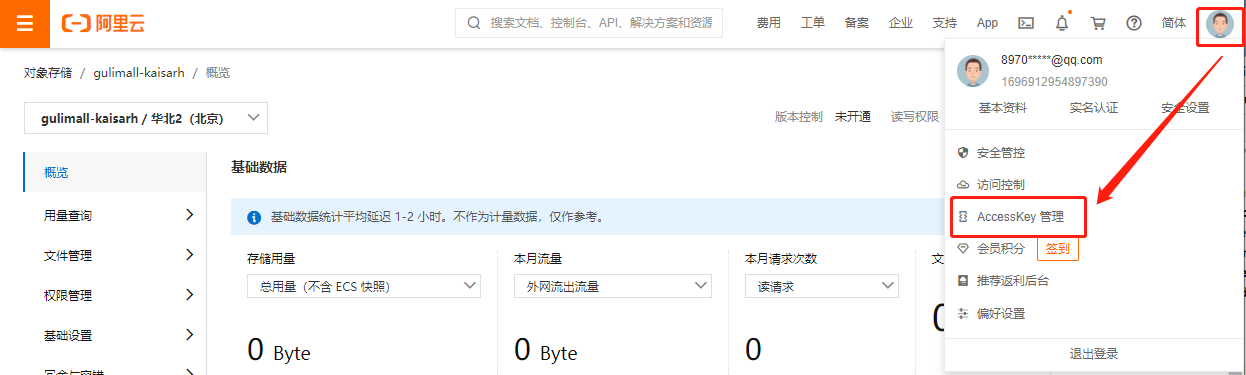
accessKeyId,accessKeySecret:
-
Manage AccessKey
-
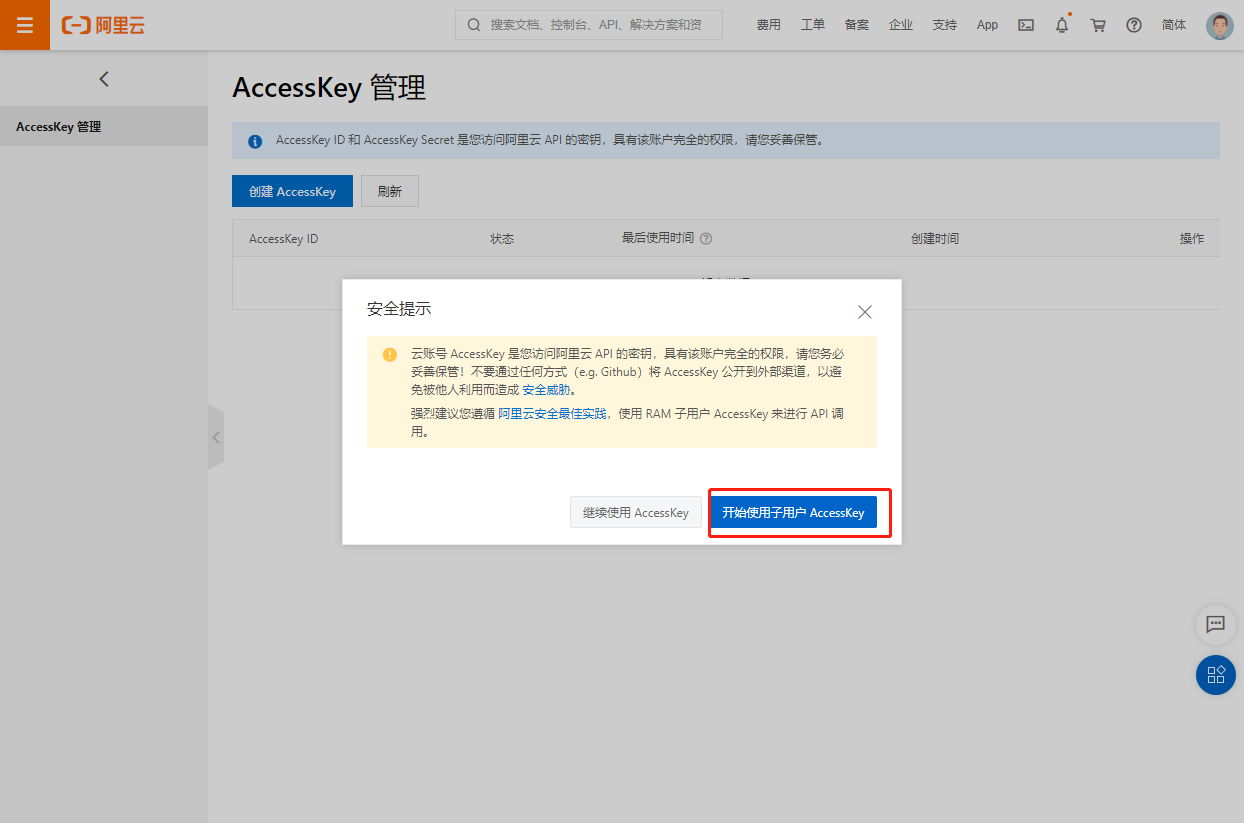
Use child user AccessKey
-
Create user
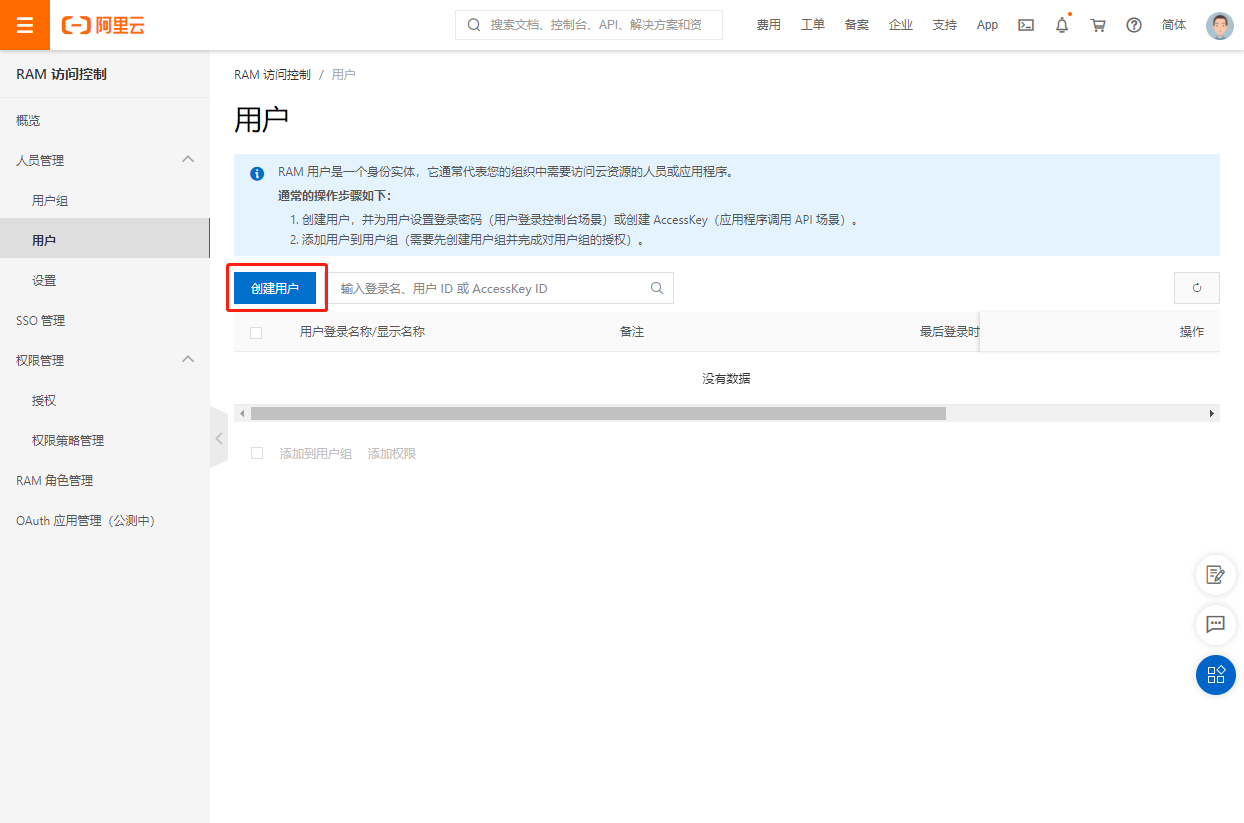
-
Set account

-
Generate accessKeyId and accessKeySecret after opening
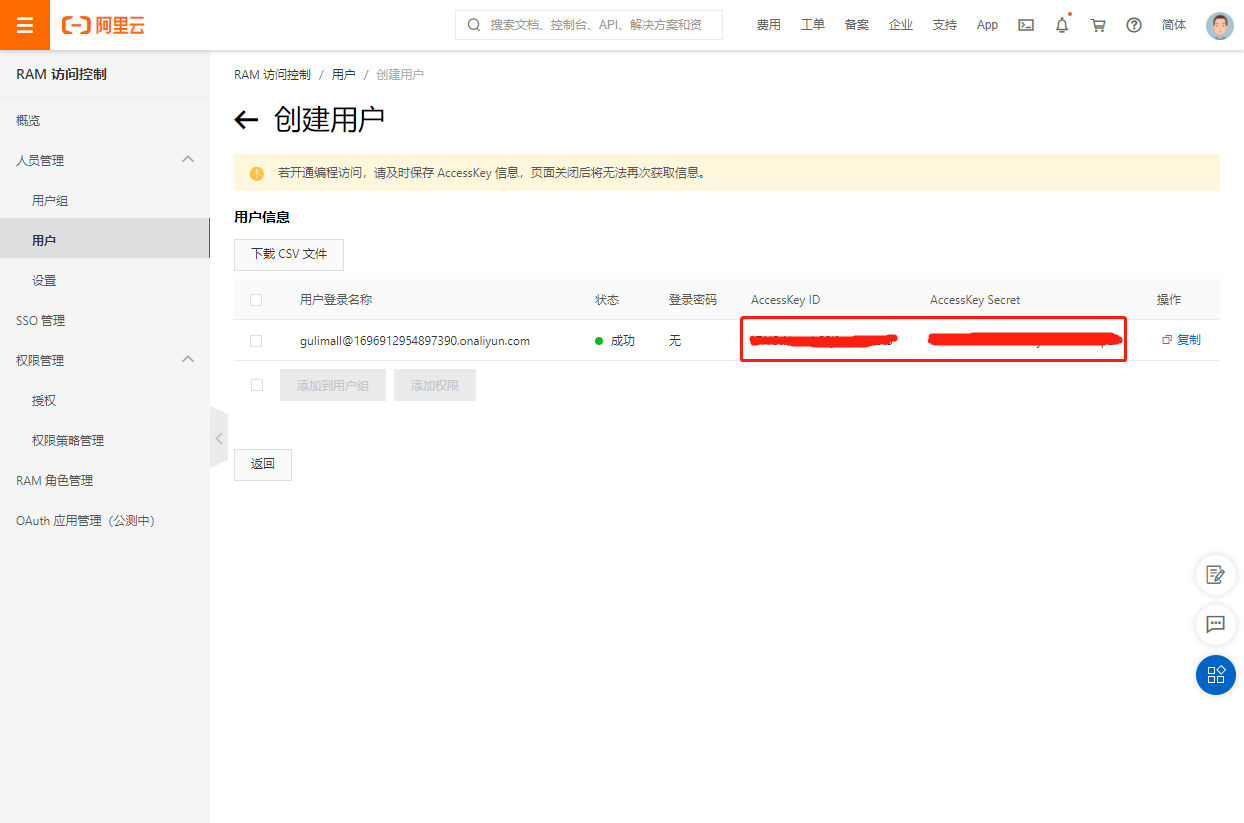
-
The new account does not have any permission. Add permission
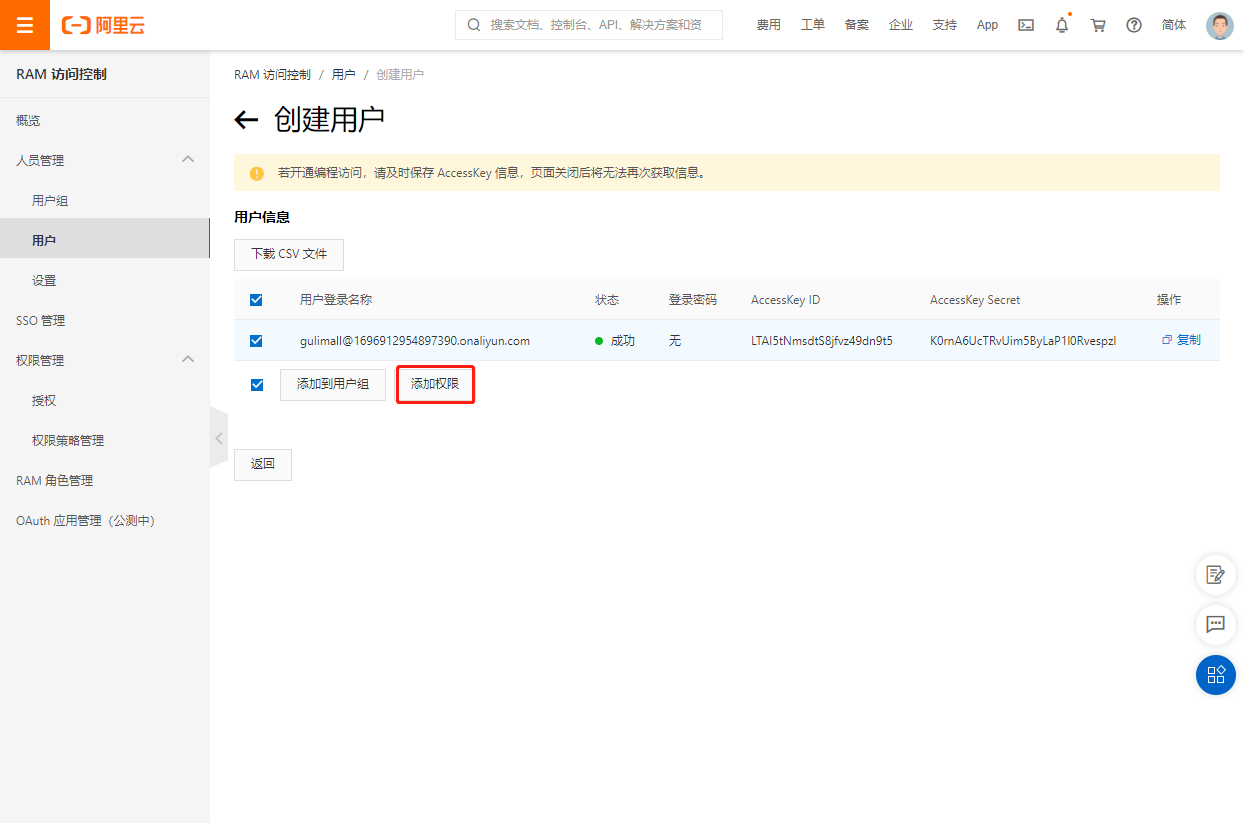

-
-
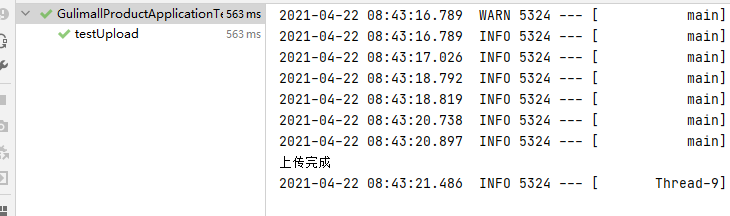
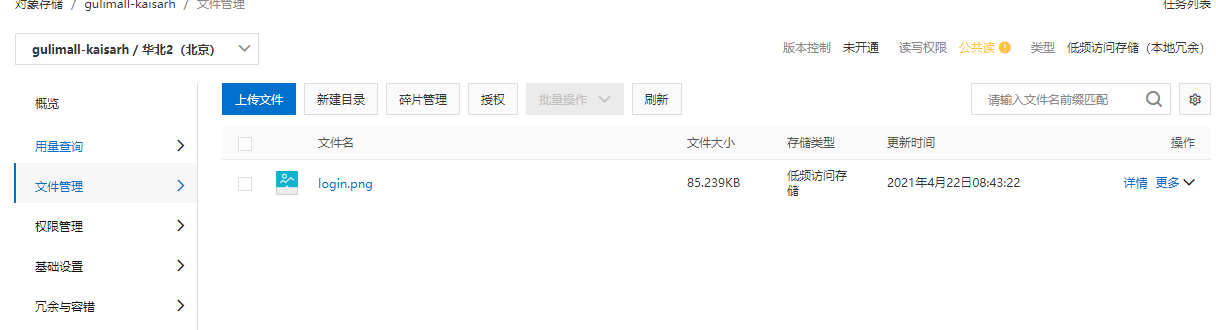
Complete code
@Test public void testUpload() { String endpoint = "xxx"; String accessKeyId = "xxx"; String accessKeySecret = "xxx"; OSS ossClient = new OSSClientBuilder().build(endpoint, accessKeyId, accessKeySecret); PutObjectRequest putObjectRequest = new PutObjectRequest("gulimall-kaisarh", "login.png", new File("C:\\Users\\Administrator\\Pictures\\login.png")); ossClient.putObject(putObjectRequest); ossClient.shutdown(); System.out.println("Upload complete"); } -
test
4.4. Spring cloud Alibaba OSS implements object storage
4.4.1. Introducing springcloud Alibaba OSS
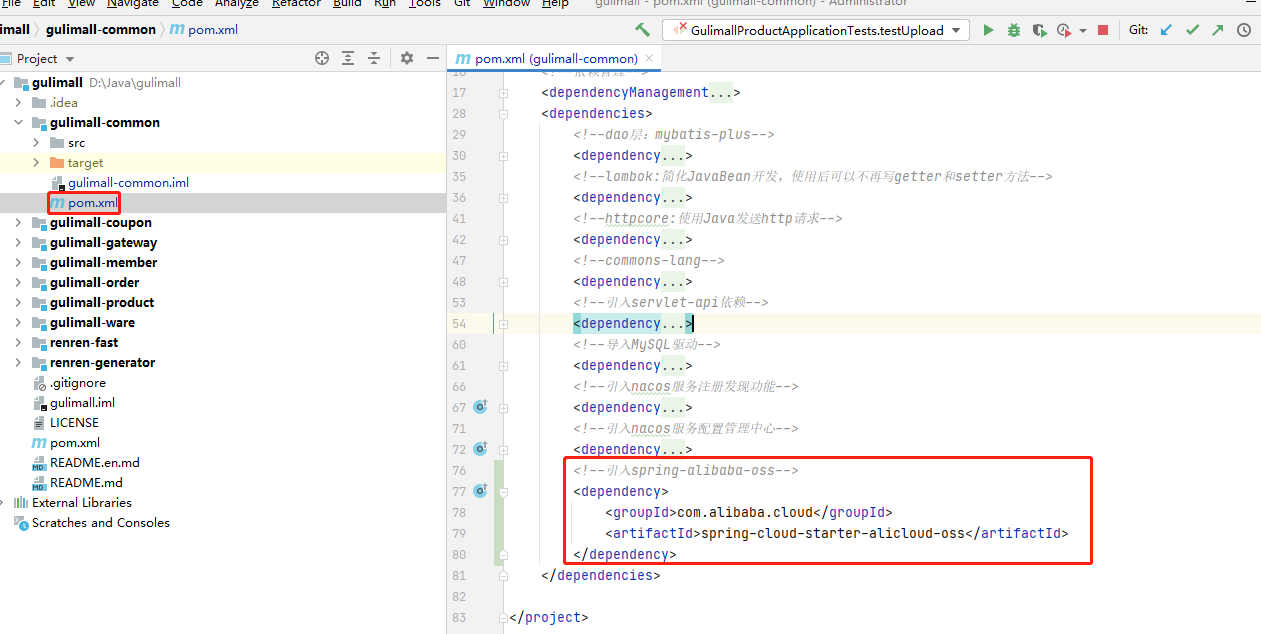
Since many services may use file upload, it is directly introduced in gulimall common
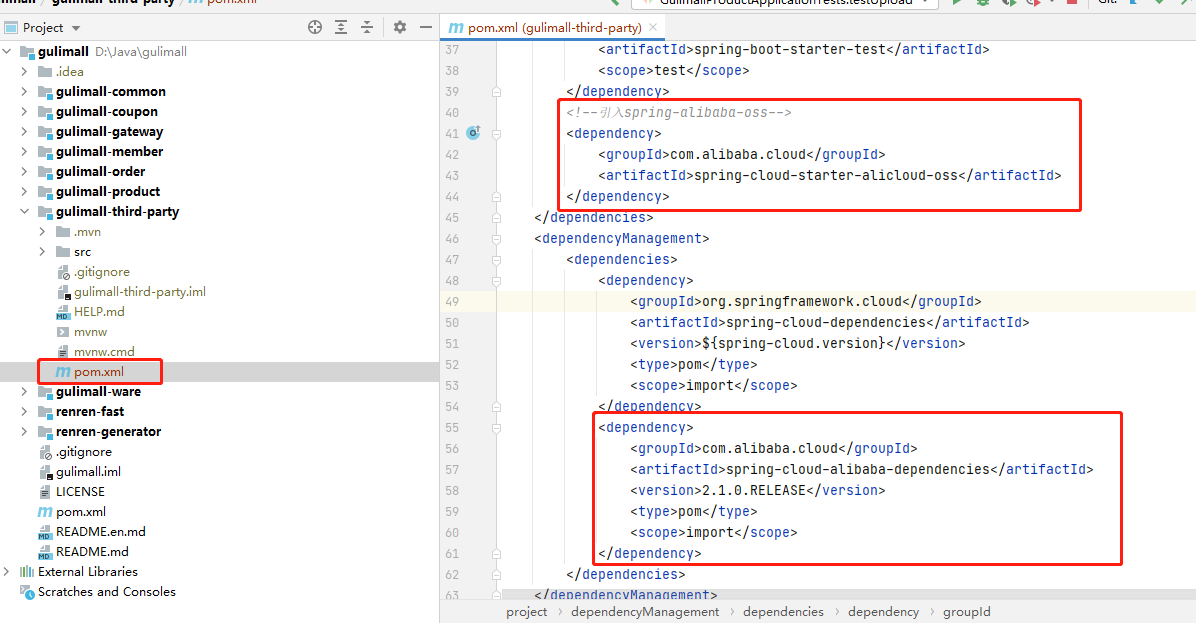
--introduce spring-alibaba-oss-->
<dependency>
    <groupId>com.alibaba.cloud</groupId>
    <artifactId>spring-cloud-starter-alicloud-oss</artifactId>
</dependency>
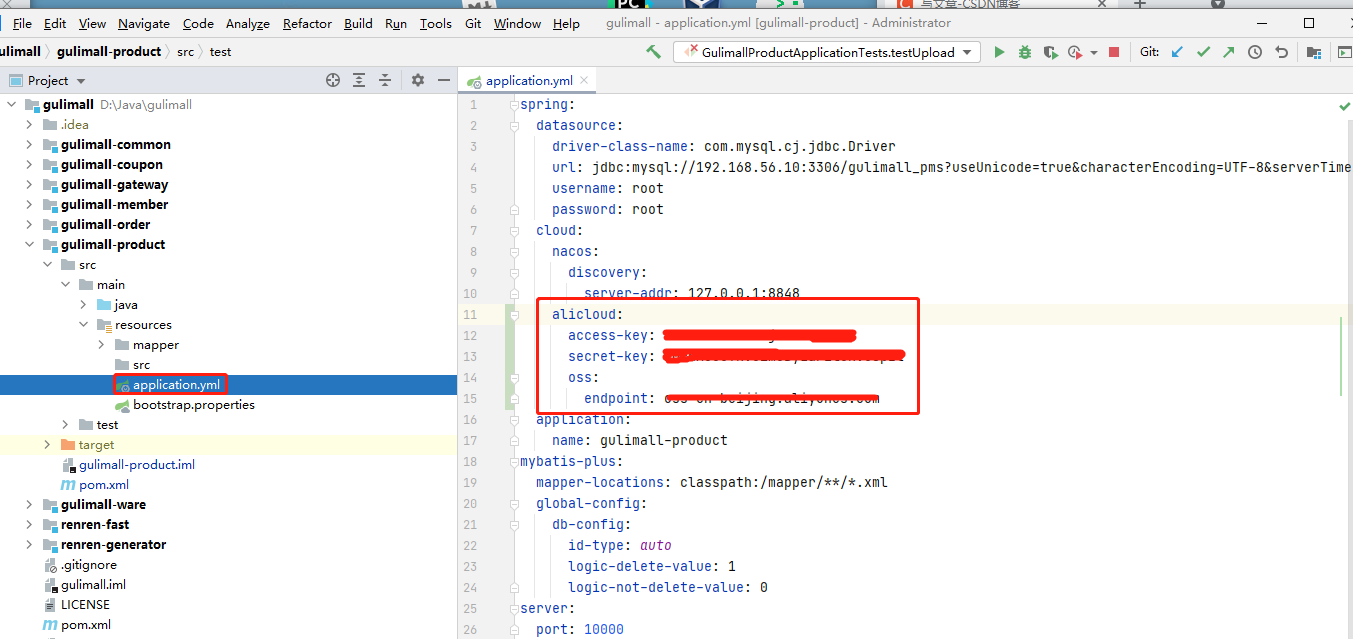
4.4.2. Configure account information related to alicloud oss
spring:
 cloud:
  alicloud:
   oss:
    endpoint: oss-cn-shanghai.aliyuncs.com
   access-key: xxxxxx
   secret-key: xxxxxx
Note: you must apply for RAM account information and assign OSS operation permission
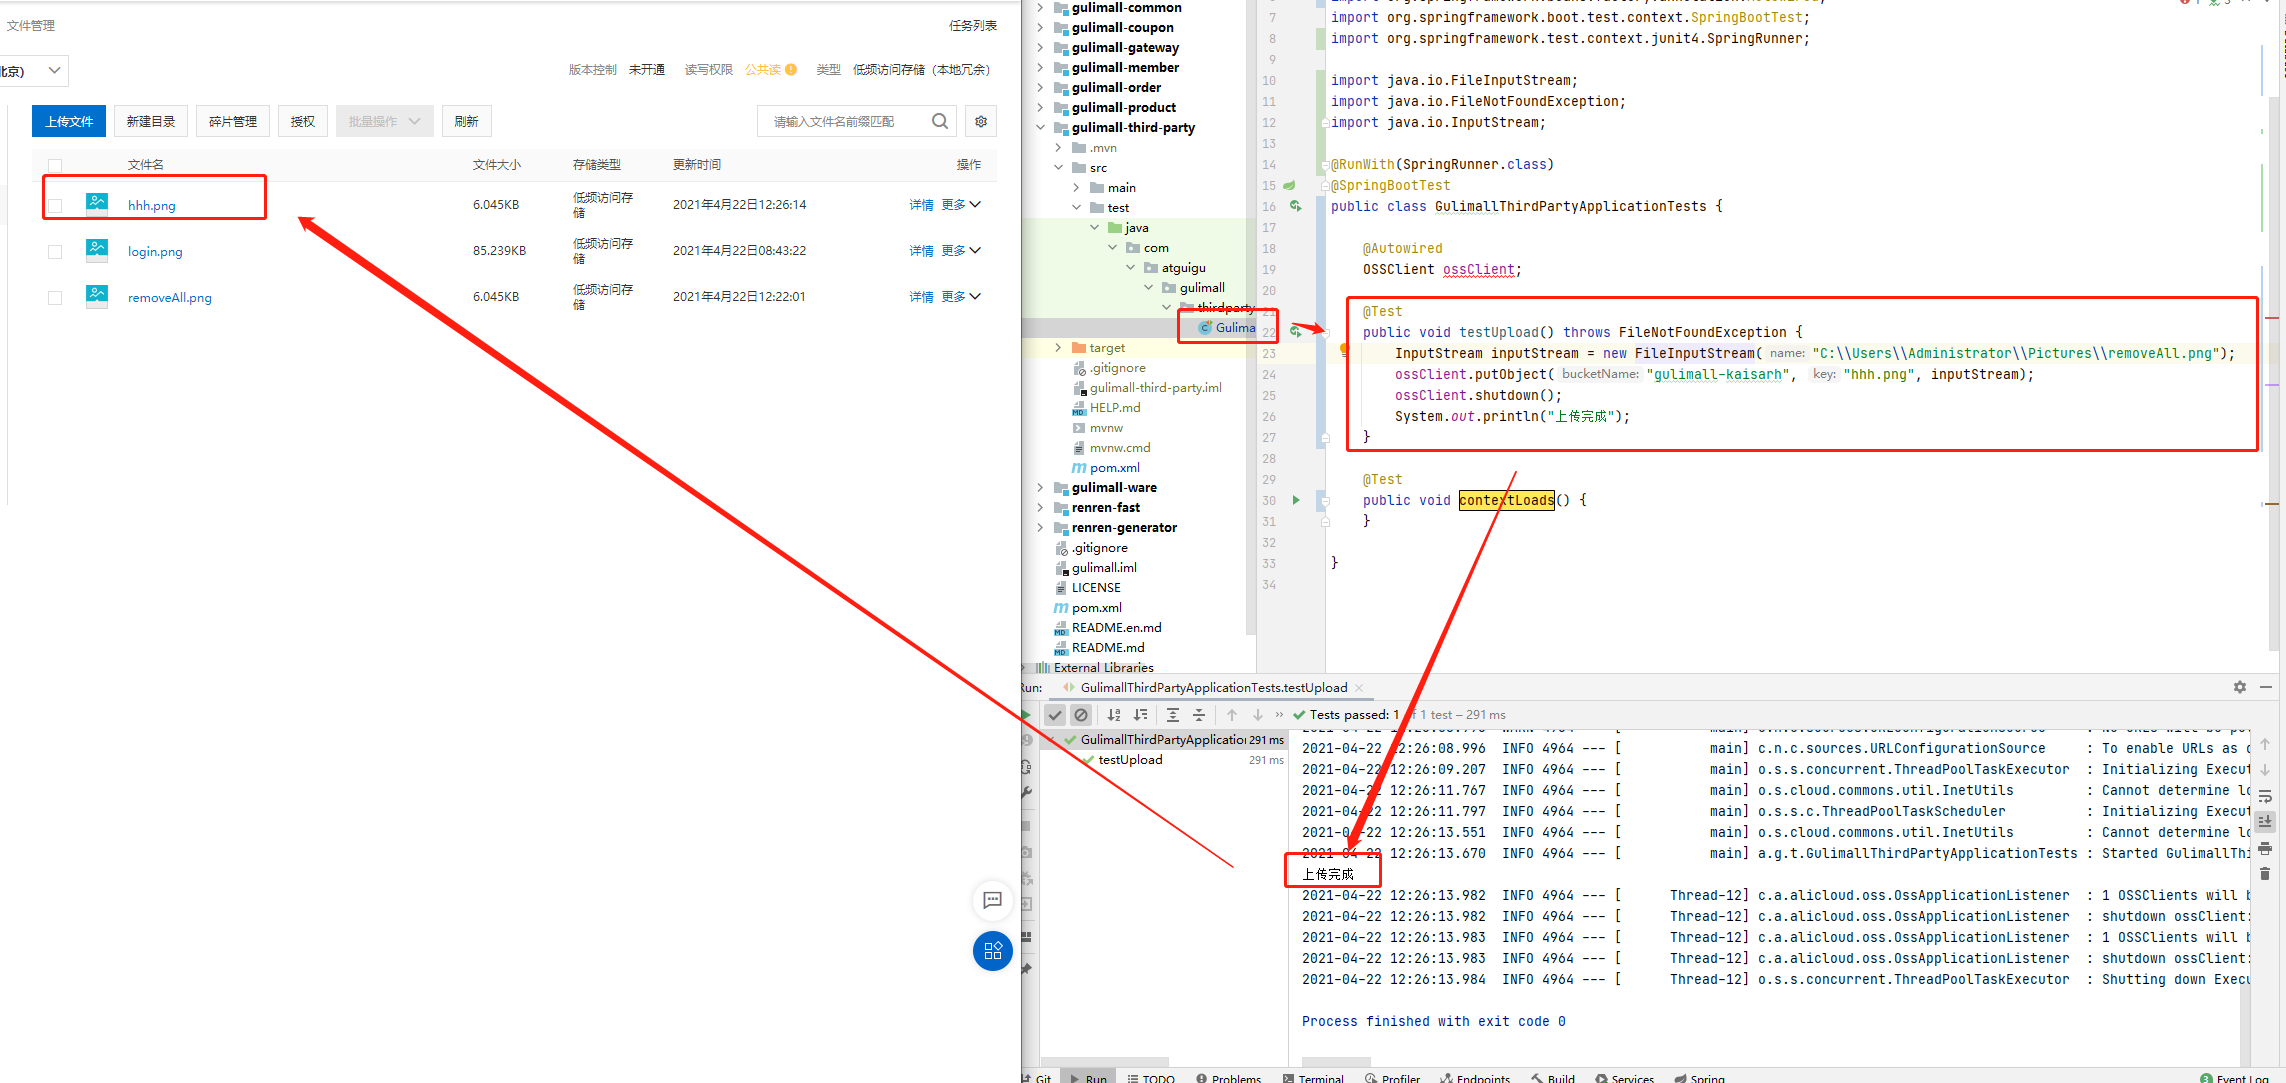
4.4.3 the test is uploaded using OssClient
@Autowired
OSSClient ossClient;

@Test
public void testUpload() throws FileNotFoundException {
    InputStream inputStream = new FileInputStream("C:\\Users\\Administrator\\Pictures\\removeAll.png");
    ossClient.putObject("gulimall-kaisarh", "removeAll.png", inputStream);
    ossClient.shutdown();
    System.out.println("Upload complete");
}
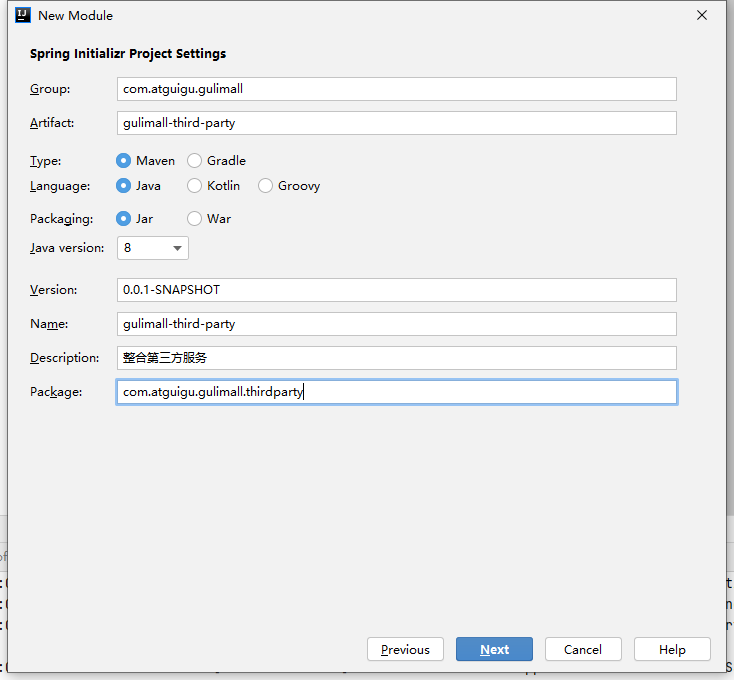
5. Create micro services and integrate third-party functions
5.1. Create a micro service gulimall third party

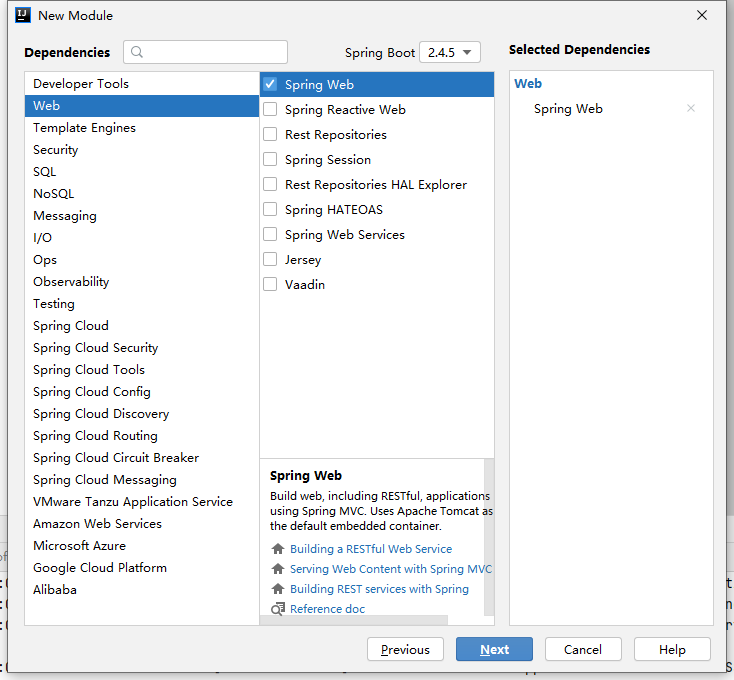
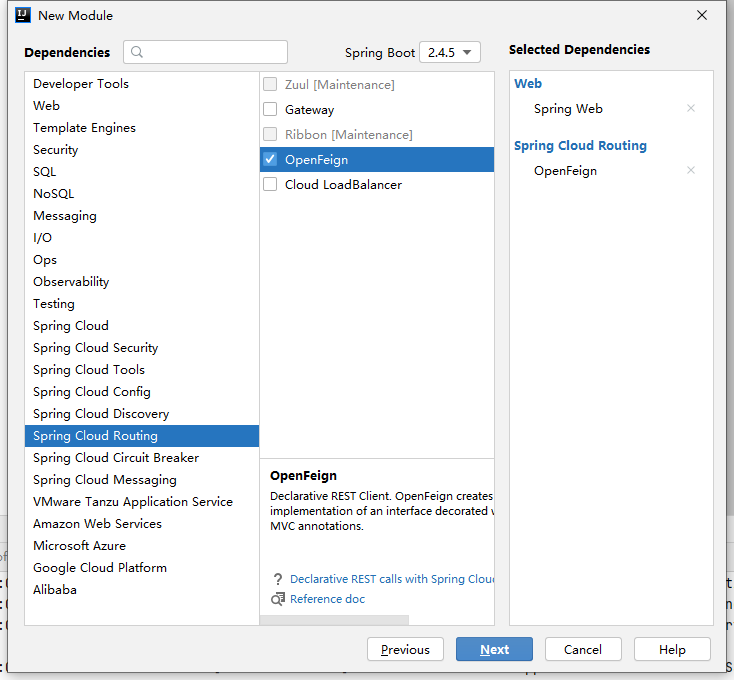
5.2. Modify dependency
<dependency>
    <groupId>com.atguigu.gulimall</groupId>
    <artifactId>gulimall-common</artifactId>
    <version>0.0.1-SNAPSHOT</version>
</dependency>
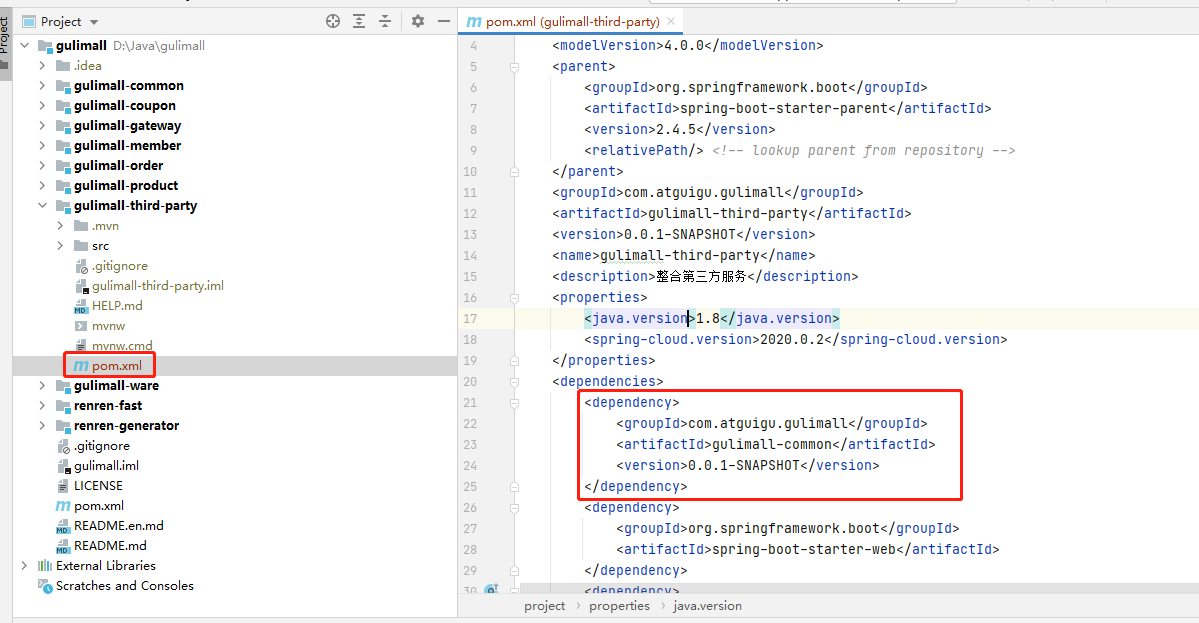
Put the object storage dependency into the GUI mall third party
5.3. Add gulimall third party to nacos
5.3.1. New namespace
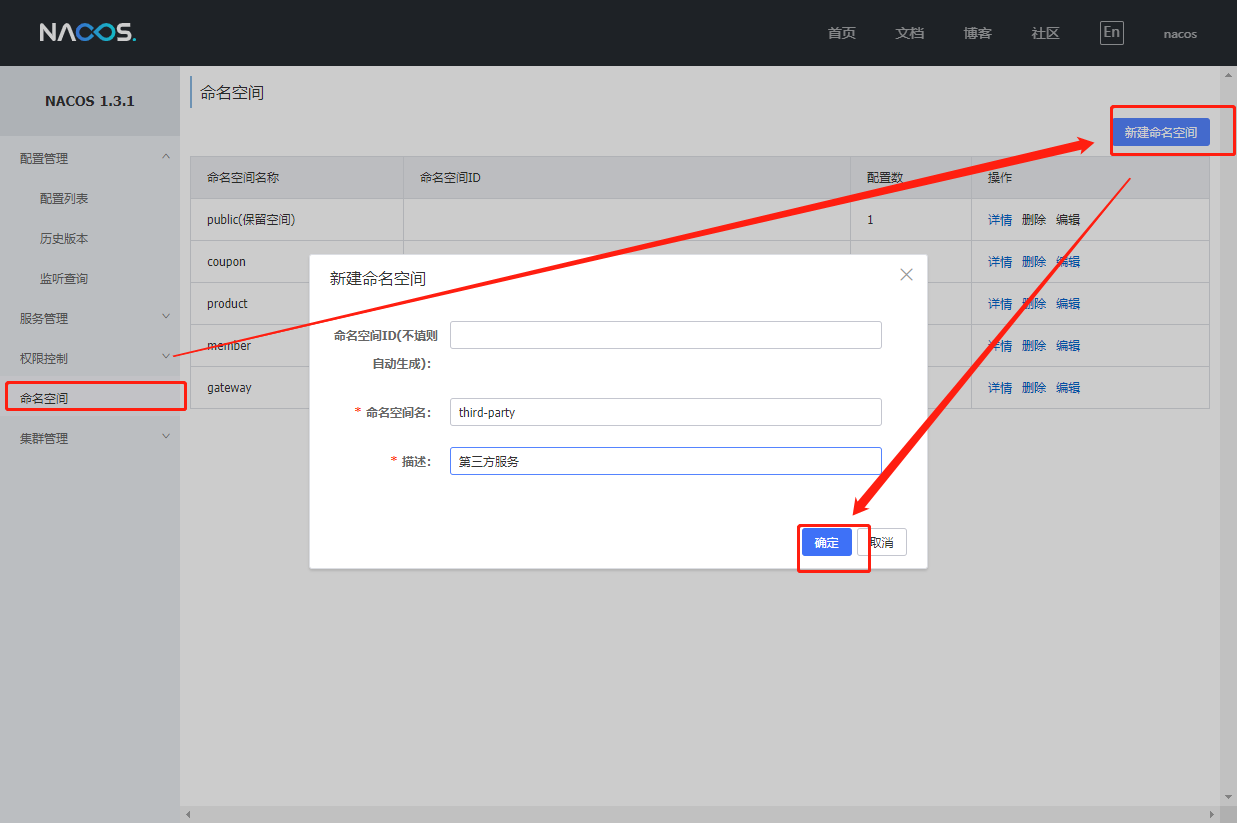
Create and configure OSS yml
Perfect configuration

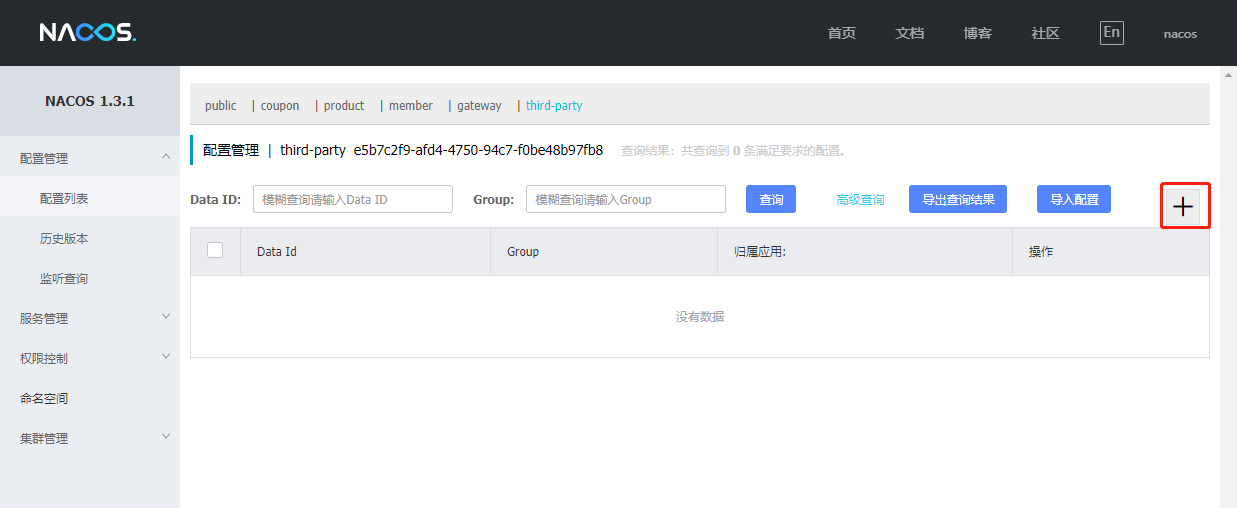
5.3.2. Configure the gulimall third party configuration center
spring.application.name=gulimall-third-party
spring.cloud.nacos.config.server-addr=127.0.0.1:8848
spring.cloud.nacos.config.namespace=e5b7c2f9-afd4-4750-94c7-f0be48b97fb8
spring.cloud.nacos.config.ext-config[0].data-id=oss.yml
spring.cloud.nacos.config.ext-config[0].group=DEFAULT_GROUP
spring.cloud.nacos.config.ext-config[0].refresh=true

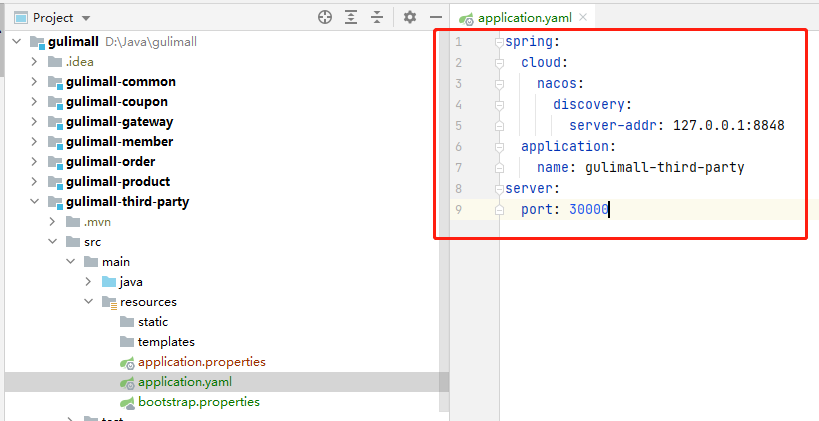
5.3.3. Configure the gulimall third party registry
spring:
  cloud:
    nacos:
      discovery:
        server-addr: 127.0.0.1:8848
  application:
    name: gulimall-third-party
server:
  port: 30000
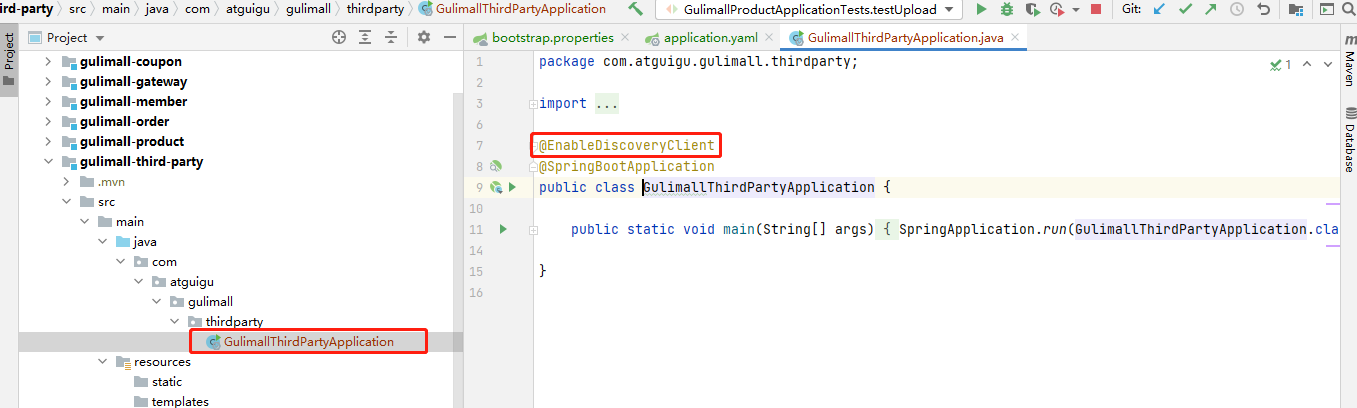
Open service registration discovery
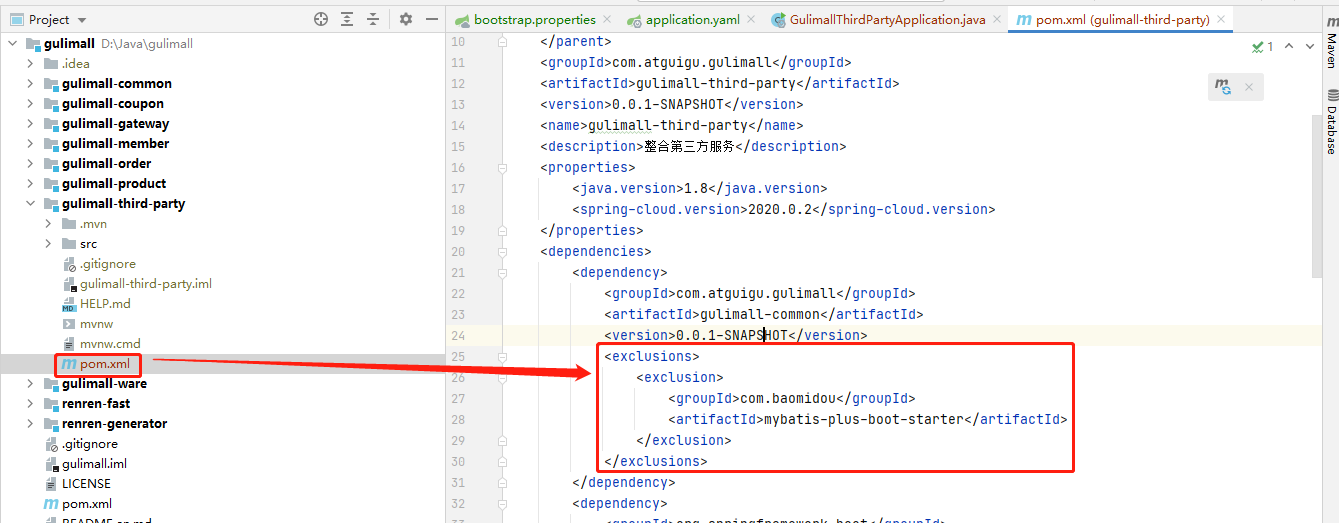
Remove data source mybatis dependency
<exclusions>
    <exclusion>
        <groupId>com.baomidou</groupId>
        <artifactId>mybatis-plus-boot-starter</artifactId>
    </exclusion>
</exclusions>
5.4. Start project
After starting the project, you can query in the service list of Nacos
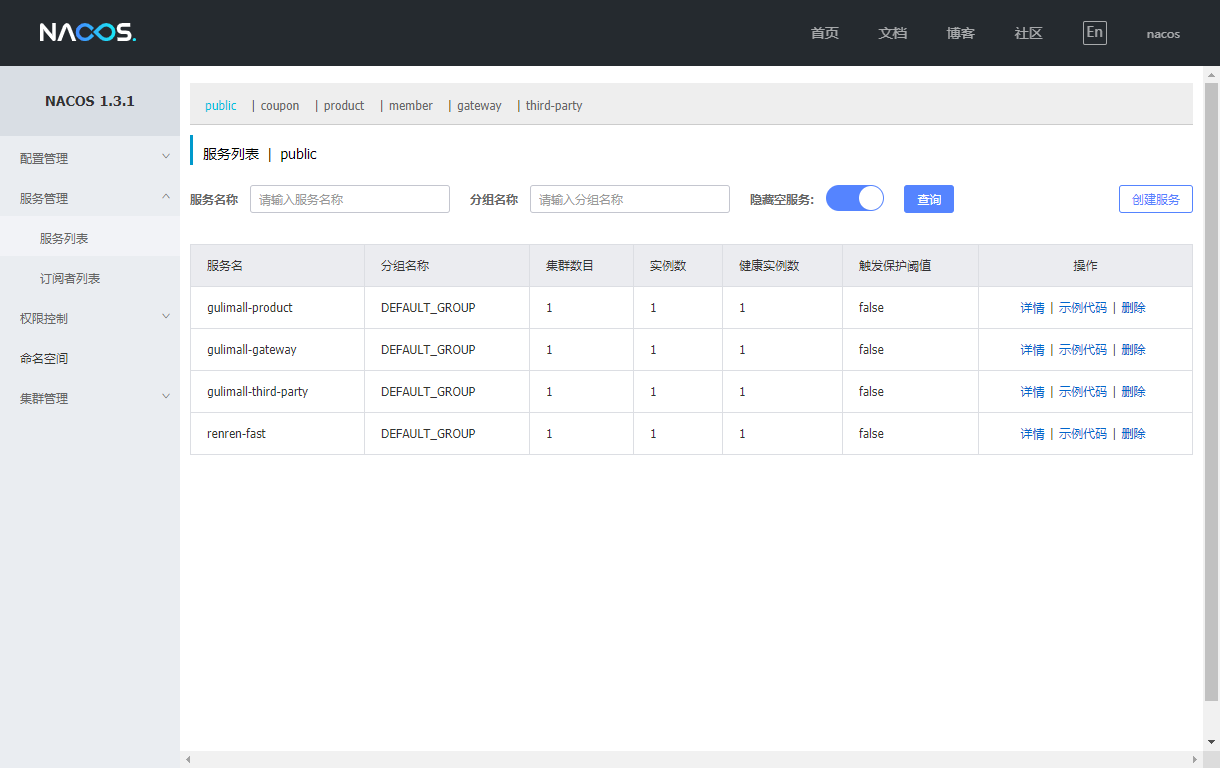
Test upload passed
6. Direct transmission after the server signs
6.1. file
The server directly transmits the document after signing
6.2. Process introduction
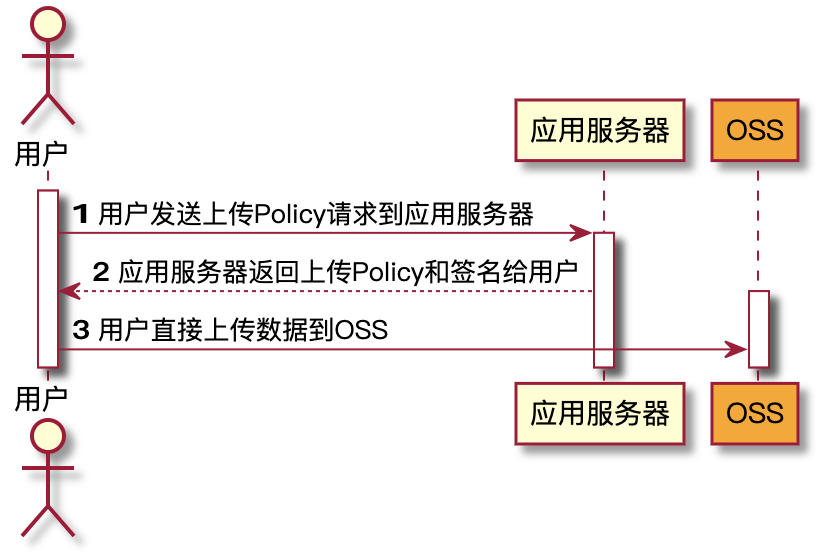
The Web side requests a signature from the server and then uploads it directly, which will not put pressure on the server and is safe and reliable.
6.3. code
-
Create a controller in the GUI mall third part micro service and add the @ RestController annotation
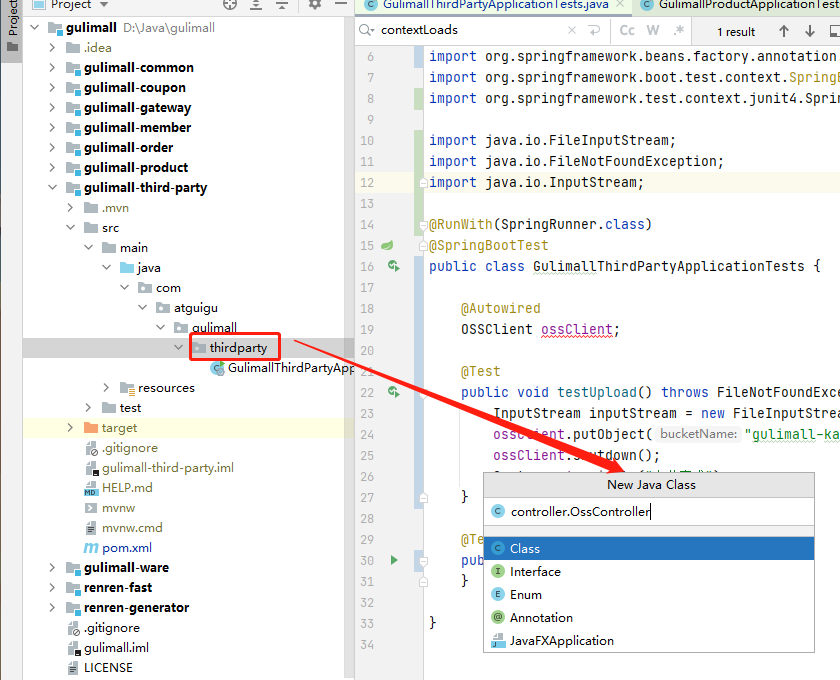
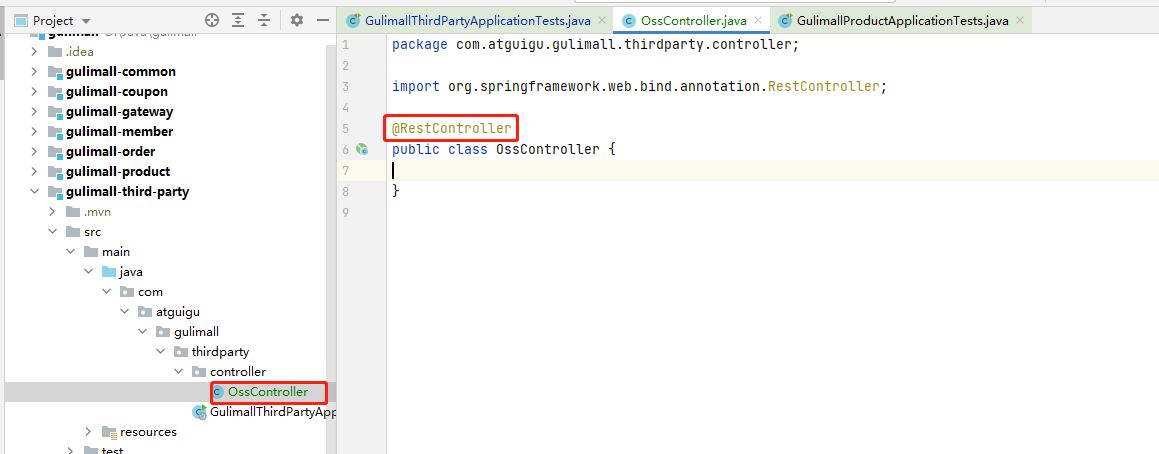
-
Write get signature interface
package com.atguigu.gulimall.thirdparty.controller; import com.aliyun.oss.OSS; import com.aliyun.oss.common.utils.BinaryUtil; import com.aliyun.oss.model.MatchMode; import com.aliyun.oss.model.PolicyConditions; import org.springframework.beans.factory.annotation.Autowired; import org.springframework.beans.factory.annotation.Value; import org.springframework.web.bind.annotation.RequestMapping; import org.springframework.web.bind.annotation.RestController; import java.nio.charset.StandardCharsets; import java.text.SimpleDateFormat; import java.util.Date; import java.util.LinkedHashMap; import java.util.Map; @RestController public class OssController { @Autowired OSS ossClient; @Value("${spring.cloud.alicloud.oss.endpoint}") private String endpoint; @Value("${spring.cloud.alicloud.oss.bucket}") private String bucket; @Value("${spring.cloud.alicloud.access-key}") private String accessId; @RequestMapping("/oss/policy") public Map<String, String> policy() { String host = "https://" + bucket + ". "+ endpoint; / / the format of host is bucketname.endpoint // callbackUrl is the URL of the upload callback server. Please configure the following IP and Port as your own real information. // String callbackUrl = "http://88.88.88.88:8888"; String format = new SimpleDateFormat("yyyy-MM-dd").format(new Date()); String dir = format + "/"; // Prefix specified when the user uploads the file. Map<String, String> respMap = null; try { long expireTime = 30; long expireEndTime = System.currentTimeMillis() + expireTime * 1000; Date expiration = new Date(expireEndTime); // The maximum supported file size requested by PostObject is 5 GB, i.e. CONTENT_LENGTH_RANGE is 5 * 1024 * 1024 * 1024. PolicyConditions policyConds = new PolicyConditions(); policyConds.addConditionItem(PolicyConditions.COND_CONTENT_LENGTH_RANGE, 0, 1048576000); policyConds.addConditionItem(MatchMode.StartWith, PolicyConditions.COND_KEY, dir); String postPolicy = ossClient.generatePostPolicy(expiration, policyConds); byte[] binaryData = postPolicy.getBytes(StandardCharsets.UTF_8); String encodedPolicy = BinaryUtil.toBase64String(binaryData); String postSignature = ossClient.calculatePostSignature(postPolicy); respMap = new LinkedHashMap<String, String>(); respMap.put("accessid", accessId); respMap.put("policy", encodedPolicy); respMap.put("signature", postSignature); respMap.put("dir", dir); respMap.put("host", host); respMap.put("expire", String.valueOf(expireEndTime / 1000)); // respMap.put("expire", formatISO8601Date(expiration)); } catch (Exception e) { // Assert.fail(e.getMessage()); System.out.println(e.getMessage()); } finally { ossClient.shutdown(); } return respMap; } } -
Start test Test interface
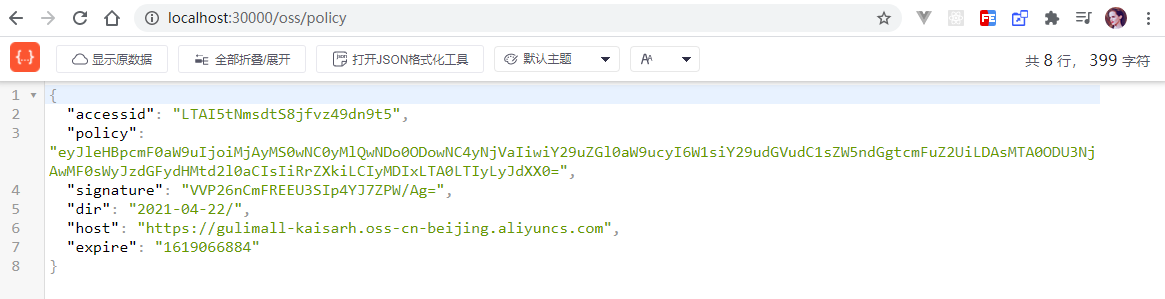
- expire: expiration time
- dir: upload file name
- host: upload file address
- policy: Signature
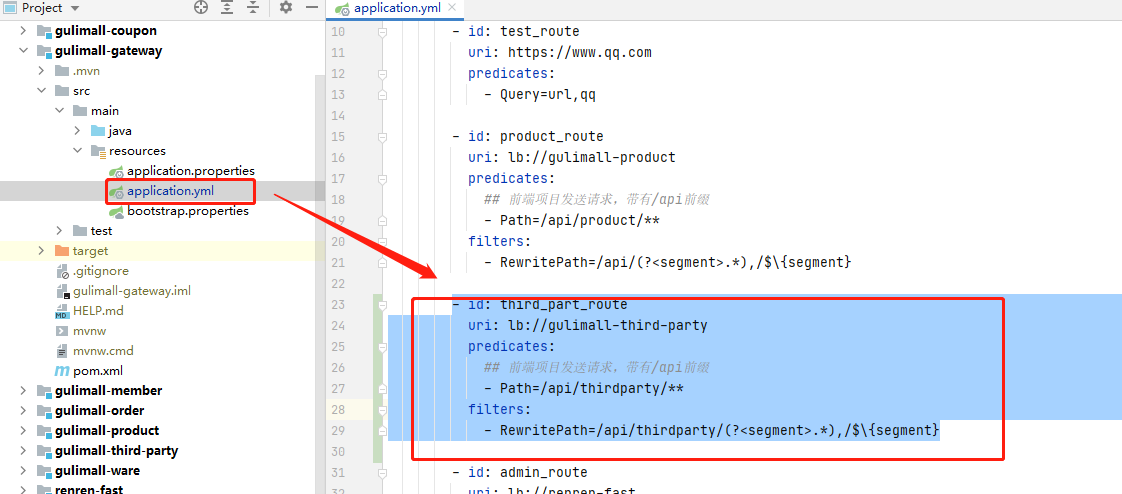
6.4. configure gateway
- id: third_part_route
  uri: lb://gulimall-third-party
  predicates:
    ## Front end project sends request with / api prefix
    - Path=/api/thirdparty/**
  filters:
    - RewritePath=/api/thirdparty/(?<segment>.*),/$\{segment}
Test: Test interface

7. OOS front and rear end joint debugging and uploading function
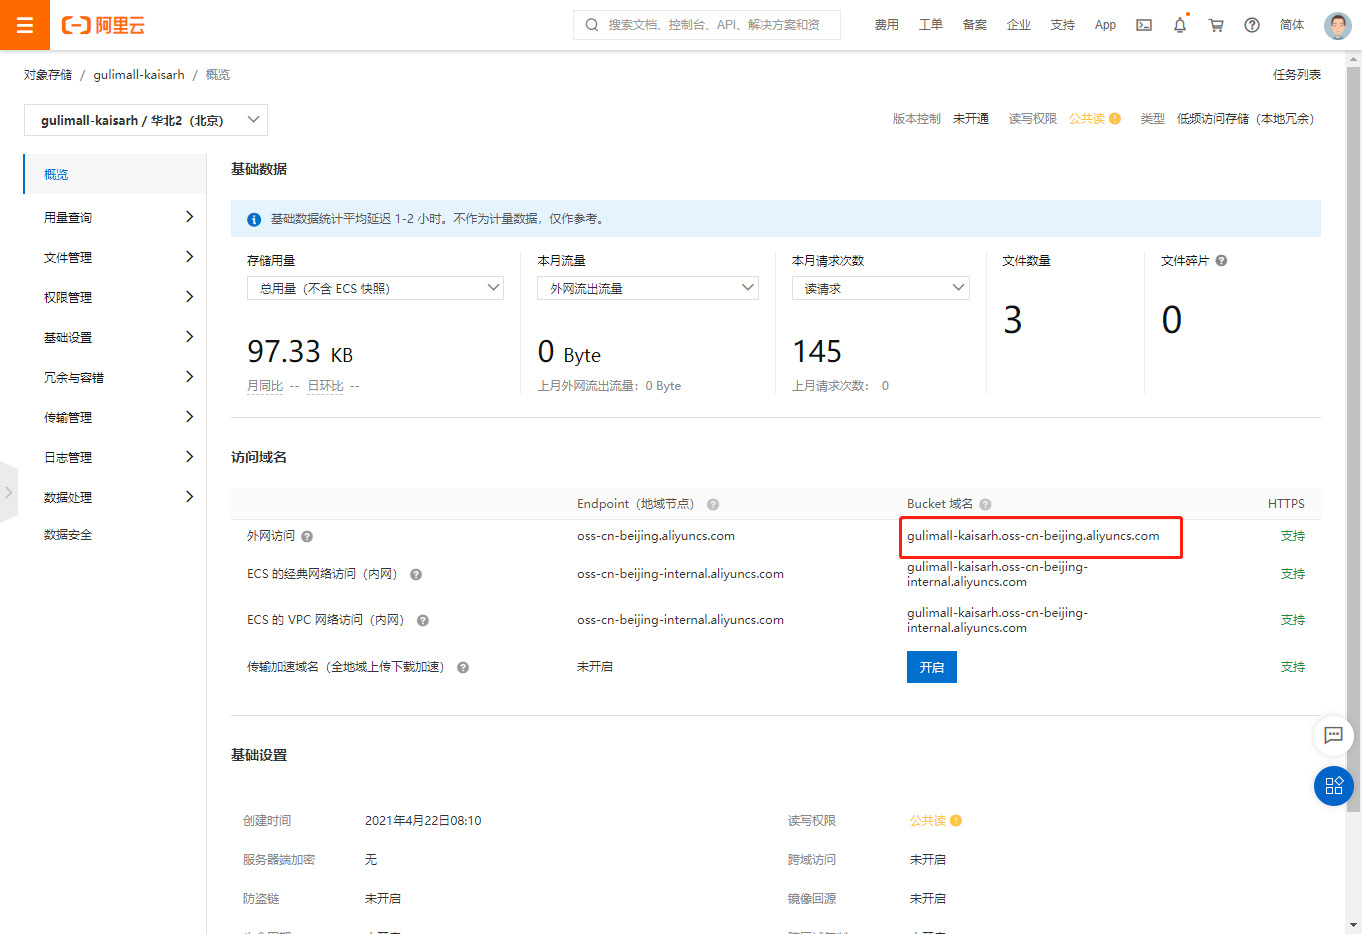
-
The action attribute of the file upload component El upload corresponds to the Bucket domain name
-
Update the back-end interface and return the R object
 R policy() {
    ···
    return R.ok().put("data", respMap);
}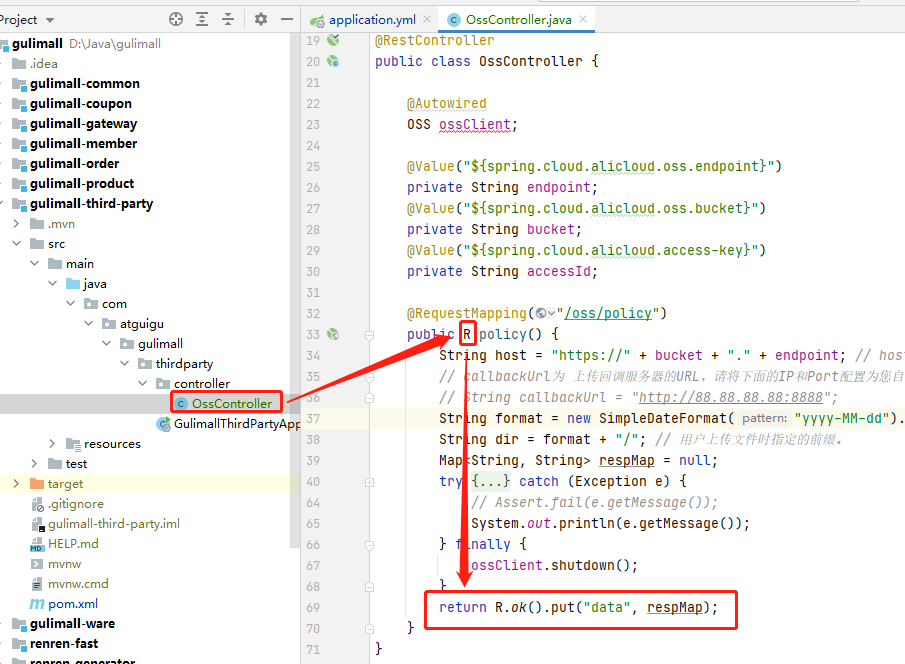
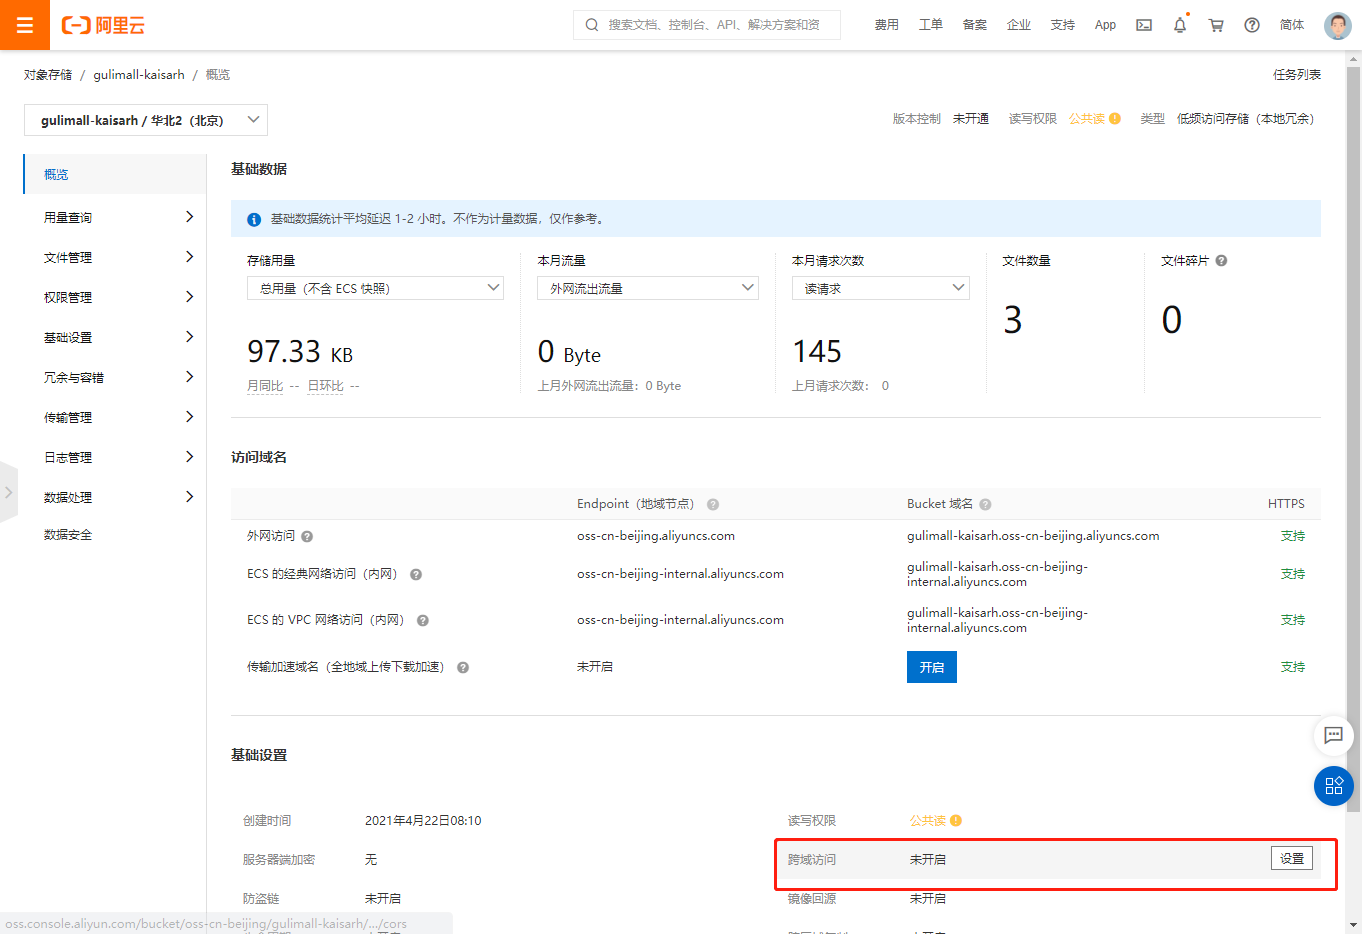
-
Configure OSS cross domain

-
multiUpload.vue
<template> <div> <el-upload action="http://gulimall-kaisarh.oss-cn-beijing.aliyuncs.com" :data="dataObj" :list-type="listType" :file-list="fileList" :before-upload="beforeUpload" :on-remove="handleRemove" :on-success="handleUploadSuccess" :on-preview="handlePreview" :limit="maxCount" :on-exceed="handleExceed" :show-file-list="showFile" > <i class="el-icon-plus"></i> </el-upload> <el-dialog :visible.sync="dialogVisible"> <img width="100%" :src="dialogImageUrl" alt /> </el-dialog> </div> </template> <script> import { policy } from "./policy"; import { getUUID } from "@/utils"; export default { name: "multiUpload", props: { //Image attribute array value: Array, //Maximum number of uploaded pictures maxCount: { type: Number, default: 30, }, listType: { type: String, default: "picture-card", }, showFile: { type: Boolean, default: true, }, }, data() { return { dataObj: { policy: "", signature: "", key: "", ossaccessKeyId: "", dir: "", host: "", uuid: "", }, dialogVisible: false, dialogImageUrl: null, }; }, computed: { fileList() { let fileList = []; for (let i = 0; i < this.value.length; i++) { fileList.push({ url: this.value[i] }); } return fileList; }, }, mounted() {}, methods: { emitInput(fileList) { let value = []; for (let i = 0; i < fileList.length; i++) { value.push(fileList[i].url); } this.$emit("input", value); }, handleRemove(file, fileList) { this.emitInput(fileList); }, handlePreview(file) { this.dialogVisible = true; this.dialogImageUrl = file.url; }, beforeUpload(file) { let _self = this; return new Promise((resolve, reject) => { policy() .then((response) => { console.log("what is it? ${filename}"); _self.dataObj.policy = response.data.policy; _self.dataObj.signature = response.data.signature; _self.dataObj.ossaccessKeyId = response.data.accessid; _self.dataObj.key = response.data.dir + getUUID() + "_${filename}"; _self.dataObj.dir = response.data.dir; _self.dataObj.host = response.data.host; resolve(true); }) .catch((err) => { console.log("Error ...", err); reject(false); }); }); }, handleUploadSuccess(res, file) { this.fileList.push({ name: file.name, // url: this.dataObj.host + "/" + this.dataObj.dir + "/" + file.name; Replace ${filename} with the real file name url: this.dataObj.host + "/" + this.dataObj.key.replace("${filename}", file.name), }); this.emitInput(this.fileList); }, handleExceed(files, fileList) { this.$message({ message: "You can only upload at most" + this.maxCount + "Picture", type: "warning", duration: 1000, }); }, }, }; </script> <style> </style> -
policy.js
import http from '@/utils/httpRequest.js' export function policy() { return new Promise((resolve, reject) => { http({ url: http.adornUrl("/thirdparty/oss/policy"), method: "get", params: http.adornParams({}) }).then(({ data }) => { resolve(data); }) }); } -
singleUpload.vue
<template> <div> <el-upload action="http://gulimall-kaisarh.oss-cn-beijing.aliyuncs.com" :data="dataObj" list-type="picture" :multiple="false" :show-file-list="showFileList" :file-list="fileList" :before-upload="beforeUpload" :on-remove="handleRemove" :on-success="handleUploadSuccess" :on-preview="handlePreview" > <el-button size="small" type="primary">Click upload</el-button> <div slot="tip" class="el-upload__tip"> Upload only jpg/png Documents, and no more than 10 MB </div> </el-upload> <el-dialog :visible.sync="dialogVisible"> <img width="100%" :src="fileList[0].url" alt="" /> </el-dialog> </div> </template> <script> import { policy } from "./policy"; import { getUUID } from "@/utils"; export default { name: "singleUpload", props: { value: String, }, computed: { imageUrl() { return this.value; }, imageName() { if (this.value != null && this.value !== "") { return this.value.substr(this.value.lastIndexOf("/") + 1); } else { return null; } }, fileList() { return [ { name: this.imageName, url: this.imageUrl, }, ]; }, showFileList: { get: function () { return ( this.value !== null && this.value !== "" && this.value !== undefined ); }, set: function (newValue) {}, }, }, data() { return { dataObj: { policy: "", signature: "", key: "", ossaccessKeyId: "", dir: "", host: "", // callback:'', }, dialogVisible: false, }; }, methods: { emitInput(val) { this.$emit("input", val); }, handleRemove(file, fileList) { this.emitInput(""); }, handlePreview(file) { this.dialogVisible = true; }, beforeUpload(file) { let _self = this; return new Promise((resolve, reject) => { policy() .then((response) => { console.log("Response data", response); _self.dataObj.policy = response.data.policy; _self.dataObj.signature = response.data.signature; _self.dataObj.ossaccessKeyId = response.data.accessid; _self.dataObj.key = response.data.dir + getUUID() + "_${filename}"; _self.dataObj.dir = response.data.dir; _self.dataObj.host = response.data.host; console.log("Response data 222...", _self.dataObj); resolve(true); }) .catch((err) => { reject(false); }); }); }, handleUploadSuccess(res, file) { console.log("Upload successful..."); this.showFileList = true; this.fileList.pop(); this.fileList.push({ name: file.name, url: this.dataObj.host + "/" + this.dataObj.key.replace("${filename}", file.name), }); this.emitInput(this.fileList[0].url); }, }, }; </script> <style> </style> -
brand-add-or-update.vue
<template>
	···
    <el-form-item label="brand logo address" prop="logo">
        <single-upload v-model="dataForm.logo"></single-upload>
    </el-form-item>
	···
</template>

<script>
import singleUpload from "../../../components/upload/singleUpload.vue";
export default {
  components: { singleUpload },
  ···
};
</script>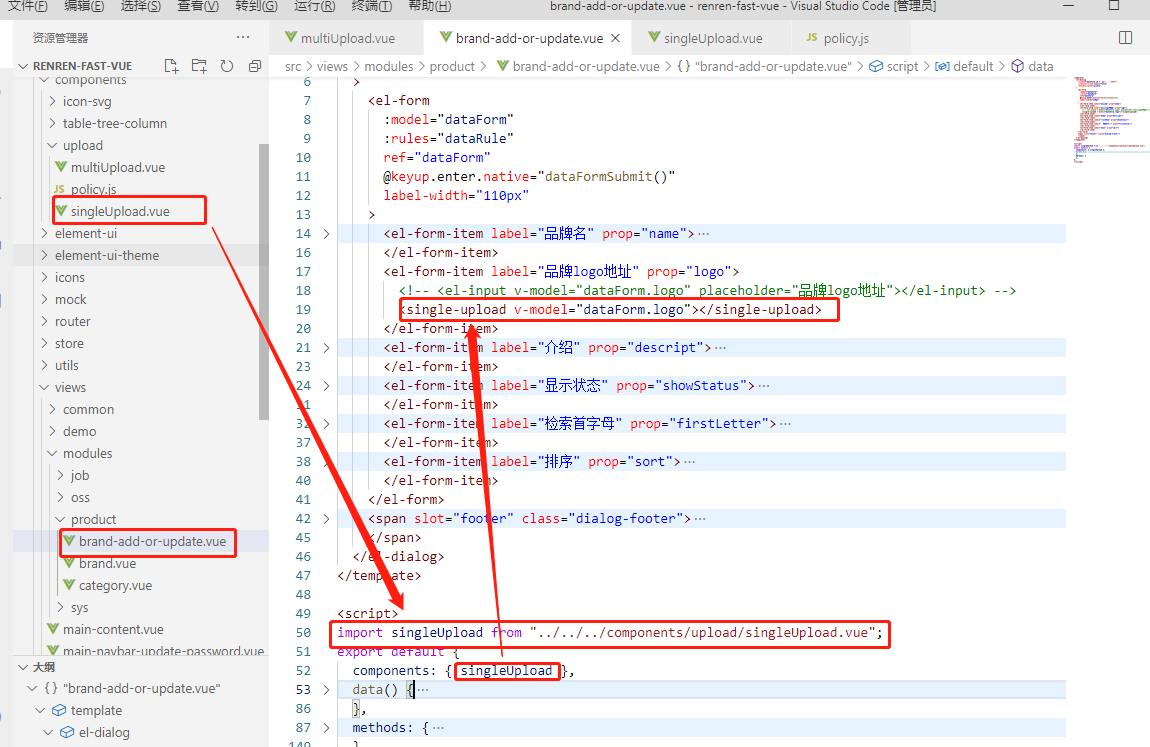
8. Perfect brand management function
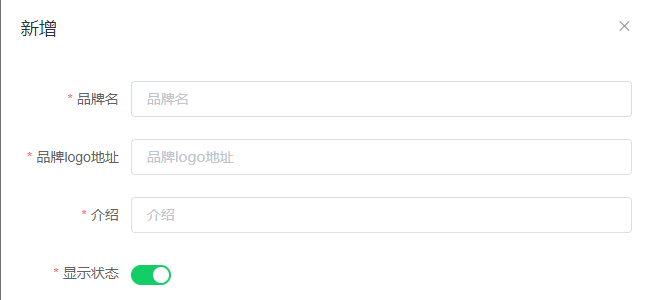
8.1. New brand interface
-
Set the switch display status switch, active as 0 and inactive as 1
<el-form-item label="Display status" prop="showStatus"> <el-switch v-model="dataForm.showStatus" active-color="#13ce66" inactive-color="#ff4949" :active-value="1" :inactive-value="0" > </el-switch> </el-form-item> -
Check when adding data
dataRule: {
  ···
  firstLetter: [
    {
      validator: (rule, value, callback) => {
        if (value === "") {
          callback(new Error("Initials must be filled in!"));
        } else if (!^[a-zA-Z]$.test(value)) {
          callback(new Error("Initial must be a-z or A-Z!"));
        } else {
          callback();
        }
      },
      trigger: "blur",
    },
  ],
  sort: [
    {
      validator: (rule, value, callback) => {
        console.log(value);
        console.log(typeof value);
        if (value === "") {
          callback(new Error("Sorting field must be filled in!"));
        } else if (!Number.isInteger(value) || value < 0) {
          callback(new Error("Sort field must be an integer greater than or equal to 0"));
        } else {
          callback();
        }
      },
      trigger: "blur",
    },
  ],
},
8.2. Brand list interface
-
Set brand logo as picture
<template>
	···
      <el-table-column
        prop="logo"
        header-align="center"
        align="center"
        label="brand logo"
      >
        <template slot-scope="scope">
          <img
            :src="scope.row.logo"
            alt="logo"
            style="width: 100px; height: 80px"
          />
        </template>
      </el-table-column>
 	···
</template>
9. JSR303 server data verification
-
Add verification annotation to Bean
For annotations, refer to javax\validation\constraints

-
Use the annotation @ Valid to tell spring MVC to verify and enable the verification function

-
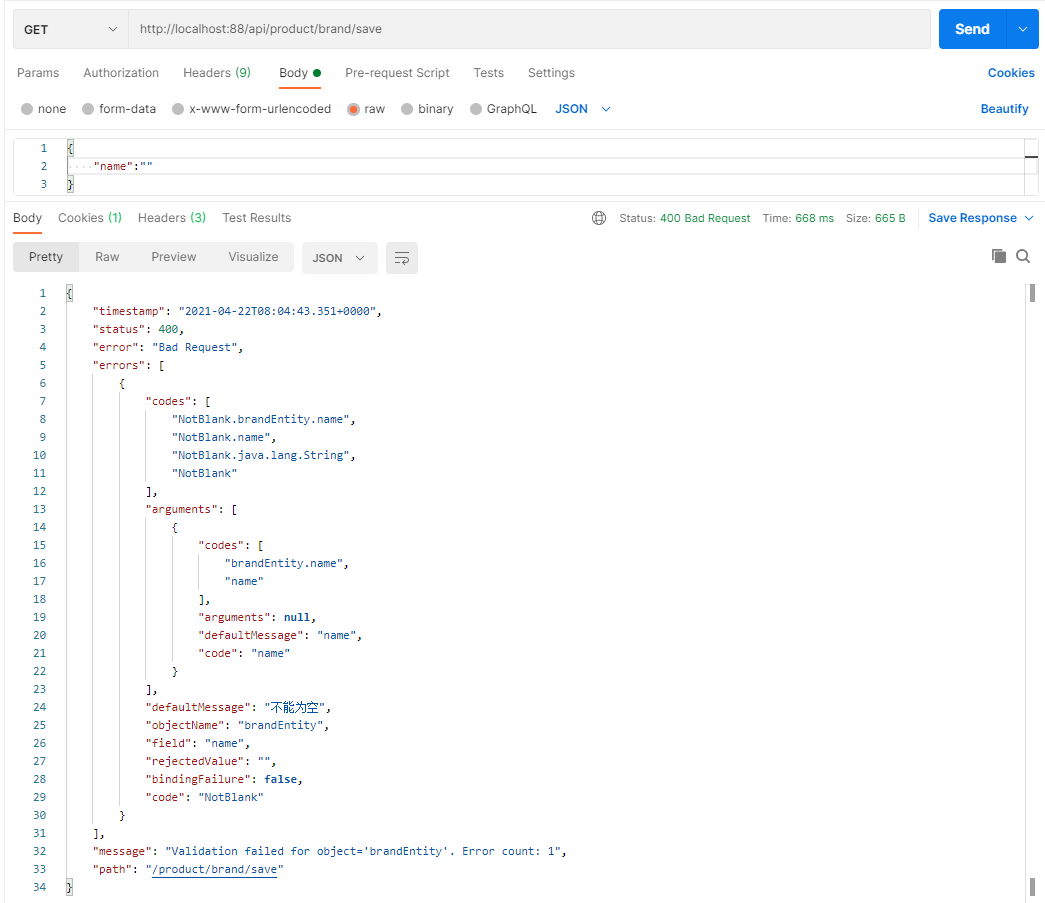
Postman test
Effect: there will be a default response after verification error
-
Error messages can be customized through annotations
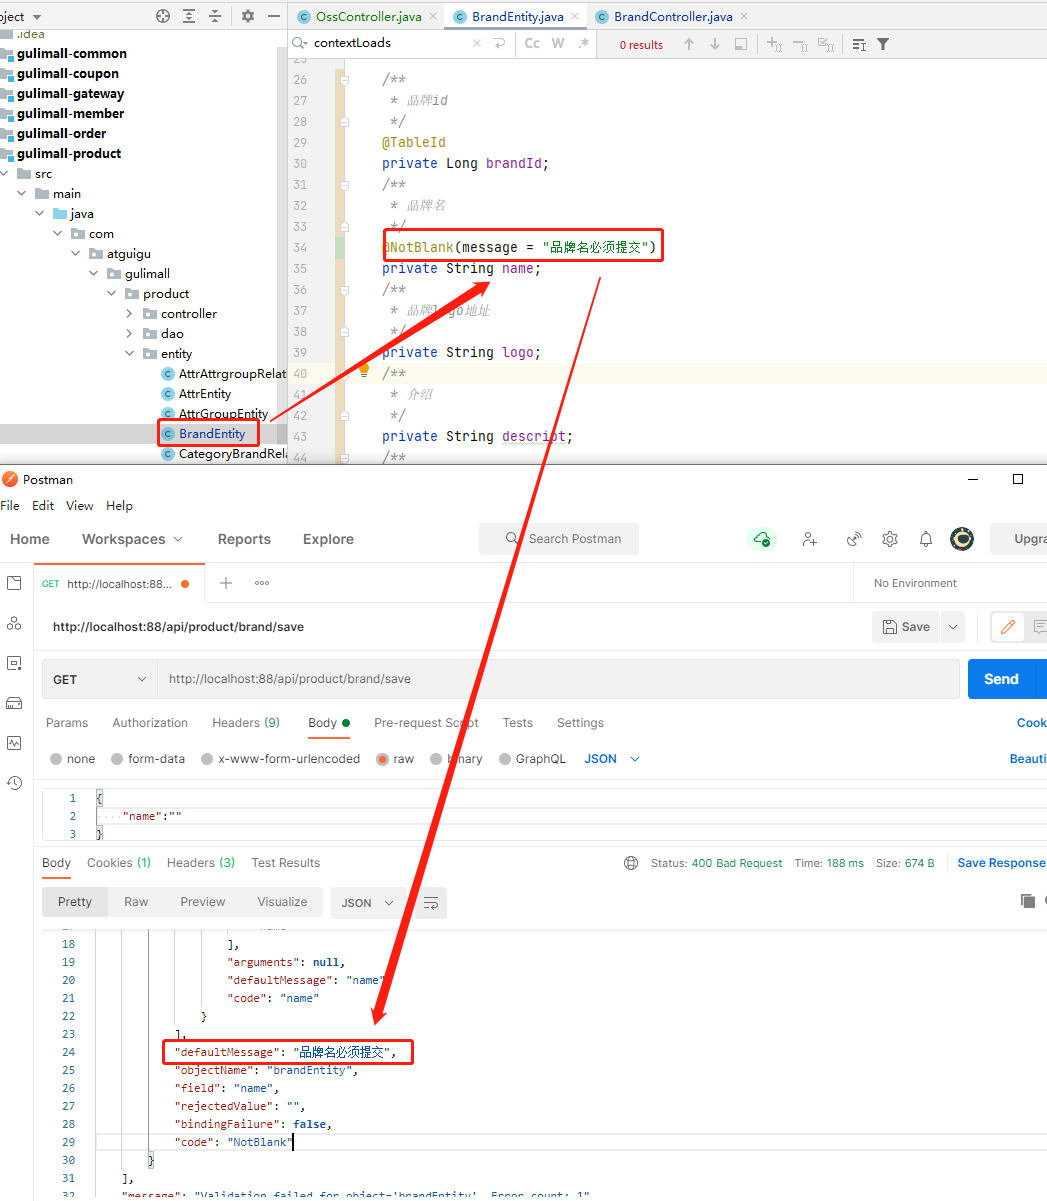
-
You can get the verification result by immediately following a BindingResult to the verified bean, and you can customize the error return information
/**
 * preservation
 */
@RequestMapping("/save")
public R save(@Valid @RequestBody BrandEntity brand, BindingResult result) {
    if (result.hasErrors()) {
        Map<String, String> map = new HashMap<>();
        // 1. Get the error result of verification
        result.getFieldErrors().forEach(item -> {
            // FieldError get error prompt
            String defaultMessage = item.getDefaultMessage();
            // Get error property name
            String field = item.getField();
            map.put(field, defaultMessage);
        });
        return R.error(400, "The submitted data is illegal").put("data", map);
    } else {
        brandService.save(brand);
        return R.ok();
    }
}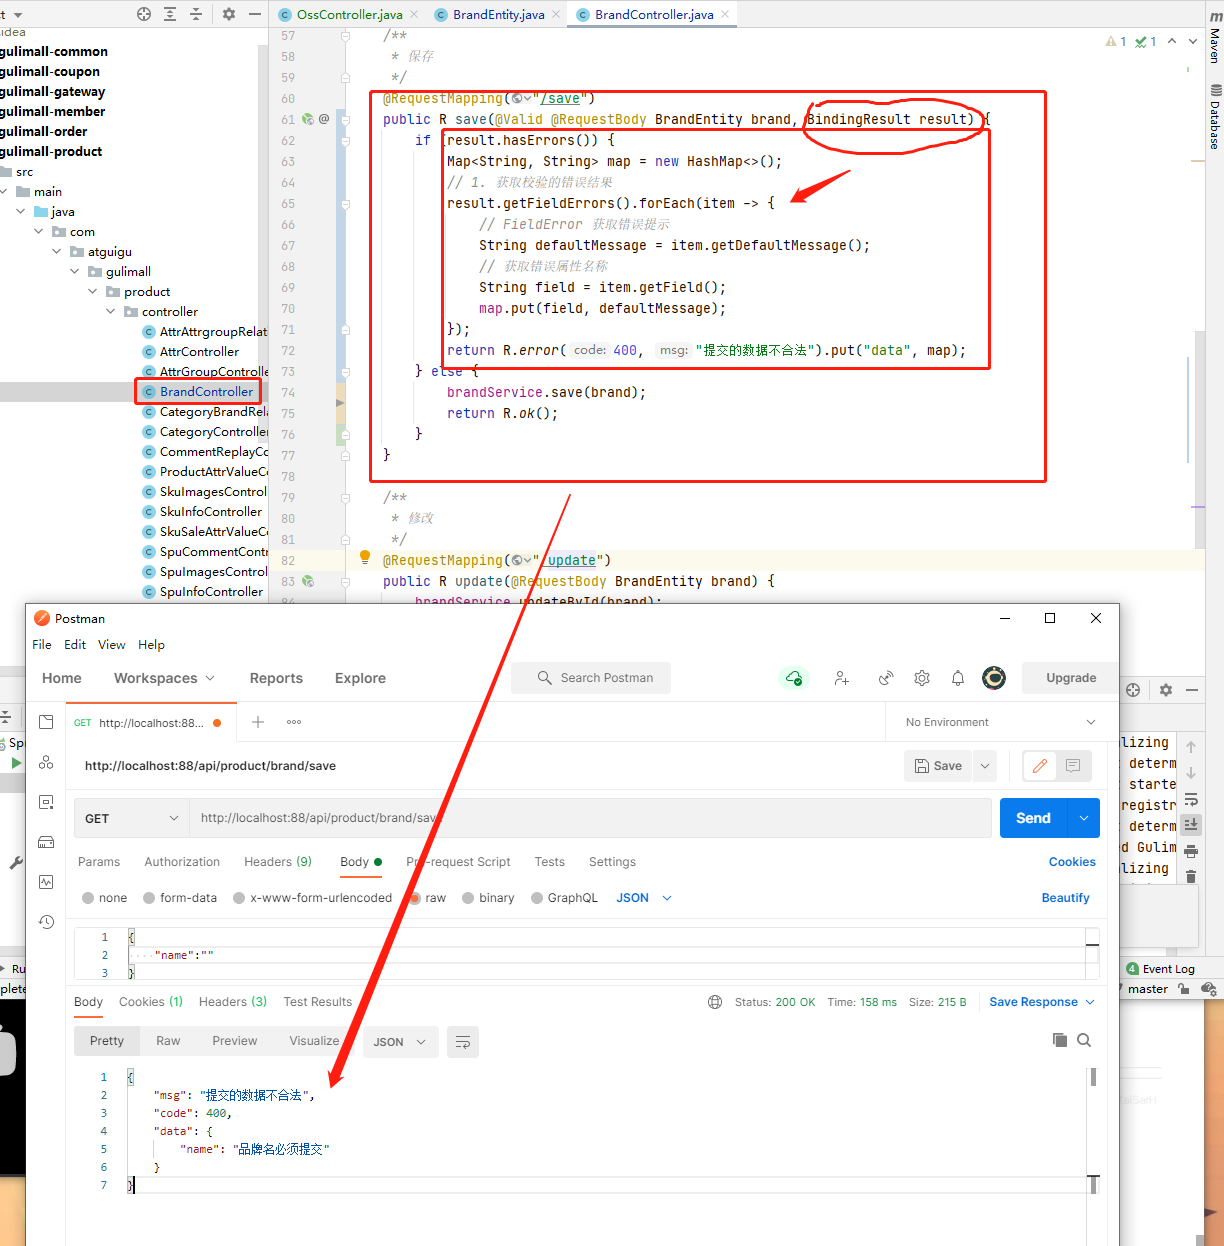
-
Add verification comments to other fields
package com.atguigu.gulimall.product.entity;

import com.baomidou.mybatisplus.annotation.TableId;
import com.baomidou.mybatisplus.annotation.TableName;

import java.io.Serializable;
import java.util.Date;

import lombok.Data;
import org.hibernate.validator.constraints.URL;

import javax.validation.constraints.*;

/**
 * brand
 *
 * @author KaiSarH
 * @email huankai7@163.com
 * @date 2021-04-15 16:20:25
 */
@Data
@TableName("pms_brand")
public class BrandEntity implements Serializable {
    private static final long serialVersionUID = 1L;

    /**
     * Brand id
     */
    @TableId
    private Long brandId;
    /**
     * Brand name
     */
    @NotBlank(message = "Brand name must be submitted")
    private String name;
    /**
     * Brand logo address
     */
    @URL(message = "logo Must be a legal url address")
    @NotEmpty
    private String logo;
    /**
     * introduce
     */
    private String descript;
    /**
     * Display status [0-not displayed; 1-displayed]
     */
    private Integer showStatus;
    /**
     * Retrieve initials
     */
    @Pattern(regexp = "^[a-zA-Z]$", message = "The search initial must be a letter")
    private String firstLetter;
    /**
     * sort
     */
    @Min(value = 0, message = "Sort must be greater than or equal to 0")
    private Integer sort;
}
10. Unified exception handling
Many businesses need data validation. Most of the codes are repetitive, and unified exception handling can be done
Use @ ControllerAdvice provided by spring MVC
Use steps:
-
Extract exception handling class
Use @ ControllerAdvice annotation to identify
Use basePackages to identify where exceptions occur for processing

-
The interface uses BindingResult to receive errors and sense exceptions.
After deletion, the exception is no longer handled, but thrown directly.
The function of gulamallexeptioncontrolleradvice is to sense exceptions and handle them centrally.
-
The error message is returned in JSON format, and the @ ResponseBody annotation needs to be added to the class
@The ResponseBody annotation and the @ ControllerAdvice(basePackages) annotation can be combined into the @ RestControllerAdvice annotation
//@ResponseBody
//@ControllerAdvice(basePackages = "com/atguigu/gulimall/product/controller")
@RestControllerAdvice(basePackages = "com/atguigu/gulimall/product/controller")
-
Handle MethodArgumentNotValidException exceptions uniformly
package com.atguigu.gulimall.product.exception;

import com.atguigu.common.utils.R;
import lombok.extern.slf4j.Slf4j;
import org.springframework.validation.BindingResult;
import org.springframework.web.bind.MethodArgumentNotValidException;
import org.springframework.web.bind.annotation.ControllerAdvice;
import org.springframework.web.bind.annotation.ExceptionHandler;
import org.springframework.web.bind.annotation.ResponseBody;
import org.springframework.web.bind.annotation.RestControllerAdvice;

import java.util.HashMap;
import java.util.Map;

/**
 * Centralized processing of all exceptions
 */
@Slf4j
//@ResponseBody
//@ControllerAdvice(basePackages = "com/atguigu/gulimall/product/controller")
@RestControllerAdvice(basePackages = "com.atguigu.gulimall.product.controller")
public class GulimallExceptionControllerAdvice {
    // Accurately match an exception
    @ExceptionHandler(value = MethodArgumentNotValidException.class)
    public R handleVaildException(MethodArgumentNotValidException e) {
        log.error("There is a problem with data verification:{},Exception type:{}", e.getMessage(), e.getClass());
        BindingResult bindingResult = e.getBindingResult();
        Map<String, String> errorMap = new HashMap<>();
        bindingResult.getFieldErrors().forEach(fieldError -> {
            errorMap.put(fieldError.getField(), fieldError.getDefaultMessage());
        });
        return R.error(400, "There is a problem with data verification").put("data", errorMap);
    }

    // Unable to accurately match post-processing
    @ExceptionHandler(value = Throwable.class)
    public R handleException(Throwable throwable) {
        return R.error();
    }
}
11. Global status code enumeration class
Error code and error message definition class
- The error code definition rule is 5 numbers
- The first two digits represent the business scenario, and the last three digits represent the error code. For example: 100001. 10: General 001: system unknown exception
- After maintaining the error code, you need to maintain the error description and define them as enumeration
Error code list:
-
10: General
001: parameter format verification
-
11: Merchandise
-
12: Order
-
13: Shopping cart
-
14: Logistics
-
The status code is required in many places, so the enumeration class BizCodeEnume is defined in gulimall common
package com.atguigu.common.exception;

/***
 *	Error code and error message definition class
 *	1. The error code definition rule is 5 numbers
 *	2. The first two digits represent the business scenario, and the last three digits represent the error code. For example: 100001. 10: General 001: system unknown exception
 *	3. After maintaining the error code, you need to maintain the error description and define them as enumeration
 *	Error code list:
 *	10: currency
 *	001: Parameter format verification
 *	11:  commodity
 *	12:  order
 *	13: Shopping Cart
 *	14: logistics
 */
public enum BizCodeEnume {
    UNKNOW_EXCEPTION(10000, "System unknown exception"),
    VAILE_EXCEPTION(10001, "Parameter format verification failed");

    private int code;
    private String msg;

    BizCodeEnume(int code, String msg) {
        this.code = code;
        this.msg = msg;
    }

    public int getCode() {
        return code;
    }

    public String getMsg() {
        return msg;
    }
}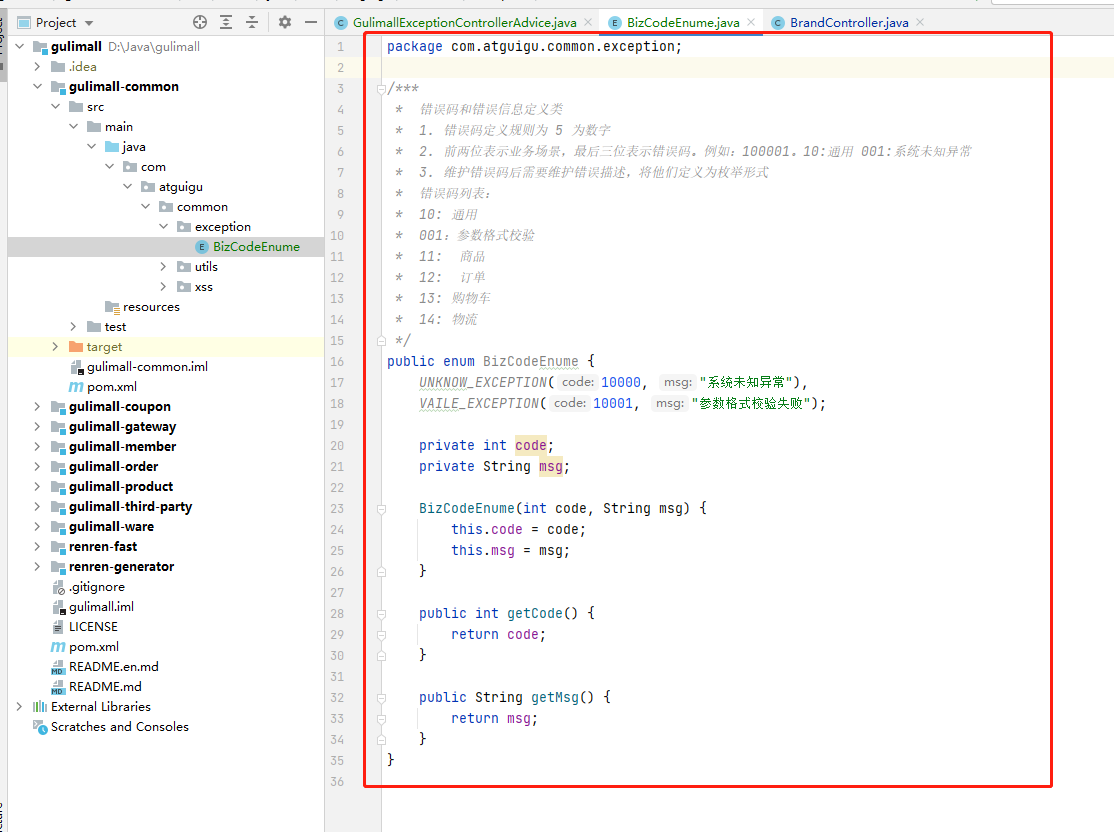
-
After the definition is completed, there is no need to write additional status codes in the interface
Original return status code method:
return R.error(400, "There is a problem with data verification").put("data", errorMap);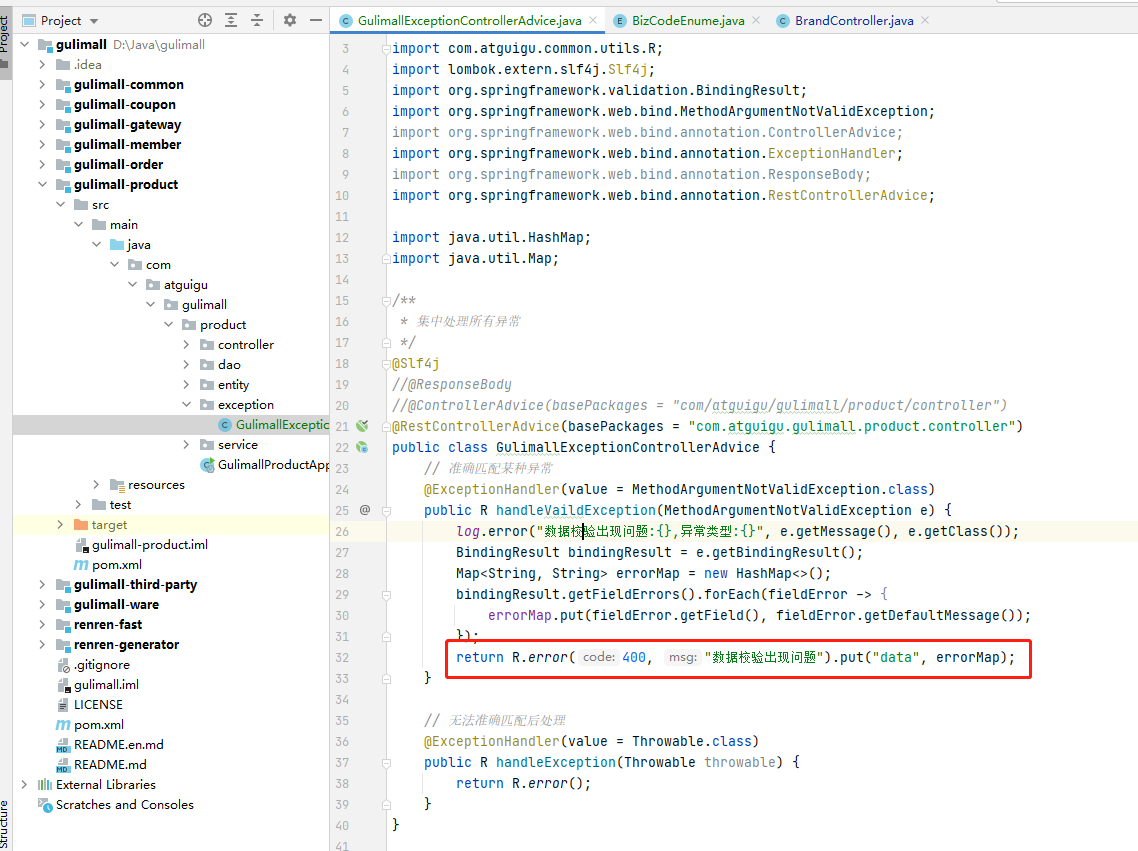
How to return the status code after defining the global status code enumeration class:
return R.error(BizCodeEnume.VAILE_EXCEPTION.getCode(), BizCodeEnume.VAILE_EXCEPTION.getMsg()).put("data", errorMap);
12. JSR303 group verification
JSR303 group verification can complete complex verification in multiple scenarios.
When adding data and modifying data, the fields to be verified may be different.
For example:
-
When adding a brand, because the ID is a self growing ID generated automatically, the ID is not carried when adding a brand
-
When modifying the brand, it needs to be modified according to the ID
-
No matter adding or modifying, the brand name cannot be empty
-
Some fields, such as logo, need to be entered when adding and must be submitted. They can be modified without submission
Solution: use JSR303 group verification function
-
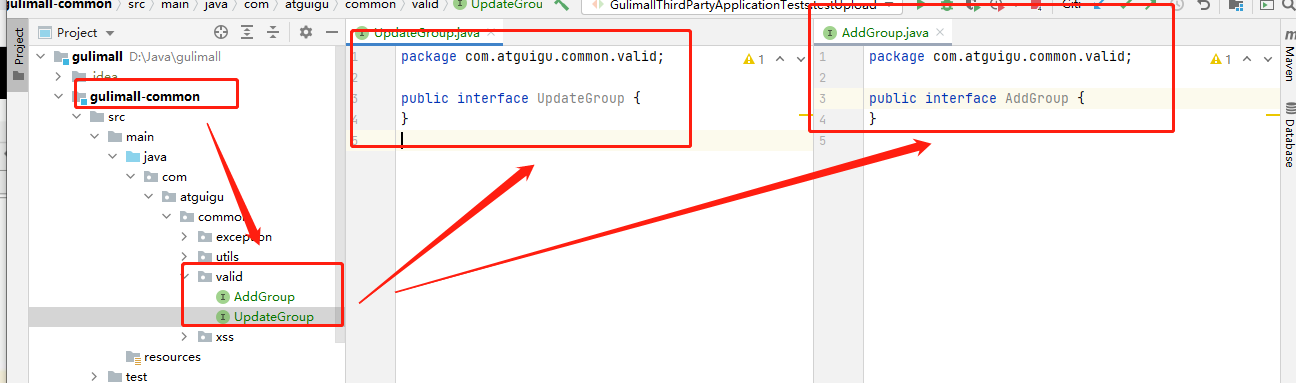
Define different groups in Gui mall common, such as adding groups and modifying groups.
-
Use the groups attribute to mark the verification annotation under what circumstances verification is required. Groups is a case array, and one or more can be added.
/**
 *
 * Brand id
 */
@NotNull(message = "Brand must be specified for modification id", groups = {UpdateGroup.class})
@Null(message = "New cannot be specified id", groups = {AddGroup.class})
@TableId
private Long brandId;
/**
 * Brand name
 */
@NotBlank(message = "Brand name must be submitted", groups = {UpdateGroup.class, AddGroup.class})
private String name;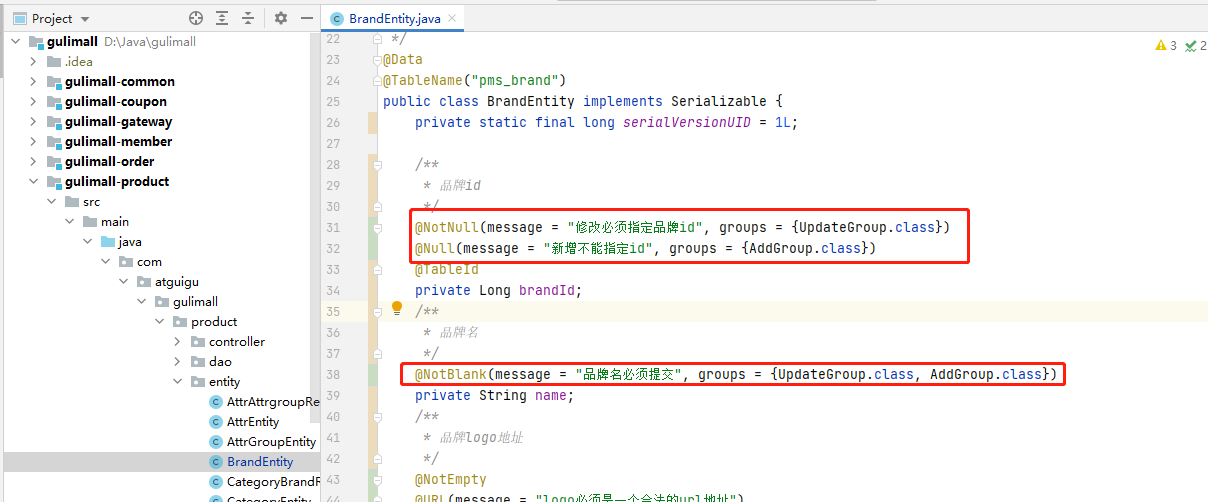
-
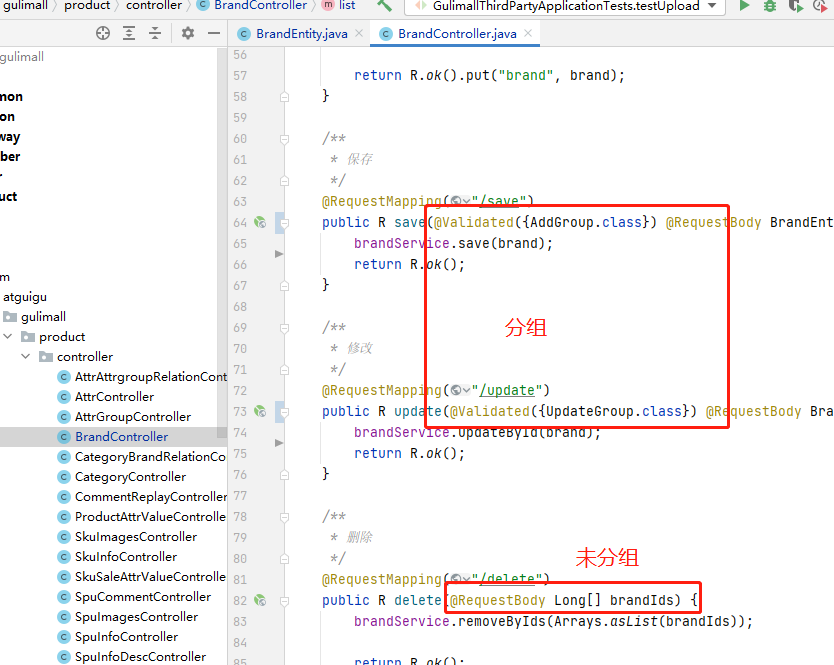
In the Controller, use the @ Validated annotation to identify which group of verifications the interface performs
/**
 * preservation
 */
@RequestMapping("/save")
public R save(@Validated({AddGroup.class}) @RequestBody BrandEntity brand/*, BindingResult result*/) {
    brandService.save(brand);
    return R.ok();
}

/**
 * modify
 */
@RequestMapping("/update")
public R update(@Validated({UpdateGroup.class}) @RequestBody BrandEntity brand) {
    brandService.updateById(brand);
    return R.ok();
}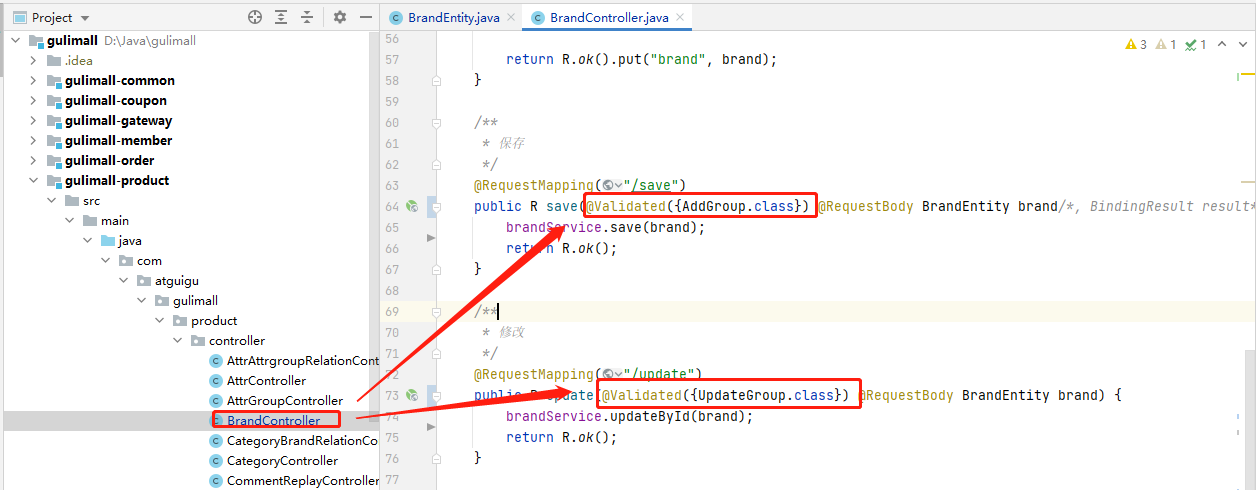
-
be careful
By default, no verification annotation for grouping is specified, such as @ NotEmpty in the following figure
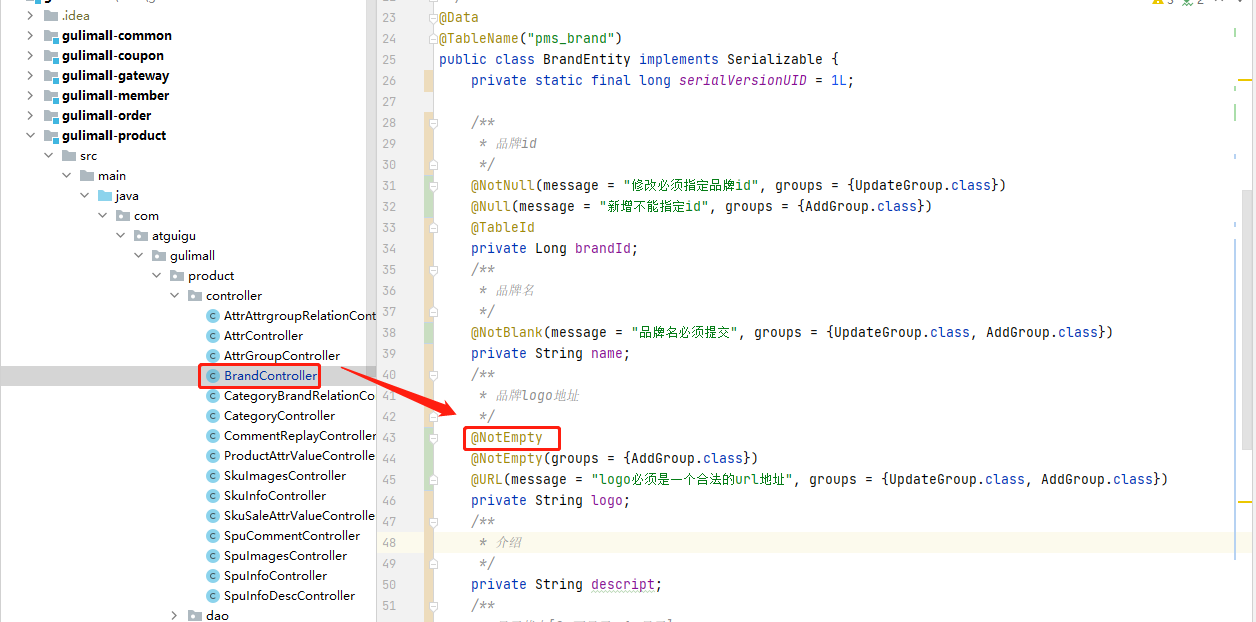
In the case of grouping verification @ Validated, it will not take effect. It will only take effect without grouping.
13. JSR303 user defined verification
In some special cases, such as the display status [0-not display, 1-display], there is no built-in verification annotation, so you need to write your own verification method.
- Annotate regular expressions with @ Pattern
- Custom verification
Use process:
-
Write a custom verification annotation
-
Write a custom verifier
-
Associate custom validators and custom validation annotations
Let the verifier verify the field identified by the verification annotation
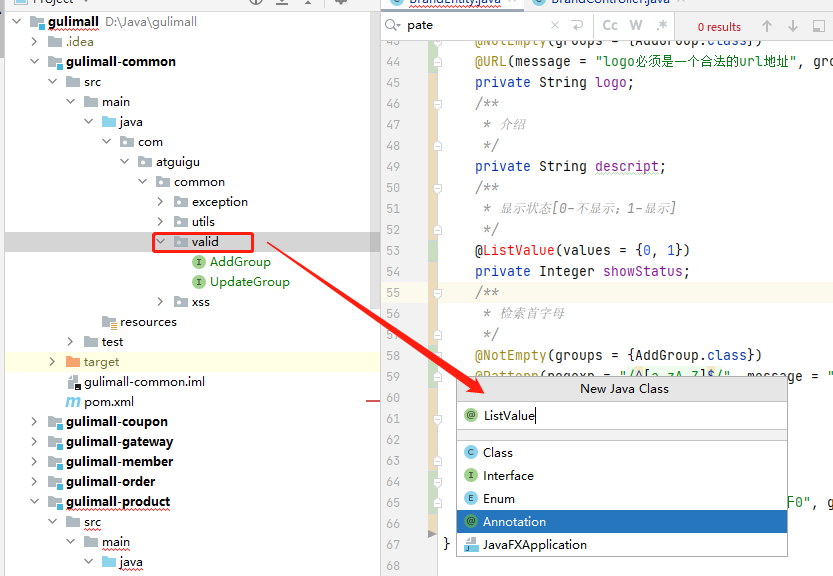
13.1. Write a custom verification annotation
You want an annotation @ ListValue(values = {0, 1}) to specify the values (0 and 1) that the field can use
-
Create ListValue verification annotation
-
Annotations must have three attributes
- Message: where to get the error message when the verification is wrong
- groups: supports group verification
- payload: Custom load information
-
The annotation must have the following original information data
@Documented @Constraint(validatedBy = {}) @Target({ElementType.METHOD, ElementType.FIELD, ElementType.ANNOTATION_TYPE, ElementType.CONSTRUCTOR, ElementType.PARAMETER, ElementType.TYPE_USE}) @Retention(RetentionPolicy.RUNTIME)- Target: where can the annotation be marked
- Retention: opportunity, which can be obtained at runtime
- Constraint: specifies which validator the annotation uses for verification
-
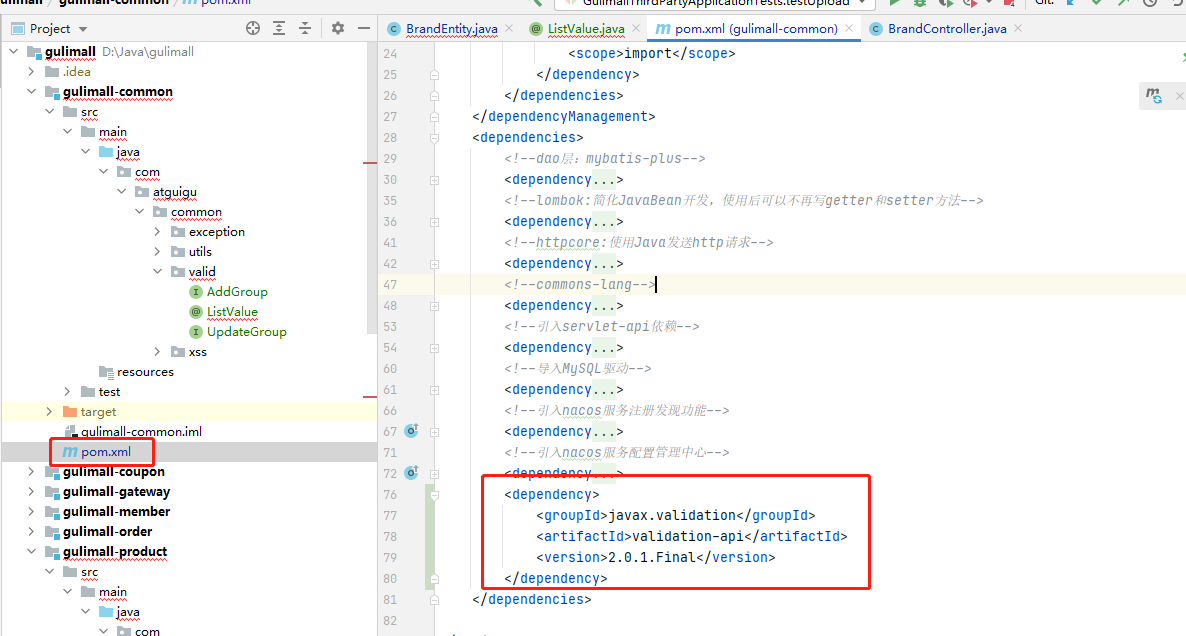
Import related packages
Payload and Constraint depend on the validation API, which is in POM XML import dependency
-
Basic annotation listvalue java
package com.atguigu.common.valid;

import javax.validation.Constraint;
import javax.validation.Payload;
import java.lang.annotation.*;

@Documented
@Constraint(validatedBy = {})
@Target({ElementType.METHOD, ElementType.FIELD, ElementType.ANNOTATION_TYPE, ElementType.CONSTRUCTOR, ElementType.PARAMETER, ElementType.TYPE_USE})
@Retention(RetentionPolicy.RUNTIME)
public @interface ListValue {
    String message() default "{javax.validation.constraints.NotEmpty.message}";

    Class<?>[] groups() default {};

    Class<? extends Payload>[] payload() default {};
}
After the definition is completed, you can click brandentity Introduced in java0

-
In listvalue value array specified in Java
int[] values() default {}; -
Specify error message
-
Change the default value of message to the full class name of ListValue message
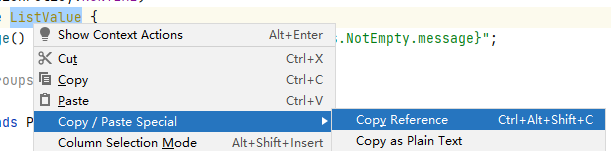
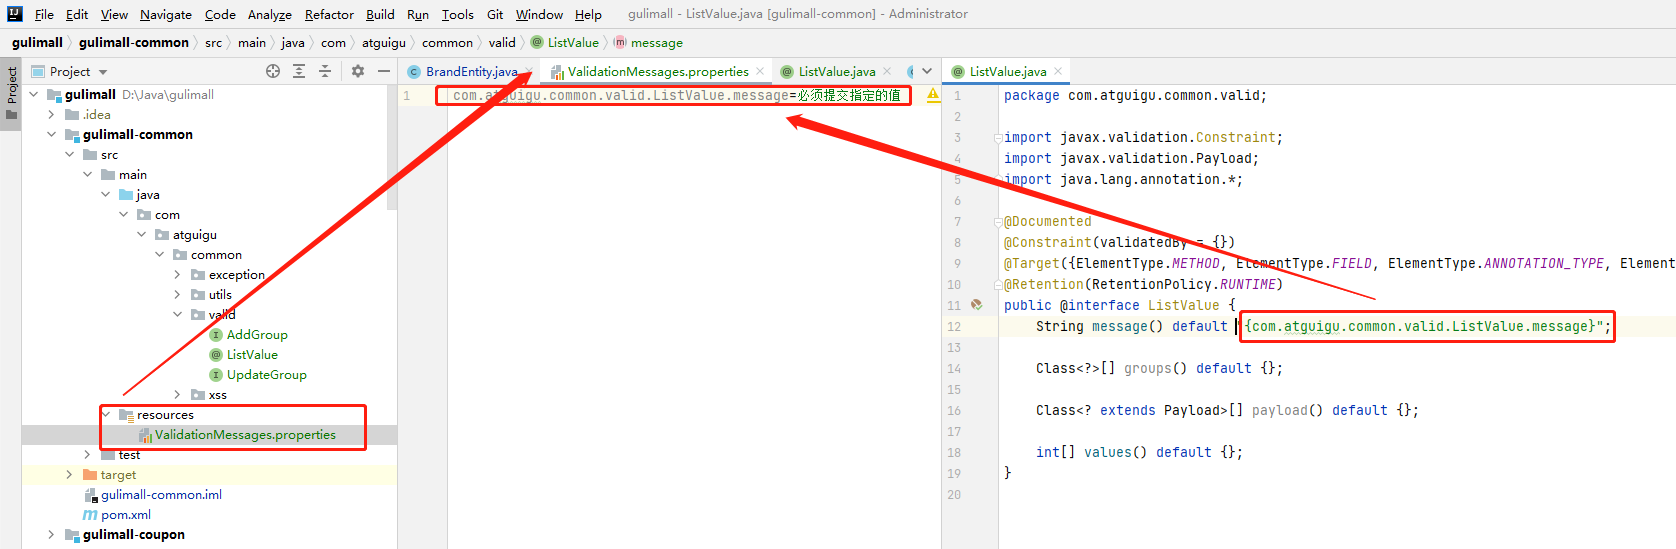
String message() default "{com.atguigu.common.valid.ListValue.message}"; -
Create the configuration file validationmessages properties
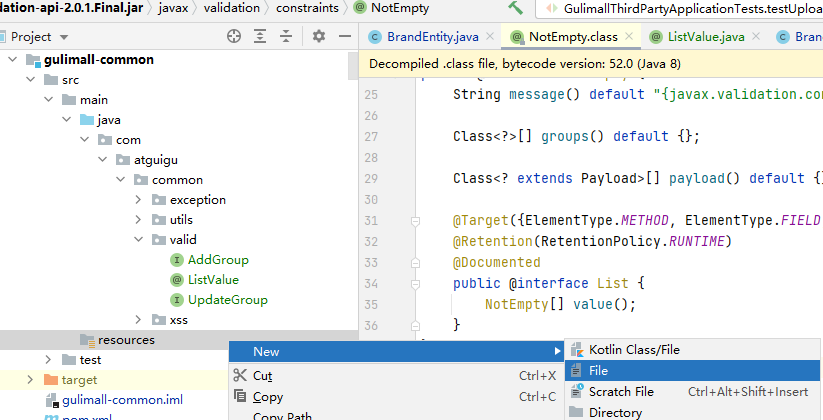
-
Configure error information in configuration file
-
13.2. Write a custom verifier
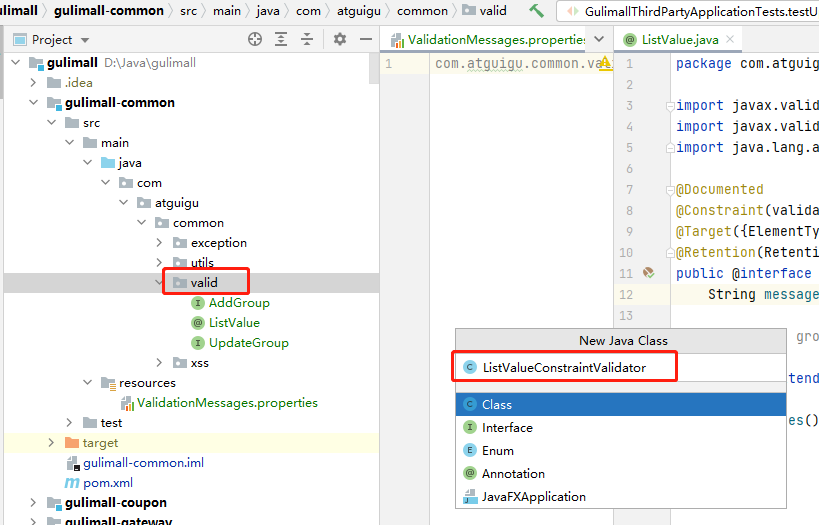
-
Create the validator class file listvalueconstraintvalidator java
-
ListValueConstraintValidator implements the interface ConstraintValidator
The ConstraintValidator interface contains two generic types. The first is the corresponding annotation and the second is the verification data type
-
Two methods to implement the ConstraintValidator interface
The initialize initialization method parameter constraintanannotation contains a default legal value
The isValid verification method parameter integer is the value submitted to be verified
-
Verifier code
package com.atguigu.common.valid;

import javax.validation.ConstraintValidator;
import javax.validation.ConstraintValidatorContext;
import java.util.HashSet;
import java.util.Set;

public class ListValueConstraintValidator implements ConstraintValidator<ListValue, Integer> {

    private Set<Integer> set = new HashSet<>();

    // Initialization method
    @Override
    public void initialize(ListValue constraintAnnotation) {
        // Legal value
        int[] values = constraintAnnotation.values();
        // Put all legal values into set to find out whether they exist
        for (int value : values) {
            set.add(value);
        }
    }

    // Judge whether the verification is successful
    @Override
    /*
     *
     * @params value Submitted values to be checked
     * @params context Verified context information
     * @return
     */
    public boolean isValid(Integer value, ConstraintValidatorContext constraintValidatorContext) {
        return set.contains(value);
    }
}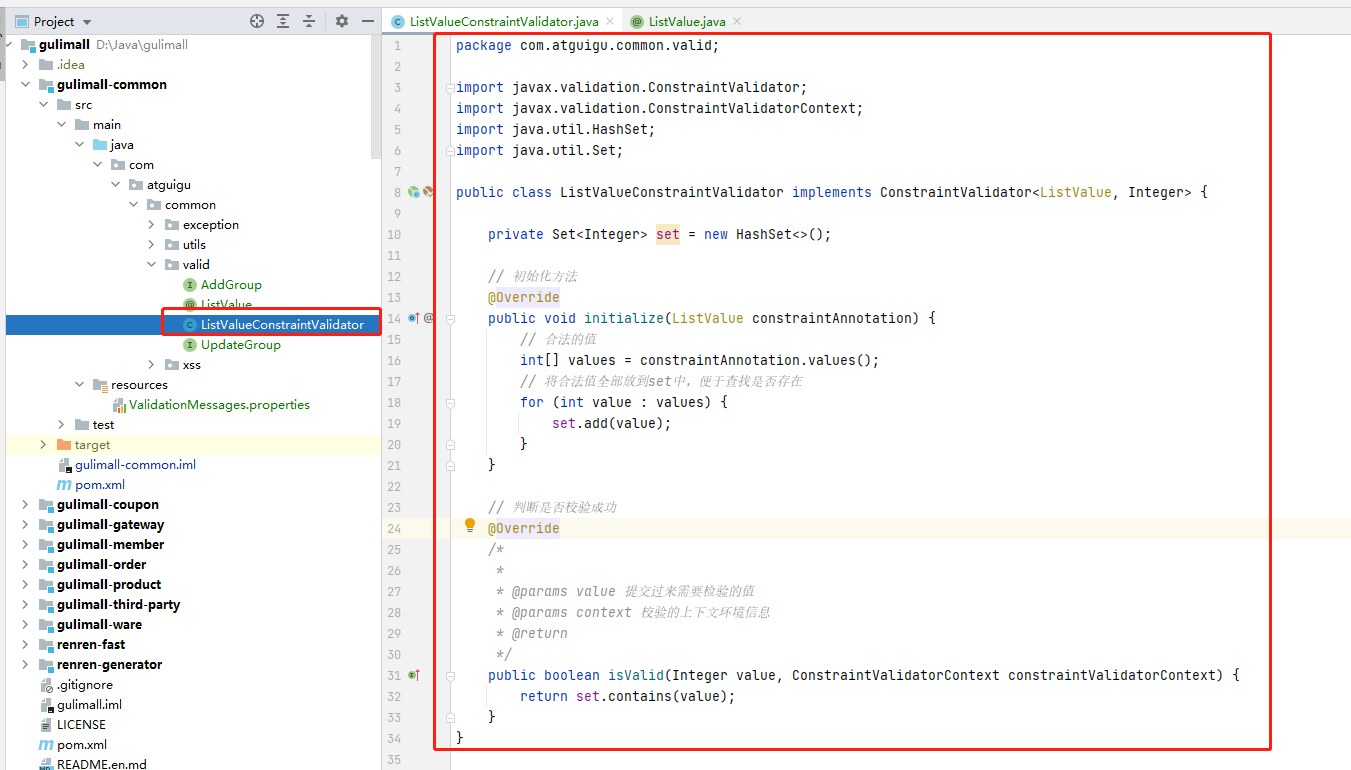
-
Correspondence between annotation and code data
When annotations are used, values = {0, 1} will be used to specify the value
@ListValue(values = {0, 1})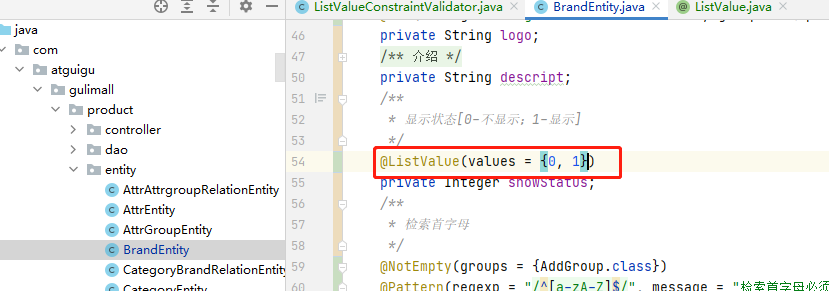
These values correspond to the legal values in the initialize initialization method.
The value in isValid verification method refers to the value to be verified passed by the client.
13.3. Correlation verifier and verification annotation
At the position of the verification annotation, use the @ Constraint annotation to specify the verifier
@Constraint(validatedBy = {ListValueConstraintValidator.class})
Multiple verifiers can be specified to adapt to different types of verifiers
@Constraint(validatedBy = {A.class,B.class,C.class})
13.4. Complete verification annotation code and verifier
13.4.1. Verification annotation
package com.atguigu.common.valid;

import javax.validation.Constraint;
import javax.validation.Payload;
import java.lang.annotation.*;

@Documented
@Constraint(validatedBy = {ListValueConstraintValidator.class})
@Target({ElementType.METHOD, ElementType.FIELD, ElementType.ANNOTATION_TYPE, ElementType.CONSTRUCTOR, ElementType.PARAMETER, ElementType.TYPE_USE})
@Retention(RetentionPolicy.RUNTIME)
public @interface ListValue {
    String message() default "{com.atguigu.common.valid.ListValue.message}";

    Class<?>[] groups() default {};

    Class<? extends Payload>[] payload() default {};

    int[] values() default {};
}
13.4.2. Calibrator
package com.atguigu.common.valid;

import javax.validation.ConstraintValidator;
import javax.validation.ConstraintValidatorContext;
import java.util.HashSet;
import java.util.Set;

public class ListValueConstraintValidator implements ConstraintValidator<ListValue, Integer> {

    private Set<Integer> set = new HashSet<>();

    // Initialization method
    @Override
    public void initialize(ListValue constraintAnnotation) {
        // Legal value
        int[] values = constraintAnnotation.values();
        // Put all legal values into set to find out whether they exist
        for (int value : values) {
            set.add(value);
        }
    }

    // Judge whether the verification is successful
    @Override
    /*
     *
     * @params value Submitted values to be checked
     * @params context Verified context information
     * @return
     */
    public boolean isValid(Integer value, ConstraintValidatorContext constraintValidatorContext) {
        return set.contains(value);
    }
}
13.4.3. Annotation use
@Data
@TableName("pms_brand")
public class BrandEntity implements Serializable {
    private static final long serialVersionUID = 1L;

    /**
     * Display status [0-not displayed; 1-displayed]
     */
    @ListValue(values = {0, 1})
    private Integer showStatus;

}
13.5. test
-
Specifies that it must be carried when adding
/** * Display status [0-not displayed; 1-displayed] */ @ListValue(values = {0, 1}, groups = {AddGroup.class}) private Integer showStatus; -
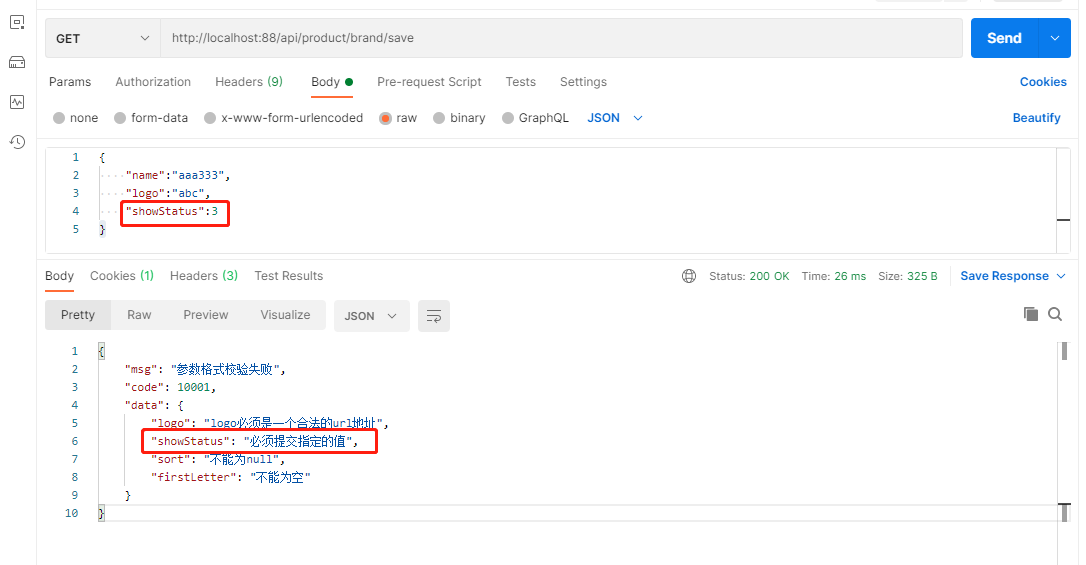
save test
-
Error test
-
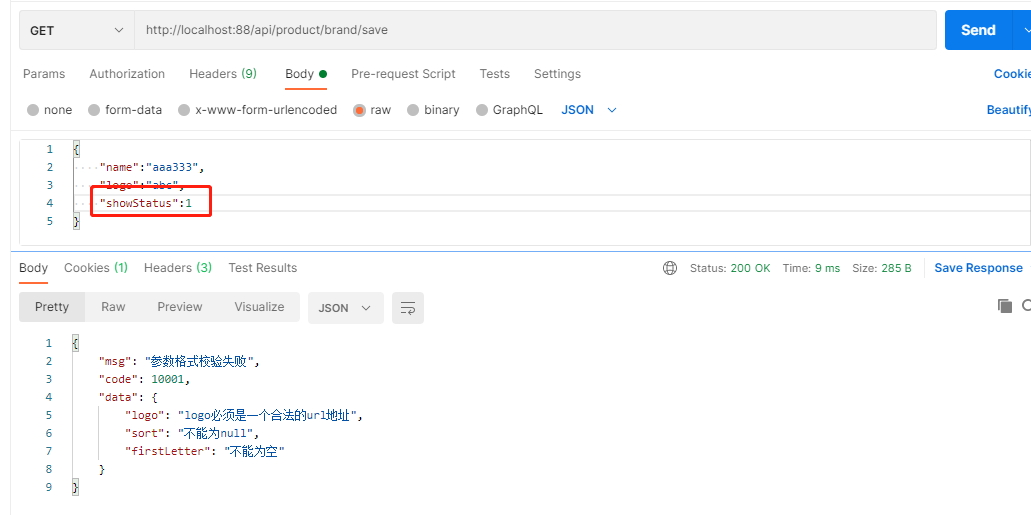
Correct test
-
14. Extract a method to modify the brand status separately
-
Add modify status group
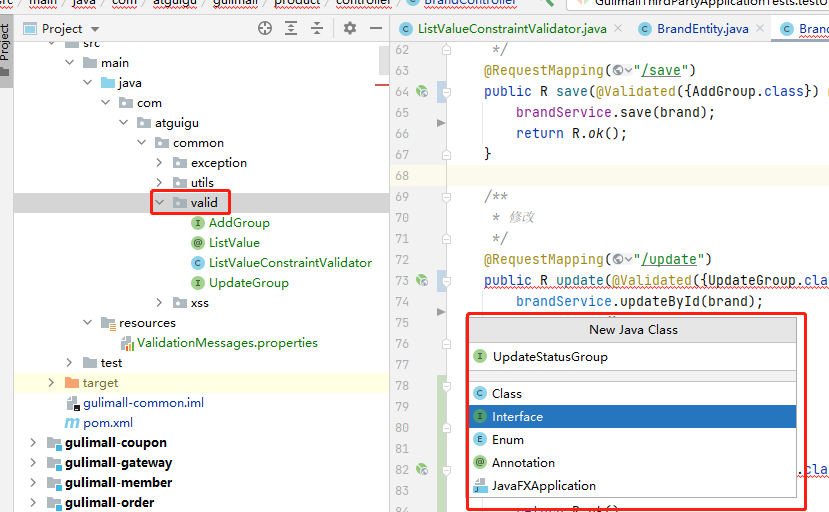
-
Create a new interface and specify to use UpdateStatusGroup grouping
/**
 * Modify brand display status
 */
@RequestMapping("/update/status")
public R updateStatus(@Validated({UpdateStatusGroup.class}) @RequestBody BrandEntity brand) {
    brandService.updateById(brand);
    return R.ok();
}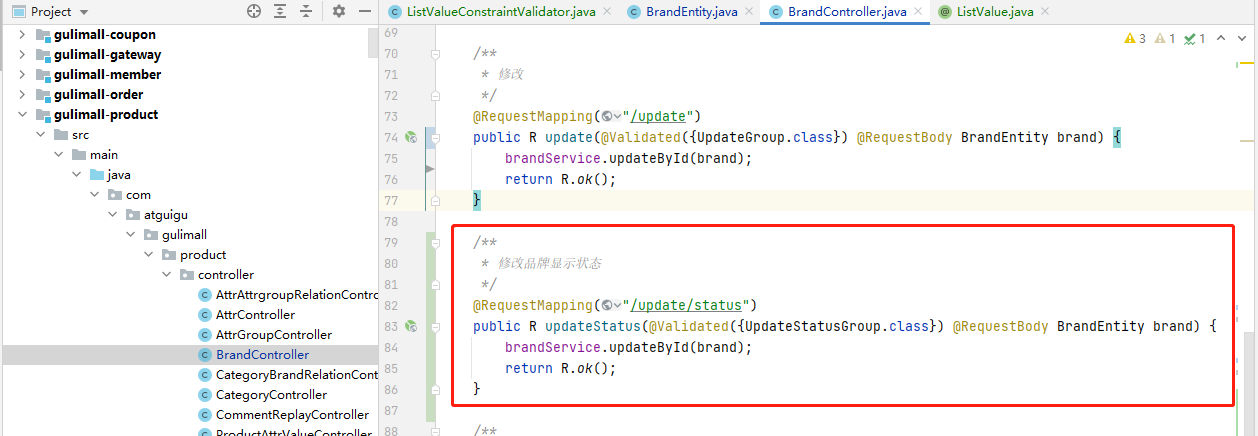
-
Configure in BrandEntity, and only judge showStatus in updatestatatungroup group
/**
 * Display status [0-not displayed; 1-displayed]
 */
@NotNull(groups = {AddGroup.class, UpdateStatusGroup.class})
@ListValue(values = {0, 1}, groups = {AddGroup.class, UpdateStatusGroup.class})
private Integer showStatus;
-
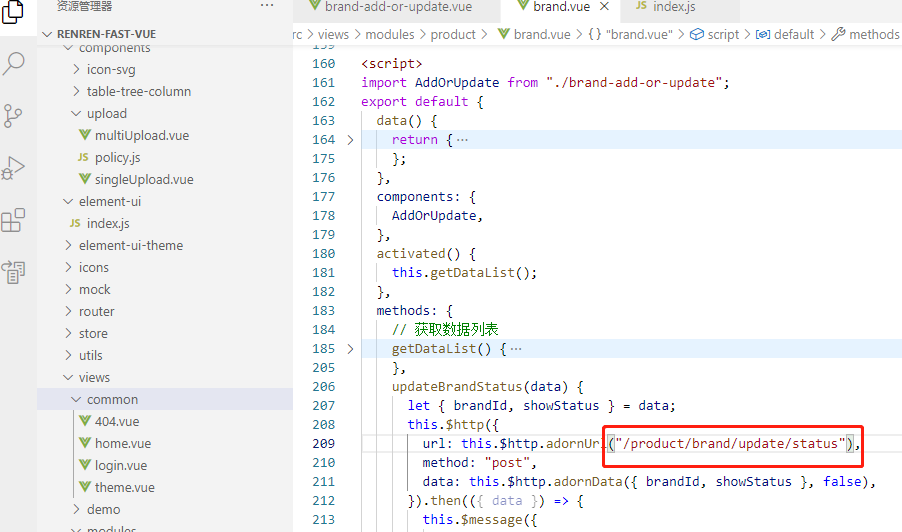
Modify front end item update status request
-
Test successful