[cereal mall] cluster chapter -k8s(4/4)
catalogue
5) Install docker, kubedm, kubelet and kubectl on all nodes
7) Install POD network plug-in (CNI)
9) Getting started kubernetes cluster
Install kubernetes visual interface - DashBoard
2. Submission of installation premise
copyright
-
Notes - Basic chapter-1(P1-P28): https://blog.csdn.net/hancoder/article/details/106922139
-
Notes - Basic chapter-2(P28-P100): https://blog.csdn.net/hancoder/article/details/107612619
-
Notes - Advanced (P340): https://blog.csdn.net/hancoder/article/details/107612746
-
Notes -vue: https://blog.csdn.net/hancoder/article/details/107007605
-
Notes - elastic search, launch and retrieval: https://blog.csdn.net/hancoder/article/details/113922398
-
Notes - certification services: https://blog.csdn.net/hancoder/article/details/114242184
-
Notes - distributed locking and caching: https://blog.csdn.net/hancoder/article/details/114004280
-
Notes - cluster: https://blog.csdn.net/hancoder/article/details/107612802
-
springcloud notes: https://blog.csdn.net/hancoder/article/details/109063671
-
Note Version Description: Note documents were provided in 2020, but only P1-P50 content, and P340 content was sorted out in 2021. Please click the column below the title to view the series of notes
-
Statement:
- You can whore for nothing, but please don't reprint and publish. It's not easy to make notes by hand
- The notes of this series are constantly optimized iteratively. csdn: hancoder is the latest version of the content, and 10W words are available for free on csdn.
- See the end of the text for offline md note files. The compressed package of md notes of 2021-3 version is 500k (cloud image bed), including the notes of the project, as well as personal notes such as cloud, docker, mybatis plus, rabbitMQ and so on
-
See the column for other notes of this project: https://blog.csdn.net/hancoder/category_10822407.html
1, K8s quick start
1) Introduction
kubernetes is abbreviated as k8s. It is an open source system for automatically deploying, extending and managing container applications.
Chinese official website: https://kubernetes.io/Zh/
Chinese community: https://www.kubernetes.org.cn/
Official documents: https://kubernetes.io/zh/docs/home/
Community documents: https://docs.kubernetes.org.cn/
Evolution of deployment methods:
[external link image transfer failed. The source station may have anti-theft chain mechanism. It is recommended to save the image and upload it directly (img-a2sutktf-1620146330108)( https://d33wubrfki0l68.cloudfront.net/26a177ede4d7b032362289c6fccd448fc4a91174/eb693/images/docs/container_evolution.svg )]
Time back
Let's review why Kubernetes is so useful.
[the external chain picture transfer fails. The source station may have an anti-theft chain mechanism. It is recommended to save the picture and upload it directly (img-jhiwhopn-1620146330110)( https://d33wubrfki0l68.cloudfront.net/26a177ede4d7b032362289c6fccd448fc4a91174/eb693/images/docs/container_evolution.svg )]
Traditional deployment era:
In the early days, organizations ran applications on physical servers. Resource boundaries cannot be defined for applications in the physical server, which can cause resource allocation problems. For example, if you run multiple applications on a physical server, one application may consume most of the resources, which may lead to the performance degradation of other applications. One solution is to run each application on different physical servers, but it cannot be expanded due to insufficient resource utilization, and the cost of maintaining many physical servers is high.
Virtualization deployment era:
As a solution, virtualization is introduced. Virtualization technology allows you to run multiple virtual machines (VMS) on the CPU of a single physical server. Virtualization allows applications to be isolated between VMS and provides a certain degree of security because the information of one application cannot be freely accessed by another application.
Virtualization technology can make better use of the resources on the physical server, and can achieve better scalability and reduce hardware costs because applications can be easily added or updated.
Each VM is a complete computer that runs all components on the virtualization hardware, including its own operating system.
Container deployment era:
Containers are similar to VMS, but they have relaxed isolation properties and can share the operating system (OS) between applications. Therefore, containers are considered lightweight. Similar to VM, container has its own file system, CPU, memory, process space, etc. Because they are separate from the infrastructure, they can be migrated across cloud and OS distributions.
Containers have become popular because of their many advantages. Here are some of the benefits of containers:
- Creation and deployment of agile applications: compared with VM image, it improves the simplicity and efficiency of container image creation.
- Continuous development, integration and deployment: support reliable and frequent container image construction and deployment through fast and simple rollback (due to the immutability of images).
- Focus on the separation of development and operation and maintenance: create application container images during build / release rather than deployment, so as to separate applications from infrastructure.
- Observability can display not only information and indicators at the operating system level, but also the health status of applications and other indicators.
- Consistency across development, test, and production environments: run on a laptop as in the cloud.
- Portability across cloud and operating system distributions: it can run in Ubuntu, RHEL, CoreOS, local, Google Kubernetes Engine and anywhere else.
- Application centric Management: improve the level of abstraction, from running the OS on virtual hardware to using logical resources to run applications on the OS.
- Loosely coupled, distributed, resilient, liberated microservices: applications are broken down into smaller, independent parts and can be dynamically deployed and managed - rather than running as a whole on a large single machine.
- Resource isolation: predictable application performance.
- Resource utilization: high efficiency and high density.


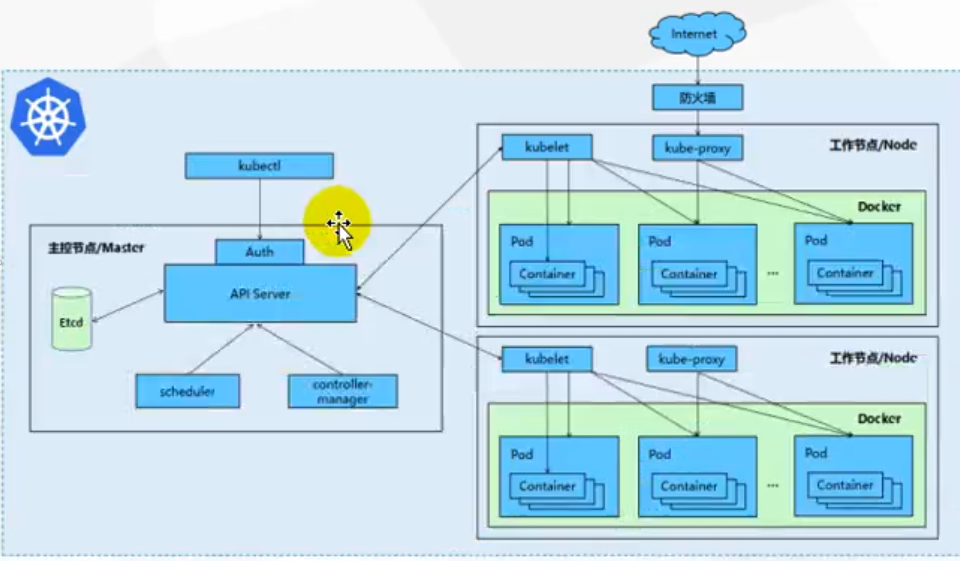
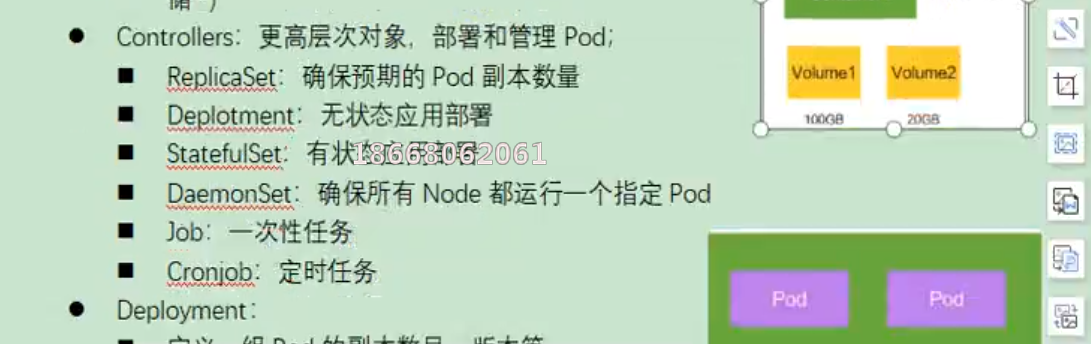
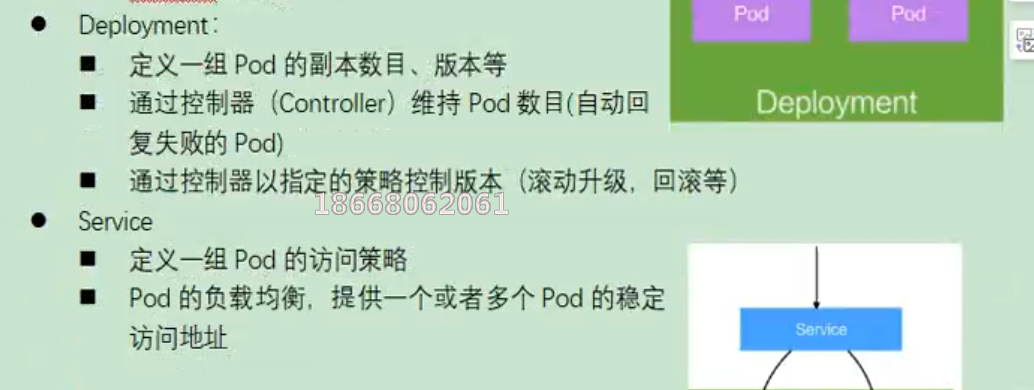
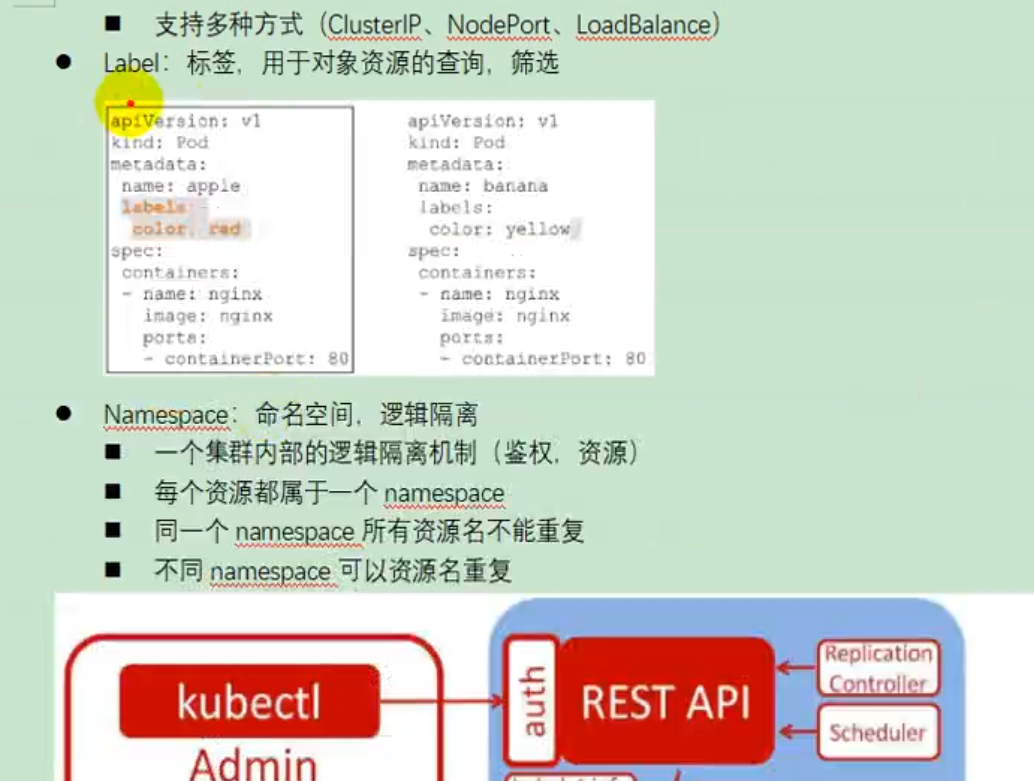
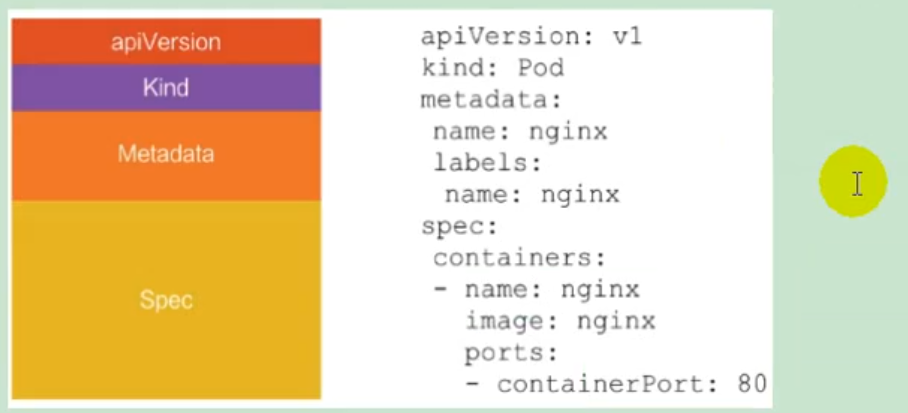
2) Structure
(1) Overall master-slave mode

(2) master node architecture
(3) Node architecture
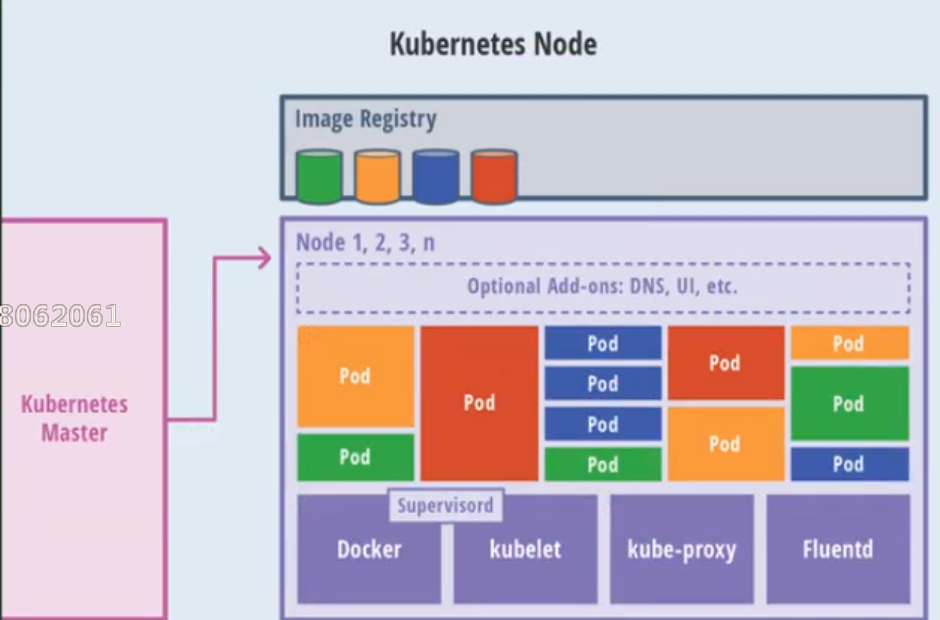
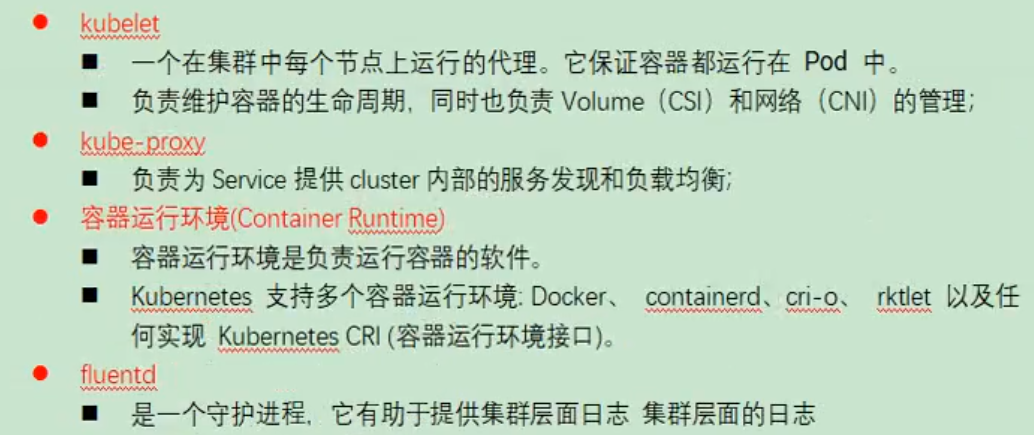
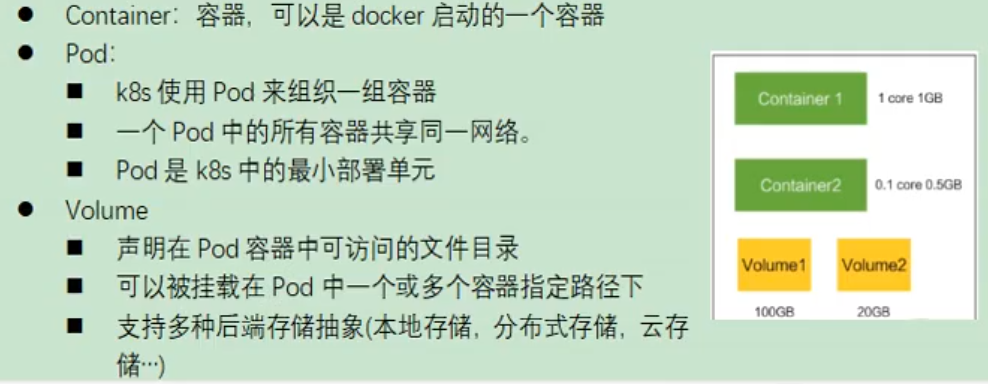
3) Concept

4) Quick experience
(1) Install minicube
https://github.com/kubernetes/minikube/releases
Download minikuber-windows-amd64 Exe renamed minicube exe
Open virtualBox and cmd
function
minikube start --vm-driver=virtualbox --registry-mirror=https://registry.docker-cn.com
Wait 20 minutes.
(2) Experience nginx deployment upgrade
-
Submit an nginx deployment
kubectl apply -f https://k8s.io/examples/application/deployment.yaml -
Upgrade nginx deployment
kubectl apply -f https://k8s.io/examples/application/deployment-update.yaml -
Capacity expansion nginx deployment
2, K8s cluster installation
1)kubeadm
Kubedm is a tool launched by the official community for rapid deployment of kuberneters clusters.
This tool can complete the deployment of a kuberneters cluster through two instructions
Create a master node
$ kuberneters init
- 1
Add a node node to the current cluster
$ kubeadm join <Master Nodal IP And port>
- 1
2) Pre requirements
One or more machines, operating system centos7 x-86_ x64
Hardware configuration: 2GB or more RAM, 2 CPUs or more CPUs, 30GB or more hard disk
Network interworking between all machines in the cluster
You can access the Internet and need to pull the image
Disable Swap partition
3) Deployment steps
- Install Docker and kubedm on all nodes
- Not Kubernetes Master
- Deploy container network plug-in
- Deploy the Kubernetes Node and add the node to the Kubernetes cluster
- Deploy the DashBoard web page to visually view Kubernetes resources
4) Environmental preparation
(1) Preparatory work
- We can use vagrant to quickly create three virtual machines. Set the host network of virtualbox before starting the virtual machine. All virtual machines are now unified as 192.168.56.1, and all virtual machines will be 56.1 in the future The ip address of X.
- In the global setting, find a disk with large space to store the image.

Network card 1 is NAT, which is used for virtual machine and local machine to access the Internet. Network card 2 is a virtual network shared only by the host network and the virtual machine
(2) Start three virtual machines
- Use the vagrant file provided by us, copy it to the non Chinese non blank directory, run vagrant up and start three virtual machines. In fact, vagrant can deploy all K8s clusters with one click
https://github.com/rootsongjc/kubernetes-vagrant-centos-cluster
http://github.com/davidkbainbridge/k8s-playground
The following is vagrantfile, which is used to create three virtual machines: k8s-node1, k8s-node2 and k8s-node3
Vagrant.configure("2") do |config|
   (1..3).each do |i|
        config.vm.define "k8s-node#{i}" do |node|
            # Set the Box of the virtual machine
            node.vm.box = "centos/7"

            # Set the host name of the virtual machine
            node.vm.hostname="k8s-node#{i}"

            # Set the IP address of the virtual machine
            node.vm.network "private_network", ip: "192.168.56.#{99+i}", netmask: "255.255.255.0"

            # Set the shared directory between host and virtual machine
            # node.vm.synced_folder "~/Documents/vagrant/share", "/home/vagrant/share"

            # VirtaulBox related configuration
            node.vm.provider "virtualbox" do |v|
                # Set the name of the virtual machine
                v.name = "k8s-node#{i}"
                # Set the memory size of the virtual machine
                v.memory = 4096
                # Set the number of CPU s of the virtual machine
                v.cpus = 4
            end
        end
   end
end
- 1
- 2
- 3
- 4
- 5
- 6
- 7
- 8
- 9
- 10
- 11
- 12
- 13
- 14
- 15
- 16
- 17
- 18
- 19
- 20
- 21
- 22
- 23
- 24
- 25
- 26
- 27
- Enter the three virtual machines and open the password access permission of root
vagrant ssh xxx After entering the system
# vagrant ssh k8s-node1
su root Password is vagrant

vi /etc/ssh/sshd_config

modify
PermitRootLogin yes
PasswordAuthentication yes

All virtual machines are set to 4-core 4 G
- 1
- 2
- 3
- 4
- 5
- 6
- 7
- 8
- 9
- 10
- 11
service sshd restart
- 1
192.168.56.100:22
- 1
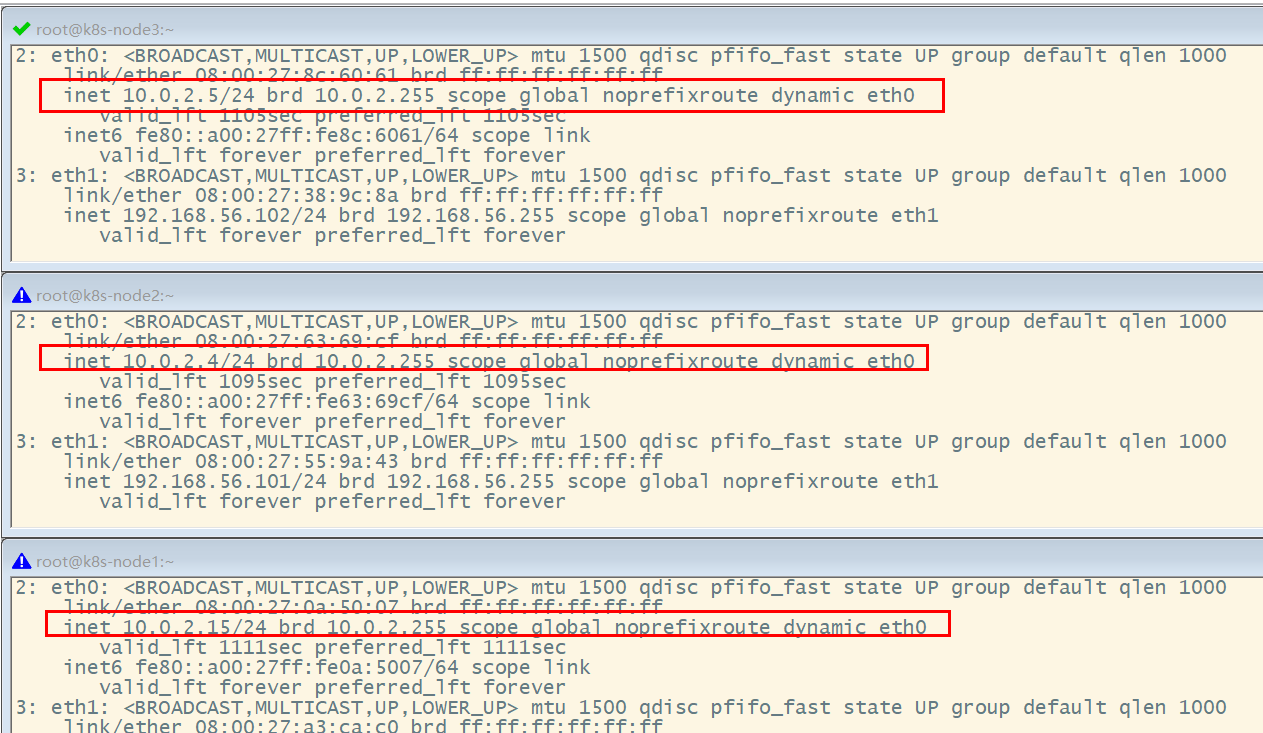
Under the connection mode of "network address translation", the eth0 and IP addresses of the three nodes are the same.
**Problem Description: * * view k8s-node1's routing table:
# View the default network card
[root@k8s-node1 ~]# ip route show
default via 10.0.2.2 dev eth0 proto dhcp metric 100

10.0.2.0/24 dev eth0 proto kernel scope link src 10.0.2.15 metric 100

192.168.56.0/24 dev eth1 proto kernel scope link src 192.168.56.100 metric 101
- 1
- 2
- 3
- 4
- 5
- 6
- 7
It can be seen that what is recorded in the routing table is that data packets are sent and received through port eth0.
Check the IP addresses bound to eth0 of k8s-node1, k8s-node2 and k8s-node3 respectively. It is found that they are the same, all of which are 10.0.2.15. These addresses are used for kubernetes cluster communication. They are different from the IP addresses on eth1 and are used for remote management.
[root@k8s-node1 ~]# ip addr
...
2: eth0: <BROADCAST,MULTICAST,UP,LOWER_UP> mtu 1500 qdisc pfifo_fast state UP group default qlen 1000
    link/ether 52:54:00:8a:fe:e6 brd ff:ff:ff:ff:ff:ff
    inet 10.0.2.15/24 brd 10.0.2.255 scope global noprefixroute dynamic eth0
       valid_lft 84418sec preferred_lft 84418sec
    inet6 fe80::5054:ff:fe8a:fee6/64 scope link
       valid_lft forever preferred_lft forever
3: eth1: <BROADCAST,MULTICAST,UP,LOWER_UP> mtu 1500 qdisc pfifo_fast state UP group default qlen 1000
    link/ether 08:00:27:a3:ca:c0 brd ff:ff:ff:ff:ff:ff
    inet 192.168.56.100/24 brd 192.168.56.255 scope global noprefixroute eth1
       valid_lft forever preferred_lft forever
    inet6 fe80::a00:27ff:fea3:cac0/64 scope link
       valid_lft forever preferred_lft forever
[root@k8s-node1 ~]#
- 1
- 2
- 3
- 4
- 5
- 6
- 7
- 8
- 9
- 10
- 11
- 12
- 13
- 14
- 15
**Cause analysis: * * this is because they use the port forwarding rule. They use the same address and are distinguished by different ports. However, this port forwarding rule will cause many unnecessary problems in future use, so it needs to be modified to NAT network type.
resolvent:
- Select three nodes, and then execute "management" - > "global settings" - > "network" to add a NAT network.
- Modify the network type of each device, refresh and regenerate the MAC address.
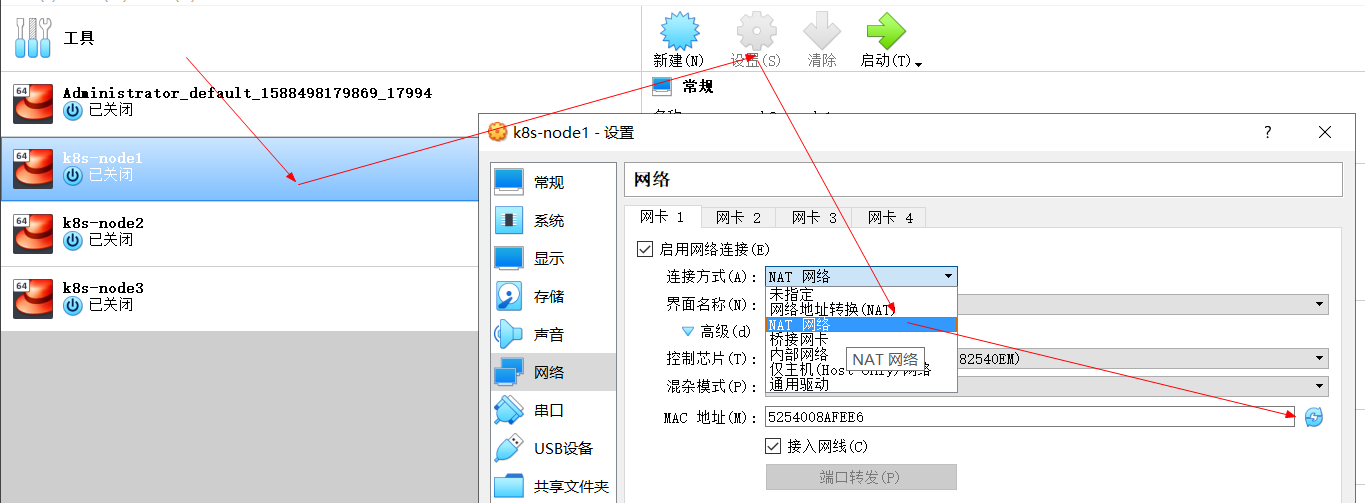
Refresh the MAC address
1 network is cluster interaction, 2 network is host interaction
- Check the IP addresses of the three nodes again
(3) Set up the Linux environment (all three nodes execute)
- Turn off the firewall
systemctl stop firewalld
systemctl disable firewalld
- 1
- 2
- Close seLinux
# linux default security policy
sed -i 's/enforcing/disabled/' /etc/selinux/config
setenforce 0
- 1
- 2
- 3
- Close swap
swapoff -a #Temporarily Closed
sed -ri 's/.*swap.*/#&/' /etc/fstab #Permanent closure
free -g #Verify that swap must be 0
- 1
- 2
- 3
- Add the corresponding relationship between host name and IP:
View host name:
hostname
- 1
If the host name is incorrect, you can modify it through the command "hostnamectl set hostname < newhostname >: specify a new hostname".
vi /etc/hosts
10.0.2.4 k8s-node1
10.0.2.5 k8s-node2
10.0.2.6 k8s-node3
- 1
- 2
- 3
- 4
The chain that transfers bridged IPV4 traffic to iptables:
cat > /etc/sysctl.d/k8s.conf <<EOF

net.bridge.bridge-nf-call-ip6tables = 1

net.bridge.bridge-nf-call-iptables = 1

EOF
- 1
- 2
- 3
- 4
- 5
- 6
- 7
Application rules:
sysctl --system
- 1
Difficult problem: if the prompt is a read-only file system, run the following command
mount -o remount rw /
- 1
- date view time (optional)
yum -y install ntpupdate

ntpupdate time.window.com #Sync latest time
- 1
- 2
- 3
5) Install docker, kubedm, kubelet and kubectl on all nodes
By default, the CRI (container runtime) of Kubenetes is Docker, so Docker is installed first.
(1) Install Docker
1. Uninstall previous docker
sudo yum remove docker \
                  docker-client \
                  docker-client-latest \
                  docker-common \
                  docker-latest \
                  docker-latest-logrotate \
                  docker-logrotate \
                  docker-engine
- 1
- 2
- 3
- 4
- 5
- 6
- 7
- 8
2. Install Docker -CE
sudo yum install -y yum-utils \
device-mapper-persistent-data \
lvm2
# Set the yum location of docker repo
sudo yum-config-manager \
    --add-repo \
    https://download.docker.com/linux/centos/docker-ce.repo

    # Install docker, docker cli
sudo yum -y install docker-ce docker-ce-cli containerd.io
- 1
- 2
- 3
- 4
- 5
- 6
- 7
- 8
- 9
- 10
3. Configure docker acceleration
sudo mkdir -p /etc/docker
sudo tee /etc/docker/daemon.json <<-'EOF'
{
  "registry-mirrors": ["https://ke9h1pt4.mirror.aliyuncs.com"]
}
EOF
sudo systemctl daemon-reload
sudo systemctl restart docker
- 1
- 2
- 3
- 4
- 5
- 6
- 7
- 8
4. Start docker & & set docker startup
systemctl enable docker
- 1
When the basic environment is ready, you can back up three virtual machines;
(2) Add Ali and Yum source
cat <<EOF > /etc/yum.repos.d/kubernetes.repo
[kubernetes]
name=Kubernetes
baseurl=https://mirrors.aliyun.com/kubernetes/yum/repos/kubernetes-el7-x86_64/
enabled=1
gpgcheck=1
repo_gpgcheck=1
gpgkey=https://mirrors.aliyun.com/kubernetes/yum/doc/yum-key.gpg https://mirrors.aliyun.com/kubernetes/yum/doc/rpm-package-key.gpg
EOF
- 1
- 2
- 3
- 4
- 5
- 6
- 7
- 8
- 9
For more details, see: https://developer.aliyun.com/mirror/kubernetes
(3) Install kubedm, kubelet and kubectl
yum list|grep kube
- 1
install
yum install -y kubelet-1.17.3 kubeadm-1.17.3 kubectl-1.17.3
- 1
Power on
systemctl enable kubelet && systemctl start kubelet
- 1
To view the status of kubelet:
systemctl status kubelet
- 1
View kubelet version:
[root@k8s-node2 ~]# kubelet --version
Kubernetes v1.17.3
- 1
- 2
6) Deploy k8s master
(1) master node initialization
On the Master node, create and execute the master_images.sh
#!/bin/bash

images=(
	kube-apiserver:v1.17.3
    kube-proxy:v1.17.3
	kube-controller-manager:v1.17.3
	kube-scheduler:v1.17.3
	coredns:1.6.5
	etcd:3.4.3-0
    pause:3.1
)

for imageName in ${images[@]} ; do
    docker pull registry.cn-hangzhou.aliyuncs.com/google_containers/$imageName
#   docker tag registry.cn-hangzhou.aliyuncs.com/google_containers/$imageName  k8s.gcr.io/$imageName
done
- 1
- 2
- 3
- 4
- 5
- 6
- 7
- 8
- 9
- 10
- 11
- 12
- 13
- 14
- 15
- 16
View the internal communication port of 100
2: eth0: <BROADCAST,MULTICAST,UP,LOWER_UP> mtu 1500 qdisc pfifo_fast state UP group default qlen 1000
    link/ether 08:00:27:7e:dd:f5 brd ff:ff:ff:ff:ff:ff
    inet 10.0.2.4/24 brd 10.0.2.255 scope global noprefixroute dynamic eth0
       valid_lft 512sec preferred_lft 512sec
    inet6 fe80::a00:27ff:fe7e:ddf5/64 scope link
       valid_lft forever preferred_lft forever
- 1
- 2
- 3
- 4
- 5
- 6
Initialize kubedm
kubeadm init \
--apiserver-advertise-address=10.0.2.4 \
--image-repository registry.cn-hangzhou.aliyuncs.com/google_containers \
--kubernetes-version   v1.17.3 \
--service-cidr=10.96.0.0/16  \
--pod-network-cidr=10.244.0.0/16
- 1
- 2
- 3
- 4
- 5
- 6
Note:
- The IP address of the host card here is 10-address-0.0-address of the host card;
Execution result:
[root@k8s-node1 opt]# kubeadm init \
> --apiserver-advertise-address=10.0.2.15 \
> --image-repository registry.cn-hangzhou.aliyuncs.com/google_containers \
> --kubernetes-version   v1.17.3 \
> --service-cidr=10.96.0.0/16  \
> --pod-network-cidr=10.244.0.0/16
W0503 14:07:12.594252   10124 configset.go:202] WARNING: kubeadm cannot validate component configs for API groups [kubelet.config.k8s.io kubeproxy.config.k8s.io]
[init] Using Kubernetes version: v1.17.3
[preflight] Running pre-flight checks
        [WARNING IsDockerSystemdCheck]: detected "cgroupfs" as the Docker cgroup driver. The recommended driver is "systemd". Please follow the guide at https://kubernetes.io/docs/setup/cri/
[preflight] Pulling images required for setting up a Kubernetes cluster
[preflight] This might take a minute or two, depending on the speed of your internet connection
[preflight] You can also perform this action in beforehand using 'kubeadm config images pull'
[kubelet-start] Writing kubelet environment file with flags to file "/var/lib/kubelet/kubeadm-flags.env"
[kubelet-start] Writing kubelet configuration to file "/var/lib/kubelet/config.yaml"
[kubelet-start] Starting the kubelet
[certs] Using certificateDir folder "/etc/kubernetes/pki"
[certs] Generating "ca" certificate and key
[certs] Generating "apiserver" certificate and key
[certs] apiserver serving cert is signed for DNS names [k8s-node1 kubernetes kubernetes.default kubernetes.default.svc kubernetes.default.svc.cluster.local] and IPs [10.96.0.1 10.0.2.15]
[certs] Generating "apiserver-kubelet-client" certificate and key
[certs] Generating "front-proxy-ca" certificate and key
[certs] Generating "front-proxy-client" certificate and key
[certs] Generating "etcd/ca" certificate and key
[certs] Generating "etcd/server" certificate and key
[certs] etcd/server serving cert is signed for DNS names [k8s-node1 localhost] and IPs [10.0.2.15 127.0.0.1 ::1]
[certs] Generating "etcd/peer" certificate and key
[certs] etcd/peer serving cert is signed for DNS names [k8s-node1 localhost] and IPs [10.0.2.15 127.0.0.1 ::1]
[certs] Generating "etcd/healthcheck-client" certificate and key
[certs] Generating "apiserver-etcd-client" certificate and key
[certs] Generating "sa" key and public key
[kubeconfig] Using kubeconfig folder "/etc/kubernetes"
[kubeconfig] Writing "admin.conf" kubeconfig file
[kubeconfig] Writing "kubelet.conf" kubeconfig file
[kubeconfig] Writing "controller-manager.conf" kubeconfig file
[kubeconfig] Writing "scheduler.conf" kubeconfig file
[control-plane] Using manifest folder "/etc/kubernetes/manifests"
[control-plane] Creating static Pod manifest for "kube-apiserver"
[control-plane] Creating static Pod manifest for "kube-controller-manager"
W0503 14:07:30.908642   10124 manifests.go:225] the default kube-apiserver authorization-mode is "Node,RBAC"; using "Node,RBAC"
[control-plane] Creating static Pod manifest for "kube-scheduler"
W0503 14:07:30.911330   10124 manifests.go:225] the default kube-apiserver authorization-mode is "Node,RBAC"; using "Node,RBAC"
[etcd] Creating static Pod manifest for local etcd in "/etc/kubernetes/manifests"
[wait-control-plane] Waiting for the kubelet to boot up the control plane as static Pods from directory "/etc/kubernetes/manifests". This can take up to 4m0s
[apiclient] All control plane components are healthy after 22.506521 seconds
[upload-config] Storing the configuration used in ConfigMap "kubeadm-config" in the "kube-system" Namespace
[kubelet] Creating a ConfigMap "kubelet-config-1.18" in namespace kube-system with the configuration for the kubelets in the cluster
[upload-certs] Skipping phase. Please see --upload-certs
[mark-control-plane] Marking the node k8s-node1 as control-plane by adding the label "node-role.kubernetes.io/master=''"
[mark-control-plane] Marking the node k8s-node1 as control-plane by adding the taints [node-role.kubernetes.io/master:NoSchedule]
[bootstrap-token] Using token: sg47f3.4asffoi6ijb8ljhq
[bootstrap-token] Configuring bootstrap tokens, cluster-info ConfigMap, RBAC Roles
[bootstrap-token] configured RBAC rules to allow Node Bootstrap tokens to get nodes
[bootstrap-token] configured RBAC rules to allow Node Bootstrap tokens to post CSRs in order for nodes to get long term certificate credentials
[bootstrap-token] configured RBAC rules to allow the csrapprover controller automatically approve CSRs from a Node Bootstrap Token
[bootstrap-token] configured RBAC rules to allow certificate rotation for all node client certificates in the cluster
[bootstrap-token] Creating the "cluster-info" ConfigMap in the "kube-public" namespace
[kubelet-finalize] Updating "/etc/kubernetes/kubelet.conf" to point to a rotatable kubelet client certificate and key
[addons] Applied essential addon: CoreDNS
[addons] Applied essential addon: kube-proxy
#Indicates that kubernetes has been initialized successfully
Your Kubernetes control-plane has initialized successfully!

To start using your cluster, you need to run the following as a regular user:

  mkdir -p $HOME/.kube
  sudo cp -i /etc/kubernetes/admin.conf $HOME/.kube/config
  sudo chown $(id -u):$(id -g) $HOME/.kube/config

You should now deploy a pod network to the cluster.
Run "kubectl apply -f [podnetwork].yaml" with one of the options listed at:
  https://kubernetes.io/docs/concepts/cluster-administration/addons/

Then you can join any number of worker nodes by running the following on each as root:

kubeadm join 10.0.2.15:6443 --token sg47f3.4asffoi6ijb8ljhq \
    --discovery-token-ca-cert-hash sha256:81fccdd29970cbc1b7dc7f171ac0234d53825bdf9b05428fc9e6767436991bfb
[root@k8s-node1 opt]#
- 1
- 2
- 3
- 4
- 5
- 6
- 7
- 8
- 9
- 10
- 11
- 12
- 13
- 14
- 15
- 16
- 17
- 18
- 19
- 20
- 21
- 22
- 23
- 24
- 25
- 26
- 27
- 28
- 29
- 30
- 31
- 32
- 33
- 34
- 35
- 36
- 37
- 38
- 39
- 40
- 41
- 42
- 43
- 44
- 45
- 46
- 47
- 48
- 49
- 50
- 51
- 52
- 53
- 54
- 55
- 56
- 57
- 58
- 59
- 60
- 61
- 62
- 63
- 64
- 65
- 66
- 67
- 68
- 69
- 70
- 71
- 72
- 73
- 74
- 75
- 76
- 77
- 78
Due to the default pull image address k8s Cr.io cannot be accessed in China. Alibaba cloud warehouse address is specified here. You can manually follow our images SH first pull the image.
The address changes to: Registry aliyuncs. com/googole_ Containers are OK.
Popular science: classless inter domain routing (CIDR) is a method for assigning IP addresses to users and effectively routing IP packets on the Internet.
The pull may fail and the image needs to be downloaded.
Run complete advance replication: the token to join the cluster.
(2) Test Kubectl (executed by master node)
mkdir -p $HOME/.kube
sudo cp -i /etc/kubernetes/admin.conf $HOME/.kube/config
sudo chown $(id -u):$(id -g) $HOME/.kube/config
- 1
- 2
- 3
Detailed deployment documents: https://kubernetes.io/docs/concepts/cluster-administration/addons/
kubectl get nodes #Get all nodes
- 1
At present, the Master status is not ready. Wait for the network to join.
journalctl -u kubelet #View kubelet log
- 1
kubeadm join 10.0.2.4:6443 --token bt3hkp.yxnpzsgji4a6edy7 \
    --discovery-token-ca-cert-hash sha256:64949994a89c53e627d68b115125ff753bfe6ff72a26eb561bdc30f32837415a
- 1
- 2
7) Install POD network plug-in (CNI)
Execute the network plug-in according to POD on the master node
kubectl apply -f \
https://raw.githubusercontent.com/coreos/flanne/master/Documentation/kube-flannel.yml
- 1
- 2
The above address may be blocked. You can directly obtain the downloaded flannel Just run YML( https://blog.csdn.net/lxm1720161656/article/details/106436252 You can download it), such as:
[root@k8s-node1 k8s]# kubectl apply -f  kube-flannel.yml
podsecuritypolicy.policy/psp.flannel.unprivileged created
clusterrole.rbac.authorization.k8s.io/flannel created
clusterrolebinding.rbac.authorization.k8s.io/flannel created
serviceaccount/flannel created
configmap/kube-flannel-cfg created
daemonset.apps/kube-flannel-ds-amd64 created
daemonset.apps/kube-flannel-ds-arm64 created
daemonset.apps/kube-flannel-ds-arm created
daemonset.apps/kube-flannel-ds-ppc64le created
daemonset.apps/kube-flannel-ds-s390x created
[root@k8s-node1 k8s]#
- 1
- 2
- 3
- 4
- 5
- 6
- 7
- 8
- 9
- 10
- 11
- 12
At the same time, flannel The images specified in YML cannot be accessed. You can go to the docker hub to find a wget yml address
vi modify yml the addresses of all amd64
Wait about 3 minutes
Kubectl get Pods - n Kube system view pods for the specified namespace
Kubectl get Pods - all namespace view pods for all namespaces
$ip link set cni0 down if there is a problem with the network, shut down cni0, restart the virtual machine and continue the test
Execute watch kubectl get Pod - n Kube system - O wide to monitor the progress of pod
Wait for 3-10 minutes and continue after running
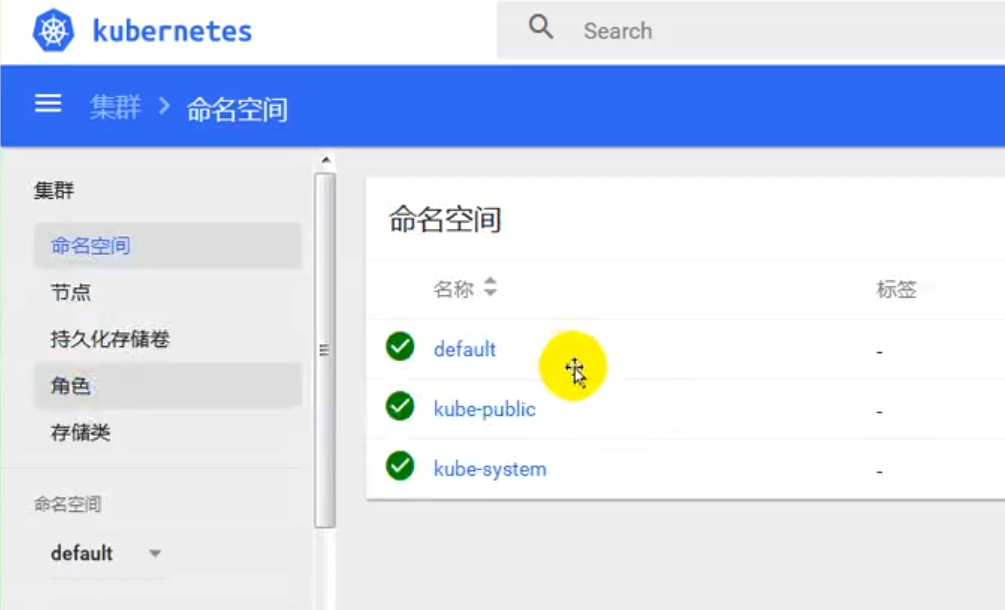
View namespace:
[root@k8s-node1 k8s]# kubectl get ns
NAME              STATUS   AGE
default           Active   30m
kube-node-lease   Active   30m
kube-public       Active   30m
kube-system       Active   30m
[root@k8s-node1 k8s]#
- 1
- 2
- 3
- 4
- 5
- 6
- 7
[root@k8s-node1 k8s]# kubectl get pods --all-namespaces
NAMESPACE     NAME                                READY   STATUS    RESTARTS   AGE
kube-system   coredns-546565776c-9sbmk            0/1     Pending   0          31m
kube-system   coredns-546565776c-t68mr            0/1     Pending   0          31m
kube-system   etcd-k8s-node1                      1/1     Running   0          31m
kube-system   kube-apiserver-k8s-node1            1/1     Running   0          31m
kube-system   kube-controller-manager-k8s-node1   1/1     Running   0          31m
kube-system   kube-flannel-ds-amd64-6xwth         1/1     Running   0          2m50s
kube-system   kube-proxy-sz2vz                    1/1     Running   0          31m
kube-system   kube-scheduler-k8s-node1            1/1     Running   0          31m
[root@k8s-node1 k8s]#
- 1
- 2
- 3
- 4
- 5
- 6
- 7
- 8
- 9
- 10
- 11
To view node information on the master:
[root@k8s-node1 k8s]# kubectl get nodes
NAME        STATUS   ROLES    AGE   VERSION
k8s-node1   Ready    master   34m   v1.17.3   #The following command can be executed only when the status is ready
[root@k8s-node1 k8s]#
- 1
- 2
- 3
- 4
Finally, execute again, and execute the commands here on "k8s-node2" and "k8s-node3" respectively:
kubeadm join 10.0.2.4:6443 --token bt3hkp.yxnpzsgji4a6edy7 \
    --discovery-token-ca-cert-hash sha256:64949994a89c53e627d68b115125ff753bfe6ff72a26eb561bdc30f32837415a
- 1
- 2
[root@k8s-node1 opt]# kubectl get nodes;
NAME        STATUS     ROLES    AGE   VERSION
k8s-node1   Ready      master   47m   v1.17.3
k8s-node2   NotReady   <none>   75s   v1.17.3
k8s-node3   NotReady   <none>   76s   v1.17.3
[root@k8s-node1 opt]#
- 1
- 2
- 3
- 4
- 5
- 6
Monitor pod progress
# Execute on master
watch kubectl get pod -n kube-system -o wide
- 1
- 2
After all statuses change to running status, check the node information again:
[root@k8s-node1 ~]#  kubectl get nodes;
NAME        STATUS   ROLES    AGE     VERSION
k8s-node1   Ready    master   3h50m   v1.17.3
k8s-node2   Ready    <none>   3h3m    v1.17.3
k8s-node3   Ready    <none>   3h3m    v1.17.3
[root@k8s-node1 ~]#
- 1
- 2
- 3
- 4
- 5
- 6
8) Node joining kubenetes
Execute in the node node, add a new node to the cluster, and execute the kubedm join command output in kubedm init;
Ensure that the node node is successful:
What if the token expires
kubeadm token create --print-join-command
9) Getting started kubernetes cluster
1. Deploy a tomcat on the master node
kubectl create deployment tomcat6 --image=tomcat:6.0.53-jre8
- 1
Get all resources:
[root@k8s-node1 k8s]# kubectl get all
NAME                           READY   STATUS              RESTARTS   AGE
pod/tomcat6-7b84fb5fdc-cfd8g   0/1     ContainerCreating   0          41s

NAME                 TYPE        CLUSTER-IP   EXTERNAL-IP   PORT(S)   AGE
service/kubernetes   ClusterIP   10.96.0.1    <none>        443/TCP   70m

NAME                      READY   UP-TO-DATE   AVAILABLE   AGE
deployment.apps/tomcat6   0/1     1            0           41s

NAME                                 DESIRED   CURRENT   READY   AGE
replicaset.apps/tomcat6-7b84fb5fdc   1         1         0       41s
[root@k8s-node1 k8s]#
- 1
- 2
- 3
- 4
- 5
- 6
- 7
- 8
- 9
- 10
- 11
- 12
- 13
It can be deployed to - 8betom3 widgets, and you can see that it can be deployed to - 8betom3 widgets
[root@k8s-node1 k8s]# kubectl get all -o wide
NAME                           READY   STATUS              RESTARTS   AGE   IP       NODE        NOMINATED NODE   READINESS GATES
pod/tomcat6-5f7ccf4cb9-xhrr9   0/1     ContainerCreating   0          77s   <none>   k8s-node3   <none>           <none>

NAME                 TYPE        CLUSTER-IP   EXTERNAL-IP   PORT(S)   AGE   SELECTOR
service/kubernetes   ClusterIP   10.96.0.1    <none>        443/TCP   68m   <none>

NAME                      READY   UP-TO-DATE   AVAILABLE   AGE   CONTAINERS   IMAGES               SELECTOR
deployment.apps/tomcat6   0/1     1            0           77s   tomcat       tomcat:6.0.53-jre8   app=tomcat6

NAME                                 DESIRED   CURRENT   READY   AGE   CONTAINERS   IMAGES               SELECTOR
replicaset.apps/tomcat6-5f7ccf4cb9   1         1         0       77s   tomcat       tomcat:6.0.53-jre8   app=tomcat6,pod-template-hash=5f7ccf4cb9
- 1
- 2
- 3
- 4
- 5
- 6
- 7
- 8
- 9
- 10
- 11
- 12
Check which images have been downloaded on the node3 node:
[root@k8s-node3 k8s]# docker images
REPOSITORY                                                       TAG             IMAGE ID       CREATED         SIZE
registry.cn-hangzhou.aliyuncs.com/google_containers/kube-proxy   v1.17.3         ae853e93800d   14 months ago   116MB
quay.io/coreos/flannel                                           v0.11.0-amd64   ff281650a721   2 years ago     52.6MB
registry.cn-hangzhou.aliyuncs.com/google_containers/pause        3.1             da86e6ba6ca1   3 years ago     742kB
tomcat                                                           6.0.53-jre8     49ab0583115a   3 years ago     290MB
- 1
- 2
- 3
- 4
- 5
- 6
- 7
View the running containers on Node3 node:
[root@k8s-node3 k8s]# docker ps
CONTAINER ID   IMAGE                                                            COMMAND                  CREATED              STATUS              PORTS     NAMES
8a197fa41dd9   tomcat                                                           "catalina.sh run"        About a minute ago   Up About a minute             k8s_tomcat_tomcat6-5f7ccf4cb9-xhrr9_default_81f186a8-4805-4bbb-8d77-3142269942ed_0
4074d0d63a88   registry.cn-hangzhou.aliyuncs.com/google_containers/pause:3.1    "/pause"                 2 minutes ago        Up 2 minutes                  k8s_POD_tomcat6-5f7ccf4cb9-xhrr9_default_81f186a8-4805-4bbb-8d77-3142269942ed_0
db3faf3a280d   ff281650a721                                                     "/opt/bin/flanneld -..."   29 minutes ago       Up 29 minutes                 k8s_kube-flannel_kube-flannel-ds-amd64-vcktd_kube-system_31ca3556-d6c3-48b2-b393-35ff7d89a078_0
be461b54cb4b   registry.cn-hangzhou.aliyuncs.com/google_containers/kube-proxy   "/usr/local/bin/kube..."   30 minutes ago       Up 30 minutes                 k8s_kube-proxy_kube-proxy-ptq2t_kube-system_0e1f7df3-7204-481d-bf15-4b0e09cf0c81_0
88d1ab87f400   registry.cn-hangzhou.aliyuncs.com/google_containers/pause:3.1    "/pause"                 31 minutes ago       Up 31 minutes                 k8s_POD_kube-flannel-ds-amd64-vcktd_kube-system_31ca3556-d6c3-48b2-b393-35ff7d89a078_0
52be28610a02   registry.cn-hangzhou.aliyuncs.com/google_containers/pause:3.1    "/pause"                 31 minutes ago       Up 31 minutes                 k8s_POD_kube-proxy-ptq2t_kube-system_0e1f7df3-7204-481d-bf15-4b0e09cf0c81_0
- 1
- 2
- 3
- 4
- 5
- 6
- 7
- 8
Execute on node1:
[root@k8s-node1 k8s]# kubectl get pods
NAME                       READY   STATUS    RESTARTS   AGE
tomcat6-7b84fb5fdc-cfd8g   1/1     Running   0          5m35s

[root@k8s-node1 k8s]# kubectl get pods --all-namespaces
NAMESPACE     NAME                                READY   STATUS    RESTARTS   AGE
default       tomcat6-7b84fb5fdc-cfd8g            1/1     Running   0          163m
kube-system   coredns-546565776c-9sbmk            1/1     Running   0          3h52m
kube-system   coredns-546565776c-t68mr            1/1     Running   0          3h52m
kube-system   etcd-k8s-node1                      1/1     Running   0          3h52m
kube-system   kube-apiserver-k8s-node1            1/1     Running   0          3h52m
kube-system   kube-controller-manager-k8s-node1   1/1     Running   0          3h52m
kube-system   kube-flannel-ds-amd64-5xs5j         1/1     Running   0          3h6m
kube-system   kube-flannel-ds-amd64-6xwth         1/1     Running   0          3h24m
kube-system   kube-flannel-ds-amd64-fvnvx         1/1     Running   0          3h6m
kube-system   kube-proxy-7tkvl                    1/1     Running   0          3h6m
kube-system   kube-proxy-mvlnk                    1/1     Running   0          3h6m
kube-system   kube-proxy-sz2vz                    1/1     Running   0          3h52m
kube-system   kube-scheduler-k8s-node1            1/1     Running   0          3h52m
[root@k8s-node1 ~]#
- 1
- 2
- 3
- 4
- 5
- 6
- 7
- 8
- 9
- 10
- 11
- 12
- 13
- 14
- 15
- 16
- 17
- 18
- 19
- 20
From the above, we can see that tomcat is deployed on node3. Now simulate the downtime due to various reasons, turn off the power of node3 and observe the situation.
When docker stop is executed, docker ps finds a new container, which is k8s newly created, so it chooses to shut down node3
[root@k8s-node1 k8s]# kubectl get nodes
NAME        STATUS     ROLES    AGE   VERSION
k8s-node1   Ready      master   79m   v1.17.3
k8s-node2   Ready      <none>   41m   v1.17.3
k8s-node3   NotReady   <none>   41m   v1.17.3
- 1
- 2
- 3
- 4
- 5
It will take a few minutes to recover from the disaster
[root@k8s-node1 k8s]# kubectl get pods -o wide
NAME                       READY   STATUS        RESTARTS   AGE     IP           NODE        NOMINATED NODE   READINESS GATES
tomcat6-5f7ccf4cb9-clcpr   1/1     Running       0          4m16s   10.244.1.2   k8s-node2   <none>           <none>
tomcat6-5f7ccf4cb9-xhrr9   1/1     Terminating   1          22m     10.244.2.2   k8s-node3   <none>           <none>
- 1
- 2
- 3
- 4
2. Expose nginx access
Execute on master
kubectl expose deployment tomcat6 --port=80 --target-port=8080 --type=NodePort
- 1
The 80 of pod maps to the 8080 of container; server will bring 80% of pod
View services:
[root@k8s-node1 k8s]# kubectl get svc
NAME         TYPE        CLUSTER-IP   EXTERNAL-IP   PORT(S)        AGE
kubernetes   ClusterIP   10.96.0.1    <none>        443/TCP        93m
tomcat6      NodePort    10.96.7.78   <none>        80:30055/TCP   8s
- 1
- 2
- 3
- 4
[root@k8s-node1 k8s]# kubectl get svc -o wide
NAME         TYPE        CLUSTER-IP   EXTERNAL-IP   PORT(S)        AGE     SELECTOR
kubernetes   ClusterIP   10.96.0.1    <none>        443/TCP        103m    <none>
tomcat6      NodePort    10.96.7.78   <none>        80:30055/TCP   9m38s   app=tomcat6
- 1
- 2
- 3
- 4
Browser input: http://192.168.56.100:30055/ , you can see the home page of tomcat
Enter the following command to see the pod and the service encapsulating the pod. The pod is generated by deployment, and there is a copy of the deployment
[root@k8s-node1 ~]# kubectl get all
NAME                           READY   STATUS    RESTARTS   AGE
pod/tomcat6-5f7ccf4cb9-clcpr   1/1     Running   0          4h12m

NAME                 TYPE        CLUSTER-IP   EXTERNAL-IP   PORT(S)        AGE
service/kubernetes   ClusterIP   10.96.0.1    <none>        443/TCP        5h37m
service/tomcat6      NodePort    10.96.7.78   <none>        80:30055/TCP   4h3m

NAME                      READY   UP-TO-DATE   AVAILABLE   AGE
deployment.apps/tomcat6   1/1     1            1           4h30m

NAME                                 DESIRED   CURRENT   READY   AGE
replicaset.apps/tomcat6-5f7ccf4cb9   1         1         1       4h30m
- 1
- 2
- 3
- 4
- 5
- 6
- 7
- 8
- 9
- 10
- 11
- 12
- 13
- 14
3. Dynamic capacity expansion test
kubectl get deployment
[root@k8s-node1 ~]# kubectl get deployment
NAME      READY   UP-TO-DATE   AVAILABLE   AGE
tomcat6   2/2     2            2           11h
[root@k8s-node1 ~]#
- 1
- 2
- 3
- 4
Application upgrade: kubectl set image (– help view help)
Capacity expansion: kubectl scale --replicas=3 deployment tomcat6
[root@k8s-node1 ~]# kubectl scale --replicas=3 deployment tomcat6
deployment.apps/tomcat6 scaled
[root@k8s-node1 ~]# kubectl get pods -o wide
NAME                       READY   STATUS    RESTARTS   AGE     IP           NODE        NOMINATED NODE   READINESS GATES
tomcat6-5f7ccf4cb9-clcpr   1/1     Running   0          4h23m   10.244.1.2   k8s-node2   <none>           <none>
tomcat6-5f7ccf4cb9-jbvr4   1/1     Running   0          9s      10.244.2.3   k8s-node3   <none>           <none>
tomcat6-5f7ccf4cb9-ng556   1/1     Running   0          9s      10.244.2.4   k8s-node3   <none>           <none>

[root@k8s-node1 ~]# kubectl get svc -o wide
NAME         TYPE        CLUSTER-IP   EXTERNAL-IP   PORT(S)        AGE     SELECTOR
kubernetes   ClusterIP   10.96.0.1    <none>        443/TCP        5h48m   <none>
tomcat6      NodePort    10.96.7.78   <none>        80:30055/TCP   4h15m   app=tomcat6
- 1
- 2
- 3
- 4
- 5
- 6
- 7
- 8
- 9
- 10
- 11
- 12
It has expanded the capacity of multiple copies. No matter which node's designated port is accessed, tomcat6 can be accessed
http://192.168.56.101:30055/
http://192.168.56.102:30055/
Volume reduction: kubectl scale --replicas=2 deployment tomcat6
[root@k8s-node1 ~]# kubectl scale --replicas=1 deployment tomcat6
deployment.apps/tomcat6 scaled

[root@k8s-node1 ~]# kubectl get pods -o wide
NAME                       READY   STATUS    RESTARTS   AGE     IP           NODE        NOMINATED NODE   READINESS GATES
tomcat6-5f7ccf4cb9-clcpr   1/1     Running   0          4h32m   10.244.1.2   k8s-node2   <none>           <none>

[root@k8s-node1 ~]# kubectl get all
NAME                           READY   STATUS    RESTARTS   AGE
pod/tomcat6-5f7ccf4cb9-clcpr   1/1     Running   0          4h33m

NAME                 TYPE        CLUSTER-IP   EXTERNAL-IP   PORT(S)        AGE
service/kubernetes   ClusterIP   10.96.0.1    <none>        443/TCP        5h58m
service/tomcat6      NodePort    10.96.7.78   <none>        80:30055/TCP   4h24m

NAME                      READY   UP-TO-DATE   AVAILABLE   AGE
deployment.apps/tomcat6   1/1     1            1           4h51m

NAME                                 DESIRED   CURRENT   READY   AGE
replicaset.apps/tomcat6-5f7ccf4cb9   1         1         1       4h51m
- 1
- 2
- 3
- 4
- 5
- 6
- 7
- 8
- 9
- 10
- 11
- 12
- 13
- 14
- 15
- 16
- 17
- 18
- 19
- 20
- 21
4. yaml acquisition of the above operations
Reference k8s details
5. Delete
kubectl get all
[root@k8s-node1 ~]# kubectl get all
NAME                           READY   STATUS    RESTARTS   AGE
pod/tomcat6-5f7ccf4cb9-clcpr   1/1     Running   0          4h33m

NAME                 TYPE        CLUSTER-IP   EXTERNAL-IP   PORT(S)        AGE
service/kubernetes   ClusterIP   10.96.0.1    <none>        443/TCP        5h58m
service/tomcat6      NodePort    10.96.7.78   <none>        80:30055/TCP   4h24m

NAME                      READY   UP-TO-DATE   AVAILABLE   AGE
deployment.apps/tomcat6   1/1     1            1           4h51m

NAME                                 DESIRED   CURRENT   READY   AGE
replicaset.apps/tomcat6-5f7ccf4cb9   1         1         1       4h51m
#Delete deployment apps/tomcat6
[root@k8s-node1 ~]# kubectl delete deployment.apps/tomcat6
deployment.apps "tomcat6" deleted
#View remaining resources
[root@k8s-node1 ~]# kubectl get all
NAME                 TYPE        CLUSTER-IP   EXTERNAL-IP   PORT(S)        AGE
service/kubernetes   ClusterIP   10.96.0.1    <none>        443/TCP        6h
service/tomcat6      NodePort    10.96.7.78   <none>        80:30055/TCP   4h26m
# At this time, there is no deployment, but there is a service, no pod, only a service, and there is no corresponding service

# View pod information
[root@k8s-node1 ~]# kubectl get pods
No resources found in default namespace.
- 1
- 2
- 3
- 4
- 5
- 6
- 7
- 8
- 9
- 10
- 11
- 12
- 13
- 14
- 15
- 16
- 17
- 18
- 19
- 20
- 21
- 22
- 23
- 24
- 25
- 26
- 27
kubectl delete deploye/nginx
kubectl delete service/nginx-service
3, docker depth
4, K8s details
1. kubectl document
https://kubernetes.io/zh/docs/reference/kubectl/overview/
2. Resource type
https://kubernetes.io/zh/docs/reference/kubectl/overview/# Resource type
3. Format output
https://kubernetes.io/zh/docs/reference/kubectl/overview/
The default output format for all kubectl commands is human readable plain text. To output details to a terminal window in a specific format, you can add the - o # or -- output # parameter to the supported # kubectl # command.
grammar
kubectl [command] [TYPE] [NAME] -o=<output_format>
- 1
According to the kubectl operation, the following output formats are supported:
| Output format | Description |
|---|---|
| -o custom-columns= | Comma separated Custom column List print table. |
| -o custom-columns-file= | Use the in the ` ` file Custom column Template print table. |
| -o json | Output API objects in JSON format |
| `-o jsonpath= | Print jsonpath Expression defined fields |
| -o jsonpath-file= | Print ` ` in file jsonpath The field defined by the expression. |
| -o name | Print only the resource name and nothing else. |
| -o wide | Output in plain text format with any additional information. For pod, include the node name. |
| -o yaml | Output API objects in YAML format. |
Examples
In this example, the following command outputs the details of a single pod as an object in YAML format:
kubectl get pod web-pod-13je7 -o yaml
- 1
Remember: for more information about which output formats are supported for each command, see kubectl Reference documentation.
–dry-run:
–dry-run='none': Must be "none", "server", or "client". If client strategy, only print the object that would be
sent, without sending it. If server strategy, submit server-side request without persisting the resource.
The value must be none, server or client. If it is a client policy, only the sending object is printed, but it is not sent. If the server policy, submit the server-side request without persisting the resource.
In other words, this command will not be executed through the – dry run option.
[root@k8s-node1 ~]# kubectl create deployment tomcat6 --image=tomcat:6.0.53-jre8 --dry-run -o yaml

W0504 03:39:08.389369    8107 helpers.go:535] --dry-run is deprecated and can be replaced with --dry-run=client.
apiVersion: apps/v1
kind: Deployment
metadata:
  creationTimestamp: null
  labels:
    app: tomcat6
  name: tomcat6
spec:
  replicas: 1
  selector:
    matchLabels:
      app: tomcat6
  strategy: {}
  template:
    metadata:
      creationTimestamp: null
      labels:
        app: tomcat6
    spec:
      containers:
      - image: tomcat:6.0.53-jre8
        name: tomcat
        resources: {}
status: {}
[root@k8s-node1 ~]#
- 1
- 2
- 3
- 4
- 5
- 6
- 7
- 8
- 9
- 10
- 11
- 12
- 13
- 14
- 15
- 16
- 17
- 18
- 19
- 20
- 21
- 22
- 23
- 24
- 25
- 26
- 27
- 28
In fact, we can also output this yaml to a file, and then use kubectl apply -f to apply it
#Output to Tomcat6 yaml
[root@k8s-node1 ~]# kubectl create deployment tomcat6 --image=tomcat:6.0.53-jre8 --dry-run -o yaml >tomcat6.yaml
W0504 03:46:18.180366   11151 helpers.go:535] --dry-run is deprecated and can be replaced with --dry-run=client.

#The number of modified copies is 3
[root@k8s-node1 ~]# cat tomcat6.yaml
apiVersion: apps/v1
kind: Deployment
metadata:
  creationTimestamp: null
  labels:
    app: tomcat6
  name: tomcat6
spec:
  replicas: 3     #The number of modified copies is 3
  selector:
    matchLabels:
      app: tomcat6
  strategy: {}
  template:
    metadata:
      creationTimestamp: null
      labels:
        app: tomcat6
    spec:
      containers:
      - image: tomcat:6.0.53-jre8
        name: tomcat
        resources: {}
status: {}

#Application Tomcat6 yaml
[root@k8s-node1 ~]# kubectl apply -f tomcat6.yaml
deployment.apps/tomcat6 created
[root@k8s-node1 ~]#
- 1
- 2
- 3
- 4
- 5
- 6
- 7
- 8
- 9
- 10
- 11
- 12
- 13
- 14
- 15
- 16
- 17
- 18
- 19
- 20
- 21
- 22
- 23
- 24
- 25
- 26
- 27
- 28
- 29
- 30
- 31
- 32
- 33
- 34
- 35
View pods:
[root@k8s-node1 ~]# kubectl get pods
NAME                       READY   STATUS    RESTARTS   AGE
tomcat6-7b84fb5fdc-5jh6t   1/1     Running   0          8s
tomcat6-7b84fb5fdc-8lhwv   1/1     Running   0          8s
tomcat6-7b84fb5fdc-j4qmh   1/1     Running   0          8s
[root@k8s-node1 ~]#
- 1
- 2
- 3
- 4
- 5
- 6
To view the specific information of a pod:
[root@k8s-node1 ~]# kubectl get pods tomcat6-7b84fb5fdc-5jh6t -o yaml
- 1
apiVersion: v1
kind: Pod
metadata:
  creationTimestamp: "2020-05-04T03:50:47Z"
  generateName: tomcat6-7b84fb5fdc-
  labels:
    app: tomcat6
    pod-template-hash: 7b84fb5fdc
  managedFields:
  - apiVersion: v1
    fieldsType: FieldsV1
    fieldsV1:
      f:metadata:
        f:generateName: {}
        f:labels:
          .: {}
          f:app: {}
          f:pod-template-hash: {}
        f:ownerReferences:
          .: {}
          k:{"uid":"292bfe3b-dd63-442e-95ce-c796ab5bdcc1"}:
            .: {}
            f:apiVersion: {}
            f:blockOwnerDeletion: {}
            f:controller: {}
            f:kind: {}
            f:name: {}
            f:uid: {}
      f:spec:
        f:containers:
          k:{"name":"tomcat"}:
            .: {}
            f:image: {}
            f:imagePullPolicy: {}
            f:name: {}
            f:resources: {}
            f:terminationMessagePath: {}
            f:terminationMessagePolicy: {}
        f:dnsPolicy: {}
        f:enableServiceLinks: {}
        f:restartPolicy: {}
        f:schedulerName: {}
        f:securityContext: {}
        f:terminationGracePeriodSeconds: {}
    manager: kube-controller-manager
    operation: Update
    time: "2020-05-04T03:50:47Z"
  - apiVersion: v1
    fieldsType: FieldsV1
    fieldsV1:
      f:status:
        f:conditions:
          k:{"type":"ContainersReady"}:
            .: {}
            f:lastProbeTime: {}
            f:lastTransitionTime: {}
            f:status: {}
            f:type: {}
          k:{"type":"Initialized"}:
            .: {}
            f:lastProbeTime: {}
            f:lastTransitionTime: {}
            f:status: {}
            f:type: {}
          k:{"type":"Ready"}:
            .: {}
            f:lastProbeTime: {}
            f:lastTransitionTime: {}
            f:status: {}
            f:type: {}
        f:containerStatuses: {}
        f:hostIP: {}
        f:phase: {}
        f:podIP: {}
        f:podIPs:
          .: {}
          k:{"ip":"10.244.2.7"}:
            .: {}
            f:ip: {}
        f:startTime: {}
    manager: kubelet
    operation: Update
    time: "2020-05-04T03:50:49Z"
  name: tomcat6-7b84fb5fdc-5jh6t
  namespace: default
  ownerReferences:
  - apiVersion: apps/v1
    blockOwnerDeletion: true
    controller: true
    kind: ReplicaSet
    name: tomcat6-7b84fb5fdc
    uid: 292bfe3b-dd63-442e-95ce-c796ab5bdcc1
  resourceVersion: "46229"
  selfLink: /api/v1/namespaces/default/pods/tomcat6-7b84fb5fdc-5jh6t
  uid: 2f661212-3b03-47e4-bcb8-79782d5c7578
spec:
  containers:
  - image: tomcat:6.0.53-jre8
    imagePullPolicy: IfNotPresent
    name: tomcat
    resources: {}
    terminationMessagePath: /dev/termination-log
    terminationMessagePolicy: File
    volumeMounts:
    - mountPath: /var/run/secrets/kubernetes.io/serviceaccount
      name: default-token-bxqtw
      readOnly: true
  dnsPolicy: ClusterFirst
  enableServiceLinks: true
  nodeName: k8s-node2
  priority: 0
  restartPolicy: Always
  schedulerName: default-scheduler
  securityContext: {}
  serviceAccount: default
  serviceAccountName: default
  terminationGracePeriodSeconds: 30
  tolerations:
  - effect: NoExecute
    key: node.kubernetes.io/not-ready
    operator: Exists
    tolerationSeconds: 300
  - effect: NoExecute
    key: node.kubernetes.io/unreachable
    operator: Exists
    tolerationSeconds: 300
  volumes:
  - name: default-token-bxqtw
    secret:
      defaultMode: 420
      secretName: default-token-bxqtw
status:
  conditions:
  - lastProbeTime: null
    lastTransitionTime: "2020-05-04T03:50:47Z"
    status: "True"
    type: Initialized
  - lastProbeTime: null
    lastTransitionTime: "2020-05-04T03:50:49Z"
    status: "True"
    type: Ready
  - lastProbeTime: null
    lastTransitionTime: "2020-05-04T03:50:49Z"
    status: "True"
    type: ContainersReady
  - lastProbeTime: null
    lastTransitionTime: "2020-05-04T03:50:47Z"
    status: "True"
    type: PodScheduled
  containerStatuses:
  - containerID: docker://18eb0798384ea44ff68712cda9be94b6fb96265206c554a15cee28c288879304
    image: tomcat:6.0.53-jre8
    imageID: docker-pullable://tomcat@sha256:8c643303012290f89c6f6852fa133b7c36ea6fbb8eb8b8c9588a432beb24dc5d
    lastState: {}
    name: tomcat
    ready: true
    restartCount: 0
    started: true
    state:
      running:
        startedAt: "2020-05-04T03:50:49Z"
  hostIP: 10.0.2.4
  phase: Running
  podIP: 10.244.2.7
  podIPs:
  - ip: 10.244.2.7
  qosClass: BestEffort
  startTime: "2020-05-04T03:50:47Z"
- 1
- 2
- 3
- 4
- 5
- 6
- 7
- 8
- 9
- 10
- 11
- 12
- 13
- 14
- 15
- 16
- 17
- 18
- 19
- 20
- 21
- 22
- 23
- 24
- 25
- 26
- 27
- 28
- 29
- 30
- 31
- 32
- 33
- 34
- 35
- 36
- 37
- 38
- 39
- 40
- 41
- 42
- 43
- 44
- 45
- 46
- 47
- 48
- 49
- 50
- 51
- 52
- 53
- 54
- 55
- 56
- 57
- 58
- 59
- 60
- 61
- 62
- 63
- 64
- 65
- 66
- 67
- 68
- 69
- 70
- 71
- 72
- 73
- 74
- 75
- 76
- 77
- 78
- 79
- 80
- 81
- 82
- 83
- 84
- 85
- 86
- 87
- 88
- 89
- 90
- 91
- 92
- 93
- 94
- 95
- 96
- 97
- 98
- 99
- 100
- 101
- 102
- 103
- 104
- 105
- 106
- 107
- 108
- 109
- 110
- 111
- 112
- 113
- 114
- 115
- 116
- 117
- 118
- 119
- 120
- 121
- 122
- 123
- 124
- 125
- 126
- 127
- 128
- 129
- 130
- 131
- 132
- 133
- 134
- 135
- 136
- 137
- 138
- 139
- 140
- 141
- 142
- 143
- 144
- 145
- 146
- 147
- 148
- 149
- 150
- 151
- 152
- 153
- 154
- 155
- 156
- 157
- 158
- 159
- 160
- 161
- 162
- 163
- 164
- 165
- 166
- 167
- 168
Command Reference
https://kubernetes.io/docs/reference/generated/kubectl/kubectl-commands#create
The meaning of service
3,Service Meaning of
1,Deploy a nginx
kubectl create deployment nginx --image=nginx

2,expose nginx visit
kubectl expose deployment nginx --port=80 --type=NodePort

Unified application access portal,
Service Manage a group Pod
 prevent Pod Lost contact (service discovery), define a group Pod Access policy for
 Now we use NodePort In this way, the ports of each node can be accessed Pod,If the node goes down, there will be a problem.
- 1
- 2
- 3
- 4
- 5
- 6
- 7
- 8
- 9
- 10
- 11
- 12
Previously, we deployed and exposed tomcat through the command line. In fact, we can complete these operations through yaml.
#These operations are actually to obtain the yaml template of Deployment
[root@k8s-node1 ~]#  kubectl create deployment tomcat6 --image=tomcat:6.0.53-jre8 --dry-run -o yaml >tomcat6-deployment.yaml
W0504 04:13:28.265432   24263 helpers.go:535] --dry-run is deprecated and can be replaced with --dry-run=client.
[root@k8s-node1 ~]# ls tomcat6-deployment.yaml
tomcat6-deployment.yaml
[root@k8s-node1 ~]#
- 1
- 2
- 3
- 4
- 5
- 6
Modify "tomcat6-deployment.yaml" as follows:
apiVersion: apps/v1
kind: Deployment
metadata:
  labels:
    app: tomcat6
  name: tomcat6
spec:
  replicas: 3
  selector:
    matchLabels:
      app: tomcat6
  template:
    metadata:
      labels:
        app: tomcat6
    spec:
      containers:
      - image: tomcat:6.0.53-jre8
        name: tomcat
- 1
- 2
- 3
- 4
- 5
- 6
- 7
- 8
- 9
- 10
- 11
- 12
- 13
- 14
- 15
- 16
- 17
- 18
- 19
#deploy
[root@k8s-node1 ~]# kubectl apply -f tomcat6-deployment.yaml
deployment.apps/tomcat6 configured


#View resources
[root@k8s-node1 ~]# kubectl get all
NAME                           READY   STATUS    RESTARTS   AGE
pod/tomcat6-7b84fb5fdc-5jh6t   1/1     Running   0          27m
pod/tomcat6-7b84fb5fdc-8lhwv   1/1     Running   0          27m
pod/tomcat6-7b84fb5fdc-j4qmh   1/1     Running   0          27m

NAME                 TYPE        CLUSTER-IP   EXTERNAL-IP   PORT(S)   AGE
service/kubernetes   ClusterIP   10.96.0.1    <none>        443/TCP   14h

NAME                      READY   UP-TO-DATE   AVAILABLE   AGE
deployment.apps/tomcat6   3/3     3            3           27m

NAME                                 DESIRED   CURRENT   READY   AGE
replicaset.apps/tomcat6-7b84fb5fdc   3         3         3       27m
[root@k8s-node1 ~]#
- 1
- 2
- 3
- 4
- 5
- 6
- 7
- 8
- 9
- 10
- 11
- 12
- 13
- 14
- 15
- 16
- 17
- 18
- 19
- 20
- 21
kubectl expose deployment tomcat6 --port=80 --target-port=8080 --type=NodePort --dry-run -o yaml
- 1
apiVersion: v1
kind: Service
metadata:
  creationTimestamp: null
  labels:
    app: tomcat6
  name: tomcat6
spec:
  ports:
  - port: 80
    protocol: TCP
    targetPort: 8080
  selector:
    app: tomcat6
  type: NodePort
status:
  loadBalancer: {}
- 1
- 2
- 3
- 4
- 5
- 6
- 7
- 8
- 9
- 10
- 11
- 12
- 13
- 14
- 15
- 16
- 17
Splice this output with "tomcat6-deployment.yaml" to indicate that the deployment is completed and the service is exposed:
apiVersion: apps/v1
kind: Deployment
metadata:
  labels:
    app: tomcat6
  name: tomcat6
spec:
  replicas: 3
  selector:
    matchLabels:
      app: tomcat6
  template:
    metadata:
      labels:
        app: tomcat6
    spec:
      containers:
      - image: tomcat:6.0.53-jre8
        name: tomcat
---
apiVersion: v1
kind: Service
metadata:
  creationTimestamp: null
  labels:
    app: tomcat6
  name: tomcat6
spec:
  ports:
  - port: 80
    protocol: TCP
    targetPort: 8080
  selector:
    app: tomcat6
  type: NodePort
- 1
- 2
- 3
- 4
- 5
- 6
- 7
- 8
- 9
- 10
- 11
- 12
- 13
- 14
- 15
- 16
- 17
- 18
- 19
- 20
- 21
- 22
- 23
- 24
- 25
- 26
- 27
- 28
- 29
- 30
- 31
- 32
- 33
- 34
- 35
Deploy and expose services
[root@k8s-node1 ~]# kubectl apply -f tomcat6-deployment.yaml
deployment.apps/tomcat6 created
service/tomcat6 created
- 1
- 2
- 3
View service and deployment information
[root@k8s-node1 ~]# kubectl get all
NAME                           READY   STATUS    RESTARTS   AGE
pod/tomcat6-7b84fb5fdc-dsqmb   1/1     Running   0          4s
pod/tomcat6-7b84fb5fdc-gbmxc   1/1     Running   0          5s
pod/tomcat6-7b84fb5fdc-kjlc6   1/1     Running   0          4s

NAME                 TYPE        CLUSTER-IP      EXTERNAL-IP   PORT(S)        AGE
service/kubernetes   ClusterIP   10.96.0.1       <none>        443/TCP        14h
service/tomcat6      NodePort    10.96.147.210   <none>        80:30172/TCP   4s

NAME                      READY   UP-TO-DATE   AVAILABLE   AGE
deployment.apps/tomcat6   3/3     3            3           5s

NAME                                 DESIRED   CURRENT   READY   AGE
replicaset.apps/tomcat6-7b84fb5fdc   3         3         3       5s
[root@k8s-node1 ~]#
- 1
- 2
- 3
- 4
- 5
- 6
- 7
- 8
- 9
- 10
- 11
- 12
- 13
- 14
- 15
- 16
Access 30172 ports of node1, node1 and node3:
[root@k8s-node1 ~]# curl -I http://192.168.56.{100,101,102}:30172/
HTTP/1.1 200 OK
Server: Apache-Coyote/1.1
Accept-Ranges: bytes
ETag: W/"7454-1491118183000"
Last-Modified: Sun, 02 Apr 2017 07:29:43 GMT
Content-Type: text/html
Content-Length: 7454
Date: Mon, 04 May 2020 04:35:35 GMT

HTTP/1.1 200 OK
Server: Apache-Coyote/1.1
Accept-Ranges: bytes
ETag: W/"7454-1491118183000"
Last-Modified: Sun, 02 Apr 2017 07:29:43 GMT
Content-Type: text/html
Content-Length: 7454
Date: Mon, 04 May 2020 04:35:35 GMT

HTTP/1.1 200 OK
Server: Apache-Coyote/1.1
Accept-Ranges: bytes
ETag: W/"7454-1491118183000"
Last-Modified: Sun, 02 Apr 2017 07:29:43 GMT
Content-Type: text/html
Content-Length: 7454
Date: Mon, 04 May 2020 04:35:35 GMT

[root@k8s-node1 ~]#
- 1
- 2
- 3
- 4
- 5
- 6
- 7
- 8
- 9
- 10
- 11
- 12
- 13
- 14
- 15
- 16
- 17
- 18
- 19
- 20
- 21
- 22
- 23
- 24
- 25
- 26
- 27
- 28
- 29
Ingress
Find pod s through Ingress and associate them. Domain name based access
Load balancing of POD through progress controller
Support TCP / UDP layer 4 load balancing and HTTP layer 7 load balancing
- service manages multiple pod s
- Ingress manages multiple service s
Steps:
(1) Deploy Ingress controller
Execute "k8s / ingress controller. Yaml"
[root@k8s-node1 k8s]# kubectl apply -f ingress-controller.yaml
namespace/ingress-nginx created
configmap/nginx-configuration created
configmap/tcp-services created
configmap/udp-services created
serviceaccount/nginx-ingress-serviceaccount created
clusterrole.rbac.authorization.k8s.io/nginx-ingress-clusterrole created
role.rbac.authorization.k8s.io/nginx-ingress-role created
rolebinding.rbac.authorization.k8s.io/nginx-ingress-role-nisa-binding created
clusterrolebinding.rbac.authorization.k8s.io/nginx-ingress-clusterrole-nisa-binding created
daemonset.apps/nginx-ingress-controller created
service/ingress-nginx created
[root@k8s-node1 k8s]#
- 1
- 2
- 3
- 4
- 5
- 6
- 7
- 8
- 9
- 10
- 11
- 12
- 13
see
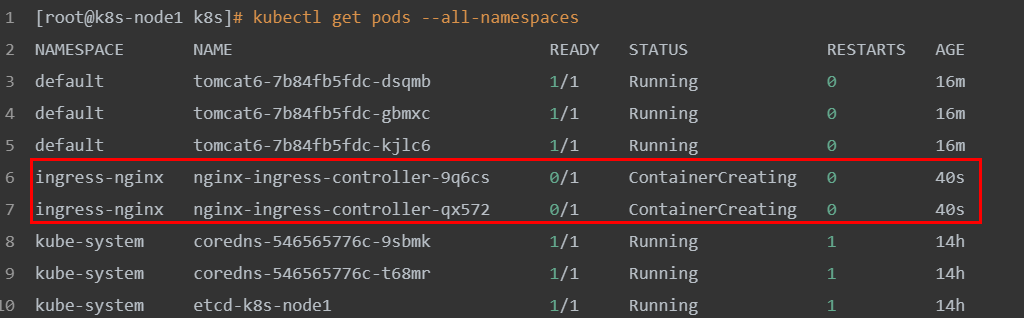
[root@k8s-node1 k8s]# kubectl get pods --all-namespaces
NAMESPACE       NAME                                READY   STATUS              RESTARTS   AGE
default         tomcat6-7b84fb5fdc-dsqmb            1/1     Running             0          16m
default         tomcat6-7b84fb5fdc-gbmxc            1/1     Running             0          16m
default         tomcat6-7b84fb5fdc-kjlc6            1/1     Running             0          16m
ingress-nginx   nginx-ingress-controller-9q6cs      0/1     ContainerCreating   0          40s
ingress-nginx   nginx-ingress-controller-qx572      0/1     ContainerCreating   0          40s
kube-system     coredns-546565776c-9sbmk            1/1     Running             1          14h
kube-system     coredns-546565776c-t68mr            1/1     Running             1          14h
kube-system     etcd-k8s-node1                      1/1     Running             1          14h
kube-system     kube-apiserver-k8s-node1            1/1     Running             1          14h
kube-system     kube-controller-manager-k8s-node1   1/1     Running             1          14h
kube-system     kube-flannel-ds-amd64-5xs5j         1/1     Running             2          13h
kube-system     kube-flannel-ds-amd64-6xwth         1/1     Running             2          14h
kube-system     kube-flannel-ds-amd64-fvnvx         1/1     Running             1          13h
kube-system     kube-proxy-7tkvl                    1/1     Running             1          13h
kube-system     kube-proxy-mvlnk                    1/1     Running             2          13h
kube-system     kube-proxy-sz2vz                    1/1     Running             1          14h
kube-system     kube-scheduler-k8s-node1            1/1     Running             1          14h
[root@k8s-node1 k8s]#
- 1
- 2
- 3
- 4
- 5
- 6
- 7
- 8
- 9
- 10
- 11
- 12
- 13
- 14
- 15
- 16
- 17
- 18
- 19
- 20
Here, the master node is responsible for scheduling, and the specific execution is handed over to node2 and node3. You can see that they are downloading images
(2) Create Ingress rule
apiVersion: extensions/v1beta1
kind: Ingress
metadata:
  name: web
spec:
  rules:
  - host: tomcat6.kubenetes.com
    http:
       paths:
          - backend:
              serviceName: tomcat6
              servicePort: 80
- 1
- 2
- 3
- 4
- 5
- 6
- 7
- 8
- 9
- 10
- 11
- 12
[root@k8s-node1 k8s]# touch ingress-tomcat6.yaml
#Add the above rule to ingress-tomcat6 Yaml file
[root@k8s-node1 k8s]# vi  ingress-tomcat6.yaml

[root@k8s-node1 k8s]# kubectl apply -f ingress-tomcat6.yaml
ingress.extensions/web created
[root@k8s-node1 k8s]#
- 1
- 2
- 3
- 4
- 5
- 6
- 7
Modify the hosts file of this machine and add the following domain name conversion rules:
192.168.56.102 tomcat6.kubenetes.com
- 1
Test: http://tomcat6.kubenetes.com/
And even if one node in the cluster is unavailable, it will not affect the overall operation.
Install kubernetes visual interface - DashBoard
1. Deploy DashBoard
$ kubectl appy -f kubernetes-dashboard.yaml
- 1
The file is available in the "k8s" source directory
2. Expose DashBoard to public access
The default DashBoard can only be accessed inside the cluster. Modify the Service to NodePort type and expose it to the outside
kind: Service
apiVersion: v1
metadata:
  labels:
    k8s-app: kubernetes-dashboard
  name: kubernetes-dashboard
  namespace: kube-system
spec:
  type: NodePort
  ports:
    - port: 443
      targetPort: 8443
      nodePort: 3001
  selector:
    k8s-app: kubernetes-dashboard
- 1
- 2
- 3
- 4
- 5
- 6
- 7
- 8
- 9
- 10
- 11
- 12
- 13
- 14
- 15
Access address: http://NodeIP:30001
3. Create authorized account
$ kubectl create serviceaccount dashboar-admin -n kube-sysem
- 1
$ kubectl create clusterrolebinding dashboar-admin --clusterrole=cluter-admin --serviceaccount=kube-system:dashboard-admin
- 1
$ kubectl describe secrets -n kube-system $( kubectl -n kube-system get secret |awk '/dashboard-admin/{print $1}' )
- 1
Log in to the dashboard using the output token
kubesphere
The default dashboard is useless. We can use kubesphere to get through all devops links. Kubesphere integrates many suites and requires high clustering requirements
https://kubesphere.io
kuboard is also very good, and the cluster requirements are not high
https://kuboard.cn/support/
1. Succinct
kubesphere is an open source project for cloud soundtrack design. The distributed multi-user container management platform built by kubernets IQ, the current mainstream container scheduling platform, provides a simple and easy-to-use operation interface and wizard operation mode, which not only reduces the learning cost of users using the container scheduling platform, but also greatly reduces the complexity of daily work of development, testing, operation and maintenance.
2. Submission of installation premise
1. Install helm (executed by the master node)
Helm is the package manager of kubernetes. The package manager is similar to apt in Ubuntu, yum in centos or pip in python. It can quickly find, download and install software packages. Helm is composed of client component helm and server component Tiller. It can package and manage a group of K8S resources uniformly. It is the best way to find, share and use the software built for kubernetes.
1) Installation
curl -L https://git.io/get_helm.sh|bash
- 1
Due to the wall, use our given get_helm.sh.
[root@k8s-node1 k8s]# ll
total 68
-rw-r--r-- 1 root root  7149 Feb 27 01:58 get_helm.sh
-rw-r--r-- 1 root root  6310 Feb 28 05:16 ingress-controller.yaml
-rw-r--r-- 1 root root   209 Feb 28 13:18 ingress-demo.yml
-rw-r--r-- 1 root root   236 May  4 05:09 ingress-tomcat6.yaml
-rwxr--r-- 1 root root 15016 Feb 26 15:05 kube-flannel.yml
-rw-r--r-- 1 root root  4737 Feb 26 15:38 kubernetes-dashboard.yaml
-rw-r--r-- 1 root root  3841 Feb 27 01:09 kubesphere-complete-setup.yaml
-rw-r--r-- 1 root root   392 Feb 28 11:33 master_images.sh
-rw-r--r-- 1 root root   283 Feb 28 11:34 node_images.sh
-rw-r--r-- 1 root root  1053 Feb 28 03:53 product.yaml
-rw-r--r-- 1 root root   931 May  3 10:08 Vagrantfile
[root@k8s-node1 k8s]# sh get_helm.sh
Downloading https://get.helm.sh/helm-v2.16.6-linux-amd64.tar.gz
Preparing to install helm and tiller into /usr/local/bin
helm installed into /usr/local/bin/helm
tiller installed into /usr/local/bin/tiller
Run 'helm init' to configure helm.
[root@k8s-node1 k8s]#
- 1
- 2
- 3
- 4
- 5
- 6
- 7
- 8
- 9
- 10
- 11
- 12
- 13
- 14
- 15
- 16
- 17
- 18
- 19
- 20
2) Verify version
helm version
- 1
3) Create permission (master execution)
Create helm RBAC Yaml, write the following
apiVersion: v1
kind: ServiceAccount
metadata:
  name: tiller
  namespace: kube-system
---
apiVersion: rbac.authorization.k8s.io/v1
kind: ClusterRoleBinding
metadata:
  name: tiller
roleRef:
  apiGroup: rbac.authorization.k8s.io
  kind: ClusterRole
  name: cluster-admin
subjects:
  - kind: ServiceAccount
    name: kubernetes-dashboard
    namespace: kube-system
- 1
- 2
- 3
- 4
- 5
- 6
- 7
- 8
- 9
- 10
- 11
- 12
- 13
- 14
- 15
- 16
- 17
- 18
Application configuration:
[root@k8s-node1 k8s]#  kubectl apply -f helm-rbac.yaml
serviceaccount/tiller created
clusterrolebinding.rbac.authorization.k8s.io/tiller created
[root@k8s-node1 k8s]#
- 1
- 2
- 3
- 4
2. Install Tilller (Master execution)
1. Initialize
[root@k8s-node1 k8s]# helm init --service-account=tiller --tiller-image=sapcc/tiller:v2.16.3 --history-max 300
Creating /root/.helm
Creating /root/.helm/repository
Creating /root/.helm/repository/cache
Creating /root/.helm/repository/local
Creating /root/.helm/plugins
Creating /root/.helm/starters
Creating /root/.helm/cache/archive
Creating /root/.helm/repository/repositories.yaml
Adding stable repo with URL: https://kubernetes-charts.storage.googleapis.com
Adding local repo with URL: http://127.0.0.1:8879/charts
$HELM_HOME has been configured at /root/.helm.

Tiller (the Helm server-side component) has been installed into your Kubernetes Cluster.

Please note: by default, Tiller is deployed with an insecure 'allow unauthenticated users' policy.
To prevent this, run `helm init` with the --tiller-tls-verify flag.
For more information on securing your installation see: https://v2.helm.sh/docs/securing_installation/
[root@k8s-node1 k8s]#
- 1
- 2
- 3
- 4
- 5
- 6
- 7
- 8
- 9
- 10
- 11
- 12
- 13
- 14
- 15
- 16
- 17
- 18
- 19
– tiler image specifies the image, otherwise it will be blocked by the wall and wait for the tiler deployed on the node to complete.
[root@k8s-node1 k8s]#  kubectl get pods -n kube-system
NAME                                   READY   STATUS             RESTARTS   AGE
coredns-546565776c-9sbmk               1/1     Running            3          23h
coredns-546565776c-t68mr               1/1     Running            3          23h
etcd-k8s-node1                         1/1     Running            3          23h
kube-apiserver-k8s-node1               1/1     Running            3          23h
kube-controller-manager-k8s-node1      1/1     Running            3          23h
kube-flannel-ds-amd64-5xs5j            1/1     Running            4          22h
kube-flannel-ds-amd64-6xwth            1/1     Running            5          23h
kube-flannel-ds-amd64-fvnvx            1/1     Running            4          22h
kube-proxy-7tkvl                       1/1     Running            3          22h
kube-proxy-mvlnk                       1/1     Running            4          22h
kube-proxy-sz2vz                       1/1     Running            3          23h
kube-scheduler-k8s-node1               1/1     Running            3          23h
kubernetes-dashboard-975499656-jxczv   0/1     ImagePullBackOff   0          7h45m
tiller-deploy-8cc566858-67bxb          1/1     Running            0          31s
[root@k8s-node1 k8s]#
- 1
- 2
- 3
- 4
- 5
- 6
- 7
- 8
- 9
- 10
- 11
- 12
- 13
- 14
- 15
- 16
- 17
View all node information of the cluster:
kubectl get node -o wide
- 1
[root@k8s-node1 k8s]#  kubectl get node -o wide
NAME        STATUS   ROLES    AGE   VERSION   INTERNAL-IP   EXTERNAL-IP   OS-IMAGE                KERNEL-VERSION               CONTAINER-RUNTIME
k8s-node1   Ready    master   23h   v1.17.3   10.0.2.15     <none>        CentOS Linux 7 (Core)   3.10.0-957.12.2.el7.x86_64   docker://19.3.8
k8s-node2   Ready    <none>   22h   v1.17.3   10.0.2.4      <none>        CentOS Linux 7 (Core)   3.10.0-957.12.2.el7.x86_64   docker://19.3.8
k8s-node3   Ready    <none>   22h   v1.17.3   10.0.2.5      <none>        CentOS Linux 7 (Core)   3.10.0-957.12.2.el7.x86_64   docker://19.3.8
[root@k8s-node1 k8s]#
- 1
- 2
- 3
- 4
- 5
- 6
2. Testing
helm install stable/nginx-ingress --name nginx-ingress
- 1
Minimize KubeSphere installation
If the available CPU of the cluster is > 1 core and the available memory is > 2 g, you can use the following command to minimize the installation of KubeSphere:
kubectl apply -f https://raw.githubusercontent.com/kubesphere/ks-installer/master/kubesphere-minimal.yaml
- 1
Tip: if your server prompts that you cannot access GitHub, you can kubesphere-minimal.yaml Or kubesphere-complete-setup.yaml Save the above command as a local reference file for static installation.
- Check the installation log of rolling refresh. Please wait patiently for the installation to succeed.
$ kubectl logs -n kubesphere-system $(kubectl get pod -n kubesphere-system -l app=ks-install -o jsonpath='{.items[0].metadata.name}') -f
- 1
Note: if you encounter problems during installation, you can also use the above log commands to troubleshoot the problems