catalogue
Using multiple particle systems
Create the particle image from scratch
Move the particle in the systems
The force function Deconstructed
This tutorial will take you to learn more about special effects, such as weather and rocket blaster.
To understand the basics of particle systems, refer to Getting started with particle systems(Introduction to Particle Systems).
Note: the beginning of the snow tutorial introduces the implementation of North American air defense command tracking Santa Claus.
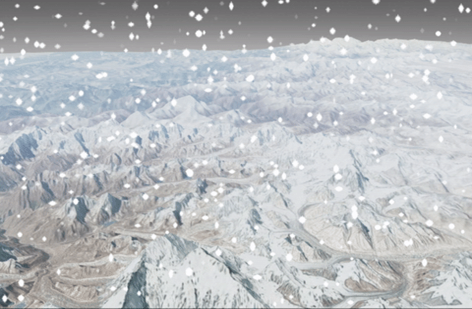
We'll start by explaining how to make snow, and then how to turn snow into rain.
In order to create snow effects, we need to add snowflake pictures for each particle, and define the running behavior of particles and other dynamic elements in the updateParticle function.
- The Images
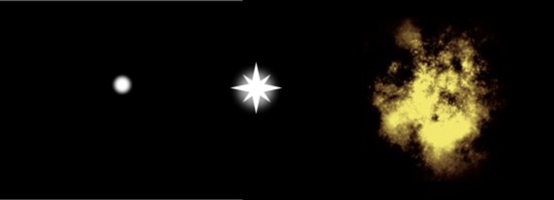
For the image representing each particle, we can start with any color: red, green, white, and so on. Because PNGs supports transparency, we use it to keep the colorless area of the image invisible. In the tutorial of this chapter, the following three pictures are used to create png of particle effects for billboards. On the left is the png used for rain in the tutorial of this chapter; In the middle is png for snow; On the right is Introduction to particle systems(Introduction Particle Systems )png for fire.
As long as we select an image, we can modify its appearance in Cesium, as shown below. For example, we modify the picture of round particles on the left to make it long and blue and look more like raindrops, as shown at the beginning of this chapter. The picture of fire can be changed to green leaves, yellow electric sparks, and even white water splashes / bubble buns at the bottom of the waterfall. Creativity is beneficial here!
In addition, in the rain and snow system, we set the initial opacity to 0 and the final opacity to visible, which means that they are completely invisible when they are created for the first time.
- The Update Function
Update function is the most free place for particle motion, arrangement and visualization. Here we can modify some simple things, such as particle color, image size, particle lifetime and so on. Use this method to make as few or as many modifications as necessary. We can modify the particle according to the distance from the particle to the camera (as shown below), to the imported model, to the earth itself, etc.
The following is the snow update function:
// snow
var snowGravityScratch = new Cesium.Cartesian3();
var snowUpdate = function(particle, dt) {
    snowGravityScratch = Cesium.Cartesian3.normalize(particle.position, snowGravityScratch);
    snowGravityScratch = Cesium.Cartesian3.multiplyByScalar(snowGravityScratch,
                                                            Cesium.Math.randomBetween(-30.0, -300.0),
                                                            snowGravityScratch);
    particle.velocity = Cesium.Cartesian3.add(particle.velocity, snowGravityScratch, particle.velocity);

    var distance = Cesium.Cartesian3.distance(scene.camera.position, particle.position);
    if (distance > (snowRadius)) {
        particle.endColor.alpha = 0.0;
    } else {
        particle.endColor.alpha = snowSystem.endColor.alpha / (distance / snowRadius + 0.1);
    }
};
The first part of the function causes the particle to fall down like gravity.
As a new feature, the update function includes a distance check that allows particles farther away from the user to disappear. The farther away the particles are, the less visible they are, which produces a close-up fog effect.
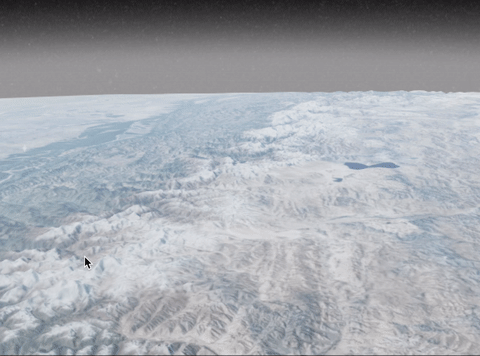
- Additional Weather Effects
In addition to the visual effect of particles disappearing in the distance, this example also includes changes in fog and atmospheric effects to match the type of weather you are trying to replicate.
hueShift changes the color in the spectrum. Saturation shift changes how much color is needed relative to black and white vision. Brightness shift changes the vividness of the color.
The density of fog changes the opacity of the earth's cover with the color of fog. The minimum brightness of fog is the minimum limit of the brightness of fog. It is a method to darken fog.
// snow
scene.skyAtmosphere.hueShift = -0.8;
scene.skyAtmosphere.saturationShift = -0.7;
scene.skyAtmosphere.brightnessShift = -0.33;

scene.fog.density = 0.001;
scene.fog.minimumBrightness = 0.8;
The snow sky above is mainly dark gray with almost no color, while the fog is strong white.
In order to get independent visual effects, we created two different particle systems, one for snow and one for rain.
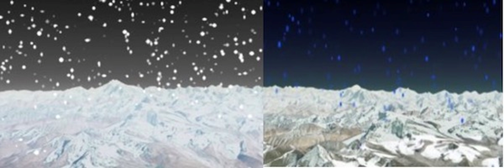
- Snow
The following system uses a sphere emitter based on the center position to create particles. In addition, the picture size used by each particle is random between a given size and twice the size to allow more particle changes.
The snow system has the following properties and all the functions discussed earlier:
var snowParticleSize = scene.drawingBufferWidth / 100.0;
var snowRadius = 100000.0;

var snowSystem = new Cesium.ParticleSystem({
    modelMatrix : new Cesium.Matrix4.fromTranslation(scene.camera.position),
    minimumSpeed : -1.0,
    maximumSpeed : 0.0,
    lifetime : 15.0,
    emitter : new Cesium.SphereEmitter(snowRadius),
    startScale : 0.5,
    endScale : 1.0,
    image : "../../SampleData/snowflake_particle.png",
    emissionRate : 7000.0,
    startColor : Cesium.Color.WHITE.withAlpha(0.0),
    endColor : Cesium.Color.WHITE.withAlpha(1.0),
    minimumImageSize : new Cartesian2(snowParticleSize, snowParticleSize),
    maximumImageSize : new Cartesian2(snowParticleSize * 2.0, snowParticleSize * 2.0),
    updateCallback : snowUpdate
});
scene.primitives.add(snowSystem); - Rain
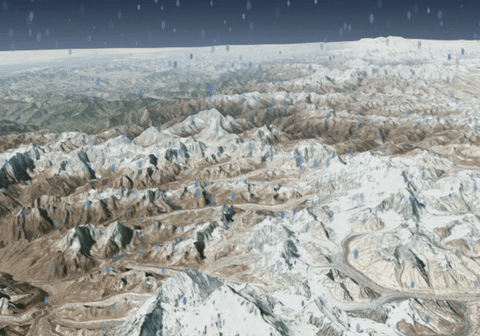
The rain system is as like as two peas, but only with some different characteristics.
Like the snow system, the following system uses a center based sphere emitter to create particles. However, we chose different pictures to represent rain, circular_particle.png, we paint it blue and stretch it vertically to make it look more slender. Different from the snow system example, the image size here is random. Each particle is set to have exactly the same image size, and the height is twice the width.
rainSystem = new Cesium.ParticleSystem({
    modelMatrix : new Cesium.Matrix4.fromTranslation(scene.camera.position),
    speed : -1.0,
    lifetime : 15.0,
    emitter : new Cesium.SphereEmitter(rainRadius),
    startScale : 1.0,
    endScale : 0.0,
    image : "../../SampleData/circular_particle.png",
    emissionRate : 9000.0,
    startColor :new Cesium.Color(0.27, 0.5, 0.70, 0.0),
    endColor : new Cesium.Color(0.27, 0.5, 0.70, 0.98),
    imageSize : new Cesium.Cartesian2(rainParticleSize, rainParticleSize * 2),
    updateCallback : rainUpdate
});
scene.primitives.add(rainSystem);
In addition, the update function of rain is also different, because it falls much faster than snow. The following code shows how to match the visualization by enhancing the scalar multiplication of gravity. We modify the particle Position, not particle Velocity.
// rain
rainGravityScratch = Cesium.Cartesian3.normalize(particle.position, rainGravityScratch);
rainGravityScratch = Cesium.Cartesian3.multiplyByScalar(rainGravityScratch,
                                                        -1050.0,
                                                        rainGravityScratch);

particle.position = Cesium.Cartesian3.add(particle.position, rainGravityScratch, particle.position);
Finally, in order to better match the environment with the scene, modify the atmosphere and fog to match the rain. The following code implements a dark blue sky with mist.
// rain
scene.skyAtmosphere.hueShift = -0.97;
scene.skyAtmosphere.saturationShift = 0.25;
scene.skyAtmosphere.brightnessShift = -0.4;

scene.fog.density = 0.00025;
scene.fog.minimumBrightness = 0.01;
For additional help, you can see the example of snow rain sand castle( Sandcastle example for both snow and rain).
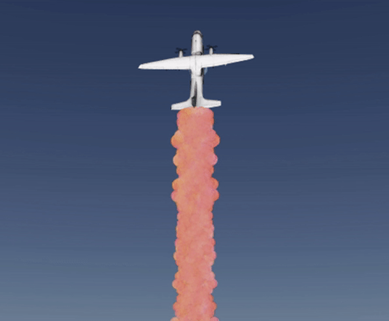
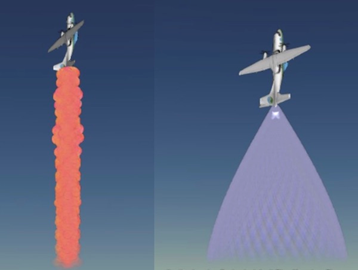
Although the weather system example requires only one particle system, we will need multiple particle systems to create comets and rocket trails. The particle ring created by the example is actually a completely independent particle system at each position. That is, we create a cycle of particle systems, and each particle system emits a particle along the path emitted by the emission position. In this way, the running direction of the system can be better controlled in a more unified way. An easy way to visualize this effect is to limit cometoptions Numberofsystems is 2, cometoption Coloroptions contains only two colors, as shown in the following figure. As the particles of each system form, it is easy to track their trajectories.
To simplify the different system sets, we created arrays to carry independent systems related to comets, rather than systems related to rocket examples.
var rocketSystems = [];
var cometSystems = [];
In addition, we have created two different options for objects, mainly to facilitate organization; One is the comet version and the other is the rocket version. This allows different appearances between two systems with different initial system numbers, offset values, and so on.
var cometOptions = {
    numberOfSystems : 100.0,
    iterationOffset : 0.003,
    cartographicStep : 0.0000001,
    baseRadius : 0.0005,

    colorOptions : [{
        red : 0.6,
        green : 0.6,
        blue : 0.6,
        alpha : 1.0
    }, {
        red : 0.6,
        green : 0.6,
        blue : 0.9,
        alpha : 0.9
    }, {
        red : 0.5,
        green : 0.5,
        blue : 0.7,
        alpha : 0.5
    }]
};

var rocketOptions = {
    numberOfSystems : 50.0,
    iterationOffset :  0.1,
    cartographicStep : 0.000001,
    baseRadius : 0.0005,

    colorOptions : [{
        minimumRed : 1.0,
        green : 0.5,
        minimumBlue : 0.05,
        alpha : 1.0
    }, {
        red : 0.9,
        minimumGreen : 0.6,
        minimumBlue : 0.01,
        alpha : 1.0
    }, {
        red : 0.8,
        green : 0.05,
        minimumBlue : 0.09,
        alpha : 1.0
    }, {
        minimumRed : 1,
        minimumGreen : 0.05,
        blue : 0.09,
        alpha : 1.0
    }]
};
In addition, each group of colorOptions is a color array to support more random visual effects. That is, instead of using settings to initialize colors, we let each system start with a system specific color that is currently created. In the following example, i represents the current iteration.
var color = Cesium.Color.fromRandom(options.colorOptions[i % options.colorOptions.length]);
Use the following function as the initialization program for each system:
function createParticleSystems(options, systemsArray) {
    var length = options.numberOfSystems;
    for (var i = 0; i < length; ++i) {
        scratchAngleForOffset = Math.PI * 2.0 * i / options.numberOfSystems;
        scratchOffset.x += options.baseRadius * Math.cos(scratchAngleForOffset);
        scratchOffset.y += options.baseRadius * Math.sin(scratchAngleForOffset);

        var emitterModelMatrix = Cesium.Matrix4.fromTranslation(scratchOffset, matrix4Scratch);
        var color = Cesium.Color.fromRandom(options.colorOptions[i % options.colorOptions.length]);
        var force = forceFunction(options, i);

        var item = viewer.scene.primitives.add(new Cesium.ParticleSystem({
            image : getImage(),
            startColor : color,
            endColor : color.withAlpha(0.0),
            particleLife : 3.5,
            speed : 0.00005,
            imageSize : new Cesium.Cartesian2(15.0, 15.0),
            emissionRate : 30.0,
            emitter : new Cesium.CircleEmitter(0.1),
            bursts : [ ],
            lifetime : 0.1,
            forces : force,
            modelMatrix : particlesModelMatrix,
            emitterModelMatrix : emitterModelMatrix
        }));
        systemsArray.push(item);
    }
}
Look at the creation function of the system line by line. Options indicates whether we are currently creating comet trails or rocket trails. As mentioned in the system collection section, systemsArray is like this -- as long as we create all ParticleSystems, we can use all systems related to the input options.
Because the two wake versions are similar, we can make the same input except for color and force, which will change in the examples of comets and rockets. In addition, emitterModelMatrix is completely independent for each system. These systems create "rotation offset". In them, each newly created ring seems to have its particles slightly offset from the previous ring.
In addition, we don't actually load the image file here, but we use it directly HTML canvas Create a picture. Although we use it to draw a circle directly, this function makes image creation more malleable. For example, by adding a parameter to getImage that represents the current iteration, each picture can be created according to different parameters, allowing multiple different visual outputs.
var particleCanvas;
function getImage() {
    if (!Cesium.defined(particleCanvas)) {
        particleCanvas = document.createElement('canvas');
        particleCanvas.width = 20;
        particleCanvas.height = 20;
        var context2D = particleCanvas.getContext('2d');
        context2D.beginPath();
        context2D.arc(8, 8, 8, 0, Cesium.Math.TWO_PI, true);
        context2D.closePath();
        context2D.fillStyle = 'rgb(255, 255, 255)';
        context2D.fill();
    }
    return particleCanvas;
}
Now that we have the main idea we want to build, we need a way to actually visualize the created particles. Instead of loading the image as before, here we create an image. Instead of relying on loading files, this approach allows more code based methods to be used.
var particleCanvas;
function getImage() {
    if (!Cesium.defined(particleCanvas)) {
        particleCanvas = document.createElement('canvas');
        particleCanvas.width = 20;
        particleCanvas.height = 20;
        var context2D = particleCanvas.getContext('2d');
        context2D.beginPath();
        context2D.arc(8, 8, 8, 0, Cesium.Math.TWO_PI, true);
        context2D.closePath();
        context2D.fillStyle = 'rgb(255, 255, 255)';
        context2D.fill();
    }
    return particleCanvas;
}
Hold on, let's start with the exciting content of particle motion. Here, you need to fill in the updateCallback function:
var func = function(particle) {
    scratchCartesian3 = Cesium.Cartesian3.normalize(particle.position, new Cesium.Cartesian3());
    scratchCartesian3 = Cesium.Cartesian3.multiplyByScalar(scratchCartesian3, -1.0, scratchCartesian3);

    particle.position = Cesium.Cartesian3.add(particle.position, scratchCartesian3, particle.position);

    scratchCartographic = Cesium.Cartographic.fromCartesian(particle.position,
                                                            Cesium.Ellipsoid.WGS84,
                                                            scratchCartographic);

    var angle = Cesium.Math.PI * 2.0 * iterationOffset / options.numberOfSystems;
    iterationOffset += options.iterationOffset;
    scratchCartographic.longitude += Math.cos(angle) * options.cartographicStep;
    scratchCartographic.latitude += Math.sin(angle) * options.cartographicStep;

    particle.position = Cesium.Cartographic.toCartesian(scratchCartographic);
};
There are two reasons for this: first, in JavaScript, although this can be done, it is not recommended that users create functions in the for loop. Second, the update function requires access to the iteration that created it to allow an appropriate rotation offset (based on angle and iteration threshold) when the function is called by a particle in the system. To solve this problem, we create a help function that returns the correct function we need.
What is the function of updateCallback function and forceFunction? Like createParticleSystems, each system we create has a loop offset, and we also want each particle to update in that direction to provide further loop effects when the system is far from the initialization point.
Iterative offsets on particles not only create the appearance of rotation, but also allow smooth or rough rotation, just like comparing the visual effects of comets and rockets. Instead of setting the new position to the newly calculated angle cosine and sine, add this new value to the previous position. Therefore, a small iterative offset is not enough to adjust the angle, so that the radius increases steadily with the continuation of the system. In turn, a larger iterative offset will change the angle faster and add to the original position; This makes the output more compact, tight and more cylindrical, as shown in the rocket example.
In this tutorial, most of us only apply sine and cosine functions to realize circular effects; However, you can further make, for example, Lissajous curves( Lissajous curve )Gibbs phenomenon( Gibbs phenomenon )And other shapes, and even create square waves as needed( square wave ). In addition, users can completely abandon trigonometry, deal with the position based noise of particle motion, and even do something more interesting. This is the unique innovation of users!
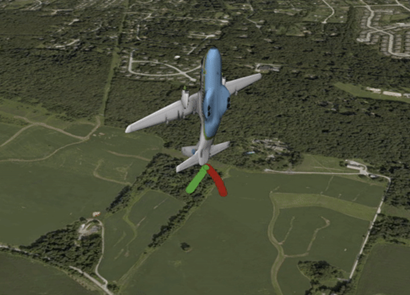
Just as we are in the original Particle system tutorial(Particle Systems Tutorial )Now that we have the special effects we want, we hope to combine it into the appropriate position of the aircraft. Since our system is vertical, in order to get the correct position of the system relative to the aircraft, we need to use the particleOffset value for fine tuning. Use it to create a particleModelMatrix as the overall global positioning matrix of each system. As shown in the createParticleSystems function, for each system we create, an offset is used to populate the emitterModelMatrix, and the calculation of the offset depends on the creation iteration of the system in the loop.
// positioning the plane
var planePosition = Cesium.Cartesian3.fromDegrees(-75.59777, 40.03883, 800.0);
var particlesOffset = new Cesium.Cartesian3(-8.950115473940969, 34.852766731753945, -30.235411095432937);

// creating the particles model matrix
var transl = Cesium.Matrix4.fromTranslation(particlesOffset, new Cesium.Matrix4());
var translPosition = Cesium.Matrix4.fromTranslation(planePosition, new Cesium.Matrix4());
var particlesModelMatrix = Cesium.Matrix4.multiplyTransformation(translPosition, transl, new Cesium.Matrix4());
More help
- For additional help, please check Sandcastle example for both tails examples.
For more sample code, see: