Contents of this article:
13.2 Several network-related file descriptions
13.2.1 Network Card Profile ifcfg-*
13.2.2 DNS Profile/etc/resolve.conf
13.2.3 /etc/udev/rules.d/70-persistent-net.rules
13.3 Network Interface Configuration and Host Name
13.4.2 Configure Permanent Routing
13.6.1 Get help with ip commands
When explaining Linux network management related content, I feel it is necessary to first explain the packet forwarding capabilities and the resulting routing decisions.Then the network configuration commands and related files are introduced.
13.1 Linux Packet Forwarding
If the Linux host has multiple network cards, they cannot communicate with each other unless they are in the same segment address unless packet forwarding is turned on.For example, eth0 is 172.16.10.0/24 and eth1 is 192.168.100.0/24. Packets arriving at the Linux host cannot be handed over from eth0 to eth1 or eth1 to eth0 unless the Linux host has enabled packet forwarding.This is different from router devices, which essentially forward packets across network segments, so router devices are enabled for forwarding by default.
There are several ways to turn on Forwarding on Linux:
shell> echo 1 > /proc/sys/net/ipv4/ip_forward
shell> sysctl -w net.ipv4.ip_forward=1
These two methods are temporary and should be written to the configuration file if they are to be permanent.In CentOS 6, the value of "net.ipv4.ip_forward" in the /etc/sysctl.conf file can be changed to 1. However, in CentOS 7, systemd manages too many functions, and sysctl's configuration files are divided into multiple files, including/etc/sysctl.d/*.conf, etc/sysctl.d/*.conf and/usr/lib/sysctl.d/*.conf, and there are no net.ipv4.ip_forward entries by default in these files.Of course, it is also possible to write this item directly to these configuration files, and it is recommended that you write it in/etc/sysctl.d/*.conf, which is the directory where systemd provides custom kernel modifications.For example:
shell> echo "net.ipv4.ip_forward=1" > /etc/sysctl.d/ip_forward.conf
There are several ways to see if forwarding is turned on.
[root@xuexi ~]# sysctl net.ipv4.ip_forward
net.ipv4.ip_forward = 0

[root@xuexi ~]# cat /proc/sys/net/ipv4/ip_forward
0

[root@xuexi ~]# sysctl -a | grep ip_forward
net.ipv4.ip_forward = 0
net.ipv4.ip_forward_use_pmtu = 0
In addition, IP addresses belong to the kernel (not only, the entire tcp/ip stack belongs to the kernel, including port numbers), and can communicate with one address, regardless of whether packet forwarding is enabled or not.For example, a Linux host has two network cards eth0:172.16.10.5 and eth1:192.168.100.20, and a 192.168.100.22 host gateway points to 192.168.100.20. If it pings 172.16.10.5, the result will be passable because the address belongs to the kernel. When the packets coming from eth1 are analyzed by the kernel, the target address is found to be the local address, and the response packet continues to leave eth1.Do not leave eth1 unless the route is explicitly set.
The following diagram shows the communication mechanism of the Linux host.Suppose the host has two network cards, eth0 and eth1, and they belong to different network segments.
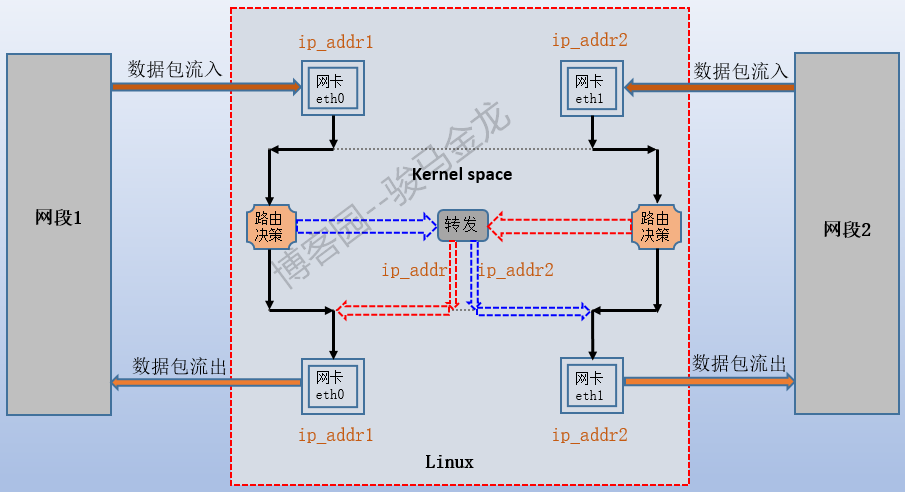
According to the figure above, if the host of segment 1 ping ip_addr1 or ping ip_addr2 enters the packet from eth0, the kernel analyzes the packet and finds that the ultimate destination of the packet is the IP address on the local machine, and the kernel makes routing decisions. Generally, the routing entries for such packets specify that they flow from the direct connection port, eth0.This is the black route shown above.
Although the Segment 1 host can ping through ip_addr2, the packet is not handed over to eth1.
If the segment 1 host Ping segment 2 host, the kernel will analyze the packet when ping's request packet flows from eth0 to the Linux host, and find that the target of the packet is the segment 2 address. According to the routing table, such packets will generally go out of the direct connection port eth1, so the eth0 packet will be transferred to eth1, but forwarding is not enabled, so the packet cannot reach eth1, so it will be discarded.If packet forwarding is enabled, the blue and red dotted lines above will be connected, and the packet forwarding will reach the eth1 interface, then go out to the host of segment 2.
13.2 Several network-related file descriptions
13.2.1 Network Card Profile ifcfg-*
There are many files in the / etc/sysconfig/network-scripts/directory, most of which are script files, but there is one type of ifcfg file that starts with the interface config. All ifcfg files are loaded and read when the network service is started, but the specific file name ifcfg-XX can be named arbitrarily.
The following is an example of the contents of an ifcfg-XX file (on CentOS 7).
[root@xuexi ~]# cat /etc/sysconfig/network-scripts/ifcfg-eth0
DEVICE="eth0"      # Display name, must/sys/class/net/A network card in the directory has the same name
IPV6INIT="no"
BOOTPROTO="dhcp"
ONBOOT=yes
TYPE="Ethernet"
DEFROUTE="yes"
PEERDNS="yes"      # Set to yes This file sets the DNS Will cover/etc/resolve.conf,
                   # If turned on DHCP,Then defaults to yes,therefore dhcp Of dns Will also cover/etc/resolve.conf
PEERROUTES="yes"
IPV4_FAILURE_FATAL="no"
NAME="System eth0"
DNS1=114.114.114.114
DNS2=8.8.8.8
DNS3=114.114.115.115
13.2.2 DNS Profile/etc/resolve.conf
This file is used to set DNS pointing and parsing order.The file format is as follows:
domain  domain_name         # Declare a local domain name, that is, a domain name that is automatically implicitly complemented upon resolution
search  domain_name_list    # Specifies the domain name search order (up to 6), and domains cannot coexist. If they coexist, the lines written below take effect
nameserver  IP1             # Set DNS Pointing, up to 3
nameserver  IP2
nameserver  IP3
options timeout:n attempts:n  # Specify resolution timeout (default 5 seconds) and number of parses (default 2)
For example, set /etc/resolve.conf as shown below, and do not set the nameserver for testing purposes.
domain malong.com
When resolving host names without dots, such as "www", which is not considered fqdn, automatically add ".malong.com" to resolve "www.malong.com".
[root@xuexi ~]# host -a www
Trying "www.malong.com"
;; connection timed out; trying next origin
Trying "www"
;; connection timed out; no servers could be reached
When the name is resolved without a dot at the end but with a dot in the middle, such as "www.host", which is considered fqdn, it will directly resolve "www.host", and then resolve the name with "malong.com", that is, "www.host.malong.com".
[root@xuexi ~]# host -a www.host
Trying "www.host"
;; connection timed out; trying next origin
Trying "www.host.malong.com"
;; connection timed out; no servers could be reached
When a name with a dot at the end of the resolution, such as "www.host." is considered to be a complete fqdn, it will directly resolve "www.host". When the resolution is complete, it will end directly without completing the local domain name resolution.
[root@xuexi ~]# host -a www.host.
Trying "www.host"
;; connection timed out; trying next origin
Trying "www.host"   # Default parse twice
;; connection timed out; no servers could be reached
The search keyword works the same as the domain, except that search also implies the order in which domain names are searched.For example, set search to the following:
search malongshuai.com longshuai.com mashuai.com
If you parse "www.host", you will parse "www.host","www.host.malongshuai.com", "www.host.longshuai.com", "www.host.mashuai.com".
[root@xuexi ~]# host -a www.host
Trying "www.host"
;; connection timed out; trying next origin
Trying "www.host.malongshuai.com"
;; connection timed out; trying next origin
Trying "www.host.longshuai.com"
;; connection timed out; trying next origin
Trying "www.host.mashuai.com"
;; connection timed out; no servers could be reached
[root@xuexi ~]# host -a www
Trying "www.malongshuai.com"
;; connection timed out; trying next origin
Trying "www.longshuai.com"
;; connection timed out; trying next origin
Trying "www.mashuai.com"
;; connection timed out; trying next origin
Trying "www"
;; connection timed out; no servers could be reached
The domain and search parts cannot coexist, and if they do, subsequent rows will be valid.
13.2.3 /etc/udev/rules.d/70-persistent-net.rules
When a new network device is inserted, the kernel first recognizes it, then generates the corresponding information file for the device in the sysfs file system (typically mounted under / sys).The kernel then notifies udevd's daemon udevd (if you don't know what it is, consider it a device manager in the Windows system to manage and monitor hardware devices). udevd reads information about the corresponding device in sysfs and compares or generates a rule set for udev to do the corresponding action for matching rules.For a network card, its rule set file defaults to / etc/udev/rules.d/70-persistent-net.rules, and after successfully matching the rules, a corresponding device subdirectory is generated in the / sys/class/net directory.
The following are the contents of the rule set for the two network cards:
[root@xuexi ~]# cat /etc/udev/rules.d/70-persistent-net.rules

# PCI device 0x8086:0x100f (e1000)
SUBSYSTEM=="net", ACTION=="add", DRIVERS=="?*", ATTR{address}=="00:0c:29:7f:cf:a4", ATTR{type}=="1", KERNEL=="eth*", NAME="eth0"

# PCI device 0x8086:0x100f (e1000)
SUBSYSTEM=="net", ACTION=="add", DRIVERS=="?*", ATTR{address}=="00:0c:29:7f:cf:ae", ATTR{type}=="1", KERNEL=="eth*", NAME="eth1"
The specific udev rule set syntax is not the content of this article, so only the two above rule sets are briefly explained here.Rule set files are written in key/value format, but are divided into matching key/vaule and behavior key/value.In the example above, from SUBSYSTEM to KERNEL, a'=='sign is used to indicate a match key/value, and the last NAME uses a single'=' sign to indicate an assignment key/value.So what the above file means is that when each information of a device in /sys matches one of the above rules, assign the device name to eth0 or eth1, and then name the directory of device information under the / sys/class/net directory. The value of DEVICE in the ifcfg-* configuration file must be the same as they are.
Note that network rule set files are automatically generated or written when the kernel detects a device, so emptying it has no effect.
When cloning a virtual machine, MAC address conflicts always occur because both the rule set file and the ifcfg configuration file are cloned, and the MAC address in the newly cloned machine is new, so a new rule set is generated, but the DEVICE value in the cloned ifcfg configuration file does not correspond to the rule, resulting in the cloned host's network will not start.The solution is to empty the file and restart the cloning host so that the kernel will generate a rule set file corresponding to the new MAC address.Of course, it is also possible to empty the rule set file of the template host before cloning and then clone it.
It is worth mentioning that in CentOS 7, systemd has integrated udevd functionality, so udev's rule set files are rare, but more convenient. When cloning a CentOS 7 host, there is no possibility of MAC address conflicts at all, since all rule sets are generated in memory by the kernel.However, the explicitly written rule set file is still valid.
13.2.4 /etc/services
This file records the relationship between the port and the service.
[root@xuexi ~]# grep '^ftp\|^ssh' /etc/services
ftp-data        20/tcp
ftp-data        20/udp
ftp             21/tcp
ftp             21/udp          fsp fspd
ssh             22/tcp                          # The Secure Shell (SSH) Protocol
ssh             22/udp                          # The Secure Shell (SSH) Protocol
ftp-data        20/sctp                 # FTP
ftp             21/sctp                 # FTP
ssh             22/sctp                 # SSH
ftp-agent       574/tcp                 # FTP Software Agent System
ftp-agent       574/udp                 # FTP Software Agent System
sshell          614/tcp                 # SSLshell
sshell          614/udp                 #       SSLshell
ftps-data       989/tcp                 # ftp protocol, data, over TLS/SSL
ftps-data       989/udp                 # ftp protocol, data, over TLS/SSL
ftps            990/tcp                 # ftp protocol, control, over TLS/SSL
ftps            990/udp                 # ftp protocol, control, over TLS/SSL
ssh-mgmt        17235/tcp               # SSH Tectia Manager
ssh-mgmt        17235/udp               # SSH Tectia Manager
13.3 Network Interface Configuration and Host Name
13.3.1 ifconfig
Although the command is described as obsolete in the man document, it is clearly not forgotten by the public.The ifconfig command is an interface configuration command, but more is used to display activated network interface information.
ifconfig [ interface | -a ]
ifconfig interface options

Option description:
Interface: Specify the name of the network interface to be operated on, such as eth0
 Up: Activates the specified network interface, and defaults to up if an IP address is assigned to the network interface from the command line
 Down: Sets the specified interface to down state
 [-]arp: Enable or disable the use of ARP protocol on this interface, such as "ifconfig eth0-arp"
mtu N: Sets the maximum transfer unit (MTU) for the specified interface
 Netmask: Sets the IP netmask for the interface, using the number of bits masked for class A/B/C addresses by default
 Address: The IP address to be assigned to the interface
ifconfig example:
[root@xuexi ~]# ifconfig eth0:1 192.168.100.20 netmask 255.255.255.0 up  # Add IP Address
[root@xuexi ~]# ifconfig eth0:1 192.168.100.20/24 up                     # Masks in CIDR format can also be used
[root@xuexi ~]# ifconfig eth1 up       # Activate this network interface
[root@xuexi ~]# ifconfig eth1 down     # Temporarily down load eth1 interface
[root@xuexi ~]# ifconfig eth1 -arp     # Inhibiting arp on eth1
[root@xuexi ~]# ifconfig eth1 arp      # Enable arp on eth1
It is important to note that all ifconfig configurations are applied to the kernel, so they will only take effect temporarily and will fail immediately after restarting the network service.
For slave addresses, which are aliased addresses, to be permanently valid, a corresponding alias interface configuration file, such as/ets/sysconfig/network-scripts/ifcfg-eth0:0, should be established, and given an eth0:0 name on the DEVICE keyword in that file, the DEVICE entry must be configured correctly.
13.3.2 ifcfg
The usage is simple.
ifcfg DEV [[add|del [ADDR[/LEN]] | stop]
       add - add new address
       del - delete address
       stop - completely disable IP
For example:
[root@xuexi ~]# ifcfg eth1:0 add 192.168.100.20/24   # Add an address
[root@xuexi ~]# ifcfg eth1:0 del 192.168.100.20      # Delete an address
[root@xuexi ~]# ifcfg eth1 stop      # Temporarily disable eth1
13.3.3 hostname command
Used to set the host name, but there are several other useful features.
hostname [-I] [-f] [-d] [-s] [hostname]

Option description:
-I: Get all non-loopback IP addresses on this host, this option does not depend on host name resolution
 -f,--fqdn: Get FQDN
 -d,--domain: Gets the domain name portion of fqdn, which is equivalent to the command dnsdomainname
 -s,--short: Get the host name part of fqdn, strictly before the first'.', for example,'www.baidu.com'will be obtained as'www'
Using the -I option, you can get all the IP addresses on the host directly, including the alias address, which is sometimes too convenient.
[root@xuexi ~]# hostname -I
192.168.100.54 172.16.10.10
The hostname modified host name is temporarily in effect, and it modifies the / proc/sys/kernel/hostname file.
[root@xuexi ~]# cat /proc/sys/kernel/hostname
xuexi.longshuai.com
Although there is a permanently valid option (-b) in the man documentation, it is ineffective to test.To be permanently effective, you need to modify the configuration file/etc/hostname(CentOS 7) or/etc/sysconfig/network(CentOS 6).For example, on CentOS 7:
13.4 Gateway/Routing
There are three routes on Linux:
- Host Routing: Directly indicates how to get to a specific host. Host routing is also known as static routing.
- Network Routing: Indicates where a certain type of network is going
- Default Route: Default Route without Host Route or Network Route.Default routes set on the operating system are also commonly referred to as gateways.
If there are multiple routes to a host on Linux, the route with the highest priority will be selected.In Linux, routing entries are prioritized by matching the length of the mask bits before comparing the management distances.That is, route entries with long mask bits must have higher priority than those with short mask bits, so host routes have the highest priority, followed by direct-connected networks (that is, network routes), network routes, and finally default routes.If the masks of the route entries are the same length, the shorter managed distances will take effect by comparing the managed distances between nodes.
For example, in the routing table below, if ping 192.168.5.20, a mismatch is found first against 192.168.100.78, then against 192.168.100.0, a mismatch is found, and then against 192.168.0.0, the network route entry is found to match, so select the route entry.
[root@xuexi ~]# route -n
Kernel IP routing table
Destination     Gateway         Genmask         Flags Metric Ref    Use Iface
0.0.0.0         192.168.100.2   0.0.0.0         UG    100    0        0 eth0
172.16.10.0     0.0.0.0         255.255.255.0   U     100    0        0 eth1
192.168.0.0     192.168.100.70  255.255.0.0     UG    0      0        0 eth0
192.168.100.0   0.0.0.0         255.255.255.0   U     100    0        0 eth0
192.168.100.78  0.0.0.0         255.255.255.255 UH    0      0        0 eth0
Another example is the routing table below.Since both eth0 and eth1 network cards are 192.168.100.0/24 segment addresses, their routing entries are identical in mask length matching, but when communicating with eth0 directly connected segment hosts, eth0 is definitely chosen because eth1 and the segment host are separated by an eth0 and the distance increases by 1.
[root@xuexi ~]# route -n
Kernel IP routing table
Destination     Gateway         Genmask         Flags Metric Ref    Use Iface
0.0.0.0         192.168.100.2   0.0.0.0         UG    100    0        0 eth0
192.168.100.0   0.0.0.0         255.255.255.0   U     100    0        0 eth0
192.168.100.0   0.0.0.0         255.255.255.0   U     101    0        0 eth1
13.4.1 route command
The route command displays and manages routing tables.When the add or del option is used, the route command sets the route entry, otherwise the route command displays the route table.
To display routing table information, simply route -n, where the -n option means that the host name is not resolved.
For example:
[root@xuexi ~]# route -n
Kernel IP routing table
Destination     Gateway         Genmask         Flags Metric Ref    Use Iface
0.0.0.0         192.168.100.2   0.0.0.0         UG    100    0        0 eth0
172.16.10.0     0.0.0.0         255.255.255.0   U     100    0        0 eth1
192.168.0.0     192.168.100.70  255.255.0.0     UG    0      0        0 eth0
192.168.100.0   0.0.0.0         255.255.255.0   U     100    0        0 eth0
192.168.100.78  0.0.0.0         255.255.255.255 UH    0      0        0 eth0
For systems above CentOS 6, ignore the Metric and Ref columns, which are no longer used by the kernel, but may be used by some routing software.
For Flags columns, if no routing software is installed, only the following three values are possible:
U (route is up)
H (target is a host)
G (use gateway, which is the route entry with the next hop set)
To manage the routing table, use the add or del option.
route [add/del] [-host/-net/default] [address[/mask]] [netmask] [gw] [dev]

Option description:
add/del: add or delete route entries
 -net: a network route was added or deleted
 -host: A host route was added or deleted
 Default: a default route was added or deleted
 Netmask: explicitly use the netmask keyword to specify a mask, so that you can use the cidr format mask directly on the address, that is, IP/MASK, without using this option.
gw: specify the address of the next hop.Requires that the next hop address must be reachable and typically a direct connection to the network segment.
dev: Forces routing entries to be associated to a specified interface.In general, the kernel automatically determines which network interface a route entry should be associated with.
For example:
(1). Add and remove default routes
shell> route add default gw 192.168.100.10
shell> route del default
shell> route del default gw 192.168.100.10   # If there are multiple default routes, adding gw will uniquely delete the specified route entry
Since the destination of the default route is 0.0.0.0, the default keyword can also be replaced by 0.0.0 to operate on the default route, but this is more cumbersome.
(2). Adding and deleting network routes
shell> route add -net 172.16.10.0/24 gw 192.168.100.70
shell> route add -net 172.16.10.0 netmask 255.255.255.0 gw 192.168.100.70
If you really don't know who to jump to next, it's also possible to specify a native interface.
shell> route add -net 172.16.10.0/24 dev eth0
Deleting a route directly changes the add keyword to the del keyword in the statement that adds the route.as
shell> route del -net 172.16.10.0/24 gw 192.168.100.70
shell> route del -net 172.16.10.0 netmask 255.255.255.0 gw 192.168.100.70
shell> route del -net 172.16.10.0/24 dev eth0
But most of the time, you can be lazy, as long as you can only decide which route to delete.For example:
shell> route del -net 172.16.10.0/24
(3) Add and delete host routes
13.4.2 Configure Permanent Routing
Create a routing profile/etc/syconfig/network-scripts/route-ethX based on the interface from which X will be exported.
The configuration format of the route profile is very simple, with one route entry per line, first the destination to be reached, then the via keyword, and finally the next-hop address.Requires that the next hop must be reachable and generally be in the same segment as ethX.
DEST via nexthop
For example, the IP address of the eth0 network card is 192.168.10.123. To get out to 10.0.0.10 through the eth0 network card, the address of the next hop should be in the same network segment as the eth0 address, such as 192.168.10.222.
10.0.0.0 via 192.168.10.222
The route-ethX file has another configuration way to write persistent routes, but the above method is simpler and faster, so I won't say much here.
13.5 arp and arping commands
Maintain or view the system arp cache, which is obsolete and replaced by ip neigh.
arp is an address resolution protocol that finds the corresponding MAC address of a given ipv4 address in the network.
In general, the host MAC in the LAN is acquired by using the arp protocol, so the hosts in the LAN are also called network neighbors.
13.5.1 arp command
arp command syntax:
arp-n-v-i #View arp cache
 arp-i-d hostname #Delete arp cache entries

Option description:
-n: do not resolve ip address to name
 -v: Details
 -i: the interface for the specified operation
 -d: delete an arp entry
hostname: Operates the host's arp entries. In addition to deleting the host's arp entries, there are other actions, such as adding the host's arp entries manually. This usage is not explained here.
For example:
[root@xuexi ~]# arp -n
Address                  HWtype  HWaddress           Flags Mask            Iface
192.168.100.1            ether   00:50:56:c0:00:08   C                     eth1
192.168.100.254          ether   00:50:56:e7:e1:d4   C                     eth0
192.168.100.70           ether   00:0c:29:71:81:64   C                     eth0
192.168.100.1            ether   00:50:56:c0:00:08   C                     eth0
192.168.100.2            ether   00:50:56:e2:16:04   C                     eth1
192.168.100.254          ether   00:50:56:e7:e1:d4   C                     eth1
192.168.100.2            ether   00:50:56:e2:16:04   C                     eth0
The information you are viewing is actually the content in the / proc/net/arp file.
[root@xuexi ~]# cat /proc/net/arp
IP address       HW type     Flags       HW address            Mask     Device
192.168.100.1    0x1         0x2         00:50:56:c0:00:08     *        eth1
192.168.100.254  0x1         0x2         00:50:56:e7:e1:d4     *        eth0
192.168.100.70   0x1         0x2         00:0c:29:71:81:64     *        eth0
192.168.100.1    0x1         0x2         00:50:56:c0:00:08     *        eth0
192.168.100.2    0x1         0x2         00:50:56:e2:16:04     *        eth1
192.168.100.254  0x1         0x2         00:50:56:e7:e1:d4     *        eth1
192.168.100.2    0x1         0x2         00:50:56:e2:16:04     *        eth0
[root@xuexi ~]# arp -d 192.168.100.70 -i eth0 # Delete arp cache entries
The arp command can only delete one arp entry at a time. To delete or empty the entire arp entry in batch, use the ip neigh flush command.For example:
[root@xuexi ~]# ip neigh flush all            # Empty all
[root@xuexi ~]# ip neigh flush dev eth0     # Delete cached arp entries on eth0
13.5.2 arping command
arping is used to send an arp request message, parse and get the MAC of the target address.By default, the broadcast message will be sent first, then the unicast message will be sent after the reply is received. All hosts in the LAN can receive the broadcast message, but only the target host will reply to its MAC address.
Note: Sending an arp request message is actually an alternative ping, so you can detect whether the target is alive or not, and you need to communicate with the target, which also caches the arp entries of the host (that is, the source address).
Grammar:
arping [-fqbDU] [-c count] [-w timeout] [-I device] [-s source] destination
-f : First received reply Exit immediately
-q : Quiet mode, nothing to output
-b : Only broadcast, no unicast
-D : Address Conflict Detection
-U : Actively updating neighbors arp cache(Unsolicited ARP mode)
-c count : How many to send arp Exit after requesting package
-w timeout : wait for reply Timeout
-I device : Which interface to use to send the request package.Send out arp Request Package Interface MAC Address will be cached on target host
-s source : Appoint arp The source address in the request message. If the sending interface and the source address are different, the destination host will cache the address and the interface's MAC Address, not the interface of the source address MAC address
 destination : To whom arp Request message to get the message IP Or hostname MAC address
For example:
(1). Request resolution of MAC address for 192.168.100.70 host
[root@xuexi ~]# arping -f 192.168.100.70
This will send a broadcast message until a response from 192.168.100.70 is received.
At the same time, 192.168.100.70 also caches local IP and MAC entries. Since there is no specified sending interface and source address for the request message, the interface and corresponding interface address are selected according to the routing table when sending the message.
(2) Specify that a request message should be sent to 192.168.100.70 to exit, that the interface to send the message is eth1, and that the source address of the request message should be 192.168.100.54 on the native eth0 interface.
[root@xuexi ~]# arping -c 1 -I eth1 -s 192.168.100.54 192.168.100.70
Sending such an arp request packet would cause the target host 192.168.100.70 to cache the native arp entry as "192.168.100.54 MAC_eth1", but in fact, the MAC address of the interface on which 192.168.100.54 resides is MAC_eth0.
The arping command can only implement this simple arp spoofing, and more arp Spoofing methods can use specialized tools.
(3). Detect if the other host is alive
For example, if you send four probes, a response means the other party is alive
[root@xuexi ~]# arping -c 4 -I eth0 192.168.100.2
ARPING 192.168.100.2 from 192.168.100.54 eth0
Unicast reply from 192.168.100.2 [00:50:56:E2:16:04]  0.593ms
Unicast reply from 192.168.100.2 [00:50:56:E2:16:04]  0.930ms
Unicast reply from 192.168.100.2 [00:50:56:E2:16:04]  0.868ms
Unicast reply from 192.168.100.2 [00:50:56:E2:16:04]  0.844ms
Sent 4 probes (1 broadcast(s))
Received 4 response(s)
Four probing messages have been sent, the first of which is a broadcast message, and four responses have been received.
13.6 ip command
This is a very powerful command, all the previous commands for network information display and management can be replaced by ip commands.It is a strictly modeled command.
13.6.1 Get help with ip commands
Start with a brief description of the ip command and how to get help.
[root@xuexi ~]# ip -h

Usage: ip [ OPTIONS ] OBJECT { COMMAND | help }
       ip [ -force ] -batch filename
where  OBJECT := { link | addr | addrlabel | route | rule | neigh | ntable |
                   tunnel | tuntap | maddr | mroute | mrule | monitor | xfrm |
                   netns | l2tp | tcp_metrics | token }
       OPTIONS := { -V[ersion] | -s[tatistics] | -d[etails] | -r[esolve] |
                    -h[uman-readable] | -iec |
                    -f[amily] { inet | inet6 | ipx | dnet | bridge | link } |
                    -4 | -6 | -I | -D | -B | -0 |
                    -l[oops] { maximum-addr-flush-attempts } |
                    -o[neline] | -t[imestamp] | -b[atch] [filename] |
                    -rc[vbuf] [size] | -n[etns] name | -a[ll] }
Visible commands are complex, with many options and many objects, each corresponding to a different command.But only a few objects can be used: addr/route/neigh/link.
Use ip object help to get syntax help for the object.For example:
[root@xuexi ~]# ip addr help
Under the ip command line, any object can have its full name or its abbreviated name, such as address, which can be abbreviated as addr or a letter.
[root@xuexi ~]# ip a help # Equivalent to ip address help and ip addr help
Although there is also an object beginning with a that is addrlabel.This is because IP will match backwards and forwards from the order of objects given in the above syntax, for example, "ip m" will match to "ip maddr". If you want to match something else, such as addrlabel, you can write "ip addrl" longer.
For CentOS 6, man ip outputs help documentation for the entire ip, including commands and instructions for each object.In CentOS 7, each object is manned independently, such as addr.
[root@xuexi ~]# man ip-address
The following is a list of man for all Object s.
[root@xuexi ~]# rpm -ql iproute | grep "man8/ip-"
/usr/share/man/man8/ip-address.8.gz
/usr/share/man/man8/ip-addrlabel.8.gz
/usr/share/man/man8/ip-l2tp.8.gz
/usr/share/man/man8/ip-link.8.gz
/usr/share/man/man8/ip-maddress.8.gz
/usr/share/man/man8/ip-monitor.8.gz
/usr/share/man/man8/ip-mroute.8.gz
/usr/share/man/man8/ip-neighbour.8.gz
/usr/share/man/man8/ip-netconf.8.gz
/usr/share/man/man8/ip-netns.8.gz
/usr/share/man/man8/ip-ntable.8.gz
/usr/share/man/man8/ip-route.8.gz
/usr/share/man/man8/ip-rule.8.gz
/usr/share/man/man8/ip-tcp_metrics.8.gz
/usr/share/man/man8/ip-token.8.gz
/usr/share/man/man8/ip-tunnel.8.gz
/usr/share/man/man8/ip-xfrm.8.gz
13.6.2 ip addr
ip addr is used to manage IP addresses on network devices and also to view the property information of IP addresses.In older versions of Linux, multiple IPs were set on a single network card. These IPs were called aliased IPs, but starting with CentOS 6, these IPs were called secondary or slave IP s because they also had attributes attached to them.
(1).ip addr add/del
ip address { add | del } IFADDR dev STRING
IFADDR := PREFIX [ broadcast ADDR ] [ anycast ADDR ] [ label STRING ]

Take add for example:
dev NAME: Specify the network card to set the IP address
 local ADDRESS (default): The IP address of the interface.The format of an IP address depends on whether it is IPv4 or ipv6.For ipv4, a given address may also require a given cidr mask bit length
 broadcast ADDRESS: broadcast ADDRESS of the interface
 label NAME: Sets the label NAME for the IP address of the interface. The label NAME must start with the network interface name followed by a colon, such as eth0:X

The del and add parameters are the same, and dev must be given. The remaining parameters are optional, because del is a wildcard del, and if more than one item meets the criteria when deleting, the first one is deleted.
For example:
[root@xuexi ~]# ip addr add 192.168.100.45 dev eth0
[root@xuexi ~]# ip addr add 192.168.100.35/24 dev eth1
Addresses added this way are not shown in the ifconfg command, and ifconfg captures aliases, so label can be added to the address so that the secondary is viewed by ifconfig.For example:
[root@xuexi ~]# ip addr add 192.168.100.45 dev eth0 label eth0:0
Deleting ip is much simpler, but dev must be specified, and ideally, cidr's mask length.
[root@xuexi ~]# ip addr del 192.168.100.45 dev eth0
[root@xuexi ~]# ip addr del 192.168.100.35/24 dev eth1
(2).ip addr show
There are also several options, but it doesn't feel useful, just ip addr show.Because the ip command can be abbreviated, it can be written as
[root@xuexi ~]# ip a show
[root@xuexi ~]# ip a s
[root@xuexi ~]# ip a
1: lo: <LOOPBACK,UP,LOWER_UP> mtu 65536 qdisc noqueue state UNKNOWN
    link/loopback 00:00:00:00:00:00 brd 00:00:00:00:00:00
    inet 127.0.0.1/8 scope host lo
    inet6 ::1/128 scope host
       valid_lft forever preferred_lft forever
2: eth0: <BROADCAST,MULTICAST,UP,LOWER_UP> mtu 1500 qdisc pfifo_fast state UP qlen 1000
    link/ether 00:0c:29:71:81:64 brd ff:ff:ff:ff:ff:ff
    inet 192.168.100.70/24 brd 192.168.100.255 scope global eth0
    inet6 fe80::20c:29ff:fe71:8164/64 scope link
       valid_lft forever preferred_lft forever
(3).ip addr flush
For batch address deletion, this command is actually dangerous, accidentally hurting innocent people. Fortunately, when flush does not give any parameters or when there are no entries to match, it will not perform the flush action. In short, this command should be used with care.The dev parameter must also be given.
For example, delete all addresses on eth1.
[root@xuexi ~]# ip a flush dev eth1
Delete all secondary addresses on eth1.
13.6.3 ip route
This command maintains and views routing tables in the kernel.
(1).ip route add/del/change/append/replace
The grammar format is:
ip route { add | del | change | append | replace } dest[/cidr_mask] [ via ADDRESS ] [ dev STRING ]
Dest is the target address, which can be the host address and the segment address. Generally, the address will be followed by a mask length in cidr format, which defaults to 32-bit length when not.If dest is "0/0" or written as "default", it represents the default route.
For example, add/modify/replace regular routes:
[root@xuexi ~]# ip route add/change/replace 172.16.10.0/24 via 192.168.10.20
Add/modify/replace default routes:
[root@xuexi ~]# ip route add/change/replace default via 192.168.10.20
[root@xuexi ~]# ip route add/change/replace 0/0 via 192.168.100.2
Delete a route:
[root@xuexi ~]# ip route del 172.16.10.0/24
[root@xuexi ~]# ip route del default   # Delete Default Route
(2).ip route show
List routing tables.
The grammar format is:
ip route show [to [ root | match | exact ] ADDR_pattern ] [ via ADDR ]
The to keyword is the default keyword used to match the destination address of the route.It can then be followed by the modifier root/match/exact, which is the default modifier for the exact match mask bit length, the root modifier for the matched mask bit length greater than or equal to the mask bit length given by ADDR_patternand the match modifier matching less than or equal to the ADDR_patternmask bit length.For example, "to match 16.0/16" will match "16.0/16", "16/8" and "0/0", but it will not match "16.1/16" and "16.0/24" and "16.0.1/24", while "to root 16.0/16" will match "16.0/24" and "16.0.1/24".
via lists the route entries according to the next hop.
For example:
[root@xuexi ~]# ip route show | column -t
default           via  192.168.100.2  dev    eth0    proto  static  metric  100
172.16.10.0/24    dev  eth1           proto  kernel  scope  link    src     172.16.10.20    metric  100
172.168.10.0/24   dev  eth0           proto  kernel  scope  link    src     172.168.10.20
172.168.10.0/24   dev  eth0           proto  kernel  scope  link    src     172.168.10.20   metric  100
192.168.10.0/24   dev  eth0           proto  kernel  scope  link    src     192.168.10.20
192.168.10.0/24   dev  eth0           proto  kernel  scope  link    src     192.168.10.20   metric  100
192.168.100.0/24  dev  eth0           proto  kernel  scope  link    src     192.168.100.54  metric  100
192.168.100.0/24  dev  eth1           proto  kernel  scope  link    src     192.168.100.74  metric  101
[root@xuexi ~]# ip route show to match 192.168.10/24 | column -t
default          via  192.168.100.2  dev    eth0    proto  static  metric  100
192.168.10.0/24  dev  eth0           proto  kernel  scope  link    src     192.168.10.20
192.168.10.0/24  dev  eth0           proto  kernel  scope  link    src     192.168.10.20  metric  100
[root@xuexi ~]# ip route show to match 192.168/24 | column -t
default  via  192.168.100.2  dev  eth0  proto  static  metric  100
[root@xuexi ~]# ip route show to root 192.168/16 | column -t
192.168.10.0/24   dev  eth0  proto  kernel  scope  link  src  192.168.10.20
192.168.10.0/24   dev  eth0  proto  kernel  scope  link  src  192.168.10.20   metric  100
192.168.100.0/24  dev  eth0  proto  kernel  scope  link  src  192.168.100.54  metric  100
192.168.100.0/24  dev  eth1  proto  kernel  scope  link  src  192.168.100.74  metric  101
In fact, there is no need to be so fancy, simple "ip r" is convenient.
(3).ip route flush
Bulk deletion of routing table entries.The parameters are the same as those of the ip route show.
For example, delete the route entry from eth1.
[root@xuexi ~]# ip route flush eth1
Delete the route entry with the next jump of 192.168.100.70.
[root@xuexi ~]# ip r flush via 192.168.100.70
Delete routes that target 192.168.0.0/16 segments
[root@xuexi ~]# ip route flush 192.168/16
(4).ip route save/restore
Used to save the current routing table and restore the routing table.When saving a routing table, the routing table will be output in the format of binary bare data, that is, binary files that you cannot understand.When restoring a routing table, device settings are required to be the same as when saving the routing table. Routing entries that already exist in the routing table at the time of restore will be ignored.
For example, the current routing table information is as follows:
[root@xuexi ~]# ip r
default via 192.168.100.2 dev eth0  proto static  metric 100
192.168.10.0/24 dev eth0  proto kernel  scope link  src 192.168.10.20
192.168.10.0/24 dev eth0  proto kernel  scope link  src 192.168.10.20  metric 100
192.168.100.0/24 dev eth0  proto kernel  scope link  src 192.168.100.54  metric 100
192.168.100.0/24 dev eth1  proto kernel  scope link  src 192.168.100.74  metric 101
Save the current routing table.
[root@xuexi ~]# ip route save > /tmp/route.txt
Delete several routing tables.
[root@xuexi ~]# ip route flush dev eth0

[root@xuexi ~]# ip r
192.168.100.0/24 dev eth1  proto kernel  scope link  src 192.168.100.74  metric 101
Restore routing table.
13.6.4 ip link
Link stands for link layer, which is the link layer.This command is used to manage and view network interfaces, and can even add virtual network interfaces to manage them in groups.
(1).ip link set
ip link set DEVICE  { up | down | arp { on | off } | name NEWNAME | address LLADDR }

Option description:
dev DEVICE: Specify the name of the device to operate on
 up and down: Start or stop the device
 arp on or arp off: Enable or disable the arp protocol for the device
 name NAME: Modifies the name of the specified device and does not recommend renaming when the interface is running or an IP address has been assigned
 address LLADDRESS: Sets the MAC address of the specified interface
For example, disable eth1 network card.
[root@xuexi ~]# ip link set eth1 down
Equivalent to:
[root@xuexi ~]# ifconfig eth1 down
Modify the MAC address of eth1 network card.
[root@xuexi ~]# ip link set eth1 address 00:0c:29:f3:33:77
(2).ip link show
Grammar Format:
ip [ -s | -h ] link show [dev DEV]

Option description:
-s: Displays traffic statistics on each network interface
 -h: Explicitly in a human readable manner, i.e., unit conversion.Note: "-h" is only supported on CentOS 7.
For example:
[root@xuexi ~]# ip -s -h link show  dev eth0
2: eth0: <BROADCAST,MULTICAST,UP,LOWER_UP> mtu 1500 qdisc pfifo_fast state UP mode DEFAULT qlen 1000
    link/ether 00:0c:29:f7:43:77 brd ff:ff:ff:ff:ff:ff
    RX: bytes  packets  errors  dropped overrun mcast
    13.7M      20.0k    0       0       0       0
    TX: bytes  packets  errors  dropped carrier collsns
    1.59M      9.97k    0       0       0       0
Back to the series article outline: http://www.cnblogs.com/f-ck-need-u/p/7048359.html