Python's default GUI library Tk can be accessed through Python's interface tkinter. Tk is not the latest and best in Python GUI library, nor does it contain the most powerful GUI building module set, but Tk is easy enough to use to build GUI applications that can run on most platforms.
A good reference website: https://www.runoob.com/python/python-gui-tkinter.html
18.1 tkinter introduction
tkinter is Python's default GUI library. It is based on the Tk toolkit, which was originally designed for Tool Command Language (TCL). After the popularity of Tk, it has been transplanted to many other scripting languages, including Perl, Ruby and python. Using these scripting languages, you can develop many GUI applications with the same quality as commercial software.
tkinter is a calling interface made of python, and the bottom layer still uses the GUI library written in C + +, so its running efficiency is equivalent to that of GUI applications written in C/C + +, but its development efficiency is far higher than that of C/C + + language. Moreover, the language used is python, which means that rich and powerful third-party modules of Python language can be used, including network, system access, XML, JSON, scientific computing, deep learning, web crawler, etc.
18.2 write the first tkinter program
If you are using Anaconda Python development environment, you do not need to install tkinter development environment because Anaconda has built-in. If you have to force the installation again, you can use the following command:
conda install -c anaconda tk
Install tkinter in CentOS 8. If you need to install Xming in the remote display window, you need to install Xming.
reference resources: Xming +Xshell 6 realize remote opening of Linux interface
yum install python3-tk* -y
yum install tk-devel -y
The basic steps of developing GUI application using tkinter module are as follows:
- Import tkinter module.
- Create an instance of the Tk class. The Tk object represents a window.
- Set the window, such as setting the title of the window through the Title Method and setting the size and position of the window through the geometry method.
- Create an instance of the control class and add the control to the window.
- Call the mainloop function to enter the event loop.
# Import tkinter module
import tkinter
# Create an instance of the Tk class, that is, the window to be displayed
window = tkinter.Tk()
# Set the window background to blue
window['background']='blue'
# Defines the width of the window
w = 300
# Defines the height of the window
h = 200
# Get screen width
ws = window.winfo_screenwidth()
# Get screen height
hs = window.winfo_screenheight()
# Calculate the x coordinate value that centers the window horizontally according to the screen width and window width
x = (ws/2) - (w/2)
# Calculate the y coordinate value to center the window vertically according to the screen height and window height
y = (hs/2) - (h/2)
# Set window title
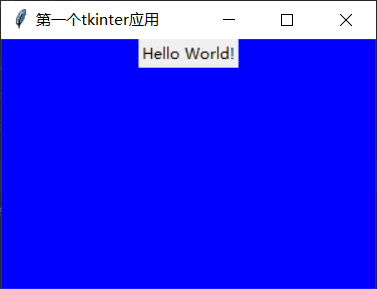
window.title('first tkinter application')
# Set the size and position of the window
window.geometry('%dx%d+%d+%d' % (w, h, x, y))
# Create a Label object and place the Label on the window with the text "Hello World"
label = tkinter.Label(window, text='Hello World!')
# Use the Pack layout to center the Label horizontally
label.pack()
# Call the mainloop function to enter the event loop
tkinter.mainloop()
Windows, Mac OS X, and Linux can run this program. The following points need to be understood:
- tkinter does not directly provide an API to center the window, so you need to calculate the x-coordinate value and y-coordinate value when the window is centered through the width and height of the current computer screen and the width and height of the created window.
- The geometry method of the window object is used to set the size and position of the window. The window size and position need to be described by one string. The format is width*height+x+y. for example, 200 * 100 + 300 + 150 indicates that the window width is 200, the height is 100, the abscissa of the upper left corner of the window is 300, and the ordinate of the upper left corner of the window is 150.
- If you want to display the control on the window, you need to pass the window object as the first parameter of the control class into the control object when creating the control object, for example, Tkinter Label(window, text=‘Hello World!’).
- The pack method of the Label object allows the Label to be placed on the window through the pack layout.
18.3 layout
tkinter has three layout management methods: pack, grid and place. These three layouts cannot be mixed in the window, that is, only one layout can be used at the same time. The main work of layout in tkinter is to place the control on the window, and adjust the position and size of the control according to the specific layout.
18.3.1 pack layout
The pack layout is the most commonly used of the three layouts. The other two layouts need to specify the specific position of the control accurately, while the pack layout can specify the relative position, and the accurate position will be automatically set by the pack system. This also makes the pack layout less flexible than the other two layouts. Therefore, the pack layout is the preferred layout for simple applications.
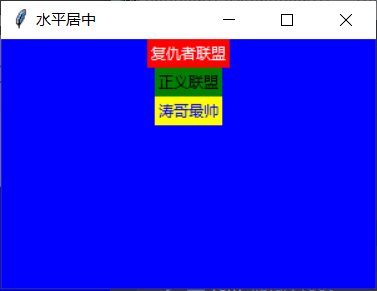
1. The control is horizontally centered
from tkinter import *


window = Tk()
# Window title
window.title('horizontally')
# Window width and height
window.geometry('300x200')
# Window background color
window['background']='blue'
# The following three all use the pack layout
# Place a Label control on the window with red background and white text
Label(window, text="The Avengers", bg="red", fg="white").pack()
# Place a Label control on the window with green background and black text
Label(window, text="Justice League: Injustice for All", bg="green", fg="black").pack()
# Place a Label control on the window with yellow background and blue text
Label(window, text="Tianqixing", bg="yellow", fg="blue").pack()

mainloop()
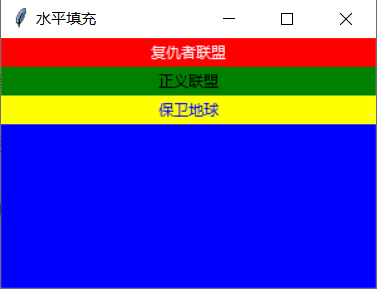
2. Horizontal filling
By setting the fill keyword parameter value of the pack method to x ', the control can be filled horizontally, that is, the whole window can be filled horizontally.
from tkinter import *

window = Tk()
window.title('Horizontal fill')
window['background']='blue'
window.geometry('300x200')
# Fill with fill keyword
w = Label(window, text="The Avengers", bg="red", fg="white")
w.pack(fill=X)
w = Label(window, text="Justice League: Injustice for All", bg="green", fg="black")
w.pack(fill=X)
w = Label(window, text="Defend the earth", bg="yellow", fg="blue")
w.pack(fill=X)

mainloop()
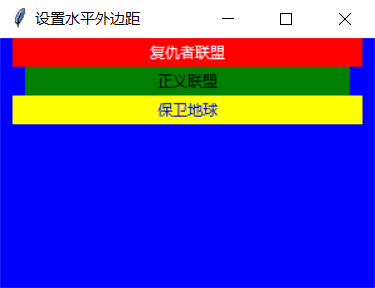
3. Set margin
tkinter layout can set the outer and inner margins of controls. The outer margin and inner margin are divided into horizontal outer margin, vertical outer margin, horizontal inner margin and vertical inner margin.
- Horizontal outer margin. You can set the horizontal margin of the control by specifying the padx keyword parameter of the pack method.
from tkinter import *

window = Tk()
window.title('Set horizontal outer margin')
window['background']='blue'
window.geometry('300x200')

# Specify the distance between the control and the left and right edges of the window through the keyword padx
w = Label(window, text="The Avengers", bg="red", fg="white")
w.pack(fill=X,padx=10)
w = Label(window, text="Justice League: Injustice for All", bg="green", fg="black")
w.pack(fill=X,padx=20)
w = Label(window, text="Defend the earth", bg="yellow", fg="blue")
w.pack(fill=X,padx=10)

mainloop()
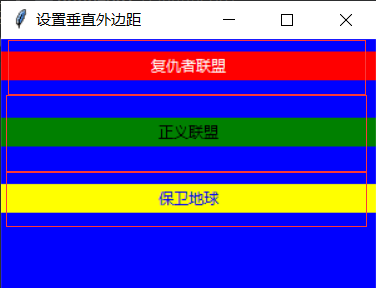
- Vertical outer margin. You can set the vertical outer margin of the control by specifying the pady keyword parameter of the pack method.
from tkinter import *

window = Tk()
window.title('Set vertical outer margin')
window['background']='blue'
window.geometry('300x200')
# Specify the vertical outer margin of the control with the keyword pady
w = Label(window, text="The Avengers", bg="red", fg="white")
w.pack(fill=X,pady=10)
w = Label(window, text="Justice League: Injustice for All", bg="green", fg="black")
w.pack(fill=X,pady=20)
w = Label(window, text="Defend the earth", bg="yellow", fg="blue")
w.pack(fill=X,pady=10)
mainloop()
- Set both horizontal and vertical margins. In the pack method, the padx keyword parameter and the pady keyword parameter can be used at the same time, so that the control will have both horizontal and vertical margins.
from tkinter import *

window = Tk()
window.title('Set both horizontal and vertical margins')
window['background'] = 'blue'
window.geometry('300x200')

# Set both horizontal and vertical margins
w = Label(window, text="The Avengers", bg="red", fg="white")
w.pack(fill=X, padx=10, pady=10)
w = Label(window, text="Justice League: Injustice for All", bg="green", fg="black")
w.pack(fill=X, padx=20, pady=20)
w = Label(window, text="Defend the earth", bg="yellow", fg="blue")
w.pack(fill=X, padx=10, pady=10)
mainloop()

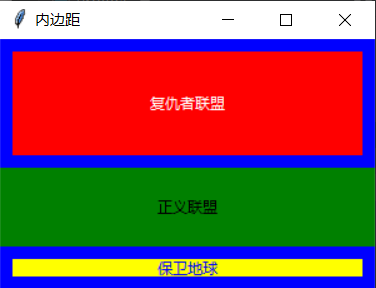
- Inner margin. The inside margin refers to the distance from the content in the control (such as text) to the edge of the control. The horizontal inner margin of the control can be set through the iPad x keyword parameter of the pack method, and the vertical inner margin of the control can be set through the iPad y keyword parameter. IPad X and iPad y can be used alone or mixed. Of course, they can also be used with padx and pady.
from tkinter import *

window = Tk()
window.title('padding ')
window['background']='blue'
window.geometry('300x200')
w = Label(window, text="The Avengers", bg="red", fg="white")
w.pack(fill=X,ipady=30,padx=10, pady=10)
w = Label(window, text="Justice League: Injustice for All", bg="green", fg="black")
w.pack(fill=X,ipadx=10,ipady=20)
w = Label(window, text="Defend the earth", bg="yellow", fg="blue")
w.pack(fill=X,ipadx=10,padx=10, pady=10)
mainloop()
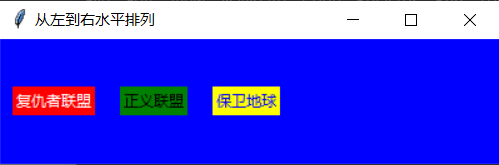
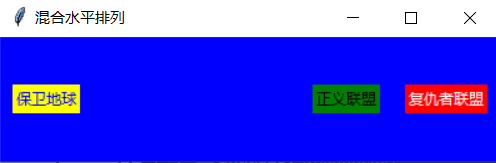
4. Horizontal arrangement
Setting the side keyword parameter of the pack method allows multiple controls to be arranged horizontally from left to right or from right to left.
- Arranged horizontally from LEFT to right. Setting the side keyword parameter value of the pack method to LEFT will make the controls arranged horizontally from LEFT to right.
from tkinter import *

window = Tk()
window.title('Horizontal from left to right')
window['background']='blue'
window.geometry('400x100')

# Set the control to arrange side=LEFT from left to right
w = Label(window, text="The Avengers", bg="red", fg="white")
w.pack(padx=10,pady=10,side=LEFT)
w = Label(window, text="Justice League: Injustice for All", bg="green", fg="black")
w.pack(padx=10,pady=10,side=LEFT)
w = Label(window, text="Defend the earth", bg="yellow", fg="blue")
w.pack(padx=10,pady=10,side=LEFT)
mainloop()
- Arranged horizontally from RIGHT to LEFT. Setting the value of the side keyword parameter of the pack method to RIGHT allows the controls to be arranged horizontally from RIGHT to LEFT. Of course, LEFT and RIGHT can be mixed. Controls using LEFT are arranged horizontally from LEFT to RIGHT, and controls using RIGHT are arranged horizontally from RIGHT to LEFT.
from tkinter import *

window = Tk()
window.title('Mixed horizontal arrangement')
window['background']='blue'
window.geometry('400x100')
# Right to left arrangement
w = Label(window, text="The Avengers", bg="red", fg="white")
w.pack(padx=10,pady=10,side=RIGHT)
w = Label(window, text="Justice League: Injustice for All", bg="green", fg="black")
w.pack(padx=10,pady=10,side=RIGHT)
w = Label(window, text="Defend the earth", bg="yellow", fg="blue")
w.pack(padx=10,pady=10,side=LEFT)
mainloop()
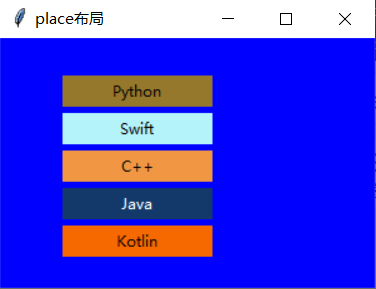
18.3.2 place layout
The place layout allows you to specify the position (x and y) and size (width and height) of the control through the parameters of the place method. These four values can be set through the X, y, width and height parameters of the place method of the control object.
import tkinter as tk
import random

window = tk.Tk()
window.title('place layout')
window['background'] = 'blue'
# Set the width and height of the window; And the abscissa and ordinate of the upper left corner of the window
window.geometry("300x200+30+30")
# Control
languages = ['Python', 'Swift', 'C++', 'Java', 'Kotlin']
labels = range(5)
# Loop to generate 5 controls
for i in range(5):
    # Three primary colors of randomly generated background color
    ct = [random.randrange(256) for x in range(3)]
    # Take brightness
    brightness = int(round(0.299 * ct[0] + 0.587 * ct[1] + 0.114 * ct[2]))
    # Get the hexadecimal form of the background color
    ct_hex = "%02x%02x%02x" % tuple(ct)
    bg_colour = '#' + "".join(ct_hex)
    # Create a control and set the text color to white and black according to the brightness
    label = tk.Label(window,
                     text=languages[i],
                     fg='White' if brightness < 120 else 'Black',
                     bg=bg_colour)
    # Place layout, set the position and size of the control through the place method
    label.place(x=50, y=30 + i * 30, width=120, height=25)

window.mainloop()
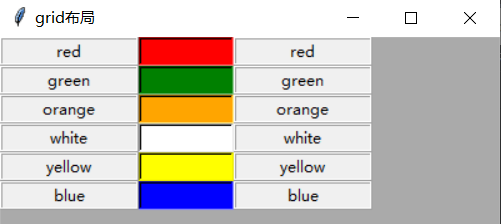
18.3.3 grid layout
Grid layout, as its name suggests, is to put controls as cells into a table, similar to a two-dimensional table. Each cell will adjust its size according to the size of the controls in it. By calling the grid method of the control object, the control can be placed in a tabular form. The grid method needs to specify two keyword parameters: row and column, where row represents the current row (starting from 0) and column represents the current column (starting from 0).
Example: create 18 controls, which are placed in a 6 * 3 table.
from tkinter import *
window = Tk()
window.title('grid layout')
# Set the window background color to gray
window['background'] = '#AAA'
# Set the size and position of the void
window.geometry("400x150+30+30")
# Sets the background color of the control in the middle column
colours = ['red','green','orange','white','yellow','blue']

r = 0
# Dynamic generation of 18 controls
for c in colours:
    # The relief keyword parameter represents the effect of the control edge
    Label(window,text=c, relief=RIDGE,width=15).grid(row=r,column=0)
    Label(window,bg=c, relief=SUNKEN,width=10).grid(row=r,column=1)
    Label(window,text=c, relief=RIDGE,width=15).grid(row=r,column=2)
    r = r + 1
mainloop()
18.4 controls
Because tkinter relies on the powerful Python language, learning tkinter is mainly about learning layout and controls, and then you can use the massive native modules and third-party modules of Python language to write powerful GUI programs.
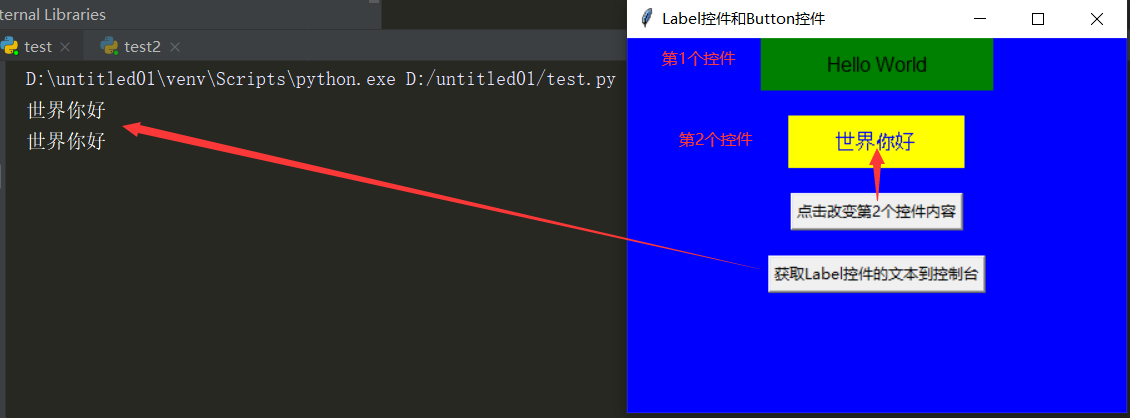
18.4.1 Label control and Button control
The construction method of the Label class needs to pass in some necessary parameter values. For example, the first parameter is usually a window object, and then set the text to be displayed through the text parameter, set the text presentation through the fg attribute, and set the width and height of the Label control through the width and height parameters.
Label(window, text='Hel1o World', fg='blue', bg='green', width=20, height=2)
In addition to the above parameters, you can also set the font and size of the text displayed in the Label control through the font parameter.
Label(window,text='Hello World', fg='blue', bg='green', font=('Arial', 12), width=20,height=2)
If you want to get and set the text content in the Label control, a very simple method is to bind a Label control to a variable. If the variable changes, the text displayed in the Label control will also change.
var = StringVar()
Label(window, textvariable=var)
# Sets the text in the Label control
var.set('Hello World')
# Gets and outputs the text in the Label control
print (var.get())
Button is another very common control in tkinter. It is mainly used to interact with users. Users will notify the program to complete some tasks by clicking the button. Generally, the program will give users some feedback after completing the task. For example, it will output messages in Console and pop up a dialog box.
The Button control is almost the same as the Label control in use, except that the Button control also needs a callback function to handle click events, which needs to be specified through the command keyword parameter of the Button class.
Example: two Label controls and two Button controls are created. Click the first Button control to replace the text in the Label control. Click the second Button control to obtain the text of the second Label control and display it in Console.
import tkinter as tk
import random

window = tk.Tk()
window.title('Label Controls and Button control')
window['background'] = 'blue'
window.geometry("400x300+30+30")
# Create control, set font and font size
label1 = tk.Label(window,
                  text='Hello World',
                  bg='green', font=('Arial', 12), width=20, height=2)
label1.pack()
# Create a variable that binds the control
var = tk.StringVar()
# initialize variable
var.set('Hello World')
# Create control and bind to var variable
label2 = tk.Label(window,
                  textvariable=var,
                  fg='blue',
                  bg='yellow', font=('Arial', 12), width=15, height=2)
# Use the pack layout to place the controls and set the vertical outer margin of the controls
label2.pack(pady=20)
onHit = False

# Click callback function of the first button
def hitMe():
    global onHit
    if onHit == False:
        onHit = True
        var.set('Hello world')
    else:
        onHit = False
        var.set('Hello World')

# Create the first Button control and bind it to the hitMe function
button1 = tk.Button(window, text='Click to change the content of the second control', command=hitMe)
button1.pack()

# Click callback function of the second button
def getLabelText():
    # Output content in control
    print(var.get())

# Create the second Button control and bind it to the getLabelText function
button2 = tk.Button(window, text='obtain Label Control to the console', command=getLabelText)
button2.pack(pady=20)

window.mainloop()
18.4.2 Entry control and Text control
Both the entry control and the Text control are used to enter Text. Entry is a single line Text input control, while Text is a multi line Text input control, and supports image, rich Text and other formats.
Example: two Entry controls and a Text control are created. One Entry control echoes an asterisk (*). When Text is entered in this Entry control, the same Text will be displayed in the other Entry control. Two local images are inserted into the Text control, and large font Text is inserted between the two images.
import tkinter as tk

window = tk.Tk()
window.title('Entry Controls and Text control')
window['background']='blue'
window.geometry("600x500+30+30")

# Variable is bound to the first Entry control
entryVar1 = tk.StringVar()
# The function called back when entering text in the first Entry control
def callback():
    # Update the text in the second control
    entryVar2.set(entryVar1.get())
# Bind the first Entry control with entryVar1. w means to call the callback function when writing, where a, B and C are Lambda expressions
# Pass in three parameters, otherwise an exception will be thrown (these three parameters are not used in this example)
entryVar1.trace("w", lambda a,b,c: callback())

# Create the first Entry control
entry1 = tk.Entry(window,textvariable=entryVar1,show='*')
# Use the pack layout for the first control
entry1.pack(pady = 10)
# This variable is bound to the second Entry control
entryVar2 = tk.StringVar()
# Create the second Entry control
entry2 = tk.Entry(window,textvariable=entryVar2)
# Use the pack layout for the second control
entry2.pack(pady = 10)

# Create Text control
text = tk.Text(window)
# Using pack layout
text.pack(pady = 10)
# Because the Text control only supports a few images (gif, bmp, etc.) and does not support jpg and png, you need to use PIL to insert these images that do not support formats
from PIL import Image, ImageTk
# Load pic png
pic = Image.open('pic.png')
photo1=ImageTk.PhotoImage(pic)
# Inserts an image at the end of the Tetx control
text.image_create(tk.END, image=photo1)
# Setting font and size needs to be referenced by big
text.tag_configure('big', font=('Arial', 25, 'bold'))
# Insert text at the end of the Tetx control and use the font property specified by big
text.insert(tk.END, "Tao ",'big')
ha = Image.open('ha.jpg')
photo2 = ImageTk.PhotoImage(ha)
# Inserts an image at the end of the Text control
text.image_create(tk.END, image=photo2)

window.mainloop()

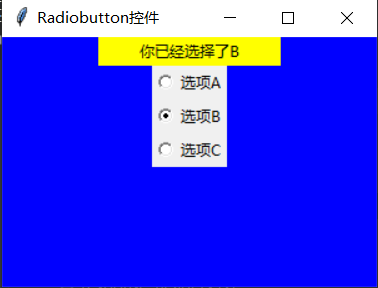
18.4.3 Radiobutton control
Radiobutton is a radio button control. Usually, two or more Radiobutton controls are used together. At the same time, only one Radiobutton control can be selected. To achieve this, multiple Radiobutton controls need to be bound to the same variable and selection change event.
import tkinter as tk

window = tk.Tk()
window.title('Radiobutton control')
window.geometry('300x200')
window['background'] = 'blue'

# This variable is bound to three Radiobutton controls at the same time
var = tk.StringVar()
label = tk.Label(window, bg='yellow', width=20, text='empty')
label.pack()
# The first Radiobutton control is selected by default
var.set('A')
# This function is called when the selection of Radiobutton changes
def printSelection():
    # Update the text controlled by the Label to display the status selected by the current user
    label.config(text='You have chosen' + var.get())
printSelection()
# Create the first Radiobutton control
r1 = tk.Radiobutton(window, text='option A',
                    variable=var, value='A',
                    command=printSelection)
r1.pack()
# Create the second Radiobutton control
r2 = tk.Radiobutton(window, text='option B',
                    variable=var, value='B',
                    command=printSelection)
r2.pack()
# Create the 3rd Radiobutton control
r3 = tk.Radiobutton(window, text='option C',
                    variable=var, value='C',
                    command=printSelection)
r3.pack()
window.mainloop()
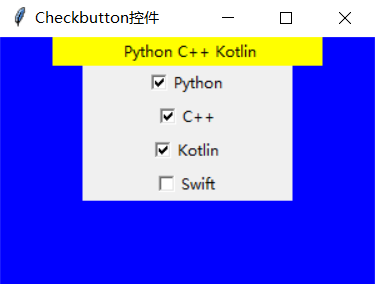
18.4.4 Checkbutton control
Checkbutton is a multi selection control, which is usually used with two or more checkbutton controls. The checkbutton control is bound to the variable through the variable keyword parameter of the construction method of the checkbutton class. The value of the selected state of the checkbutton is specified through the onvalue keyword parameter, and the value of the unselected state of the checkbutton is specified through the offvalue keyword parameter.
import tkinter as tk

window = tk.Tk()
window.title('Checkbutton control')
window.geometry('300x200')
window['background'] = 'blue'
label = tk.Label(window, bg='yellow', width=30, text='empty')
label.pack()

# The function called when the state of the Checkbutton control changes
def printSelection():
    text = ''
    if var1.get() == 1:
        text += ' ' + c1.cget('text')
    if var2.get() == 1:
        text += ' ' + c2.cget('text')
    if var3.get() == 1:
        text += ' ' + c3.cget('text')
    if var4.get() == 1:
        text += ' ' + c4.cget('text')
    label.config(text=text)

# Create 4 variables and bind with 4 Checkbutton controls
var1 = tk.IntVar()
var2 = tk.IntVar()
var3 = tk.IntVar()
var4 = tk.IntVar()
c1 = tk.Checkbutton(window, text='Python', variable=var1, onvalue=1, offvalue=0,width=20, command=printSelection)
c2 = tk.Checkbutton(window, text='C++', variable=var2, onvalue=1, offvalue=0,width=20, command=printSelection)
c3 = tk.Checkbutton(window, text='Kotlin', variable=var3, onvalue=1, offvalue=0,width=20, command=printSelection)
c4 = tk.Checkbutton(window, text='Swift', variable=var4, onvalue=1, offvalue=0, width=20, command=printSelection)
# It's hard to align left
c1.pack()
c2.pack()
c3.pack()
c4.pack()

window.mainloop()
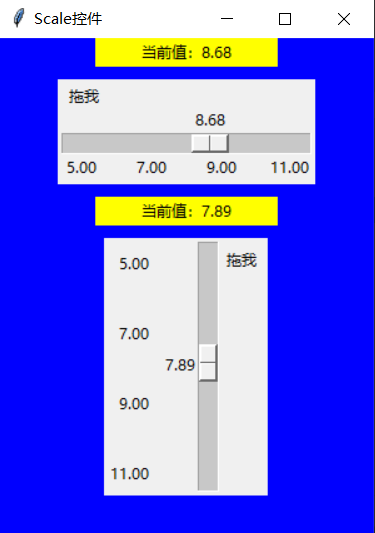
18.4.5 Scale control
Scale is a slider component that supports horizontal and vertical sliding. Through the sliding of the slider, the numerical value can be set in a limited range. There are many properties that need to be set for the scale control (set through the construction method of the scale class). The following are the main properties that need to be set for the scale control.
- Label: the label text displayed next to the Scale control, the horizontal slider control is displayed above, and the vertical slider control is displayed on the right.
- Length: the length of the scale control.
- from_: The minimum value that the slider can set is also the starting value of the Scale control.
- to: the maximum value that the slider can set, which is also the end value of the Scale control.
- Tick interval: the step size of the scale control.
- resolution: the step that the slider can slide.
- command: Specifies the callback function corresponding to the sliding event.
- orient: sets the Scale control type. HORIZONTAL represents the HORIZONTAL Scale control, and VERTICAL represents the VERTICAL Scale control.
import tkinter as tk

window = tk.Tk()
window.title('Scale control')
window.geometry('300x400')
window['background'] = 'blue'
label1 = tk.Label(window, bg='yellow', width=20)
label1.pack()

# The function called when the horizontal Scale control slides
def printSelection1(v):
    # Displays the current value of the horizontal Scale control in the Label control
    label1.config(text='Current value:' + v)
# Create a horizontal Scale control
scale1 = tk.Scale(window, label='Drag me', from_=5, to=11, orient=tk.HORIZONTAL,
             length=200, tickinterval=2, resolution=0.01, command=printSelection1)
scale1.pack(pady = 10)

label2 = tk.Label(window, bg='yellow', width=20)
label2.pack()
# Function called when the vertical Scale control slides
def printSelection2(v):
    label2.config(text='Current value:' + v)
# Create a vertical Scale control
scale2 = tk.Scale(window, label='Drag me', from_=5, to=11, orient=tk.VERTICAL,
             length=200, tickinterval=2, resolution=0.01, command=printSelection2)
scale2.pack(pady = 10)

window.mainloop()
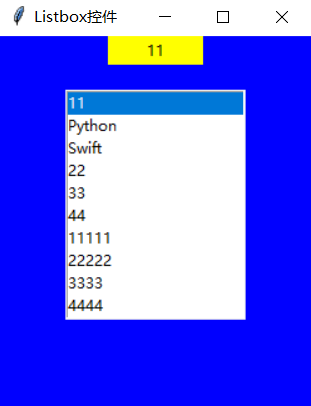
18.4.6 Listbox control
Listbox is a list control. As its name suggests, it is a control that can display a set of values. The listbox object provides insert and delete methods to add and delete list items to the ListBox control. If you want to edit a list item, you can delete the list item to be edited first, and then insert a new list item in this position, that is, delete first and then insert. The most commonly used event of the ListBox control is the list item selection event. You can use the bind method of the listbox object to bind the ListboxSelect event. The code is as follows:
#Both sides of the event name should be enclosed by "< <" and "> >"
bind('<<ListboxSe1ect>>', onselect)
Example:
import tkinter as tk

window = tk.Tk()
window.title('Listbox control')
window.geometry('250x300')
window['background'] = 'blue'

var1 = tk.StringVar()
l = tk.Label(window, bg='yellow', width=10, textvariable=var1)
l.pack()

# Variables bound to Listbox controls
var2 = tk.StringVar()
var2.set((11,22,33,44))
# Create Listbox control
lb = tk.Listbox(window, listvariable=var2)
# The function called when the Listbox control selects a list
def onselect(evt):
    w = evt.widget
    value = w.get(w.curselection())
    # Displays the currently selected list item text on the Label control
    var1.set(value)
# Bind the ListboxSelect event to the onselect function
lb.bind('<<ListboxSelect>>', onselect)
# Select the first list item
lb.selection_set(first=0)
value = lb.get(lb.curselection())
# Displays the text of the first list item on the Label control
var1.set(value)


list_items = [11111,22222,3333,4444]
# Insert 4 list items into the Listbox control
for item in list_items:
    lb.insert('end', item)
# Insert list item at position n
lb.insert(1, 'Python')
lb.insert(2, 'Kotlin')
lb.insert(3, 'Swift')
# Delete the 3rd list item
lb.delete(2)
lb.pack(pady = 20)

window.mainloop()
18.5 adding menus to windows
To add a Menu to a window, you first need to create a Menu object. The first Menu object created represents the root of the Menu. When creating this Menu object, the parameter of the Menu class constructor is the window object, which binds the Menu to the window. Then create a Menu object. The parameter of the Menu class constructor is the Menu object corresponding to the parent Menu. In order to add a submenu to a Menu item, you also need to call add of the Menu object_ Cascade method.
import tkinter as tk

window = tk.Tk()
window.title('MenuBar')
window.geometry('300x200')

label = tk.Label(window, width = 20, bg='yellow')
label.pack()
# Counter. Each time you select a menu item, the counter will increase by 1
counter = 1
# Function selected after menu item selection
def menuClick():
    global counter
    label.config(text='The first '+ str(counter) + ' One click')
    counter+=1
# Create root menu
menubar = tk.Menu(window)
# Create file menu item
filemenu = tk.Menu(menubar)
# Add the file menu item to the root menu
menubar.add_cascade(label='file', menu=filemenu)
# Add a new submenu item for the file menu item, bind the menu item through the command keyword parameter, and click the callback function
filemenu.add_command(label='newly build', command=menuClick)
filemenu.add_command(label='open', command=menuClick)
filemenu.add_command(label='preservation', command=menuClick)
# Add a separator
filemenu.add_separator()
# Add the "exit" menu item, and specify that selecting this menu item calls the callback function provided by the system. Select this menu item and exit the whole program
filemenu.add_command(label='sign out', command=window.quit)
# Create Edit menu item
editmenu = tk.Menu(menubar, tearoff=0)
# Adds a new submenu item to the edit menu item
menubar.add_cascade(label='edit', menu=editmenu)
editmenu.add_command(label='shear', command=menuClick)
editmenu.add_command(label='copy', command=menuClick)
editmenu.add_command(label='paste', command=menuClick)

submenu = tk.Menu(filemenu)
# Under the "file" menu item, add the "import" menu item with menu item
filemenu.add_cascade(label='Import', menu=submenu)
submenu.add_command(label="Import text file", command=menuClick)
submenu.add_command(label="Import pdf file", command=menuClick)
# Show menu on window
window.config(menu=menubar)

window.mainloop()

18.6 dialog box
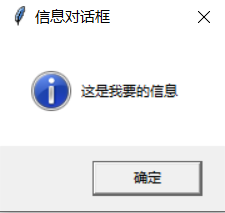
Dialog boxes are similar to windows, except that dialog boxes are modal, that is, once the dialog box is displayed, the controls on the window behind the dialog box cannot be accessed unless it is closed. Different styles of dialog boxes can be displayed using the corresponding API s in the messagebox module.
import tkinter as tk
import tkinter.messagebox
window = tk.Tk()
window.title('my window')
window.geometry('200x200')
# Calling this function will execute various types of dialog boxes in turn. The latter dialog box will be displayed only when the previous dialog box is closed
def hit_me():
# return 'ok'
tk.messagebox.showinfo(title='Information dialog box', message='This is the information I want')
# return 'ok'
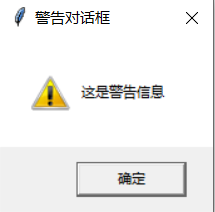
tk.messagebox.showwarning(title='Warning dialog box', message='This is a warning message')
# return 'ok'
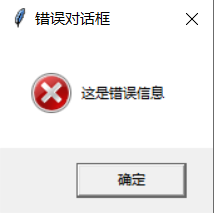
tk.messagebox.showerror(title='Error dialog', message='This is an error message')
# return 'yes' , 'no'
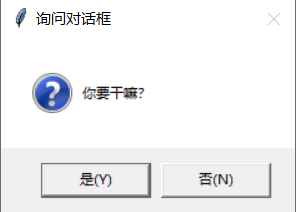
print(tk.messagebox.askquestion(title='Query dialog box', message='What are you up to?'))
# return True, False
print(tk.messagebox.askyesno(title='yes/no', message='Please give your choice'))
# return True, False
print(tk.messagebox.askokcancel(title='ok/cancal', message='determine/cancel'))
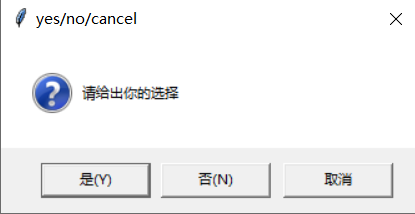
# return, True, False, None
print(tk.messagebox.askyesnocancel(title="yes/no/cancel", message="Please give your choice"))
tk.Button(window, text='hit me', command=hit_me).pack()
window.mainloop()