The list control allows us to present the content in the form of a list, making the interface more orderly and beautiful. The QListWidget list control should be used together with the QListWidget item, which is added to the list control as an item, that is, each item in the list control is a QListWidget item. This is why we say that QListWidget is an item based control.
Similarly, item based controls include QTreeWidget tree control and QTableWidget table control. The former presents content in a tree and is used with QTreeWidget item; The latter presents the content in tabular form and is used with QTableWidget item.
19.1 list control QListWidget
The author once made a desktop applet that can easily generate quotation table. The screenshot is as follows:
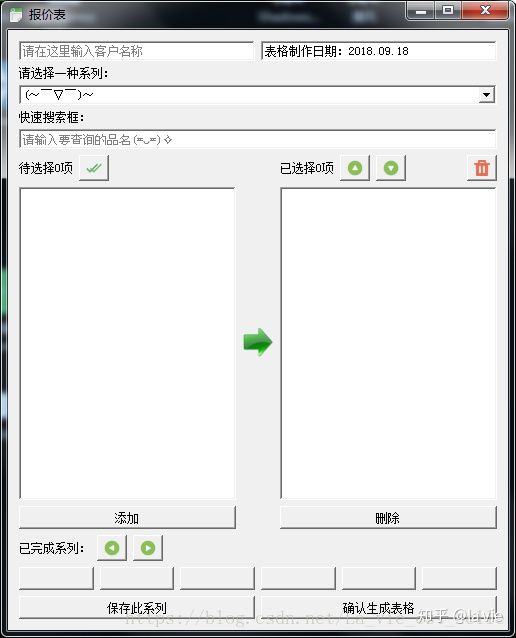
QListWidget is used in the program. When a product series is selected, all the contents of the series will be displayed in the list space on the left, and then double-click an item to display the double-click item in the list control on the right:

Let's learn the QListWidget by implementing this simple function.
import sys
from PyQt5.QtGui import QPixmap
from PyQt5.QtWidgets import QApplication, QWidget, QLabel, QListWidget, QListWidgetItem, QHBoxLayout


class Demo(QWidget):
    def __init__(self):
        super(Demo, self).__init__()
        self.pic_label = QLabel(self)                       # 1
        self.pic_label.setPixmap(QPixmap('arrow.png'))

        self.listwidget_1 = QListWidget(self)               # 2
        self.listwidget_2 = QListWidget(self)
        self.listwidget_1.doubleClicked.connect(lambda: self.change_func(self.listwidget_1))
        self.listwidget_2.doubleClicked.connect(lambda: self.change_func(self.listwidget_2))

        for i in range(6):                                  # 3
            text = 'Item {}'.format(i)
            self.item = QListWidgetItem(text)
            self.listwidget_1.addItem(self.item)

        self.item_6 = QListWidgetItem('Item 6', self.listwidget_1)  # 4

        self.listwidget_1.addItem('Item 7')                         # 5
        str_list = ['Item 9', 'Item 10']
        self.listwidget_1.addItems(str_list)

        self.item_8 = QListWidgetItem('Item 8')                     # 6
        self.listwidget_1.insertItem(8, self.item_8)
        # self.listwidget_1.insertItem(8, 'Item 8')

        self.h_layout = QHBoxLayout()
        self.h_layout.addWidget(self.listwidget_1)
        self.h_layout.addWidget(self.pic_label)
        self.h_layout.addWidget(self.listwidget_2)
        self.setLayout(self.h_layout)

    def change_func(self, listwidget):                              # 7
        if listwidget == self.listwidget_1:
            item = QListWidgetItem(self.listwidget_1.currentItem())
            self.listwidget_2.addItem(item)
            print(self.listwidget_2.count())
        else:
            self.listwidget_2.takeItem(self.listwidget_2.currentRow())
            print(self.listwidget_2.count())


if __name__ == '__main__':
    app = QApplication(sys.argv)
    demo = Demo()
    demo.show()
    sys.exit(app.exec_())
-
pic_label is used to display pictures;
-
Instantiate two qlistwidgets, listwidget_1 is placed on the left to display optional content, list widget_ 2 is placed on the right to display the items that have been double clicked. Then connect the doubleClicked signal of the two QListWidget controls with the custom slot function. Each time you double-click an item in the QListWidget, the slot function will be triggered.
-
Loop to create six qlistwidgettitem and add them to listwidget by calling addItem (qlistwidgettitem)_ 1 medium;
-
Of course, it can also be added by directly specifying the parent class during instantiation;
-
You can also directly call the addItem(str) method to add a content without qlistwidgettitem. You can also use addItem (iteratable) to add a set of item contents (but to make the item render more functions, you should still select QListWidgetItem);
-
An item can be added to the specified line through the insertitem (row, qlistwidgettitem) method;
-
Next, let's talk about the slot function:
def change_func(self, listwidget):
    if listwidget == self.listwidget_1:
        item = QListWidgetItem(self.listwidget_1.currentItem())
        self.listwidget_2.addItem(item)
        print(self.listwidget_2.count())
    else:
        self.listwidget_2.takeItem(self.listwidget_2.currentRow())
        print(self.listwidget_2.count())
In the slot function, we judge which QListWidget sends the signal, and if it is a listwidget_1, we first get the currently double clicked item through currentItem(), then instantiate it as qlistwidgettitem, and then add listwidget through addItem (qlistwidgettitem) method_ 2. The count() method is used to get the number of items. Here we print out the list widget_ How many items are there in 2. If the signal is ListGet_ 2, the number of rows of the currently double clicked item is passed to the takeItem(int) method for deletion, and then the next item quantity is also printed.
bug report: the return value of currentItem() is QListWidgetItem, which can be added directly. In other words, the following method should also be possible, but it is useless:
self.listwidget_2.addItem(self.listwidget_1.currentItem())
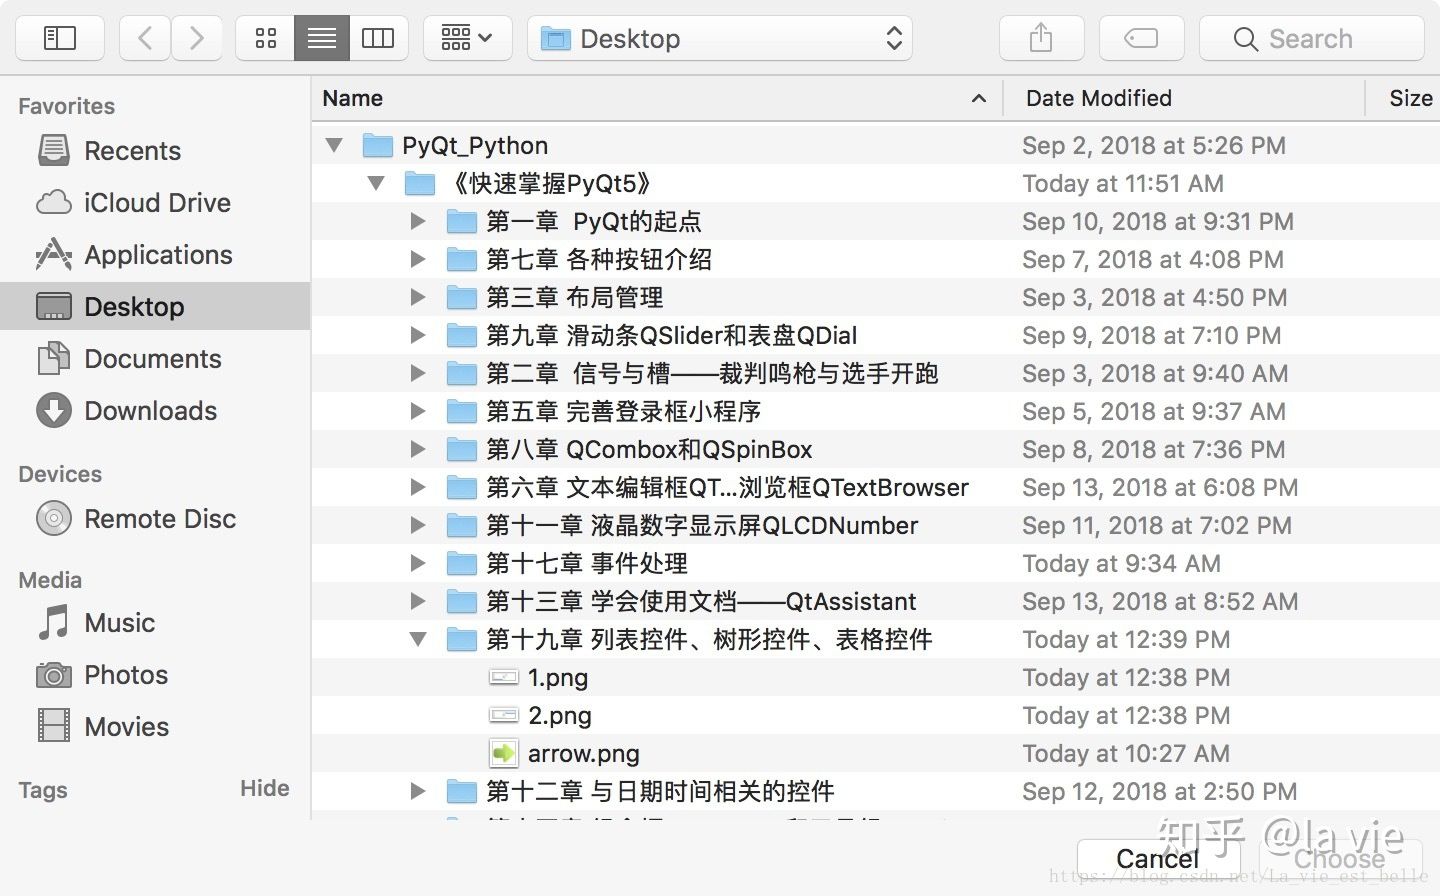
Picture download address:
arrow.png: https://www.easyicon.net/download/png/3980/64/
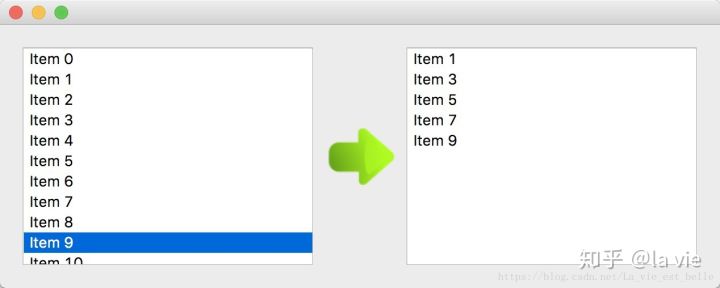
The screenshot is as follows. Double click an item on the left and the list control on the right will be displayed:
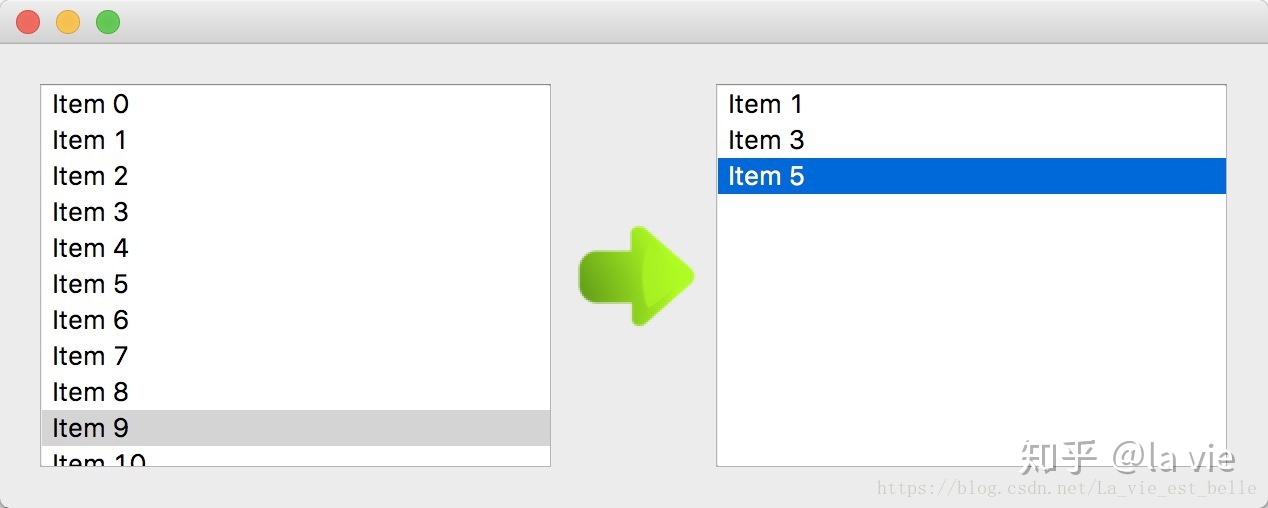
Double click an item on the right to delete it:
19.2 tree control QTreeWidget
We usually use QTreeWIdget to display the file directory structure, such as the following figure:
However, here we will use QTreeWidget to implement the installer tree structure shown when explaining the qccheckbox button in Chapter 7:
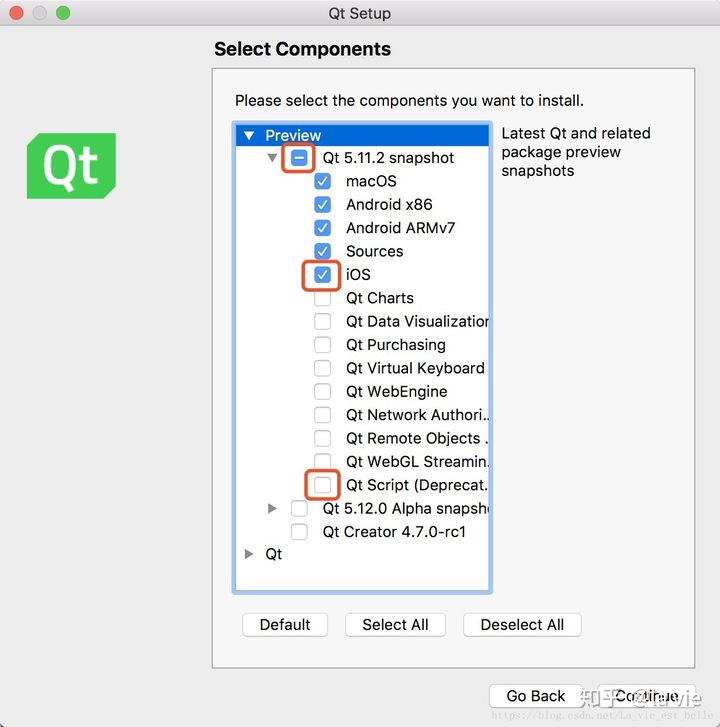
We take the following parts for description and Implementation:

It can be seen that the root node is Preview and its child node is Qt5 11.2 snapshot has three statuses: all selected, none selected and half selected. Under this sub node are macOS, Android x86, Android ARMv7, Sources and iOS sub nodes.
Let's start the implementation. See the code:
import sys
from PyQt5.QtCore import Qt
from PyQt5.QtWidgets import QApplication, QWidget, QTreeWidget, QTreeWidgetItem, QLabel, QHBoxLayout


class Demo(QWidget):
    def __init__(self):
        super(Demo, self).__init__()
        self.resize(500, 300)
        self.label = QLabel('No Click')                         # 1

        self.tree = QTreeWidget(self)                           # 2
        self.tree.setColumnCount(2)
        self.tree.setHeaderLabels(['Install Components', 'Test'])
        self.tree.itemClicked.connect(self.change_func)

        self.preview = QTreeWidgetItem(self.tree)               # 3
        self.preview.setText(0, 'Preview')

        # self.preview = QTreeWidgetItem()
        # self.preview.setText(0, 'Preview')
        # self.tree.addTopLevelItem(self.preview)

        self.qt5112 = QTreeWidgetItem()                         # 4
        self.qt5112.setText(0, 'Qt 5.11.2 snapshot')
        self.qt5112.setCheckState(0, Qt.Unchecked)
        self.preview.addChild(self.qt5112)

        choice_list = ['macOS', 'Android x86', 'Android ARMv7', 'Sources', 'iOS']
        self.item_list = []
        for i, c in enumerate(choice_list):                     # 5
            item = QTreeWidgetItem(self.qt5112)
            item.setText(0, c)
            item.setCheckState(0, Qt.Unchecked)
            self.item_list.append(item)

        self.test_item = QTreeWidgetItem(self.qt5112)           # 6
        self.test_item.setText(0, 'test1')
        self.test_item.setText(1, 'test2')

        self.tree.expandAll()                                   # 7

        self.h_layout = QHBoxLayout()
        self.h_layout.addWidget(self.tree)
        self.h_layout.addWidget(self.label)
        self.setLayout(self.h_layout)

    def change_func(self, item, column):
        self.label.setText(item.text(column))                   # 8

        print(item.text(column))
        print(column)
        if item == self.qt5112:                                 # 9
            if self.qt5112.checkState(0) == Qt.Checked:
                [x.setCheckState(0, Qt.Checked) for x in self.item_list]
            else:
                [x.setCheckState(0, Qt.Unchecked) for x in self.item_list]
        else:                                                   # 10
            check_count = 0
            for x in self.item_list:
                if x.checkState(0) == Qt.Checked:
                    check_count += 1

            if check_count == 5:
                self.qt5112.setCheckState(0, Qt.Checked)
            elif 0 < check_count < 5:
                self.qt5112.setCheckState(0, Qt.PartiallyChecked)
            else:
                self.qt5112.setCheckState(0, Qt.Unchecked)


if __name__ == '__main__':
    app = QApplication(sys.argv)
    demo = Demo()
    demo.show()
    sys.exit(app.exec_())
-
QLabel control is used to display the text of each QTreeWidgetItem;
-
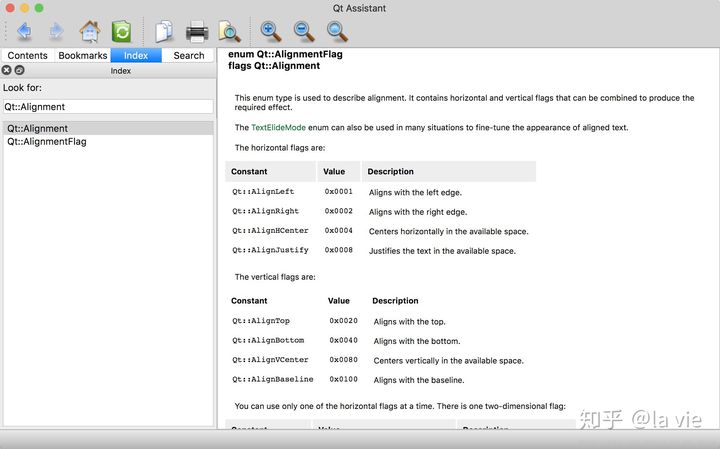
Instantiate a QTreeWidget and set the number of columns of the tree control to 2 (1 column by default) through setColumnCount(int). Set the title of each column through setheaderlabels (iteratable). If there is only one column, it should be set through setHeaderLabel(str) method. Next, we connect the itemClicked signal with the custom slot function. Whenever any item in the QTreeWidget is clicked, the itemClicked signal will be triggered. The description of this signal in QtAssistant is as follows:

We found that this is a signal with parameters, and the document explained that whenever an item is clicked, the parameter item is the clicked item, and the parameter column is the column where the clicked item is located. That is, when the signal is triggered, the parameter item saves the clicked item and the column saves the number of columns, and these two parameters will be automatically passed to our slot function. To correspond, our slot function also takes two parameters, so that we can know the number of items and columns clicked.
-
Instantiate a QTreeWidgetItem and set its parent class to self Tree, which means self Preview is the outermost (topmost) item, and then set the text through the setText(int, str) method. The first int type parameter is the column where the text is located, and 0 means to put it in the first column. Of course, we can also instantiate without specifying the parent class and let self Tree calls the addTopLevelItem() method to set the topmost item;
-
The setCheckState(int, CheckState) method can make the item appear in the form of a check box, and the addChild(QTreeWidgetItem) method can add children. Here, let self Preview adds a self Qt5112 option;
-
Instantiate 5 children and add them to self Qt5112 and displayed in the form of check box;
-
Here's self The test item is only used as a comparison to let readers know what it looks like when QTreeWidget is set to two columns;
-
Calling the expandAll() method allows all items of the QTreeWidget to be displayed in the open state. Note that you must call this method after all items have been instantiated. If you call it at the beginning, it will have no effect;
-
In the slot function, self Label displays the corresponding item text. Item is the clicked item. We call text(int) to pass in the number of columns to obtain the text (the usage of the text() function is different from that we used before).
-
If the clicked item is qt5112, we will judge whether it is selected. If so, all its sub items will be set to the selected state. If not, all its sub items will be set to the unselected state;
-
If the clicked item is a sub item of qt5112, we will judge how many sub items have been selected. If the quantity is 5, qt5112 will be set as selected; if it is between 0-5, it will be set as semi selected; if it is equal to 0, it will be set as unselected.
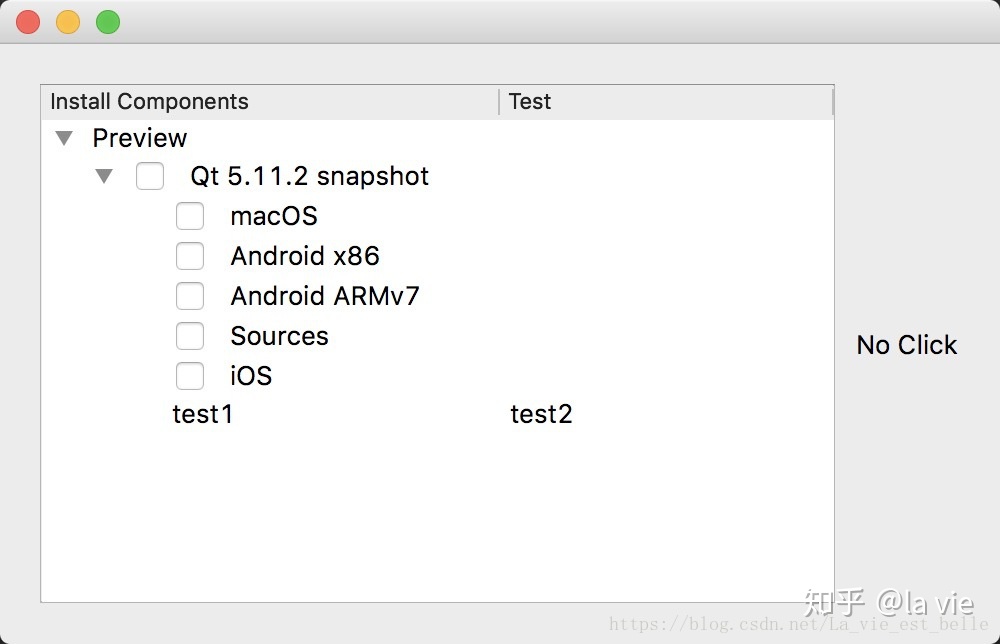
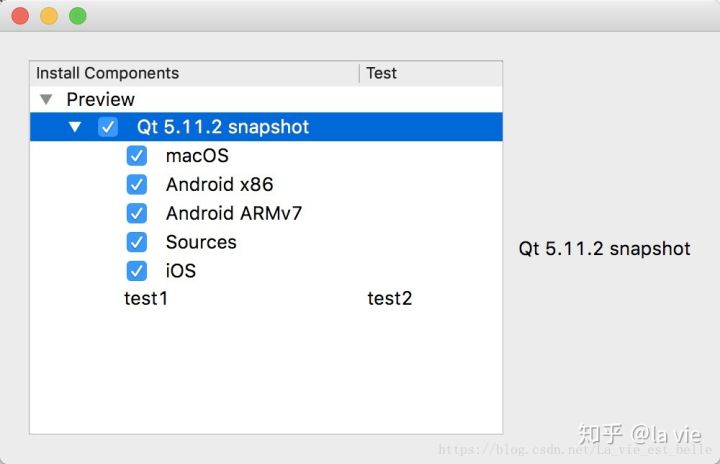
The operation screenshot is as follows:
19.3 table control QTableWidget
The core is similar. It is used with qtablewidgettitem. Here are the common methods:
import sys
from PyQt5.QtCore import Qt
from PyQt5.QtWidgets import QApplication, QTableWidget, QTableWidgetItem
class Demo(QTableWidget): # 1
def __init__(self):
super(Demo, self).__init__()
self.setRowCount(6) # 2
self.setColumnCount(6)
# self.table = QTableWidget(6, 6, self)
print(self.rowCount()) # 3
print(self.columnCount())
self.setColumnWidth(0, 30) # 4
self.setRowHeight(0, 30)
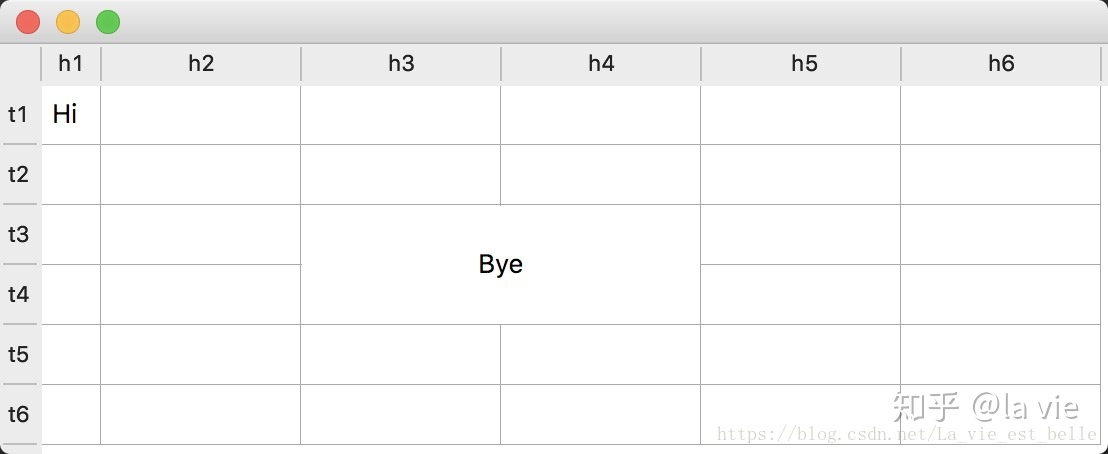
self.setHorizontalHeaderLabels(['h1', 'h2', 'h3', 'h4', ' h5', 'h6']) # 5
self.setVerticalHeaderLabels(['t1', 't2', 't3', 't4', 't5', 't6'])
# self.setShowGrid(False) # 6
self.item_1 = QTableWidgetItem('Hi') # 7
self.setItem(0, 0, self.item_1)
self.item_2 = QTableWidgetItem('Bye') # 8
self.item_2.setTextAlignment(Qt.AlignCenter)
self.setItem(2, 2, self.item_2)
self.setSpan(2, 2, 2, 2) # 9
print(self.findItems('Hi', Qt.MatchExactly)) # 10
print(self.findItems('B', Qt.MatchContains))
if __name__ == '__main__':
app = QApplication(sys.argv)
demo = Demo()
demo.show()
sys.exit(app.exec_())
-
Here, we directly inherit QTableWidget to implement the program;
-
setRowCount(int) sets the number of rows in the table, and setColumnCount(int) sets the number of columns. Alternatively, you can directly specify the number of rows and columns during instantiation;
-
rowCount() gets the number of rows and columnCount() gets the number of columns;
-
setColumnWidth(int, int) sets the column payment. The first parameter fills in the serial number and the second parameter fills in the width value. setRowCount(int, int) sets the row width, and the parameters are the same;
-
setHorizontalHeaderLabels(iterable) sets the title of the row, while setVerticalHeaderLabels sets the title of the column;
-
setShowGird(bool) sets whether to display grid lines on the table. True is displayed, False is not displayed;
-
Instantiate a cell and add it to the table with setitem (int, int, qtablewidgettitem). The first two int type parameters are row sequence number and column sequence number respectively;
-
setTextAlignment() sets the text alignment of cells. You can find various alignment modes by entering Qt::Alignment in QtAssistant:
-
The setSpan(int, int, int, int) method is used to merge cells. The first two int parameters are row serial number and column serial number respectively, and the last two are the number of rows and columns to be merged respectively;
-
The findItems(str, Qt.MatchFlag) method is used to find. The former parameter is the string used to match, and the latter parameter is the matching method. In the code, we use two matching methods, the first is QT Matchexactly, indicating an exact match. The second is QT Matchcontains, which means contains matches. Output Qt::MatchFlag in QtAssistant to understand various matching methods:
[the external link image transfer fails. The source station may have an anti-theft chain mechanism. It is recommended to save the image and upload it directly (img-WL8JLPFP-1641377961715)(data:image/svg+xml;utf8, )]
The operation screenshot is as follows:
19.4 summary
-
List control QListWidget, tree control QTreeWidget and table control QTableWidget are item based controls and should be used with qlistwidgettitem, qtreewidgettitem and qtablewidgettitem;
-
Use more documents.