internationalization
Method 1 GetX (recommended)
GetX is a super lightweight and powerful solution for Fl} utter. It quickly and practically combines high-performance state management, intelligent dependency injection and routing management.
GetX address:
- Github: https://github.com/jonataslaw/getx
- Pub.dev: https://pub.dev/packages/get
Add Get to your pubspec Yaml file:
dependencies:
·
·
·
  cupertino_icons: ^1.0.3
  oktoast: ^3.0.0
  get: ^4.1.4
You can use GetX by importing in the file to be used.
import 'package:get/get.dart';
Use the internationalization provided by Getx to switch languages. First, create language package files and translation service class files.
mkdir lib/common/lang -p
cd lib/common/lang

touch en_US.dart zh_Hans.dart translation_service.dart
Where en_US.dart,zh_Hans.dart is the language pack file, translation_ Service Dart is a Getx internationalization service class file.
en_US.dart
const Map<String, String> en_US = {
  "appName": "LuoXun",
  "pushLabel": "You have pushed the button this many times:",

  "navigationHome": "Home",
  "navigationFind": "Find",
  "navigationMap": "Map",
  "navigationMessage": "Message",
  "navigationMine": "Mine",

  "exitBy2Click": "click again to exit",

  "menuSettings": "Settings",
  "menuAbout": "About",
  "menuLanguage": "Language",
  "menuTheme": "Theme",
  "menuLogOut": "LogOut",
  "languageChinese": "Chinese",
  "languageEnglish": "English",
  "languageAuto": "Auto"
};
zh_Hans.dart
const Map<String, String> zh_Hans = {
  "appName": "Luo Xun",
  "pushLabel": "You clicked these buttons:",

  "navigationHome": "home page",
  "navigationFind": "find",
  "navigationMap": "Map",
  "navigationMessage": "news",
  "navigationMine": "my",

  "exitBy2Click": "Press again to exit the program",

  "menuSettings": "set up",
  "menuAbout": "about",
  "menuLanguage": "language",
  "menuTheme": "theme",
  "menuLogOut": "Log out",
  "languageChinese": "Simplified Chinese",
  "languageEnglish": "English",
  "languageAuto": "System default"
};
Save the simple key value dictionary mapping. To add custom Translations, you also need to create a class and inherit Translations. First, try to use the device language. If our language pack does not support it, set it to English. After all, English is an international language.
import 'dart:ui';
import 'package:flutter_locyin/common/lang/zh_Hans.dart';
import 'package:get/get.dart';
import 'en_US.dart';

class Messages extends Translations {
  //
  static Locale? get locale => Get.deviceLocale;
  static final fallbackLocale = Locale('en_US');
  @override
  Map<String, Map<String, String>> get keys => {
    'en_US': en_US,
    'zh_Hans': zh_Hans,
  };
}
Finally, pass the parameters to GetMaterialApp to define the locale and translation.
Note: Here we have used GetMaterialApp to replace the original MaterialApp of Flutter
·
·
·
import 'package:get/get.dart';
import 'package:flutter_locyin/common/lang/translation_service.dart';

class MyApp extends StatelessWidget {
  // This widget is the root of your application.
  @override
  Widget build(BuildContext context) {
    return GetMaterialApp(
      ·
      ·
      ·
        locale: Messages.locale,
        fallbackLocale: Messages.fallbackLocale,
        translations: Messages(),
    );
  }
}
We only need to attach when writing system text tr to the specified key, you can use the Translation:
Text('appName'.tr);
For more complex singular and plural translations and translations with parameters, please check Github's official documents. Call get Update locale (locale) updates the locale. Then the translation will automatically use the new locale. We can use get Devicelocale reads the system locale.
var locale = Locale('en_US');
Get.updateLocale(locale);
Language switching
Running the project first, the Flutter hot overload can help developers immediately see the effect of their changes, which greatly reduces development time and error repair time.
Then modify the APP title text: text (S.of (context) AppName,), and then modify the label text (S.of (context) above the counter Pushlabel,),, create a new method to switch languages_ changeLocale() is called by the button in the lower right corner to switch the language to English (because the real machine I use is debugged, and the system language is Chinese). After CTRL+S is saved, click the button to see that the system language is switched to English (if there is no effect, please restart the application). main. The complete code of dart is as follows:
class _MyHomePageState extends State<MyHomePage> {
  int _counter = 0;

  void _incrementCounter() {
    setState(() {
      _counter++;
    });
  }

void _changeLocale(){
  setState(() {
    //var locale = Locale('zh', 'Hans');
    var locale = Locale('en','US');
    Get.updateLocale(locale);
  });
}

  @override
  Widget build(BuildContext context) {
    return Scaffold(
      appBar: AppBar(
        title: Text(S.of(context).appName,),
      ),
      body: Center(
        child: Column(
          mainAxisAlignment: MainAxisAlignment.center,
          children: <Widget>[
            Text(S.of(context).pushLabel,),
            Text(
              '$_counter',
              style: Theme.of(context).textTheme.headline4,
            ),
          ],
        ),
      ),
      floatingActionButton: FloatingActionButton(
        onPressed: _changeLocale,
        tooltip: 'Increment',
        child: Icon(Icons.add),
      ), // This trailing comma makes auto-formatting nicer for build methods.
    );
  }
}
The persistent storage of language will continue to be explained in 3.3. The effect diagram is as follows:
Because this section is a testing section, the purpose is only to let readers understand the widget, State and how to use internationalization, so version control is not submitted.
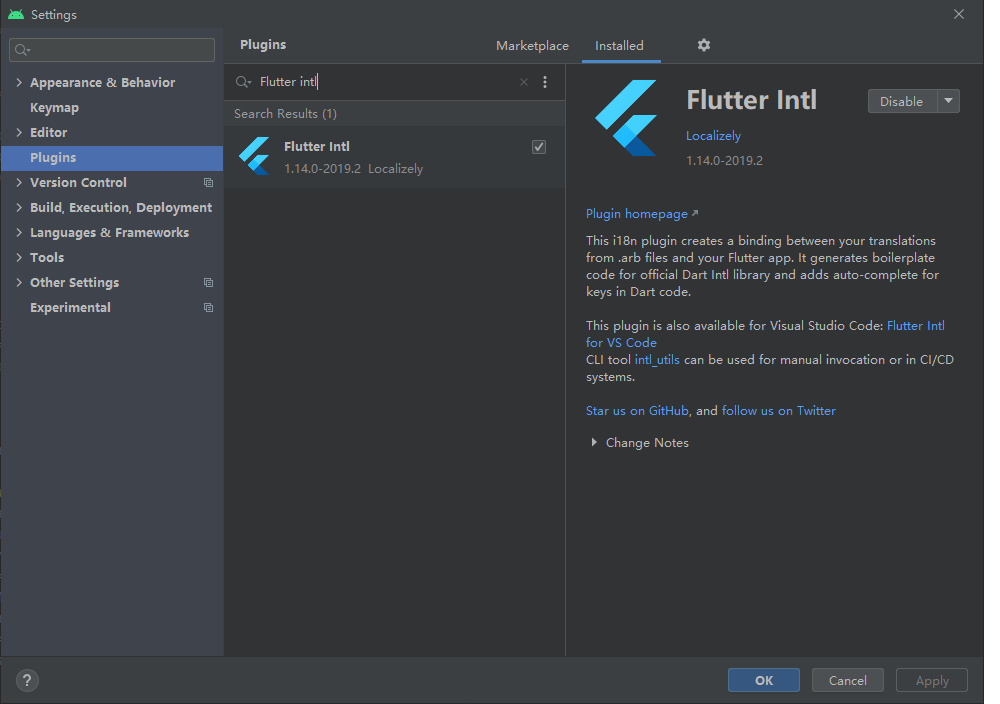
Method 2: fluent Intl
Android Studio installation plug-in fluent Intl
After installing the plug-in, select Tools – > shutter Intl – > initialize for the project from the menu
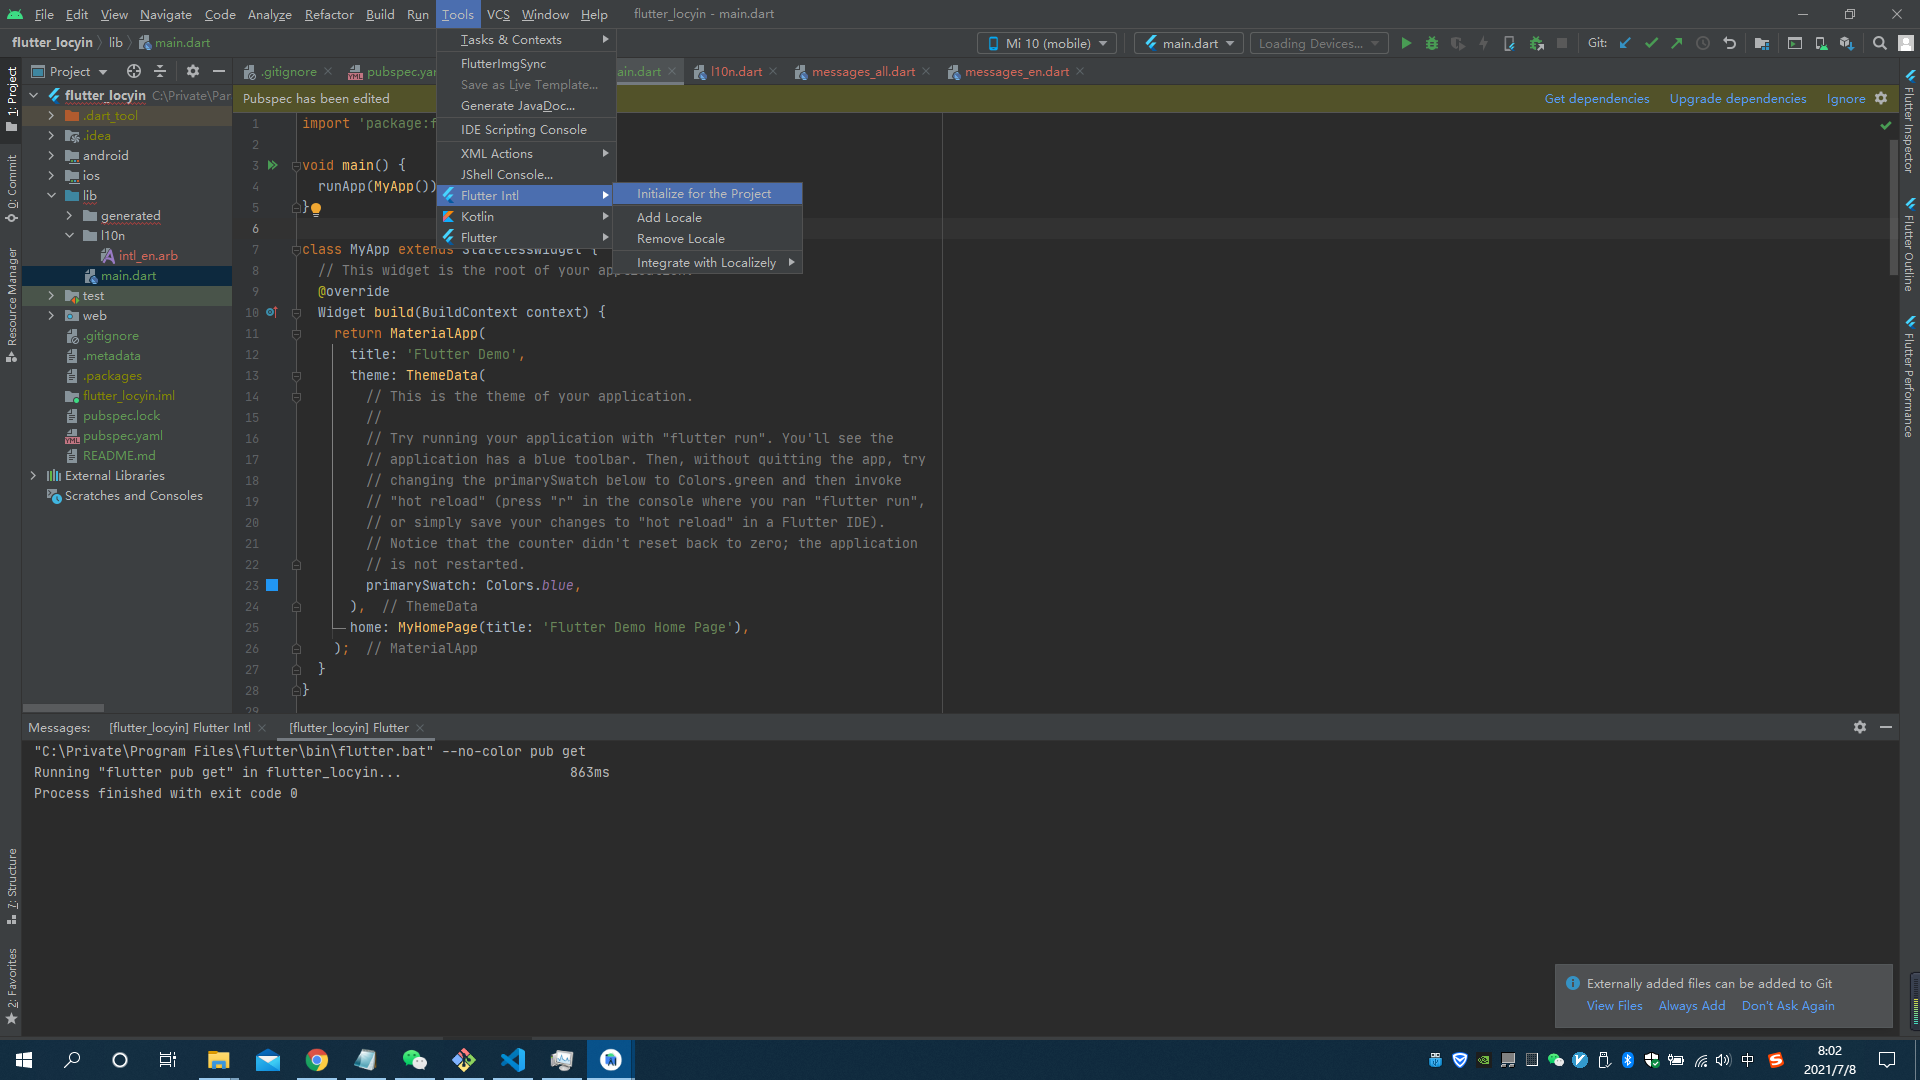
- Will be in pubspec Add the following fields to yaml
flutter_intl:
    enabled: true
- generated and l10n packages will be added in the lib directory
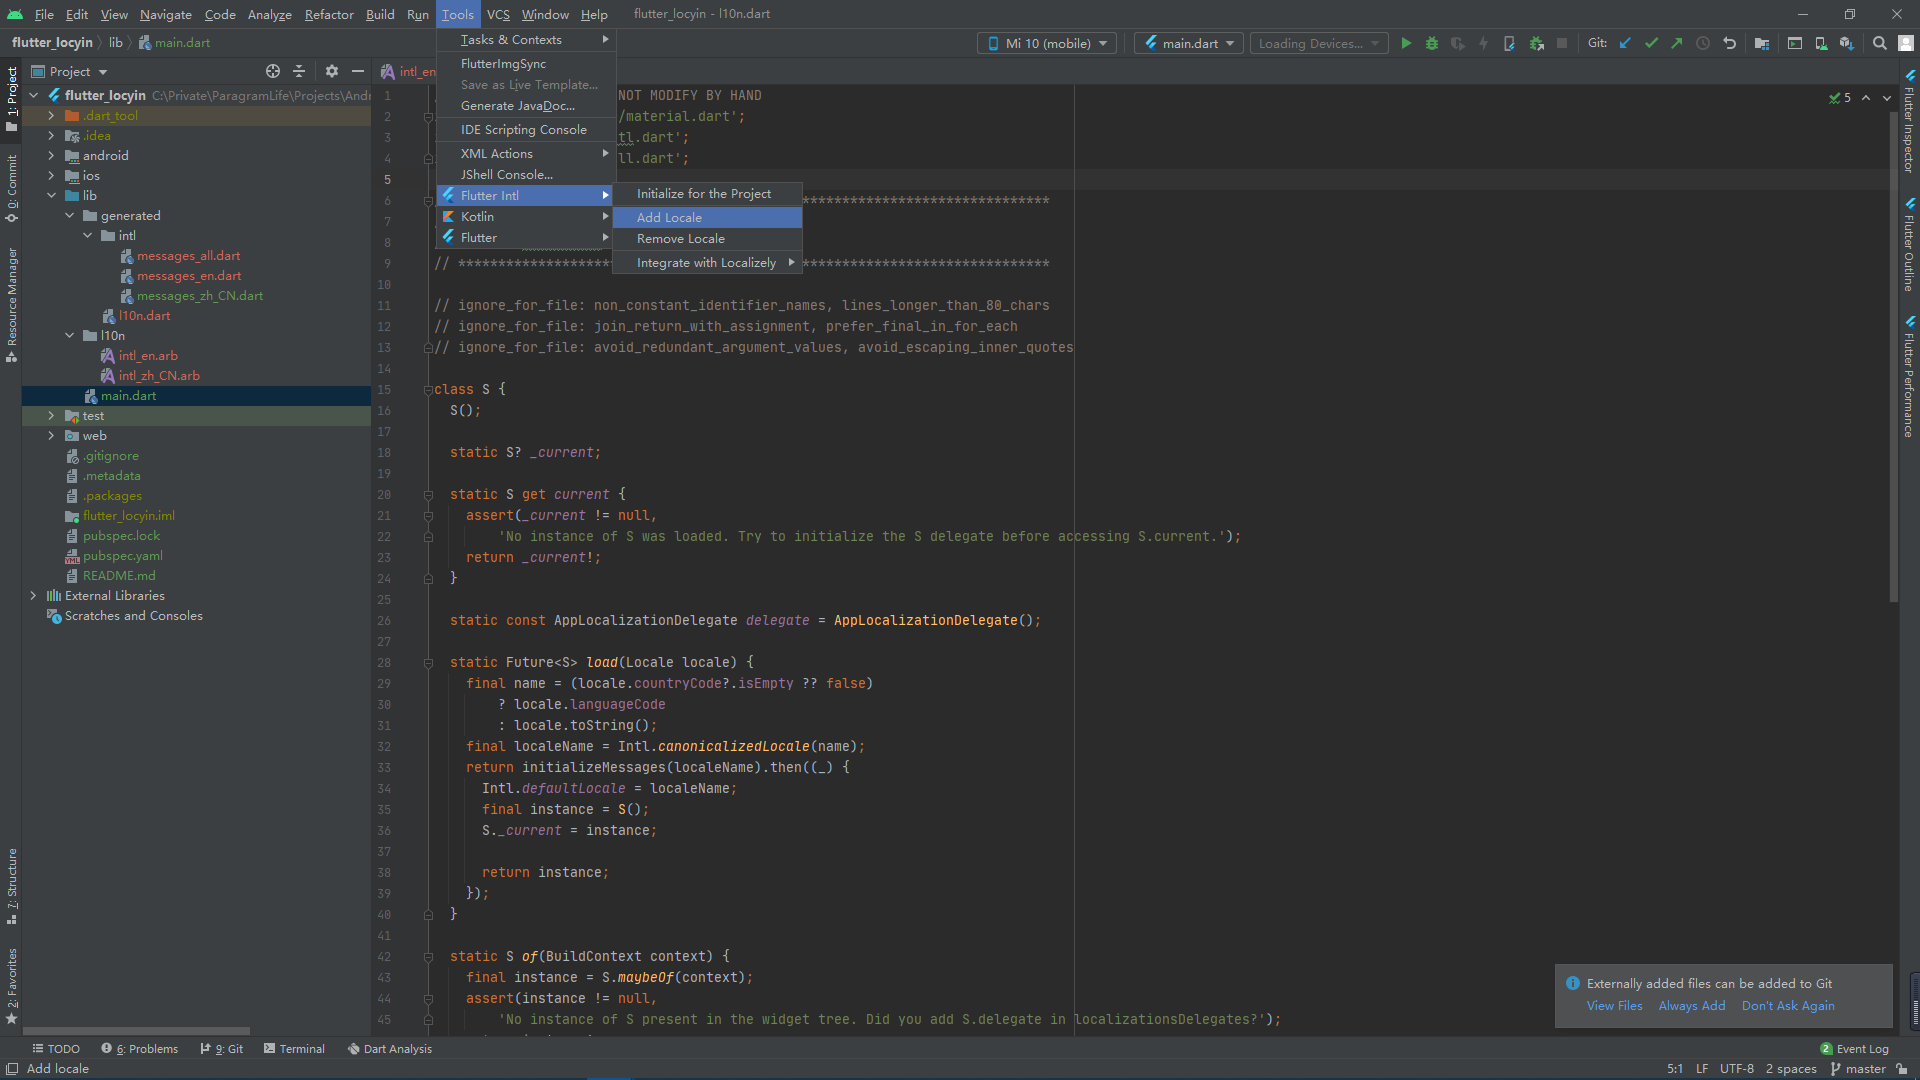
Use Add Locale to add support for Chinese. Enter zh_CN, Intl will be generated under l10n package_ zh_CN. ARB file
In pubspec Add dependency in yaml
dependencies:
  flutter:
    sdk: flutter
  flutter_localizations:
    sdk: flutter
After updating the dependency, let's test it.
test
Let's simply implement such a function: the user clicks the button to complete the switching of application language. For the test phase, we only need the "main.dart" file. This file comes with some code. Developers usually delete it to write code from scratch. We don't need to delete it first. We just need to modify this file to see the effect.
Set agent
The first important thing is to import the "fluent_localizations" package.
import 'package:flutter_localizations/flutter_localizations.dart';
import 'generated/l10n.dart';
Next, set up the proxy
class MyApp extends StatelessWidget {
  // This widget is the root of your application.
  @override
  Widget build(BuildContext context) {
    return MaterialApp(
      title: 'Flutter Demo',
      theme: ThemeData(
        primarySwatch: Colors.blue,
      ),
      home: MyHomePage(title: 'Flutter Demo Home Page'),

      localizationsDelegates: [
        S.delegate,
        GlobalMaterialLocalizations.delegate,
        GlobalWidgetsLocalizations.delegate,
        GlobalCupertinoLocalizations.delegate,
      ],
      supportedLocales: S.delegate.supportedLocales,
    );
  }
}
Like many other languages, the execution of the fluent app starts with the main method. The main method should include the runApp() method, which calls the code to be executed.
void main() => runApp(MyApp());
The code to execute is just a widget. Remember, fluent is entirely based on widgets.
If you don't know what a Widget is, let me briefly say it. A Widget can be anything in the view -: button, list, table, input box, card view, etc. Therefore, your entire fluent application is a collection of widgets, which are nested and combined together to build a beautiful UI. That's why every class you create should extend the Widget class.
Widget components in fluent can be divided into stateful and stateless components. Stateful components bring changes in display status due to user operation. The variable declared in the State class under the StatefulWidget component is referenced in the rendering component. When the display content needs to be updated, use the setState function callback to modify the variable value, so that the UI will be re rendered. The setState function in fluent is used to update the data displayed in the UI.
Set agent
Let's start with Intl_ en. Define English key value pairs in ARB
{
  "@@last_modified": "2021-07-09 00:02:00",
  "appName": "LuoXun",
  "pushLabel": "You have pushed the button this many times:"
}
Note: the English key is consistent with the Chinese key, and the value is the value of their respective language.
Next, define the Chinese language pack intl_zh_CN.arb:
{
  "@@last_modified": "2021-07-09 00:02:00",
  "appName": "Luo Xun",
  "pushLabel": "You clicked these buttons:"
}
Language switching
Running the project first, the Flutter hot overload can help developers immediately see the effect of their changes, which greatly reduces development time and error repair time.
Then modify the APP title text: text (S.of (context) AppName,), and then modify the label text (S.of (context) above the counter Pushlabel,),, create a new method to switch languages_ changeLocale() is called by the button in the lower right corner, where S.load(Locale("en","US")); The method will switch the language to English (because the real machine I use is debugged, and the system language is Chinese). After CTRL+S is saved, click the button to see that the system language is switched to English (if there is no effect, please restart the application). main. The complete code of dart is as follows:
class _MyHomePageState extends State<MyHomePage> {
  int _counter = 0;

  void _incrementCounter() {
    setState(() {
      _counter++;
    });
  }
  void _changeLocale(){
    setState(() {
      S.load(Locale("en","US"));
    });
  }

  @override
  Widget build(BuildContext context) {
    return Scaffold(
      appBar: AppBar(
        title: Text(S.of(context).appName,),
      ),
      body: Center(
        child: Column(
          mainAxisAlignment: MainAxisAlignment.center,
          children: <Widget>[
            Text(S.of(context).pushLabel,),
            Text(
              '$_counter',
              style: Theme.of(context).textTheme.headline4,
            ),
          ],
        ),
      ),
      floatingActionButton: FloatingActionButton(
        onPressed: _changeLocale,
        tooltip: 'Increment',
        child: Icon(Icons.add),
      ), // This trailing comma makes auto-formatting nicer for build methods.
    );
  }
}
The renderings are as follows:
Because this section is a testing section, the purpose is only to let readers understand the widget, State and how to use intl internationalization, so version control is not submitted.
Method 3: Flutter i18n
VS Code installation plug-in fluent I18N