Catalog
- 1 Jenkins2.X Pipeline
- 1.0 CI/CD
- 1.1 pipeline Brief Introduction
- 1.2 Jenkinsfile
- 1.3 Pipeline Grammar
- 1.4 Blue Ocean
- Advantages of 1.5 Pipeline
- 2 Multi-branch Pipeline Practice
- 2.1 Configuration
- 2.2 New project
- 2.3 scripting
- 2.3.1 Code Extraction
- 2.3.2 Maven Packaging
- 2.3.3 Setting Environmental Variables
- 2.3.4 Building Mirrors
- 2.3.5 Test
- 2.3.5.1 Startup Services and Environmental Fault Tolerance Processing
- 2.3.5.2 test
- 2.3.5.3 Publish Html Report
- 2.3.6 Push Mirror to Warehouse
- 2.3.7 Deployment to remote machines
- 2.3.8 post-construction operation
- 2.3.9 Configuration
- 3 Complete pipeline script
- 4 Summary
1 Jenkins2.X Pipeline
1.0 CI/CD
Continuous integration is a software development practice in which team members often integrate their work. By integrating each member at least once a day, it means that integration may occur many times a day. Each integration is validated by automated builds (including compilation, publishing, automated testing) to detect integration errors as early as possible.
continuous deployment is the rapid delivery of high-quality products through an automated build, test and deployment cycle. To some extent, it represents the degree of engineering of a development team. After all, the human cost of fast-running Internet companies will be higher than that of machines. Investing in machines to optimize the development process also improves human efficiency and maximizes engineering productivities.
1.1 pipeline Brief Introduction
Pipeline, or pipeline, is a new feature of Jenkins 2.X and a continuous integration scheme officially recommended by jenkins. Unlike traditional freestyle projects, it is implemented by writing code through jenkins DSL. Compared with the way users could define Jenkins tasks only by configuring the Web interface, now users can define pipelines and perform various tasks by using the jenkins DSL and Groovy language to write programs.
1.2 Jenkinsfile
So the point is, where is the pipeline code written?
The answer is Jenkins file.
In jenkins 2, pipeline configuration can be stripped from jenkins. In projects such as Freestyle, task configurations are stored on jenkins'servers in the form of configuration files, which means that all configuration changes depend on jenkins' web interface. When many plug-ins are used in configurations, it is cumbersome to maintain configurations built by others. In pipeline projects, you can write pipeline scripts in the Web interface, or you can save scripts in the form of text in the external version control system. This text is Jenkins file.
For git projects, multi-branch pipelines are recommended. Save task configuration and pipeline information in Jenkins file and Jenkins file in the project root directory. Different projects and branches will have their own Jenkins file with different contents. Such a multi-branch pipeline project can continuously integrate and deploy different branch codes.
jenkins file can be used to manage jenkins tasks in the form of files just like code in a project, supporting functions such as historical traceability and difference comparison.
1.3 Pipeline Grammar
There are two kinds of pipeline grammar: script pipeline and declarative pipeline. The following two grammars are briefly introduced. For more details, please refer to Official Documents.
1.3.1 scripted pipeline
The pipeline code is the Groovy script, which inserts some DSL steps for jenkins. This approach has almost no structural constraints, and the program flow is also based on Groovy grammar structure. This approach is more flexible, but you need to use Groovy.
Jenkinsfile (Scripted Pipeline)

  node {
    stage('Example') {
        if (env.BRANCH_NAME == 'master') {
            echo 'I only execute on the master branch'
        } else {
            echo 'I execute elsewhere'
        }
    }
}
1.3.2 Declarative Pipeline
Compared with the flexibility of script pipeline, declarative pipeline is more rigorous. Its structure is clearer and closer to projects of free style type. At the same time, a clear structure is helpful for error checking. It's easy to get started, and it's good to support Blue Ocean. This grammatical format is officially recommended.
From the following example, you can see that a stage is a stage, with steps and related configurations in each stage. agent identifies the node on which the phase is flaunting. The relevant grammar will be explained below in conjunction with the actual project.
If declarative pipeline can't meet our needs, we can use script pipeline script in declarative script. The specific method is in the next chapter.
Jenkinsfile (Declarative Pipeline)

  pipeline {
    agent none
    stages {
        stage('Example Build') {
            agent { docker 'maven:3-alpine' }
            steps {
                echo 'Hello, Maven'
                sh 'mvn --version'
            }
        }
        stage('Example Test') {
            agent { docker 'openjdk:8-jre' }
            steps {
                echo 'Hello, JDK'
                sh 'java -version'
            }
        }
    }
}
In the practice of this article, declarative grammar is used to demonstrate a multi-branch pipeline project.
1.4 Blue Ocean
Blue Ocean is a new visual interface in Jenkins 2 (Blue Ocean plug-in is required). It adds graphical display for each stage of the pipeline, which can view the status and progress of each stage, and has the function of selective log viewing for each stage and task, which is very clear.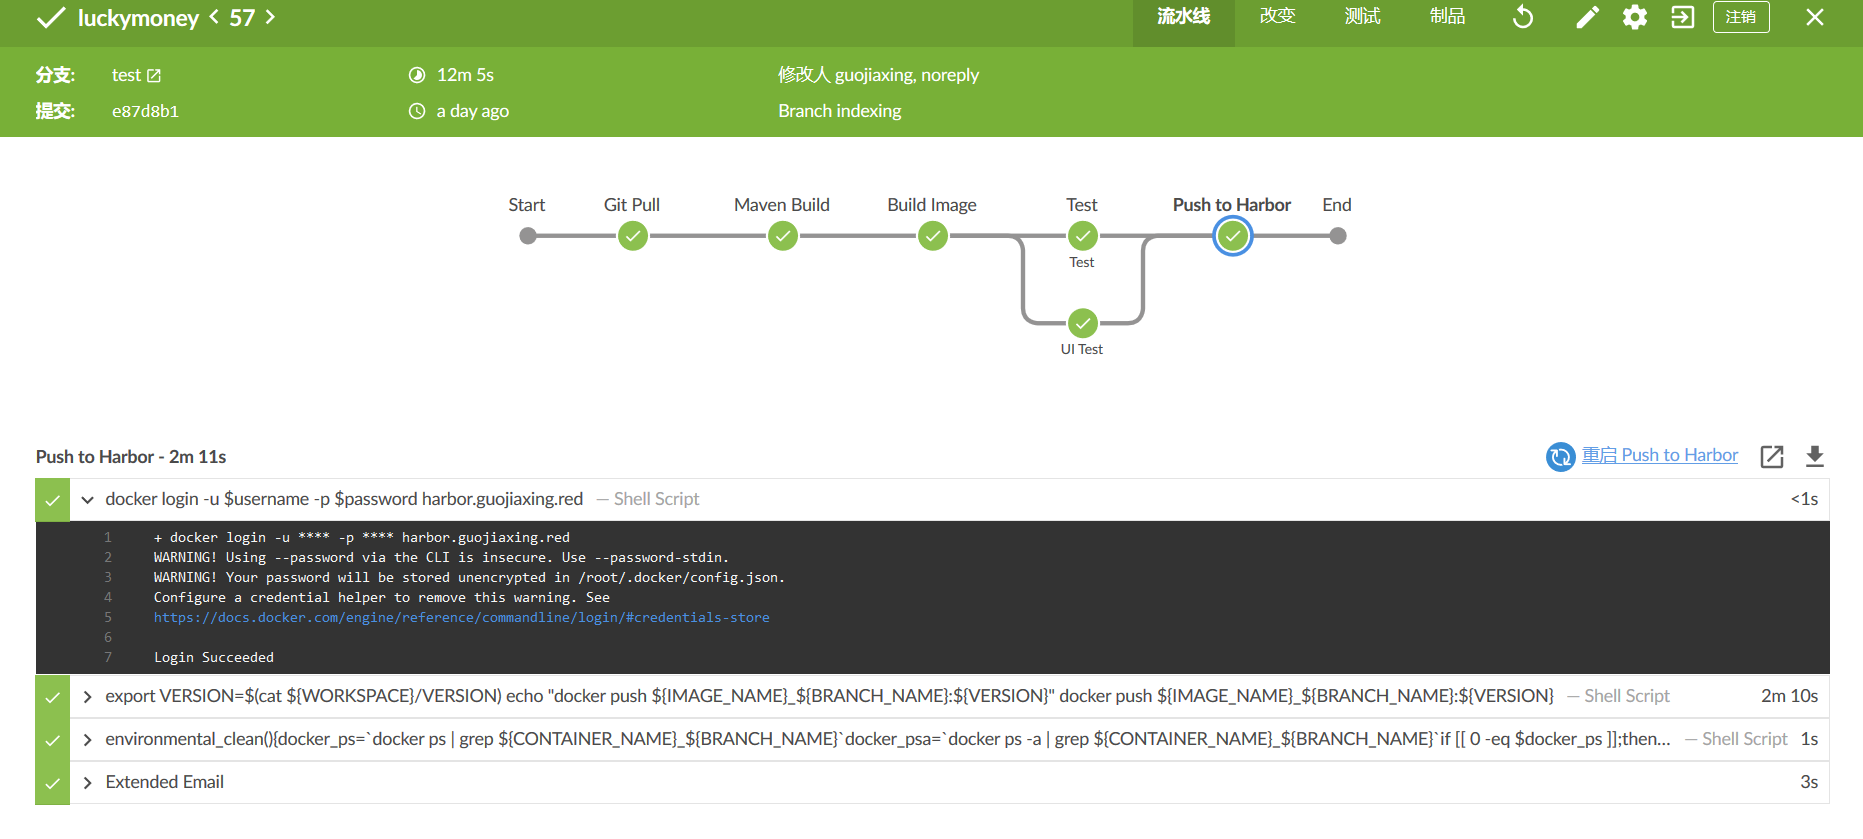
Advantages of 1.5 Pipeline
- Flexibility: It's more flexible to script than to rely solely on WEB interface configuration.
- Traceability: The Jenkins file is managed under the source code, which allows historical traceability and variance comparison of configurations.
- Clarity: Clear structure, easy to troubleshoot.
- Recoverability: It can be rerun based on the configuration of a particular version.
2 Multi-branch Pipeline Practice
2.1 Configuration
pipeline related plug-ins have been installed. The object of practice is a git project. There are three branches: maste, test and script. There is a Jenkins file under each branch.
The configuration of the three branches is basically the same. The main steps are as follows:
Pull Substitution Code - > Maven Packaging - > Building Mirror - > Testing - > Pushing harbor Warehouse - > Deployment and Publication
The above basically completes the continuous integration and deployment of a project.
2.2 New project
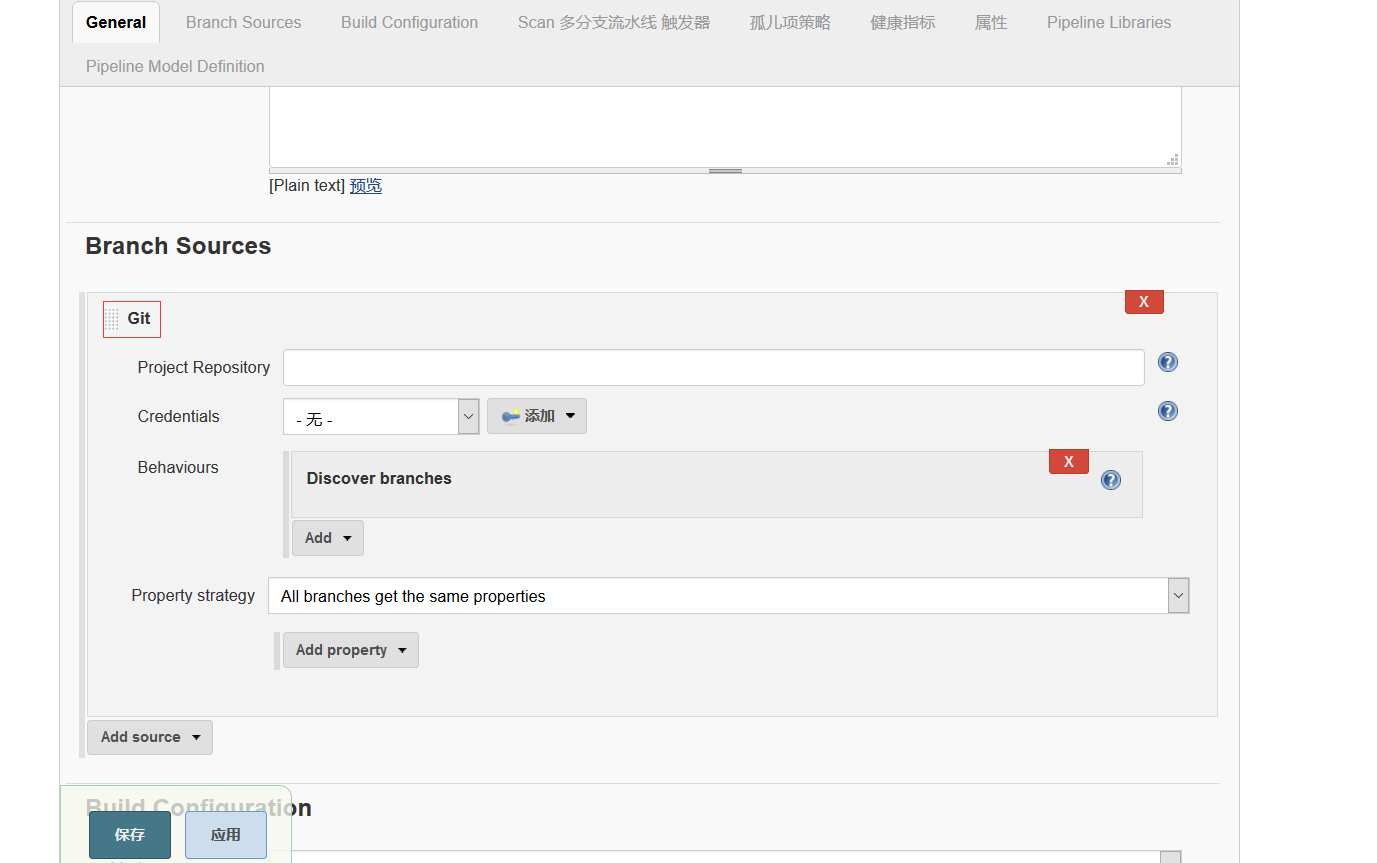
Create a new multi-branch pipeline project, select git for source code management, and then fill in the GIT address of the project. If the permissions are normal, Jenkins scans the Jenkins file under all branches of the project after saving, automatically creates the pipeline and executes it.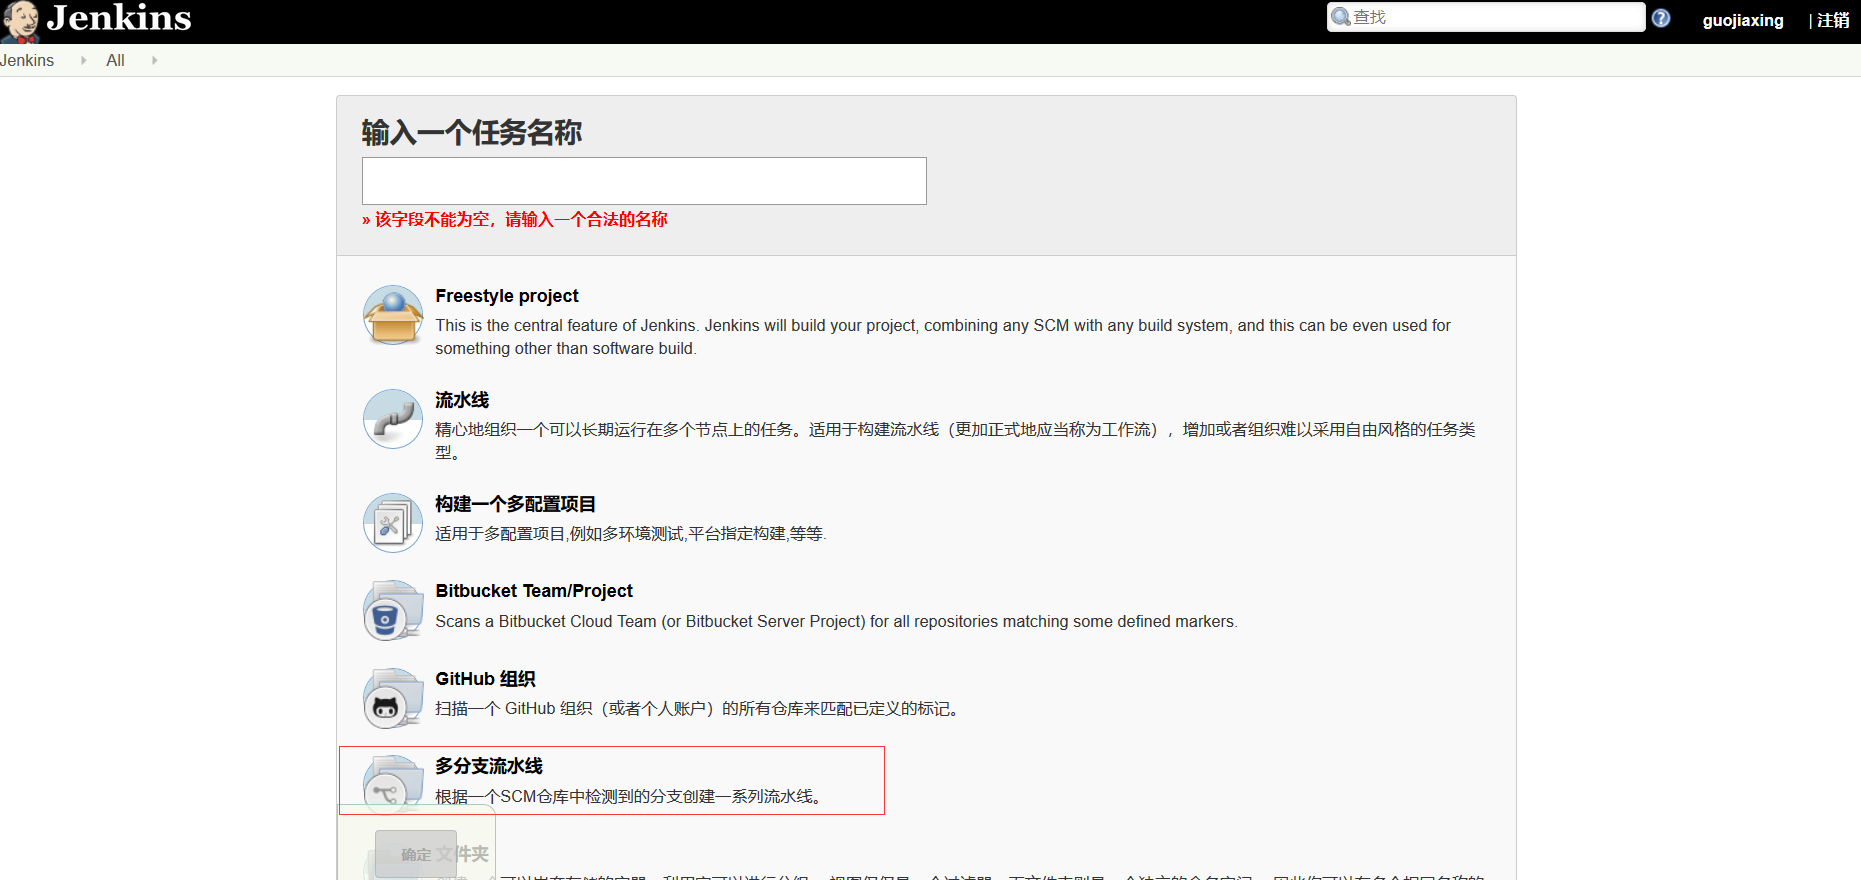
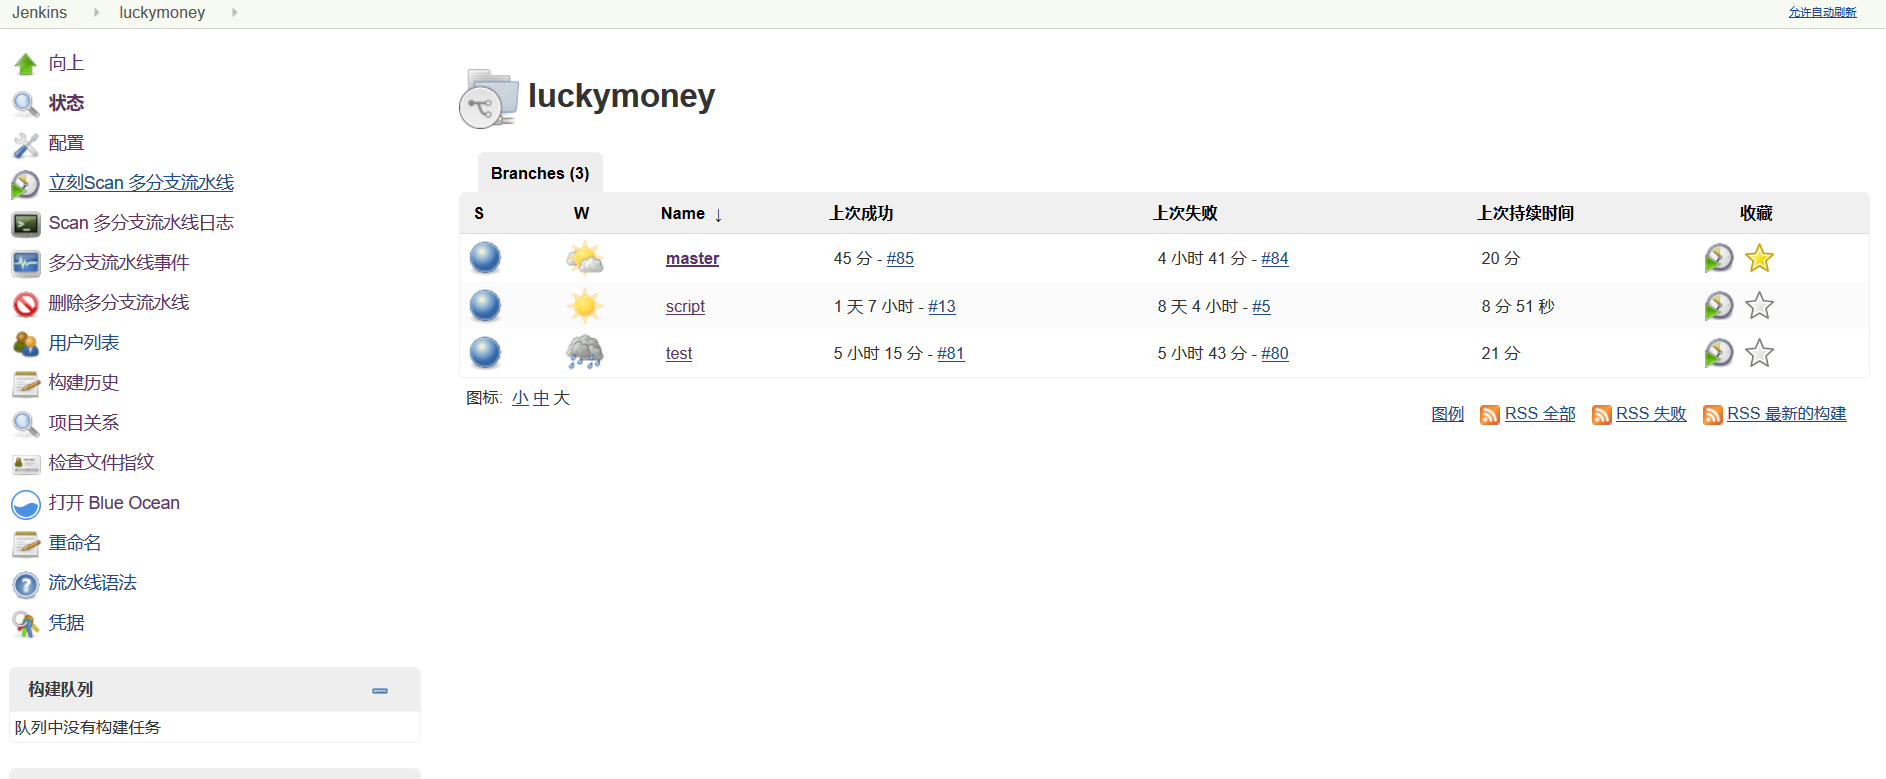
 Check out the new multi-branch pipeline (I've built each branch several times here).
Click on Blue Ocean on the left to enter the visual interface.
2.3 scripting
2.3.1 Code Extraction
The source of continuous integration is to get the latest code. Let's see how we do it in pipeline scripts.
    stage('Git Pull') {
      steps {
        git(url: 'https://gitee.com/GJXing/luckymoney.git', branch: 'master',credentialsId: '6cde17d1-5480-47df-9e08-e0880762b496')
        echo 'pull seccess'
      }
    }
- url: Source code address
- Branch: git branch
- Credentials Id: credentials (username and password)
echo is the output of information, prompt pull success, here can be dispensable.
2.3.2 Maven Packaging
The project is a SpringBook Java project that builds jar packages through maven.
    stage('Maven Build') {
      steps {
        sh 'mvn clean install'
      }
 }
sh is to execute shell commands
Note: TesNG tests are done in the test branch, where executing `mvn clean install'will be tested when packaged. If the test branch does not want to test at this stage, it ignores the test when packaging
    stage('Maven Build') {
      steps {
        sh 'mvn clean install -Dmaven.test.skip=true'
      }
    }
Save jar packages as "artifacts"
Suppose we want to save the jar package built by the script branch, then we can
archive 'target/luckymoney-0.0.1-SNAPSHOT.jar'Enter Blue Ocean to view products
2.3.3 Setting Environmental Variables
Before proceeding to the next stage, we should first solve an important problem, how to configure environmental variables in the pipeline.
environment {
  IMAGE_NAME = 'harbor.guojiaxing.red/public/springbootdemo'
  CONTAINER_NAME = 'luckymoney'
}
The declarative pipeline environment variable configuration is declared in the environment block. Here I declare two environment variables, one is the mirror name and the other is the container name. These two variables will be used repeatedly in later stages.
environment can declare that it acts on the entire configuration under the pipeline block, or that it acts on only one stage under one stage.
Environment variables are invoked in the same way as shell s, such as: ${CONTAINER_NAME}
2.3.4 Building Mirrors
pipeline packages docker and defines a set of grammatical rules for container operation.
For example:
build(image[,args])
Using the Docker file of the current directory, run docker build to create a mirror and label it.
Image.run([args,command])
Use docker run to run an image and return a container at the same time.
Image.pull()
Run docker pull
There are many other methods besides the ones listed above. But I'm not willing to use these methods. There are two reasons. One is that the docker command itself is not complicated and easy to use. Another reason is that using the docker command is more flexible than using the second split method.
Following is the official start of mirror construction
stage('Build Image') {
  steps {
    sh '''VERSION=$(date +%Y%m%d%H%M%S)
          echo "$(date +%Y%m%d%H%M%S)" > ${WORKSPACE}/VERSION
          echo "building image: ${IMAGE_NAME}_${BRANCH_NAME}:${VERSION}"
          docker build -t ${IMAGE_NAME}_${BRANCH_NAME}:${VERSION} .'''
	}
}
Mirror image consists of mirror name and mirror TAG.
For mirror names, since they are multi-branch pipelines, the combination of base mirror names and branch names is adopted here.
The role of tag is to indicate the version, where build time is used to be accurate to seconds. The build time is saved in the file, which is then read by all stages to get the version. Of course, we can also choose variables such as build number or custom as tags (as follows), but this method is not as unique as the time method. Here you can choose according to the actual business.
sh ' docker build -t ${IMAGE_NAME}_${BRANCH_NAME}:${BUILD_NUMBER} .'2.3.5 Test
After each build, we should automate the current version of the code and evaluate the quality of the current version by smoking and other tests. Guarantee that the quality of the version we want to release is passable. If any test step fails, the subsequent phase will not continue and the application will not be released. This is also an important idea of continuous integration.
2.3.5.1 Startup Services and Environmental Fault Tolerance Processing
Strictly speaking, service startup should not be in one phase with testing, but should be implemented in a separate phase, which is abbreviated here for convenience.
Knowing docker will tell you that if the container with the same name has not been deleted, the container will not be able to start. If the container with the target container name exists due to the last build failure or other reasons, it is necessary to clean up the environment before the container starts.
steps {
  script {
    try {
      sh '''environmental_clean(){
            docker_ps=`docker ps | grep ${CONTAINER_NAME}_${BRANCH_NAME}`
            docker_psa=`docker ps -a | grep ${CONTAINER_NAME}_${BRANCH_NAME}`

            if [[ 0 -eq $docker_ps ]];
            then
                #Container not started
                echo "container${CONTAINER_NAME}_${BRANCH_NAME}Unactivated"
            else
                echo "Stop container"
                docker stop ${CONTAINER_NAME}_${BRANCH_NAME}
            fi

            if [[ 0 -eq $docker_psa ]];
            then
                echo "container${CONTAINER_NAME}_${BRANCH_NAME}Non-existent"
            else
                echo "Delete containers"
                docker rm ${CONTAINER_NAME}_${BRANCH_NAME}
            fi
            }
            #docker environment cleaning
            environmental_clean'''
    }
    catch (exc) {
        echo 'The environment does not need to be cleaned up'
    }
}
The script is simple, stopping or deleting containers by judging whether the docker process exists.
The emphasis is to use script blocks to refer to scripted code in declarative code. Why do we do this?
As I mentioned earlier, this is a fault-tolerant process. Clean up if the environment is not clean, but if the container with no target container name in the environment returns - 1 after execution of `docker_ps = docker PS', `grep ${CONTAINER_NAME} ${BRANCH_NAME}, unlike shell scripts, pipeline specifies that when the return result is not expressed as When the work is done, the pipeline will terminate. In order to keep the pipeline going, try catch is used for exception handling.
Without scripting syntax, declarative pipelines can add'set +e'at the beginning of the sh step, and will not stop after an error occurs. The main purpose of this article is to demonstrate how to refer to scripted code in declarative code.
Start container
sh '''VERSION=$(cat ${WORKSPACE}/VERSION)
docker run -dit --name=${CONTAINER_NAME}_${BRANCH_NAME} ${IMAGE_NAME}_${BRANCH_NAME}:${VERSION}'''
2.3.5.2 test
Pipeline can not only be serial but also parallel. In the test phase, we can do parallel operations.
As shown in the figure, in the Test phase of the test branch, ui automation, interface automation, performance testing, unit testing, and so on can be executed in parallel.
In pipeline scripts, stage blocks within the parallel block are executed in parallel.
parallel {
  stage('Interface Automation Testing') {
         steps {
            sh  '''echo "Automated interface testing"
                   mvn clean test
                   echo "Automated Testing Completion" '''
      	  }
       }

  stage('UI automated testing') {
    steps {
      echo 'ui test'
    }
  }
 }
2.3.5.3 Publish Html Report
Publish html reports.
After the execution of testNG, report.html is generated in the project test-output directory and published. Install the HTML Publisher plugin plugin.
post {
  always {
    publishHTML([
      allowMissing: false,
      alwaysLinkToLastBuild: false,
      keepAll: true,
      reportDir: "test-output",
      reportFiles: "report.html",
      reportName:"testNg report"
  ])
    }
  }
The function of the post block is to execute at the end of all steps, which can act on the entire pipeline or a stage. always means that both success and failure are performed.
Look at the same in-process
Click Report to View( Click here for styling problems)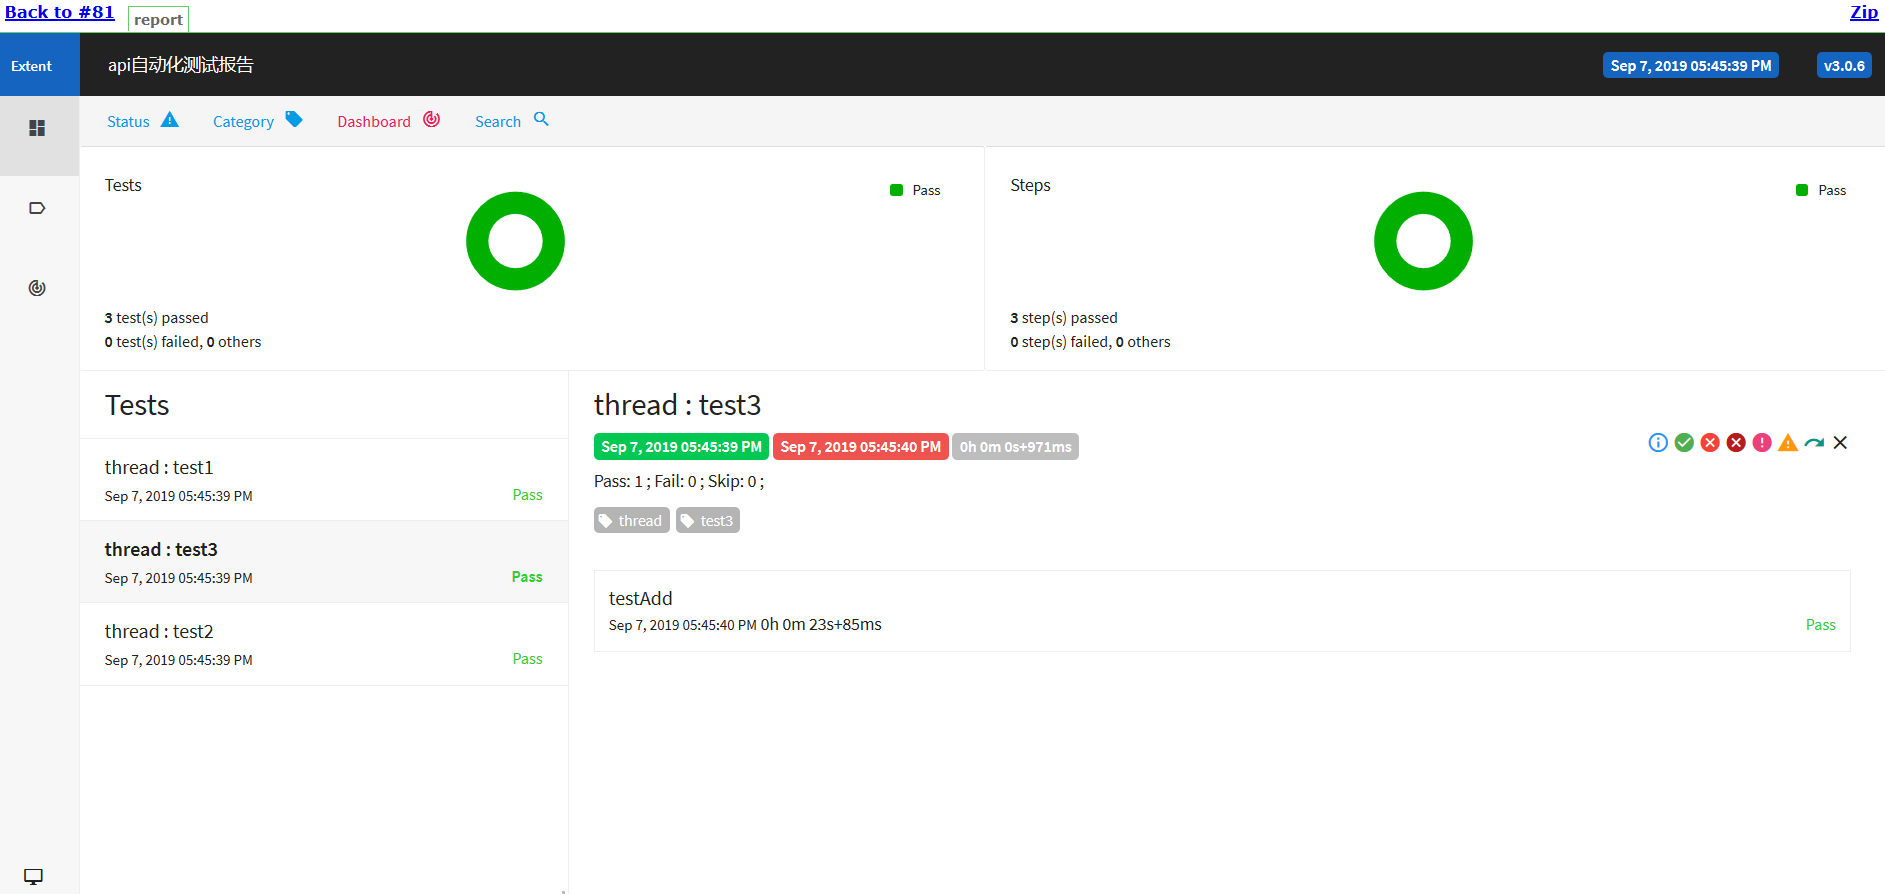
2.3.6 Push Mirror to Warehouse
After the code test is completed, the mirror can be pushed to the remote warehouse.
The warehouse is my own harbor.
stage('Push to Harbor') {
  steps {
    withCredentials(bindings: [usernamePassword(credentialsId: 'e8dc0fa7-3547-4b08-8b7b-d9e68ff6c18f', passwordVariable: 'password', usernameVariable: 'username')]) {
      sh 'docker login -u $username -p $password harbor.guojiaxing.red'
    }

    sh '''export VERSION=$(cat ${WORKSPACE}/VERSION)
      echo "docker push ${IMAGE_NAME}_${BRANCH_NAME}:${VERSION}"
      docker push ${IMAGE_NAME}_${BRANCH_NAME}:${VERSION}'''
  }
The authentication method in pipeline is withCredentials(), which requires that credentials be stored in the jenkins configuration beforehand.
2.3.7 Deployment to remote machines
Install the SSH Pipeline Steps plug-in. Configure username and password credentials.
stage('ssh deploy') {
  steps {
    script {
        def remote = [:]
        remote.name = 'gjx_server'
        remote.host = 'www.guojiaxing.red'
        remote.allowAnyHosts = true
        withCredentials([usernamePassword(credentialsId: 'gjx-server', passwordVariable: 'password', usernameVariable: 'username')]) {
            remote.user = "${username}"
            remote.password = "${password}"
        }
        sshCommand remote: remote, command: "docker pull ${IMAGE_NAME}_${BRANCH_NAME}:${BUILD_NUMBER}"
    }
}
See ssh pipeline for more operations Official Documents
2.3.8 post-construction operation
2.3.8.1 Environmental Cleaning
Clean up the environment in a post that acts on the overall pipeline
always {
      script {
        try{
            sh '''environmental_clean(){
                docker_ps=`docker ps | grep ${CONTAINER_NAME}_${BRANCH_NAME}`
                docker_psa=`docker ps -a | grep ${CONTAINER_NAME}_${BRANCH_NAME}`

                if [[ 0 -eq $docker_ps ]];
                then
                    #Container not started
                    echo "container ${CONTAINER_NAME}_${BRANCH_NAME}Unactivated"
                else
                    echo "Stop container"
                    docker stop ${CONTAINER_NAME}_${BRANCH_NAME}
                fi

                if [[ 0 -eq $docker_psa ]];
                then
                    echo "container ${CONTAINER_NAME}_${BRANCH_NAME}Non-existent"
                else
                    echo "Delete containers"
                    docker rm ${CONTAINER_NAME}_${BRANCH_NAME}
                fi
                }
                #docker environment cleaning
                environmental_clean
                export BUILD_NUMBER=$(cat ${WORKSPACE}/BUILD_NUMBER)
                docker rmi ${IMAGE_NAME}_${BRANCH_NAME}:${BUILD_NUMBER}'''
        }
         catch (exc) {
              echo 'Mirror does not need to be deleted'
          }
      }
2.3.8.2 Send mail
Install the Email Extension Plugin plug-in and complete mail configuration
Writing mail configuration in post that acts on pipeline Global
failure {
       emailext (
       subject: "FAILED: Job '${env.JOB_NAME} [${env.BUILD_NUMBER}]' Automated test results",
       body: '''<body leftmargin="8" marginwidth="0" topmargin="8" marginheight="4" offset="0">
                   <table width="95%" cellpadding="0" cellspacing="0"
                   style="font-size: 11pt; font-family: Tahoma, Arial, Helvetica, sans-serif">
                       <tr>
                               <td><br />
                               <b><font color="#0B610B">Building Information</font></b>
                               <hr size="2" width="100%" align="center" /></td>
                           </tr>
                           <tr>
                               <td>
                                   <ul>
                                       <li>Construction name: ${JOB_NAME}</li>
                                       <li>Construction results: <span style="color:red"> ${BUILD_STATUS}</span></li>
                                       <li>Construction number: ${BUILD_NUMBER}</li>
                                       <li>Build address:<a href="${BUILD_URL}">${BUILD_URL}</a></li>
                                       <li>GIT Branch: ${BRANCH_NAME}</li>
                                       <li>Change record: ${CHANGES,showPaths=true,showDependencies=true,format="<pre><ul><li>Submission ID: %r</li><li>The author:%a</li><li>Submission time:%d</li><li>Submit information:%m</li><li>Submission of documents:<br />%p</li></ul></pre>",pathFormat="         %p <br />"}
                                   </ul>
                               </td>
                           </tr>
                       </table>
                   </body>
                   </html>
                   ''',
       to: "XXX802003@qq.com",
       from: "XXX34093915@163.com",
       attachLog: true,
       compressLog: true
   )
   }
   success {
       emailext (
       subject: "SUCCESSFUL: Job '${env.JOB_NAME} [${env.BUILD_NUMBER}]' Automated test results",
       body: '''<body leftmargin="8" marginwidth="0" topmargin="8" marginheight="4" offset="0">
                   <table width="95%" cellpadding="0" cellspacing="0"
                   style="font-size: 11pt; font-family: Tahoma, Arial, Helvetica, sans-serif">
                       <tr>
                               <td><br />
                               <b><font color="#0B610B">Building Information</font></b>
                               <hr size="2" width="100%" align="center" /></td>
                           </tr>
                           <tr>
                               <td>
                                   <ul>
                                       <li>Construction name: ${JOB_NAME}</li>
                                       <li>Construction results: <span style="color:green"> ${BUILD_STATUS}</span></li>
                                       <li>Construction number: ${BUILD_NUMBER}</li>
                                       <li>Build address:<a href="${BUILD_URL}">${BUILD_URL}</a></li>
                                       <li>GIT Branch: ${BRANCH_NAME}</li>
                                       <li>Change record: ${CHANGES,showPaths=true,showDependencies=true,format="<pre><ul><li>Submission ID: %r</li><li>The author:%a</li><li>Submission time:%d</li><li>Submit information:%m</li><li>Submission of documents:<br />%p</li></ul></pre>",pathFormat="         %p <br />"}
                                   </ul>
                               </td>
                           </tr>
                       </table>
                   </body>
                   </html>
                   ''',
       to: "XXX802003@qq.com",
       from: "xxx34093915@163.com",
       attachLog: true,
       compressLog: true
   )
   }
failure is executed when the build fails and success is executed when the build succeeds.
Check email: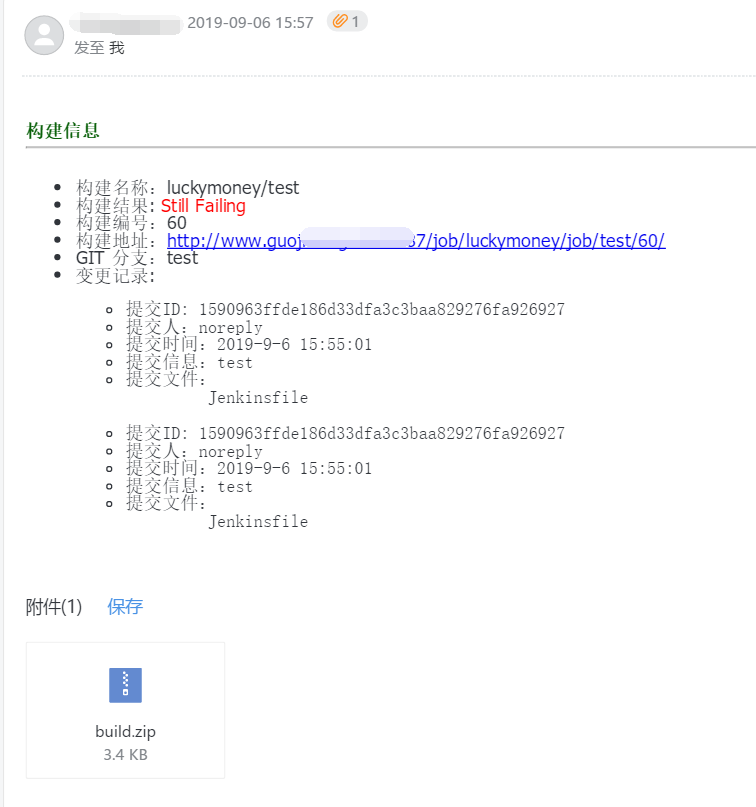
2.3.9 Configuration
  options {
    disableConcurrentBuilds()
    timeout(time: 1, unit: 'HOURS')
  }
  triggers {
    pollSCM('H/15 * * * *')
  }
disableConcurrentBuilds() means that multiple branches are not allowed to be built at the same time
Time out (time: 1, unit:'HOURS') denotes a timeout, and an hour timeout fails to build.
pollSCM('H/15* * *') means that the source code is scanned every 15 minutes by polling. If there are changes, the source code is built, and if there are no changes, the source code is not built.
3 Complete pipeline script
Jenkins file under script branch
4 Summary
Through this Jenkins Pipeline practice, compared with the traditional free style projects, I feel the strength and convenience of pipeline engineering, and also deepened my understanding of CI/CD.
This time from code pull-out to packaging, testing and deployment, using maven, docker, testNG and harbor tools, basically covering the general business deployment process. For the study of a new technology or tool, I think it is not necessary to master a tool or technology completely, and it is generally difficult to master them all. What is used is useful. Even so, this practice covers more than 80% of pipeline grammar.
pipeline is powerful, easy to use, and it is constantly improving, over time, it will play a greater role in the field of CI/CD in the future.