CL236 configuring IP failover – CTDB
This section describes how to configure IP failover. This chapter studies CTDB, mainly to solve the problem of high availability of NFS and Samba.
RHCA column address: https://blog.csdn.net/qq_41765918/category_11532281.html
High availability cluster NAS (this section is extracted from Professor Liu Aigui's article)
Cluster file systems such as Glusterfs, Lustre and Ceph provide unstructured data solutions with unified namespace, high performance, high availability and high expansion. For performance considerations, cluster file systems are designed with private protocol clients, which are usually POSIX compliant interfaces based on VFS or FUSE interfaces, but often only provide Linux/Unix system client software. For Linux/Unix system, you only need to install the cluster file system client kernel module or software; For systems such as Windows/Mac, the cluster file system cannot be accessed because there is no client software available. In addition, on some special occasions, users do not want to install client software on Linux/Unix/Windows/Mac system, but want to access the cluster file system through standard protocol. Therefore, we need to take the cluster file system as the underlying foundation and core to build storage services accessed by standard protocols. At present, it is mainly NAS using NFS/CIFS standard protocols. Traditional NAS systems have some shortcomings, such as single point performance bottleneck, poor scalability, limited application scale and high load support, and can not meet the needs of big data applications. Cluster NAS is a scale out storage architecture. It cooperates with multiple nodes (commonly known as NAS heads) to provide high-performance, high availability or high load balanced NAS (NFS/CIFS) services. It has the advantages of linear expansion of capacity and performance.
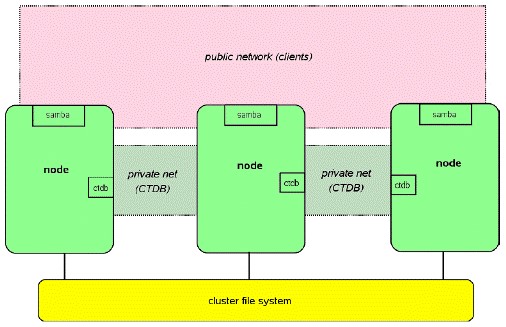
Here we implement high availability cluster NAS based on CTDB. CTDB It is a lightweight implementation of cluster database. Based on it, many application clusters can be realized. At present, CTDB supports samba, NFS, httpd, vsftpd, iSCSI and winbind applications. Cluster shared data storage supports GPFS, GFS (2), glusterfs, luster and ocfs (2). CTDB itself is not an HA solution, but combined with the cluster file system, it can provide a simple and efficient ha cluster solution. The cluster is configured with two groups of IP. Private IP is used for heartbeat and internal communication of the cluster, and public IP is used to provide external service access. Public IP is dynamically allocated on all cluster nodes. When a node fails, CTDB will schedule other available nodes to take over its previously allocated public IP. After the failed node recovers, the drifting public IP will be taken over again. This process is transparent to the client to ensure that the application will not be interrupted, which is what we call high availability ha here.
CTDB
cluster trivial database
When nfs and samba are mounted on the client, IP failover is realized. For example, when the specified host is down, automatic switching is realized.
glusterfs itself has been implemented, so CTDB is not required. CTDB is to solve the high availability problem of NFS and Samba.
**Note: * * CTDB requires that the host names of all nodes can be resolved
The principle of IP Failover is similar to the bond of dual network cards and the load IP of applications.
1) vip accessing volume through ctdb
2) How vip accesses volumes: it is not suitable for distributed, but only for replication
3) When testing in a distributed environment and creating multiple files at the same time, data will still be distributed to the failed node because the directory of the failed node in the glusterfs volume is not deleted. However, the node has failed and cannot be written. At this time, an error will be reported and the data will be lost.
Configure ctdb
1. Packing
# yum install -y ctdb
#Install ctdb on all nodes
#After loading the package, the configuration file is in: / etc/ctdb/
2. Create a new replication volume
The configuration file of about 100M bytes will be locked in a virtual volume
# gluster volume create ctdb replica 3 \
node1:/brick/brick8/brick \
node2:/brick/brick8/brick \
node3:/brick/brick8/brick

#Note: do not start this volume here
3. Modify script
Before starting and after closing this volume, you need to execute the following two scripts:
/var/lib/glusterd/hooks/1/start/post/S29CTDBsetup.sh
/var/lib/glusterd/hooks/1/stop/pre/S29CTDB-teardown.sh
The following changes need to be made on all nodes:
# vim /var/lib/glusterd/hooks/1/start/post/S29CTDBsetup.sh
META=ctdb   # You can also write all volumes according to the situation
#By default, this script will be executed before all volumes are started. It is specified here that only ctdb will be executed before the volume is started
Actions performed by script:
1) Mount the volume specified by META variable to the local / gluster/lock (default) directory first
2) Then write the auto mount entry in / etc/fstab
3) Finally, set the startup and self startup ctdb
# vim /var/lib/glusterd/hooks/1/stop/pre/S29CTDB-teardown.sh
META=ctdb  # You can also write all volumes according to the situation
4. Start volume
# gluster volume start ctdb
#Start volume
5. Confirm mounting
After startup, confirm that the actions executed by the above start script have been completed at all relevant nodes
# df -Th
node1:ctdb fuse.glusterfs 1021M   33M  988M   4% /gluster/lock
cat /etc/fstab
node1:/ctdb /gluster/lock glusterfs _netdev,defaults,transport=tcp,xlator-option=*client*.ping-timeout=10 0 0
be careful:
1. ip failover can be implemented only after all relevant nodes have been mounted
2. If there is no mount, check the above configuration on the node with the problem, and then stop volume, and then start volume
6. Configure virtual IP
Create a / etc/ctdb/nodes file on all nodes using NFS services, and add the IP addresses of these nodes to this file
# vim /etc/ctdb/nodes
192.168.1.100
192.168.1.101
192.168.1.102
192.168.1.103
# scp /etc/ctdb/nodes root@node2:/etc/ctdb/
# scp /etc/ctdb/nodes root@node3:/etc/ctdb/
# scp /etc/ctdb/nodes root@node4:/etc/ctdb/
Create / etc / ctdb / public on all NFS nodes that need IP failover_ Addresses this file, add virtual IP to this file, and specify which network card this IP is attached to
# vim /etc/ctdb/public_addresses
192.168.1.20/24 eth0
# scp /etc/ctdb/public_addresses root@node2:/etc/ctdb
# scp /etc/ctdb/public_addresses root@node3:/etc/ctdb
# scp /etc/ctdb/public_addresses root@node4:/etc/ctdb
7. Configure Samba
Ctdb will manage Samba service, so it is necessary to configure the samba configuration document in advance, and there is no need to start samba. This operation needs to be configured in all nodes (if ctdb is started first, the operation of creating password only needs to be performed on one node, because ctdb transmits this change to all nodes). The configuration process is as follows:
# useradd samba
# pdbedit -a -u samba
perhaps smbpasswd -a samba
# vim /etc/samba/smb.conf
[global]
clustering=yes
idmap backend = tdb2
private dir = /gluster/lock
# systemctl restart smb
8. Configure glusterfs
Modify volume properties:
# gluster volume set ctdb stat-prefetch off
# gluster volume set ctdb server.allow-insecure on
# gluster volume set ctdb storage.batch-fsync-delay-usec 0

modify glusterfs Service properties:
# vim /etc/glusterfs/glusterd.vol
option rpc-auth-allow-insecure on

Restart the service after modification:
# systemctl restart glusterd
9. Configure ctdb (if necessary)
Add the following configuration in / etc/sysconfig/ctdb:
# vim /etc/sysconfig/ctdb
CTDB_RECOVERY_LOCK=/gluster/lock/lockfile
CTDB_PUBLIC_INTERFACE=eth0
CTDB_PUBLIC_ADDRESSES=/etc/ctdb/public_addresses
CTDB_MANAGES_SAMBA=yes
CTDB_SAMBA_SKIP_SHARE_CHECK=yes
CTDB_MANAGES_NFS=no
CTDB_MANAGES_WINBIND=no
CTDB_NODES=/etc/ctdb/nodes
CTDB_DEBUGLEVEL=ERR
If NFS service needs to be enabled, set CTDB_MANAGES_NFS=yes
10. Start ctdb service
Start ctdb service on all nodes
# systemctl start ctdb
Client access
Note: virtual IP should be used to mount at this time
NFS:
# mount -t nfs 192.168.1.20:/vol1 /mnt/vol1
Samba:
# yum install -y samba-client cifs-utils
# smbclient -L 192.168.1.20 -U samba
# mount -t cifs -o username=samba,password=redhat //192.168.1.20/gluster-vol1 /mnt/vol1
View ctdb status
You can use the command to view the status of the CTDB cluster:
# ctdb status
# ctdb ip
# ctdb ping -n all
Textbook practice
[root@workstation ~]# lab ctdb setup
Setting up  for lab exercise work:

 • Testing if all hosts are reachable..........................  SUCCESS
 • Adding glusterfs to runtime firewall on servera.............  SUCCESS
 • Adding glusterfs to permanent firewall on servera...........  SUCCESS
 • Adding glusterfs to runtime firewall on serverb.............  SUCCESS
 • Adding glusterfs to permanent firewall on serverb...........  SUCCESS
 • Adding servera to trusted storage pool......................  SUCCESS
 • Adding serverb to trusted storage pool......................  SUCCESS
 • Ensuring thin LVM pool vg_bricks/thinpool exists on servera.  SUCCESS
............
1. Install the required software on servera and serverb and open any ports required for this setting on the firewall on these machines.
# yum -y install samba ctdb
# firewall-cmd --add-service=samba --permanent
# firewall-cmd --add-port=4379/tcp --permanent
# firewall-cmd --reload
2. Stop the ctdbmeta volume, and then set relevant start and stop triggers on servera and serverb to use the ctdbmeta volume for CTDB. Clustering is also enabled for Samba on both nodes.
[root@servera ~]# gluster volume stop ctdbmeta
Stopping volume will make its data inaccessible. Do you want to continue? (y/n) y
volume stop: ctdbmeta: success

vim /var/lib/glusterd/hooks/1/start/post/S29CTDBsetup.sh
# $META is the volume that will be used by CTDB as a shared filesystem.
# It is not desirable to use this volume for storing 'data' as well.
# META is set to 'all' (viz. a keyword and hence not a legal volume name)
# to prevent the script from running for volumes it was not intended.
# User needs to set META to the volume that serves CTDB lockfile.
META=ctdbmeta

vim /var/lib/glusterd/hooks/1/stop/pre/S29CTDB-teardown.sh
# $META is the volume that will be used by CTDB as a shared filesystem.
# It is not desirable to use this volume for storing 'data' as well.
# META is set to 'all' (viz. a keyword and hence not a legal volume name)
# to prevent the script from running for volumes it was not intended.
# User needs to set META to the volume that serves CTDB lockfile.
META=ctdbmeta

add to clustering = yes to configure
# grep clustering -C 2 /etc/samba/smb.conf

[global]
clustering=yes
#------------------------ AIO Settings ------------------------
#
3. Start ctdbmeta volume, and then configure CTDB to use servera and serverb systems for IP failover, using 172.25.250.15/24 as floating IP address.
[root@servera ~]# gluster volume start ctdbmeta
volume start: ctdbmeta: success

# vim /etc/ctdb/nodes
# cat /etc/ctdb/nodes
172.25.250.10
172.25.250.11
# vim /etc/ctdb/public_addresses
# cat /etc/ctdb/public_addresses
172.25.250.15/24 eth0
# systemctl enable ctdb
# systemctl start ctdb
4. Ensure that the custdata volume is exported using samba. Remember to set a redhat Samba password for smbuser users.
Set the samba password of smbuser to redhat. Because ctdb propagates this change to all nodes, this step only needs to be performed on a single host.
# smbpasswd -a smbuser
New SMB password: redhat
Retype new SMB password: redhat
Added user smbuser.

# gluster volume set custdata stat-prefetch off
# gluster volume set custdata server.allow-insecure on
# gluster volume set custdata storage.batch-fsync-delay-usec 0

servera and serverb All need to be changed:
# vim /etc/glusterfs/glusterd.vol
    option rpc-auth-allow-insecure on
# systemctl restart glusterd

[root@servera ~]# gluster volume stop custdata
Stopping volume will make its data inaccessible. Do you want to continue? (y/n) y
volume stop: custdata: success
[root@servera ~]# gluster volume start custdata
volume start: custdata: success
5. On your workstation system, use Samba to permanently mount custdata volumes on / mnt/custdata through floating IP addresses.
[root@workstation ~]# mkdir /mnt/custdata
[root@workstation ~]# echo "//172.25.250.15/gluster-custdata /mnt/custdata cifs user=smbuser,pass=redhat 0 0" >> /etc/fstab
[root@workstation ~]# mount -a
[root@workstation ~]# df -TH
Filesystem                       Type      Size  Used Avail Use% Mounted on
/dev/vda1                        xfs        11G  3.3G  7.6G  31% /
devtmpfs                         devtmpfs  946M     0  946M   0% /dev
tmpfs                            tmpfs     965M   87k  965M   1% /dev/shm
tmpfs                            tmpfs     965M   18M  948M   2% /run
tmpfs                            tmpfs     965M     0  965M   0% /sys/fs/cgroup
tmpfs                            tmpfs     193M   17k  193M   1% /run/user/42
tmpfs                            tmpfs     193M     0  193M   0% /run/user/0
//172.25.250.15/gluster-custdata cifs      2.2G   35M  2.2G   2% /mnt/custdata
6. Simulate fault.
Test your IP failover by creating some files in / mnt/custdata, shut down the host currently assigned floating IP, and then create more files in / mnt/custdata. Don't forget to start the machine you turned off.
[root@workstation ~]# touch /mnt/custdata/file{00..49}

[root@servera ~]# ctdb ip -n all
Public IPs on ALL nodes
172.25.250.15 1
[root@servera ~]# ctdb status
Number of nodes:2
pnn:0 172.25.250.10    OK (THIS NODE)
pnn:1 172.25.250.11    OK
Generation:1156537640
Size:2
hash:0 lmaster:0
hash:1 lmaster:1
Recovery mode:NORMAL (0)
Recovery master:0

[root@serverb ~]# ip addr
1: lo: <LOOPBACK,UP,LOWER_UP> mtu 65536 qdisc noqueue state UNKNOWN
    link/loopback 00:00:00:00:00:00 brd 00:00:00:00:00:00
    inet 127.0.0.1/8 scope host lo
       valid_lft forever preferred_lft forever
    inet6 ::1/128 scope host
       valid_lft forever preferred_lft forever
2: eth0: <BROADCAST,MULTICAST,UP,LOWER_UP> mtu 1500 qdisc pfifo_fast state UP qlen 1000
    link/ether 52:54:00:00:fa:0b brd ff:ff:ff:ff:ff:ff
    inet 172.25.250.11/24 brd 172.25.250.255 scope global eth0
       valid_lft forever preferred_lft forever
    inet 172.25.250.15/24 brd 172.25.250.255 scope global secondary eth0
       valid_lft forever preferred_lft forever
    inet6 fe80::5054:ff:fe00:fa0b/64 scope link
       valid_lft forever preferred_lft forever
3: bond0: <BROADCAST,MULTICAST,MASTER> mtu 1500 qdisc noop state DOWN
    link/ether f2:1a:f8:73:6d:cf brd ff:ff:ff:ff:ff:ff
[root@serverb ~]# init 0
Connection to serverb closed by remote host.
Connection to serverb closed.

[root@workstation ~]# touch /mnt/custdata/file{50..99}

[root@foundation0 ~]# rht-vmctl start serverb
Starting serverb.
7. Check the log.
# tail -f /var/log/log.ctdb -n 1000
............
2020/12/05 21:19:36.151950 [recoverd: 3641]: Resetting ban count to 0 for all nodes
2020/12/05 21:19:49.906734 [ 3491]: 50.samba: Redirecting to /bin/systemctl start  smb.service
2020/12/05 21:19:50.179897 [recoverd: 3641]: Trigger takeoverrun
2020/12/05 21:19:52.352823 [ 3491]: Node became HEALTHY. Ask recovery master 0 to perform ip reallocation
2020/12/05 21:37:51.497398 [recoverd: 3641]: ../ctdb/server/ctdb_recoverd.c:3973 The vnnmap count is different from the number of active lmaster nodes: 2 vs 1
2020/12/05 21:37:51.497495 [recoverd: 3641]: Taking out recovery lock from recovery daemon
2020/12/05 21:37:51.497500 [recoverd: 3641]: Take the recovery lock
2020/12/05 21:38:06.547795 [ 3491]: High RECLOCK latency 15.050065s for operation recd reclock
2020/12/05 21:38:06.551899 [ 3491]: Freeze priority 1
............
8. Script scoring
[root@workstation ~]# lab ctdb grade
summary
-
Describes how to configure CTDB.
-
Describes how to configure NFS and Samba clients.
The above is the sharing of brother goldfish. I hope it can be helpful to the little friends who see this article.
If this [article] is helpful to you, I hope I can praise [brother goldfish] 👍, It is not easy to create. Compared with the official statement, I prefer to explain every knowledge point in [easy to understand] style. If you are interested in [operation and maintenance technology], you are also welcome to pay attention ❤️❤️❤️ [brother goldfish] ❤️❤️❤️, I will bring you great [harvest and surprise] 💕💕!
