1, Pre knowledge points
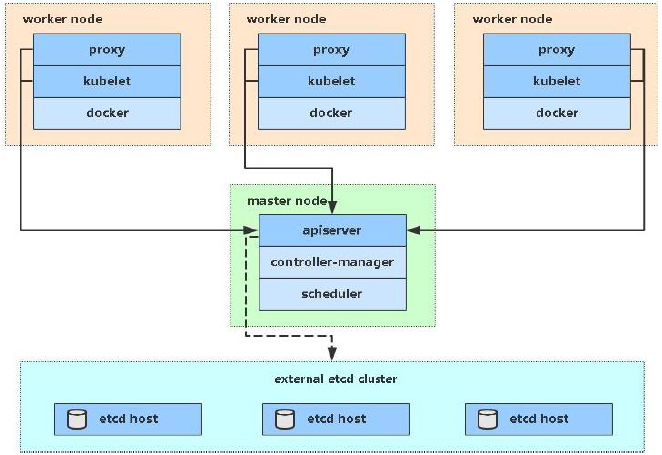
At present, there are three main ways to deploy Kubernetes clusters in production:
minikube
Minicube is a tool that can quickly run a single node kubernetes locally. It is only used to try K8S or daily development test environment.
kubeadm

Kubedm is a K8S deployment tool that provides kubedm init and kubedm join for rapid deployment of Kubernetes clusters.
Official address: Kubeadm | Kubernetes
Binary package
Download the binary package of the distribution from github and manually deploy each component to form a Kubernetes cluster.
kubeadm lowers the deployment threshold, but shields many details, making it difficult to troubleshoot problems. If you want to be more controllable, it is recommended to use binary packages to deploy Kubernetes clusters. Although manual deployment is troublesome, you can learn a lot of working principles during this period, which is also conducive to later maintenance.

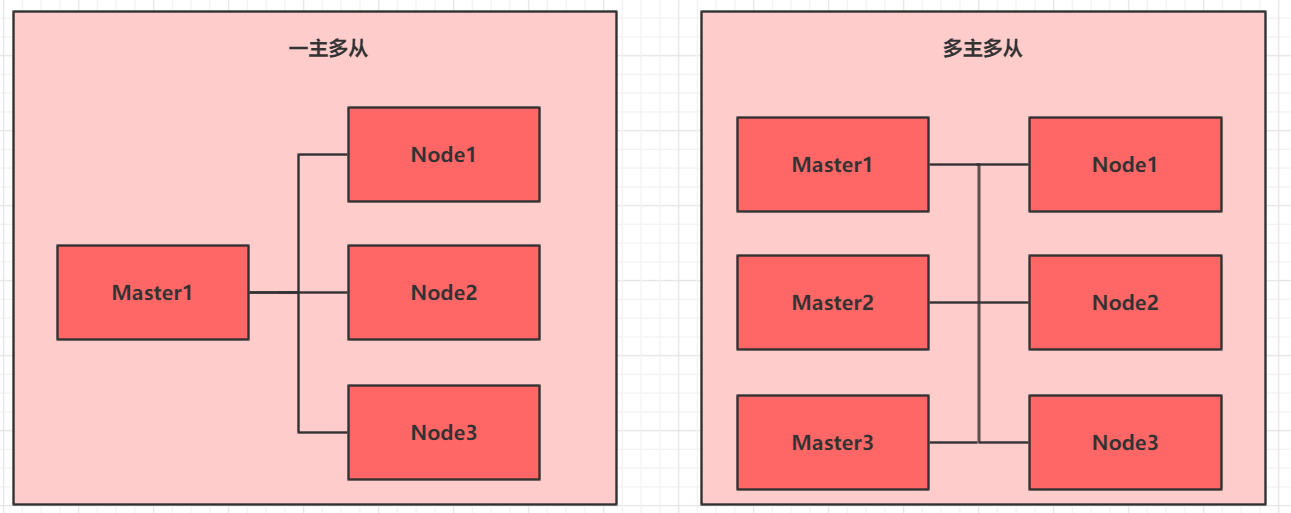
Deployment method:
- One master and many slaves: test environment and practice environment.
- Multi master and multi slave: recommended for production environment.
2, Introduction to kubedm deployment mode
kubeadm is a tool launched by the official community for rapid deployment of kubernetes clusters. This tool can complete the deployment of a kubernetes cluster through two instructions:
- Kubedm init: create a Master node.
- Kubedm join < IP and port of master Node >: join the Node to the current cluster.
3, Installation requirements
Before starting, the machines that deploy the Kubernetes cluster need to meet the following conditions:
- One or more machines, operating system centos7 x-86_ X64 (CentOS 8 for my own reproduction environment)
- Hardware configuration: 2GB or more RAM, 2 CPUs or more CPUs, hard disk 30GB or more
- Network interworking between all machines in the cluster
- You can access the Internet. You need to pull the image
- Disable swap partition
4, Ultimate goal
- Install Docker and kubedm on all nodes
- Deploy Kubernetes Master
- Deploy container network plug-in
- Deploy the Kubernetes Node and add the node to the Kubernetes cluster
- Deploy the Dashboard Web page to visually view Kubernetes resources
5, Prepare environment

| role | IP address | assembly |
|---|---|---|
| k8s-master01 | 192.168.9.10 | docker,kubectl,kubeadm,kubelet |
| k8s-node01 | 192.168.9.20 | docker,kubectl,kubeadm,kubelet |
| k8s-node02 | 192.168.9.30 | docker,kubectl,kubeadm,kubelet |
Note: the learning environment consists of one Master and two nodes.
6, Environment initialization
6.1 set the mutual resolution of system host name and Hosts file
- Modify host name
hostnamectl set-hostname k8s-master01 && bash
hostnamectl set-hostname k8s-node01 && bash
hostnamectl set-hostname k8s-node02 && bash
- Modify / etc/hosts of the Master node
192.168.9.10     k8s-master01
192.168.9.20     k8s-node01
192.168.9.30     k8s-node02
- Copy to Node
scp /etc/hosts root@192.168.9.20:/etc/hosts
scp /etc/hosts root@192.168.9.30:/etc/hosts
- Test connectivity
ping k8s-master01
ping k8s-node01
ping k8s-node02
6.2 installation dependent files (all nodes)
yum install -y conntrack chrony ipvsadm ipset jq iptables curl sysstat libseccomp wget vim net-tools git
Note: in CentOS 8, NTP is replaced by chrony service.
6.3 disable iptables and firewalld services (all nodes)
systemctl stop firewalld
systemctl disable firewalld

systemctl stop iptables
systemctl disable iptables
6.4 disable Swap partition and SELinux (all nodes)
# 1. Disable swap partition
swapoff -a && sed -i '/ swap / s/^\(.*\)$/#\1/g' /etc/fstab
# 2. Disable SELinux
setenforce 0 && sed -i 's/^SELINUX=.*/SELINUX=disabled/' /etc/selinux/config
6.5 adjust kernel parameters for K8S (all nodes)
- Modify the Linux kernel parameter / etc / sysctl d/kubernetes. conf
# Modify Linux kernel parameters and add bridge filtering and address forwarding functions
# Edit / etc / sysctl d/kubernetes. Conf file, add the following configuration:
net.bridge.bridge-nf-call-iptables=1
net.bridge.bridge-nf-call-ip6tables=1
net.ipv4.ip_forward=1

# Reload configuration
sysctl -p

# Load bridge filter module
modprobe br_netfilter

# Check whether the bridge filter module is loaded successfully
lsmod | grep br_netfilter
- Configure ipvs function
In kubernetes, service has two proxy models, one based on iptables and the other based on ipvs.
Compared with the two, the performance of ipvs is obviously higher, but if you want to use it, you need to load the ipvs module manually.
# 1. Install ipset and ipvsadm
yum install ipset ipvsadm -y

# 2. Add the module to be loaded and write the script
cat <<EOF > /etc/sysconfig/modules/ipvs.modules
#! /bin/bash
modprobe -- ip_vs
modprobe -- ip_vs_rr
modprobe -- ip_vs_wrr
modprobe -- ip_vs_sh
modprobe -- nf_conntrack_ipv4
EOF

# 3. Add execution permission for script file
chmod +x /etc/sysconfig/modules/ipvs.modules

# 4. Execute script file
/bin/bash /etc/sysconfig/modules/ipvs.modules

# 5. Check whether the corresponding module is loaded successfully
lsmod | grep -e ip_vs -e nf_conntrack_ipv4
6.6 adjust the system time zone (all nodes, optional)
# Set the system time zone to China / Shanghai
timedatectl set-timezone Asia/Shanghai
# Writes the current UTC time to the hardware clock
timedatectl set-local-rtc 0
# Restart system time dependent services
systemctl restart rsyslog
systemctl restart crond
6.7 set rsyslogd and SYSTEMd Journal (all nodes, optional)
# Directory where logs are persisted
mkdir /var/log/journal
mkdir /etc/systemd/journald.conf.d
cat > /etc/systemd/journald.conf.d/99-prophet.conf <<EOF
[Journal]
# Persistent save to disk
Storage=persistent

# Compress history log
Compress=yes

SyncIntervalSec=5m
RateLimitInterval=30s
RateLimitBurst=1000

# Maximum occupied space 10G
SystemMaxUse=10G

# The maximum size of a single log file is 200M
SystemMaxFileSize=200M

# Log retention time: 2 weeks
MaxRetentionSec=2week

# Do not forward logs to syslog
ForwardToSyslog=no
EOF

systemctl restart systemd-journald
6.8 installing Docker (all nodes)
# 1. Switch image source
wget https://mirrors.aliyun.com/docker-ce/linux/centos/docker-ce.repo -O /etc/yum.repos.d/docker-ce.repo

# 2. View the supported docker versions in the current image source
yum list docker-ce --showduplicates

# 3. Install a specific version of docker CE
# You can specify -- setopt=obsoletes=0, otherwise yum will automatically install a later version
yum install docker-ce -y

# 4. Add a profile
# By default, the Cgroup Driver used by Docker is cgroups, while kubernetes recommends using systemd instead of cgroups
mkdir /etc/docker
cat <<EOF > /etc/docker/daemon.json
{
	"exec-opts":["native.cgroupdriver=systemd"],
	"registry-mirrors":["https://gq8usroj.mirror.aliyuncs.com"]
}
EOF

# 5. Start Docker
systemctl restart docker
systemctl enable docker

# 6. Check docker status and version
docker version
6.9 installing kubenetes components (all nodes)
# Since the image source of kubernetes is abroad and the speed is relatively slow, switch to the domestic image source here
# Edit / etc / yum.com repos. d/kubernetes. Repo, add the following configuration
cat <<EOF > /etc/yum.repos.d/kubernetes.repo
[kubernetes]
name=Kubernetes
baseurl=http://mirrors.aliyun.com/kubernetes/yum/repos/kubernetes-el7-x86_64/
enabled=1
gpgcheck=0
repo_gpgcheck=0
gpgkey=http://mirrors.aliyun.com/kubernetes/yum/doc/yum-key.gpg
	   http://mirrors.aliyun.com/kubernetes/yum/doc/rpm-package-key.gpg
EOF

# Install kubedm, kubelet, and kubectl
yum install kubeadm kubelet kubectl

# Configure cgroup of kubelet
# Edit / etc/sysconfig/kubelet to add the following configuration
KUBELET_CGROUP_ARGS="--cgroup-driver=systemd"
KUBE_PROXY_MODE="ipvs"

# Set kubelet to start automatically
systemctl enable kubelet
7, Deploy Kubernetes cluster
7.1 preparing cluster images
Use kubedm config images list to view the required images:
[root@k8s-master01 ~]# kubeadm config images list
k8s.gcr.io/kube-apiserver:v1.23.1
k8s.gcr.io/kube-controller-manager:v1.23.1
k8s.gcr.io/kube-scheduler:v1.23.1
k8s.gcr.io/kube-proxy:v1.23.1
k8s.gcr.io/pause:3.6
k8s.gcr.io/etcd:3.5.1-0
k8s.gcr.io/coredns/coredns:v1.8.6
# Before installing Kubernetes cluster, you must prepare the image required by cluster No. in advance. The required image can be viewed through the following command
kubeadm config images list

# Download Image
# This image is in the warehouse of kubernetes and cannot be connected due to network reasons. An alternative is provided below
images=(
	kube-apiserver:v1.23.1
	kube-controller-manager:v1.23.1
	kube-scheduler:v1.23.1
	kube-proxy:v1.23.1
	pause:3.6
	etcd:3.5.1-0
	coredns:v1.8.6
)

# Pull the required image
for imageName in ${images[@]};
do
	docker pull registry.cn-hangzhou.aliyuncs.com/google_containers/$imageName
done

# Re label the image. If the warehouse is specified during kube init, there is no need to re tag
for imageName in ${images[@]};
do
	docker tag registry.cn-hangzhou.aliyuncs.com/google_containers/$imageName k8s.gcr.io/$imageName
done

# Delete the image of the original name
for imageName in ${images[@]};
do
	docker rmi registry.cn-hangzhou.aliyuncs.com/google_containers/$imageName
done
The effects are as follows:
[root@k8s-master01 ~]# docker images
REPOSITORY                           TAG       IMAGE ID       CREATED        SIZE
k8s.gcr.io/kube-apiserver            v1.23.1   b6d7abedde39   2 weeks ago    135MB
k8s.gcr.io/kube-proxy                v1.23.1   b46c42588d51   2 weeks ago    112MB
k8s.gcr.io/kube-scheduler            v1.23.1   71d575efe628   2 weeks ago    53.5MB
k8s.gcr.io/kube-controller-manager   v1.23.1   f51846a4fd28   2 weeks ago    125MB
k8s.gcr.io/etcd                      3.5.1-0   25f8c7f3da61   8 weeks ago    293MB
k8s.gcr.io/coredns                   v1.8.6    a4ca41631cc7   2 months ago   46.8MB
k8s.gcr.io/pause                     3.6       6270bb605e12   4 months ago   683kB
7.2 cluster initialization
Now start to initialize the cluster and add the node node to the cluster
The following operations only need to be performed on the master node
This step is crucial because kubedm defaults to the official website k8s gcr. The image required for IO download cannot be accessed in China, so you need to specify the address of alicloud image warehouse through -- image repository =.
# Create cluster
kubeadm init \
	--kubernetes-version=v1.23.1 \
	--pod-network-cidr=10.244.0.0/16 \
	--service-cidr=10.96.0.0/12 \
	--image-repository registry.aliyuncs.com/google_containers  \
	--apiserver-advertise-address=192.168.9.10

# Create necessary files
mkdir -p $HOME/.kube
sudo cp -i /etc/kubernetes/admin.conf $HOME /.kube/config
sudo chown $(id -u):$(id -g) $HOME/.kube/config
After successful cluster initialization, the following information is returned:
[root@k8s-master01 ~]# kubeadm init \
> --kubernetes-version=v1.23.1 \
> --pod-network-cidr=10.244.0.0/16 \
> --service-cidr=10.96.0.0/12 \
> --image-repository registry.aliyuncs.com/google_containers  \
> --apiserver-advertise-address=192.168.9.10
[init] Using Kubernetes version: v1.23.1
[preflight] Running pre-flight checks
        [WARNING FileExisting-tc]: tc not found in system path
[preflight] Pulling images required for setting up a Kubernetes cluster
[preflight] This might take a minute or two, depending on the speed of your internet connection
[preflight] You can also perform this action in beforehand using 'kubeadm config images pull'

[certs] Using certificateDir folder "/etc/kubernetes/pki"
[certs] Generating "ca" certificate and key
[certs] Generating "apiserver" certificate and key
[certs] apiserver serving cert is signed for DNS names [k8s-master01 kubernetes kubernetes.default kubernetes.default.svc kubernetes.default.svc.cluster.local] and IPs [10.96.0.1 192.168.9.10]
[certs] Generating "apiserver-kubelet-client" certificate and key
[certs] Generating "front-proxy-ca" certificate and key
[certs] Generating "front-proxy-client" certificate and key
[certs] Generating "etcd/ca" certificate and key
[certs] Generating "etcd/server" certificate and key
[certs] etcd/server serving cert is signed for DNS names [k8s-master01 localhost] and IPs [192.168.9.10 127.0.0.1 ::1]
[certs] Generating "etcd/peer" certificate and key
[certs] etcd/peer serving cert is signed for DNS names [k8s-master01 localhost] and IPs [192.168.9.10 127.0.0.1 ::1]
[certs] Generating "etcd/healthcheck-client" certificate and key
[certs] Generating "apiserver-etcd-client" certificate and key
[certs] Generating "sa" key and public key
[kubeconfig] Using kubeconfig folder "/etc/kubernetes"
[kubeconfig] Writing "admin.conf" kubeconfig file
[kubeconfig] Writing "kubelet.conf" kubeconfig file
[kubeconfig] Writing "controller-manager.conf" kubeconfig file
[kubeconfig] Writing "scheduler.conf" kubeconfig file
[kubelet-start] Writing kubelet environment file with flags to file "/var/lib/kubelet/kubeadm-flags.env"
[kubelet-start] Writing kubelet configuration to file "/var/lib/kubelet/config.yaml"
[kubelet-start] Starting the kubelet
[control-plane] Using manifest folder "/etc/kubernetes/manifests"
[control-plane] Creating static Pod manifest for "kube-apiserver"
[control-plane] Creating static Pod manifest for "kube-controller-manager"
[control-plane] Creating static Pod manifest for "kube-scheduler"
[etcd] Creating static Pod manifest for local etcd in "/etc/kubernetes/manifests"
[wait-control-plane] Waiting for the kubelet to boot up the control plane as static Pods from directory "/etc/kubernetes/manifests". This can take up to 4m0s
[apiclient] All control plane components are healthy after 7.503475 seconds
[upload-config] Storing the configuration used in ConfigMap "kubeadm-config" in the "kube-system" Namespace
[kubelet] Creating a ConfigMap "kubelet-config-1.23" in namespace kube-system with the configuration for the kubelets in the cluster
NOTE: The "kubelet-config-1.23" naming of the kubelet ConfigMap is deprecated. Once the UnversionedKubeletConfigMap feature gate graduates to Beta the default name will become just "kubelet-config". Kubeadm upgrade will handle this transition transparently.
[upload-certs] Skipping phase. Please see --upload-certs
[mark-control-plane] Marking the node k8s-master01 as control-plane by adding the labels: [node-role.kubernetes.io/master(deprecated) node-role.kubernetes.io/control-plane node.kubernetes.io/exclude-from-external-load-balancers]
[mark-control-plane] Marking the node k8s-master01 as control-plane by adding the taints [node-role.kubernetes.io/master:NoSchedule]
[bootstrap-token] Using token: 9xx9un.p2x8icgh1wxo6y45
[bootstrap-token] Configuring bootstrap tokens, cluster-info ConfigMap, RBAC Roles
[bootstrap-token] configured RBAC rules to allow Node Bootstrap tokens to get nodes
[bootstrap-token] configured RBAC rules to allow Node Bootstrap tokens to post CSRs in order for nodes to get long term certificate credentials
[bootstrap-token] configured RBAC rules to allow the csrapprover controller automatically approve CSRs from a Node Bootstrap Token
[bootstrap-token] configured RBAC rules to allow certificate rotation for all node client certificates in the cluster
[bootstrap-token] Creating the "cluster-info" ConfigMap in the "kube-public" namespace
[kubelet-finalize] Updating "/etc/kubernetes/kubelet.conf" to point to a rotatable kubelet client certificate and key
[addons] Applied essential addon: CoreDNS
[addons] Applied essential addon: kube-proxy

Your Kubernetes control-plane has initialized successfully!

To start using your cluster, you need to run the following as a regular user:

  mkdir -p $HOME/.kube
  sudo cp -i /etc/kubernetes/admin.conf $HOME/.kube/config
  sudo chown $(id -u):$(id -g) $HOME/.kube/config

Alternatively, if you are the root user, you can run:

  export KUBECONFIG=/etc/kubernetes/admin.conf

You should now deploy a pod network to the cluster.
Run "kubectl apply -f [podnetwork].yaml" with one of the options listed at:
  https://kubernetes.io/docs/concepts/cluster-administration/addons/

Then you can join any number of worker nodes by running the following on each as root:

kubeadm join 192.168.9.10:6443 --token 9xx9un.p2x8icgh1wxo6y45 \
        --discovery-token-ca-cert-hash sha256:797daf093fb0c4bbde161107bf297f858f76fe368ae66e789d3bd331ecc51480
Then you need to run the following on the Master node:
#To start using your cluster, you need to run the following as a regular user:
mkdir -p $HOME/.kube
sudo cp -i /etc/kubernetes/admin.conf $HOME/.kube/config
sudo chown $(id -u):$(id -g) $HOME/.kube/config
Then you can see the following effects:
[root@k8s-master01 ~]# kubectl get nodes
NAME           STATUS     ROLES                  AGE    VERSION
k8s-master01   NotReady   control-plane,master   5m9s   v1.23.1
The following operations only need to be performed on the node node
Then, add the Node node to the cluster
# In the node node, enter
kubeadm join 192.168.9.10:6443 --token 9xx9un.p2x8icgh1wxo6y45 \
        --discovery-token-ca-cert-hash sha256:797daf093fb0c4bbde161107bf297f858f76fe368ae66e789d3bd331ecc51480
Then you can see the following effects on the Master node:
[root@k8s-master01 ~]# kubectl get nodes
NAME           STATUS     ROLES                  AGE     VERSION
k8s-master01   NotReady   control-plane,master   9m43s   v1.23.1
k8s-node01     NotReady   <none>                 11s     v1.23.1
k8s-node02     NotReady   <none>                 15s     v1.23.1
However, at this time, the STATUS is NotReady because the network plug-in has not been installed.
7.3 installing network plug-ins
Kubernetes supports a variety of network plug-ins, such as flannel, calico, canal, etc. you can use any one. Flannel is selected this time.
The following operations are still only performed on the master node. The plug-in uses the DaemonSet controller, which will run on each node.
# Get the configuration file of the fan
wget https://raw.githubusercontent.com/coreos/flannel/master/Documentation/kube-flannel.yml
# If the one above doesn't work, use this
# https://raw.fastgit.org/coreos/flannel/master/Documentation/kube-flannel.yml

# Modify the quay in the file The IO warehouse is quay mirror qiniu. com

# Start the fan using the configuration file
kubectl apply -f kube-flannel.yml
# Wait a moment and check the status of the cluster nodes again
[root@k8s-master01 ~]# kubectl get nodes
NAME           STATUS   ROLES                  AGE   VERSION
k8s-master01   Ready    control-plane,master   24m   v1.23.1
k8s-node01     Ready    <none>                 14m   v1.23.1
k8s-node02     Ready    <none>                 14m   v1.23.1
So far, the Kubernetes cluster environment has been built.
8, Test Kubernetes cluster
Next, deploy an nginx program in the Kubernetes cluster to test whether the cluster is working normally.
# Deploy nginx
kubectl create deployment nginx --image=nginx:latest
# Exposed port
kubectl expose deployment nginx --port=80 --type=NodePort
# View service status
[root@k8s-master01 ~]# kubectl get pods,svc
NAME                         READY   STATUS              RESTARTS   AGE
pod/nginx-7c658794b9-9xwg7   0/1     ContainerCreating   0          17s

NAME                 TYPE        CLUSTER-IP     EXTERNAL-IP   PORT(S)        AGE
service/kubernetes   ClusterIP   10.96.0.1      <none>        443/TCP        46m
service/nginx        NodePort    10.97.244.84   <none>        80:31182/TCP   11s
svc = service above
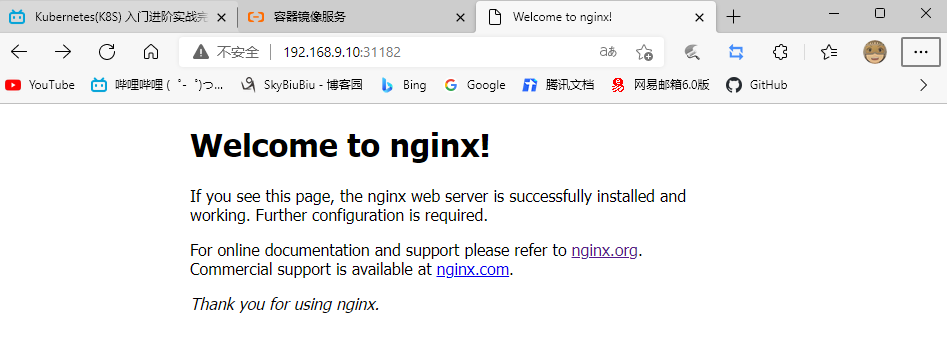
Then test access to port 31182 on the computer

In this way, the test is completed!