CMake is an open source and cross platform construction tool, which allows us to generate local Makefile by writing a simple configuration file. This configuration file is independent of the running platform and compiler, so there is no need to write Makefile in person, and the configuration file can be directly used on other platforms without modification, which is very convenient.
This article mainly describes how to use CMake to compile our program under Linux.
I. installation of CMake
This article uses Ubuntu 18 04. To install cmake, use the following command:,
sudo apt install cmake
After installation, enter cmake -version under the terminal to view the cmake version,
So cmake is installed.
Two simple examples
First, let's start with the simplest code and experience how cmake operates. Write main c. As follows,
Then in main C write cmakelists in the same directory Txt, as follows,
#include <stdio.h>

int main(void)
{
	printf("Hello World\n");

	return 0;
}
Then in main C write cmakelists in the same directory Txt, as follows,
cmake_minimum_required (VERSION 2.8)

project (demo)

add_executable(main main.c)
The first line means that the minimum version requirement of cmake is 2.8, and we installed 3.10.2; The second line represents the project information, that is, the project name is demo; The third line is more critical, indicating that the name of the elf file to be generated is main, and the source file used is main c
Switch to main under the terminal C, and then enter the following command to run cmake,
cmake .
The following information will be output,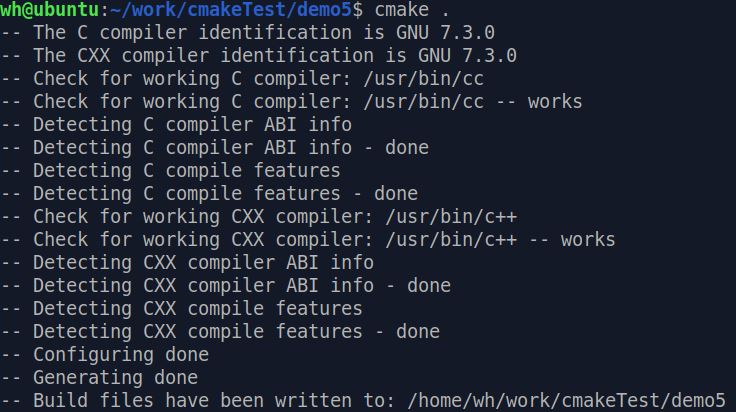
Let's look at the files in the directory,
You can see that the Makefile is successfully generated, and there are some files automatically generated by cmake runtime.
Then enter make under the terminal and press enter,
You can see that the Makefile generated by executing cmake can display the progress with color. Look at the files in the directory,
You can see that the elf file main we need has also been successfully generated, and then run main,
Run successfully!
PS: if you want to regenerate main, enter make clean to delete the elf file main.
Multiple files in the same directory
Let's move on to a slightly more complicated example: there are multiple source files in the same directory.
Add two files in the previous directory, testfunc C and testfunc h. After adding, the overall file structure is as follows:,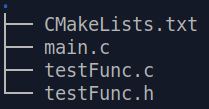
testFunc.c the contents are as follows:,
/*
** testFunc.c
*/

#include <stdio.h>
#include "testFunc.h"

void func(int data)
{
	printf("data is %d\n", data);
}
testFunc.h the contents are as follows:,
/*
** testFunc.h
*/

#ifndef _TEST_FUNC_H_
#define _TEST_FUNC_H_

void func(int data);

#endif
Modify main c. Call testfunc The function func() declared in H,
#include <stdio.h>

#include "testFunc.h"

int main(void)
{
	func(100);

	return 0;
}
Modify cmakelists Txt, in add_ In the parameter of executable, put testfunc C add in
cmake_minimum_required (VERSION 2.8)

project (demo)

add_executable(main main.c testFunc.c)
Then execute cmake again, generate Makefile and run make,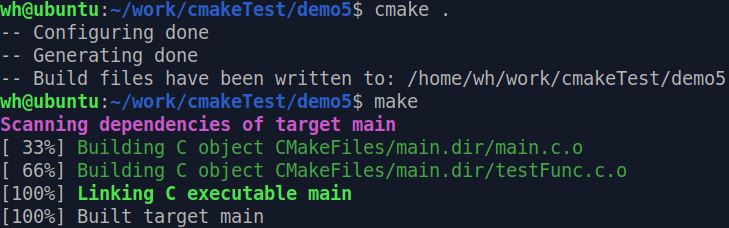
Then run the regenerated elf file main,
Run successfully!
By analogy, if there are multiple source files in the same directory, just add_ Just add all the source files in the executable. However, if there are 100 source files, it will be a bit of a pit to do so again, which can not reflect the advantages of cmake. Cmake provides a command that can store all the source files in the specified directory in a variable. This command is {aux_source_directory(dir var).
The first parameter dir is the specified directory, and the second parameter var is the variable used to store the source file list.
We are in main Add two more files in the directory where C is located, testfunc1 C and testfunc1 h. After adding, the overall file structure is as follows:,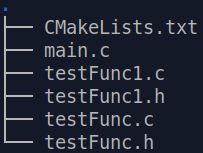
testFunc1.c as follows,
/*
** testFunc1.c
*/

#include <stdio.h>
#include "testFunc1.h"

void func1(int data)
{
	printf("data is %d\n", data);
}
testFunc1.h as follows,
/*
** testFunc1.h
*/

#ifndef _TEST_FUNC1_H_
#define _TEST_FUNC1_H_

void func1(int data);

#endif
Then modify main c. Call testfunc1 Function func1() declared in H,
#include <stdio.h>

#include "testFunc.h"
#include "testFunc1.h"

int main(void)
{
	func(100);
	func1(200);

	return 0;
}
Modify cmakelists txt,
cmake_minimum_required (VERSION 2.8)

project (demo)

aux_source_directory(. SRC_LIST)

add_executable(main ${SRC_LIST})
Using aux_source_directory stores the source file save list in the current directory into the variable SRC_LIST, and then add_ Calling Src in executable_ List (pay attention to the writing method when calling variables).
Execute cmake and make again and run main,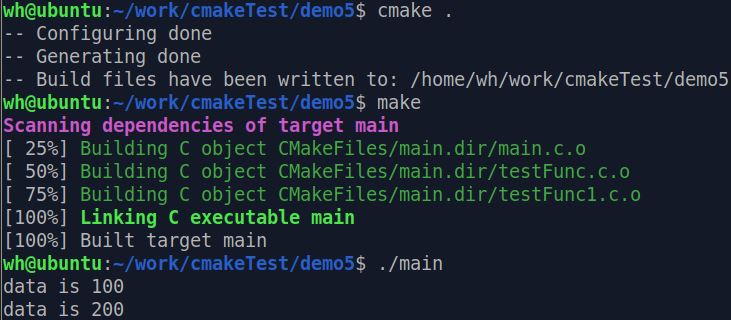
You can see that the operation is successful.
aux_source_directory() also has disadvantages. It will add all source files in the specified directory and may add some files we don't need. At this time, we can use the set command to create a new variable to store the required source files, as shown below,
cmake_minimum_required (VERSION 2.8)

project (demo)

set( SRC_LIST
	 ./main.c
	 ./testFunc1.c
	 ./testFunc.c)

add_executable(main ${SRC_LIST})
IV. multiple source files in different directories
Generally speaking, when there are many program files, we will carry out classified management and put the code in different directories according to the functions, which is convenient to find. So how to write cmakelists What about TXT?
Let's sort out the previous source files (create two directories test_func and test_func1). After sorting, the overall file structure is as follows,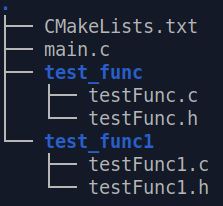
Put the previous testfunc C and testfunc H test_ Under func directory, testfunc1 C and testfunc1 H is put into test_func1 directory.
Where cmakelists Txt and main C under the same directory, the content is modified as follows,
cmake_minimum_required (VERSION 2.8)

project (demo)

include_directories (test_func test_func1)

aux_source_directory (test_func SRC_LIST)
aux_source_directory (test_func1 SRC_LIST1)

add_executable (main main.c ${SRC_LIST} ${SRC_LIST1})
Here comes a new command: include_directories. This command is used to add the search paths of multiple specified header files to the project, and the paths are separated by spaces.
Because main Testfunc is included in C H and testfunc1 h. If there is no header, the file cannot be compiled. Of course, it can also be in main C uses include to specify the path, as follows
#include "test_func/testFunc.h"
#include "test_func1/testFunc1.h"
It's just that this way of writing is not good-looking.
In addition, we used aux twice_ source_ Directory. Because the source files are distributed in two directories, they are added twice.
V. a more formal organizational structure
To be more formal, the source files are generally put in the src directory, the header files are put in the include file, the generated object files are put in the build directory, and the final output elf files are put in the bin directory, so that the whole structure is clearer. Let's reorganize the previous documents again,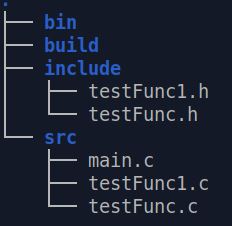
Let's create a new cmakelists. Com directory in the outermost directory Txt, as follows,
cmake_minimum_required (VERSION 2.8)

project (demo)

add_subdirectory (src)
A new command, add, appears here_ Subdirectory(), this command can add a subdirectory for storing source files to the current project, and can specify the storage location of intermediate binary and target binary. The specific usage can be Baidu.
Here, the source files are stored in the src directory. When cmake is executed, you will enter the src directory and look for cmakelists under the src directory Txt, so create a CMakeLists.txt file in the src directory Txt, as follows,
aux_source_directory (. SRC_LIST)

include_directories (../include)

add_executable (main ${SRC_LIST})

set (EXECUTABLE_OUTPUT_PATH ${PROJECT_SOURCE_DIR}/bin)
A new command set appears here, which is used to define variables, EXECUTABLE_OUT_PATH and PROJECT_SOURCE_DIR is the predefined variable of CMake, and its meaning is as follows:,
- EXECUTABLE_OUTPUT_PATH: the storage location of the target binary executable
- PROJECT_SOURCE_DIR: the root directory of the project
Therefore, set here means to set the location where elf files are stored to the bin directory under the project root directory. (cmake has many predefined variables, which can be searched online for details)
Add the above two cmakelists Txt, the overall file structure is as follows,
Let's run cmake, but this time let's switch to the build directory, and then enter the following command,
cmake ..
Makefile will be generated in the build directory, and then run make in the build directory,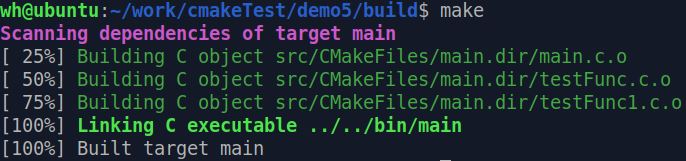
Run ok, then switch to the bin directory, find that main has been generated, and run the test,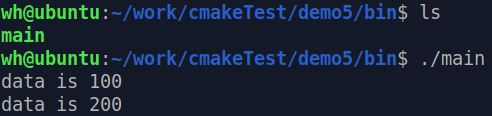
Test OK!
Here is an explanation of why cmake is run in the build directory? From the previous case s, we can see that if we don't do this, the attached files generated by cmake will be mixed with the source files, which will pollute the directory structure of the program. If we run cmake in the build directory, the attached files generated will only stay in the build directory. If we don't want these files, we can directly empty the build directory, Very convenient.
Another way of writing:
The previous project uses two cmakelists Txt, the outermost cmakelists Txt is used to control the whole situation, and add is used_ Subdirectory to control cmakelists in other directories Txt operation.
The above example can also use only one cmakelists Txt, put the outermost cmakelists Txt to read as follows,
cmake_minimum_required (VERSION 2.8)

project (demo)

set (EXECUTABLE_OUTPUT_PATH ${PROJECT_SOURCE_DIR}/bin)

aux_source_directory (src SRC_LIST)

include_directories (include)

add_executable (main ${SRC_LIST})
At the same time, cmakelists in the src directory Txt delete.
Vi. compilation control of dynamic library and static library
Sometimes you just need to compile dynamic and static libraries and wait for other programs to use them. Let's see how to use cmake in this case. First, reorganize the file as follows, leaving only testfunc H and testfunc c,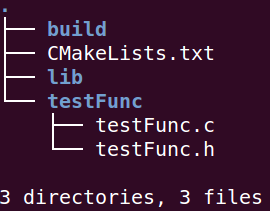
We will run cmake in the build directory and store the generated library files in the lib directory.
CMakeLists.txt as follows,
cmake_minimum_required (VERSION 3.5)

project (demo)

set (SRC_LIST ${PROJECT_SOURCE_DIR}/testFunc/testFunc.c)
set (LIBRARY_OUTPUT_PATH ${PROJECT_SOURCE_DIR}/lib)


set_target_properties (testFunc_shared PROPERTIES OUTPUT_NAME "testFunc")
set_target_properties (testFunc_static PROPERTIES OUTPUT_NAME "testFunc")

add_library (testFunc_shared SHARED ${SRC_LIST})
add_library (testFunc_static STATIC ${SRC_LIST})
New commands and predefined variables appear here,
- add_library: generate dynamic library or static library (the first parameter specifies the name of the library; the second parameter determines whether it is dynamic or static; if not, it will be static by default; the third parameter specifies the source file of the generated library)
- set_target_properties: set the name of the finally generated library and other functions, such as setting the version number of the library, etc
- LIBRARY_OUTPUT_PATH: the default output path of the library file, which is set as the lib directory under the project directory
OK, let's go to the build directory and run cmake, Run make after success,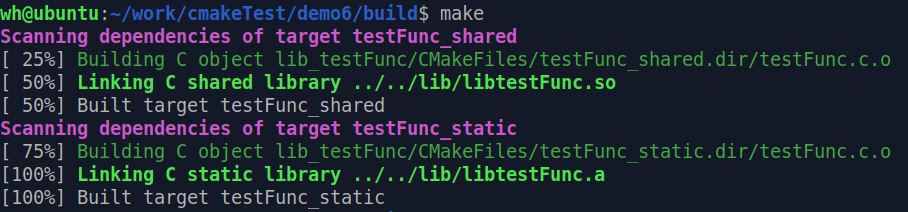
cd to the lib directory and find that the dynamic library and static library have been successfully generated,

PS: use set before_ target_ Properties redefines the output name of the library if set is not used_ target_ Properties is also OK, so the name of the library is add_ The name defined in the library only uses add twice in a row_ When library specifies the library name (the first parameter), the name cannot be the same, but set_target_properties can be set to the same name, but the final generated library file has different suffixes (one is. So and the other is. A), which will be relatively nice.
VII. Link the library
Now that we have generated the library, let's do the link test. Create a new project directory, then copy the library generated in the previous section, and then create a new src directory and bin directory under the project directory, and add a main c. The overall structure is as follows:,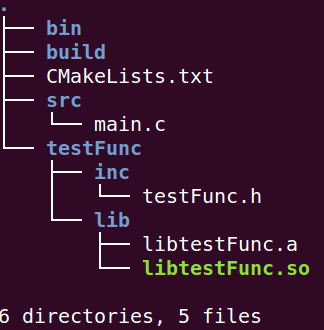
main.c the contents are as follows:,
#include <stdio.h>

#include "testFunc.h"

int main(void)
{
    func(100);

    return 0;
}
Cmakelists under the project directory Txt as follows,
cmake_minimum_required (VERSION 3.5)

project (demo)


set (EXECUTABLE_OUTPUT_PATH ${PROJECT_SOURCE_DIR}/bin)

set (SRC_LIST ${PROJECT_SOURCE_DIR}/src/main.c)

# find testFunc.h
include_directories (${PROJECT_SOURCE_DIR}/testFunc/inc)

find_library(TESTFUNC_LIB testFunc HINTS ${PROJECT_SOURCE_DIR}/testFunc/lib)

add_executable (main ${SRC_LIST})

target_link_libraries (main ${TESTFUNC_LIB})
Two new commands appear here,
- find_library: find the specified library in the specified directory and store the absolute path of the library in the variable. The first parameter is the variable name, the second parameter is the library name, the third parameter is hits, and the fourth parameter is the path. For other uses, please refer to cmake documentation
- target_link_libraries: link the target file to the library file
Use find_ The advantage of library is to execute cmake It will find out whether the library exists, so that errors can be found in advance without waiting for the link.
cd to the build directory, and then run cmake&& Make. Finally, go to the bin directory to check. It is found that main has been generated and run,

Run successfully!
ps: there are static and dynamic libraries of testFunc in the Lib directory, find_library(TESTFUNC_LIB testFunc... The default is to find dynamic libraries. If you want to directly specify whether to use dynamic libraries or static libraries, you can write find_library(TESTFUNC_LIB libtestFunc.so... Or find_library(TESTFUNC_LIB libtestFunc.a...)
ps: to view which libraries are used in elf files, you can use readelf - D/ XX to view
The previous tutorial in this section used the library search method link_ However, many readers reported that there was a problem with the runtime. I checked the official documents and found that it is not recommended to use it. I recommend using find_library or find_package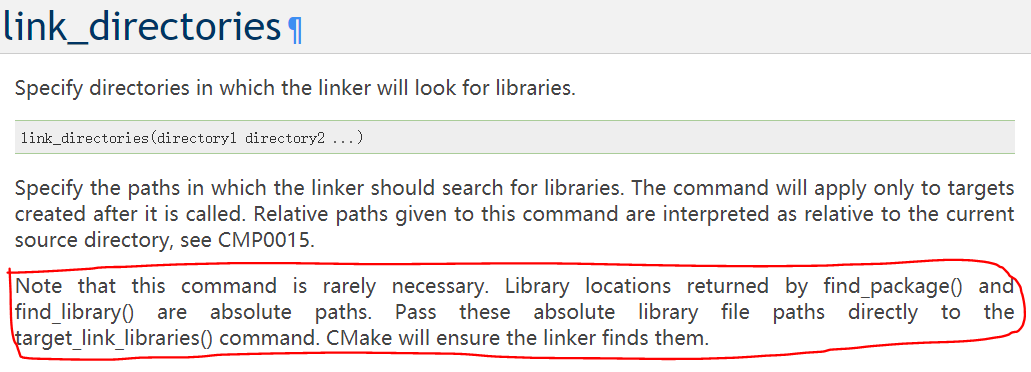
VIII. Add compilation options
Sometimes, if you want to add some compilation options when compiling the program, such as - Wall, - std=c++11, you can use add_compile_options.
Here is a simple program for demonstration, main CPP is as follows
#include <iostream>

int main(void)
{
    auto data = 100;
    std::cout << "data: " << data << "\n";
    return 0;
}
CMakeLists.txt as follows,
cmake_minimum_required (VERSION 2.8)

project (demo)

set (EXECUTABLE_OUTPUT_PATH ${PROJECT_SOURCE_DIR}/bin)

add_compile_options(-std=c++11 -Wall)

add_executable(main main.cpp)
The overall directory structure is as follows:,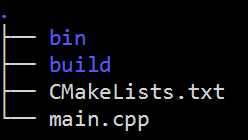
Then cd to the build directory and execute cmake&& With the make command, you can get the elf file of main in the bin directory
IX. add control options
Sometimes you want to compile only some specified source code when compiling code. You can use the option command of cmake. There are two main situations:
- Originally, I wanted to generate multiple bin or library files. Now I just want to generate some specified bin or library files
- For the same bin file, you only want to compile part of the code (controlled by macros)
Case 1
Suppose that our current project will generate two bin files, main1 and main2. Now the overall structure is as follows,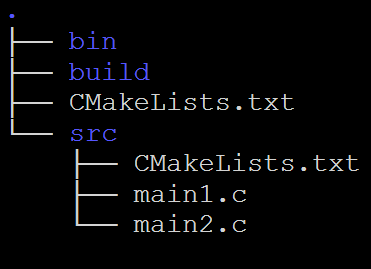
Outer cmakelists Txt as follows,
cmake_minimum_required(VERSION 3.5)

project(demo)

option(MYDEBUG "enable debug compilation" OFF)

set (EXECUTABLE_OUTPUT_PATH ${PROJECT_SOURCE_DIR}/bin)

add_subdirectory(src)
The option command is used here. The first parameter is the name of the option, the second parameter is a string, which is used to describe what the option is for, and the third is the value of the option, ON or OFF. It can also be left blank. If it is not written, it is OFF by default.
Then write cmakelists. Exe in the src directory Txt, as follows
cmake_minimum_required (VERSION 3.5)

add_executable(main1 main1.c)

if (MYDEBUG)
    add_executable(main2 main2.c)
else()
    message(STATUS "Currently is not in debug mode")
endif()
Note that if else is used here to decide whether to compile main2 according to the option c
Including 1 C and 2 C is as follows:,
// main1.c
#include <stdio.h>

int main(void)
{
    printf("hello, this main1\n");

    return 0;
}
// main2.c
#include <stdio.h>

int main(void)
{
    printf("hello, this main2\n");

    return 0;
}
Then cd to the build directory and enter cmake&& Make can only compile main1. If you want to compile main2, set MYDEBUG to ON and enter cmake again&& Make recompile.
Every time you want to change MYDEBUG, you need to modify cmakelists Txt, a little troublesome. In fact, it can be operated through the command line of cmake. For example, we want to set MYDEBUG to OFF, first cd to the build directory, and then enter cmake- Dmydebug = on, so you can compile main1 and main2 (in the bin directory)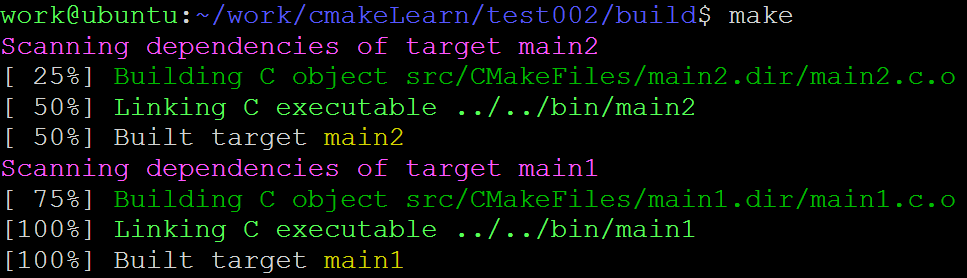
Case 2
Suppose we have a main c. The contents are as follows:,
#include <stdio.h>

int main(void)
{
#ifdef WWW1
    printf("hello world1\n");
#endif

#ifdef WWW2
    printf("hello world2\n");
#endif

    return 0;
}
You can control the printing information by defining macros. We cmakelists Txt as follows,
cmake_minimum_required(VERSION 3.5)

project(demo)

set (EXECUTABLE_OUTPUT_PATH ${PROJECT_SOURCE_DIR}/bin)

option(WWW1 "print one message" OFF)
option(WWW2 "print another message" OFF)

if (WWW1)
    add_definitions(-DWWW1)
endif()

if (WWW2)
    add_definitions(-DWWW2)
endif()

add_executable(main main.c)
Here, keep the name of option and main The names of macros in C are the same, which is more intuitive. You can also choose different names. Through and add_ With the cooperation of definitions (), you can control the printout of a single bin file.
The parameter after - D is the flow direction of the control program.
The overall engineering structure is as follows:,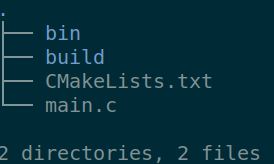
cd to the build directory and execute cmake&& Make, and then execute in the bin directory/ main, you can see that the print is empty,
Then execute the following instructions respectively, and then check the printing effect,
- cmake .. -DWWW1=ON -DWWW2=OFF && make
- cmake .. -DWWW1=OFF -DWWW2=ON && make
- cmake .. -DWWW1=ON -DWWW2=ON && make
If cmake and CMB are not set in the last call, the default values of cmake and CMB will be deleted. Note that if cmake and CMB are not set in the last call, CM A and CMB will be deleted first.
Therefore, if the option changes, either delete the cache file generated during the last execution of cmake, or explicitly specify the value of all options.
Ten summary
The above is a little learning record of learning CMake by yourself. Through simple examples, you can get started with CMake. While learning, you also read many netizens' blogs. CMake has many knowledge points, and the specific details can be searched online. In short, CMake allows us not to write complex makefiles, and is cross platform. It is a very powerful tool worth learning.
If there is something wrong, I hope I can leave a message for correction. Thank you for reading.