Use Linux commands to view data about the current system status and health. However, a single Linux command and application can only obtain one aspect of system data. We need to use the Python module to feed these details back to the administrator and generate a useful system report at the same time.
We divided the report into two parts. The first part is the general system information obtained by platform module. The second part is the hardware resources, such as CPU and memory.
Start by importing the platform module, which is a built-in Python library. There are many methods in the platform module that can be used to get the details of the operating system currently running Python commands.
import platform
system = platform.system()
print(system)
The results of the above code are as follows.
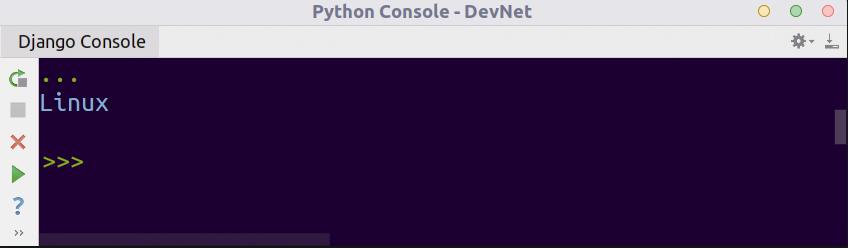
This script returns the type of the current system, and different results will be obtained if the same script runs on the windows system. When it runs on a Windows system, the output becomes windows.

The commonly used function uname() has the same function as Linux command (uname-a): it obtains the host name, architecture and kernel information of the machine, but uname() uses a structured format to reference the corresponding value through the sequence number.
import platform
from pprint import pprint
uname = platform.uname()
pprint(uname)
The results of the above code are as follows.
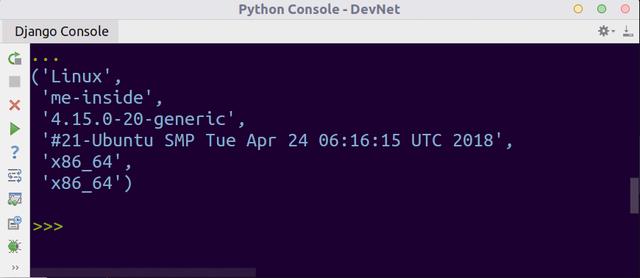
The first value obtained by the system() method is the system type, and the second is the host name of the current machine.
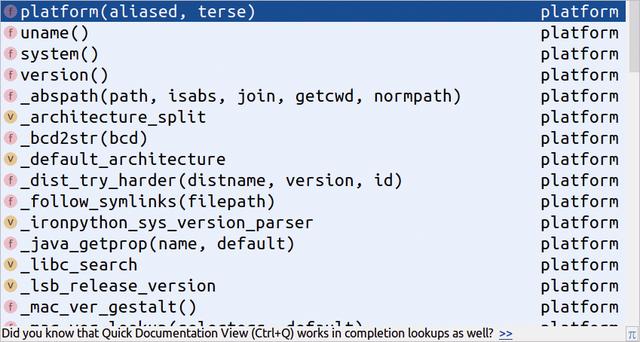
You can browse and list all the functions available in the platform module by using the auto completion function in PyCharm, and press Ctrl + Q to view the documents of each function (see the figure below).
Then, use the information provided by the Linux file to list the hardware configuration in the Linux machine. Remember here that you can access CPU, memory, network and other related information in the / proc / directory; we will read these information and access them in Python using the standard open() function. See the / proc / directory for more information.
The specific script is given below.
First, import the platform module, which is only used in the current task.
#!/usr/bin/python
__author__ = "Bassim Aly"
__EMAIL__ = "basim.alyy@gmail.com"

import platform
Then, define the function. The following code contains the two functions required in this exercise -- check_feature() and get_value_from_string().
def check_feature(feature,string):
    if feature in string.lower():
        return True
    else:
        return False
def get_value_from_string(key,string):
    value = "NONE"
    for line in string.split("\n"):
        if key in line:
            value = line.split(":")[1].strip()
    return value
Finally, there is the main part of the python script, including the Python code used to get the required information.
cpu_features = []
with open('/proc/cpuinfo') as cpus:
    cpu_data = cpus.read()
    num_of_cpus = cpu_data.count("processor")
    cpu_features.append("Number of Processors: {0}".format(num_of_cpus))
    one_processor_data = cpu_data.split("processor")[1]
    print one_processor_data
    if check_feature("vmx",one_processor_data):
        cpu_features.append("CPU Virtualization: enabled")
    if check_feature("cpu_meltdown",one_processor_data):
        cpu_features.append("Known Bugs: CPU Metldown ")
    model_name = get_value_from_string("model name ",one_processor_data)
    cpu_features.append("Model Name: {0}".format(model_name))

    cpu_mhz = get_value_from_string("cpu MHz",one_processor_data)
    cpu_features.append("CPU MHz: {0}".format((cpu_mhz)))

memory_features = []
with open('/proc/meminfo') as memory:
    memory_data = memory.read()
    total_memory = get_value_from_string("MemTotal",memory_data).replace("kB","")
    free_memory = get_value_from_string("MemFree",memory_data).replace("kB","")
    swap_memory = get_value_from_string("SwapTotal",memory_data).replace("kB","")
    total_memory_in_gb = "Total Memory in GB:
{0}".format(int(total_memory)/1024)
    free_memory_in_gb = "Free Memory in GB:
{0}".format(int(free_memory)/1024)
    swap_memory_in_gb = "SWAP Memory in GB:
{0}".format(int(swap_memory)/1024)
    memory_features =
[total_memory_in_gb,free_memory_in_gb,swap_memory_in_gb]
This part of the code is used to output the information obtained from the code in the previous section.
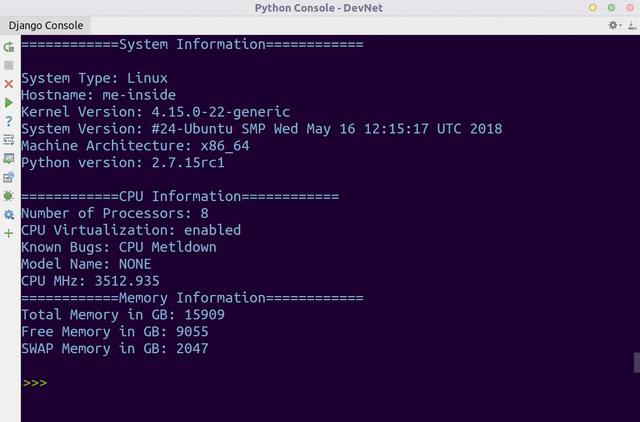
print("============System Information============")

print("""
System Type: {0}
Hostname: {1}
Kernel Version: {2}
System Version: {3}
Machine Architecture: {4}
Python version: {5}
""".format(platform.system(),
           platform.uname()[1],
           platform.uname()[2],
           platform.version(),
           platform.machine(),
           platform.python_version()))

print("============CPU Information============")
print("\n".join(cpu_features))

print("============Memory Information============")
print("\n".join(memory_features))
In the above example, we have completed the following tasks.
(1) Open / proc/cpuinfo, read its contents, and store the results in the cpu_data.
(2) Use the string function count() to count the number of keyword processors in the file, so as to know how many processors there are on the machine.
(3) To obtain the options and functions supported by each processor, we only need to read the information of one processor (because generally all processor properties are the same) and pass it to check_feature() function. One parameter of this method is the function we expect the processor to support, the other is the attribute information of the processor. This method returns True if the processor's properties support the functionality specified by the first parameter.
(4) Because the property data of the processor is presented as key value pairs, we design get_value_from_string() method. This method searches the corresponding value by iterating the processor attribute data according to the input key name, and then splits the returned key value pairs according to the colon to obtain the value.
(5) Use the append() method to add all values to the CPU_ In the feature list.
(6) Repeat the same operation for memory information to obtain the size of total memory, free memory and swap memory.
(7) Use platform's built-in methods, such as system(), uname(), and python_version() to get information about the system.
(8) Output a report containing the above information.
The script output is shown in the following figure.
Another way to present data is to visualize data over time using the Matplotlib library introduced in Chapter 5.
11.1.1 data collected by email
You can see the current resources in the system from the report generated in the previous section. In this section, we tweak the script to enhance its functionality by, for example, sending this information via email. This function is very useful for the Network Operation Center (NOC) team. When a special event (such as HDD failure, high CPU or packet loss) occurs, they want the monitored system to automatically send them email. Python has a built-in library, smtplib, which uses the Simple Mail Transfer Protocol (SMTP) to send and receive e-mail from the mail server.
Using this feature requires a local e-mail server to be installed on your computer, or the ability to use free online e-mail services such as Gmail or Outlook. In this example, we will use SMTP to log in to the Gmail website and send the data by email.
Next, start to modify the script to add the SMTP function.
Import the required modules into Python. This time, you need to import smtplib and platform.
#!/usr/bin/python
__author__ = "Bassem Aly"
__EMAIL__ = "basim.alyy@gmail.com"

import smtplib
imp        ort platform
Here is check_feature() and get_value_from_string() code for these two functions.
def check_feature(feature,string):
    if feature in string.lower():
        return True
    else:
        return False

def get_value_from_string(key,string):
    value = "NONE"
    for line in string.split("\n"):
        if key in line:
            value = line.split(":")[1].strip()
    return value
Finally, the body of the python script contains the Python code to get the required information.
cpu_features = []
with open('/proc/cpuinfo') as cpus:
    cpu_data = cpus.read()
    num_of_cpus = cpu_data.count("processor")
    cpu_features.append("Number of Processors: {0}".format(num_of_cpus))
    one_processor_data = cpu_data.split("processor")[1]
    if check_feature("vmx",one_processor_data):
        cpu_features.append("CPU Virtualization: enabled")
    if check_feature("cpu_meltdown",one_processor_data):
        cpu_features.append("Known Bugs: CPU Metldown ")
    model_name = get_value_from_string("model name ",one_processor_data)
    cpu_features.append("Model Name: {0}".format(model_name))

    cpu_mhz = get_value_from_string("cpu MHz",one_processor_data)
    cpu_features.append("CPU MHz: {0}".format((cpu_mhz)))

memory_features = []
with open('/proc/meminfo') as memory:
    memory_data = memory.read()
    total_memory = get_value_from_string("MemTotal",memory_data).replace("kB","")
    free_memory = get_value_from_string("MemFree",memory_data).replace("kB","")
    swap_memory = get_value_from_string("SwapTotal",memory_data).replace("kB","")
    total_memory_in_gb = "Total Memory in GB:
{0}".format(int(total_memory)/1024)
    free_memory_in_gb = "Free Memory in GB:
{0}".format(int(free_memory)/1024)
    swap_memory_in_gb = "SWAP Memory in GB:
{0}".format(int(swap_memory)/1024)
    memory_features =
[total_memory_in_gb,free_memory_in_gb,swap_memory_in_gb]

Data_Sent_in_Email = ""
Header = """From: PythonEnterpriseAutomationBot <basim.alyy@gmail.com>
To: To Administrator <basim.alyy@gmail.com>
Subject: Monitoring System Report

"""
Data_Sent_in_Email += Header
Data_Sent_in_Email +="============System Information============"

Data_Sent_in_Email +="""
System Type: {0}
Hostname: {1}
Kernel Version: {2}
System Version: {3}
Machine Architecture: {4}
Python version: {5}
""".format(platform.system(),
           platform.uname()[1],
           platform.uname()[2],
           platform.version(),
           platform.machine(),
           platform.python_version())

Data_Sent_in_Email +="============CPU Information============\n"
Data_Sent_in_Email +="\n".join(cpu_features)

Data_Sent_in_Email +="\n============Memory Information============\n"
Data_Sent_in_Email +="\n".join(memory_features)
Here is the information you need to connect to the gmail server.
fromaddr = 'yyyyyyyyyyy@gmail.com'
toaddrs = 'basim.alyy@gmail.com'
username = 'yyyyyyyyyyy@gmail.com'
password = 'xxxxxxxxxx'
server = smtplib.SMTP('smtp.gmail.com:587')
server.ehlo()
server.starttls()
server.login(username,password)
server.sendmail(fromaddr, toaddrs, Data_Sent_in_Email)
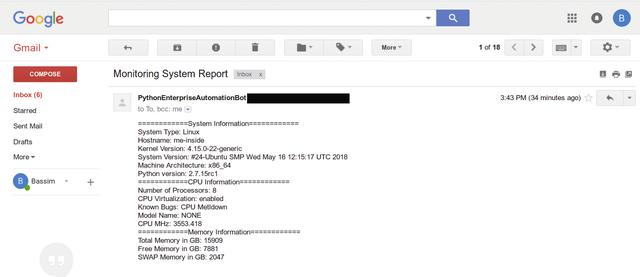
server.quit()In the previous example, the following functions are implemented.
(1) The first part is the same as the previous example, except that the data is not output to the terminal, but added to the data_ Sent_ In_ In the email variable.
(2) The Header variable represents the email title, including the sender address, recipient address, and email subject.
(3) Use the SMTP() class in the smtplib module to connect to the public Gmail SMTP server and complete the TTLS connection. This is also the default way to connect to the Gmail server. We save the SMTP connection in the server variable.
(4) Log in to the server using the login() method, and finally send the email using the sendmail() function. sendmail() has three input parameters -- sender, recipient, and email body.
(5) Close the connection to the server.
The script output is shown in the following figure.
11.1.2 using time and date modules
So far, we have been able to email custom data generated from the server. However, due to network congestion, mail system failure or any other problems, there may be a time difference between the generated data and the delivery time of e-mail, so we can not calculate the actual time of generating data according to the time of receiving e-mail.
For these reasons, you need to use the datetime module in Python to get the current time on the monitored system. The module can format the time using various fields, such as year, month, day, hour, and minute.
In addition, the datetime instance in the datetime module is actually an independent object in python (such as int, string, boolean, etc.), so the datetime instance has its own properties in Python.
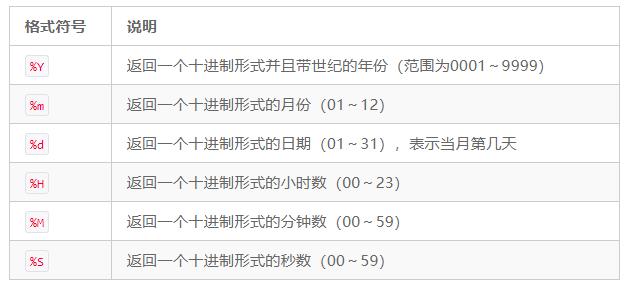
Use the strftime() method to convert the datetime object to a string. This method uses the format symbols in the following table to format the time.
Modify the script to add the following snippet to the code.
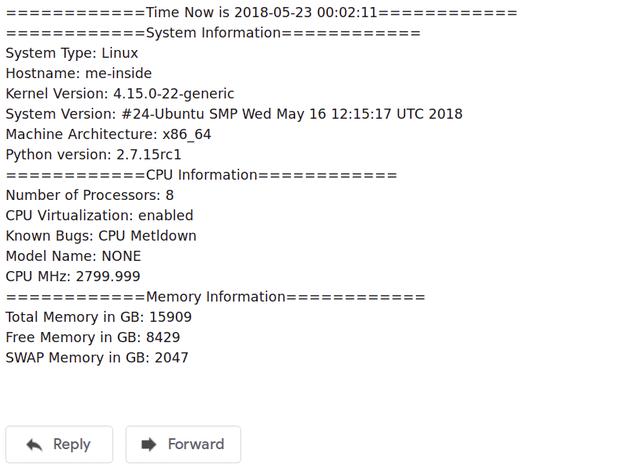
from datetime import datetime
time_now = datetime.now()
time_now_string = time_now.strftime("%Y-%m-%d %H:%M:%S")
Data_Sent_in_Email += "====Time Now is {0}====\n".format(time_now_string)
In this code, first import the datetime class from the datetime module. Then use the datetime class and the now() function to create time_now object, which returns the current time of the system. Finally, use strftime() with formatting symbols to format the time and convert it to a string for output (note that this object contains the datetime object).
The output of the script is as follows.
11.1.3 running scripts regularly
At the end of the script, set the time interval to run the script, which can be daily, weekly, hourly, or at a specific time. This function uses cron service on Linux system. Cron is used to schedule recurring events, such as cleaning up directories, backing up databases, dumping logs, or any other event.
Use the following command to view the tasks in the current schedule.
crontab -l
The - e option is required to edit crontab. The first time you run cron, you will be prompted to choose your favorite editor (nano or vi).
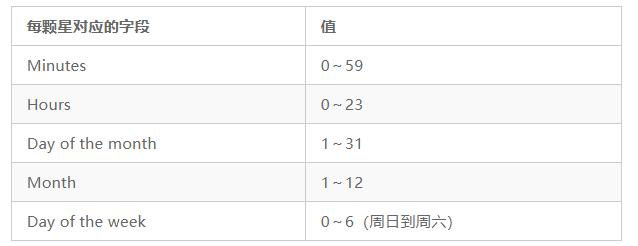
A typical crontab consists of five stars, each representing a time item (see table below).
If you need to run a task at 9 p.m. every five nights, you can use the following configuration.
0 21 * * 5 /path/to/command
If you need to run a command (such as backup) at 0 o'clock every day, use this configuration.
0 0 * * * /path/to/command
In addition, you can let cron run at a specific time interval. If you need to run the command every 5 minutes, you can use this configuration.
*/5 * * * * /path/to/command
Back to the script, use this configuration if we expect it to run every morning at 7:30.
30 7 * * * /usr/bin/python /root/Send_Email.py
Finally, remember to save the cron configuration before exiting.
It is best to use absolute path Linux commands instead of relative paths to avoid any potential problems.
This article is excerpted from Python automation operation and maintenance practice
This book aims to describe the methods and practices of simplifying operation and maintenance and improving operation and maintenance efficiency through Python.
This book first introduces how to develop Python programs and create Python modules, then describes how to use Python tools to obtain important output information, generate general configuration templates, automatically install operating systems, configure a large number of servers, and finally discusses how to create and manage virtual machines, and how to use OpenStack, VMware, AWS to automatically perform management tasks.
Through this book, you will master various methods and skills of automatic operation and maintenance in Python.
Main contents of this book:
- The usage of common modules in Python;
- The method of managing network devices by Python script;
- Using Ansible and Fabric to automatically perform common Linux management tasks;
- Using Python to manage VMware, OpenStack and AWS instances;
- Usage of Python based security tools.