relation:
Common node operations of JS DOM (Part 1)
catalogue
1. Registration method in label
2. Traditional registration method
3. Registered listening method
1. Deletion of registration methods and traditional registration methods in the label
2. Deletion of registered listening method
Capture and bubbling of events
4. Deepen understanding - capture stage and bubbling stage are mixed in the element structure
5. Common usage skills of event flow - event delegation
3. It is forbidden to pop up the right-click menu
Code writing location for DOM operations
DOM events
Event overview
1. Events
It can perceive user operation and browser behavior, and then make corresponding response, as shown in the figure below is a user click event

2. 3 elements of the event:
① Event source (the element that triggered the event)
② Event type (click event, double click event, load event, etc.)
③ Event handler (response to event)
3. Event object
When an Event occurs, an Event object (Event object) will be created, which contains information such as Event source, Event type, mouse position, page position, etc.
You can get the event object by declaring the formal parameter directly in the parameter list of the event handler function
<!doctype html>
<html lang="en">
<head>
  <meta charset="UTF-8">
  <title>DOM</title>
  <style>
    div{
      width: 100px;
      height: 100px;
      border:1px solid black;
    }
  </style>
</head>
<body>
<div></div>
</body>
<script>
  let div = document.querySelector('div')
  div.onclick = function(e){
    console.log(e instanceof Event) // Result: true
  }
</script>
</html>
Common properties of event object:
| Attribute name | explain |
| target | The element object that triggered the event |
| clientX | The x-axis coordinate {of the mouse in the visual window is not affected by the sliding of the scroll bar |
| clientY | The y-axis coordinate of the mouse in the visual window {is not affected by the sliding of the scroll bar |
| pageX | The x-axis coordinate of the mouse on the html document page {is affected by the sliding of the scroll bar |
| pageY | The y-axis coordinate of the mouse on the html document page {is affected by the sliding of the scroll bar |
| screenX | The x-axis coordinate of the mouse on the computer screen |
| screenY | y-axis coordinates of the mouse on the computer screen |
Registration event
There are many ways to register events. The following examples achieve the same effect in different ways
1. Registration method in label
The writing method is simple, but the same event of the same element can only specify one event handler
<!doctype html>
<html lang="en">
<head>
  <meta charset="UTF-8">
  <title>DOM</title>
  <style>
    div {
      width: 100px;
      height: 100px;
      text-align: center;
      line-height: 100px;
      border: 1px solid black;
    }
  </style>
  <script>
    function changeColor() {
      let obj = document.querySelector('div')
      obj.style.backgroundColor = obj.style.backgroundColor === 'skyblue' ? 'greenyellow' : 'skyblue'
    }
  </script>
</head>
<body>
<div onclick="changeColor()">Click color change</div>
</body>
</html>
Steps:
1. Declare the event handler function {changeColor()
2. Specify the event type (onclick) and event handler function (changeColor()) in the tag
2. Traditional registration method
The same event of the same element can only specify one event handler in the same way as the registration in the tag
<!doctype html>
<html lang="en">
<head>
  <meta charset="UTF-8">
  <title>DOM</title>
  <style>
    div {
      width: 100px;
      height: 100px;
      text-align: center;
      line-height: 100px;
      border: 1px solid black;
    }
  </style>
</head>
<body>
<div>Click color change</div>
<script>
  let obj = document.querySelector('div')
  obj.onclick = function () {
    obj.style.backgroundColor = obj.style.backgroundColor === 'skyblue' ? 'greenyellow' : 'skyblue'
  }
</script>
</body>
</html>
Steps:
1. Get label element object
2. Specify events and event handlers for them
3. Registered listening method
Multiple handlers can be added to the same event of the same element, but there is a browser compatibility problem. This method is not supported in lower versions of IE
<!doctype html>
<html lang="en">
<head>
  <meta charset="UTF-8">
  <title>DOM</title>
  <style>
    div {
      width: 100px;
      height: 100px;
      text-align: center;
      line-height: 100px;
      border: 1px solid black;
    }
  </style>
</head>
<body>
<div>Click color change</div>
<script>
  let obj = document.querySelector('div')
  obj.addEventListener('click', function () {
    obj.style.backgroundColor = obj.style.backgroundColor === 'skyblue' ? 'greenyellow' : 'skyblue'
  })
  obj.addEventListener('click', function () {
    alert('You can add multiple handlers to the same event of the same element')
  })
</script>
</body>
</html>
Steps:
1. Get label element object
2. Specify events and event handlers for them (when specifying events, you do not need to write on, for example, onclick and ondbllick can be written as click and dblclick)
Compatible with the writing method of low version IE. I personally don't recommend compatible with low version IE. many grammars of too old browsers don't support it. Don't you use it for compatibility?
<!doctype html>
<html lang="en">
<head>
  <meta charset="UTF-8">
  <title>DOM</title>
  <style>
    div {
      width: 100px;
      height: 100px;
      text-align: center;
      line-height: 100px;
      border: 1px solid black;
    }
  </style>
</head>
<body>
<div>Click color change</div>
<script>
  var obj = document.getElementsByTagName('div')[0]
  var process = function () {
    obj.style.backgroundColor = obj.style.backgroundColor === 'skyblue' ? 'greenyellow' : 'skyblue'
  }

  // Register event compatibility
  if (obj.addEventListener) {
    obj.addEventListener('click', process)
  } else {
    obj.attachEvent('onclick', process)
  }
</script>
</body>
</html>
Steps:
1. Judge whether the browser supports addEvenetListener
2. Support: use addEvenetListener to register events. Note that the event type does not need to be written on
3. Not supported: use attachEvent to register events. Note that the event type must be written on
Delete event
1. Deletion of registration methods and traditional registration methods in the label
Set the event handler of the specified event type to null
<!doctype html>
<html lang="en">
<head>
  <meta charset="UTF-8">
  <title>DOM</title>
  <style>
    div {
      width: 100px;
      height: 100px;
      text-align: center;
      line-height: 100px;
      border: 1px solid black;
    }
  </style>
</head>
<body>
<div onclick="changeColor()">Click color change</div>
<script>

  let obj = document.querySelector('div')

  function changeColor() {
    obj.style.backgroundColor = obj.style.backgroundColor === 'skyblue' ? 'greenyellow' : 'skyblue'
  }

  // Delete registered events
  obj.onclick = null;
</script>
</body>
</html>
2. Deletion of registered listening method
① The event handler of the specified event type set during registration cannot be an anonymous function
② Use the {removeeventlistener (event type at registration, function object address at registration) method to remove the registered event listener
<!doctype html>
<html lang="en">
<head>
  <meta charset="UTF-8">
  <title>DOM</title>
  <style>
    div {
      width: 100px;
      height: 100px;
      text-align: center;
      line-height: 100px;
      border: 1px solid black;
    }
  </style>
</head>
<body>
<div>Click color change</div>
<script>
  let obj = document.querySelector('div')

  // Declare function variables
  let process = function () {
    obj.style.backgroundColor = obj.style.backgroundColor === 'skyblue' ? 'greenyellow' : 'skyblue'
  }
  // Register event listening
  obj.addEventListener('click', process)

  // Remove event listener
  obj.removeEventListener('click', process)
</script>
</body>
</html>
Capture and bubbling of events
1. Event flow
When an event occurs, the JS engine will find the elements in the target area and the relationship between elements, as shown in the following figure:
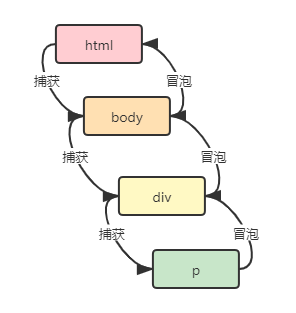
Knowledge points of event flow:
1. Events are communicable. The propagation path is to go back and forth from top to bottom and then from bottom to top along the DOM tree.
2. The top-down propagation stage is called capture stage, and the bottom-up propagation stage is called bubbling stage.
3. During propagation, it will be judged whether the same event is set for each element and whether it can be triggered at this stage.
4. The event of an element can only be triggered in one stage, either in the capture stage or in the bubble stage.
2. Bubbling stage
1. The bubbling phase is the default execution phase of an event
2. Manually set the execution of the bubbling phase: add the event addEventListener by registered listening, and pass the third parameter false
3. resize scroll focus blur mouseenter mouseleave load unload media does not support bubbling stage
effect:
Code structure:
<!doctype html>
<html lang="en">
<head>
  <meta charset="UTF-8">
  <title>DOM</title>
</head>
<body>
<div>
  <p>I'm bubbling</p>
</div>
<script>
  let html = document.documentElement
  let body = document.body
  let div = document.querySelector('div')
  let p = document.querySelector('p')

  html.onclick = () => {
    alert('html')
  }
  body.addEventListener('click', () => {
    alert('body')
  }, false)
  div.addEventListener('click', () => {
    alert('div')
  })
  p.onclick = () => {
    alert('p')
  }

</script>
</body>
</html>
Understand the process of event flow in Code:
Execute the capture phase first
html → body → div → p
There are no events that can be triggered in the capture phase, and then in the bubble phase
p (bubble can be triggered) → div (bubble can be triggered) → body (bubble can be triggered) → html (bubble can be triggered)
All elements can trigger events during the bubbling phase, so their event handlers are executed sequentially.
3. Capture phase
Set the execution of the capture phase: add the event {addEventListener by registered listening, and pass the third parameter true
effect:

Code structure:
<!doctype html>
<html lang="en">
<head>
  <meta charset="UTF-8">
  <title>DOM</title>
</head>
<body>
<div>
  <p>I'm bubbling</p>
</div>
<script>
  let html = document.documentElement
  let body = document.body
  let div = document.querySelector('div')
  let p = document.querySelector('p')

  html.addEventListener('click', () => {
    alert('html')
  }, true)
  body.addEventListener('click', () => {
    alert('body')
  }, true)
  div.addEventListener('click', () => {
    alert('div')
  }, true)
  p.addEventListener('click', () => {
    alert('p')
  }, true)
</script>
</body>
</html>
Understand the process of event flow in Code:
Execute the capture phase first
html → body → div → p
All elements can trigger events during the capture phase, so their event handlers are executed sequentially
Then perform the bubbling phase
p (capture can be triggered) → div (capture can be triggered) → body (capture can be triggered) → html (capture can be triggered)
There are no events that can be triggered during the bubbling phase.
4. Deepen understanding - capture stage and bubbling stage are mixed in the element structure
In the example, the elements in the target area are executed in both capture phase and bubble phase to help deepen understanding.
effect:

Code structure:
<!doctype html>
<html lang="en">
<head>
  <meta charset="UTF-8">
  <title>DOM</title>
</head>
<body>
<div>
  <p>I'm bubbling</p>
</div>
<script>
  let html = document.documentElement
  let body = document.body
  let div = document.querySelector('div')
  let p = document.querySelector('p')

  html.addEventListener('click', () => {
    alert('html')
  }, true)
  body.addEventListener('click', () => {
    alert('body')
  }, false)
  div.addEventListener('click', () => {
    alert('div')
  }, true)
  p.addEventListener('click', () => {
    alert('p')
  }, false)
</script>
</body>
</html>
Understand the process of event flow in Code:
Execute the capture phase first
html (capture triggered) → body (bubble triggered) → div (capture triggered) → p (bubble triggered)
In this stage, the elements that the event will execute are html and div, and then in the bubble stage
p (bubble triggered) → div (capture triggered) → body (bubble triggered) → html (capture triggered)
The elements that will execute events include p and body, so the final execution order is html → div → p → body
5. Common usage skills of event flow - event delegation
Event delegation means that events and event handlers are the same among multiple same root elements. You can use the bubbling feature to set events only for their parent node elements, rather than each child element.
The common occasions are lists, as shown in the following figure:
There are three common ways to achieve the above effect:
① The stupidest way - hard coding. Add events for each element in turn, but it is not flexible enough and troublesome to expand
<!doctype html>
<html lang="en">
<head>
  <meta charset="UTF-8">
  <title>DOM</title>
  <style>
    table {
      border-collapse: collapse;
    }

    td, th {
      width: 100px;
      text-align: center;
      border: 1px solid black;
    }
  </style>
</head>
<body>
<table id="score_table">
  <thead>
  <tr>
    <th>Serial number</th>
    <th>name</th>
    <th>achievement</th>
    <th>operation</th>
  </tr>
  </thead>
  <tbody>
  <tr>
    <td>1</td>
    <td>Zhao</td>
    <td>97</td>
    <td><input type="button" value="delete"></td>
  </tr>
  <tr>
    <td>2</td>
    <td>money</td>
    <td>95</td>
    <td><input type="button" value="delete"></td>
  </tr>
  <tr>
    <td>3</td>
    <td>Sun</td>
    <td>99</td>
    <td><input type="button" value="delete"></td>
  </tr>
  <tr>
    <td>4</td>
    <td>Lee</td>
    <td>98</td>
    <td><input type="button" value="delete"></td>
  </tr>
  </tbody>
</table>
</body>
<script>
  // Get element object
  let scoreTBody = document.querySelector('#score_table tbody')
  let btnFirst = document.querySelector('#score_table  tr:first-of-type input[type=button]')
  let btnSecond = document.querySelector('#score_table  tr:nth-of-type(2) input[type=button]')
  let btnThird = document.querySelector('#score_table  tr:nth-of-type(3) input[type=button]')
  let btnLast = document.querySelector('#score_table  tr:last-of-type input[type=button]')

  // Declare click event handler
  let process = (e) => {
    scoreTBody.removeChild(e.target.parentElement.parentElement)
  }

  // Set click events in sequence
  btnFirst.addEventListener('click', process)
  btnSecond.addEventListener('click', process)
  btnThird.addEventListener('click', process)
  btnLast.addEventListener('click', process)
</script>
</html>
② Common method - traversal. Get the element collection and add events through traversal, but this method will affect the page performance when there are too many contents in the list.
Replace the script above with the following code
<script>
  // Get element collection
  let scoreTBody = document.querySelector('#score_table tbody')
  let btnArray = document.querySelectorAll('#score_table tr td input[type=button]')

  // Traverse add event
  for (let i = 0; i < btnArray.length; i++) {
    btnArray[i].addEventListener('click', (e) => {
      scoreTBody.removeChild(e.target.parentElement.parentElement)
    })
  }
</script>
③ The best way - event delegation. Using the bubble principle, only events can be set for the outer elements.
Replace script code with
<script>
  // Gets the outer element object and sets the event
  let scoreTBody = document.querySelector('#score_table tbody')
  scoreTBody.addEventListener('click', (e) => {
    scoreTBody.removeChild(e.target.parentElement.parentElement)
  })
</script>
Disable default events
1. Do not capture or bubble
Prohibit capture: e.stopPropagation() is written in the upstream element, and the event of this element allows the capture phase to trigger
No bubbling: e.stopPropagation() is written in the downstream element, and the event of this element allows the bubbling phase to be triggered
effect:

2. Prohibit link jump events
① Simple prohibition of Jump Behavior
effect:
code:
<!doctype html>
<html lang="en">
<head>
  <meta charset="UTF-8">
  <title>DOM</title>
</head>
<body>
<a href="javascript:void(0)">Block link jump javascript:void(0) mode</a><br>
<a href="javascript:">Block link jump javascript: mode</a>
</body>
</html>
② Skip behavior is prohibited and custom functions are added
effect:
code:
<!doctype html>
<html lang="en">
<head>
  <meta charset="UTF-8">
  <title>DOM</title>
</head>
<body>
<a href="http://www.baidu. Com "> I can't jump, and I have my own function</a>
</body>
<script>
  let a = document.querySelector('a')
  a.addEventListener('click', (e) => {
    alert('Popup ')
    e.preventDefault()
  })
</script>
</html>
3. It is forbidden to pop up the right-click menu
<!doctype html>
<html lang="en">
<head>
  <meta charset="UTF-8">
  <title>DOM</title>
</head>
<body></body>
<script>
  document.addEventListener('contextmenu', function (e) {
    e.preventDefault();
  })
</script>
</html>
Code writing location for DOM operations
Because the code is executed in order, when JS is used to operate the DOM before rendering the DOM element, it will fail to obtain the DOM object. Therefore, the writing position of the code for JS to operate the DOM is very important.
JS is written before the element code to be operated on, and it will fail to get the element because it needs to be obtained before rendering
<!doctype html>
<html lang="en">
<head>
  <meta charset="UTF-8">
  <title>DOM</title>
</head>
<body>
<script>
  console.log(document.querySelector('#container ') / / result: null
</script>
<div id="container"></div>
</body>
</html>
JS code is written after the element to be manipulated. You can successfully obtain the element because the element has been rendered
<!doctype html>
<html lang="en">
<head>
  <meta charset="UTF-8">
  <title>DOM</title>
</head>
<body>
<div id="container"></div>
<script>
  console.log(document.querySelector('#container ') / / result: the element object is obtained successfully
</script>
</body>
</html>
The JS code is written in the page loading completion event, so that no matter where the JS location is written, it will not affect the acquisition of DOM objects, because it is executed after the loading is completed
<!doctype html>
<html lang="en">
<head>
  <meta charset="UTF-8">
  <title>DOM</title>
</head>
<body>
<script>
  document.addEventListener('load', () => {
    console.log(document.querySelector('#container ') / / result: the element object is obtained successfully
  })
</script>
<div id="container"></div>
</body>
</html>
JS common event list
| Event name | describe | Event type |
| onclick | Mouse click | Mouse event |
| ondblclick | Double click the mouse | Mouse event |
| onmousedown | Mouse down | Mouse event |
| onmouseup | Mouse up | Mouse event |
| onmousemove | Mouse movement | Mouse event |
| oncontextmenu | Right mouse button | Mouse event |
| onwheel | Mouse wheel slide | Mouse event |
| onmouseover | Mouse in | Mouse event |
| onmouseout | Mouse away | Mouse event |
| onmouseenter | When the mouse moves in, bubbling is not supported | Mouse event |
| onmouseleave | When the mouse is removed, bubbling is not supported | Mouse events |
| onkeydown | Press the key down | Keyboard events |
| onkeyup | Key pop up | Keyboard events |
| onkeypress | When the key is pressed, the function key is not supported | Keyboard events |
| onfocus | Get focus | Form Events |
| onblur | Lose focus | Form Events |
| onchange | Content change | Form Events |
| onsubmit | Click the submit button | Form Events |
| onreset | Click the reset button | Form Events |
| onselect | select text | Form Events |
| onload | Page element loading completed | Browser events |
| onresize | Change browser window size | Browser events |